Windows has a built-in Backup and Restore system so if the Windows Backup or Restore fails and you receive any of the errors 0x80070001, 0x81000037, 0x80070003, worry not for this post will guide you in fixing the problem. You might not be able to browse to the folders and files that you want to restore in the File Restore Wizard.
The cause of the error could vary depending on what error code you receive:
0x80070001 – If you got this particular error code when trying to back up a specific library or when you accept the default settings in Windows Backup and Restore.
0x81000037 – If you got this kind of error code when you try to read from the shadow copy on one of the volumes being backed up.
0x80070003 – If you got this error code when trying to restore the folders or files in a library by using the Windows Backup and Restore.
On the other hand, you cannot use the Browse for files or the Browse for folders functionality.
Note that the Windows Backup or Restore failed, Errors 0x80070001, 0x81000037, 0x80070003 Error code 0x80070001, 0x81000037 occurs during backup while Error code 0x80070003 and “Browse for Files” issue occurs when you try to restore files. Whichever error codes you got, here are some possible fixes that might help.
Option 1 – Fix Windows Backup error codes 0x80070001, 0x81000037
The reason for the Windows Backup error codes 0x80070001, 0x81000037, as mentioned above, is when there is a volume that uses a FAT file system (0x80070001) and when a volume contains compressed files (0x81000037). To fix these errors, you need to remove the “reparse point” also known as SYMBOLIC LINK, and select the absolute path of this location in the Windows Backup configuration user interface. Refer to these steps to remove the reparse point.
Tap the Win + R keys to open the Run dialog box.
Then type “cmd” in the field and hit Enter to open Command Prompt.
Next, type the following command and hit Enter:
DIR /AL /S
After you enter the command, it will display the JUNCTION list.
Now to delete the mounted volume reparse point, you have to locate the reparse point you found and right-click on the reparse point icon, and click on Properties.
Confirm that the folder Type is Mounted Volume in the General tab and then delete this folder.
Option 2 – Fix the Windows Restore Error 0x81000037
When you try to restore a deleted backed-up directory, it fails and the Error code 0x81000037 pops up. You can also encounter this error when you select to restore the files to their original subfolders check box in the File Restore Wizard and you try to restore folders or files to an alternative location, then you will encounter error code 0x81000037 which will be displayed in an error message as shown below:
To fix this error, you need to re-create the missing directory using the following steps:
Take note of the path for which the error occurs.
Then create the corresponding folder.
Now perform the restore operation again.
And since you might have subfolders in the deleted folder, click to clear the “Restore the files to their original subfolders” checkbox when you run the File Restore Wizard.
Option 3 – Cannot use the Browse for files or the Browse for folders functionality
There is no proper fix for this particular error but if you remember the name of the files, you can just search for them. Click on the Search button when using the File Restore functionality and then type the name of the file and when that file appears, select and click on it to restore it.
Well if anyone told me just a few years ago that I will see the day when Microsoft releases a new OS based on Linux I would be very amused, but that day has come. Mariner is the newest OS out of nowhere.
Microsoft’s new Linux Distro, dubbed Common Base Linux (CBL)-Mariner, isn’t the type of distro you’d want to install directly on any old machine. It’s primarily meant for cloud infrastructure and edge products. Specifically Microsoft’s Cloud and Edge products.
But if you are curious, it’s possible to run. Juan Manuel Rey, a Microsoft Senior Program Manager for Azure VMware, recently published a guide to ISO CBL-Mariner image. With that, you can easily get it up and running. And you can build CBL-Mariner on an Ubuntu 18.04 desktop. So you can try it out since it is free.
You can get it from here: https://github.com/microsoft/CBL-Mariner
It is obvious that Microsoft aims to set itself as a leader in enterprise server environments with this move and it is very likely that it may succeed or at least give a good shake to its competitors, mainly red hat and Suse which are two dominant distros in that field.
Many believe that they can win over by providing regular updates and package delivery via their already established system and that feature could be a turning point for some.
In any case, time will tell and we shall see.
Error 0x0000001e is when you start the Windows XP Setup and you see a message which says something like:
STOP: 0x0000001E (0x80000003, 0xBFC0304, 0x0000000, 0x0000001)
Solution
Error Causes
You are most likely to face this error if you restart your PC while the Windows Setup is still under process and yet to complete.
Other causes of this error include any of the following conditions:
The drive on which you are installing Windows has insufficient disk space to accommodate the installation.
An incompatible or outdated third-party driver (or more) is installed on your PC which is conflicting with the installation. For instance, this could be a problematic video driver.
The system BIOS has incompatibilities with the installation.
Further Information and Manual Repair
This error is also called the “Bug check code”.
The STOP 0x1E signifies that there was an unknown or illegal processor instruction detected by the Windows XP kernel. You will see the exception address which shows up to indicate the root of the problem which is usually a driver or faulty hardware.
You should note this address down as well as the link date of the faulty driver or image which includes it.
If at any point it becomes impossible for you to handle and you end up contacting the Windows support center to help you out with the process then this information will help you out in making things a lot easier while the support team tries to troubleshoot the problem.
The parameters included in the STOP 0x1E error message are the following:
is the exception code which couldn’t be handled.
shows the module’s address where the exception took place.
signifies the exception’s parameter 0.
represents the exception’s parameter 1.
You can use this information which usually is provided in error 0x0000001e message to pinpoint the root cause of the problem and troubleshoot it.
In order to fix this error, you need to follow either one of the following procedures as needed according to your situation.
Clean Up Your Disk
If your disk doesn’t have ample space to accommodate the installation then you should free up some of the space on your disk to make sure the Windows can be installed on it.
You can also reinstall the Windows on another disk that has sufficient space.
Get Rid of the Third Party Driver
If the error 0x0000001e message gives you the name of the driver due to which the installation process is being halted, then get rid of that driver by disabling it or removing it.
If the problem is resolved by this then you should contact the manufacturer of the third-party driver and ask them about any newer versions of the driver that wouldn’t conflict with the installation of Windows.
Upgrade System BIOS
Upgrading your system BIOS is something that you can’t do on your own. You will need to find out more about how you can upgrade. For this, you should contact either your PC’s manufacturer or your motherboard’s manufacturer.
If nothing else works, you can always make use of the Microsoft Debugging Tools which will provide you ample information about the error message.
You will find the Debugging Tools and further information about them including the downloading and installation process on Microsoft’s website.
As you probably know, uTorrent is one of the best software you can use to download torrents over the web. It has been around for many years now and is trusted by lots of users despite having competition here and there.
Over the years, uTorrent has changed as it is now packed with tons of features. What’s more, is that this program is no longer the smallest client when it comes to file size. However, just like other software, it is not always working smoothly as there are instances when it’s not responding even when it’s already running. The first thing you can do is to close all the processes of uTorrent and then try opening it again.
There are various reasons why your uTorrent program fails to respond. However, it is most likely caused by some virus that was brought on by the file you’ve just downloaded. On the other hand, it could also be caused by other factors as well but whichever the case is, here are some fixes you can check out to resolve the uTorrent issue.
Option 1 – Delete the file you’ve downloaded
As pointed out earlier, uTorrent might have failed to respond due to some file you’ve just downloaded which is why you have to delete it since there really is no point in keeping a file that’s causing this kind of issue. After deleting the file, try opening uTorrent again and see if it now works or not.
Option 2 – Allow uTorrent to run via Windows Defender Firewall
Click on the Cortana or the Start button and type “firewall” in the field.
From the search results that appear, click on the “Allow an app through Windows firewall”.
After that, a new window will pop up and from there, you will see a list of apps that can be allowed or disallowed using a Windows firewall. From this list, you have to search for uTorrent and once you find it, set it to Publick if you are on a public network or Private if you’re in a private network.
Option 3 – Uninstall or reinstall uTorrent software
You can also try to completely uninstall uTorrent from your computer and then reinstall it right back. to do so, follow the steps below.
In the search box, type in “control” and then click on Control Panel (desktop app) among the search results.
After that, select Programs and Features from the list which will give you a list of all the programs installed on your computer.
From there, look for uTorrent and select it and then uninstall it.
Once uTorrent is uninstalled, go to uTorrent’s official website and download its latest version.
Option 4 – Try scanning your computer using Windows Defender
Tap the Win + I keys to open Update & Security.
Then click on the Windows Security option and open Windows Defender Security Center.
Next, click on Virus & threat protection > Run a new advanced scan.
Now make sure that Full Scan is selected from the menu and then click the Scan Now button to get started.
Can’t Find Games on Twitch is a common error happening to a vast variety of people. The issue can be traced back to browser issues to others like malware infection.
In this guide, we will provide you with common fixes on how to overcome this issue so you can continue watching your favorite streamer.
Sign out of Twitch, then sign back in
If it is a browser issue or some glitch in the Twitch system simply signing out and then signing back in will solve the issue since information about the account will be resent to the twitch platform.
Refresh the application
Sometimes servers are having high traffic and can get overloaded, refresh the application in the upper left corner to reload content.
Use browser instead of Twitch application
If you are still having issues with the application, open the twitch website and access content there.
Close twitch
But in task manager. Sometimes just closing it via the X button is not enough, some glitches stay and the application is still running in the background. Open task manager and close it from there.
Scan system for malware
Scan the entire system for malware, various malware can halt twitch and cause issues.
Reinstall application
If everything else failed, reinstall the application.
Each time you open an application inside your Windows 11 operating system, it is opened with standard privileges. Now, please note that your account privileges and application privileges are two different things, you might be the administrator of the system but when you open the app, it still opens with standard privilege.
Most of the time running applications with typical settings is fine but from time to time we might have some applications that will require running with administrator privilege in order to work properly. In this case, it is very easy to do it, you just right-click and choose run as administrator.
Although a very easy solution, it can be quite annoying if running the app is on a daily basis or even more times per day. If this is the case then right-clicking and choosing to run as administrator can be a daunting task, sometimes you can even forget to run it like this in heat of work and some unforeseen consequences might occur.
Luckily there is an easy hack so you can open the chosen application each time as an administrator with a simple double click each time.
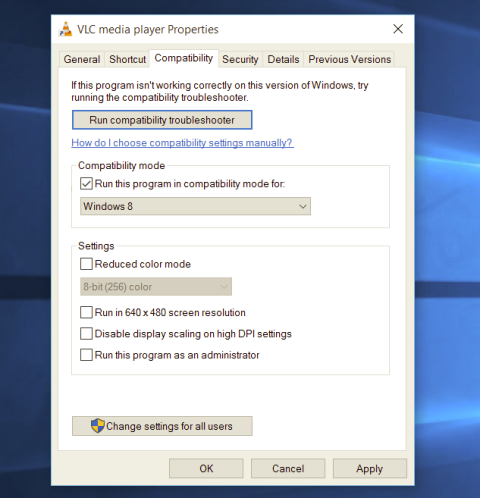
Setting application to run as administrator always
Locate application executable file
Right-click on in and choose properties
Click on the Compatibility tab
Check the box next to Run this Program as an Administrator
Click on Apply
Click on OK
From now on each time you open an application normally with a double click, it will be opened as administrator privileges.
If you have multiple products with Windows on them, Copy & Paste text between them is easy as 1,2,3 and we will be happy to tell you how can you do it.
Hello and welcome everyone, today we will see how can we share text information between 2 devices using Windows 10 in instant. In order for you to be able to share text information between devices, there are two prerequisites that you must meet. The first is that all devices must be connected to the internet, the second is that you must have a Microsoft account.
If you have both of these things continue with the tutorial, if you do not have a Microsoft account go to Microsoft website and create one for free.
Also, know that this option needs to be turned ON on all devices in order to work. So steps we will explain will have to be done on each device, if you already have some device logged in and connected to Microsoft account, you can skip setting it up.
Click on ⊞ WINDOWS and click on settings.
Then click on System.
Once you are in the system, on the left tabs find and click on Clipboard.If you are not logged in to your Microsoft account do so on the right panel by locating Sync across devices and click on sign in.
When you are signed in click on the option to turn it on.
One option is turned ON, you will be greeted with two choices, to copy everything from the clipboard automatically or to choose text which you want to sync and paste it with ⊞ WINDOWS + V. Choose whatever better suits your needs, and you are done.
Repeat these steps for other devices and you are done.
Mapi32.dll is a Windows Messaging Application Programming Interface that enables Windows to perform various email functions and launch messaging programs like Microsoft Outlook and Microsoft Office. The inability of the interface to execute email functions properly results in the Mapi32.dll Outlook Error.
This error occurs mostly when you are attempting to upgrade the operating system to a new version.
Solution
Error Causes
The common causes of the Mapi32.dll Outlook Error during the OS upgrade are:
Damaged or Corrupt Outlook user profile
The software is overwritten by some other program
Outlook PST file corruption
The Mapi32.dll Outlook Error message is displayed in either of the following forms:
Mapi32.dll is missing
Cannot start Microsoft Office Outlook. Mapi32.dll is corrupt or the wrong version.
Mapi32.dll was not found
Mail is not installed
Further Information and Manual Repair
So, what if you experience this issue and how do you fix it? Well, first there is no need to panic as Microsoft has recognized this issue and provided adequate solutions to fix this problem in no time.
However, to ensure the Mapi32.dll Outlook error is a quick fix, you must first understand the cause of the issue and the message displayed on the screen.
Let’s say the errors occur because your Outlook profile is corrupt. In this scenario, the best solution is to create a new Outlook profile. Regardless of whether you have Windows Vista or XP, to create your new Outlook profile, first, you will have to click on the Control Panel, then User Account, and then Mail. Once you click on the Mail tab, the mail set up dialog box will open. In this dialog box there will be a ‘Show Profiles’ tab, click and then click the Add tab that appears next. Now type the name for your new Outlook profile and then click ‘OK’. After that, add an email account to go with the profile.
If Mapi32.dll is missing or corrupt, you will have to run ‘Fixmapi.exe’ to resolve the problem. It is located in the System32 folder inside the Windows directory in Windows Explorer.
Therefore, first start Windows Explorer and then locate the following folder on your computer: C: /Program Files/Common Files/System/Msmapi1033
Now find Fixmapi.exe and double click it
After that locate the Mapi32.dll file and rename it to MSmapi32.old and press enter.
Restart your computer when finished.
A word of advice for computer users is to scan for viruses with an antivirus program or a registry cleaner regularly to prevent the Mapi32.dll Outlook error from occurring in the first place. Viruses often latch onto .dll files and corrupt them.
It’s always best to have a forward-looking approach.
Random freezing in a Windows in the middle of work can be a very frustrating experience and can even cost us the loss of work. From time delays to sometimes complete crashes this behavior is something that every PC user wants to avoid or at least have very little of.
In this article, we will cover solutions on what to do and how to fix the random freezing of computers.
Run a virus scan on your computer.
Viruses and other malware can cause freezes and other issues in your computer, run a complete system scan for any kind of viruses and malware and if needed remove them.
Uninstall applications that you are not using
Besides taking your hard drive space some applications can have and require to have some services always running on your computer which can cause some issues, if an application is not needed and it is not used, removing it might solve freezing issues.
Increase RAM memory
Sometimes the problem with freezing is not a software issue, having less RAM memory than the application requires can cause the application not to work properly and it can cause freezing of the entire system since precious RAM can not be allocated to the required application.
Run system checker
Corrupted Windows system files can cause freezing of the entire system, to fix this, start the command prompt in administrator mode and type sfc /scannow
Keep running applications to a minimum
Having too many applications running in the background can drain system resources and can cause system freezes because of lack of memory. Close applications that are running in the background and keep them minimal.
Delete files and folders which you are not using
Having many files and/or folders on the hard drive can cause a lot of system resources to be wasted, from indexing size to less free space for caching. If you have files that you no longer need, removing them will free up space and can increase performance and introduce the stability.
Run memory check
Memory issues could lead to system freezing. When an application needs to write or read to a corrupted memory cluster, freezing will occur since it can not. To check memory bring up run dialog and type in ti mdsched.exe, click on restart now and let the memory test finish.
Update all drivers
Hardware issues can cause freezing of applications and having the latest drivers can make a world of difference. Make sure that you have all device drivers to the latest versions.
Optimize Disk drives and check for errors
Windows 10 has built-in tools to check hard drives for errors and to optimize them, use them in order to see if this issue is causing freezes.
Clean your registry
A Clean registry is a happy registry and Windows is appreciating it. Make sure that you do not have any keys which you do not need in the registry and that long-forgotten application trails are deleted for good.
Upgrade SSD firmware
Like updating drivers, updating firmware is also important, and having the latest firmware for your SSD can help a lot, newer firmware can eliminate freezing if the issue was in Windows not using SSD properly.
Update BIOS
Like updating SSD firmware can help so it can update Firmware on your BIOS. Make sure that you have the latest firmware version and freezing can go away if that was the issue.
As you know, Microsoft Office Word is a program that’s widely used all over the web and it’s because it’s the best program there is when it comes to editing and processing words. However, even when it is the best there is, it is not without its faults and so on as it can still encounter some errors every now and then. One of these errors is the Template_fields errors. When you encounter such an error, you will see a pop-up window. This strange error randomly appears on documents but you need not worry as this post will provide you with possible solutions to resolve the problem. But before you proceed with these solutions, you have to create a backup for all your Word documents to Microsoft OneDrive preferably.
To fix the problem, you can try to disable the add-ins or try to start Word in Safe Mode or repair Office. For more details, refer to the options given below.
Option 1 – Disable the Add-ins
Although add-ins enhance Microsoft Word, there are times when they can also cause problems that end up breaking Microsoft Word instead of improving it which is why you have to disable them. Refer to the following steps to do so:
Open Microsoft Word and then click on File.
After that, select Options from the menu and then click on Add-ins.
From there, you’ll see Manage: Com Add-ins as well as a button that says Go.
Now click on the Go button and wait for a couple of seconds for a new window to appear.
In the newly opened window, uncheck all the Add-ins and click on OK.
Restart Microsoft Word and check if the “Template_fields” error is now fixed or not.
Option 2 – Try starting Word in Safe Mode
You might also want to try rebooting Microsoft Office in Safe Mode as it is one of your best shots in finding out whether the problem is internal or external. However, if the problem does not appear after you reboot Microsoft Word in Safe Mode, then there is a possibility that the problem is with Microsoft Office itself. On the other hand, if the problem persists, then it could be a deeper issue.
First, start Microsoft Word in Safe Mode.
Next, tap and hold the Ctrl key on your keyboard and open the Word document.
After that, you should see a dialog box. Click on Yes and see if Microsoft Word opens in Safe Mode.
Alternatively, you can open the search box and then type “winword.exe /safe” and hit Enter.
Option 3 – Try repairing Microsoft Office
If the first two options didn’t work, then you might want to try repairing Microsoft Office without getting rid of it. In most cases, this usually works in fixing any problems and returns the program back to its default state. To repair Microsoft Office, follow the steps below.
Right-click on the Start Menu button and select Apps and Features.
Next, scroll until you see the Microsoft Office program you want to repair and then select the Modify option.
After that, follow the options to repair Microsoft Office and then restart your PC and see if the “Template_fields” error is no longer present.
Blackouts are one of the most annoying things that can happen in the modern age. We have all learned to depend on electricity, maybe too much, so having a backup plan in these unpleasant situations is necessary. Here are some good gadgets for these kinds of situations.
Power Bank
The fully charged power bank is a great item that could fill up your phone or tablet. If it is a larger power bank it could fill them up all the way to the top several times and having charged phone or tablet can help greatly with some fun during dark times. The power bank can also be used to fill up other gadgets on this list so if the power outage is expected to last longer perhaps it would be wiser not to waste it on phone/tablet games.
Portable Generator
If the power bank is too short-lived for your needs, a portable generator is always a good option since it can provide power for longer time periods. The solar generator is what we recommend because it is much cheaper to produce electricity but it is limited if a power surge comes at night, one on gasoline is more stable and practical but it costs more to produce electricity.
Portable Solar Charger
One more electric-producing device on the list, this one however is aimed at charging your phone, tablet, or laptop by harvesting Sun's energy and turning it into valuable electricity for your devices. Fully silent and easy to operate this is a great tool for power outrage. It will not be able to produce electricity for smaller house appliances but for basic phone/tablet/laptop needs it will suffice.
Panic light
Self-sustained with its own battery, panic lights are great assets for lightning when power is not present. They can turn automatically when the circuit detects that power is missing but can be also manually switched on or off. There are many versions of panic lights ranging from the light they produce to how long can they work so picking the right one will depend entirely on your home size and needs.
USB Headlamp
If you lack panic lights USB headlamp is a great choice to light your way and it works even better than a flashlight, although a flashlight is also a great tool, a headlight will provide you with free arms to do various things that you would not be able to by holding a flashlight. Modern headlights come with LED lights so they provide a good amount of light with small power consumption and they can be recharged in a power bank, solar charger, or generator.
LED lantern
LED Lantern is a gadget sitting somewhere between a headlight and a panic light, it offers around the same light amount as a panic light but you can carry it around with you. Of course, it will drain its battery faster than a panic light and it will still need to carry around but it can offer some good options when you need it, like taking it with you to the toilet.
Electric Lighter
An electric lighter is also one of the things that you will need, it can ignite candles, paper, stoves, etc. Its battery is usually enough for extensive use and there are small chances that it will need to be recharged. Having matches is also smart, just in case.
Solar Oven
Great gadget when outbreaks last long or when you get hungry. Not all households have gas ovens so a Solar oven is a great tool to keep you full of food. Granted it will not be on par in speed and quality with a regular oven but when it is the only option it will suffice.

 Well if anyone told me just a few years ago that I will see the day when Microsoft releases a new OS based on Linux I would be very amused, but that day has come. Mariner is the newest OS out of nowhere.
Microsoft’s new Linux Distro, dubbed Common Base Linux (CBL)-Mariner, isn’t the type of distro you’d want to install directly on any old machine. It’s primarily meant for cloud infrastructure and edge products. Specifically Microsoft’s Cloud and Edge products.
But if you are curious, it’s possible to run. Juan Manuel Rey, a Microsoft Senior Program Manager for Azure VMware, recently published a guide to ISO CBL-Mariner image. With that, you can easily get it up and running. And you can build CBL-Mariner on an Ubuntu 18.04 desktop. So you can try it out since it is free.
You can get it from here: https://github.com/microsoft/CBL-Mariner
It is obvious that Microsoft aims to set itself as a leader in enterprise server environments with this move and it is very likely that it may succeed or at least give a good shake to its competitors, mainly red hat and Suse which are two dominant distros in that field.
Many believe that they can win over by providing regular updates and package delivery via their already established system and that feature could be a turning point for some.
In any case, time will tell and we shall see.
Well if anyone told me just a few years ago that I will see the day when Microsoft releases a new OS based on Linux I would be very amused, but that day has come. Mariner is the newest OS out of nowhere.
Microsoft’s new Linux Distro, dubbed Common Base Linux (CBL)-Mariner, isn’t the type of distro you’d want to install directly on any old machine. It’s primarily meant for cloud infrastructure and edge products. Specifically Microsoft’s Cloud and Edge products.
But if you are curious, it’s possible to run. Juan Manuel Rey, a Microsoft Senior Program Manager for Azure VMware, recently published a guide to ISO CBL-Mariner image. With that, you can easily get it up and running. And you can build CBL-Mariner on an Ubuntu 18.04 desktop. So you can try it out since it is free.
You can get it from here: https://github.com/microsoft/CBL-Mariner
It is obvious that Microsoft aims to set itself as a leader in enterprise server environments with this move and it is very likely that it may succeed or at least give a good shake to its competitors, mainly red hat and Suse which are two dominant distros in that field.
Many believe that they can win over by providing regular updates and package delivery via their already established system and that feature could be a turning point for some.
In any case, time will tell and we shall see. 
 If your disk doesn’t have ample space to accommodate the installation then you should free up some of the space on your disk to make sure the Windows can be installed on it.
You can also reinstall the Windows on another disk that has sufficient space.
If your disk doesn’t have ample space to accommodate the installation then you should free up some of the space on your disk to make sure the Windows can be installed on it.
You can also reinstall the Windows on another disk that has sufficient space.
 Most of the time running applications with typical settings is fine but from time to time we might have some applications that will require running with administrator privilege in order to work properly. In this case, it is very easy to do it, you just right-click and choose run as administrator.
Although a very easy solution, it can be quite annoying if running the app is on a daily basis or even more times per day. If this is the case then right-clicking and choosing to run as administrator can be a daunting task, sometimes you can even forget to run it like this in heat of work and some unforeseen consequences might occur.
Luckily there is an easy hack so you can open the chosen application each time as an administrator with a simple double click each time.
Most of the time running applications with typical settings is fine but from time to time we might have some applications that will require running with administrator privilege in order to work properly. In this case, it is very easy to do it, you just right-click and choose run as administrator.
Although a very easy solution, it can be quite annoying if running the app is on a daily basis or even more times per day. If this is the case then right-clicking and choosing to run as administrator can be a daunting task, sometimes you can even forget to run it like this in heat of work and some unforeseen consequences might occur.
Luckily there is an easy hack so you can open the chosen application each time as an administrator with a simple double click each time.
 Once you are in the system, on the left tabs find and click on Clipboard.
 If you are not logged in to your Microsoft account do so on the right panel by locating Sync across devices and click on sign in.
 When you are signed in click on the option to turn it on.
 One option is turned ON, you will be greeted with two choices, to copy everything from the clipboard automatically or to choose text which you want to sync and paste it with ⊞ WINDOWS + V. Choose whatever better suits your needs, and you are done.
Repeat these steps for other devices and you are done.
One option is turned ON, you will be greeted with two choices, to copy everything from the clipboard automatically or to choose text which you want to sync and paste it with ⊞ WINDOWS + V. Choose whatever better suits your needs, and you are done.
Repeat these steps for other devices and you are done. 


