As you know, the Windows Firewall is designed not just to protect your computer from viruses and malware, and other security threats but it’s also designed to block any program from accessing the internet. Users are given the option to block both inbound and outbound traffic for any apps on their computers. However, this kind of option can often lead to not being able to access the internet.
In such cases, when you try to run the Windows Firewall Troubleshooter or the Windows Network Diagnostic troubleshooter, it will throw an error message that says, “Windows Firewall is preventing connections to your computer. The Windows Firewall rule HSS DNS Leak Rule may be blocking your connection”. If you are in this kind of scenario, then you’ve come to the right place as this post will guide you on how exactly you can fix this error.
When you encounter this kind of error, there are several options you can check out to fix it. You can try to allow an app or feature through the Windows Firewall or uncheck the HSS DNS leak rule in both private and public. For more details, refer to the suggestions provided below.
Option 1 – Try to allow an app or feature through Windows Firewall
The first thing you can do to get rid of the error is to allow a feature or app through the Windows Firewall. To do this, follow these steps:
Open the Windows Defender Security Center.
From there, select the Firewall and Network Protection option.
Next, click on the “Allow an app through firewall” option and then click on the “Change Settings” button and make sure that you have administrative privileges.
After that, select the app or feature you want to allow through the Firewall from the menu. You also have the option to manually add the app by using the “Add an App” option.
Then select the between the type of network an app can access such as:
Private Network will allow the app to connect to the internet only at home or work.
Public Network will allow the app to connect to the internet from anywhere, including Public WiFi hotspots.
Once done, restart your computer and see if it fixed the error or not.
Option 2 – Try to uncheck the HSS DNS leak rule in both private and public
The next thing you can do to fix the error is to uncheck the HSS DNS leak rule in both private and public. You can do this by following these steps:
Open the Windows Defender Security Center.
From there, select the Firewall and Network Protection option.
After that, click on the “Allow an app through firewall” option and then click on the “Change Settings” button and make sure that you have administrative privileges.
Next, scroll down until you see the HSS DNS leak rule in both private and public option and then uncheck it.
Now restart your computer and check if the error is now gone.
ShopAtHome Toolbar is a browser extension. This extension tracks information when you visit a website, whether typing in the URL or clicking a link, the Browser App recognizes whether the URL is that of an Affiliate Store, and, if so, may redirect you through the affiliate network site to the Affiliate Store’s website, at which time, a tracking cookie will be placed in your browser. This cookie is the tracking mechanism that will follow your transaction with the Affiliate Store.
During installation, the Browser App may automatically change the default search engine used by your Web browser, whether via a built-in search box or otherwise, to our search engine. Upon installation and setup, it defines an auto-start registry entry which makes this program run on each Windows boot for all user logins. A scheduled task is added to Windows Task Scheduler in order to launch the program at various scheduled times.
Multiple anti-virus scanners have detected possible malware in ShopAtHome.com Helper and are therefore classified as potentially unwanted and flagged for optional removal.
About Browser Hijackers
Browser hijacking is actually a form of an unwanted program, often a web browser add-on or extension, which then causes modifications in the browser’s settings. Browser hijackers can do a variety of things on your PC. The idea would be to force users to visit certain sites that are looking to increase their visitor traffic and generate higher ad income. A lot of people assume that these kinds of sites are legitimate and harmless but that is incorrect. Almost every browser hijacker poses an actual threat to your online safety and it is important to classify them under privacy risks. They do not just screw up your web browsers, but browser hijackers could also modify the system registry, leaving your computer or laptop susceptible to other forms of hacking.
Browser hijacking signs and symptoms
Signs that your web browser is hi-jacked include:
1. the home page of your web browser is changed suddenly2. you find yourself regularly directed to some other web page than the one you actually meant3. The default search page of the browser is changed4. you find many toolbars in your web browser5. you see a lot of pop-ups on your computer screen6. your internet browser starts running sluggishly or displays frequent glitches7. Inability to navigate to particular sites, particularly anti-malware as well as other security software sites.
How browser hijacker infects PCs
Browser hijackers infect computers through malicious email attachments, downloaded infected documents, or by checking out infected internet sites. They also come from add-on programs, also called browser helper objects (BHO), web browser extensions, or toolbars. Other times you may have unintentionally accepted a browser hijacker as part of a software program package (generally freeware or shareware). Popular examples of browser hijackers include Conduit, CoolWebSearch, Coupon Server, OneWebSearch, RocketTab, Delta Search, Searchult.com, and Snap.do.
The best ways to get rid of browser hijackers
Some hijackers could be removed simply by uninstalling the related freeware or add-ons from the Add or Remove Programs in the Microsoft Windows Control Panel. Sadly, the majority of the software packages utilized to hijack a web browser are deliberately designed to be hard to detect or remove. Besides, browser hijackers can modify the Windows registry so it can be very difficult to fix manually, particularly if you are not a very tech-savvy person.
Help! Malware Preventing Anti-virus Installation And Access To The Web
All malware is inherently dangerous, but certain kinds of malware do a lot more damage to your computer or laptop than others. Some malware sits in between the computer and the net connection and blocks some or all websites that you would like to visit. It might also block you from adding anything on your PC, especially anti-malware applications. If you’re reading this, odds are you’re stuck with a virus infection that is preventing you to download and/or install Safebytes Anti-Malware software on your PC. Do as instructed below to get rid of the malware by alternate methods.
Boot your PC in Safe Mode
In the event the malware is set to load at Windows startup, then booting in Safe Mode should avoid it. Just the minimum required applications and services are loaded when you boot your personal computer in Safe Mode. To launch your Windows XP, Vista, or 7 PCs in Safe Mode with Networking, please do as instructed below.
1) Press the F8 key repeatedly as soon as your PC boots, but before the big Windows logo shows up. This will conjure up the “Advanced Boot Options” menu.2) Make use of the arrow keys to choose Safe Mode with Networking and press ENTER.3) Once you get into this mode, you should have online access again. Now, obtain the virus removal application you need by utilizing the browser. To install the application, follow the guidelines in the installation wizard.4) Right after installation, do a full scan and let the software delete the threats it detects.
Use an alternate web browser to download a security program
Malicious program code can exploit vulnerabilities in a particular browser and block access to all antivirus software websites. The best solution to avoid this problem is to choose a browser that is well known for its security features. Firefox contains built-in Phishing and Malware Protection to keep you secure online.
Install and run anti-virus from a USB drive
Here’s another solution which is using a portable USB anti-virus software package that can check your system for viruses without the need for installation. Try these simple actions to clean up your affected computer by using portable anti-malware.
1) Make use of another virus-free computer system to download Safebytes Anti-Malware.2) Put the USB drive into the clean PC.3) Double click on the downloaded file to run the installation wizard.4) When asked, choose the location of the USB drive as the place where you would like to store the software files. Follow the on-screen instructions to finish the installation.5) Now, plug the thumb drive into the corrupted system.6) Run the Safebytes Anti-malware directly from the pen drive by double-clicking the icon.7) Run Full System Scan to identify and clean-up up all types of malware.
SafeBytes Anti-Malware Features
If you’re planning to purchase anti-malware for your computer system, there are many brands and utilities for you to consider. Some are very good ones, some are ok types, while some are simply just fake anti-malware software that could harm your PC themselves! While looking for an antimalware tool, pick one that provides reliable, efficient, and total protection against all known computer viruses and malware. While considering the dependable software programs, Safebytes AntiMalware is undoubtedly the highly recommended one.
Safebytes is among the well-established computer solutions firms, which provide this complete anti-malware tool. With its cutting-edge technology, this application can help you remove multiples types of malware including computer viruses, worms, PUPs, trojans, adware, ransomware, and browser hijackers.
SafeBytes anti-malware takes computer protection to a totally new level with its enhanced features. Here are a few popular features found in this program:
Antimalware Protection: With a critically acclaimed anti-malware engine, SafeBytes offers multilayered protection that is intended to find and get rid of viruses and malware that are hidden deep inside your computer’s operating system.
Live Protection: SafeBytes provides complete and real-time security for your PC. It’ll continuously monitor your pc for hacker activity and also gives users sophisticated firewall protection.
Extremely Speed Scanning: SafeBytes Anti-Malware has got a multi-thread scan algorithm that works up to 5x faster than any other anti-malware software.
Web Filtering: SafeBytes provides an instant safety rating on the pages you are about to check out, automatically blocking harmful sites and make sure that you’re certain of your online safety while browsing the net.
Lightweight Application: This software program is not “heavy” on the computer’s resources, so you will not find any overall performance troubles when SafeBytes is operating in the background.
24/7 Customer Service: Skilled technicians are at your disposal 24/7! They will quickly fix any technical issues you might be encountering with your security software.
Technical Details and Manual Removal (Advanced Users)
If you wish to manually remove ShopAtHome without the use of an automated tool, it may be possible to do so by removing the program from the Windows Add/Remove Programs menu, or in cases of browser extensions, going to the browsers AddOn/Extension manager and removing it. You will likely also want to reset your browser.
To ensure the complete removal, manually check your hard drive and registry for all of the following and remove or reset the values accordingly. Please note that this is for advanced users only and may be difficult, with incorrect file removal causing additional PC errors. In addition, some malware is capable of replicating or preventing deletion. Doing this in Safe Mode is advised.
The following files, folders, and registry entries are created or modified by ShopAtHome
Files:
File %PROGRAMFILESSelectRebatsToolbarShopAtHomeToolbar.dll.
File %WINDIRDownloaded Program Filesinstall.inf.
File %WINDIRDownloaded Program Filessahagent-cdt1004.exe.
File %LOCALSETTINGSTempsahagent-cdt1004.exe.
File %LOCALSETTINGSTempcdt1004.sah.
File %LOCALSETTINGSTempsetup4002b.cab.
File %LOCALSETTINGSTempsetup4002b.ini.
File %SYSDIRap9h4qmo.ini.
Search and Delete: ap9h4qmo.ini.
File %SYSDIRap9h4qmo.exe.
File %SYSDIRBundleLite_westfrontier1001.exe.
File %SYSDIRap9h4qmo.ini.
File %WINDIRa95kfrhe.exe.
File %SYSDIRa95kfrhe.ini.
File %SYSDIRa95kfrhe.ini.
File %SYSDIRq17i9a4j.ini.
Search and Delete: ap9h4qmo.ini.
Directory %LOCALSETTINGSTempSahUpdate.
Registry:
Key 759C257C-F750-4F52-AB58-FB8A7B8770FE at HKEY_CLASSES_ROOTTypeLib.
Key HKEY_CLASSES_ROOT named GRInstall7.Installer
Key HKEY_CLASSES_ROOT named GRInstall7.Installer.1
The Google Chrome browser checks the SSL Security Certificate of the website that you are trying to open. However, if Chrome is not able to check the certificate then you might encounter an error related to the SSL Certificates which you might face when browsing the web. This particular error is the ERR BAD SSL CLIENT AUTH CERT error which is caused by many factors such as the computer’s Time, Cached Data is corrupt, Date is out of sync, as well as third party software installed in your computer is the one that’s blocking the site and many more.
The ERR_BAD_SSL_CLIENT_AUTH_CERT error might also be coming from the website’s end. It could be that the server is rejecting the certificate the client website is sending. The certificate might have already expired or the server may not trust its issuer – whichever the case may be, here are some options you can check out to fix the error.
Option 1 – Sync Date and Time
The first thing you can try is to sync the Date and Time of your computer as the wrong Date and Time settings are one of the most common causes of connection problems like the ERR_BAD_SSL_CLIENT_AUTH_CERT error. This is because of the incompatibility between the SSL Certificate validation date and the System Clock. Thus, you have to sync your System Clock. Refer to the steps below to do so.
Right-click on the Taskbar and click on the Adjust Date and Time option.
Next, click on the Sync Now button to synchronize the Date and Time with the Microsoft Servers.
Now make sure that the Time Zone that’s set on the same page is correct.
Option 2 – Try clearing the browser data
There are times when some data in the browser is conflicting with the loading of the website and triggers errors like ERR_BAD_SSL_CLIENT_AUTH_CERT. And so you can try to clear your browser’s data. This might be a very basic solution but oftentimes it works in fixing this kind of error in Google Chrome. Follow the steps below to clear the data in your browser.
Open your Google Chrome browser.
After that, tap the Ctrl + H keys. Doing so will open a new panel that allows you to delete the browsing history and other data in your browser.
Now select every checkbox that you see and click on the Clear browsing data button.
Then restart your Chrome browser and check if you can now open any website or not.
Option 3 – Try to check and fix any possible conflicts with third-party programs
Third-party programs like internet protection software could be interrupting the connection and causing the error. For some unknown reason, your antivirus program or firewall might be detecting the webpage you are trying to open as malicious or with less credibility which is why it is blocking the browser from opening the website. To fix that, if you have third-party programs installed like VPN, security software, or any add-on, or firewall, you can disable them temporarily and see if it fixes the problem and you’re able to pull up the website. After a while, you have to enable them back and configure their settings so that the website won’t get blocked again.
If you were using Google Chrome when you got the ERR_BAD_SSL_CLIENT_AUTH_CERT error, then you need to follow the protocol fixes for SSL3/TLS and QUIC which are usually some of the reasons that cause the SSL version / Cipher Mismatch. It also has a few fixes for Windows 10 computer where you can clear the certificates and make sure that your computer date and time is in sync with your time zone and so on.
If you were using Edge or Internet Explorer when you got the error, then you have to follow the steps below.
Type “Internet” in the search box of your browser. After that, you should see the Internet Options from the search results.
Next, open the Internet Properties window and switch to the Advanced tab and then scroll down to the Security section.
From there, check the “Use TLS 1.1” checkbox as well as the “Use TLS 1.2” checkbox and then click OK to save the changes made.
Restart the browser.
On the other hand, if you were using Firefox when you go the error, here’s what you have to do.
Open Firefox and in the address bar, type “about:config” and hit Enter.
If a warning appears, just click on the “I accept the risk!” button to proceed.
Next, type in “TLS” in the search field and hit Enter.
Then look for “security.tls.version.min” and double click on it and set its integer value to 3 to force the protocol of TLS 1.3.
Now click OK and restart Firefox and do the same thing with SSL.
Option 5 – Try to update Google Chrome
You might also want to try updating your browser to its latest version and have it installed in your computer. After you install the update, check if you can now open the website you were trying to open earlier.
Option 6 – Get rid of any conflicting browser extensions
Open Chrome and press Alt + F keys.
Go to More tools and click Extensions to look for any suspicious browser extensions or toolbars.
Click the Recycle bin and select Remove.
Restart Chrome and press Alt + F keys again.
Proceed to On Startup and mark Open a specific page or set of pages.
To check if the browser hijacker is still active, click Set pages, if it is active, overwrite the URL.
Note: If removing the browser extensions or toolbars didn’t work, you can also try to reset your Google Chrome browser.
Open Google Chrome, then tap the Alt + F keys.
After that, click on Settings.
Next, scroll down until you see the Advanced option, once you see it, click on it.
After clicking the Advanced option, go to the “Restore and clean up option and click on the “Restore settings to their original defaults” option to reset Google Chrome.
The latest update from Panos Panay on Twitter is including New and redesigned Snipping tool inside Windows 11. From the shared video, we can see that it includes modern Windows 11 UI redesign and it looks and feels like a part of Windows 11.
More things that can be seen from the shared video is that it looks like the new snipping tool is a merged version of the old with snip & sketch.
It is good to see that it is still possible to capture screen with easier way natively inside Windows 11 but some more functionality would be more welcome I guess.
Users were asking for added functions for a long time like adding simple text for example but from shared video, no new features were presented so for some users 3rd party solutions will still be the way to go.
The new and redesigned Snipping tool will roll out with the next update and we will see then about all new features inside it firsthand. Until then, take care.
Default applications in previous Windows versions were a pretty straightforward process. The user went to the settings application and picked for each category which application he would like to choose from the list of installed ones.
In Windows 11 things are little changed. In this article, we will show you how to choose the default internet browser inside Windows 11, and sadly it is a more tedious task than in previous versions.
Choosing default browser in settings
As in previous versions of the Windows operating system you will need to use the settings application in order to change your default Internet browser. Previously, in Windows 10, a variety of general categories like email, web browser, and photo viewer were all listed under the Default Apps section of the Settings panel. It was easy to click on one of those categories and click on the option you like best from the small pop-up suggestion window.
In the Windows 11 Insider Build, you’ll see a gauche list of an individual file or link types that you’ll need to specify your preferred browser for. The types include: HTM, HTML, PDF, SHTML, SVG, WEBP, SHT, FTP, HTTP, and HTTPS. There are additional optional types you can specify your preferred browser for as well.
The issue here is in order to use a single browser which most users do you will have to go through each file type and set your preferred one. I am really not sure why this was introduced or why it has to be this way, all I can do is hope that in the final release of Windows 11 this feature will be rolled back as it used to be and that you could set your default browser in just one simple click.
Error Code 0x80244019 is a basic error that occurs during the Windows Update process in Windows 10 and previous versions of the software dating back to the release of Windows XP. It can cause updates to fail, which can often be frustrating for Windows users who are attempting to keep their devices up to speed.
Common symptoms include:
Failure of updates for the Windows operating system to complete or download
The appearance of an error message that references the number 0x80244019
While an error during the Update process can be frustrating to encounter, there are a few simple solutions that can be employed to try to address the problem at hand. At least one of the methods for resolution does require some familiarity with the command prompt and other advanced tools, so if you are not completely confident in your ability to follow the steps mentioned below, you may want to get in touch with a qualified repair technician who can assist you in resolving the error code.
Solution
Error Causes
In some cases, the error in the Update process can be caused by a conflict between the operating system and the antivirus software running on your computer. In other cases, there may be a portion of the file missing or corrupted that needs to be fixed before the Update process can be run through to completion.
Further Information and Manual Repair
For users who are experiencing the appearance of Error Code 0x80244019 on their devices, there are a few methods that can be used to attempt to resolve the issue. While at least one of these methods is fairly simple to complete, even for basic users, the other does require some comfort in using the command prompt to input a series of commands. If you do not feel comfortable in following the steps listed below, contact a computer repair professional who is familiar with Windows 10 to assist you.
Here are the top methods for dealing with Error Code 0x80244019 on a Windows machine:
Method One: Use the Windows Update Troubleshooting Tool to Resolve the Issue
When an error arises during the Windows Update process on Windows 10, the best solution is often to use the built-in tool provided by Microsoft, the Windows Update Troubleshooter. An option to open this tool often appears when the error message itself appears.
By running this tool, your system will attempt to scan the files involved in the Update process to try to determine where the conflict or error may be occurring. If one of the system files needs to be repaired or downloaded again, this tool can often resolve the issue on its own.
If the Troubleshooter tool successfully fixes the error, be sure to restart your computer before attempting to run the Update process again so that you can fully apply any changes that have been made.
In some cases, however, the Troubleshooter tool will not be able to find the problem or will be able to identify what the issue is, but not able to fix it. If this happens, it may be time to turn to Method Two.
Method Two: Manually Perform a Reset on Windows Update Assets
To manually reset the assets associated with the Windows Update tool, follow these steps:
Step One: Open up the command prompt from the start menu and select the option to run it as an administrator.
Step Two: Run the following commands, hitting the enter key after each is put in:
Step Three: Type in the word “exit” to quit out from the Command Prompt.
Once these steps are done, you can try to use the Windows Update tool again to see if the problem has successfully been resolved.
Method Three: Use An Automated Tool
If you wish to always have at your disposal a utility tool to fix these Windows 10 and other related issues when they do arise, download and install a powerful automated tool.
It really sucks when you can’t fully enjoy the newest version of your favorite OS.
Windows 11 is still relatively fresh and consequently has some annoying little bugs that really ruin our experience. The good news is that you’re not alone and most of them are easy to fix.
Here are 5 commonly reported Windows 11 issues and what you can do to get rid of them.
1. Windows 11 audio problems
One of the absolute most irritating things in the world is struggling with the sound on your computer. Windows 11 users have reported facing the issue of low or no sound. If you’re currently experiencing the same frustration, you can be relieved. Chances are fixing it will only take a few minutes.
The first thing to check would be whether you accidentally muted your device by pressing the mute button on your keyboard. Yes, we know it sounds a lot like the old “have you tried turning it off and on again?” But it’s important to leave no stone unturned, and the most obvious things are usually the ones we easily overlook.
Moreover, if you have several audio output sources, check whether the right one is selected. You can do this via the Action Center or through Settings. If you want to use the same source every time, we also recommend you set it as the default one.
It’s also important to have a good, up-to-date audio driver. More often than not, this will be the true cause of your audio struggles. Make sure to update your driver, and if that doesn’t work out, you can always un- and reinstall it or install a different one.
Lastly, if all attempts remain unsuccessful, run the audio troubleshooter to figure out what’s actually going wrong.
2. Unable to find files
Such a powerful new operating system, yet it can’t seem to do the simplest thing imaginable? The File Explorer not responding on Windows 11 is one of the most frustrating and most common problems with Microsoft’s newest iteration of its awesome OS.
However, 9/10 times it can be fixed by simply restarting your PC. You could also try killing the Windows Explorer process in the Task Manager and then rerunning it.
If these don’t help, check whether there are any pending Windows 11 updates. A single missing update can compromise your PC’s functionality, so always make sure to install them all on time.
Should none of that work, then there are other ways to solve the File Explorer problem. However, then the issue is probably a bit deeper and it’s no longer in the ‘easy fix’ territory.
3. Start menu not working
Just like the File Explorer, the Start menu is a fundamental element of your OS. So, it’s only natural that its malfunction grinds your gears. It may be more customizable than on previous Windows versions, but it doesn’t always work smoothly.
If you’re facing the so-called Start menu critical error, there are a few things this could be caused by. Usually it means you turned off your system while an important update was still being installed, there is a corrupt file on your PC, or Windows forcefully stopped a program.
Whatever the reason, the solution should be pretty simple. Try the basic steps: restarting your File Explorer (like we explained above) and signing out and back into your account. If that doesn’t do anything, you may want to try uninstalling third-party start menu apps (if you have any), since they can interfere with your default programs’ functionality.
Now, those are the easy fixes. If you get nowhere with them, you might need to identify the root cause and search for more complex solutions than that.
4. Snipping tool not working
Our beloved screenshot tool was introduced with Windows 10 and Microsoft decided to keep it. However, you were probably just as disappointed as us when you tried to run it and failed.
Normally, this can be fixed by installing the latest Out-of-band (OOB) update, or even pending updates in general. Even if your system appears to be up-to-date, run the checker just in case.
Another cool thing Windows 11 lets you do is ‘Repair’ and ‘Reset’, which is the easiest way to troubleshoot your Snipping tool. If this fails, you can also try the good old un- and reinstall method. Simply uninstall the tool through the Control Panel and reinstall it from the Microsoft Store.
Furthermore, in the case of an upgrade from Windows 10 to 11, it may be that the old Snipping tool version is interfering with the launch of the new one. If you don’t care that much about the additional options available with the enhanced screenshot tool, you can use the old version instead.
Simply go to your C Drive, find the Windows.old folder, search for the tool and open it from there. Make sure to pin it to your taskbar as well, if you know you’re going to use it often.
5. Can’t install the latest update
The latest Windows 11 version, 22H2, has brought tons of enhancements to our dearest operating system. Unfortunately, a lot of users still haven’t had the opportunity to experience it. A mere update of your OS version should be the one thing that goes smoothly, but sometimes that’s not the case.
Failure to install 22H2 can be caused by a few things. Most commonly, the issue is caused by lack of storage space or corrupted files, but there could be other culprits.
There are a couple of things you could try. For example, it’s crucial that your drivers be up-to-date and some important services be enabled. These are: Windows Modules Installer, Background Intelligent Transfer Service, Cryptographic Service, Windows Update services.
To enable them, search ‘Services’, find the service you need and right-click on it. Open ‘Properties’ and select the startup type ‘Automatic’.
It may also be necessary to unplug all peripherals that aren’t crucial and disable third-party antivirus tools until after the update is finished.
Ultimately, you can run the Windows Update troubleshooter to detect and fix other possible issues.
Summary
Tiny bugs like these are nothing out of the ordinary. That said, we still all hate when they happen.
Hopefully some of our solutions have helped you to a smoother Windows 11 experience. But if you’re still struggling, feel free to reach out to us. We’d be happy to help!
Error code 0x801901F7, also known as “The Server Stumbled” error because it shows a message saying “The Server Stumbled. We all have bad days” is associated with Windows Store. Server Stumbled Error 0x801901F7 is an error related to the MS server. The error occurs due to damaged registry files, malware, virus, and corrupted data. You should fix this error to prevent a system crash or a BSOD error. There are some things you can do to fix it. These are not so complex. So, anyone can try these methods to fix error 0x801901F7.
Common Symptoms for error 0x801901F7:
Problems with Windows startup
System becomes very slow or the system freezes
Blue screen of death appears
Windows fails to start some process due to Stop error code 0x801901f7
Solution
Error Causes
This error is generally caused by corrupt registry files.
Virus infection can cause this problem.
Outdated driver, missing .DLL files may also cause this error.
Microsoft server overload may cause this problem as well.
Incorrect configuration may cause this problem.
Further Information and Manual Repair
To fix error 0x801901f7, there are four methods listed below. Some might work for you and some might not. Please try all of them to fix this error.
Method 1:
Basic method to fix error code 0x801901F7: Resetting Windows Store Cache
Most of the time clearing or resetting the cache helps. It doesn't always work, but you should try this first before moving on to some advanced methods which are mentioned below.
To reset the Windows Store cache please follow the simple steps below
Open RUN by searching or pressing "Windows Key + R"
Type "wsreset.exe" and press Enter or click on OK.
Windows Store will open automatically along with a command prompt.
This will reset Windows Store and you might see it loading as it should.
This method might work but if it fails to solve Error 0x801901F7 then follow the method below.
Method 2:
Advanced method of fixing error code 0x801901F7: Deleting Windows Store database file.
By using this method, you will be deleting the database file for Windows Store. This file is located on your C drive or the drive where you installed your Operating System. Follow the steps below.
Navigate to C:WindowsSoftwareDistributionDataStoreDataStore.edb.
Delete DataStore.edb file from there.
Now Open Windows Store and see if you still get error code 0x801901F7.
The Datastore.edb file that you deleted will be automatically created once you perform Step 3 which is launching Windows Store.
If you still cannot get this error away then Close Windows Store and Reboot your PC then Launch Windows Store Again.
Method 3:
Modifying Windows update properties:
Perform the steps below only if the above-mentioned methods fail. You will be tweaking a few things in the Windows update to see if it helps.
Open Task Manager by right-clicking on Taskbar, then click on Task Manager.
Go to Services Tab. Click on Open Services at the very bottom of the Window.
Now a new window will pop up. Scroll down & find "Windows Update" from the list.
Double click on Windows update to open up its Properties.
Now from the Startup Type drop-down list, select Automatic. Click on Apply, Start, and then Ok.
Now you need to perform just one more step. Reset Windows Store again (Refer to method 1 for Steps). This should fix your Windows Store error that shows The Server Stumbled with 0x801901F7 Error Code.
Method 4:
If the error is due to a problem with a driver, then follow the method below to uninstall the current driver:
Open the Run command and type “sysdm.cpl” in the text box.
Click Enter.
Open the Hardware tab on the system properties dialog box.
Then press on Device Manager.
Double press on Device type and then press on the hardware device that is reporting error code 0x801901F7.
Go to the Driver tab and press on Uninstall button to uninstall the device driver completely.
Now, install the new driver on your computer.
Restart your computer.
Run virus scan of your PC
Try using a different USB port.
If you do not possess the technical expertise required to accomplish this yourself or do not feel comfortable doing so, download and install a powerful automated tool to get the job done.
One of the essential parts of the Windows 10 operating system is the Microsoft Store as it is the distribution hub of numerous applications such as Netflix, Facebook, and many more. In fact, Microsoft is planning to make it a hub not just for UWP applications but also Windows Classic applications. Microsoft has already built a bridge with the power of Project Centennial which allows developers to migrate and upload their Windows Classic applications to the Microsoft Store. Although the Microsoft Store has been constantly improving, there are still times when you might face an error while using it. One of these errors is error 0x80131500. When you encounter this error, you will get the following error message on your screen:
“Try that again, Something happened at our end, Waiting a bit might help, The error code is 0x80131500 in case you need it.”
To fix this error, you can try changing your internet connection, toggle the date & time settings, change DNS, create a new user account, run the Microsoft Store Apps troubleshooter or reset the Microsoft Store as well re-register it using Windows PowerShell.
Option 1 – Try changing your internet connection
The first thing you can do is to change your internet connection. If you are using Ethernet, you can try to connect to a Wi-Fi connection instead and see if it helps.
Option 2 – Try to toggle the Date and Time settings
The first thing you can try is to sync the Date and Time of your computer as the wrong Date and Time settings are one of the most common causes of connection problems like the error 0x80131500. This is because of the incompatibility between the SSL Certificate validation date and the System Clock. Thus, you have to sync your System Clock. Refer to the steps below to do so.
Start by tapping the Win + I keys to open the Windows Settings.
Next, go to Time & Language > Date & time.
From there, turn the toggle on for the “Set time automatically and Set time zone automatically” option on the right-side panel.
After that, click on Region & language located on the left side panel and make sure that the Country or region on the right-side panel is set to the country you live in.
Now close the Settings app and restart your computer and see if it fixes the problem or not.
Option 3 – Try to change the DNS Server
In this option, you can try changing your current DNS settings to the Google Public DNS as it could also help in fixing error 0x80131500. To do so, follow the steps below.
The first thing you have to do is right-click on the network icon in the Taskbar and select Network and Sharing Center.
Next, click on the “Change Adapter Settings” option.
After that, search for the network connection that you are using to connect to the internet. Note that the option might be “Wireless Connection” or “Local Area Connection”.
Right-click on your network connection and click on Properties.
Then select the new window to choose the “Internet Protocol 4 (TCP/IPv4)” option.
After that, click on the Properties button and click the checkbox in the new window for the option “Use the following DNS server addresses”.
Type in “8.8.8.8” and “8.8.4.4” and click OK and exit.
Option 4 – Try to create a new Administrator User account
If you have a standard account, you can try creating a new account but this time, you create an administrator user account and then see if the error is fixed or not. Note that you have to sign in with your main account before you can create an admin account.
Option 5 – Run the Microsoft Store Apps troubleshooter
The Microsoft Store Apps Troubleshooter will help you in fixing the error 0x80131500. This is a great built-in tool from Microsoft that helps users fix any app installation issues. So this is worth a try to solve the problem. This built-in tool also helps you fix the Windows 10 Store if it isn’t working.
To use the Windows Store Troubleshooter, follow the steps below.
Tap Win + I keys again to open the Windows Settings panel.
Go to Update & Security and then go to Troubleshoot.
On your right-hand side, scroll down to find the Windows Store Apps and then click on the Run the troubleshooter option and see if it fixes the problem.
Option 6 – Try to reset the Microsoft Store cache
Just like browsers, Microsoft Store also caches as you view apps and games so it is most likely that the cache is no longer valid and must be removed. To do so, follow the steps below.
Right-click on the start button and click on Command Prompt (administrator).
Next, type in the command, “exe” and tap Enter. Once you do, the command will clear the cache for the Windows Store app.
Now restart your PC and afterward, try opening Microsoft Store again and then try to install your app or update your computer again.
Option 7 – Try to re-register the Microsoft Store app via PowerShell
Tap the Win + X key combination or right-click on the Start button and click on the Windows PowerShell (Admin) option.
If a User Account Control or UAC prompt appears, just click on Yes to proceed and open the Windows PowerShell window.
Next, type in or copy-paste the following command to re-register the Microsoft Store app and tap Enter:
If you’re having some problem browsing multiple websites on the Firefox browser on your Windows 10 computer, then this post might be of help. One of the most common problems you could encounter in Firefox is mostly related to HTTPS and one of them is the MOZILLA PKIX ERROR MITM DETECTED or ERROR SELF SIGNED CERT or SEC ERROR UNKNOWN ISSUER error which means that Firefox was unable to trust certificates issued on secured websites.
If you encounter the MOZILLA_PKIX_ERROR_MITM_DETECTED error in Firefox, this indicates that something in your network or system is interrupting your connection and injecting certificates and when that happens, Firefox won’t trust it. In such cases, one of the culprits is malware. Malware will try to replace a legitimate certificate with its certificate. Another cause is security software where it keeps a tab on a secure connection and creates a false positive, for instance:
“In Microsoft Windows accounts protected by Family Safety settings, secure connections on popular websites like Google, Facebook and YouTube might be intercepted and their certificates replaced by a certificate issued by Microsoft in order to filter and record search activity.”
And if you are connected to a corporate network, there might be a monitoring/filtering product that could be replacing certificates. Moreover, there are also users who reported getting this issue when they use the Nightly version of Firefox. And if that’s the case, you have to try accessing secure websites using only the stable build especially when it comes to payments. However, if you are not doing that, then here are some options you need to check out.
Option 1 – Try turning off HTTPS Scanning on your security and antivirus programs
Each security-based software has a security option that allows you to turn off the HTTPS scanning functionality. They may be available under different names such as HTTPS Scanning, Scan SSL, Show safe result, Do not scan encrypted connections, etc. Find what is applicable for your security or antivirus software and then try turning it off temporarily and see if it helps in fixing the MOZILLA_PKIX_ERROR_MITM_DETECTED error in Firefox.
Option 2 – Try to disable security.enterprise_roots.enabled
The next thing you can do if the first option didn’t work is to disable security.enterprise_roots.enabled which is an HTTPS certificate check on Firefox. Note that this is not recommended but you have to at least try in order to fix the error.
Open Firefox and then type “about: config” in the Firefox address bar and hit Enter.
After that, if an info message appears, confirm it.
Next, search for the security.enterprise_roots.enabled preference and once you found it, double click on it.
Then change its value to true and restart the Firefox browser once. This will import all the custom certificates from the other security software into Firefox. As a result, it will make sure to mark those sources as trusted and you won’t get the MOZILLA_PKIX_ERROR_MITM_DETECTED error.
We have all experienced Windows errors over time and that can range from simple ones that will do very little to no harm and can be even system breaking making us lose our work or completely making the PC unusable. No one likes them but they happen, and usually, they happen once we least expect them.
No matter how frequent and unpleasant they might be there are ways to keep them at the minimum and even avoid them.
We will discuss steps that you can take in order to do this, simple tips and guides on how to keep your computer in top form and eliminate not just Windows, but any kind of errors altogether.
Keep your hardware clean
Believe it or not, some serious Windows errors like the dreaded blue screen of death can come from hardware issues not from the software at all. It is very important to keep your computer clean and with enough air flow so it can function properly.
Keeping applications on the drive might seem harmless but sadly that is not the case. Some applications have a certain impact on the system itself after all most of them are tweaking registry entries in Windows and sometimes having too many applications means an increased possibility of conflict over certain resources even when they are not running.
Some applications like adobe creative suite, for example, will have certain services always running in the background, and more of these kinds of applications you have, more services, more places for unexpected errors when they collide. Some of them will also install certain dependencies that could be problematic.
The general idea is: if you are not using it, uninstall it and you will be safer and more resilient to errors inside OS.
Do not use pirated or cracked software
Besides moral and law implications that using pirated or cracked software might bring you there are also certain other things that might be problematic. Certain "free" software might come packet with some problematic malware, for example, it is not uncommon for attackers to use some popular software to pack their malicious application with it.
Other things might be wrong and incomplete tweaking with application in order to bypass security and thus bringing some instability due to scripts needed to run in order to achieve this goal.
Keep your drivers updated
Errors can also come from old drivers or bad drivers, device manufacturers are not all-knowing and perfect, and sometimes drivers can wreak havoc on the system. Having updated drivers can minimize any kind of unexpected behaviors inside the operating system making it more stable and reliable.
You can check your driver version in the control panel inside the Windows OS and then compare it to the ones found on the manufacturer's site, if there are newer available it is recommended to download and install them,
Keep software updated
Applications can have bugs, and bugs can lead to certain errors both in the system and when using the app as well. It is in your best interest to get the latest patch or newer version of the software in order to avoid these unpleasant experiences.
Also, certain codecs and extensions that are installed directly in Windows can also have some unpredictable behavior, updating is the best solution to keep them in line.
Keep Windows updated
Same as with drivers and applications, Windows itself is not immune from bugs and some unpredictable issues. Luckily Microsoft is always working on fixes and features of Windows but in order to actually have benefited from that work, you will need to keep Windows updated. Sometimes a bad update can introduce some errors but you can always roll back to the previous and wait for them to fix everything and then download them all.
Check the health of your hardware regularly
Hardware components have their life cycle, more quality ones tend to last longer but eventually, they will reach the end of their lifecycle. There are a lot of testers for various components in your computer that can check different things and provide you with information about the state of your components.
If you are on Windows 11, Microsoft has included a basic health app inside OS, just type PC health check in search and start the app. For some more detailed information and advanced checks, you will have to use a custom application. There are plenty of them specialized for single components like RAM, SSD, etc. A simple google search with providing you with top results and most of them are free for personal use.
Remember, a faulty component or component that is reaching its life cycle can produce many errors inside the operating system.

 The latest update from Panos Panay on Twitter is including New and redesigned Snipping tool inside Windows 11. From the shared video, we can see that it includes modern Windows 11 UI redesign and it looks and feels like a part of Windows 11.
More things that can be seen from the shared video is that it looks like the new snipping tool is a merged version of the old with snip & sketch.
It is good to see that it is still possible to capture screen with easier way natively inside Windows 11 but some more functionality would be more welcome I guess.
Users were asking for added functions for a long time like adding simple text for example but from shared video, no new features were presented so for some users 3rd party solutions will still be the way to go.
The new and redesigned Snipping tool will roll out with the next update and we will see then about all new features inside it firsthand. Until then, take care.
The latest update from Panos Panay on Twitter is including New and redesigned Snipping tool inside Windows 11. From the shared video, we can see that it includes modern Windows 11 UI redesign and it looks and feels like a part of Windows 11.
More things that can be seen from the shared video is that it looks like the new snipping tool is a merged version of the old with snip & sketch.
It is good to see that it is still possible to capture screen with easier way natively inside Windows 11 but some more functionality would be more welcome I guess.
Users were asking for added functions for a long time like adding simple text for example but from shared video, no new features were presented so for some users 3rd party solutions will still be the way to go.
The new and redesigned Snipping tool will roll out with the next update and we will see then about all new features inside it firsthand. Until then, take care. 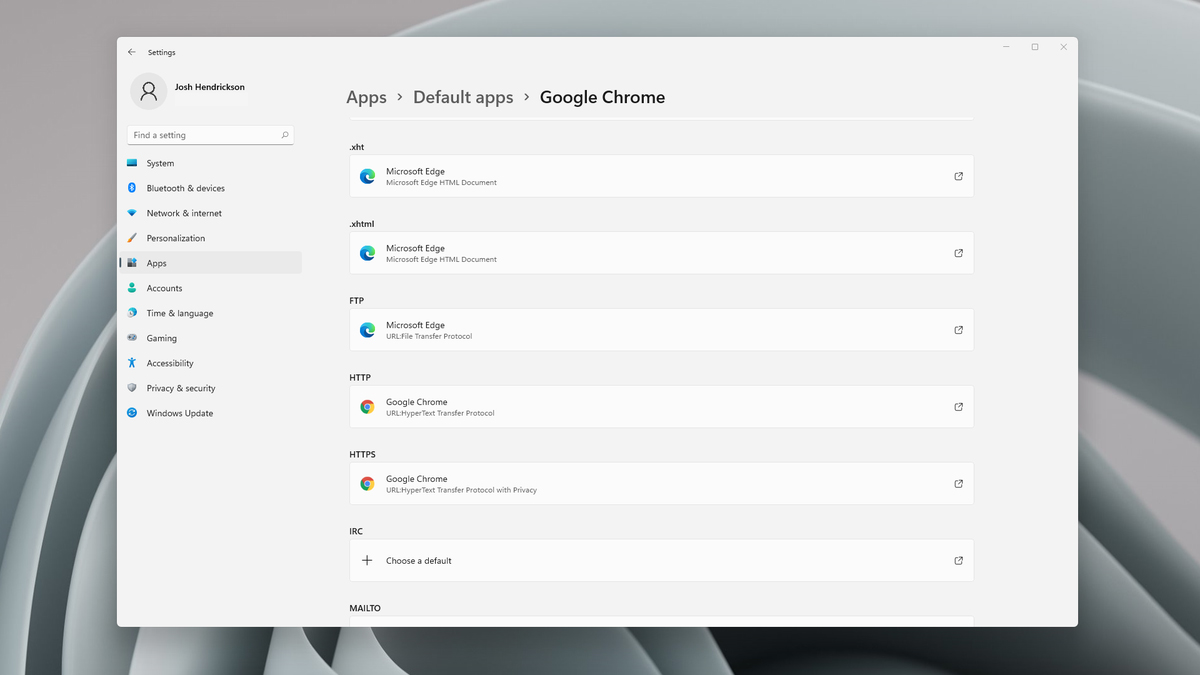 Choosing default browser in settings


