How to be a healthy PC gamer

Spending a large amount of time working or gaming in front of the computer can take a toll on your health. And as someone who indeed spends a large amount of time in front of the computer, I would like to share some insights about how can you be happy and healthy at the same time by incorporating some practices and habits.

gaming

Get good chair

This is first on the list because it matters the most. A proper sitting chair is essential for back health. If your budget allows it, do yourself a favor and get an anatomic sitting chair or gaming chair with lumbar support. It costs but it is worth it.

Learn to sit properly

As the important chair is, sitting properly is also as important as much. Your spine believe it or not is a very important part of your body and you need to take care of it. Sadly long periods of sitting sessions are bad for muscles around the spine that could reflect on the spine itself. Keep your back straight and keep your head not down nor up, place it in a position like when you are walking so the spine that is going from your head is in line with the spine on your back.

Stretch

By medical standards, each hour of sitting should be accompanied by a stretch session since sitting itself is placing too much pressure on certain muscles and blood circulation is lowered. Changing leg position and doing just a little stretch each hour can be really beneficial for your health in long run.

Take breaks

Yes, playing games is fun and most of the time we do not want to stop playing, especially if we are winning but taking breaks is essential for your personal health. Old saying goes that overdoing anything is bad and this applies true even to things that we do for pleasure and relaxation. Take periodic breaks to stretch, stand up and maybe even walk just a little.

Drink water

During long work hours or long gaming sessions, it is not uncommon that we are so focused on our activity that we forget to take our water intake. Approximately 2liters of water per day is needed for an adult person to function properly during that day and if you spend long times in front of a PC do not forget to drink water.

Do not neglect your daily tasks

As enjoyable as it is gaming can make us forget about our daily tasks, do not neglect your life and your tasks. Remember, gaming is only OK if it does not interfere with the daily things that you need to do. Do not postpone going for groceries because of gaming, do not switch shower for another level in the game. Do all of the things you must do first and then sit and game.

Take care of yourself mentally

Having mental health is as important as having a physical one. Playing games is fun, but playing games with someone is even better, do not forget to socialize and invite some friends so you can share some fun times together. Also, detach yourself from outcomes that will come because of gaming, this is very important for gamers that do a lot of PVP games and get annoyed and angry when they lose or when some other player is talking trash. Remember, gaming is for you to relax and enjoy, not to stress you.
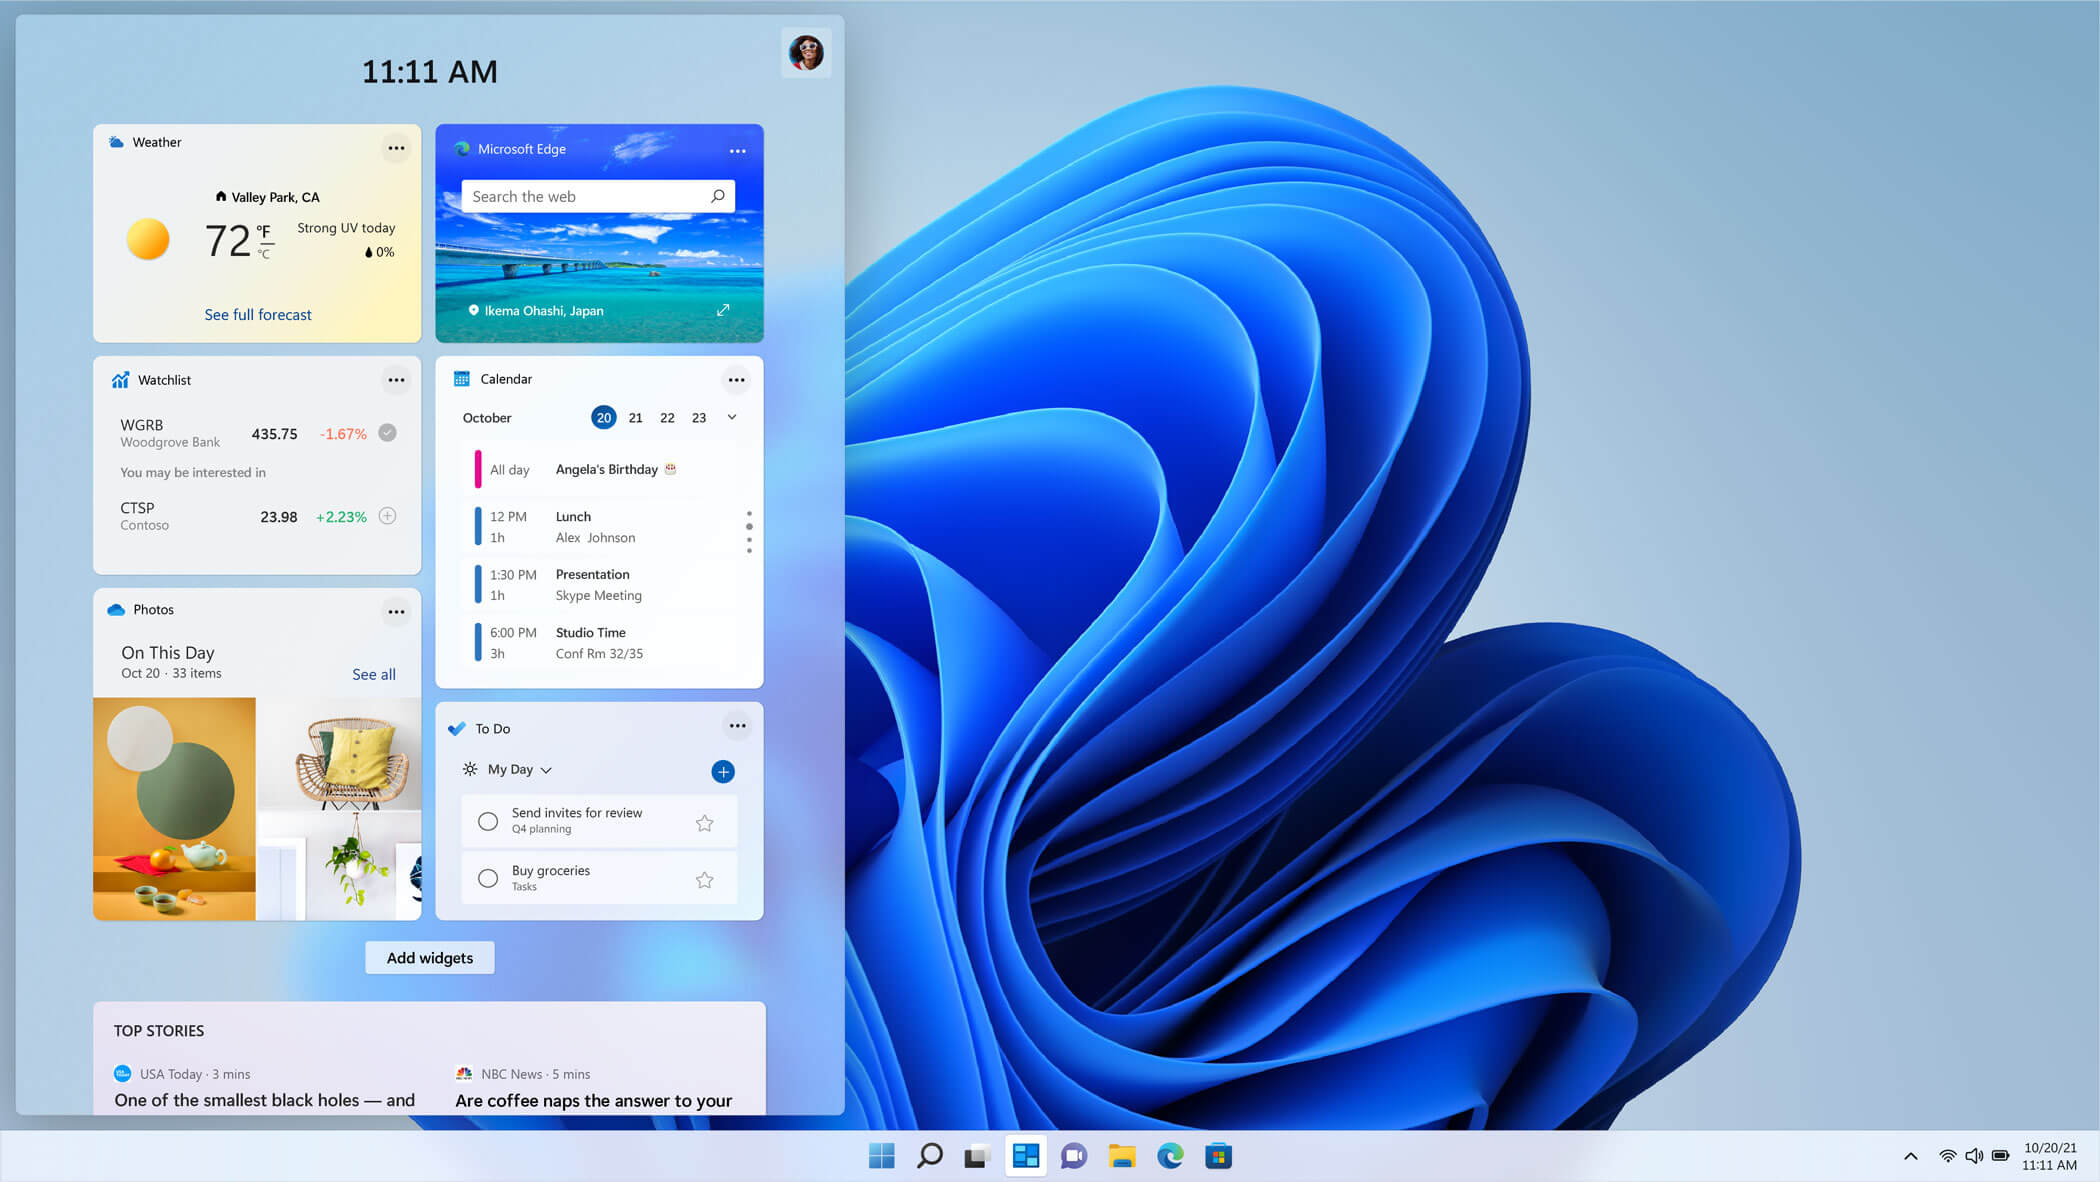
Advanced System Repair Pro

One-click automated PC repair solution
With Advanced System Repair Pro you can easily
Replace damaged files
Restore performance
Free disk space
Remove Malware
Protects WEB browser
Remove Viruses
Stop PC freezing
DOWNLOAD
Advanced System Repair Pro is compatible with all versions of Microsoft Windows including Windows 11

Share this article:

You might also like

Fix Windows Upgrade Error 0x800701E3
There are various components that take part during a Windows Upgrade process such as the CPU, Disk, Network, and many more. This is why the process of upgrading your Windows 10 computer can be quite complex and due to its complexity, there are times when you might encounter some errors like the Windows Upgrade error 0x800701E3. If you encounter this kind of error then it has something to do with the “disk” part of the whole upgrade process which could be due to a conflict with the storage of your Windows 10 computer. When you receive this error, you will see the following error message on your screen:
“Windows cannot install required files. Make sure all files required for installation are available and restart the installation. Error code: 0x800701e3.”
To fix this Windows Upgrade error, here are some suggestions that might help.

Option 1 – Delete Files from Software Distribution Folder & Catroot2 folders

The downloaded Windows Updates are placed in a folder called “SoftwareDistribution”. The files downloaded in this folder are automatically deleted once the installation is completed. However, if the files are not clean up or if the installation is still pending, you can delete all the files in this folder after you pause the Windows Update service. For complete instructions, refer to the steps below.
  • Open the WinX Menu.
  • From there, open Command Prompt as admin.
  • Then type in the following command – don’t forget to hit Enter right after typing each one of them.
net stop wuauserv net start cryptSvc net start bits net start msiserver
  • After entering these commands, it will stop the Windows Update Service, Background Intelligent Transfer Service (BITS), Cryptographic, and the MSI Installer
  • Next, go to the C:/Windows/SoftwareDistribution folder and get rid of all the folders and files thereby tapping the Ctrl + A keys to select them all and then click on Delete. Note that if the files are in use, you won’t be able to delete them.
After resetting the SoftwareDistribution folder, you need to reset the Catroot2 folder to restart the services you just stopped. To do that, follow these steps:
  • Type each one of the following commands.
net start wuauserv net start cryptSvc net start bits net start msiserver
  • After that, exit Command Prompt and restart your computer, and then try to run Windows Update once more.

Option 2 – Try running the DISM tool

You can try running the Deployment Imaging and Servicing Management or DISM tool to fix the Windows Upgrade problem. Using this built-in tool, you have various options such as the “/ScanHealth”, “/CheckHealth”, and “/RestoreHealth”.
  • Open the Command Prompt with admin privileges.
  • Then type in the following commands and make sure to hit Enter right after you type each one of them:
    • Dism /Online /Cleanup-Image /CheckHealth
    • Dism /Online /Cleanup-Image /ScanHealth
    • exe /Online /Cleanup-image /Restorehealth
  • Do not close the window if the process takes a while as it will probably take a few minutes to finish.

Option 3 – Run the System File Checker Scan

System File Checker or SFC is a built-in command utility that helps in restoring corrupted files as well as missing files. It replaces bad and corrupted system files with good system files. To run the SFC command, follow the steps given below.
  • Tap Win + R to launch Run.
  • Type in cmd in the field and tap Enter.
  • After opening Command Prompt, type in sfc /scannow
The command will start a system scan which will take a few whiles before it finishes. Once it’s done, you could get the following results:
  1. Windows Resource Protection did not find any integrity violations.
  2. Windows Resource Protection found corrupt files and successfully repaired them.
  3. Windows Resource Protection found corrupt files but was unable to fix some of them.
  • Restart your computer.

Option 4 – Try running the ChkDsk utility

You can also run the ChkDsk utility to fix the Windows Upgrade error 0x800701E3.
  • First, open This PC and right-click on your operating system partition for Windows.
  • Next, click on Properties and navigate to the Tools tab.
  • Then click on Check under the Error Checking section.
  • After that, a new mini window will be opened and from there click on Scan drive and let it scan your disk drive partition for any errors and then restart your computer.

Option 5 – Run the Windows Update Troubleshooter

Running the built-in Windows Update troubleshooter is one of the things you can first check out as it is known to automatically resolve any Windows Update or upgrade errors like error code 0x800701E3. To run it, go to Settings and then select Troubleshoot from the options. From there, click on Windows Update and then click the “Run the troubleshooter” button. After that, follow the next on-screen instructions and you should be good to go.

Option 6 – Run Microsoft’s online troubleshooter

Running Microsoft’s online troubleshooter might also help you fix the Windows Upgrade error code 0x800701E3. This online troubleshooter is known to help in fixing Windows Update errors, it scans your computer for issues that might be causing the problem and then fixes them automatically.
Read More
Disabling Absolute Volume in Windows 10
As you know, Bluetooth headphones allow users to connect to their mobile devices wirelessly. This allows you to talk on your mobile device or listen to music without having to connect any cords or wires. Additionally, it even allows you to adjust the volume of a left or right speaker. However, Bluetooth headphones in Windows 10 are another story as their scope is limited. For instance, the left and right pieces can’t have different volume levels. But if you still want to change the dual control of the volume of headphones separately in Windows 10. And in this post, you will be guided on how exactly you can do that. In addition, in this post, you will also be guided on what you can do if the Windows Update messed with the Bluetooth volume control and what you can do to disable the absolute volume in Windows 10. In case you don’t know, the Absolute Volume feature is actually incompatible with a number of Bluetooth devices which can result in the inability of the Bluetooth device to adjust its volume. Thus, if you experience this kind of issue, you’ll notice that the volume slider in the taskbar and the device volume control neither have any effect in adjusting the volume. And each time you try to adjust the volume level for one speaker, the volume of another speaker also automatically changes. In such a case, it would be difficult for you to separately change the dual volume control headphones. Worry not for there is an easy registry tweak you can try to make this possible to do. But before you proceed with the instructions provided below, make sure that you create a System Restore first. Once you have that covered, follow the steps below carefully. Step_1: Tap the Win + R keys to open the Run dialog box and type “Regedit” in the field and hit Enter to open the Registry Editor. Step_2: Next, navigate to this registry path: HKEY_LOCAL_MACHINESYSTEMControlSet001ControlBluetoothAudioAVRCPCT Step_3: After that, look for the entry named “DisableAbsoluteVolume” which should be located in the right pane. But if you’re unable to find this entry, you can just create it by right-clicking on the CT key and selecting New > DWORD (32-bit) value, and then assign “DisableAbsoluteVolume” as its name. Step_4: Once done, double click on the “DisableAbsoluteVolume” DWORD and set its value from 0 to 1. Step_5: Now exit the Registry Editor and restart your computer. On the other hand, you can also disable or enable the Absolute Volume feature by executing a command in the Command Prompt.
  • If you want to disable the Absolute Volume feature, just execute this command: reg add HKLMSYSTEMControlSet001ControlBluetoothAudioAVRCPCT /v DisableAbsoluteVolume /t REG_DWORD /d 1 /f
  • If you want to enable the Absolute Volume feature, just execute this command: reg add HKLMSYSTEMControlSet001ControlBluetoothAudioAVRCPCT /v DisableAbsoluteVolume /t REG_DWORD /d 0 /f
After you execute the command, just restart your computer.

After your computer restarts.

Once you’re done executing the given instructions above, you have to right-click on the speaker icon located in the system tray and select Open Sound Settings and click on Manage device settings – the same controls will be visible to you like earlier. Now when you change the volume level for one speaker, the other speaker should now remain as it is and won’t change alongside the speaker.
Read More
What to do if Windows 10 Disk Management is not working
The Disk Management tool in Windows 10 is a built-in tool that contains a user interface used to manage disk partitions to administrators of the computer. There are lots of instances when you have to change the size of the hard disk partition or reduce the size and so on. This is where the Disk Management tool comes in. It’s useful as the command line interface can be quite confusing and risky for some users. However, there are cases when this tool stops working. A proof of this the reports submitted recently by some Windows 10 users. Based on the reports, the Disk Management does not load or respond. If you are having the same problem, read on as this post will give you some suggestions on what you can do to resolve the problem.

Option 1 – Try restarting the Disk Management Service

  • Tap the Win + R key combination to open the Run dialog box.
  • Then type “services.msc” in the field and hit Enter or click OK to open the Windows Services Manager.
  • Next, scroll down in the service list until you see the Virtual Disk Service. Double click on it to open and then select Automatic.
  • Click on Apply and OK to save the changes made.
  • If it hasn’t started yet, you can just click on the Start button to start the Service. The Virtual Disk service provides management services for disk, volumes, file systems as well as storage arrays.
  • Now save all the changes you’ve made and restart your computer. Then check if you can now use the Disk Management tool without any problem.

Option 2 – Try using the System File Checker scan

System File Checker or SFC is a built-in command utility that helps in restoring corrupted files as well as missing files. It replaces bad and corrupted system files with good system files that might be causing some issues with the Disk Management tool. To run the SFC command, follow the steps given below.
  • Boot your PC into Safe Mode.
  • Tap Win + R to launch Run.
  • Type in cmd in the field and tap Enter.
  • After opening Command Prompt, type in sfc /scannow
The command will start a system scan which will take a few whiles before it finishes. Once it’s done, you could get the following results:
  1. Windows Resource Protection did not find any integrity violations.
  2. Windows Resource Protection found corrupt files and successfully repaired them.
  3. Windows Resource Protection found corrupt files but was unable to fix some of them.

Option 3 – Try using the DISM tool

Aside from the System File Checker, the DISM tool can also help you resolve the issue with the Disk Management tool. It helps in restoring the health of your computer.
  • Open the Command Prompt as admin.
  • Then type in this command: Dism /Online /Cleanup-Image /RestoreHealth
  • Do not close the window if the process takes a while as it will probably take a few minutes to finish.

Option 4 – Try using Diskpart and Fsutil

If both the System File Checker and DISM tool didn’t work, you can use command-line tools like diskpart and fsutil. These command-line tools are powerful but you need to be careful especially if you’re not that familiar with using them. However, it’s recommended that you have somebody who knows if you’re really inexperienced with this kind of stuff.
Read More
Proven Solutions For Error Code 0x80131700

Error Code 0x80131700 - What is it?

0x80131700 is a Windows 7 error that occurs when there is a problem with the Troubleshooting Wizard. The wizard fails to function and with an error message displaying the following message on the computer screen:

‘An unexpected error has occurred’- The troubleshooting wizard can’t continue

Error code: 0x80131700'

Windows 7 features Troubleshooting Wizard, an automated tool that helps users resolve several PC-related problems such as accessing shared files or internet connectivity to name a few.

Error Causes

The error code 0x80131700 largely occurs because of two reasons:
  • The .NET framework is not properly installed on your system
  • Mis-configured System Files and Registry Issues

Further Information and Manual Repair

0x80131700 Windows error is rated easy to fix error code. Thus, repairing this error code is not difficult. It is so easy to fix that you don’t need any technical expertise or professional help for that matter. To begin with, there are 2 methods to resolve the 0x80131700 error code. Let’s take a look at the solutions:

Cause: The .NET framework not properly installed on your system

Solution: If the underlying cause for the error code 0x80131700 is the improper installation of .NET framework on your PC, then the best and easy way to resolve this error is to reinstall it. By default, the built-in version of the .NET framework in Windows is 3.5.1 to reinstall this again on your system follow the steps given below:
  1. Go to the Start menu and type: features in the search box
  2. Now Choose the option ‘Turn Windows Features on or off’ and then press Enter
  3. After this, look for Microsoft .NET framework 3.5.1 and uncheck the box
  4. Once you uncheck it, restart your computer
  5. Repeat the step 1 and 2
  6. Now check the box before .NET framework 3.5.1
  7. Restart your system
  8. Now try using the Troubleshooting Wizard.

Cause: Mis-configured System Files and Registry Issues

Solution: If the error code 0x80131700 triggered due to misconfigured files and registry issues, then the easiest way to fix this error on your system is to download Restoro
Read More
How to Fix ‘Your Computer is Low on Memory’ Error
Low on Memory is a Windows PC memory leak error. You may come across it out of the blue however, there are various underlying reasons for this PC error. It is like a warning sign that indicates memory/RAM issues on your system. The ‘Your Computer is Low on Memory’ error means that your PC does not have enough memory space for all the activities you are trying to perform. Due to this error, your Windows and programs can also stop working. If this error is not fixed timely it can lead to serious PC threats like valuable data loss and hard disk corruption. Along with this memory error, you may also come to experience other types of signs including PC poor performance, speed issues, out-of-memory notifications, and display problems.

Solution

Restoro box imageError Causes

The ultimate and the underlying cause of low memory error is data overload in the RAM which triggers registry issues. To understand this better, here is a comprehensive explanation. The computer has 2 types of memory, RAM (Random Access Memory) and virtual memory. All programs and activities that you do on your computer are saved by the registry in the RAM. This includes obsolete and unnecessary files too like junk files, cookies, internet history, temporary files, invalid registry entries, and bad registry keys. Due to poor PC maintenance practices, these files accumulate in the RAM, thereby overloading it. Also, all programs on the PC use RAM to run. So, when there isn’t enough RAM for the program you are trying to run on your system, Windows temporarily moves information that would normally be stored in RAM to a file called a paging file which is also referred to as the virtual memory. By moving the information to and from the paging file- the virtual memory, Windows temporarily frees up enough RAM for programs to run smoothly. However, when you start running more programs than the RAM installed on your PC can support, low memory errors begin to occur. It triggers that the computer is out of RAM and is also low on virtual memory.

Further Information and Manual Repair

PC users should know that this is a critical error therefore it is advisable to fix it immediately before the damage sets in. Here are some of the best solutions that you can try to resolve Your computer is low on memory and similar memory leak errors on your system.

1. Run Few Programs at a Time

This is a temporary solution to prevent low memory problems.  By running a few programs at one time you can easily keep this memory error away from popping on your computer screen. However, this can cause you inconvenience if you run several programs together to perform different tasks simultaneously.

2. Increase the Virtual Memory Size

Though Windows automatically attempts to augment the virtual memory size the first time you experience ‘low on memory issues; however this again is a temporary way out of this problem. But if you are looking for a solution that can resolve these memory issues for a long time, then you can try manually increasing your PC’s memory size. Increase it up to a maximum size this is by the way determined by the amount of RAM installed on your system. Nonetheless, the drawback of this solution is that increasing the paging file size can reduce your PC performance. It can make your programs run more slowly.

3. Install More RAM

Another solution to resolve low on memory issues is to install more RAM. To do this first check your system properties to see the size of the RAM already installed on your PC. To do this press the Windows key+ Pause/Break key this will open system properties. If the RAM size is lower than 2 GB then you need to install more RAM. But if it is more then you should look for two things one check the piece of software that is causing the problem and secondly you need to clean the registry and remove the unnecessary files from your RAM and hard disk. This would free up space dramatically and resolve the low memory issue right away.

4. Download and Run Restoro, Registry Cleaner on your System

To clean the registry and wipe out unnecessary and obsolete files overloading your RAM and disk space, you should download Restoro. Restoro is a next-generation and highly functional error cleaner. By running this error cleaner on your system, you can easily scan for junk stored in your RAM and hard disk and remove it in seconds, clearing up ample disk space. This will resolve all your PC memory-related issues. Furthermore, it repairs the damaged files and restores the registry too. It spares you from the hassle of installing more RAM or virtual memory. Since this PC repair tool also functions as a system optimizer, it simultaneously boosts the speed of your system thus resolving speed issues too, all in one go. Restoro is a bug-free and efficient tool. It has a user-friendly interface making it easy for all levels of users to operate and run it on their systems. Furthermore, it is compatible with all Windows versions including Windows 7, 8, XP,  Vista & 10. Click here to download Restoro to resolve Low on Memory issues on your PC in seconds!
Read More
Error 740 Requested operation requires elevation
If you are trying to open a folder or run a program or delete a file but you encounter an error message instead saying, “Error (740), The requested operation requires elevation” on your Windows 10 computer, then this post should help. Make sure that you follow each one of the options given below carefully.

Option 1 – Always run the program as an administrator

There are some apps that require administrator privilege before they can be opened. So if you are got the “Error (740), The requested operation requires elevation” error when you try to open a particular app on your computer, you have to try opening it as administrator instead. On the other hand, if you are already using an administrator account or if you are a member of the administrator group, this option may not work for you so just proceed to the next one but if you’re only using a regular account, then follow these steps:
  • First, right-click on the app you are trying to open and select Properties.
  • After that, go to the Compatibility tab and check the checkbox labeled “Run this program as an administrator”.
  • Next, click the Apply and OK buttons and see if the app opens without any problem.

Option 2 – Try to change the folder permissions

If you encounter Error 740 while opening a folder, then you need to try changing the folder permissions.
  • First, right-click on the folder and click Properties.
  • Next, go to the Security tab and click the Advanced button.
  • After that, check the checkbox labeled, “Replace all child object permission entries with inheritable permission entries from this object” and then click the Apply and OK buttons to save the changes made.

Option 3 – Try disabling UAC

The User Account Control or UAC settings might be the one that’s responsible for Error 740 which is why you have to disable the User Account Control and then verify if it’s the one that triggers the error or not. To do that, simply search for “Change user account control settings” in the Taskbar search box and then drag the blue bar down to the bottom and click the OK button to save the change made.

Option 4 – Select the Elevate without prompting option in the Group Policy Editor

There is an option in the Group Policy Editor which allows you to disable the UAC prompt. Disabling the “Elevate without prompting” option can help in resolving Error 740 and to disable it, follow the steps below.
  • Tap the Win + R keys to open the Run dialog box.
  • Then type “gpedit.msc” in the field and hit Enter to open the Group Policy Editor.
  • Next, navigate to the following path:
Computer Configuration > Windows Settings > Security Settings > Local Policies > Security Options
  • From there, go to the Security Options folder where you can find a policy named “User Account Control: Behavior of the elevation prompt for administrators in Admin Approval Mode”. Double click on it to open its options.
  • Now select the Elevate without prompting option from the drop-down menu and click OK.
Read More
How to Fix File System Error 2147219196
If you receive an error message saying, “File System Error 2147219196” when trying to open a picture, access a file or when moving a folder on your Windows 10 computer then read on as this post will help you resolve this error. According to experts, this error started to appear right after the Windows Update v1803 was released. Users who installed the new Windows version faced the same dilemma. This error might be caused by a corrupted disk or it could be due to some broken Windows components or due to file system encryptions. Before you troubleshoot the problem, make sure that you are logged in as an administrator.

Option 1 – Update Windows

The first thing you can do to Resolve File System Error -2147219196 is to update Windows. Since Microsoft is already aware of this issue, they might have already released a fix for this in one of their new updates so make sure to check for any available updates on your computer and have it installed right away.
  • Tap Win + S to open Search then type “update” in the field and from the search results that appear, click on Windows Update.
  • After that, it will open Windows Update under Settings and from there click the Check for Updates button and let Windows check for any available updates.
  • And if there are any updates available, download and install them on your Windows 10 computer.
  • Restart your PC and check if the error is now fixed or not.

Option 2 – Run CHKDSK to check your disk for errors

When it comes to some issues concerning the hard drive or removable devices, there is a utility in Windows that might help which is called “chkdsk”. This error check utility can help with several issues in the system including File System Error -2147219196.
  • Tap the Win + S keys to open the Search box.
  • Then type “command prompt” in the field and from the search results that appear, right-click on Command Prompt and select “Run as administrator”.
  • After opening an elevated command prompt, copy and paste the following command and hit Enter:
chkdsk /r /f
  • Now if you are prompted to run CHKDSK after your reboot your PC, just tap Y and reboot your PC.
  • If CHKDSK is not able to find any errors, tap the Win + E keys and navigate the access window. From there, right-click on the concerned drive and click on Properties.
  • After opening Properties, click on the tab Tools and then click on the “Check” button under the Error-checking section.
  • Wait until the process is completed and then restart your computer.
  • Once your computer has restarted, try accessing the file and check if the error persists.

Option 3 – Disable the File System Encryption

File System Encryption allows you to encrypt drives to protect them from being accessed from another computer. This is the standard practice in various organizations in order to protect their data. However, there are times when the file encryption system caused issues for users in accessing files and throws the File System Error -2147219196 instead which is why you need to temporarily disable it to access your file. To do so, follow the steps below.
  • Tap the Win + R keys to open the Run dialog box.
  • Then type “control” in the field to open Control Panel.
  • From there, navigate to Security and select the BitLocker Drive Encryption option from the list.
  • After that, make sure that all your drives are not encrypted and if any of them are encrypted, turn off encryption by selecting Turn off BitLocker.
  • Reboot your computer for the changes to take effect.

Option 4 – Run SFC scan

  • Tap Win + R to launch Run.
  • Type in cmd in the field and tap Enter.
  • After opening Command Prompt, type in sfc /scannow
  • Restart your computer once the scan is completed.
Read More
What to do if Cortana Search Box turned white
A lot of Windows 10 users prefer the black theme on their computers and when you see anything but black it can get quite annoying. Such as is the case of the Taskbar which, as you know, is usually dark, however, when you take a look at the Cortana search bar, instead of seeing black, you’ll see that it has turned white. To fix this issue, read on as we will provide you some options you can try to set the Cortana search bar back to black. Before you proceed, take note that the options provided below will change all white search boxes to black and that one of these options needs administrative privileges.

Option 1 – Try changing the default App mode

As you know, Windows 10 has two modes, namely the Light and the Dark. Thus, you can switch to the Dark mode so that your Cortana search bar will be black as well. However, remember that it will completely change everything into dark mode so there will be no more Light mode elsewhere.
  • First, you need to click on the Start button and then click on the cog icon to open the Windows 10 Settings.
  • Next, from the Settings Menu, select Personalization and then select Colours from the left pane.
  • Then scroll down until you see the “Choose your default app mode” option and select “Dark”.
After you apply the changes, it will change the Cortana search bar into black instantly. Aside from that, you will also see the User Interface changing into dark mode.

Option 2 – Try changing the Registry value

If you are well-versed in editing registry keys, then you need to try this option. But before you go over the steps below, make sure that you create a System Restore point first so that if anything goes wrong, you can always go back to how it was before the changes were applied.
  • Tap the Win + R keys to open the Run prompt.
  • Then in the field, type in “regedit” and hit Enter to open the Registry Editor. If a User Account Control prompt appears, just click Yes.
  • Now that you’ve opened the Registry Editor, navigate to the following key:
HKEY_CURRENT_USERSoftwareMicrosoftWindowsCurrentVersionSearchFlightingWhiteSearchBox
  • After that, double-click on the “Value” key located on the right pane and set the value to “0” instead of “1” and then click Ok to save the changes made. You should now see a black or grey text box color instead of white.

Option 3 – Try changing the Region

In some forums, a lot of users stated that changing the Region also worked out for them in changing the white Cortana search bar to white. Thus, you need to change the region settings of your computer temporarily. To do so, follow the steps below.
  • Type in “Regional Settings” in the box and then click it as soon as it appears from the search results.
  • Next, make sure to select a region where Cortana is not available.
  • Then select apply to that region. After that, it will change the Cortana search bar color to black.
  • Now sign out and sign back in and revert to the original settings. But the changes you made earlier in Cortana will still remain.
Read More
Fix 169 IP address error in Windows 10
169 IP address error can stop your computer from connecting to the internet which could be a very frustrating experience. In this guide, we will cover simple but effective tips on how to fix this error so you can continue with internet use.
  1. Reconnect your Modem or Router

    Simple and sometimes effective solution, unplug and plug back in modem or router so IP is fetched again, it is very likely that computer will pick right IP address with this stunt.
  2. Use built-in Windows Network troubleshooter

    Press ⊞ WINDOWS + X top open secret menu Go to settings Go to Network & Internet Inside click on Network troubleshooter Follow onscreen instructions After the troubleshooter ends reboot your PC
  3. Reconfigure IP address

    Press ⊞ WINDOWS + R to open the run dialog Inside run dialog type ncpa.clp and press ENTER Right-click on your network adapter and select properties Uncheck Internet Protocol Version 6 (TCP/IPv6) and click on OK Now press ⊞ WINDOWS + X and click on Command prompt (admin) In command prompt type and after each line press ENTER netsh winsock reset catalog netsh int ip reset reset.log ipconfig /release ipconfig /renew Reboot your computer
  4. Restart DHCP client

    Press ⊞ WINDOWS + R to open the run dialog In run dialog type services.msc and click on OK Find DHCP client Right-click on it and choose Restart Reboot PC
  5. Reinstall Network Adapter

    Press ⊞ WINDOWS + X to open the windows menu Click on Device Manager Expand Network Adapter and right-click on wireless or ethernet adapter, click on Uninstall device Reboot the computer to automatically reinstall the device driver
  6. Reset IP and subnet mask

    Press ⊞ WINDOWS + R to open the run dialog In run dialog type in ncpa.cpl and press OK Right-click on your network adapter and select properties Uncheck Internet Protocol Version 6 (TCP/IPv6) Double click on Internet Protocol Version 4 (TCP/IPv4) Select Use the following IP address and change it to 192.168.0.1 Change Subnet mask to 255.255.255.0 Leave default gateway blank Click OK to save changes
Read More
Razer Iskur gaming chair for healthy gaming
Razer IskurIt seems that last few days we were riding some Razer bandwagon but rest assured that we are not sponsored by them in any way, truth is that simply they come up with some interesting accessories which I believe are worth covering. Gaming Chair itself comes in two colors, fully black and green black combination and it is not really an entry-level chair if we are talking about price. The chair itself is around 600USD depending on the distributor and considering that price range it is placed in more top cream of gaming chairs but it is worth every dime.

Iskur Specifications

Iskur is made of a steel frame with a reinforced plywood lumbar support frame for added weight tolerance. Frame and lumbar support are surrounded with memory foam and all of that is wrapped in cotton and polyester layer which is again wrapped in multi-layer synthetic leather making the chair very durable for long hours of daily use. The chair also comes with a memory foam head cushion which is detachable and removable if you do not wish to use it. On the Razer website among specifications, it stands that the chair is best suited for persons from 5’6” – 6’2” (170 – 190cm) height and up to 299lbs (136kg).

Features

The chair has, of course, height adjustment as any gaming chair and surprisingly it has great control for the armrest. The armrest can be adjusted in 4 different ways: up & down, left & right, forward & backward, and inward & outward. The backrest can be also tilted up to 26 degrees angle. All of these features are great and good but there is one more feature that really makes this chair stand out from rest and it is Lumbar support. Iskur has an adjustable lumbar support system on the lower part of the backrest. With your lumbar support secured, you can then make the necessary tweaks to optimize the rest of your posture using the Razer Iskur’s adjustable height, backrest, and armrests.

Conclusion

Razer Iskur is neither cheapest nor perhaps the best gaming chair you can buy, but it is a really good one. It is well manufactured and made to feel and look like a premium product that actually it is.
Read More
1 2 3 170
Logo
Copyright © 2022, ErrorTools. All Rights Reserved
Trademarks: Microsoft Windows logos are registered trademarks of Microsoft. Disclaimer: ErrorTools.com is not affiliated with Microsoft, nor claim direct affiliation.
The information on this page is provided for information purposes only.
DMCA.com Protection Status