The Internet has become an essential human right as stated in many countries around the world. Among many benefits that the internet offers are various sites selling Stock photographs for all of your needs. No matter are you working in the design industry or just want to make something for yourself there is a high chance that you will eventually need some photos for your work.
In this article we are going to go through the best Stock Photo sites BUT, we will focus on ones that give you royalty-free Photos, so no paying stuff here, just the best of the free world.
In the last year of 2020, Adobe has made more than 70000 photos, videos, illustrations, and templates completely free. You are free to use provided material for personal, commercial, and creative work. Since this is adobe’s collection, well part of it, all of the given material is of high quality. You can also upload pictures to do a visual search to find similar ones.
Unsplash is a place where you will go if you want to find free-quality pictures. Since a lot of photographers are donating their selected work there you will find always consistently high-quality work there. Unsplash also has applications for Android and iOS so you can go through their stock on your mobile device as well. Photos are organized into categories that make searching much easier.
Pixabay is maybe well known due to its huge collection of both images and illustrations. There are tons and tons of stuff in there all royalty-free for use. The bad side is due to its strongest one, since there are so many images on its site, quality is not always top-notch like on Unsplash for comparison but you might find stuff here that you will not be able to do it anywhere else.
This is a great choice for web or app developers since you can find various UI ideas and designs on it. Many UI ideas ready for implementation will be found here and a decent amount of photos as well. The overall site is great for that purpose but please do read the license on each image since some of them are limited in use and cannot be used in commercial projects.
Stock photography from Pikwizard is a place where you will go if you need high-quality pictures of people. There are a lot of images of people in natural poses doing things, nothing cheesy or unnatural, just pure and great-looking ones. Among other things is also a vast selection of cityscapes. Sadly as in the case of Pexels, not all pictures have the the same license so make sure to check terms of use before using one.
Last on our list is a Stock site with a strange name and if you visit it you will see that it is not just the name that is strange. Gratisography is a stock site that aims to provide you with high-quality photographs but in different take from another site. These images are more artistic and surreal than other competitor sites. Images are uploaded almost on daily basis but since thematic is somewhat niche collection itself is relatively small.
Conclusion
That’s it, we hope that we have helped you in any way to find some material for your next project and I hope to see you soon back on errortools.com.
The Windows 10 system allows users to change the default location of the User folders to another drive. This is probably to make sure that the files stay safe in case the system suddenly crashes. However, in some cases, while changing the path to another drive, for instance, the D drive or any folder, the Windows system recognized it as a hard drive as well so even though the files will be saved on that folder, it will appear as a hard drive in the Windows Explorer or look merged with another folder. It could also be that you had dragged and dropped a user folder to another user folder by accident. So if you’re wondering how you can unmerge the User folders, read on as this post will guide you on how exactly you can do that.
Take note that even if you try to use the File History to restore the User folders, it still won’t work and you won’t be able to move them back to their previous locations nor restore the folders back to their previous versions and it would only state that they are not available. In the instructions given below, we are using the Downloads folder as an example.
Step 1: Tap the Win + R keys to open the Run dialog box.
Step 2: Next, type “Regedit” in the field and hit Enter to open the Registry Editor.
Step 3: After opening the Registry Editor, navigate to the following registry key:
Step 4: Then double-click on the multi-string value {374DE290-123F-4565-9164-39C4925E467B} located in the right hand pane. And in the Value Data, copy and paste the following value:
%USERPROFILE%Downloads
Step 5: Now click OK and close the Registry Editor.
Note: Look close enough and you’ll see that the multi-string values belong to each one of the folders. From there, you have a Desktop, Favorites, Skydrive, Music, Pictures, and many more.
Step 6: Restart your computer. After that, the operating system will pick up the new folder location during the startup. Here are the values for the other folders:
Step 7: Now all you have to do is to change the location correctly. Start by tapping the Win + E keys to open the Windows File Explorer.
Step 8: After that, right-click on the Downloads folder located in the right-hand pane.
Step 9: Then click on Properties and go to the Location tab then type “D:\Downloads” in the location box.
Step 10: Click the Apply button and then the OK button to save the changes made. Doing so would ensure that not only the Downloads folder is restored but also that it does not stay merged to another folder or appear as a drive.
Coming in October for insiders and in November for all in the update, Microsoft has prepared a series of updates which they call an "additional set of experiences"
These updates are looked upon by Panos Panay, a vice executive president at Microsoft & chief product officer for Windows and devices as sort of makeup tests. They will consist of new additions with the biggest one being a tabbed version of File Explorer.
File Explorer received a UI makeover in the last update but the tabbed interface was missing which was expected by many users so it will come in following the next update.
The rest of the features that we will receive are an updated Photos application, Suggested Actions in the Windows Shell, Overflow menu for the taskbar, and improved Nearby Share.
The tabbed File Explorer interface is essentially File Explorer’s version of Sets, the tabbed window interface that Microsoft tested out several years ago. In testing, the tabbed interface proved handy for moving and copying files, and we’d expect the same once the feature formally goes live. The difference between Sets and the tabbed File Explorer interface is Sets allowed for multiple applications to be clustered together via tabs.
Photos app will include a “new photos-managing experience that brings a gorgeous gallery, simplifying browsing, finding, management and consumption of your collection of photos.” It will allow “easy backup to OneDrive” and a “delightful Memories experience.”
As for other features, nothing specifically was said except giving just some tips on what will they bring, it is obvious that File Explorer and the photos app were the main focus for MS in this upcoming update.
Hacker group recently came up with claims that they have stolen data from 100 million T-Mobile customers. T-Mobile has responded with confirmation it has been compromised and that over 40 million records were stolen, among them are not just present customers, but anyone who has applied for T-Mobile service as well as past accounts.
What has been stolen?
Report from T-Mobile states that stolen records included first and last name, date of birth, social security number, driver’s license & ID information. The company said that it has “no indication that the data contained in the stolen files included any customer financial information, credit card information, debit or other payment information.” Not really a reassuring statement meaning that they really do not know, but even if the statement is true, already stolen information is as much if even not more damaging and devastating as payment information.
What T-Mobile is planning to do now?
It is stated that the hole used for the hack has been addressed and closed so no more data can be stolen.
Considering people that had their personal information compromised, T-Mobile said it is planning to reach out to them and offer them two years of free identity protection through McAfee’s ID Theft Protection Service.
Additionally, T-Mobile recommends postpaid customers change their PIN by going online into their T-Mobile account or calling T-Mobile customer service by dialing 611 on their phone. The company also recommends a feature called Account Takeover Protection that prevents unauthorized individuals from stealing a phone number and porting it out of T-Mobile.
Finally, the company will publish a website “for one-stop information and solutions to help customers take steps to further protect themselves.”
Have you been feeling anxious in the digital space? Feeling like you have a million eyes on you each time you visit a website? It can definitely make you uneasy. Luckily there’s an easy fix, and it’s called a VPN.
In this article we’ll take you through the basics of what a VPN does and some of the biggest benefits you can reap from buying one.
VPN: definition and how it works
VPN stands for Virtual Private Network, so its name already says a lot about what it does.
A VPN is specialized software that keeps your browsing private and secure. Essentially it hides your identity, preventing possible cyberattacks and data theft. This is especially important in cases of public network use, where you’re highly exposed to potential threats.
To be more specific, this software encrypts your Internet Protocol (IP) address by filtering it through a server hosted by the VPN provider first. That way, it prevents your Internet service provider, third parties and lurking online thieves from tracking the actual you.
Credit: FLY:D on Unsplash
Some providers, such as Surfshark VPN with its IP Rotator feature, even make it a habit to frequently change your IP address to further protect your identity. With most VPN providers, you can also appear to be in a completely different country, adding to your disguise.
There are tons of advantages you can look forward to if you decide to use a VPN. Take a look at some of the crucial ones.
Benefits of using a VPN
When choosing a VPN, you can find both free and paid options. We recommend you go with the paid ones, since they have stronger security, encryption and data protection, as well as more advanced features. Free VPNs come with limitations and risk of malicious attacks on the software itself.
You can choose to buy a singular VPN service or opt for antivirus software that has a VPN built in, for example Bitdefender’s Ultimate Security plan. That depends on what you use your computer for and how much.
When you pick one, here’s what it can do for you.
1. Access region-specific content
When we said you could change your location, we meant it. Say you’re using a streaming service and a show you desperately want to watch isn’t available in your country. You can use your VPN to make it look like you’re browsing from a country where it’s unlocked.
This option is also convenient for gamers who want to access maps, skins and other in-game items unavailable in their location.
In addition, you can use this powerful feature when you’re traveling to a region where some of your favorite content may not be accessible.
Do keep in mind that you need to read the Terms and Conditions (yeah, we know - who does that?) of your games and services before doing this, since you could end up getting a penalty. It’s also important to remember that there are entire countries that have strict regulations or even bans on VPNs, for example Belarus, Russia and China. So make sure to be very cautious with your VPN use, friends.
2. Browse like no one’s watching
VPNs shield your browsing habits from prying eyes on the web. Those can be malicious hackers or just third-party cookies tracking your every move to later bombard you with targeted ads. For example, Surfshark VPN features a Cookie blocker that blocks all cookie-related pop-ups and lets you browse in peace (and secret). It works even when the VPN is turned off, which is also pretty neat.
In addition, their CleanWeb 2.0 technology makes sure ads and especially malware don’t stand a chance at all, since they’re blocked before they can even load.
The inability of sites to track your browsing means they can’t collect and analyze any of your data. So, your personal information - or your company’s information in case that’s what you’re using your computer for - is entirely hidden and secure.
3. Save money
It’s well-known that the prices of certain items and services vary based on your location, browsing time, age and many other factors. This most commonly goes for airline tickets and hotel stays.
You can use your VPN to avoid high prices and surcharges. Clear all cookies, turn on your VPN and visit an online shopping site to check out their prices. Then compare your findings with the offers you see when your VPN is off, when you spend a long time on the site or have an active account with the company.
Sometimes this can really help you find the best deals and avoid breaking the bank. But again, check the Terms and Conditions before you purchase something using a VPN.
4. Secure your smart home
The more smart devices you have connected to your network, the more exposed you are to potential cyberattacks. Phones and computers are generally designed to be decently secure even without a VPN or antivirus, but smart home devices leave a lot to be desired in that regard.
Protecting your home network with a VPN software means all devices connected to it are secure, be it an air purifier or Alexa.
Credit: Bence Boros on Unsplash
5. Prevent connection slowdown
Your ISP can intentionally slow down your internet speed based on how much data you’ve consumed (data throttling) or your activities online (bandwidth throttling).
But with a VPN, what kind of data you send and receive and how much is entirely hidden. Therefore, if your ISP can’t see you, they can’t control you and they can’t throttle down your speed.
The bottom line
You can never be too safe online. So definitely think about getting yourself a solid VPN to pump up your privacy and security as much as you can. And if you have any questions or need help choosing the perfect software for you, feel free to reach out to us.
DRIVER_IRQL_NOT_LESS_OR_EQUAL will cause your computer to go to the blue screen of death but do not worry there are solutions around this and we are here to instruct you on how to solve this.
Uninstall and install network drivers
DRIVER_IRQL_NOT_LESS_OR_EQUAL is most commonly tied to bad network drivers, whatever that be a corruption of the driver files or their incompatibility. So first thing is to check if this is the case.
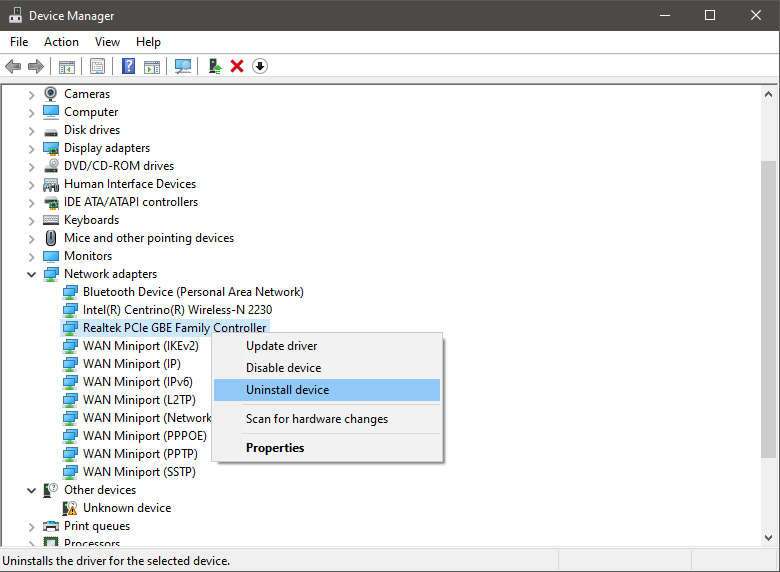
Press ⊞ WINDOWS + X to open the hidden menu in Windows and click on Device Manager.
In the Device Manager expand Network adapters, choose adapter, right-click on it and choose Uninstall.
Install latest driver or reboot so Windows will install the driver automatically
Update driver
If you do not want to reinstall the driver or you are unable to for whatever reason updating the driver might do the trick. To update driver:
Press ⊞ WINDOWS + X to open the hidden menu in Windows and click on Device Manager.
In the Device Manager expand Network adapters, choose adapter, right-click on it and choose Update Driver.
Fix via Command prompt
If both of the beforementioned solutions fail, try running the command prompt and fix the issue from there.
Press ⊞ WINDOWS + X to open the hidden menu in Windows and click on Command Prompt (administrator)
In command prompt type next line and press ENTERDEL /F /S /Q /A “C:\Windows\System32\drivers\mfewfpk.sys
Reboot the system
Scan your PC for malware
Sometimes corruption in the system is caused by malware, Scan your system for malware, viruses, etc.
Check connections or other hardware issues
If all methods fail, open your PC case and check to see if connections everywhere are properly connected and tight. Clean your PC and turn it back ON
Use system restore
If anything fails, use Windows system restore and bring back computer into a state where everything was working fine.
In today’s world and age, there are some essential IT skills that basically everyone should know. No matter in what field you are working some skills are just needed in order to function properly in the work. So, without further ado let's dive into what are these essential IT skills everyone, even your grandmother should know.
5 Essential IT skills everybody should know
Word processing
No matter are you creating or editing business documents or just trying to help a friend or relative, word processing skill is an essential asset and requirement in today’s age. Writing anything on a bunch of paper is time-consuming, papers can get lost, and searching for a particular item inside a bunch of papers is not a really enjoyable experience. A much easier solution is to write, format, and keep everything on the computer and almost all employers are asking for this skill.
Send and using emails
Today we live in the digital age and most communication is done in real-time via messaging apps and file sharing is done via file-sharing services. Despite mentioned technology, many files are shared and sent through emails. When a message is too long or complex when it needs to have some attachment or to be kept in archive emails are the way to go and therefore using email is a must-have essential skill.
Using search engines
When talking about using search engines we really do not think about firing up your favorite browser, going into the search engine,s and typing cat pictures. What we think is that a person should know how to use a search engine properly, tweak its search options, and phrase words and sentences to find everything he or she needs.
Doing data work
Data entry and data calculations have been made easier than ever thanks to today's technology. Microsoft excel, libre office calc, google sheets, etc. are all capable of performing a great variety of calculations and keeping track of plenty of required data. This skill is often asked by employers as an essential one.
Cyber security
Each employee or person, in general, should be quite aware of various scams and best practices to keep itself safe in this digital world. We have several articles on this topic and there are a great variety of articles on the internet as well.
Conclusion
No matter are you young or old, employed or looking for a job, these skills are a must-have in today’s world. There are a lot of great tutorials online on these various topics and I am sure that your knowledgeable friend or cousin would be happy to help and show you how to do all of these things.
If you use Ms-Outlook. You may experience the malfunction 0x8004060c sooner or later. This malfunction was proven to arise in nearly every MS Outlook variation be it 2010 or 2,000, 2007.
The malfunction 0x8004060c hinders your capacity to deliver and get e-mails from and your MS-Outlook account and happens without any forewarning.
The error happens when the PST file grows too big and there's almost no memory to handle the increase (Which is rather rare nowadays).
Generally, the PST file has about 2 gigabytes upper limit and when you reach that, this error is unavoidable. This error happens when you attempt incorporating data that is fresh into your MS-OUTLOOK Account.
Solution
Error Causes
This malfunction might generate difficulties for you personally as your e-mails vanish and can happen suddenly. The system could also crash at times unpredictably. You may not be able to see fresh notifications and attachments in your e-mail.
Also, it's also possible to drop significant contact details. What's more, this malfunction could stop e-mails that are fresh to arrive in your inbox. Therefore, it is undoubtedly a significant issue that has to be repaired immediately.
The following may be some of the causes for error 0x8004060c:-
This error might occur when OST/PST file got corrupt.
OST file becomes inaccessible due to Exchange connectivity or synchronization issue.
OST/PST file exceeded its default maximum file size.
Further Information and Manual Repair
In the event that you find the malfunction 0x8004060c at any stage, you should do the repair instead of risking dropping connections and all the significant data in your account.
The easiest way to repair this malfunction and to handle this issue would be to download the Restoro.
Click here to obtain this fix tool on your computer. After installing, click your mouse's left button after which can use the application.
It repairs the error code 0x8004060c in the least period and walks you through the entire repair procedure quickly.
Error code 652 is a runtime error. It hampers you from accessing and running your program on your system. If not resolved, it can also lead to program corruption.
Solution
Error Causes
Runtime Error 652 can occur due to several causes. These include:
Conflict of color depth within icons, the desktop, or a particular application in the Visual Basic environment. This happens when the Image
List control consists of more colors than the depth of what Windows can support.
Other causes include:
Malicious software and malware attack
Conflict with Terminate
Invalid or corrupt registry
Further Information and Manual Repair
If you are not a computer programmer and don’t have any sound technical expertise, then you might think of hiring a professional to resolve the error on your PC. But this can be costly as you may have to pay hundreds of dollars to the technician.
However, an alternative way to resolve the error code 652 is to download the Total System Care. This PC repair tool is integrated with an intuitive registry cleaner and a powerful anti-virus. It is safe, efficient, user-friendly, and available for free.
Restoro is a multi-functional error tool and a one-stop solution to resolve practically all kinds of PC-related problems. By running this repair tool, you can fix runtime error code 652 on your system in seconds.
Restoro
What makes Restoro a hot favorite among PC users is that it is simple and easy to use.
To operate this PC fixer, you don’t need to have the sound technical knowledge or be adept at computer programming. It can be used by all levels of PC users including beginners and intermediates.
It has a neat and clean layout with simple instructions and navigation making it easy for users to resolve even the mightiest errors in just a few clicks.
Restoro features
Whether the underlying reason for the error code 652 is malicious software or registry corruption, Restoro takes care of all. Registry corruption occurs due to unnecessary files and data overload in the hard disk. This includes junk files, internet history, invalid registry entries, and bad registry keys.
The registry cleaner embedded in Restoro intuitively detects and scans all registry issues.
It wipes and clears the hard disk from all the unnecessary and obsolete files and thus cleans up your disk space. It repairs the corrupt registry and also boosts your PC’s performance.
Thus it not only repairs the error code 652 but also resolves system slowdown issues by optimizing your system’s speed.
With the help of its in-built anti-virus, it removes all the malicious software on your system that could be triggering the error code 652.
Data security threats such as malicious software are detected and scanned and listed under the privacy error utility.
It is compatible with all Windows versions including both the latest and old versions. You can run it to scan error code 652 on any Windows version you have installed on your computer.
Restoro for error Code 652
Furthermore, as mentioned above Error Code 652 is safe to use. It is bug-free and besides, it offers users outstanding data safety. It has a backup file feature that helps you save and create backup copies of all the data you have on your system. This is carried for safety purposes.
It enables users to retrieve and recover data in case the data and files are lost during the repair thus sparing you from a big loss.
The error code 652 may be critical but it can be resolved in seconds with Restoro. Here’s how:
To get started click here to download and install Restoro on your system
Once installed, run it to scan for errors. It will take only a few seconds to scan your entire PC.
Then simply create a backup and click on repair to resolve and resume your desired program.
For best results, it is advised to run Restoro on the computer often. This will help you detect PC errors and repair them timely. It will help you ensure proper PC maintenance, health, and performance.
We have all experienced Windows errors over time and that can range from simple ones that will do very little to no harm and can be even system breaking making us lose our work or completely making the PC unusable. No one likes them but they happen, and usually, they happen once we least expect them.
No matter how frequent and unpleasant they might be there are ways to keep them at the minimum and even avoid them.
We will discuss steps that you can take in order to do this, simple tips and guides on how to keep your computer in top form and eliminate not just Windows, but any kind of errors altogether.
Keep your hardware clean
Believe it or not, some serious Windows errors like the dreaded blue screen of death can come from hardware issues not from the software at all. It is very important to keep your computer clean and with enough air flow so it can function properly.
Keeping applications on the drive might seem harmless but sadly that is not the case. Some applications have a certain impact on the system itself after all most of them are tweaking registry entries in Windows and sometimes having too many applications means an increased possibility of conflict over certain resources even when they are not running.
Some applications like adobe creative suite, for example, will have certain services always running in the background, and more of these kinds of applications you have, more services, more places for unexpected errors when they collide. Some of them will also install certain dependencies that could be problematic.
The general idea is: if you are not using it, uninstall it and you will be safer and more resilient to errors inside OS.
Do not use pirated or cracked software
Besides moral and law implications that using pirated or cracked software might bring you there are also certain other things that might be problematic. Certain "free" software might come packet with some problematic malware, for example, it is not uncommon for attackers to use some popular software to pack their malicious application with it.
Other things might be wrong and incomplete tweaking with application in order to bypass security and thus bringing some instability due to scripts needed to run in order to achieve this goal.
Keep your drivers updated
Errors can also come from old drivers or bad drivers, device manufacturers are not all-knowing and perfect, and sometimes drivers can wreak havoc on the system. Having updated drivers can minimize any kind of unexpected behaviors inside the operating system making it more stable and reliable.
You can check your driver version in the control panel inside the Windows OS and then compare it to the ones found on the manufacturer's site, if there are newer available it is recommended to download and install them,
Keep software updated
Applications can have bugs, and bugs can lead to certain errors both in the system and when using the app as well. It is in your best interest to get the latest patch or newer version of the software in order to avoid these unpleasant experiences.
Also, certain codecs and extensions that are installed directly in Windows can also have some unpredictable behavior, updating is the best solution to keep them in line.
Keep Windows updated
Same as with drivers and applications, Windows itself is not immune from bugs and some unpredictable issues. Luckily Microsoft is always working on fixes and features of Windows but in order to actually have benefited from that work, you will need to keep Windows updated. Sometimes a bad update can introduce some errors but you can always roll back to the previous and wait for them to fix everything and then download them all.
Check the health of your hardware regularly
Hardware components have their life cycle, more quality ones tend to last longer but eventually, they will reach the end of their lifecycle. There are a lot of testers for various components in your computer that can check different things and provide you with information about the state of your components.
If you are on Windows 11, Microsoft has included a basic health app inside OS, just type PC health check in search and start the app. For some more detailed information and advanced checks, you will have to use a custom application. There are plenty of them specialized for single components like RAM, SSD, etc. A simple google search with providing you with top results and most of them are free for personal use.
Remember, a faulty component or component that is reaching its life cycle can produce many errors inside the operating system.
The author of the famous software library mode-ipc that gets over a million downloads per week found that it has some questionable code inside. The code itself behaves like this: if it finds out that your location is within Russia or Belarus it will try to replace the contents of all files on the computer with a heart emoji.
One important thing is that we here are not supporting the current Ukrainian situation and are against any type of violence or war but we also do not support this kind of behavior as well. If we look at this only from a technical perspective, we would then classify the mode-ipc library as malware and a harmful piece of code no matter the motivation behind it.
So this so-called protestware is well basically malware, but not always, it will protest when certain conditions are met. The issue with this is that companies and users should not be placed under harm if they do not share the personal view of the code author. Imagine if, for example, I would publish code to delete all pictures from your computer if my code found out that you do not like metal music. I guess you not liking metal music and war in Ukraine are two very different things but the source is the same, unreliable code that invades your privacy in order to serve one purpose, punishment for disagreeing with my personal views and that should not be allowed.
Not all protestware are equal, some will not harm your computer on purpose, they will just annoy you with some messages like viruses did in their infancy stages, others might place some developer sanctions but no matter the outcome basic principle is the same, it does something without user consent and without informing the user that something like that might happen.
On the internet, many blog posts and discussions were open about this issue and its morality. Discussion is still active with different takes on the situation and how to prevent it. Our take on this matter is that professional developers should have standards and not submit to doing harm for the sake of personal views and feelings.
In the long run, this kind of behavior and practice can only harm developers involved in this kind of entanglement. Infected libraries will in time stop being used since people would not trust them and authors will have a stain on their name as impulsive or not trustworthy.
 In this article we are going to go through the best Stock Photo sites BUT, we will focus on ones that give you royalty-free Photos, so no paying stuff here, just the best of the free world.

 Hacker group recently came up with claims that they have stolen data from 100 million T-Mobile customers. T-Mobile has responded with confirmation it has been compromised and that over 40 million records were stolen, among them are not just present customers, but anyone who has applied for T-Mobile service as well as past accounts.


 In the Device Manager expand Network adapters, choose adapter, right-click on it and choose Uninstall.
 Install latest driver or reboot so Windows will install the driver automatically
 In command prompt type next line and press ENTERDEL /F /S /Q /A “C:\Windows\System32\drivers\mfewfpk.sys
Reboot the system
In command prompt type next line and press ENTERDEL /F /S /Q /A “C:\Windows\System32\drivers\mfewfpk.sys
Reboot the system 5 Essential IT skills everybody should know

