The docking station was promised upon release of the Deck but it was pushed back and now the official statement is that it is delayed again.
Valve said in an announcement on June 1:
“Due to parts shortages and COVID closures at our manufacturing facilities, the official Steam Deck Docking Station is delayed. We’re working on improving the situation and will share more info when we have it.”
Valve
The docking station was presented at the same time as Deck itself and the whole idea was to make Steam Deck work like a laptop docking station. It has ports for USB devices, displays, and network connections that became functional the moment Deck is placed on it. Docking supports a mouse, keyboard, and external display making it an almost full PC station if needed.
Valve confirmed that its official dock station will not improve performance so while you wait for its release you can use another docking station with a USB Type-C connector.
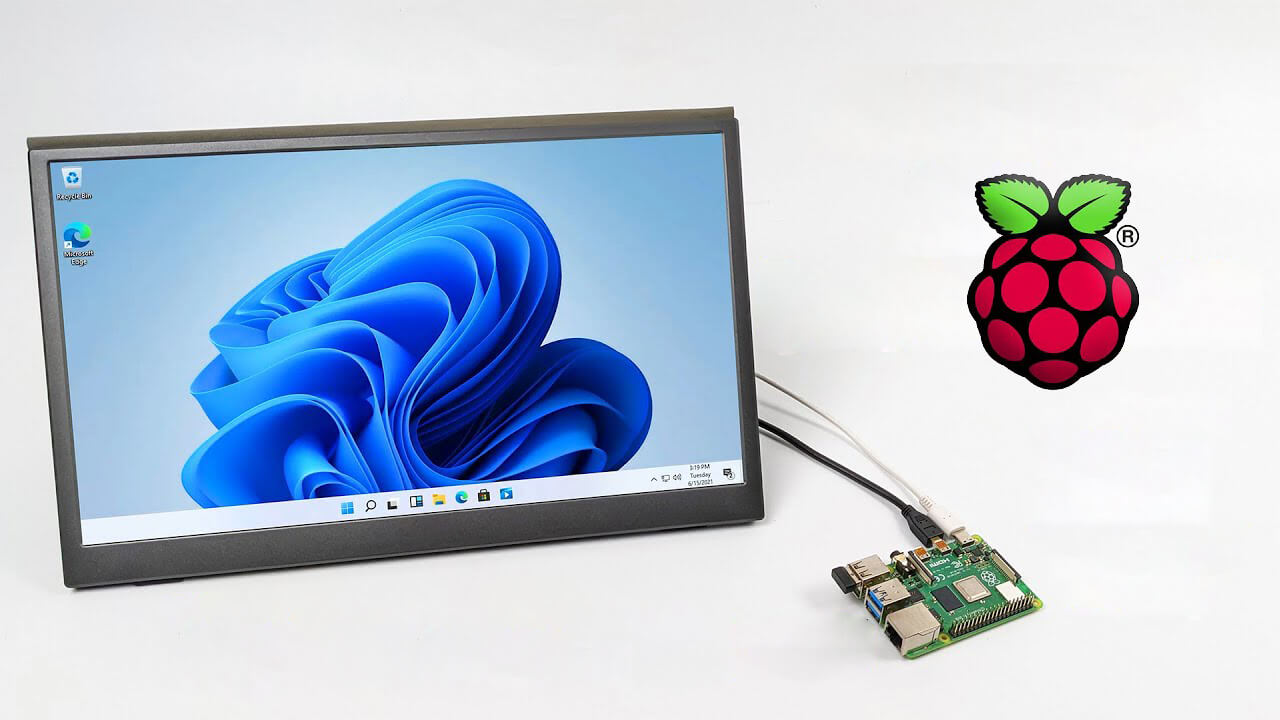
A lot of controversies and mixed emotions have come from statements about Windows 11 minimum system requirements, especially ones linked to TPM.
Naturally, each time some software company giant announces how things are must have there are people who go out and prove them wrong.
This time Raspberry Pi community was one which demonstrated that not only Raspberry Pi does not have a TPM module, it can run the full desktop version of Windows 11
Raspberry Pi 4 and things you need for Windows 11 installation
In order to actually install Windows 11 on your Pi, there are certain things that you will need. Check out the below list and prepare everything.
Raspberry Pi 4 4GB or 8GB
A 32GB or larger SSD via a USB 3 caddy. Best for performance or 16GB or larger microSD card
USB boot enabled, see below.
A micro SD card with the latest Raspberry Pi OS
Windows 10 PC
USB to Ethernet or WiFi dongle
Bluetooth dongle (if you want Bluetooth)
Keyboard, mouse, HDMI, and power for your Raspberry Pi
Configuring Pi to boot from SSD
In order to boot from SSD be sure that firmware and bootloader are up to date on the latest version and upgrade if needed. Be aware that this firmware update can only be performed using the official Raspberry Pi OS.
Also if you are eager and want to use a standard microSSD card instead of an SSD to run Windows 11 feel free to skip this entire section.
Boot from microSSD with the latest Raspberry Pi OS on it.
Update firmware and OS using the terminal by typing
sudo apt updatesudo apt full-upgradesudo rpi-update
Reboot your Pi
Install the latest version of bootloader again using the terminal with the command
sudo rpi-eeprom-update -d – a
Reboot Pi
Launch raspi-config on your Pi via terminal with
sudo raspi-config
Select option 3 (Boot options – Configure options for start-up) from boot options
Select Boot ROM version and press ENTER
Select latest and then OK
Select NO when prompted to reset boot ROM to defaults on the latest version boot ROM selected screen. Press OK
Select Boot order and press ENTER
Select USB Boot and click on OK and remove microSD card from Pi
Select Finish and click on NO when prompted to reboot
Creating Windows 11 installation image for Pi 4
In order to install Windows 11 on our Pi, we must create an installation image, follow the steps below explaining the process.
Download Windows on Raspberry imager and extract it into the win11 folder
Open Imager and allow it to make changes to your computer, set your language, and click on next
Select storage drive where you would like to install Windows
Set device type and click on next
Select our Windows 11 ISO image we created and click on next
On the drivers screen select Use the latest driver package available on the server
On UEFI firmware select screen choose Use the latest firmware available on the server
On configuration screen click on next
Check your setting on the installation overview and if everything is ok click on install
Wait for the whole process to be finished
Once the process is completed, close Windows on Raspberry imager, take out SSD or microSSD card from PC and connect it on your Pi along with Pi peripherals.
Setting Windows 11 on Pi
In order to actually use Windows 11 on our Raspberry Pi we now have to set up the Windows 11 install using the standard post-installation setup sequence.
Power up Pi and press ESC when prompted
Go to Device manager and press ENTER
Select Raspberry Pi Configuration
Select Advanced configuration
Set Limit RAM to 3GB to a disabled state, press F10 to save, and ESC to exit.
Select Display configuration
Set the resolution to desired option and press ENTER, F10 to save, and ESC to exit
Go to CPU configuration
Check if the CPU clock is set to default, if not set it
Press ESC to go back all the way to the main menu
Select Continue to exit BIOS and boot your Raspberry Pi with Windows 11 on it
And there you have it, fully working Windows 11 OS on Raspberry Pi despite what Microsoft says
Note that due to lack of some drivers performance can be less than optimal, for example, full HD videos will not work since there are no compatible graphic drivers for Pi and some other stuff like Wi-Fi will also cause some issues but overall Windows 11 is working pretty well.
Speech Recognition is a technology used to control computers using voice commands. Through this feature, you can say commands that your computer will respond to, and aside from that, you can also dictate text to your computer which eliminates the need to type words in any word processing program or text editor. All in all, the Speech Recognition feature allows you to communicate with your computer and improves your computer’s ability to understand your own voice better as well as improve its diction accuracy. However, before you can improve its accuracy, you need to “train the feature” first. And if so far you are not satisfied with its performance, you actually have the option to disable it. So in this post, you will be guided on how you can disable the Speech Recognition feature in Windows 10 v1809.
To disable Speech Recognition on your computer, follow the steps below.
Step 1: Go to Settings > Ease of Access.
Step 2: From there, go to Speech.
Step 3: Now switch off the toggle button for Speech Recognition to disable this feature.
On the other hand, you can also disable the Online Speech Recognition feature if you really don’t want to have anything to do with it. You have two options to do that – you can either do it using Settings or using the Registry Editor.
Disable Online Speech Recognition feature via Settings:
Click on the Start button and select Settings.
Next, go to the Privacy section and click on the Speech option located at the right pane.
Then switch the toggle button off to turn off the Online Speech Recognition feature.
Note: Speech services exist on your computer and even in the cloud since Microsoft collects essential information from these services in order to enhance user experience and if you want to stop this, you have to turn off the “Getting to know you” option under the “Inking and typing Personalization” section.
Disable Online Speech Recognition feature via Registry Editor:
Before you proceed, you need to create a System Restore Point first.
Tap the Win + R keys to open the Run dialog box.
Then type “Regedit” in the field and hit Enter to open the Registry Editor.
After that, check the default value of the “HasAccepted” key located in the right pane. As you can see its value is set to “1” which means that the Speech Recognition feature is enabled. And so to change it, you have to set “0” as its new value to permanently disable the feature.
Just double click on the key and change the value from “1” to “0”. Keep in mind that even if you are using a 64-bit Windows 10 computer, you still have to create a 32-bit DWORD value.
After that, restart your computer to apply the changes made.
In case you don’t know, when you visit a website that uses HTTPS, it also offers an SSL certificate to the browser in order to verify the website’s identity. Although it may contain lots of things inside it, one of them is the URL of the website. So if the certificate does not match the URL to what you entered, you will most likely get the “Server’s certificate does not match, ERR CERT COMMON NAME INVALID” error which indicates that the connection is not private and the site may try to steal your data but worry not, as this post will guide you in resolving this issue.
To fix the ERR_CERT_COMMON_NAME_INVALID error, here are some suggestions that might help.
Option 1 – Check the website’s certificate
If you own the website where you’re getting the error, then you might have to check if the website’s certificate is installed properly and configured on the server as it could be the reason why you’re suddenly getting the error.
Option 2 – Check the Windows Host file
You can also try to cross-check the Windows Hosts file to find out if the website you are trying to open has been blocked, because if it is, then it’s no wonder why you’re getting the ERR_CERT_COMMON_NAME_INVALID error. There are instances when some third-party application modifies the file and adds some websites to the blocklists. So if the website is indeed blocked, you need to remove it from the list.
Option 3 – Use the Google Public DNS
You might want to change your DNS to Google Public DNS as it could also help you in fixing the ERR_CERT_COMMON_NAME_INVALID error in Chrome. To do so, follow the steps below.
The first thing you have to do is right-click on the network icon in the Taskbar and select Network and Sharing Center.
Next, click on the “Change Adapter Settings” option.
After that, search for the network connection that you are using to connect to the internet. Note that the option might be “Wireless Connection” or “Local Area Connection”.
Right-click on your network connection and click on Properties.
Then select the new window to choose the “Internet Protocol 4 (TCP/IPv4)” option.
After that, click on the Properties button and click the checkbox in the new window for the option “Use the following DNS server addresses”.
Type in “8.8.8.8” and “8.8.4.4” and click OK and exit.
Option 4 – Run the built-in Malware Scanner and Cleanup Tool in Chrome
In case you don’t know, there is actually a built-in malware scanner and cleanup tool in Chrome that helps you get rid of any unwanted ads, pop-ups, and even malware, as well as unusual startup pages, toolbars, and other things that could affect the performance of the browser. In addition, this built-in tool in Chrome might also help in fixing the ERR_CERT_COMMON_NAME_INVALID error.
Option 5 – Reset Chrome
Resetting Chrome can also help you get rid of the error. Resetting Chrome means restoring its default settings, disabling all the extensions, add-ons, and themes. Aside from that, the content settings will be reset as well and the cookies, cache, and site data will also be deleted. To reset Chrome, here’s what you have to do:
Open Google Chrome, then tap the Alt + F keys.
After that, click on Settings.
Next, scroll down until you see the Advanced option, once you see it, click on it.
After clicking the Advanced option, go to the “Restore and clean up option and click on the “Restore settings to their original defaults” option to reset Google Chrome.
Copy & Paste function is an essential option in properly working Windows, from copying text to weblinks and many other sources like pictures and files it is one of the crucial features in Windows.
When the copy and paste feature is not working we are somewhat left in Windows limbo, essentially Windows itself is working but without this specific feature it is very hard, almost impossible to get any work done, if you are an unfortunate user who has faced this particular issue do not worry, we have solutions for you.
Update Windows
Glitches come in various forms and sometimes they are introduced in updates, check to see if it is available Windows update and if it, download and install it, there is a very high chance that the next update will bring fixes for known glitches.
Disable antivirus
A good antivirus is an essential piece of software for any PC, however, sometimes it can interfere with the basic operations of windows itself. Disable it completely to see if copying and pasting will start to work, if this is a case, see can you somehow turn options off in antivirus or switch to another one.
Run Check disc
Corrupted applications and system files can cause issues with Windows functioning, the easiest way to solve this issue is to run build-in Windows Check disk utility and let it scan and fix potential issues.
Run SFC
If the check disk failed to fix the issue, run command prompt as administrator and type in sfc /scannow, file checker will go through all files and fix if it finds anything including corrupted system files. Reboot your system after the operation completes. Please note that an SFC scan can take a long time sometimes, do not interrupt the scanning process and leave it to finish.
Restart rdpclip process
Restarting rdpclip.exe can solve the issue. Open task manager and under process find rdpclip.exe, right-click on it and end it, then go to windows/system32 and search for rdpclip.exe and double click it. Please note that you will be able to find this process only if you are on a remote PC machine, on a local user machine rdpclip is not running.
Rollback to the previous system restore point
If this particular issue was introduced in the latest update and previous solutions have not worked, roll back to the restore point where everything was working as it should.
Stop virtualization
if you are using virtual software there is a chance that the shared clipboard feature is interfering with Windows, turn the Virtual machine off and try copy & paste again.
If when hovering over the upgrade icon on the taskbar you get:
Your version of Windows 10 would reach the end of service soon, Click to download a newer version of Windows 10 to stay supported.orAn unsupported version of Windows will no longer receive software updates from Windows Update. These updates include security updates that can help protect your PC from harmful viruses, spyware, and other malicious software which can steal your personal information. Windows Update also installs the latest software updates to improve the reliability of Windows—such as new drivers for your hardware.
and you are unable to perform updates then this guide is for you. There are several things you can do to fix this issue presented here, it is advisable to follow them in a way how they are presented for best performance and system safety.
Run setupdiag
Download and run Setupdiag from the official MICROSOFT website. SetupDiag is a standalone diagnostic tool that can be used to obtain details about why a Windows 10 upgrade was unsuccessful. It works by examining Windows Setup log files to determine the root cause of a failure to update or upgrade the computer. Once the scan is completed, check the generated log files. The SetupDiagResults.log will be generated and saved in the same folder where you downloaded Setupdiag. Open SetupDiagResults.log using Notepad. You may need to take a look at these folders:
\Windows\Panther
\$Windows.~bt\sources\panther
\$Windows.~bt\Sources\Rollback
\Windows\Panther\NewOS
If there are any issues or conditions that are blocking the upgrade, they will be listed here.
Edit TargetReleaseVersionInfo Registry key
Press ⊞ WINDOWS + R to open the run dialog
In run dialog type Regedit and press ENTER
Locate: HKLM\SOFTWARE\Policies\Microsoft\Windows\WindowsUpdate
Locate two DWORD files, if they do not exist, create them as:
TargetReleaseVersionTargetReleaseVersionInfo
Set the value of TargetReleaseVersion to 1
If you are stuck on Windows 10 1909 and want to upgrade to Windows 10 20H2 now, you need to set the value for TargetReleaseVersionInfo to 20H2Reboot the computer
Use Windows 10 update assistant
Visit Microsoft.com and hit the ‘Update now’ button visible on the page
Download tool and run it
Click on Update now to start the upgrade process
If you are trying to copy a folder or file in your Windows 10 computer but encountered an error that says, “There is insufficient disk space to complete operation”, then you’ve come to the right place as this post will walk you through how you can fix the error. This kind of problem could be due to lack of disk space, corrupted disk, and many more. In such cases, this error usually pops up when you move or copy a file or folder to a particular location.
There are several potential fixes you can check out to fix this error. You can try to run the Storage Sense or Disk Cleanup or try copying or moving the file in a Clean Boot State. You could also try formatting the given partition to NTFS. For more information, refer to each one of the options provided below.
Option 1 – Try to delete the temporary files
The error could be caused by some temporary or junk files in your computer and so you need to clear them up to fix the problem. You can achieve that using the Storage Sense feature.
Open Setting > System > Storage from the WinX Menu.
From there, you will see a list of all the local and connected storage devices along with the details on the free space. Make sure that Storage Sense is on.
Next, find a link that says “Free Up Space” and click it to open.
After that, a screen which is the built-in program in Windows 10 will appear and will scan your computer for the following junk files so you can free up disk space:
Windows Upgrade Log Files
The system created Windows Error Reporting Files
Thumbnails
Temporary Internet Files
Previous Windows Installation Files
Delivery Optimisation Files
DirectX Shader Cache
Choose the files you want to get rid of and then click on the remove files option. Note that you’ll have an idea of the total size as you select any of the junk files listed above.
Now go to the “Free Up Space Now” section and click the Clean now button. This will get rid of all the temporary or junk files in your computer and should hopefully fix the “There is insufficient disk space to complete operation” error.
Option 2 – Restart your computer in a Clean Boot State
If the first options didn’t work and you still see the “There is insufficient disk space to complete operation” error when you copy folder or files, you can try putting your computer in a Clean Boot State and then again.
Log onto your PC as an administrator.
Type in MSConfig in the Start Search to open the System Configuration utility.
From there, go to the General tab and click “Selective startup”.
Clear the “Load Startup items” check box and make sure that the “Load System Services” and “Use Original boot configuration” options are checked.
Next, click the Services tab and select the “Hide All Microsoft Services” check box.
Click Disable all.
Click on Apply/OK and restart your PC. (This will put your PC into a Clean Boot State. And configure Windows to use the usual startup, just simply undo the changes.)
Now try to connect copy the folder or file once more and check if the error is now gone.
Option 3 – Try formatting the given partition to NTFS
Even though this option may take a lot of your time, it is proven to fix the “There is insufficient disk space to complete operation” error as reported by many users who also went through the same dilemma. So if the removable disk is showing the same error message no matter which computer you insert it, you might have to format the drive with the help of Command Prompt. But before you do that, you must know that all the contents of your drive will be permanently deleted after you format it.
Tap Win + R to launch Run.
Type in cmd and then tap Enter or click OK to open the Command Prompt.
And in the elevated window of Command Prompt, type in the following command:
format F: /fs:ntfs
In the command given above, “F” is the drive letter and “NTFS” is the file system you want. Just remember to replace “F” with the drive letter you want to format as well as the file system you prefer. Brace yourself as this process might take quite a while even if you only have a 4 GB USB drive – so you must not close the window under any circumstances as the drive might get corrupted and wait for the process to finish.
Error 0x800706be is a Windows error code that pops up when a particular system file is having some issue. This error pops up on other Windows-compatible software as well as driver vendors. This error signifies a misconfigured or corrupted system file so you might encounter this error in different instances. For instance, this error might pop up when you click the audio icon from the system tray or when the Windows Upgrade or Update has failed. Needless to say, this error can be caused by different factors. Anyhow, this post will show you what you can do to fix the problem when the error pops up during a Windows Update or Upgrade. If you are seeing this error when you try to install the latest Windows updates, it will show a Windows Update failed message and you obviously won’t be able to update your Windows 10 PC until you fix this error. You will keep seeing this error even when you try to reboot or update it a couple of times.
As mentioned, the error code 0x800706be appears when there is something wrong with your system files – they are either corrupted or misconfigured. This error is most likely caused by the corrupted Windows Update Components. Corruption of these files is not unusual and it could happen anytime. So since the Windows Update files or components are corrupted, you won’t be able to successfully install the latest Windows Updates.
Here are some options you can try to fix the problem.
Option 1 – Try running the Windows Update Troubleshooter
Running the Windows Update troubleshooter is one of the basic things to do when facing any kind of issue with Windows Updates. As long as it can it will detect the issue and automatically solve them so that there will be no need for you to do more technical steps to resolve the issue.
Tap the Windows and R keys on your keyboard to open the Run dialog box.
Then type in “control.exe /name Microsoft.Troubleshooting” in the field and tap Enter to open the Windows Update Troubleshooter.
After that, click Windows Update and follow the next on-screen instructions.
Option 2 – Try resetting the Windows Update Components
This is another basic thing to do in fixing the error 0x800706be. It is also one of the solutions that mostly worked for users who also got this error when trying to install Windows updates. And since the problem is caused by corrupted Windows update components, the most logical thing to do is to delete old files and reset components.
To reset the Windows Update components, follow the given instructions below carefully.
Tap the Windows key once.
Then in the Windows Start Search, type in “command prompt”.
From the search results displayed, right-click on Command Prompt and select the “Run as administrator” option.
After that, type in “net stop wuauserv” and tap Enter.
Next, type in “net stop cryptSvc” and tap Enter.
Then type in “net stop bits” and tap Enter.
Type in “ren C:\Windows\Software\Distribution Software\Distribution.old” and then tap Enter.
Afterward, type in “C:\Windows\System32\catroot2\Catroot2.old” and tap Enter.
Next, type “net start cryptSvc” and tap Enter.
Then type “net start bits” and tap Enter.
Finally, type in “net start msiserver” and tap Enter.
Now close Command Prompt and then try updating Windows once more.
Google Chrome, Microsoft Edge, Mozilla Firefox are some of the leading browsers commonly used these days and they all include an embedded copy of the Adobe Flash Player. So if you are running a Windows 10 PC then you can have up to 4 copies of Adobe Flash Player; one for Microsoft Edge, one for Internet Explorer, one for Opera, one for Firefox. You might also experience cases wherein two flash players are simultaneously running, i.e. one installed in Chrome as a single plug-in and another one installed in Windows, trying to parse the data. And in such cases, you might consider removing or uninstalling one of the versions of Adobe Flash Player. If you do, then you’ve come to the right place as this post will guide you in disabling the embedded Adobe Flash Player in Windows 10.
Before you get started in removing the Adobe Flash Player in Internet Explorer & Microsoft Edge browser, you need to sign in with your administrative account even if don’t use it or set it as the default browser. After you’ve signed in to your administrative account, follow the steps below.
Step 1: Open your browser, if you are using Edge then open it.
Step 2: After opening your browser, go to its Settings and select Advanced Settings.
Step 3: Next, Move the slider against the “Use Adobe Flash Player” option to off.
Step 4: After that, open File Explorer and navigate to this address, “C:/Windows/servicingPackages” and from there, check on the following entries:
Adobe-Flash-For-Windows-Package~31bf3856ad364e35~amd64….(version number of the Flash Player)
Adobe-Flash-For-Windows-WOW64-Package~31bf3856ad364e35~amd64….(version number of the Flash player #)
Adobe-Flash-For-Windows-onecoreuap-Package~31bf3856ad364e35~amd64…(version number of the Flash Player)
Step 5: Take note of all the listed package names of Adobe Flash Player and tap the Win + R keys to open the Run dialog box and type “Regedit” in the field and hit Enter to open the Registry Editor.
Step 6: Next, right-click on the three keys which have the name of the packages you listed and select “Permissions” one after the other.
Step 7: Then check “Allow” to enable full control for the Administrators account and click OK to save the changes made.
Step 8: Select the three keys one after the other and select Visibility DWORD located on the right side and then right-click on Visibility and change the Value data from 2 to 1.
Step 9: Go over the same procedures again for the other keys. Once you’ve completed then you should now be able to remove packages using the DISM tool.
Step 10: Simply open an elevated Command Prompt and execute the following commands:
Keep in mind that the numbers at the end could be different on your computer due to the difference of version number so you have to use the numbers on your system. After that, reboot your computer.
If you are in the process of booting up your computer but suddenly encountered an error saying, “The Boot Configuration Data for your PC is missing or contains errors” with an error code of 0xc0000454, read on as this post will help you resolve the problem.
The error code 0xc0000454 occurs when you boot your computer and when the Windows Boot Manager encounters an issue with the Boot Configuration Data or BCD. The error code 0xc0000454 (STATUS_INSUFFICIENT_NVRAM_RESOURCES) signifies that there are no sufficient NVRAM or Non-Volatile Random Access Memory resources to complete the API. NVRAM is a component of the system based on the software that stores the Boot Configuration Data in an operating system. Usually, a simple restart can resolve the problem. However, if you’ve already done that and it’s of no use, then there are other potential fixes you can check out to troubleshoot the problem.
To resolve the error code 0xc0000454, here are some potential fixes that should help:
Option 1 – Try to repair corrupted BCD
As mentioned, the error could also be due to corruption in BCD, and to fix it, you can use Bootrec.exe – a built-in command-line tool used to troubleshot issues related to boot up and Windows Startup. Before you run this tool, make sure that you have inserted a bootable USB or DVD into your computer. Once you have that covered, follow these steps:
You need to go to the Advanced Startup Options.
Then click on Troubleshoot.
Next, select the Advanced Options and then Command Prompt.
Once Command Prompt has been pulled up, enter each one of the following commands and in the sequence that they are given to rebuild BCD files and repair MBR files:
Bootrec /Fixmbr
Bootrec /FixBoot
After you execute the commands given above, you should see a confirmation message that says, “The operation completed successfully”.
Now type the “Bootrec /RebuildBCD” command to rebuild BCD.
Finally, close Command Prompt and then restart your computer to successfully apply the changes made.
Option 2 – Try to run the Automatic Repair Utility
You might also want to use Automatic Repair in fixing the error. To do so, follow the steps below.
You can start by creating and booting from a bootable Windows 10 USB Stick.
After that, click on Repair your computer located on the bottom left corner when you are on the initial Windows Startup screen.
Next, click on Troubleshoot, and then on the other screen, click the Startup Repair option.
Now select the operating system you want to repair. Once you do that, it will start to repair your operating system. Wait until the process is completed and then check if the problem’s now fixed.
Option 3 – Disable the Secure Boot in the BIOS
Disabling the Secure Boot in the BIOS settings is definitely recommended to resolve the error. To disable Secure Boot, here’s what you have to do:
First, boot your computer into Windows 10.
Next, go to Settings > Windows Update. From there, check if there is anything that you have to download and install if you see any available updates. Usually, OEMs send and update the list of trusted hardware, drivers, and operating systems for your computer.
After that, go to the BIOS of your computer.
Then go to Settings > Update & Security > Advanced Startup options. If you click on Restart Now, it will restart your computer and give you all the advanced options.
Next, select Troubleshoot > Advanced Options. As you can see, this screen offers you further options including System restore, Startup repair, Go back to the previous version, Command Prompt, System Image Recovery, and UEFI Firmware Settings.
Select the UEFI Firmware Settings which will take you to the BIOS.
From there, go to the Security > Boot > Authentication tab where you should see Secure Boot. Note that every OEM has its own way of implementing the options so it varies.
Next, set Secure Boot to Disabled and set Legacy Support to On or Enabled.
Save the changes made and exit. Afterward, your computer will reboot.
Option 4 – Try to reset the BIOS
If updating the BIOS didn’t help in fixing the error, you can try to reset the BIOS instead.
Start your computer and tap the F10 key during the booting process to enter the BIOS. If it does not work, you can try tapping the F1 or F2 key as well as the Del key.
Once you’re already in the BIOS, tap the F9 key to get the prompt to RestoreLoad default configuration now for the BIOS.
Next, click on Yes and then follow the next on-screen instructions that appear to set the BIOS back to its default settings.
Once you’re done restoring the default settings of the BIOS, restart your computer and then check if it now boots properly.
Wondering if upgrading to Windows 11 will boost your gaming experience? We can’t give you a straightforward answer, sadly. But we can take you through the tweaks you can expect if you have all the right requirements and help you make a final decision.
Is Windows 11 good for gaming?
Essentially, the answer to this question is yes. Microsoft has definitely added a bunch of enhancements and features to its latest OS to give gamers the best possible experience. However, you have to keep in mind that this may not work out smoothly for every single user.
Whether you’ll be able to fully take advantage of the Windows 11 gaming features really depends on your setup. As expected, Windows 11 has more demanding system requirements than its predecessor.
Credit: Florian Olivo on Unsplash
So, unless your hardware can run the new OS comfortably, you might not be able to make the most of all these gaming perks. In that case, we recommend you first upgrade your hardware and then make the switch. Be prepared to be a little surprised by a few other interesting changes in comparison to Windows 10, though!
For some of the new gaming features to work, it’ll also be necessary for you to have an NVMe SSD and an HDR-compatible monitor. So let’s take a look at 4 big improvements you can expect if your setup is compatible.
Gaming enhancements on Windows 11
1. Enjoy faster loading speed with DirectStorage
For this powerful feature to work, you need a compatible graphics card and, as stated before, an NVMe SSD. It’s also important for your GPU to support the DirectX 12 graphics API at least. And since we’re on that subject, you’ll be happy to know that Windows 11 has also introduced a new version of the API called DirectX 12 Ultimate.
Now, what does DirectStorage do? It’s a new feature designed to make full use of the speedy storage of NVMe SSDs. It also transfers game data directly onto the graphics card, lightening the load on your CPU. Normally the CPU would have to decompress the data first, but DirectStorage helps bypass this. That’s how loading times are reduced and games run more smoothly.
2. Fully immerse yourself through Game Mode
Windows 11’s Game Mode is certainly a welcomed addition. When you turn on Game Mode, usage of background apps that aren’t essential to your game is reduced. This results in the game you’re running becoming a priority process. This way, it uses your hardware and system resources to the max. Ultimately, the Game Mode means less lag and higher frame rates so you can play undisturbed and fully enjoy your gaming session.
3. Vibrant visual experience thanks to AutoHDR
For this one you’ll absolutely need an HDR-compatible monitor. Basically, HDR (High Dynamic Range) means a wider range of contrasts and colors that can be displayed on a monitor.
Windows 10 has an HDR feature, but you have to turn it on and off manually (“Use HDR”). Plus, users have reported that, if left on, it results in an unappealing appearance of content other than movies and games.
Windows 11 fixes that problem with its AutoHDR feature. Toggling it results in the system automatically adjusting the color contrast, balance and brightness based on what you’re currently looking at. For gamers, this means vivid imagery in every single game, resulting in a supreme visual experience. You can check out Microsoft’s own video showcasing the power of AutoHDR.
Aside from AutoHDR, another way Windows 11 improves the visual aspect is through its support for refresh rates of up to 360Hz.
4. Xbox Game Pass & Game Bar
It’s no secret that Microsoft wants to integrate Windows and Xbox. We’ve seen some attempts with Windows 10, but they’re pretty wonky compared to the new OS.
Windows 11’s built-in Xbox Game Bar enables quite a few options all gamers desire. You can take screenshots and videos of your game and send them, for starters. Furthermore, you can use it to see audio settings and monitor your PC’s performance without having to leave the game or open the Task Manager.
Widgets are also a really cool part of the Game Bar. You can choose from a wide variety of widgets, such as Xbox Achievements, Spotify, Gallery, Xbox Social and more.
Moreover, the Xbox Game Pass has been streamlined on Windows 11. Game Pass is a subscription service that unlocks hundreds of awesome games and supports cloud streaming. Do keep in mind that the games are only unlocked for a certain period of time, as the selection rotates once in a while.
What can you do for a better gaming experience?
Windows 11 does offer tweaks that require zero input from you. However, there are a few things you can do manually to get even more out of your new OS while gaming.
Turn off enhanced pointer precision. Most games enhance precision by default, so having this feature on might interfere with that.
Make sure to select your high performance graphics card for each game. Go to Settings > Gaming > Game Mode and tap ‘Graphics’ from the ‘Related settings’ menu. Find the game you want to adjust, click on ‘Options’ and choose your high performance graphics card to be the default setting. While there, you can also turn on ‘Hardware-accelerated GPU scheduling’ at the top.
Disable unnecessary apps and programs. As long as they aren’t essential to running your game, they might take up valuable system resources, so disable them to make space for your gaming requirements.
Check for pending updates and install them. It’s well-known that out-of-date software causes bugs, latency and crashes. The same goes for your GPU drivers.
Use the High-performance power plan (Control Panel > Power Options > Additional plans) to maximize the use of resources for the best possible performance.
Summary
Windows 11 has done quite a bit for avid gamers. We hope your setup is compatible with all these new features and you can experience these enhancements ASAP!


 Raspberry Pi 4 and things you need for Windows 11 installation
