 Following a two-year investigation by the California Department of Fair Employment and Housing, the state has filed a lawsuit against Activision Blizzard for fostering a "frat boy" culture in which female employees are allegedly subjected to unequal pay and sexual harassment.
As reported by Bloomberg, Activision Blizzard is being accused by the state of California of discriminating against female employees at nearly all levels of employment, including in regards to compensation, promotion, assignments, and termination. The state alleges Activision Blizzard’s leadership has failed to address any of these outstanding issues or prevent them from occurring within the workplace. You can read the full details of the lawsuit here.
The suit, filed Tuesday in the Los Angeles Superior Court, says Activision Blizzard, which is made up of about 20 percent women, assigns women, and women of color, to "lower paid and lower opportunity levels" with lower starting pay for similar work as their male counterparts.
The documents also accuse Activision Blizzard of fostering a "pervasive 'frat boy' workplace culture in the office. Male employees are said to drink "copious amounts of alcohol" as they make their way through cubicles and "often engage in inappropriate behavior toward female employees."
Male employees are said to come to work hungover, play video games during work "while delegating their responsibilities to female employees, engage in banter about their sexual encounters, talk openly about female bodies, and joke about rape."
The lawsuit also cites one particular incident where a female employee, who was already subjected to intense sexual harassment at the company, committed suicide during a work trip with a male supervisor who allegedly brought inappropriate, sexual items with him on the trip.
The lawsuit is asking for an injunction that will force Activision Blizzard to comply with workplace protections, as well as deliver unpaid wages, pay adjustments, back pay, and lost wages and benefits for female employees.
We value diversity and strive to foster a workplace that offers inclusivity for everyone. There is no place in our company or industry, or any industry, for sexual misconduct or harassment of any kind. We take every allegation seriously and investigate all claims. In cases related to misconduct, the action was taken to address the issue.
The DFEH includes distorted, and in many cases false, descriptions of Blizzard’s past. We have been extremely cooperative with the DFEH throughout their investigation, including providing them with extensive data and ample documentation, but they refused to inform us what issues they perceived. They were required by law to adequately investigate and to have good faith discussions with us to better understand and to resolve any claims or concerns before going to litigation, but they failed to do so.
Instead, they rushed to file an inaccurate complaint, as we will demonstrate in court. We are sickened by the reprehensible conduct of the DFEH to drag into the complaint the tragic suicide of an employee whose passing has no bearing whatsoever on this case and with no regard for her grieving family. While we find this behavior to be disgraceful and unprofessional, it is, unfortunately, an example of how they have conducted themselves throughout the course of their investigation. It is this type of irresponsible behavior from unaccountable State bureaucrats that are driving many of the State’s best businesses out of California.
The picture the DFEH paints is not the Blizzard workplace of today. Over the past several years and continuing since the initial investigation started, we’ve made significant changes to address company culture and reflect more diversity within our leadership teams. We’ve updated our Code of Conduct to emphasize a strict non-retaliation focus, amplified internal programs and channels for employees to report violations, including the “ASK List” with a confidential integrity hotline, and introduced an Employee Relations team dedicated to investigating employee concerns.
We have strengthened our commitment to diversity, equity, and inclusion and combined our Employee Networks at a global level, to provide additional support. Employees must also undergo regular anti-harassment training and have done so for many years.
We put tremendous effort into creating fair and rewarding compensation packages and policies that reflect our culture and business, and we strive to pay all employees fairly for equal or substantially similar work. We take a variety of proactive steps to ensure that pay is driven by non-discriminatory factors. For example, we reward and compensate employees based on their performance, and we conduct extensive anti-discrimination training including for those who are part of the compensation process.
We are confident in our ability to demonstrate our practices as an equal opportunity employer that fosters a supportive, diverse, and inclusive workplace for our people, and we are committed to continuing this effort in the years to come. It is a shame that the DFEH did not want to engage with us on what they thought they were seeing in their investigation.
We will see how things work out, but I am not too optimistic for Activision Blizzard, truth to be told these reports are really bringing up some disturbing news on the sunlight. I just hope that all responsible will be brought to justice.

 I going to admit right here that I am a big fan of Cooler Master PC cases, I like them and they are always one of the things that I consider when building a new PC, overall I like their ideas and quality so personal for me it was quite a surprise to see that they are one that is making a new generation gaming chair.
Now truth to be told Orb X is not your typical gaming chair as you can clearly see from the pictures. The chair itself will come in two colors: white or black and RGB lighting looks to be prominently featured throughout.
I going to admit right here that I am a big fan of Cooler Master PC cases, I like them and they are always one of the things that I consider when building a new PC, overall I like their ideas and quality so personal for me it was quite a surprise to see that they are one that is making a new generation gaming chair.
Now truth to be told Orb X is not your typical gaming chair as you can clearly see from the pictures. The chair itself will come in two colors: white or black and RGB lighting looks to be prominently featured throughout.
 The chair itself is advertised as both meant and aimed for professional and gaming crowds but I believe the gaming crowd is in general more interested in this hardware piece.
Hardware is enclosed in a fully motorized shuttle dome which aims to maximize your privacy, it supports a single 49inch display or three 27inch monitors along with surround speakers if you do not wish to use headphones.
The chair itself is advertised as both meant and aimed for professional and gaming crowds but I believe the gaming crowd is in general more interested in this hardware piece.
Hardware is enclosed in a fully motorized shuttle dome which aims to maximize your privacy, it supports a single 49inch display or three 27inch monitors along with surround speakers if you do not wish to use headphones.
 It offers an adjustable headrest, lumbar support, and footrest so you can spend some time in it and be comfortable. Controls on the chair itself allow you to raise or lower the dome for easier getting in and out of it.
Orb X also has a compartment in its backside, it folds out and has a sliding tray designed to hold your PC or console. Everything is enclosed so wiring is not the issue.
Overall Orb X seems really like the computer chair of the future, Cooler Master expects to release the Orb X by December 2021, priced around $12,000-$14,000.
It offers an adjustable headrest, lumbar support, and footrest so you can spend some time in it and be comfortable. Controls on the chair itself allow you to raise or lower the dome for easier getting in and out of it.
Orb X also has a compartment in its backside, it folds out and has a sliding tray designed to hold your PC or console. Everything is enclosed so wiring is not the issue.
Overall Orb X seems really like the computer chair of the future, Cooler Master expects to release the Orb X by December 2021, priced around $12,000-$14,000.  Today most people have Facebook accounts where they keep in touch with friends and family. But large Facebook network of users is also very interesting to another party as well, hackers.
There are many ways hackers can steal your data via direct hacks, trickery, and social engineering in order to get your credentials, emails, and many other things using them to wreak further havoc.
Once a hacker has needed information it is very difficult to minimize impact and all of your information could be compromised from a list of friends to credit card numbers. Keep on reading to learn how can you protect yourself against these attacks and learn about common practices that hackers use in order to steal your data.
Today most people have Facebook accounts where they keep in touch with friends and family. But large Facebook network of users is also very interesting to another party as well, hackers.
There are many ways hackers can steal your data via direct hacks, trickery, and social engineering in order to get your credentials, emails, and many other things using them to wreak further havoc.
Once a hacker has needed information it is very difficult to minimize impact and all of your information could be compromised from a list of friends to credit card numbers. Keep on reading to learn how can you protect yourself against these attacks and learn about common practices that hackers use in order to steal your data.
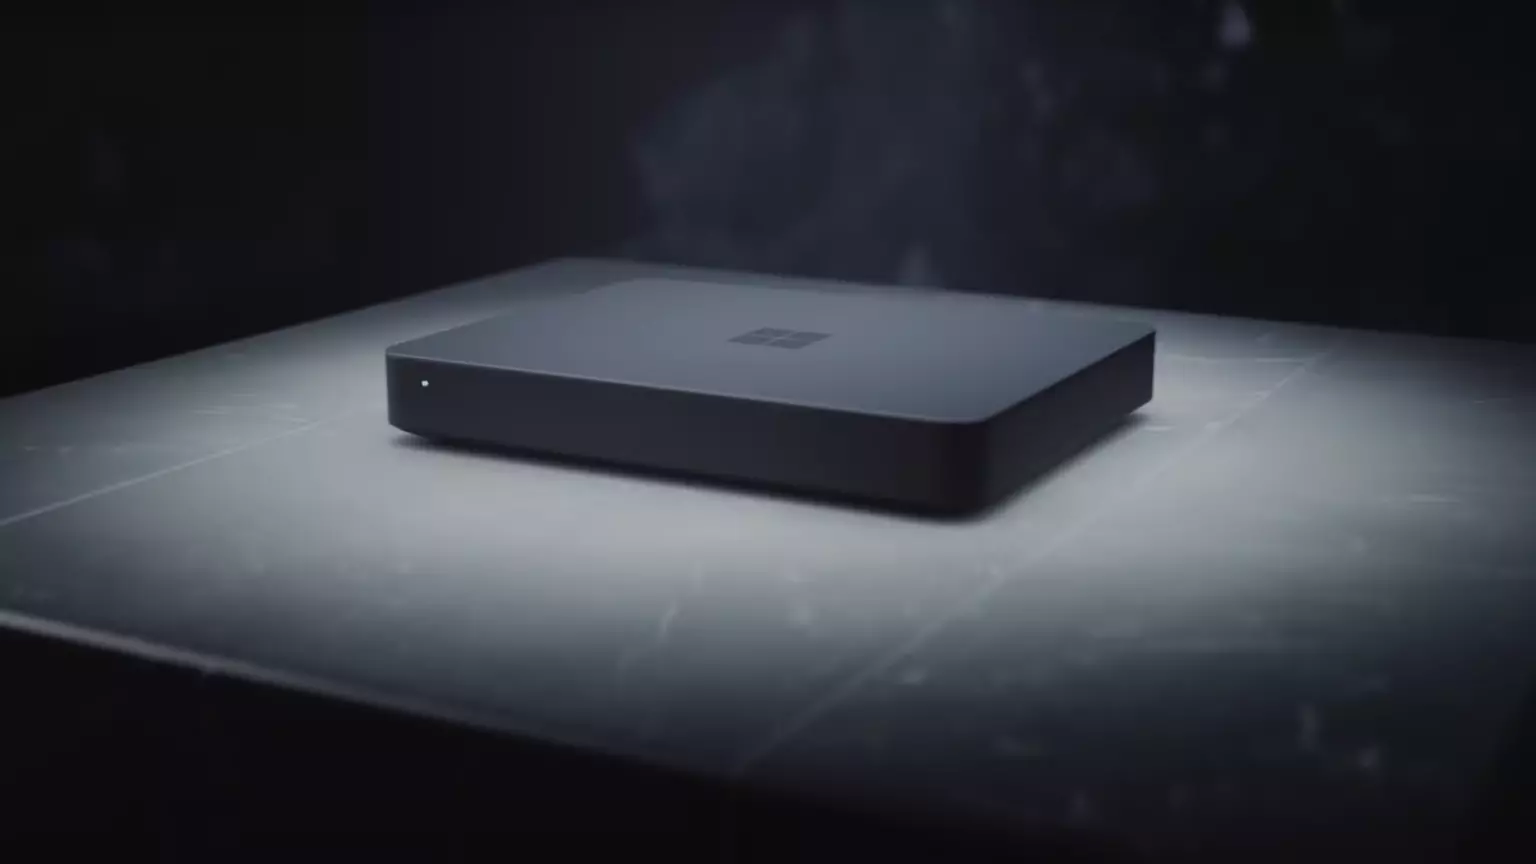
Microsoft will soon offer 4 CPU computer specifically aimed at developers and its name is Volterra. The machine as stated will come with 4 processors but the strange thing is that they will be ARM-based instead of x86.
CEO of Microsoft, mister Satya Nadella has introduced the product and Microsoft has released a youtube video promoting it.
The computer system will have Qualcomm's NPU or built-in neural processing unit to use AI's power to help developers write and produce better and faster code. The sad news is that besides processors used there is no other information on other components that will go into this system.
As seen in the video, the computer reminds me a lot of the apple MAC mini with its size and design, and as stated it is made from recycled plastic which in our opinion will bring the price under $1000.
Microsoft has not provided an official price tag for Volterra, but our hope is that it will be more affordable than building your own development PC. Also, there was nothing said about computer availability, we suspect that the selling model will be typical Microsoft one with first models available only in the USA and moving forward slowly opening it to other markets.
As previously said nothing except the number of CPUs and their type has been officially said but we managed to get some information about some other specific things not including its inside components.
The unit will have a fan inside of it for cooling purposes and better performance and that is what was officially stated by Microsoft. On the outside, it is known that the computer will have three USB-A ports, a mini DisplayPort, and an ethernet input. All of these will be positioned on the back of the device, on its left side there will be two USB-C ports.
The unit itself will be running on Windows 11 but it was not disclosed anything about the version, we presume since this is a model aimed for professional use that it will come with Windows 11 PRO version.
Since this product is aimed at developers logically support for developing software is a must-have and at the time of this writing software that will come and that will run on Volterra is:
Once MAC studio has been released it showed that specific builds have their audience and can be sold for less of a price than full-fledged custom-made workstations. There is no doubt that Microsoft Volterra will find its audience but will that be enough to have more versions of this compact computer only time will tell.
Computer voice control has moved a long way from its beginning routes and in today's age controlling your PC with voice is truly a reality and fully possible. Voice control is taking up the steam in everyday life, from simple commands in cars, Alexa, smartphones, TVs, etc. to modern computers.

Windows 10 has introduced voice control into PC with Cortana even during the installation process but a lot has changed from having a virtual assistant in begging days and in today's modern Windows 11 OS. You can now freely open apps, move, copy delete files, and even dictate in order to create a word document.
However, in order to take this advantage, you will need to turn it off first since it is disabled by default. Of course, you will need a microphone and some spare time to train Windows in understanding you properly.
Just like in Windows 10, in Windows 11 voice control is also in accessibility options and the first step is to turn ON Windows Speech Recognition.
Click on the Start button and type Settings into the search bar, click on Open, or press ENTER. On the left side of the settings, window locate and click on Accessibility. On the right part once Accessibility is selected scroll down and find a section titled Interaction and click on Speech. Turn on the switch next to Windows Speech Recognition.
A pop-up will appear that will lead you through the rest of the setup and that's it.
In order to make your voice control better, if you are not satisfied with the results, you can sample more of your voice into the algorithm to tune it more to your liking. Sadly this option is still deep in Control Panel.
Click the Start button and type in Speech recognition into the search bar, look for the search result with Control Panel displayed under it, and click on Open. Click on Train Your Computer to Better Understand You and follow the instructions.
The process will probably take a few minutes. The more data you provide to the speech recognition model, the more accurate it will be when interpreting your instructions. You can train the model multiple times, and each time you do, it should improve the accuracy.
RadioRage is a potentially unwanted application developed by Mindspark Inc. This browser add-on is compatible with Mozilla Firefox, Internet Explorer and Google Chrome and claims to enhance the Internet browsing experience by allowing users to listen to their favorite music via the installed toolbar.
RadioRage Toolbar is categorized as adware since it infiltrates computers and after successful installation, this browser extension redirects browsers to home.tb.ask.com. And changes your default search engine to myway.com.
While active on your computer RadioRage collects user information such as browsing data, website clicks, and sometimes even sensitive user information, that it later sells / forwards to its ad distributors.
 Hacker group recently came up with claims that they have stolen data from 100 million T-Mobile customers. T-Mobile has responded with confirmation it has been compromised and that over 40 million records were stolen, among them are not just present customers, but anyone who has applied for T-Mobile service as well as past accounts.
“Connapi.dll Not Found" "This application failed to start because connapi.dll was not found. Re-installing the application may fix this problem." "The file connapi.dll is missing." "Cannot start [APPLICATION]. A required component is missing: connapi.dll. Please install [APPLICATION] again." "Cannot find [PATH]connapi.dll"
 Error Causes