In this post, you will be guided on how to import and export the WSL distros in your Windows 10 computer. WSL, also known as Windows Subsystem for Linux, is a compatibility layer needed to run Linux binary executable in Windows 10, as well as the Windows Server 2019.
In case you don’t know, when you reinstall or reset Windows 10, all of its configuration data stored with the WSL distros gets deleted. Going back or restoring the configuration can be quite challenging but worry not for Microsoft has already got this covered as you can now import and export the WSL or Windows Subsystem for Linux distros.
There are three aspects that you have to deal with when you import or export WSL distros in your Windows 10 computer, such as importing WSL distro, exporting WSL distro, and uninstalling the imported WSL distros.
Before you proceed to the instructions provided below, make sure that all your installed distros are updated via Microsoft Store. Once you have this covered, follow the options below.
Note: In the given command above, replace “<Name of the distro>” with the name of the distro you want to import and replace “<Fill the path to save the backup .tar file>” with the location where you want to save the .tar file.

 Error Causes for 0x80070002
Error code 0x80240020 is a Windows 10 upgrade error code that affects users who attempt to upgrade their Windows operating system. This may occur due to a particular program that blocks the upgrade from completing. It can also result when other PC issues interfere with the upgrade process by disrupting the ability of Windows Update to download updates on one’s machine. Common symptoms of error code 0x80240020 include the following:
Error CausesTo correct issues related to error codes, it is often best to apply manual repair methods. These help Windows users determine the root causes of the error code and provide solutions that permanently fix these issues. For instance, if error code 0x80240020 on your machine is due to an issue within the Windows Update tool, you will need to first verify that this is the problem by using a troubleshooter option found within your machine’s settings. The troubleshooter will detect and fix the issue.
Most of these manual repair methods can be implemented by any Windows user, regardless of their background, technical abilities, or lack thereof. However, in certain cases, technical skills are required. If you have trouble implementing the procedures highlighted below or in any other error code article found on this site, consider getting help from a Windows repair technician or use a powerful automated tool.
Below are details regarding the manual repair methods for fixing error code 0x80240020. Ensure you follow the instructions correctly. After all, any error you make will likely cause further problems on your machine and prevent you from resolving error code 0x80240020 in Windows 10.One way to fix error code 0x80240020 is to troubleshoot Windows Update. To do this you will need to access Settings within your machine then simply select the relevant troubleshooting options available. Follow the instructions below:
If there are problems with Windows Update, the troubleshooter will be able to fix them. Once this process is complete, restart your PC and then reopen Windows Update. Attempt to upgrade your Windows operating system. If Windows Update completes the process and your machine downloads and runs the upgrade, you have successfully resolved error code 0x80240020.
If, however, there is another upgrade failure and the message box detailing the presence of error code 0x80240020 in Windows 10 appears, you will need to apply another manual repair procedure. Please see below for further details regarding manual repair method two.Corrupted or missing system files may interfere with your machine’s ability to successfully download an upgrade. For this reason, scan and fix any problems related to system files on your machine using Command Prompt. This manual repair method is often called a System File Check/ Checker (SFC).
To ensure you follow this procedure correctly, enter the command as it is written above, with a space between “sfc” and “/scannow”. Once missing, corrupted or damaged files are present on your machine, the SFC command will enable Command Prompt to scan and fix these issues. Wait until the process is complete then reboot your PC.
With your system successfully rebooted, reattempt the Windows 10 upgrade process in Windows Update or on the Windows Update website. If the issue causing error code 0x80240020 was related to problems with system files, you should be able to complete the upgrade after using the SFC tool.
If you wish to always have at your disposal a utility tool to fix these Windows 10 and other related issues when they do arise, download and install a powerful automated tool.
Faraday bag is a new take on security and privacy for people using a lot of electronic devices and credit cards. So what is exactly a Faraday bag?
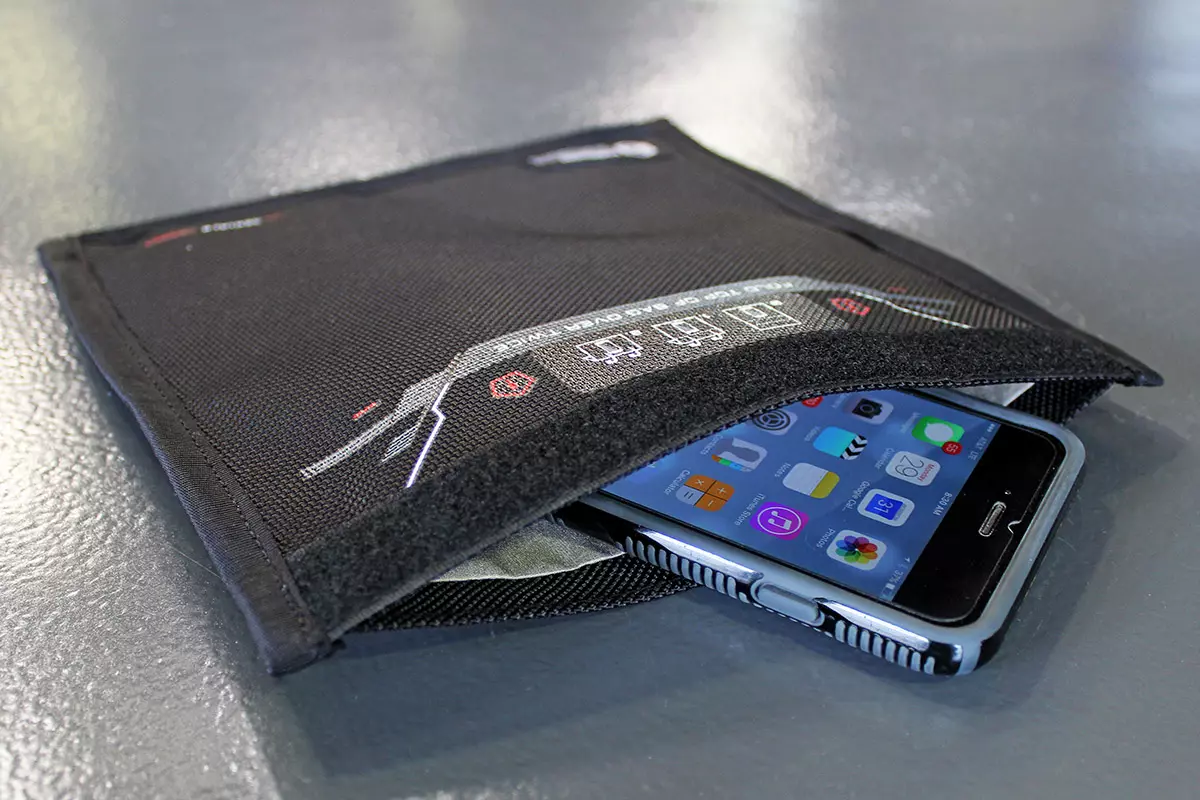
Faraday bag is designed in the same manner as the Faraday cage which was invented by Michael Faraday, who was an English scientist who contributed to the study of electromagnetism and electrochemistry. His main discoveries include the principles underlying electromagnetic induction, diamagnetism, and electrolysis.
The idea of the Faraday cage is that anything inside a cage that is made of specific grid size is completely isolated from outside current and magnetic fields since the cage itself will pick up everything upon itself. This means that for example, a human could be inside a cage that is struck by lightning and be perfectly safe and fine.
This idea led to the Faraday bag design, which takes this concept and places a wiring pattern inside clothing in order to isolate all magnetic fields from the outside so your devices and cards are completely cut off from any kind of influence and electromagnetic waves. If the pattern and quality of material for the bag are good, you have a fully safe placeholder for your stuff.
The main advantages, of course, are the privacy and safety of mobile phones and credit cards from outside influences and this is why this bag has been designed in the first place. If the bag is designed properly your phone would not be able to be hacked nor accessed from any outside source, GPS tracking will also be disabled and your phone location will not be visible. Credit cards will also be completely safe from any malicious attack via wi-fi signals.
Well, the disadvantage of using this bag is a very simple one, since your phone is isolated from outside influence that will also mean that you will not be able to take messages or calls on it while it is in the bag. Notifications from the internet would also be disabled so it is security vs usability deal.
What is Mastodon? Mastodon is an open-source microblogging network very similar to Twitter. You can make 500 characters post messages called toot (tweet), share videos or images, and follow other people. But unlike Twitter, Mastodon is decentralized, meaning the entire Mastodon is not run by a single company pulling all strings.

Mastodon can be used directly in your web browser or through a mobile client on a smartphone or tablet. It includes features that seem copied from Twitter-like replies, boosts (retweets), favorites (loves), a timeline view, blocking, and voluntary content warnings that hide sensitive content.
Mastodon also has some great features that Twitter does not have like automated post deletion for the older post of a certain age, requiring approval for follows without restricting your account, and opting out of search engine indexing.
Currently, there are also no ads on Mastodon meaning no ad tracking or ad network surveillance.
Mastodon is a social media network made of nodes called servers or instances each running special software meaning anyone can run their own Mastodon instance (if they have a proper dedicated server). When you have your own instance it can be linked in the federation or remain private, so individuals or companies can have control over individual Mastodon servers.
The software itself is open source based on the social networking protocol ActivityPub which was developed by WWW Consortium.
While using Mastodon, people sign up for accounts with specific instances. Once logged in, you can view a local timeline (of posts from that instance only) or, if the instance is federated with others, see a federated timeline comprised of toots from people in other instances. Mastodon users can send messages to each other using their Mastodon account names that are similar to email addresses in that they feature the server address as well as the user name.
HKEY_CURRENT_USERSoftwareMicrosoftWindows NTCurrentVersionWinlogon
 Changes and features
netsh int ip reset
 5 Essential IT skills everybody should know
“The boot configuration data store could not be opened”while you try to carry out any command on the bcedit.exe, then you’ve come to the right place as this post will guide you on how you can fix this error in Windows 10. This kind of error could pop up if the system is not able to locate the specified file. It is also possible that the requested system device can’t be found or that the boot configuration data store could not be opened. In addition, when you open the System Configuration or MSConfig, you might notice that there is no Boot data, and according to the reports, is that when you try to dual boot the computer, the installer will replace the default bootloader.