Error code 0x803f7001 occurs when there is a failure to update your Windows operating system to Windows 10. Usually, a message box pops up with the following statement, “Windows is not activated as your previous version of Windows on this device was not activated prior to upgrade to Windows 10.” When this occurs, common symptoms of the error code will manifest themselves:
Inability to upgrade your Windows operating system to Windows 10
Message box with error code 0x803f7001
Solution
Error Causes
The cause for error code 0x803f7001 varies. Usually, it occurs for two reasons: 1) when during the process of upgrading to Windows 10, no valid Windows license or product key is found for your device or 2) when a user performs a clean installation of Windows 10. During a clean installation, a new license is usually required to allow you to activate your copy of Windows.
Further Information and Manual Repair
There are two main options available to fix error code 0x803f7001. Usually, the use of a valid product key can help users rectify error code 0x803f7001. You may also try an automated tool to access the best solutions.
Method One: Use a Valid Product Key
A product key is a code containing 25 characters that enable users to activate Windows. You will need to enter the product key in the exact order it appears in order to install your Windows operating system. All users will be able to access this code in an email or on a card within the Windows DVD package they receive upon purchasing a version of the Windows operating system.
To solve error code 0x803f7001, complete the following steps.
Step one: Click the Start button then select Settings
Step two: Select Update and Security then Activation
Step three: Click the Change product key
Step four: Type in your valid product key. (To do this ensure the 25 characters are accounted for and in the correct order.)
If the issue causing error code 0x803f7001 relates to your product key, then the instructions within method one will rectify the issue. You will be able to install and activate Windows 10. However, if while attempting to update your Windows operating system, the error occurs once more, you will need to follow the instructions in the manual repair below.
You may also consider contacting a Windows repair technician if you are uncertain of your ability to perform the tasks required to fix error code 0x803f7001. This IT professional will be able to use his or her technical knowledge to perform complex manual repair tasks if the need arises.
Method Two: Install an Automated Tool
Automated tools help PC users eliminate common issues such as Windows error codes. To address or rectify error codes like error code 0x8007007b download a powerful automated tool on your machine. This tool enables users to access quick solutions. It also scans for and corrects issues that may result in error codes or poor PC performance.
In the Windows ecosystem, MS Surface laptops are among the best laptops on the market, they are regarded as equivalent to Apple MAC laptops but for Windows. Microsoft Fall 2022 Event will be held on October 12th at 10 AM. The event itself will be held right before it kicks off its annual, developer-focused Ignite event in Seattle from that same day through October 14.
This event is the first in-person event that Microsoft has held since the beginning of the pandemic. We expect the launch of the Surface Pro 9 and the Surface Laptop 5, and maybe Surface Studio 3 as well. There are also some rumors about products themselves like choices between an ARM or x86 CPU but nothing is confirmed so far, we can just wait and see.
A computer with no internet connection is like a mobile phone that can’t call nor text though you can still use it for other things. So if you are having problems with your computer’s internet connection, worry not as there are some basic things you can try before you go over the actual troubleshooting. Just make sure that you really have working internet. To verify it, try connecting your other devices. Aside from that, you must also make sure that your computer is connected properly over cable or connected to the router over the Wi-Fi. Once you have all these things covered, now’s the time to start troubleshooting the problem with the help of the instructions prepared below. To be more specific, this guide will walk you through what you can do when you encounter a particular internet connection problem where you get the Media State Media disconnected error message on your Windows 10 computer.
Before you troubleshoot the problem, you need to first check the internet connection status on your computer. To do that, follow these steps:
Type in “cmd” in the Cortana search box.
From the search results, right-click on Command Prompt and select “Run as administrator” from the context menu.
After opening Command Prompt with administrator privileges, type in the ipconfig /all command and hit Enter.
After you enter the command, you will see a list of all the connected media like the Ethernet, Wi-Fi along with its status, and more. From there, you need to check everything closely. I notice a message that says, “Media State . . . . . Media disconnected”, then your internet connection is indeed having issues.
Refer to the options below to fix the Media State Media disconnected error message on your Windows 10 PC.
Option 1 – Try resetting WINSOCK and IP Stack
Type in “cmd” in the Cortana search box.
From the search results, right-click on Command Prompt and select “Run as administrator” from the context menu.
After opening Command Prompt, type in each one of the commands listed below
netsh winsock reset catalog – This command will reset the WINSOCK entries.
netsh int ipv4 reset reset.log – This command will reset the IPv4 TCP/IP stack.
netsh int ipv6 reset reset.log – This command will reset the IPv6 TCP/IP stack
Once you’ve executed the commands listed above, restart your PC to successfully apply the changes made.
Option 2 – Check if your Network Adapter is disabled
If you’ve disabled the network adapters on your computer, then it’s most likely the reason why you’re getting the Media State Media disconnected error message. Thus, you need to enable it back.
Open Settings and go to Network and Internet > Select Ethernet > Change adapter options.
From there, right-click on the adapter and enable it.
Option 3 – Check the Wi-Fi Properties
Though this case is not common, Wi-Fi sharing has actually caused issues for some users. That’s why you need to check the Wi-Fi properties. Go to Network Connections and right-click on Wi-Fi and select Properties. From Properties, go to the Sharing tab and select the first option and click OK.
Option 4 – Try updating the Network driver
Tap the Win + R keys to open the Run dialog box and then type in devmgmt.msc and tap Enter or click OK to open the Device Manager.
Expand the section for the outdated device drivers.
And then select the Network driver or any other outdated driver(s) and right-click on it/them.
From the drop-down menu, select the Update Driver option and follow the on-screen instructions to install the latest version of the driver.
Then also click on the option, “Search automatically for updated driver software.
Restart your PC after the installation.
Note: If updating the Network driver didn’t work, you can go to the website of your PC manufacturer and look for the support section where you can download the drivers for your computer. You just need to take note of your PC’s correct model and model number so you can find the appropriate driver.
We have all experienced Windows errors over time and that can range from simple ones that will do very little to no harm and can be even system breaking making us lose our work or completely making the PC unusable. No one likes them but they happen, and usually, they happen once we least expect them.
No matter how frequent and unpleasant they might be there are ways to keep them at the minimum and even avoid them.
We will discuss steps that you can take in order to do this, simple tips and guides on how to keep your computer in top form and eliminate not just Windows, but any kind of errors altogether.
Keep your hardware clean
Believe it or not, some serious Windows errors like the dreaded blue screen of death can come from hardware issues not from the software at all. It is very important to keep your computer clean and with enough air flow so it can function properly.
Keeping applications on the drive might seem harmless but sadly that is not the case. Some applications have a certain impact on the system itself after all most of them are tweaking registry entries in Windows and sometimes having too many applications means an increased possibility of conflict over certain resources even when they are not running.
Some applications like adobe creative suite, for example, will have certain services always running in the background, and more of these kinds of applications you have, more services, more places for unexpected errors when they collide. Some of them will also install certain dependencies that could be problematic.
The general idea is: if you are not using it, uninstall it and you will be safer and more resilient to errors inside OS.
Do not use pirated or cracked software
Besides moral and law implications that using pirated or cracked software might bring you there are also certain other things that might be problematic. Certain "free" software might come packet with some problematic malware, for example, it is not uncommon for attackers to use some popular software to pack their malicious application with it.
Other things might be wrong and incomplete tweaking with application in order to bypass security and thus bringing some instability due to scripts needed to run in order to achieve this goal.
Keep your drivers updated
Errors can also come from old drivers or bad drivers, device manufacturers are not all-knowing and perfect, and sometimes drivers can wreak havoc on the system. Having updated drivers can minimize any kind of unexpected behaviors inside the operating system making it more stable and reliable.
You can check your driver version in the control panel inside the Windows OS and then compare it to the ones found on the manufacturer's site, if there are newer available it is recommended to download and install them,
Keep software updated
Applications can have bugs, and bugs can lead to certain errors both in the system and when using the app as well. It is in your best interest to get the latest patch or newer version of the software in order to avoid these unpleasant experiences.
Also, certain codecs and extensions that are installed directly in Windows can also have some unpredictable behavior, updating is the best solution to keep them in line.
Keep Windows updated
Same as with drivers and applications, Windows itself is not immune from bugs and some unpredictable issues. Luckily Microsoft is always working on fixes and features of Windows but in order to actually have benefited from that work, you will need to keep Windows updated. Sometimes a bad update can introduce some errors but you can always roll back to the previous and wait for them to fix everything and then download them all.
Check the health of your hardware regularly
Hardware components have their life cycle, more quality ones tend to last longer but eventually, they will reach the end of their lifecycle. There are a lot of testers for various components in your computer that can check different things and provide you with information about the state of your components.
If you are on Windows 11, Microsoft has included a basic health app inside OS, just type PC health check in search and start the app. For some more detailed information and advanced checks, you will have to use a custom application. There are plenty of them specialized for single components like RAM, SSD, etc. A simple google search with providing you with top results and most of them are free for personal use.
Remember, a faulty component or component that is reaching its life cycle can produce many errors inside the operating system.
Recently, a number of users reported not being able to use the Restore, Minimize and Close buttons on their Windows 10 computers. This kind of issue can be quite annoying as you won’t be able to use your computer properly, especially when you navigate between programs and windows. In such cases, the buttons on the right side of the title bar won’t respond to any inputs which could be caused by a number of factors such as different input modes, corrupted system files, and many more. If you are one of the users who are currently facing this problem, worry not for this post will guide you on what you can do to resolve it.
There are several potential fixes you can check out to fix the issue. You can try to check if Tablet Mode is enabled and if it is, you have to disable it. You could also boot your computer in a Clean Boot State to check if a third-party program is the one that’s causing the problem. In addition, you could also reinstall the program where you experience the problem or run built-in utilities like System File Checker and DISM tool.
Option 1 – Make sure that you are not in Tablet Mode
Since Windows 10 is designed to work on both desktop and mobile devices, it could be that your computer has slipped into Tablet Mode which explains why you’re not seeing the Taskbar. To check if your computer is really in Tablet Mode, follow these steps:
Go to the Start menu and select Settings.
Next, select the System setting and from the left pane select the Tablet Mode.
From there, make sure that the buttons next to the options given below are set to the off position:
Hide app icons on the taskbar in tablet mode
Automatically hide the taskbar in tablet mode
Option 2 – Put your computer in a Clean Boot State
As pointed out, it is possible that some third-party program or service is the one that’s behind the problem. To isolate this possibility and to identify the culprit, you have to put your computer into a Clean Boot State. To do so, follow the steps below.
Log onto your PC as an administrator.
Type in MSConfig in the Start Search to open the System Configuration utility.
From there, go to the General tab and click “Selective startup”.
Clear the “Load Startup items” check box and make sure that the “Load System Services” and “Use Original boot configuration” options are checked.
Next, click the Services tab and select the “Hide All Microsoft Services” check box.
Click Disable all.
Click on Apply/OK and restart your PC. (This will put your PC into a Clean Boot State. And configure Windows to use the usual startup, just simply undo the changes.)
Once your computer is in a Clean Boot State, try to open the program where the problem occurred.
Option 3 – Try reinstalling the program
If the first two options didn’t work, then you might want to consider uninstalling the program and then install it back with its latest version. This should resolve the problem.
Option 4 – Try to run System File Checker
System File Checker or SFC is a built-in command utility that helps in restoring corrupted files as well as missing files. It replaces bad and corrupted system files to good system files that might be the cause why the Restore, Minimize and Close buttons don’t work. To run the SFC command, follow the steps given below.
Type “cmd” in the Start search and then right-click on the appropriate search result.
Next, select “Run as administrator” to open Command Prompt with admin privileges.
After opening Command Prompt, type in sfc /scannow
The command will start a system scan which will take a few whiles before it finishes. Once it’s done, you could get the following results:
Windows Resource Protection did not find any integrity violations.
Windows Resource Protection found corrupt files and successfully repaired them.
Windows Resource Protection found corrupt files but was unable to fix some of them.
Now restart your computer and see if the problem is fixed or not.
Option 5 – Run the DISM tool
You can try running the Deployment Imaging and Servicing Management or DISM tool to fix the problem. Using this built-in tool, you have various options such as the “/ScanHealth”, “/CheckHealth”, and “/RestoreHealth”.
Open the Command Prompt with admin privileges.
Then type in the following commands and make sure to hit Enter right after you type each one of them:
Dism /Online /Cleanup-Image /CheckHealth
Dism /Online /Cleanup-Image /ScanHealth
exe /Online /Cleanup-image /Restorehealth
Do not close the window if the process takes a while as it will probably take a few minutes to finish. Once it’s done, restart your computer.
Error code 0x8007007e occurs in Windows 8 or 8.1 when users attempt to, but fail to successfully use Windows Update. When this occurs, Windows 8 or 8.1 users will not be able to access updates or certain web pages. This error manifests itself via the following common symptoms:
Error code 0x8007007e is usually caused by a malfunction within your system. This malfunction may be due to several issues such as malware on your device, or the accidental removal of a registry entry or system file.
Further Information and Manual Repair
To correct issues related to error code 0x8007007e in Windows 8.1, users may need to employ one or several manual repair methods. Users will not necessarily need technical skills to accomplish this task. However, if you are uncertain of your skills or you are unable to resolve the issue after completing the tasks below, consult a Windows repair technician or use an automated tool.
Method one: System File Checker
System File Checker (SFC) enables users to check their system for corrupt or missing system files. You will need to use Command Prompt. To access System File Checker on Windows 8 or 8.1, follow the instructions below.
Step one: Tap or use the mouse to click Search
Step two: Type Command Prompt in the Search box
Step three: Select Command Prompt, and then click Run as administrator
Step four: Type password if prompted by Command Prompt to do so or simply click Allow
Whether you run Windows 8 or 8.1 operating system on your computer, System File Checker will begin to find and repair missing or corrupted system files. If, however, you are unable to successfully complete the task via Command Prompt, repeat the steps above. You may also consider help from a professional or simply move to the next manual repair method listed below.
Method two: Perform a Clean Boot
A Clean Boot will help users determine if error code 0x8007007e in Windows 8.1 is caused by a problem associated with startup programs. Problems may arise when there is conflict among programs that run in the background when users turn on their device. To run a clean boot, follow the steps below:
Step one: Click the Start button and type msconfig in the search box
Step two: Click Services tab
Step three: Click Hide all Microsoft Services box then select Disable All
Step four: Click Startup tab
Step five: Select Disable All, then OK
Step six: Restart the computer then check if you can now update the system
If the Clean Boot is successful, you will be able to successfully update your system without receiving error code 0x8007007e. However, if the error code reappears while you attempt to access updates or web pages, proceed to the next manual repair method below.
Method three: Scan for Malware
Since error code 0x8007007e in Windows 8 or 8.1 can be caused by issues related to malware, it’s important for users to check their system using a powerful antivirus or anti-malware software. If you do not have one on your system, you will need to download such software as soon as possible.
Once you have the software on your PC, run a scan to check if your computer has been infected. If malware is indeed on your device, remove it using the anti-malware tool.
Method four: Run System Restore Tool
Another effective manual repair method relates to System Restore. This tool enables Windows users to restore their computer to an earlier period of time in which the error code was not present. When done properly, it can effectively resolve error code 0x8007007e. Before running this tool, however, be sure you select a time in which all important files and programs are present so as not to lose them.
Method Five: Use an Automated Tool
If you wish to always have at your disposal a utility tool to fix these Windows 8 and other related issues when they do arise, download and install a powerful automated tool.
There is a central location in Windows 10 that allows users to view all the notifications from its Action Center. Aside from viewing notifications, users can also manage them and take necessary actions in just one single place. Notifications in Windows 10 look similar to a message icon but can be at variance in function. However, recently, a number of users reported that even though they receive notifications about new actions but when opening them, they see nothing. In other words, the notification is false, and to fix this, read on as this post will provide you a couple of workarounds.
The Windows 10 Notifications and Action Center notification messages might show a mismatch. For instance, Windows 10 may say that you have some notifications but when you open Action Center, you find it empty and there are actually no notifications there. Take the case of the following screenshot, the Windows 10 Notification says that there are 6 new notifications available for viewing but the Action Center says otherwise.
Before you troubleshoot the problem, you might want to run System Restore especially if you’ve made some changes in your computer prior to this issue which might have messed with the Windows 10 Notifications and Action Center. To perform System Restore, refer to these steps:
First, press the Win + R keys to open the Run dialog box.
After that, type in “sysdm.cpl” in the field and tap Enter.
Next, go to the System Protection tab then click the System Restore button. This will open a new window where you have to select your preferred System Restore point.
After that, follow the on-screen instructions to finish the process and then restart your computer and check if the problem is fixed or not.
If the problem wasn’t fixed and you’re still getting false notifications, you might want to troubleshoot the problem further using the options given below.
Option 1 – via Windows PowerShell
In the Start search, type “PowerShell” in the field and hit Enter to pull up the Windows PowerShell window.
Next, copy and paste this command and hit Enter to execute it: Get-AppxPackage | % { Add-AppxPackage -DisableDevelopmentMode -Register “$($_.InstallLocation)AppxManifest.xml” -verbose }
After that, reboot your computer and check if the false notifications are now gone.
Option 2 – Try renaming the Usrclass.dat file
DAT errors like the ones that are associated with the Usrclass.dat file, most likely occur during computer startup, program startup, or while you try to use a specific function in your program. Even so, it can easily be fixed. How? Refer to the given steps below.
Tap the Win + R keys to open the Run dialog box.
Then type %localappdata%MicrosoftWindows and hit Enter to get to the location of the UsrClass.dat file.
After that, look for a file named UsrClass.dat and once you’ve found it, right-click on it and select the Rename option.
Now rename the file to UsrClass.old.dat and then restart your computer and see if the problem is now fixed or not.
Recently, a few users reported that they were unable to turn on their computers for some reason and at the same time their computers Computer makes a beeping noise couple of times or continuously whenever they try to turn them on. The sounds the computers are making can be quite annoying and it also signifies that there is something wrong with them.
The problem might have something to do with the hardware inside of the computer system rather than Windows 10 itself. As you know, a computer is designed to deliver audible error sounds every time some part of the hardware is not properly working. For instance, if you hear a single beep, this indicates that your GPU is having some issues and if you’re hearing two beeps, it indicates that your RAM is not working properly, whereas three beeps that repeat after a pause when you turn on your computer means that there is something wrong with the system memory. On the other hand, if your computer is beeping continuously, this means that the problem lies with the processor. To fix this issue, here are some suggestions that might help but before you proceed, make sure that you know how to manage your computer’s hardware, if not, better have some expert do it for you.
Option 1 – Try checking the RAM
One of the basic things you can do in this kind of case is to check the RAM. Prepare some screwdrivers and dig into your PC and then look for the RAM slots and ensure that they are attached firmly. There are times when moving around your computer daily can cause certain components in your computer to become loose. Worst case scenario is that the RAM might be broken so really have to replace it.
Option 2 – Try checking the graphics card
After digging into your computer, check the graphics card and give it some good cleaning. As you know, you have to remove certain components like the graphics card regularly and clean them to help increase their lifespan and avoid errors in a startup. And if it turns out that the graphics card is broken, you have to replace it with a new one to fix the problem.
Option 3 – Try checking the processor
The processor is the brain of every computer so if it ends up not working, everything else is useless. Thus, you need to check it to see if it’s firmly attached and see if it needs some cleaning of dust and other debris. After that, try turning on your computer again. If it doesn’t work, then you might have to take your system to a technician to resolve the problem for you.
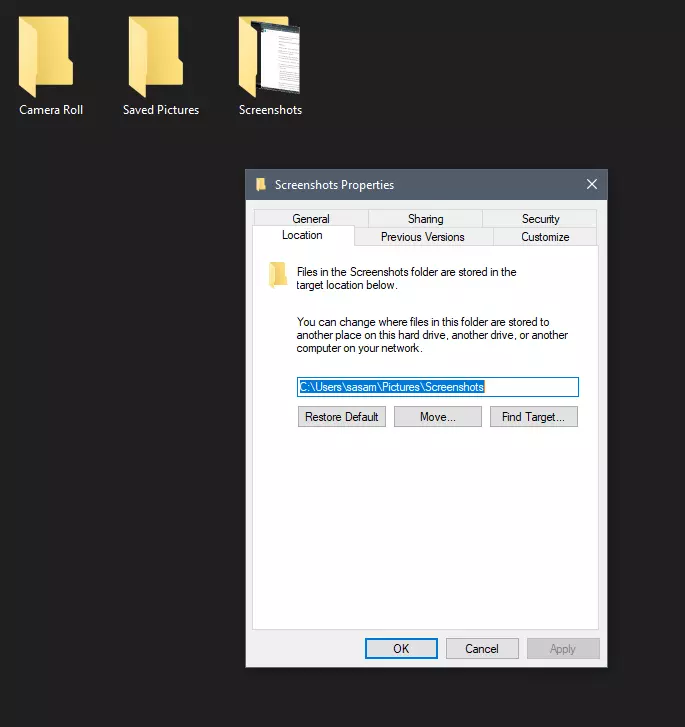
Each time when you press WINDOWS + PrtScn key on your keyboard a screenshot is taken and saved on your Hard drive, to be more precise, it is saved in a specific folder which is in c:\Users\Your user name\Pictures\Screenshots. Now, this specific location is not anything that's bad but it is a little deep and not so user-friendly for quick access.
Luckily this default location can be changed into any folder that you like.
Changing location
First thing is to open File Explorer and then navigate to your PC. Once you go to your PC, go to Pictures, and inside right-click on the Screenshots folder. If there is no screenshots folder inside, this means that since Windows was installed no screenshots were taken with WINDOWS + PrtScn key combination. Please note that just by pressing PrtScn you will create a screenshot but you will place it inside the clipboard ready to be pasted somewhere, with WINDOWS + PrtScn you are saving the screenshot directly in a file on your hard drive.
So once you clicked on the Screenshots folder, go to the bottom and click on properties. Inside properties go to the Location tab. In the location, tab clicks on MOVE and browse to your new location where you would like screenshots to be saved. Once you select the folder for screenshots, click on the Select Folder button and confirm with OK. After this, Windows will ask you would you like to move existing screenshots into the chosen folder. Click YES or NO, depending on your preference.
After this easy setup, all of your new screenshots will be placed now inside the chosen folder.
Thank you for reading and I hope to see you tomorrow. Take care.
Error code 0x80070422 is a Windows-based error code occurring in various versions of Windows including Windows 7, Windows 8 and Windows 8.1, and Windows 10. It usually occurs when users attempt to update Windows. A message box will appear stating that the error code has occurred. Users will notice the following common symptoms:
Inability to complete Windows updates
Error message occurring during use of Windows Update service
The error code, if left unresolved, can cause serious problems for PC users as they will be unable to access the latest updates to the Windows operating system. Such a situation can expose their system to vulnerabilities. Thus, fixing Windows 10 error code is of utmost importance.
Solution
Error Causes
Among the many reasons Error code 0x80070422 is encountered includes:
Corrupted or missing registry and DLL files
Badly or poorly installed software. The software could also be infected by a virus or Trojan
Outdated or poorly installed drivers
Further Information and Manual Repair
Fixing Windows-based error codes can be a simple process. However, in some cases, it requires specialized skills. In the case of Windows 10 error code 0x80070422 consider the two (2) main solutions available through manual repair. You may also need to consider help from a certified Windows repair technician or the use of an automated tool if you are not confident you have the skills to perform the solutions below.
Method 1: Check if Windows Update is Running Properly
One of the main reasons for error code 0x80070422 is a Windows Update service that is not running on the right settings. To verify if an issue with your Windows Update service is the source of the problem applies the following steps:
Type “Windows Update” in the search bar near the Windows home button.
Select “Windows Update settings” when this option appears. (You may also click the home button, then “Settings” followed by “Update and Security”.)
Select “Advanced Options”
(You will be given an option to choose how updates are installed.) Select Automatic.
Save settings and restart the computer.
Once these settings are in place Windows will be able to download updates automatically. This enables your machine to run more smoothly. However, if after applying the steps above, Windows 10 error code 0x80070422 is not resolved, you may proceed to solution two (2).
Method 2: Disable Internet Protocol Version 6 (IPv6)
IPv6 is the latest or most current version of Internet Protocol (IP). This provides your machine with an IP address, a crucial aspect of all communications related to the Internet. By disabling this IP some users have been able to successfully resolve Windows 10 error code 0x80070422.
Like many tasks involving Windows, there are more than one ways in which you can attempt to disable IPv6. These require different types of skills and must be approached with care, as mistakes can lead to serious issues with your machine. Methods include using Command Prompt, Registry Editor, or Control Panel.
If your experience with Windows 10 is quite limited and you are not certain of your skills choose the simplest approach as listed below.
Select Control Panel.
Choose “Network and Internet”, then “Network and Sharing Center”.
Right-click your Internet Connection. The name of your connection will be listed underneath the heading – “View your basic network connection and set up connections”.
Select “Properties” then uncheck Internet Protocol version 6 (IPv6)
Save settings by clicking OK.
Restart the computer and check if the 0x80070422 error code has been corrected.
Method 3: Using An Automated Tool
If the issue persists despite following the solutions above, the best step to take is to use an automated tool. This may not be your preferred course of action, especially since it can be difficult to ascertain the safety of certain tools found online. For this reason, choose a reputable source offering automated tools which are designed to specifically fix Windows 10 error code including error code 0x80070422.
Download and install a powerful automated tool to access the best Windows 10 error code solutions. The process is simple and includes clear instructions which enable even average Windows users to completely resolve complicated errors on their machine.
How to Stop Future Error Codes from Occurring
Though it is hard to predict when an error code will occur, each Windows 10 user can take precautionary steps to prevent other errors from occurring. This includes the following:
Ensure you download software from reputable sources to avoid viruses and other forms of malware.
Clean your registry often. The registry stores settings across all applications. Regular cleaning will your machine function more efficiently as it reduces the likelihood of issues such as crashes or system errors.
One of the most critical processes in the Windows 10 operating system is the Explorer.exe. And there are times when you might encounter an error that says, “System call failed”. You can encounter this error when you try to launch File Explorer, and in such case when the File Explorer does not work, it could cause issues in accessing folders and files on your computer.
This kind of error pops up when the explorer.exe system file has become corrupted or if there is some process that interferes with its smooth functioning. To fix this error, you can try to restart the explorer.exe process, run both the System File Checker scan and DISM tool. You could also put your computer in a Clean Boot State or uninstall any programs you’ve installed recently. For more details, follow each one of the given suggestions below.
Option 1 – Try to restart the Explorer.exe process
The first thing you can do is try to restart the Explorer.exe process. To do so, refer to these steps:
First, right-click on the Taskbar and select the Task Manager.
Next, expand the Task Manager window to see all the active processes.
From there, look for the Windows Explorer process, right-click on it and select Restart.
After that, check if the error is now fixed.
Option 2 – Run System File Checker scan
If restarting the explorer.exe process didn’t work, you can also try running the System File Checker or SFC scan to fix the error. System File Checker is a command utility built into your computer that helps restore corrupted files and missing files. Refer to the following steps to run it:
Hit the Win + R keys to launch Run.
Type in cmd in the field and tap Enter.
After opening Command Prompt, type in this command: sfc /SCANFILE=c:windowsexplorer.exe
Note: If you are using a 64-bit Windows operating system, enter the “sfc /SCANFILE=C:WindowsSysWow64explorer.exe” command instead.
Wait until the process is completed and then restart your computer.
Option 3 – Run the DISM tool
You might also want to run the DISM tool. This tool is known to repair potentially corrupted files in your system as having them could also system issues like the “System call failed” error. To repair these corrupted system files, you can run the DISM commands:
Tap the Win + X keys and click on the “Command Prompt (Admin)” option.
After that, input each one of the commands listed below sequentially to execute them:
Dism /Online /Cleanup-Image /CheckHealth
Dism /Online /Cleanup-Image /ScanHealth
Dism /Online /Cleanup-Image /RestoreHealth
Once you’ve executed the commands given above, restart your computer and check if the problem is now fixed.
Option 4 – Try running the Check Disk utility
In the Windows Search box, type “command prompt” and from the search results, right-click on Command Prompt and select “Run as administrator”.
After opening Command Prompt, type this command and tap Enter: chkdsk c: /f /r
The command you entered will start to check for errors and fix them automatically. Else, it will throw an error message saying, “Chkdsk cannot run because the volume is in use by another process. Would you like the schedule this volume to be checked the next time the system restarts? (Y/N)”.
Tap the Y key to schedule Disk Check the next time your computer restarts.
Option 5 – Put your computer in a Clean Boot State
As pointed out, there are some instances that some conflicting programs installed in your computer might be the one that triggers the “System call failed” error to appear when you try to open File Explorer. To identify which program is causing the problem, you need to put your computer in a Clean Boot State. To do so, follow the steps below.
Log onto your PC as an administrator.
Type in MSConfig in the Start Search to open the System Configuration utility.
From there, go to the General tab and click “Selective startup”.
Clear the “Load Startup items” check box and make sure that the “Load System Services” and “Use Original boot configuration” options are checked.
Next, click the Services tab and select the “Hide All Microsoft Services” check box.
Click Disable all.
Click on Apply/OK and restart your PC. (This will put your PC into a Clean Boot State. And configure Windows to use the usual startup, just simply undo the changes.)
Once your computer has restarted in a Clean Boot State, perform your scan again and see if it now works, and then start to isolate the problem by checking which one of the programs you installed recently is the root cause of the problem.
Option 6 – Try to uninstall the programs you’ve installed recently
In case you don’t know, freeware software packages aren’t always free as some of them could contain malicious software that can cause serious damage to your computer. Thus, if you have installed a program recently prior to getting the “System call failed” error, then you have to uninstall that program.
Tap the Win + R keys to open the Run dialog box.
Then type “appwiz.cpl” in the field and tap Enter to open the Programs and Features in Control Panel.
Next, arrange the list of installed programs in the order of the installation date.
After that, look for the problematic program and right-click on it, and then select Uninstall.
Once the process is done, restart your computer and see if the error is fixed.