Error Code 0xC004F00F can appear during the Windows 10 installation and activation process. It is a fairly straightforward error code that occurs when a product key is entered in that is unable to be used to complete the final activation of the new operating system. This error code is most commonly related to the installation of new pieces of hardware on a machine that was already running Windows 10 at a previous time.
Error Code 0xC004F00F can also appear on other versions of the Windows software, so if you are not specifically trying to install and activate Windows 10 when this message appears, you may want to contact a qualified Windows technician to help resolve your system error, as the error code has different causes and resolution methods on other versions of the Windows operating system.
Solution
Error Causes
In some cases, Error Code 0xC004F00F will show up if you are attempting to install Windows 10 on a computer in which the hard drive has been replaced or significantly altered. It can also appear when other major pieces of hardware, like the motherboard, have been changed out. These pieces may be changed as part of an upgrade to new or better hardware or be changed due to the malfunction of the original pieces of equipment. Because it may appear to the Windows activation servers that you are attempting to use the same product code that you have used before to activate what appears to be a new machine (even if the machine is the same one, just with some new parts), you may see Error Code 0xC004F00F arise.
Error Code 0xC004F00F can also come up if you have installed Windows 10 on your machine in the past and have already used the product key that you are attempting to use again.
Further Information and Manual Repair
Error Code 0xC004F00F most commonly appears for users who have made major hardware or software changes done on their machine. Because this error specifically arises from the Windows activation servers believing that your computer is a new one, you’ll need to get in touch with the Windows support team in order to resolve the error. From their database, they will be able to confirm that you are not using a new computer and will be able to bypass the error, allowing you to complete the Windows 10 Activation process.
If you haven’t installed or replaced any of the hardware on the computer, but are still seeing Error Code 0xC004F00F arise during your Windows 10 installation, you will still need to get in touch with the Windows support team to bypass the error code.
Calling the Windows' Support Team
When you call into the Windows support team, you’ll want to specifically have a list of the following information readily available: Which pieces of hardware have been changed out on your computer prior to the installation and activation, what method you were using to install Windows 10, which version of Windows 10 that you were attempting to install, whether it was a single-use or multiple-use license, and basic details about your PC like its make, model, and age. You may also want to have the product key that you were attempting to use when Error Code 0xC004F00F first appeared.
By having all of this information ready and on hand ahead of time, you’ll have a greater likelihood that your error will be able to be resolved quickly and efficiently, avoiding long periods spent on the phone with customer service. Make sure that you specifically mention that you are experiencing Error Code 0xC004F00F during the Windows 10 activation process when you call into the Windows support team so that you can be connected to a representative who is equipped to help you resolve this specific problem.
Getting a Qualified Technician
If you are not comfortable in working with the Windows support team or have not been able to successfully resolve Error Code 0xC004F00F even after getting in touch with customer support, contact a qualified technician who is familiar with the Windows 10 activation process and can walk you through the things that you will need to communicate to the Windows support team in order to have them bypass or resolve the error code.
If you wish to always have at your disposal a utility tool to fix these Windows 10 and other related issues when they do arise, download and install a powerful automated tool.
These days, Google Chrome is definitely one of the most used browsers in the browser. Google has almost created a nearly perfect product that rarely experiences problems. However, a lot of users have reported an issue where some files they’re downloading or their downloads in their Google Chrome browsers are stuck at 100%. So if you are one of these users, read on as this post will guide you on what you can do to resolve the problem.
This kind of problem could be caused by several factors. It is possible that the file download process could be blocked by a third-party antivirus or it could be that the content-length header could be missing from the server. Aside from that, a Google Chrome extension could also be the culprit or it could be that the current installation of the browser could be corrupted. This kind of problem can get really annoying as the download process has already utilized system resources as well as take up your time. Thus, you need to fix the problem using several suggestions. You can try to clear the browser cache, disable the Chrome virus scan, whitelist the file on the third-party antivirus program, put your browser in Incognito mode and download the file again. On the other hand, you could also try to reset or reinstall the browser. For more details, follow the options provided below.
Option 1 – Try to clear browser cache and try downloading again
There are times when some data in the browser is conflicting with the loading of the website and triggers some problems like download getting stuck at 100%. And so you can try to clear your browser’s data. This might be a very basic solution but oftentimes it works in fixing this kind of error in Google Chrome. Follow the steps below to clear the data in your browser.
Open your Google Chrome browser.
After that, tap the Ctrl + H keys. Doing so will open a new panel that allows you to delete the browsing history and other data in your browser.
Now select every checkbox that you see and click on the Clear data button.
Then restart your Chrome browser and check if you can now complete the download again.
Option 2 – Try disabling Chrome virus scan
The next thing you can do to resolve the problem is to disable the Chrome virus scan. It is possible that the virus scan is the one that’s preventing the download to be completed, thus, try to disable it and see if it works.
Option 3 – Whitelist the file you’re downloading in your antivirus program
The download getting stuck might also be caused by your antivirus program which could be interfering it from running. To fix this, you have to whitelist dism.exe. How? Refer to these steps:
Open the Windows Defender Security Center from the system tray area.
Next, click the “Virus & threat protection” option and then open the “Virus and threat protection settings”.
After that, scroll down until you find the “Exclusions” and click on the “Add or remove exclusions” option.
Then click the plus button and select the type of exclusion you want to add and from the drop-down list, select Folder.
Next, navigate to this path and select the WinSxS folder: C:/Windows/WinSxS
When a User Account Control or UAC prompt, just click on Yes to proceed.
Option 4 – Try downloading the file in Incognito mode
There are certain browser extensions, especially those security programs, that prevent any suspicious files from being downloaded. So the easy way to fix the problem is to launch the Chrome browser in Incognito mode and then try to download the file again. Additionally, you might want to consider disabling the problematic extension.
Option 5 – Reset Chrome
Resetting Chrome can also help you fix the problem. This means that you will be restoring its default settings, disabling all the extensions, add-ons, and themes. Aside from that, the content settings will be reset as well and the cookies, cache, and site data will also be deleted. To reset Chrome, here’s what you have to do:
Open Google Chrome, then tap the Alt + F keys.
After that, click on Settings.
Next, scroll down until you see the Advanced option, once you see it, click on it.
After clicking the Advanced option, go to the “Restore and clean up option and click on the “Restore settings to their original defaults” option to reset Google Chrome.
Now restart Google Chrome.
Option 6 – Try to clean reinstall Chrome
There are instances when programs leave files behind after you’ve uninstalled them and the same thing can happen to Chrome so before you reinstall Chrome, you have to make sure that you have deleted the User Data folder. To do so, refer to the following steps:
Hit the Win + R keys to open the Run dialog box.
Next, type “%LOCALAPPDATA%GoogleChromeUser Data” in the field and hit Enter to open the User Data folder.
From there, rename the default folder and name it something else, e.g. “Default.old”.
After that, install Google Chrome again and check if the issue is now fixed.
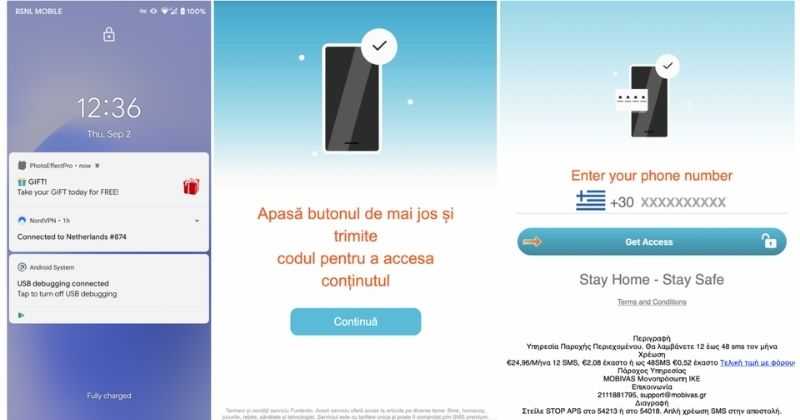
There has been recently discovered in the field of malware targeting Android devices. Affecting more than 10 million users of Android phones, the malware GriftHorse is doing its attacks via phishing and premium services scams. A lot of applications have been discovered that are hosts for this malware and many of them are inside the Google store and available for download.
According to Zimperium zLabs, this malware that was recently detected has been doing its scams and attacks even in November of 2020 and has thus far accumulated hundreds of thousands of dollars in its scam.
On the surface it looks very harmless, asking for typical permissions like internet access, calls, and other related needed functions, and then it waits. After few months the real attack happens when users get charged with premium service they never subscribed to in the first place.
List of Infected Applications that Carry GriftHorse Trojan
Zimperium zLabs listed out some of the apps with this malware. Users are advised to avoid installing them.
Amazing Video Editor
Bag X-Ray 100% Scanner
Bus – Metrolis 2021
Call Recoder Pro
Call Blocker-Spam Call Blocker
Cinema Hall: Free HD Movies
Coupons & Gifts: InstaShop
GPS Phone Tracker – Family Locator
Fingerprint Changer
Fitness Point
Free Calls WorldWide
Geospot: GPS Location Tracker
GPS Phone Tracker – Family Locator
Handy Translator Pro
Horoscope : Fortune
iCare – Find Location
iConnected Tracker
Instant Speech Translation
Lifeel – scan and test
My Chat Translator
My Locator Plus
Plant Camera Identifier
Racers Car Driver
Safe Lock
Screen Mirroring TV Cast
Slime Simulator
Smart Spot Locator
These are only some of the many infected apps available on the internet.
Zimperium zLabs also warned that GriftHorse Trojan exists in over 70 countries worldwide. The infected app quickly changes the language and displays content depending on the user’s IP address.
This post will guide you on what to do if your keyboard shortcuts or hotkeys are not working on your Windows 10 computer. A lot of users use hotkeys as they make things easier for them as they use their computer. However, there are instances when these hotkeys suddenly stop working. It’s actually one of the most common problems with keyboards. And so to resolve this problem, you can try out some suggestions prepared on this post.
Option 1 – Clean the keyboard keys physically
Your keyboard might not be working properly due to some dirt or other corrosion. First, you need to shut down your computer and then unplug the keyboard if you are using a desktop computer and then prepare it for cleaning. After that, use a small cotton ear cleaning tool to get between the creases and clean them. You can dip it slightly in alcohol to make it more efficient in cleaning dust and dirt. And if you can, you have the option to pull apart the keyboard completely and then wipe away all the corrosion from the inside. Once you’re done, put the keyboard back together and then plug it back into your PC. Now turn your PC on and check if the hotkeys are now working.
Option 2 – Try running the Hardware and Devices Troubleshooter
The first thing you can do to fix the problem is by running the Hardware Troubleshooter. Although it won’t make much of a difference, there’s still a possibility that it could automatically fix the problem with these function keys. To use it, refer to these steps:
The first thing you need to do is click on Start and then on the gear-like icon to pull up the window for Settings.
After opening Settings, look for the Update and Security option and select it.
From there, go to the Troubleshoot option located on the left-hand side of the list.
Next, select Hardware and Devices from the list and open the Troubleshooter and run it. Once it is doing its job, wait for it to complete the process and then restart the system.
After the system restarts, check if the problem’s now fixed. If not, refer to the next option given below.
Option 3 – Try connecting the keyboard to a different USB port
The problem might have something to do with the USB port that’s currently in use by your keyboard. It could be that it’s not working so it makes sense to unplug it and attach it to another USB port. You can also clean the USB port on both ends to ensure that they are not affected by corrosion.
If you have been previously using another keyboard, it might be better if you make sure that the software for the old device has been removed since there are instances when multiple software can cause problems due to similarities in actions.
Option 5 – Update the keyboard driver
You can also update the keyboard driver to fix the problem. There are cases when an outdated or corrupted driver can fix the problem. To do so, follow the steps below.
Tap the Win + R keys to open the Run dialog box.
Then type “devmgmt.msc” in the field and hit Enter to open the Device Manager.
From there, look for the keyboard driver and click on it.
Next, right-click on the keyboard driver and select the Update driver option.
After that, click the “Search automatically for updated driver software” option to proceed.
Option 6 – Reinstall the keyboard driver
If updating the keyboard driver didn’t help, then you might want to reinstall it. How? Follow the steps below.
Tap the Win + R keys to launch Run.
Type in MSC into the box and tap Enter or click OK to open the Device Manager.
After that, a list of device drivers will be displayed. Look for keyboard driver, right-click on it and then select “Uninstall device”.
After that, unplug the device and restart your PC.
Then plug your device back in. Assuming your device is connected to your PC, open the Device Manager again.
Next, click on the Action button and click the Scan for hardware changes button. That should fix the problem.
Note: You could also completely uninstall the driver and go directly to the manufacturer’s website and download the latest driver for your hardware and then install it.
Option 7 – Enable Human Interface Device (HID) Service
Another thing to consider is the Human Interface Device Service. If this service is disabled, then no wonder why your hotkeys are not working. Thus, you need to enable this service. Refer to the following steps to do that:
Tap the Win + R key to launch the Run dialog box.
Then type “services.msc” in the field and hit Enter to open Services.
After opening Services, scroll down until you see the Human Interface Device service.
Double click on HID and make sure that its Startup Type is set to “Automatic” and then click OK.
Restart your PC and check if the hotkeys are now working or not.
Option 8 – Try resetting the keyboard
You might also want to try resetting the keyboard as it can also help in fixing the problem. Setting it back to its default state will surely help.
Ever gotten an e-mail offer that seemed just a little bit too good to be true? Might’ve been a phishing attempt! These are everywhere and can come in many different forms.
So what’s phishing exactly, how can you detect it and how can you keep safe?
What is phishing?
Phishing (pronounced like fishing) is a type of cyberattack that tricks the user into trusting the source and revealing sensitive information. Fishing being the perfect analogy, the bait is a legitimate-looking site, e-mail or file and when you take a bite, your identity, banking information and much more can be revealed and stolen.
Credit: Anne Nygård on Unsplash
Some phishing attempts are incredibly obvious, others are super elaborate. Like with most types of malware, cybercriminals have become extremely well-versed in phishing and anyone can fall for it. To help you recognize and avoid it, we’ll take you through a couple of phishing types and give you tips on what to do if faced with them.
Phishing techniques
E-mail phishing
This is actually the most common type of phishing. A cybercriminal creates an e-mail containing stuff like attractive offers, legitimate-looking attachments or links and makes it appear as though it’s coming from a trusted source.
Credit: Justin Morgan on Unsplash
For example, it looks like it’s coming from your bank or your favorite retailer. The logo looks legit and the structure of the e-mail seems familiar, so you might get tricked into clicking on whatever clickable content is in it.
Unfortunately this exposes your device to malware that hands your data off to the hacker, who can decide what to do with it further.
SMS and social media phishing
Like the above example, you could be approached with lucrative offers or links via text messages or social media messages. Typically, the messages seem relevant to the user as they will be made to look like they’re related to apps or services you’re using.
Voice phishing
Voice phishing attacks are schemes that appear as though they’re coming from a credible number. Normally, you’ll get a call about something related to credit cards or taxes to get you into a state of worry, leading you to disclose personal information on the phone.
Spear phishing, whaling and BEC
Spear phishing normally targets specific individuals within a company who are likely to have access to sensitive data. Spear phishers spend time collecting information they can use to reach out to the individual looking as trustworthy as possible. They’ll typically lead with something relevant, for example mentioning an upcoming company event, and make a seemingly legitimate request.
Whaling is a more elaborate form of spear phishing, which targets people in even stronger positions such as executives or high-value individuals. The ultimate goal is to get them to transfer financial or other sensitive information that can be used to compromise the entire business.
Credit: Azamat E on Unsplash
BEC, or Business e-mail compromise, is a specific spear phishing technique carried out via e-mail. While there are many ways this is done, most commonly you’ll see instances where the phisher poses as a CEO or similar executive, or as a lower-level employee in specific positions (e.g. sales managers or financial controllers).
In the first situation, the impersonator reaches out to employees requesting them to transfer certain files or pay invoices. In the second situation, the phisher takes control of the employee’s e-mail account and sends false instructions to other employees in order to obtain data and information from them.
What can you do?
There are many ways you can be aware and spot a phishing attempt. Here are some tips:
Always check the sender’s address in your e-mails, even when they seem to come from a familiar source.
In any instance where payment information is requested, be very, very careful.
If you are receiving attachments you never asked for and definitely didn’t expect, better not click on them.
Beware of content that transmits a sense of urgency (sales deals, urgent updates to login credentials, etc.).
Bad spelling and grammar are usually a telltale sign of phishing.
Links that look shortened (e.g. Bit.ly) or just suspicious in general - if you have a bad feeling, do not click on them.
If you are receiving threats, you probably shouldn’t be clicking on anything in that message.
Always examine first-time senders in detail.
Block suspicious e-mail addresses, numbers and social media accounts.
If you are receiving a coupon for free stuff… You aren’t.
If you’re being asked to update your payment details by a service you use, such as Netflix, chances are it’s an impersonator.
Those are some of the ways to identify and prevent phishing attacks. However, sometimes phishers disguise themselves a little too well or a misclick happens and there you go - you’ve been exposed to malware.
Credit: FLY:D on Unsplash
This won’t happen if you invest in powerful protection software from the get-go, though. A good antivirus program like Bitdefender will keep you safe from becoming a victim of phishing scams. In fact, it will protect you from malicious attacks overall.
Be it your household or your business you’re concerned about, there are a bunch of different packages and options available, providing different kinds of cybersecurity services. That’s the only way you can ever really be sure you aren’t at risk of a digital attack.
Summary
Have you ever been targeted by phishers and didn’t know that’s what it was until you read this article? Many can relate. Protect yourself before it’s too late!
Like in Windows 10, Windows 11 will also support God mode to be enabled and used. For those readers that do know what God mode is, let me explain it in simple terms. God mode is the icon on the desktop that once clicked will open and let you adjust every option in the control panel and some hidden features for Windows inside one application.
There are a lot of advantages to having this one-click fast access to features, especially if you are a power user. Luckily creating such an awesome icon and enabling God mode is very easy to accomplish, all you have to do is:
Create a new folder where you want to have the God mode icon
As you can see creating and accessing all settings at your fingertips is much easier than most people think. Enjoy your ultimate access to Windows 11 features and if you wish you can drag and drop sections from it into the desktop or anywhere for easy access to that specific topic.
If the Error Code 0xC004C770 popped up on your computer during your activation of the Windows 10 software, don’t worry. This is a fairly common error, especially for people who own more than one computer upon which Windows 10 is installed and activated. The gist of this error code is that the product key that you have entered has already been claimed or used on a different computer. Because there are limitations on the number of computers that can use any given license activation code or product key, this error code can arise when you have exceeded that limit. If you have a single-use license and have already entered the particular product key onto another machine, you may see this error come up during activation.
Both Error Code 0xC004C770 and Error Code 0x803FA071 arise from the same problem and the same steps can be used to resolve both error codes.
Solution
Error Causes
Error Code 0xC004C770 is likely to appear on your screen during activation of Windows 10 if you or anyone else in your organization have already entered in the product key used on another computer. If you have a multiple-use license, the product key that you are entering may already have been used for the maximum number of computers allowed under that license.
Further Information and Manual Repair
There are two basic methods for addressing the issues associated with Error Code 0xC004C770. These methods can easily be implemented by anyone who is comfortable interacting with the Windows Store from their computer, which makes the resolution of this particular error code fairly simple and straightforward.
If you are unable to complete the steps below or Error Code 0xC004C770 has not been resolved after following the guides below, contact a Windows technician who is familiar with the Windows 10 activation process to assist you in the process. You can also get in touch with the Windows technical support team to assist you in the process if needed.
Method One: Purchase A New Product Key from Windows
If you have already used the product key on another computer or have used it on the maximum number of allowed devices, you may need to purchase an additional product key for the computer with Error Code 0xC004C770. Product keys can be purchased physically from a retailer that sells Windows 10 software licenses or purchased directly from the Windows store.
To purchase a new product key directly from the Windows Store, follow the steps below:
Step One: Select the Windows start button at the bottom of your toolbar. Click on “Settings,” then select the option for “Update and Security.”
Step Two: Click on the “Activation” option.
Step Three: In the menu that appears, choose the option to “Go to Store” and follow any on-screen instructions to finalize a purchase of the Windows 10 software and product key.
Step Four: Use the new product key to complete the installation and activation of the Windows 10 software on your computer.
If you are unable to see the “Go to Store” option when you reach the “Activation” page, you may not be set as an administrator of your machine. In this case, get in touch with the support personnel from your company to complete the purchase, installation, and activation process on your computer.
Method Two: Attempt to Finish Activation via Phone
For users who have changed out parts of their computer’s hardware, like putting in a new motherboard or activating a new hard drive, you may have more success if you attempt activation through a phone.
In order to activate your copy of Windows 10 from your phone, follow the steps below:
Step One: On your mobile device, open up the search box from the taskbar.
Step Two: In the search box, enter the phrase “SLUI 04.”
Step Three: Select the “SLUI 04” option that appears.
Step Four: Follow the directions given on the screen to complete the activation process for your copy of Windows 10.
As with any error code resolution, if the methods above are not successful or if you are not comfortable with your ability to successfully complete the steps above, get in contact with a qualified professional who is trained in the Windows 10 activation process to assist you or download a powerful automated tool to get the job done.
If you suddenly find your Windows 10 computer stuck on the “Preparing to configure” screen for quite a long time now after you run Windows Update, read on as you will be guided on how you can fix that issue in this post.
During an update process, there’s a lot of things that go on in the background which is why Windows Updates take quite a while before it finishes. It can be at 25%, 50%, or even 100% but the only message you’re going to see on your screen is the “Preparing to configure Windows, Don’t turn off your computer”. However, if you notice that the Windows Update is taking a longer time than it’s supposed to, the first option is to wait some more but if it’s still the same, then there’s definitely something wrong. This kind of issue occurs when Windows Update fails to configure in short correctly download and install the update. When this happens, it will revert all the changes which are why you were advised to wait for a couple of hours.
There are two possibilities why your computer is stuck on the “Preparing to configure Windows, Don’t turn off your computer” screen. The first one is that the Windows 10 operating system is installing any updates. The second one is when the user profile takes time to load or encounters an error. There are several options you can try to fix the problem. You can try running System Restore or boot your computer in Safe Mode or repair the corrupted profile via Registry Editor. You might also want to try using installation media to boot and repair your computer if the other options didn’t work.
Option 1 – Perform System Restore
Tap the Win + R keys to open the Run dialog box.
After that, type in “sysdm.cpl” in the field and tap Enter.
Next, go to the System Protection tab then click the System Restore button. This will open a new window where you have to select your preferred System Restore point.
After that, follow the on-screen instructions to finish the process and then restart your computer and check if the problem is fixed or not.
Note: If you can’t boot into the desktop of your computer, you can run System Restore in the Advanced Startup Options by following these steps:
Boot your computer into the Advanced Startup Options screen.
From there, you will see some options to troubleshoot when you can’t log in to Windows in the usual way.
Now select Troubleshoot > Advanced Options > Command Prompt.
After that, type “rstrui” and hit Enter to execute the command which will start the System Restore process.
Once it’s done, restart your computer.
Option 2 – Boot your computer in Safe Mode
You can try to tap the F8 key if you have it enabled in your Windows 10 computer, as you start your system to boot into Safe Mode. Once your computer is in Safe Mode, you can access the Start Menu and the Mouse and Keyboard. Aside from that, you can also access your files and other built-in tools in Windows such as Command Prompt, PowerShell, Computer Manager, Device Manager, Event Log Viewer, and many more. On the other hand, if you haven’t enabled the F8 key, you can just go to the Advanced Startup options to boot your computer into Safe Mode. Once you’re there, select Troubleshoot > Advanced Options > Startup Settings > Restart > Tap the number 4 key. After that, your computer will restart in Safe Mode. If you want to reboot into Safe Mode with Networking instead, you can tap the number 5 key and for Safe Mode with Command Prompt, tap the number 6 key. Once your computer is in Safe Mode, you can use any of the built-in tools to restore your computer or troubleshoot the problem that’s causing your computer to get stuck at the “Preparing to configure” screen.
Option 3 – Try to repair your corrupted profile via Registry
In this third option, you can try to repair the corrupted profile using the Registry but before you proceed, take note that you can only try this if you can boot into your desktop and if you can, make sure to create a System Restore Point and then follow the steps below.
Tap the Win + R keys to open the Run dialog box.
Then type “Regedit” in the field and hit Enter or click OK to open the Registry Editor.
Next, go to this registry key: ComputerHKEY_LOCAL_MACHINESOFTWAREMicrosoftWindows NTCurrentVersionProfileList
Once you’ve opened the registry key, you should see a list of all the user profiles on your computer. Now click on each S-1-5 folder and look for the “ProfileImagePath” entry and double click on it to check which user account it is related to. You will see a path like “CUsersACK” where “ACK” is the username.
You should know which of the user account is corrupted. Just look for a key named “RefCount” and change its Value data to “0” and click OK. And if it isn’t available, simply right-click on the right pane and create it.
After that, double click on the key named “State” and make sure that the Value data is “0” and click OK.
Exit the Registry Editor and restart your computer to apply the changes made.
Option 4 – Try to use installation media to boot and repair your computer
Another thing you can try to resolve the issue is to use the Windows installation bootable media so you can boot and repair the operating system. To use it, follow these steps:
You need to first create an installation media which has the dame version of the operating system installed in your computer.
After that, once you reach the Install Windows screen, click on the “Repair your computer” link.
Wait until the repair is completed and then shut down your computer
Now once your computer has restarted, check if it can now boot properly.
Many of us are taking the google search engine for granted and it is no true that it has crawled in almost every spore of our digital lives but if we wanted a little more privacy? Do we have options or we are destined to use google and send our information to this company. What if we really wanted that our searches are well safe, secure, and private? We could try other search engines like BING but since BING belongs to Microsoft we would exchange only one company for another without making any progress in the privacy battle. Enter DuckDuckGo.
DuckDuckGo is a privacy-focused search engine that’s been online since 2008. Find websites, maps, videos, news, and more without tracking your searches and serving you targetted ads. It took DUckDuckGo as you can tell sometimes to gain ground and to be recognized but finally, it got the attention it deserves. Its big breakthrough happened in September of 2014 when Apple offered it as a default search engine in Safari and since it has gained more and more ground. It seems people care about their privacy after all.
Since then DuckDuckGo has been gaining ground and all the major browsers have integrated it as an option for a default search engine.
In this article, we will show you how to switch to DuckDuckGo and set it as your preferred search engine in all major browsers.
Google Chrome
Launch Chrome and click on the three dots in the upper right.
Choose settings.
Choose Search engine in the list on the left of the screen.
Click on the drop-down box next to Search engine used in the address bar and choose DuckDuckGo.
Mozilla Firefox
Launch Firefox, click on the three lines hamburger menu icon in the top-right corner of the window.
Click on Preferences.
Click on Search in the menu to the left of the screen.
Under Default Search Engine, click the drop-down box and choose DuckDuckGo.
Microsoft Edge
Click on the three dots menu button in the top-right corner of the window
Then select Settings.
Click on Privacy, Search and Services in the menu that appears on the left
Scroll down to the Services menu and choose Address bar and search.
Click the dropdown menu next to Search engine used in the address bar and choose DuckDuckGo.
Apple Safari
Click Safari in the menu bar at the top of the screen
Then click Preferences.
You can also use the Command+, shortcut to quickly bring up Safari’s Preferences.
Click on the Search tab, then choose DuckDuckGo under the Search engine drop-down box.
Opera
Click on the Settings cog button in the sidebar on the left of the screen.
Under Basic settings scroll down until you see Search engine and a drop-down box.
Select DuckDuckGo from the list.
Installation Error 1628 is, as the name suggests, an installation error. When it occurs, a generic 1628 message is displayed to the user. When this message appears, it is either a problem with the install files or an issue with the InstallShield.
Solution
Error Causes
Installation Error 1628 is caused because every Windows-based program or application has been designed that such that it has to be installed on the computer for use.
This installation process is important because it not only moves files to the appropriate location on one’s hard drive but also because the process creates registry entries in Windows System files.
A vast majority of these programs and applications have a built-in tool that’s responsible for aptly performing this installation. This built-in tool is the InstallShield.
This establishes that when this error occurs, it is either because of some unforeseen issue that occurred during the installation process or because of some problem with the InstallShield.
Further Information and Manual Repair
In order to keep this error from occurring in the future, some recommendations are outlined below.
Check the installation disc and determine if there are any smudges, scratches, or fingerprints on it. If the system is unable to read data from the disc, Installation Error 1628 will be generated. In order to ensure that the Installation Disc is clean, use a microfiber cloth. Dampen it lightly with water and clean the disc. Wipe the inside of the disc lightly in an outward direction, making sure that it is not wiped in a circular pattern. Try to reinstall the application or program after cleaning the disc. The issue should be resolved. However, if it persists, some problems may be with the InstallShield.
The alternative solution is to repair the InstallShield and the procedure goes as follows.
Stop InstallShield’s running process. It may have been crashed and simply needs to be restarted. Now access task manager. Press Ctrl+Alt+Del and the task manager will open. Now go to the processes tab and disable ‘idriver.exe’ and ‘msiexec.exe’ from here.
Now go to ‘C: Program Files/Common Files’. Here you will find the ‘InstallShield’ folder. Select ‘rename’ and modify the folder name to ‘InstallShield1’. Confirm rename and start the installation process again. Now Windows will try to re-install any InstallShield files one needs.
If the error persists after renaming the InstallShield folder, download the Windows Installer from Microsoft’s website. This file will determine whether or not your version is valid. Old versions often have bugs that cause problems. Your system is now ready to be used.
The Boot Configuration Data or BCD files have the instructions required by the Windows operating system in order to properly boot the computer. So if you experience any trouble when you boot your computer, then it is possible that it is due to some misconfiguration or even corrupted Boot Configuration Data files. And if you also encounter an error saying,
“The boot configuration data store could not be opened”
while you try to carry out any command on the bcedit.exe, then you’ve come to the right place as this post will guide you on how you can fix this error in Windows 10.
This kind of error could pop up if the system is not able to locate the specified file. It is also possible that the requested system device can’t be found or that the boot configuration data store could not be opened. In addition, when you open the System Configuration or MSConfig, you might notice that there is no Boot data, and according to the reports, is that when you try to dual boot the computer, the installer will replace the default bootloader.
Explanation
In case you don’t know, Windows’ earlier versions were stored in the “Boot.ini” file. You can find the entry in the EFI firmware boot manager of the EFI-based operating system which is located at EFIMicrosoftBootBootmgfw.efi.
Whatever the cause of the error is, there are several suggestions you can check out to resolve the problem. You can try to set an entry option value in BCD or enable the Advanced options menu, as well as rebuild the BCD. Before you proceed with the troubleshooting options provided below, make sure that you boot your computer into the Advanced Recovery Mode first since that’s where you can find Command Prompt under the Advanced Options. In addition, you also have to suspend or disable BitLocker and Secure Boot on your PC.
Option 1 – Try to set an entry option value in BCD
Once you’re in the Advanced Options, select Command Prompt.
Next, execute this command to set an entry point: bcdedit /set {current} Description "TheNameYouWant"
After the command has been executed, it will enable the system to trust a version of Windows that is not trusted by default. This should fix the problem, if not, follow the next given options below.
Option 2 – Try to specify the BCD file
In the elevated Command Prompt, execute this command: bcdedit /store c:BootBCD
Once done, the command will give you a list of options and then execute this next command: bcdedit /store c:BootBCD /set bootmenupolicy legacy
After that, restart your computer and select your Windows and then tap the F8 key right away.
Note: When you select the legacy option, the Advanced Options menu will be available during the computer boot up and then you can select into which operating system you can boot your computer into.
Option 3 – Try to rebuild the BCD files
The first thing you can do to resolve the issue is to Rebuild Boot Configuration Data or BCD files.
You can start by booting into the installation environment for Windows 10 from an installation media.
After that, click on Repair your computer and on the blue screen, select Troubleshoot and then select the Advanced options menu.
From there, select Command Prompt and once you open it, enter each one of the commands given below by sequence.
bootrec /FixMbr
bootrec /FixBoot
bootrec /ScanOS
bootrec /RebuildBcd
Once you’re done executing the commands given above, type “exit” to close the Command Prompt window and then restart your computer and see if it fixed error code 0xc000014c.


 According to Zimperium zLabs, this malware that was recently detected has been doing its scams and attacks even in November of 2020 and has thus far accumulated hundreds of thousands of dollars in its scam.
On the surface it looks very harmless, asking for typical permissions like internet access, calls, and other related needed functions, and then it waits. After few months the real attack happens when users get charged with premium service they never subscribed to in the first place.
According to Zimperium zLabs, this malware that was recently detected has been doing its scams and attacks even in November of 2020 and has thus far accumulated hundreds of thousands of dollars in its scam.
On the surface it looks very harmless, asking for typical permissions like internet access, calls, and other related needed functions, and then it waits. After few months the real attack happens when users get charged with premium service they never subscribed to in the first place.


 Like in Windows 10, Windows 11 will also support God mode to be enabled and used. For those readers that do know what God mode is, let me explain it in simple terms. God mode is the icon on the desktop that once clicked will open and let you adjust every option in the control panel and some hidden features for Windows inside one application.
There are a lot of advantages to having this one-click fast access to features, especially if you are a power user. Luckily creating such an awesome icon and enabling God mode is very easy to accomplish, all you have to do is:
Like in Windows 10, Windows 11 will also support God mode to be enabled and used. For those readers that do know what God mode is, let me explain it in simple terms. God mode is the icon on the desktop that once clicked will open and let you adjust every option in the control panel and some hidden features for Windows inside one application.
There are a lot of advantages to having this one-click fast access to features, especially if you are a power user. Luckily creating such an awesome icon and enabling God mode is very easy to accomplish, all you have to do is: