USB Kill, a USB device is able to fry and damage your computer, mobile phone, router, etc. This device is quite dangerous and can kill electronics the moment it is inserted into an available port. By now people should know that they should not put unknown USB sticks into their devices because of potential virus and malware threats but this raises using unknown sticks to a whole new level.
Kill kits are not really new to the market, they have existed before but lately, technology really progressed and the latest USB sticks are really good, their success rate is around 95% which is pretty high and should not be taken lightly.
The second thing that you really should not play with strange USB sticks is that they dropped in price really hard, although top Kill kits will still go as high as around 300 USD, there are really cheap ones lurking in Ali Express that are just 6 USD!!! that makes them affordable devices for the mass market.
The device is made to take energy and current from the port it is plugged in, multiply it and release its charge back into the device, successfully frying some components immediately. Some more professional Kill sticks can even fry devices even when the device itself is not powered and can be even started remotely.
The point of this article is to make you aware that you should not in any kind of circumstances use and plug-in USB sticks into your devices that you do not know where they come from, especially from the mail!!
Xinput1_3.dll is a type of dynamic link library. It is an essential component of Microsoft DirectX.
This is a technology that makes Windows OS compatible with programs rich in multimedia elements It helps your graphic card in creating a detailed virtual and stimulus environment.
Games and programs with high graphics and sounds require DirectX to form a consonance with Windows PC to run successfully.
The Xinput1_3.dll error occurs when games supported by DirectX are unable to run smoothly. This error is common on Windows 7. The error message is displayed in the following format:
"The file xinput1_3.dll is missing"
"File xinput1_3.dll not found"
"Xinput1_3.dll not found. Reinstalling might help fix this."
"Xinput1_3.DLL Not Found"
Solution
Error Causes
The causes of Xinput1_3.dll error include:
Damaged and Corrupt Xinput1_3.dll files
Missing Microsoft DirectX file
Viruses and malware on your system
Driver issues
Registry overloaded with invalid entries
If you come across this error, make sure you fix it timely.
It is recommended to do so because it not only stops you from accessing and playing your desired games and using high graphic applications but also can lead to system failure and crash if the underlying cause of the error is related to the registry.
Further Information and Manual Repair
To resolve this error code, here are some of the best do it yourself methods:
Restart Your PC
Sometimes due to minor concurrence, PC is unable to load the file Xinput1_3.dll from the directory. If this is the cause, then you are lucky. All you have to do to resolve it and restart your computer. Once the computer restarts, re-launch the program.
Install the Latest DirectX Version
Search for the latest versions of the DirectX utility version. Try extracting the Xinput1_3.dll files individually from the DirectX downloadable package on your PC. Once downloading is complete, try running your desired application again and see if the error code pops up or not.
Update the Graphics Card
Being an element of Microsoft DirectX, Xinput1_3.dll is directly related to the video/graphics card assimilated.
There can be a possibility of a mismatch between the Xinput1_3.dll file and graphic card drivers. If this is the case, then the best way to resolve the error is to update the graphic drivers by installing the latest version drivers of your video/graphics card.
Nonetheless, after trying all the solutions discussed above if the error still persists, then this triggers two things either the error is triggered by a viral infection that you are unaware of or the problem is related to the registry.
Install Restoro
Whichever might be the cause, in such as scenario the best quick fix to it is to download Restoro. This is an advanced, cutting edge, and multi functional PC repair that is deployed with several utilities including a registry cleaner, an antivirus, Active X controls, and class detector, and a system optimizer.
The registry cleaner utility removes all the unnecessary files from the registry that could be damaging the dll files and the registry. It clears the disk space, repairs dll files, and restores the registry back to normal.
Simultaneously the antivirus module scans your system for all possible malicious software. It removes viruses, Trojans, malware, spyware, and adware thereby resolving the Xinput1_3.dll error right away.
Total System Care is safe, bug-free, and has a user-friendly interface with easy navigation. It is compatible with all Windows versions.
Click here to download Restoro and resolve the Xinput1_3.dll error right away!
Error code 0xc004f034 occurs when Windows 10 users fail to activate their operating system. This activation error code affects not only Windows 10 but those using other versions of the Windows operating system including Windows 8.1. Users experiencing this problem will notice the following common symptoms which occur:
Inability to activate Windows 10 operating system
Message box with error code 0xc004f034
Solution
Error Causes
Error code 0xc004f034 usually results from issues related to activation servers. In such cases when servers are busy, users will not be able to complete the activation process which would result in access to their Windows 10 edition of choice. The error code may also result from issues related to your product key. For this reason, be sure to use the correct product key when you attempt to activate Windows 10.
Further Information and Manual Repair
The completion of manual repair methods can be an effective way to correct issues like error codes in Windows 10. To begin, however, ensure you follow the instructions as given as making even a slight mistake will result in unfavorable results. If, for whatever reason, you have trouble completing the steps suggested below, feel free to contact a Windows repair technician. This type of IT professional is usually equipped with knowledge and expertise to access your particular situation. Otherwise, see the manual repair methods listed below and complete at least one method to fix error code 0xc004f034.
Method One: Ensure You Enter a Valid Product Key
If there is a problem with your product key, you will need to ensure you fix it before you can resolve error code 0xc004f034. Follow the instructions below after ensuring you have a valid product key.
Step one: Click the Start button then select Settings
Step two: Select Update & security then Activation
Step three: Click the Change product key
Step four: Type in your valid product key with its 25 characters in the correct order
Your system will activate Windows 10 if the issue was related to the use of an invalid product key. However, attempt manual method two if error code 0xc004f034 reappears and you are unable to complete the activation process.
Method Two: Reattempt Windows 10 Activation Until Process Completes
In many cases, error code 0xc004f034 occurs simply due to a busy server. This was the case in 2015 in particular when Windows users first received access to editions of Windows 10 like Windows 10 Pro. To complete this process, you will need to follow the instructions below, repeating the last step until the activation occurs.
Step one: Click the Start button then select Settings
Step two: After selecting Settings, click Update & Security
Step three: Select Windows Update then the Check for updates tab
Step four: Click Activate Windows 10 update
If this method is successful, you will finally be able to update your system to the Windows 10 edition of your choice. This process may take just a few minutes – and several attempts – before you resolve the issue. Remember to be patient. However, contact a Windows repair technician to evaluate your system if the issue persists for more than a few days.
Method Three: Use an Automated Tool
If you wish to always have at your disposal a utility tool to fix these Windows 8 and other related issues when they do arise, download and install a powerful automated tool.
USB ports, just like any other ports, also comes with a power rating. The default power output of a standard USB port is 0.5 amperes and if you notice, mobile phones charge slowly on USB ports which explains why. There are times when Windows may throw an error or warning that says, “Power surge on the USB port”. This kind of error occurs when a connected device tried to draw more power and the error comes as a part of that notification so when you select it, it will say,
“A USB device has malfunctioned and exceeded the power limits of its hub port. You should disconnect the device”.
To easily fix the problem, you can try to disconnect the device and click on Reset and if you click on Close, the port will not work until you unplug it and then restart your computer.
On the other hand, if disconnecting the device did not resolve the problem, you can try running the Hardware & USB troubleshooter or use a USB hub. You can also try to reinstall, uninstall or roll back the USB drivers or run the OEM diagnostics. For more information, refer to each one of the potential fixes provided below.
Option 1 – Try to run the Hardware & USB troubleshooter
The first thing you need to do is click on Start and then on the gear-like icon to pull up the window for Settings.
After opening Settings, look for the Update and Security option and select it.
From there, go to the Troubleshoot option located on the left-hand side of the list.
Next, select Hardware and Devices from the list and open the Troubleshooter and run it. Once it is doing its job, wait for it to complete the process and then restart the system.
After the system restarts, check if the problem’s now fixed. If not, refer to the next option given below.
Note: You could also try to run the USB troubleshooter as it could also resolve the problem.
Option 2 – Try to use a USB hub
If you’ve encountered the error on a specific device, then it is possible that the device requires more voltage. To fix this error, you can try to use the same device on another computer and if you still got the same error, you might want to use a USB hub that comes with its power source. USB hubs come with high-speed charging ports that should be able to supply the power needed for the device.
Option 3 – Update, rollback or reinstall the Universal Serial Bus Controller driver
If updating the drivers of the device did not fix the “The device is not ready” error, you can try to update, rollback, or reinstall the Universal Serial Bus Controller drivers instead of using the Device Manager. Refer to the following steps:
First, click the Start button and type “device manager”.
Then click on the “Device Manager” from the search results to open it.
From there, look for the “Universal Serial Bus controllers” option and then right-click on each one of the USB drivers and select the Update Driver from the menu.
Note: If it is a regular USB drive, then it will be listed as a USB Mass Storage Device but if you have a USB 3.0 device, then look for a USB 3.0 Extensible Host Controller.
Restart your PC and then click the “Search automatically for updated driver software” option.
Note: If updating the USB Controller drivers didn’t work, you can try to reinstall them instead.
Option 4 – Try running OEM Diagnostics if you have any
If the laptop or desktop computer you are using is a branded one, OEMs usually include software to diagnose issues in the computer like the USB port error. So if you have this software, try to run it for diagnosis and use any given suggestions to fix the error.
As you know, games with good graphics and fast play are definitely resource-intensive and can consume a lot of storage space on your computer. Because of that, they have to be compressed before it gets downloaded to your computer and then unpacked to the hard drive before it gets installed. However, if an error occurs in your computer’s RAM during the installation process or if your hard disk does not have enough memory to handle the process, then you might encounter the isDone.dll error which states:
“An error occurred when unpacking, Unarc.dll returned error code -1, ERROR: archive data corrupted (decompression fails).”
If you encounter the isDone.dll error message on your Windows 10 computer, then read on as this post will show you how you can fix it. This error has something to do with the incomplete installation of PC games or files of larger size.
The ISDone.dll error appears due to faulty
Unarc.dll file residing in the System32 folder on 32-bit operating systems and the SysWOW64 folder on 64-bit systems. So, if you see this error message, then, it means your computer was not able to read installation archive files.
What is Unarc.dll file?
Unarc.dll is a dynamic link library for Windows. Some applications or games require this file to function properly. So, if it goes missing or, an error occurs when you start a game or an application, you may get various kinds of errors.
ISDone.dll error while playing games on PC
Option 1 – Try to reinstall the game
The isDone.dll error could also be caused by the installation of an unknown application. Or it could also be caused by an outdated or corrupted application. In other words, if the game you are trying to install is broken or corrupted, then it’s no wonder why you’re getting the isDone.dll error. To fix this, make sure that you download the latest updated version of the game and then try to install it again and see if the problem is resolved or not.
Option 2 – Try to re-register the .dll file using the Regsvr32 tool
The first thing you have to do is to locate the DLL file named dll on your computer and rename it to Unarc-bak.dll.
Next, copy the Unarc.dll file from another well-functioning computer and save it on your desktop.
After that, move the DLL file you just copied to the System32 folder if you are using a 32-bit operating system, or the SysWOW64 folder if you are using a 64-bit operating system.
Now you have to register the new DLL file and you can do that using Windows PowerShell.
Open Windows PowerShell and then execute this command if you have placed the DLL file in the System32 folder: regsvr32 %systemroot%System32unarc.dll
On the other hand, if you have placed the DLL file in the SysWOW64 folder, then execute this command: regsvr32 %systemroot%SysWOW64unarc.dll
Once you’re done, a message will be displayed saying that the DLL file was registered.
Restart your computer and check if the problem is now fixed.
Option 3 – Troubleshoot the isDone.dll error in a Clean Boot State
You can also troubleshoot the isDone.dll error in a Clean Boot state. It could be that there are some third-party applications in your computer that're preventing the application from getting installed and to isolate this possibility, you need to boot your computer in a Clean Boot State and then try installing the program again. Putting your computer in this state can help you identify which program is the culprit and thus isolates the problem. In a Clean Boot state, your computer will start using only the pre-selected minimal set of drivers and startup programs. Note that you have to disable and enable one process at a time.
Log onto your PC as an administrator.
Type in MSConfig in the Start Search to open the System Configuration utility.
From there, go to the General tab and click “Selective startup”.
Clear the “Load Startup items” check box and make sure that the “Load System Services” and “Use Original boot configuration” options are checked.
Next, click the Services tab and select the “Hide All Microsoft Services” check box.
Click Disable all.
Click on Apply/OK and restart your PC. (This will put your PC into a Clean Boot State. And configure Windows to use the usual startup, just simply undo the changes.)
After you’ve set your computer into a Clean Boot State, make sure that you’re signed in as administrator and then try to install the application again.
Option 4 – Try updating or reinstalling your Graphics drivers
Updating or reinstalling the Graphics drivers in your computer can also help in resolving compatibility issues between the operating system and the driver that might have caused the isDone.dll error.
First, boot your computer into Safe Mode.
After that, tap the Win + R keys to launch Run.
Type in devmgmt.msc into the box and tap Enter or click OK to open the Device Manager.
After that, a list of device drivers will be displayed. From there, look for the Display Adapters and click on them.
After that, right-click on each entry under the Display Adapters and select the “Uninstall Device” option from the menu.
Now restart your computer.
After restarting your computer, go to the Settings app and Check for Updates in the Windows Update section.
Note: You also have the option to go directly to the website of your graphics card manufacturers like NVIDIA, Intel, or AMD and go to the section called Drivers then check if there’s a new available update – if there is, download and install it.
Option 5 – Try scanning your computer using Windows Defender
The isDone.dll error might also be infected with malware or virus and to eliminate it, you have to scan your computer using security programs like Windows Defender.
Tap the Win + I keys to open Update & Security.
Then click on the Windows Security option and open Windows Defender Security Center.
Next, click on Virus & threat protection > Run a new advanced scan.
Now make sure that Full Scan is selected from the menu and then click the Scan Now button to get started.
If you receive an error code of “0x80073afc” in Windows Defender after you boot your Windows 10 computer or when you try to manually run Windows Defender, then it could be that the Windows Defender files are corrupted. In such cases, this error could also occur if there is third-party security software that interferes with the smooth functioning of this Microsoft Security Client.
If you are one of the users who are currently facing this issue, then here are some suggestions you can check out to resolve the Windows Defender error code 0x80073afc.
Option 1 – Try to check the status of all the Windows Defender-related services
In the Cortana search box, type “services” and click on the Services icon to open the Services Manager. Alternatively, you can also tap the Win + R keys to launch the Run prompt and then type “msc” in the field and hit Enter to open the Services Manager
After opening the Services Manager, look for the following services and make sure that their Startup type is set to their default values:
Windows Defender Advanced Threat Protection Service – Manual
Windows Defender Antivirus Network Inspection Service – Manual
Windows Defender Antivirus Service – Manual
Windows Defender Firewall Service – Automatic
You can right-click on each one of the listed services and then select Start to start them.
And if some of the services don’t have their default values, just double-click on the Services to change the Startup types and select the correct option from the drop-down menu of the Startup type under the Properties box.
Next, set up the Startup type of these services to Automatic and then click on the Start button if the services are not running yet.
Now click on the Apply and OK buttons to save the changes made and then see if it fixed the problem or not.
Option 2 – Try to re-register the concerned DLL files
You could also try to re-register some Dynamic Link Library or DLL files on your computer as this could also help in fixing the Windows Defender error.
In the Start search, type “cmd” and from the search results that appear, right-click on Command Prompt and select the “Run as administrator” option from the context menu.
After opening Command Prompt as admin, type the following commands one after the other:
regsvr32 dll
regsvr32 dll
regsvr32 dll
regsvr32 dll
Once you’ve entered the commands given above, it will re-register the concerned DLL files in your system.
Now restart your computer for the changes to take effect.
Option 3 – Try to use the Registry Editor
Tap the Win + R keys to open the Run dialog box,
Then type “Regedit” in the field and hit Enter to open the Registry Editor.
Afterward, navigate to this registry path: ComputerHKEY_LOCAL_MACHINESOFTWAREMicrosoftWindows NTCurrentVersionImage File Execution Options
Next, look for the DWORDs named “MSASCui.exe”, “MpCmdRun.exe”, “MpUXSrv.exe” and “msconfig.exe”.
If you can’t find these DWORDs, refer to the next given option below.
Restart your computer.
Option 4 – Check the Environmental Values
Type “View advanced system settings” in the Windows search box and select the appropriate result.
This will open a new mini window. From there, go to the Advanced tab and click on the “Environment Variables…” button located at the bottom part of the window.
Next, look for the “%ProgramData%” variable name and make sure that its value is set to C:/ProgramData.
Then click OK to save the changes made.
Option 5 – Run the System File Checker Scan
System File Checker or SFC is a built-in command utility that helps in restoring corrupted files as well as missing files. It replaces bad and corrupted system files to good system files. To run the SFC command, follow the steps given below.
Tap Win + R to launch Run.
Type in cmd in the field and tap Enter.
After opening Command Prompt, type in sfc /scannow
The command will start a system scan which will take a few whiles before it finishes. Once it’s done, you could get the following results:
Windows Resource Protection did not find any integrity violations.
Windows Resource Protection found corrupt files and successfully repaired them.
Windows Resource Protection found corrupt files but was unable to fix some of them.
Restart your computer.
Option 6 – Perform a System Restore
Performing a System Restore on your computer can also help you fix the Windows Defender error. You can do this option either by booting into Safe Mode or in System Restore. If you are already in the Advanced Startup Options, just directly select System Restore and proceed with the next steps. And if you have just booted your PC into Safe Mode, refer to the steps below.
Tap the Win + R keys to open the Run dialog box.
After that, type in “sysdm.cpl” in the field and tap Enter.
Next, go to the System Protection tab then click the System Restore button. This will open a new window where you have to select your preferred System Restore point.
After that, follow the on-screen instructions to finish the process and then restart your computer and check if the problem is fixed or not.
You have probably heard a lot of good things about gaming mice, how they are better feeling, better in any way possible and it is all true, everything you heard is actually true, they are superior in any way to a regular mouse but with one big disadvantage, and that would be the price. While you can find a regular mouse for pocket change, a gaming mouse is in comparison very expensive even for entry-level ones.
In this article we will explore all advantages and compare it with the regular one so you can come up with your own conclusion about do you really need one for yourself or if you are fine with regular.
Price
As stated price is one factor that does not favor gaming mice. Regular mouse for a personal computer goes around 10 or 20 USD, while entry-level in gaming one will be 40 USD and can go up to 250 USD, this large gap in price is usually determining factor why people pick up regular one. If you are on a really tight budget go for the regular one, but if you can afford a gaming one get it without second thoughts.
Software
This is where you will see the big difference between mice. Regular ones when connected are recognized and the driver is automatically installed and you can use it, same goes with gaming ones but with one big difference, you have an option to install additional manufacturers' software specially tailored for your mouse. In the application, you will be able to access some features that are specific to the mouse model that you could not set in typical Windows mouse properties. Beside more options software can also have features like setting your profiles and saving them to be recalled when you need them on the fly.
Sensitivity of mouse
The sensitivity of the mouse is measured in dots per one inch or short DPI, this is directly shown on your screen by how fast your mouse can move, higher sensitivity means your mouse will move faster across the screen and lower means it will move slower. All gaming mice come with buttons and settings that will allow you to change DPI on the fly and you can choose precise DPI settings in the software.
The regular mouse comes with DPI around 800 and goes to 1200 typically and does not have usually the option to change this while gaming mice start at 400 and can go as high as 26000 with the option to change it. Some regular mice can have only 1 option of DPI, usually very cheap ones.
Polling rates in mice
Pooling rate is the measurement of how often your mouse reports where it is positioned on the computer. The higher the pooling rate, the more responsive your mouse will be and vice versa. It is measured in hertz (Hz) and regular mice have them around 125Hz that is enough if you are using a computer for office, internet, and mail work.
If you are working in design or gaming you will need more than 125Hz polling rate, luckily gaming mice come with a minimum of 500Hz as an entry point and some hi-end models are going as far as 8000Hz. This very high pooling rate will get some extra load on your CPU but the mouse itself will be maximally responsive and will respond even to the smallest moves.
Ergonomics
Regular mice are well just mice, they are typical shape and size, gaming mice are made with ergonomics in mind. How they are made for extensive daily use of several hours per day they are constructed in a way to offer a pleasant and pain-free experience.
If you work on a computer for long periods of time consider gaming an ergonomic mouse since it will take the strain from hands and place them in a more natural position.
Macro keys
Gaming mice most of the time come with more keys compared with regular ones and good thing is that via its software you can tie certain actions to these extra keys making work or gaming more pleasant and quicker.
Components and material quality
In order to make regular mice more affordable and cheaper materials and quality of components had to suffer. Gaming mice have millions of guaranteed clicks by companies that make them before they break and regular ones usually do not guarantee a single one. This is due of course quality of materials that have been used in constructing these devices.
In the long term, if you use a gaming mouse for typical daily tasks it will outlive your regular one and on the side offer you more pleasant and responsive use along the way.
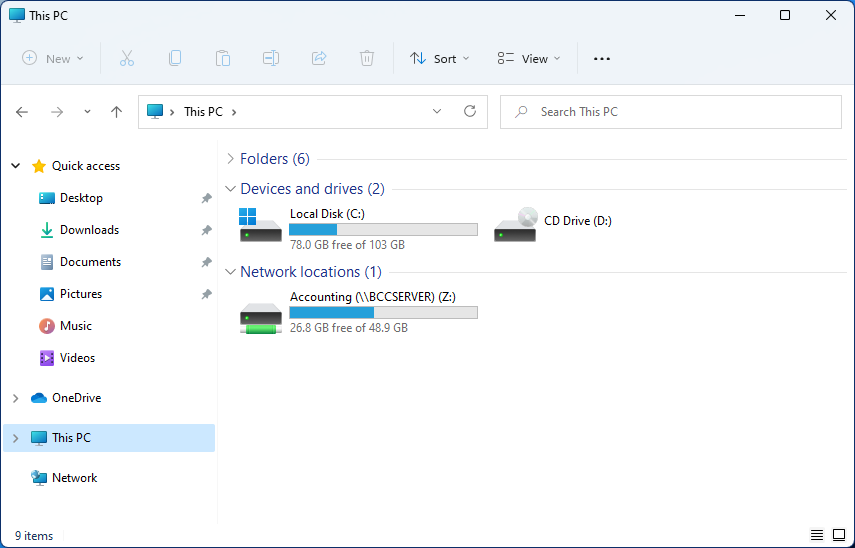
Mapping network drive has many benefits in terms of speed and ease of access of files via network. It lets you access the hard drive over the whole network like it was the hard drive inside your PC case. In order to easily and quickly map a folder as a network drive follow the guide below.
Open File Explorer
Click on the three dots icon in the Toolbar
Select Map Network Drive
Click the Drive drop-down menu
Select a driver letter that you wish to assign as a network drive
In the folder field enter network device and share name (click on browse to see all devices on local network)
Check the box beside Reconnect at sign-in if you wish to automatically connect to a network drive on Windows startup
Check Connect Using Different Credentials if you wish to connect to a network drive using different credentials that one used to login into Windows.
Click Finish
After finishing setting Windows 11 will try to connect to the network drive and if successful drive icon will appear inside File Explorer and the drive will open up to see its content.
If for any reason it cannot connect try checking user credentials, cables, network adapters, etc.
When trying to run Computer Management, or when running mmc.exe or compmgmt.msc from a command prompt you get the error that the application has been blocked for your protection then keep reading in order to solve the issue. This is a permission issue where if a regular user tries to run such system tools will result in saying that it has been blocked. Along with this, you may have a Group Policy issue. This can be fixed, but you will need admin permission to achieve it. It’s because when they are run from the command prompt with elevated privileges, it works.
Change Group Policy Settings
If your account is an admin account, and you are still facing the issue, then change the group policy settings:
Open Group Policy Settings by typing gpedit.msc in the run prompt followed by pressing ENTER
Navigate to User Configuration > Administrative Templates > Windows Components > Microsoft Management Console > Restricted/Permitted snap-ins
Locate Computer Management policy, and double click to open it
Enable it, exit Group Policy.
When Enabled: The snap-in is permitted and can be added into the Microsoft Management Console or run from the command line as a standalone console.
When Disabled: The snap-in is prohibited and cannot be added into the Microsoft Management Console or run from the command line as a standalone console. An error message is displayed stating that the policy is prohibiting the use of this snap-in.
Temporarily disable UAC
UAC is the user access control panel, and if you need to run the command right away, you can choose to disable it for some time. Click on the Start button, and then type UAC to find the User Account Control Settings.
Click to open, and then slide down the notification setting at the bottom. It will temporarily allow launching the application as there is no check. However, make sure to switch to default once you are done.
Athwbx.sys or the Qualcomm Atheros driver file is known to trigger several Blue Screen of Death errors. This occurs when the driver gets corrupted or when the operating system is unable to access or find it. In addition, bad sectors in the hard disk or RAM can also cause BSOD errors. The athwbx.sys file is known to cause the following BSOD errors listed below:
Your PC ran into a problem and needs to restart. You can search online later for this error: athwbx.sys
Before you proceed with the troubleshooting tips given below, you might want to try performing System Restore as it could resolve Blue Screen errors caused by the athwbx.sys file. To run System Restore, follow these steps:
Tap the Win + R keys to open the Run dialog box.
After that, type in “sysdm.cpl” in the field and tap Enter.
Next, go to the System Protection tab then click the System Restore button. This will open a new window where you have to select your preferred System Restore point.
After that, follow the on-screen instructions to finish the process and then restart your computer and check if the problem is fixed or not.
If System Restore didn’t help in fixing the Blue Screen error, now’s the time for you to resort to the troubleshooting tips provided below but before you get started, make sure that you create a System Restore point first.
Option 1 – Try recreating the athwbx.sys file
The first thing you can try is to recreate the athwbx.sys file. Every time your Windows 10 PC boots up, it looks for all the system drivers in place and if it is unable to find them, it tries to create them. This is why if you remove your corrupt driver file, chances are, you might get a fixed file recreated just for you. How? Refer to the steps below.
Boot your Windows 10 PC in Safe Mode.
Then open File Explorer and navigate to this location: C:/Windows/System32/drivers
From there, look for the file named sys and rename it to athwbx.old.
Note: As you can see, the file’s extension has changed from .sys to .old.
Now restart your computer and check if the athwbx.sys Blue Screen error is now fixed.
Option 2 – Try to update or rollback your device drivers
If the first option didn’t work for you, then it’s time to either update or roll back the device drivers. It is most likely that after you updated your Windows computer that your driver also needs a refresh. On the other hand, if you have just updated your device drivers then you need to roll back the drivers to their previous versions. Whichever applies to you, refer to the steps below.
Open the Devices Manager from the Win X Menu.
Then locate the device drivers and right-click on them to open the Properties.
After that, switch to the Driver tab and click on the Uninstall Device button.
Follow the screen option to completely uninstall it.
Finally, restart your computer. It will just reinstall the device drivers automatically.
Note: You can install a dedicated driver on your computer in case you have it or you could also look for it directly from the website of the manufacturer.
Option 3 – Run the System File Checker Scan
System File Checker or SFC is a built-in command utility that helps in restoring corrupted files as well as missing files. It replaces bad and corrupted system files with good system files. To run the SFC command, follow the steps given below.
Tap Win + R to launch Run.
Type in cmd in the field and tap Enter.
After opening Command Prompt, type in sfc /scannow
The command will start a system scan which will take a few whiles before it finishes. Once it’s done, you could get the following results:
Windows Resource Protection did not find any integrity violations.
Windows Resource Protection found corrupt files and successfully repaired them.
Windows Resource Protection found corrupt files but was unable to fix some of them.
Restart your computer.
Option 4 – Try to run the CHKDSK utility
Running the CHKDSK utility might also help you resolve the athwbx.sys Blue Screen error. If your hard drive has issues with integrity, the update will really fail as the system will think that it’s not healthy and that’s where the CHKDSK utility comes in. The CHKDSK utility repairs hard drive errors that might be causing the problem.
Open Command Prompt with admin privileges.
After opening Command Prompt, execute the following command and hit Enter:
chkdsk /f /r
Wait for the process to be completed and then restart your computer.
Option 5 – Run the Memory Diagnostic Tool
Running the Windows Memory Diagnostic tool in Windows 10 might also help you in fixing the athwbx.sys Blue Screen error. Refer to the steps below on how to run this tool:
Tap the Win + R keys to open Run and type exe and hit Enter to open the Windows Memory Diagnostic Tool.
After that, it will give two options such as:
Restart now and check for problems (Recommended)
Check for problems the next time I start my computer
Once your computer has restarted, perform a basic scan or you could also go for the “Advanced” options such as “Test mix” or “Pass count”. Simply tap the F10 key to start the test.
Note: After you select the option, your PC will restart and check for memory-based issues. If it finds any issues, it will automatically fix them and if there’s no issue found, then it’s most likely not a memory-based issue so you should try the other options given below.
Option 6 – Run the Blue Screen Troubleshooter
The Blue Screen troubleshooter is a built-in tool in Windows 10 that helps users in fixing BSOD errors like athwbx.sys. It can be found on the Settings Troubleshooters page. To use it, refer to these steps:
Tap the Win + I keys to open the Settings panel.
Then go to Update & Security > Troubleshoot.
From there, look for the option called “Blue Screen” on your right-hand side and then click the “Run the troubleshooter” button to run the Blue Screen Troubleshooter and then follow the next on-screen options. Note that you might have to boot your PC into Safe Mode.
0x800ccc13 is an error message related to sending email using Outlook. Many people are receiving this error after making an upgrade from Windows 7 or Windows 8.1 to Windows 10. The error message appears when you try to send an email message with the use of a POP3 account or an IMAP account in an Outlook profile that has an Exchange Server 2010 mailbox configured. A common complaint would be: Since upgrading to Windows 10 I cannot send email from Outlook 2013. Mail stays in the Outbox, and I get: Error 0x800CCC13. Cannot connect to the network.
Symptoms
This problem may arise under the following situations:
You are using Microsoft Office Outlook in online mode to connect to a Microsoft Exchange Server 2010 mailbox
When you add an additional POP3 or IMAP account in the same Microsoft Outlook profile
You are sending an attachment through email.
You try sending an email by selecting POP3 or IMAP account as the sender
During these circumstances, the email message stays in the Outbox and you receive the following error message:
Task '<the POP3 account or the IMAP account> - Sending' reported error (0x800CCC13): 'Unable to connect to the network. Check your network connection or modem.'
Solution
Error Causes
Error Code 0x800ccc13 occurs because the system files in Windows 10 during the upgrade became corrupted and most likely caused authentication issues. It can happen with any version of Outlook. Damaged data files will also cause error code 0x800ccc13 to manifest. Overall, the corruption of the Microsoft Windows System could be a result of an installation partially done (or an incomplete one), deletion of any application or hardware erroneously, and or malware or adware infestation.
Further Information and Manual Repair
Method 1:
Use the Windows System File Checker to repair corrupted files
Verify that your SMTP, username, and password settings are correct. Now, in order to correct missing or corrupt Windows System files, try the following solution by running a command. This is known as the System File Checker. Follow the steps below to invoke the program using a command prompt command:
At first, you need to open the command prompt. To do so, right-click the Windows button in the bottom left of the screen, and select Command Prompt (Admin).
Now, enter the following command
sfc/scannow
When it is done, a message will confirm that Windows found some corrupt or missing files and it has successfully repaired those.
Check the Outlook and see if your emails are sending.
If the problem persists, don’t worry there is another way to solve this. Users have found another command helpful is using the NetShell utility from the command prompt, which is similar to the above solution.
Open the Command prompt by Right-clicking the Windows button in the bottom left of the screen and select Command Prompt (Admin).
Enter the following command
netshwinsosk reset
This helpful command will reset the network adapter to its default settings. Hope this will solve your problem. If not, you may want to try the Method 2 listed below.
Method 2:
For this method, you need to consider the following things:
Are you using POP3, IMAP, or Exchange server for your email account?
How many email accounts have you configured in your Outlook?
Is there an undelivered email stuck in your Outbox?
If you are trying to send an attachment, what is the size of the attachment?
Try the following:
Move or delete any undelivered email that is stuck in the Outbox folder, and then try sending an email and verify the result
Start Outlook in Safe Mode by following the instructions below
Hold down Windows key + R.
Copy this command Outlook /safe Note, there is a space between Outlook and /
Paste it in the open box and press Enter
If Outlook in Safe Mode works, disable the add-ins by following the steps below and determine if the problem is caused by add-ins.
Disable the add-ins one at a time. Now, restart Outlook and repeat the procedure once more. If the problem appears again, it will help you find which add-in is causing the problem.
Start the computer using the clean boot. Now, try to send an email and see the result.
If the problem still lingers, create a new profile and configure the email account.
If you do not possess the technical expertise required to accomplish this yourself or do not feel comfortable doing so, download and install a powerful automated tool to get the job done.


 Error Causes
 Mapping network drive has many benefits in terms of speed and ease of access of files via network. It lets you access the hard drive over the whole network like it was the hard drive inside your PC case. In order to easily and quickly map a folder as a network drive follow the guide below.