 Windows and Devices chief Panos Panay has revealed new focus sessions feature that will be in Windows 11 on his Twitter account today. He himself is referring to it as a game-changer especially with Spotify integration.
If your Windows 10 laptop suddenly turns off when you unplug its power cord, then you’ve come to the right place as this post will guide you on how you can fix this issue.
One of the most common causes for this kind of issue is that there is some problem with your laptop’s battery. It is possible that it might have gone bad or has been damaged. However, this couldn’t be the case especially if the laptop is new. The problem could have something to do with the system settings, connections, laptop hardware, and so on. To fix it, there are various suggestions you can check out such as follows:
This option works in most cases when the laptop with a removable battery is charging slowly as it is plugged in constantly. Refer to the steps below to do a hard reset on your laptop.
Check if the problem is fixed, if not, proceed to the next option below.
The next thing you can do is to run the Power troubleshooter. To do so, follow these steps:
You could also try to run the Power Efficiency Diagnostics Report to fix the problem. This tool is helpful and will help you analyze the status of the battery but note that this can be quite overwhelming especially if you’re not well-versed in this matter.
You might also want to uninstall or reinstall the battery driver as it can also resolve the problem. But before you start, you have to shut down your computer and remove the power chord as well as the battery. Once you’re done, follow these steps:
Updating the BIOS can help you fix the problem but as you know, BIOS is a sensitive part of a computer. Even though it is a software component, the functioning of the hardware depends on it largely. Thus, you must be careful when modifying something in the BIOS. So if you don’t know much about it, it’s best if you skip on this option and try the other ones instead. However, if you are well-versed in navigating the BIOS, then follow the steps below.
Note: If updating the BIOS didn’t help, you might want to consider resetting it instead.
 Windows and Devices chief Panos Panay has revealed new focus sessions feature that will be in Windows 11 on his Twitter account today. He himself is referring to it as a game-changer especially with Spotify integration.
Converters Now developed by Mindspark Interactive is a Browser Extension for Google Chrome and is promoted at their website like a very useful tool for converting PDF and Doc files, alongside with dictionary, and other useful tools. While this might appeal to you the extension hijacks your New Tab page, changing it to Search.MyWay.com
While active, this extension monitors user’s online activity, recording visited websites, clicked links, bought products, and other browsing information. This information is later forwarded or sold to Mindsparks ad network to better deliver user Targeted Ads.
Browsing the internet with ConvertersNow will result in displaying additional ads, sponsored content, and sometimes even pop-up ads injected into various pages or websites throughout your browsing sessions. CovertersNow has been marked as a Browser Hijacker by several anti-virus programs and it is marked for removal.
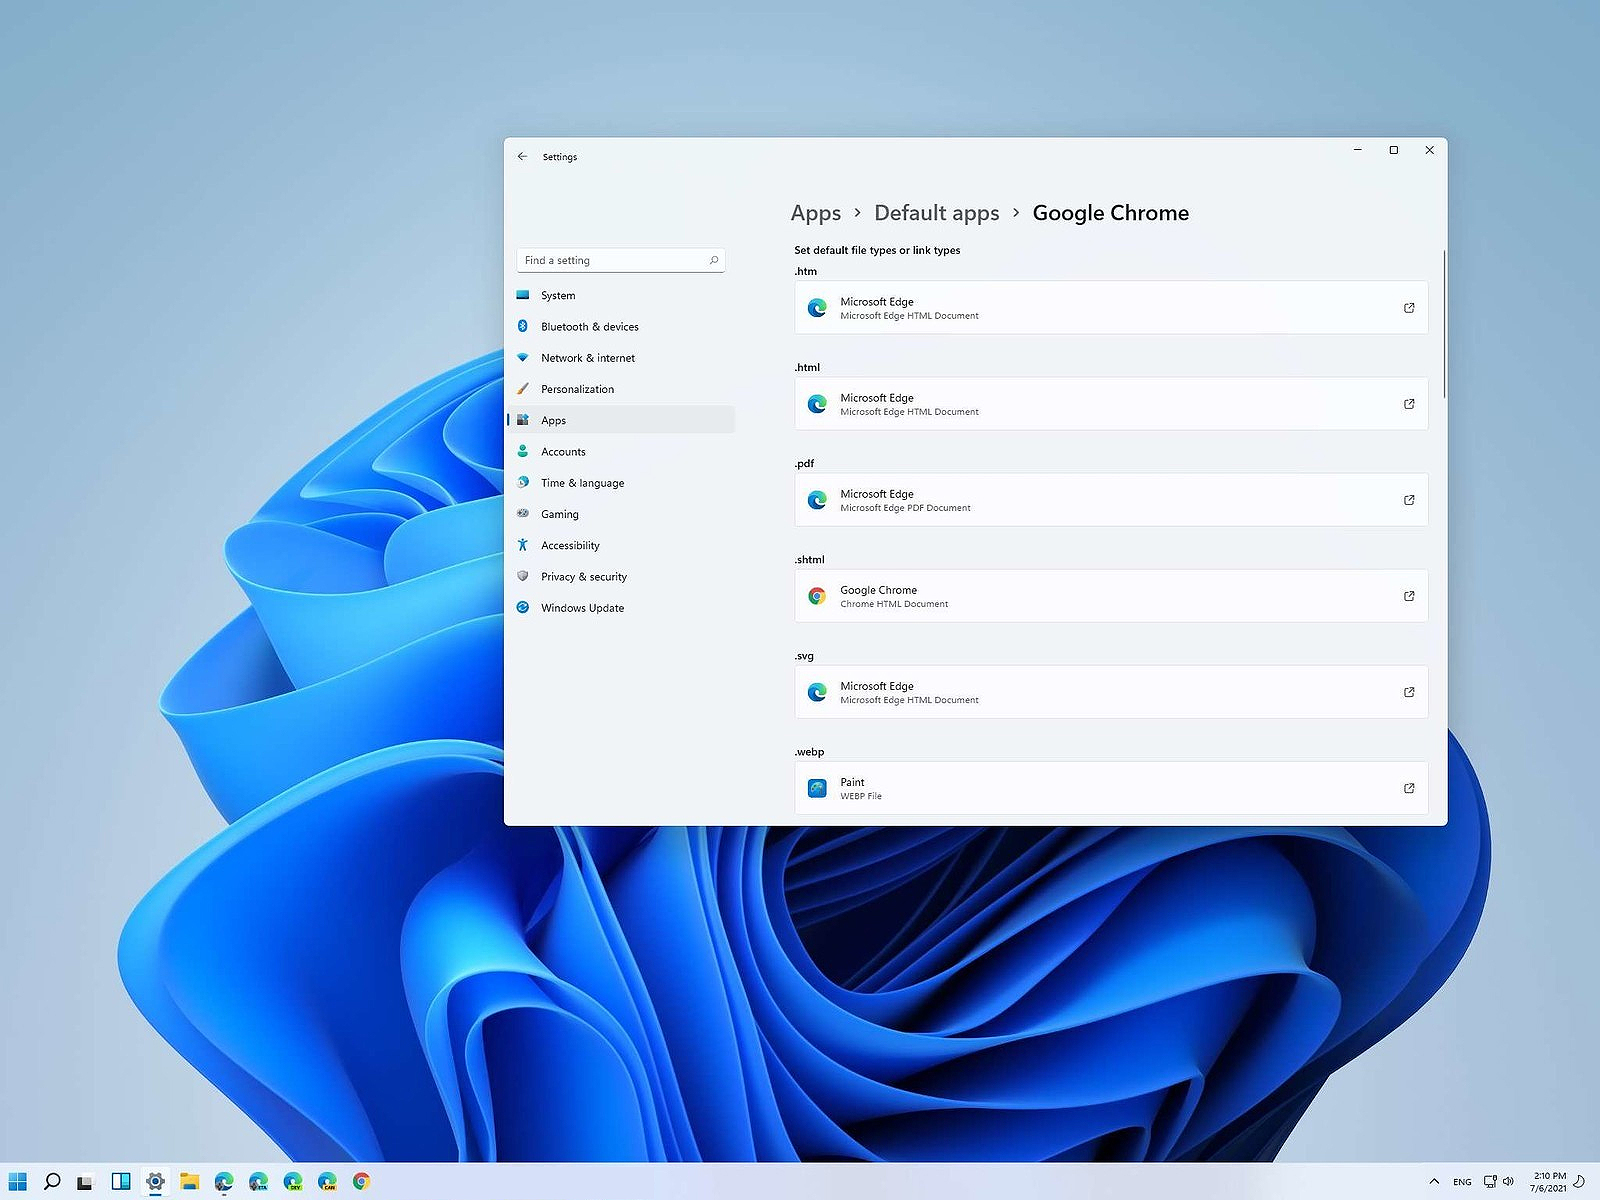 Same as in previous Windows versions, Windows 11 will also use certain applications as default ones for opening certain file types and file extensions. And yes, same as in previous versions it will come preconfigured for certain file types and associated applications like for example photos for pictures.
Of course, users usually have their own favorite applications for certain file types and much more prefer to open them inside the application of their choice instead of the default one.
We can change the default application like in previous Windows versions but this time there are two ways and overall more control of this process. Windows 11 has settings for choosing default file type applications and default file extension applications giving you more control of this process.
Same as in previous Windows versions, Windows 11 will also use certain applications as default ones for opening certain file types and file extensions. And yes, same as in previous versions it will come preconfigured for certain file types and associated applications like for example photos for pictures.
Of course, users usually have their own favorite applications for certain file types and much more prefer to open them inside the application of their choice instead of the default one.
We can change the default application like in previous Windows versions but this time there are two ways and overall more control of this process. Windows 11 has settings for choosing default file type applications and default file extension applications giving you more control of this process.
Error Code 0xC004F00F can appear during the Windows 10 installation and activation process. It is a fairly straightforward error code that occurs when a product key is entered in that is unable to be used to complete the final activation of the new operating system. This error code is most commonly related to the installation of new pieces of hardware on a machine that was already running Windows 10 at a previous time.
Error Code 0xC004F00F can also appear on other versions of the Windows software, so if you are not specifically trying to install and activate Windows 10 when this message appears, you may want to contact a qualified Windows technician to help resolve your system error, as the error code has different causes and resolution methods on other versions of the Windows operating system.
 Error Causes
In some cases, Error Code 0xC004F00F will show up if you are attempting to install Windows 10 on a computer in which the hard drive has been replaced or significantly altered. It can also appear when other major pieces of hardware, like the motherboard, have been changed out. These pieces may be changed as part of an upgrade to new or better hardware or be changed due to the malfunction of the original pieces of equipment. Because it may appear to the Windows activation servers that you are attempting to use the same product code that you have used before to activate what appears to be a new machine (even if the machine is the same one, just with some new parts), you may see Error Code 0xC004F00F arise.
Error Code 0xC004F00F can also come up if you have installed Windows 10 on your machine in the past and have already used the product key that you are attempting to use again.
Error Code 0xC004F00F most commonly appears for users who have made major hardware or software changes done on their machine. Because this error specifically arises from the Windows activation servers believing that your computer is a new one, you’ll need to get in touch with the Windows support team in order to resolve the error. From their database, they will be able to confirm that you are not using a new computer and will be able to bypass the error, allowing you to complete the Windows 10 Activation process.
If you haven’t installed or replaced any of the hardware on the computer, but are still seeing Error Code 0xC004F00F arise during your Windows 10 installation, you will still need to get in touch with the Windows support team to bypass the error code.
When you call into the Windows support team, you’ll want to specifically have a list of the following information readily available: Which pieces of hardware have been changed out on your computer prior to the installation and activation, what method you were using to install Windows 10, which version of Windows 10 that you were attempting to install, whether it was a single-use or multiple-use license, and basic details about your PC like its make, model, and age. You may also want to have the product key that you were attempting to use when Error Code 0xC004F00F first appeared.
By having all of this information ready and on hand ahead of time, you’ll have a greater likelihood that your error will be able to be resolved quickly and efficiently, avoiding long periods spent on the phone with customer service. Make sure that you specifically mention that you are experiencing Error Code 0xC004F00F during the Windows 10 activation process when you call into the Windows support team so that you can be connected to a representative who is equipped to help you resolve this specific problem.
If you are not comfortable in working with the Windows support team or have not been able to successfully resolve Error Code 0xC004F00F even after getting in touch with customer support, contact a qualified technician who is familiar with the Windows 10 activation process and can walk you through the things that you will need to communicate to the Windows support team in order to have them bypass or resolve the error code.
If you wish to always have at your disposal a utility tool to fix these Windows 10 and other related issues when they do arise, download and install a powerful automated tool.