If you are using your computer and you notice that Hard drive shows high space utilization even if you only have a few applications installed on your computer, then you’ve come to the right place as this post will guide you on what you can do to sort this problem.
Upon noticing the odd state of your hard drive and you check the actual volume that’s occupied by the apps in your drive and you see that they are not really occupying a lot of space. This kind of issue could indicate that your hard drive is not showing the correct value for the free storage space of the drive-in your Windows 10 computer.
This kind of problem could be passed off as a system bug, however, it could also be a serious problem. In fact, as you are aware, there are hidden folders and files in your computer that could be occupying space and since most of them are associated with system applications, you might not realize it unless you thoroughly check the folders.
The most common causes of the issue are as follows:
The system information folder might be utilizing a lot of space. If you wonder where the information for the system restore points is stored, they are stored in the system information folder which in turn is stored in the drive as a hidden file.
An issue with system maintenance could cause the problem.
Malware or some other software might have created an undetectable hidden file.
Space could be occupied by the trashbin folder.
These hidden files could occupy significant space in the folder, thus slowing down the system and impacting its performance. If you face this issue, try our suggestions and see if they help you.
Run ChkDsk
Clear all Junk files
Reduce the space occupied by the system restore points
Run the System Maintenance troubleshooter
Option 1 – Run CHKDSK utility to check the drive for errors
When it comes to some issues concerning the hard drive or removable devices, there is a utility in Windows that might help which is called “chkdsk”. To use it, follow the steps below.
Tap the Win + S keys to open the Search box.
Then type “command prompt” in the field and from the search results that appear, right-click on Command Prompt and select “Run as administrator”.
After opening an elevated command prompt, copy and paste the following command and hit Enter:
Note: In the command given above, “[/F]” will try to fix the system errors while “[/R]” will be the one to fix the bad sectors.
Now if you are prompted to run CHKDSK after your reboot your PC, just tap Y and reboot your PC.
If CHKDSK is not able to find any errors, tap the Win + E keys and navigate the access window. From there, right-click on the concerned drive and click on Properties.
After opening Properties, click on the tab Tools and then click on the “Check” button under the Error-checking section.
Wait until the process is completed and then restart your computer.
Option 2 – Try to delete the temporary files
The error could be caused by some temporary or junk files in your computer and so you need to clear them up to fix the problem. You can achieve that using the Storage Sense feature.
Open Setting > System > Storage from the WinX Menu.
From there, you will see a list of all the local and connected storage devices along with the details on the free space. Make sure that Storage Sense is on.
Next, find a link that says “Free Up Space” and click it to open.
After that, a screen which is the built-in program in Windows 10 will appear and will scan your computer for the following junk files so you can free up disk space:
Windows Upgrade Log Files
The system created Windows Error Reporting Files
Thumbnails
Temporary Internet Files
Previous Windows Installation Files
Delivery Optimisation Files
DirectX Shader Cache
Choose the files you want to get rid of and then click on the remove files option. Note that you’ll have an idea of the total size as you select any of the junk files listed above.
Now go to the “Free Up Space Now” section and click the Clean Now button. This will get rid of all the temporary or junk files in your computer and should hopefully fix the error.
Option 3 – Try to reduce the space occupied by the system restore points
In case you don’t know, system restore points actually occupy a significant space in your computer which is stored in the System Information folder. Thus, you need to check the size of this folder and unhide the folders and files and then click on the folder. The size of the folder should be displayed in the right pane of the window. To fix the storage space problem, you could delete all the old System Restore Points as well as Previous versions of files or you could also restrict the disk usage of the System Restore points.
Option 4 – Try to run the System Maintenance troubleshooter
The problem could also be caused by the System Maintenance and to fix it, you have to run the System Maintenance troubleshooter by following these steps:
In the Windows Search bar, type “control panel” and double click on Control Panel from the search results.
Next, go to this path: Control PanelAll Control Panel ItemsTroubleshootingSystem and Security.
After that, click on the System Maintenance troubleshooter to run it.
Once the process is completed, restart your computer.
A newfound bug in Google docs is causing it to crush and upon reopening it will crush again making it very difficult to re-access your document. The bug is manifested when a series of the same word is typed into a document and Show grammar suggestion is turned on.
How was it found
A Google Docs user, Pat Needham brought up the issue on Google Docs Editors Help forum.
"I've only tried in Google Chrome, with documents from three separate Google accounts (personal, G Suite Basic, and work one which might be enterprise). All three experience this same issue".
"It's case-sensitive. So trying with 'and. and. And. and. And.' doesn't cause it to crash."
While Needham publicly reported the bug, it appears that the issue was discovered by Eliza Callahan who was writing a poem novel for her novel using Google Docs.
Needham's findings have also been confirmed by other users running Firefox 99.0.1
Another user, Sergii Dymchenko, said strings like "But. But. But. But. But." triggered the same response. Some also noticed putting any of the terms like "Also, Therefore, And, Anyway, But, Who, Why, Besides, However," in the same format achieved the outcome.
A YCombinator HackerNews reader suspected the cause to be the "Show grammar suggestion" option in Google Docs.
A Google spokesperson confirmed the presence of the issue adding, "we're aware of this issue and the team is working on a fix."
How to recover your document
First thing first, turn off Show grammar suggestions so you do not run into issue by accident. In order to turn it off go to Tools and then into Spelling and grammar and untick Show grammar suggestions.
Now, if you already have a document that has been crushed, fear not because there is a workaround to access it. For some strange reason this bug does not manifest on Google Docs mobile app, so you can open the crushed document in the mobile app, delete words that have caused the bug and reopen the document on your desktop.
Until Google comes up with the solution this is currently the only way to address the issue.
Skinning of applications is not new to PC users, but did you knew you could skin Steam?
With skin, you can customize the UI and style of the client to what you want making it more personal and to your liking. First thing is to find the skin that you would like to install. There are a lot of sites where you could find custom made Steam skins but we would recommend steamskins.org
The site itself is organized in tabs with different sections, once you click on the tab you will get a list of skins available for chosen section. If you click on the skin you will be taken to skin page detail where you can find what skin is aiming for, its legibility, a record of how the skin has been altered over time, or some mix of these aspects.
Note that some skins might have issues like some buttons might be missing from big picture mode but so far none of the skins has any kind of client breaking feature, only functionality one.
Downloading skin
Once you have chosen desired skin and while on the skin details page, scroll to the middle of the page just above the Related Skins sections with two options: Direct Download and External Download. Now usually I would recommend Direct download but in this case, I would advise going with External Download for the simple reason that the External link will send you to the developer's website where there is a higher chance to get the latest updated skin.
Installing it in Steam
Once the skin is downloaded you will first need to create a skin folder inside your Steam installation location. Navigate to your Steam installation folder (default: C:\Program Files (x86)\Steam) and create a new folder inside it. Give new folder name Skins and confirm.
Extract the skin zip file in the newly made folder. Once the file is extracted you can delete the ZIP file if you wish.
Go to your Steam client and go to Steam>Settings. In settings select Interface on the left bar and on the right part then click the Select the skin you wish Steam to use the drop-down menu and select the skin that you wish to use. Confirm and restart your Steam client
Reverting to old skin
If you found skin unappealing or, unfortunately, has some functions missing you can always choose another skin or revert back to default Steam skin.
Default Steam skin is named in the drop-down menu as < default skin >.
As you know, the Google Drive service is a Backup and Synchronization service provided by Google. It was launched way back in April 2012 which provides users with the options to synchronize, store and share files by uploading them to Google’s servers where they stay until they are deleted personally by the users and can be accessed anywhere using the Google Account that’s used to upload them.
Recently, a lot of users reported that they were unable to connect to Google Drive from their Windows 10 computers. This kind of problem has been noticed in the middle of the upload process and can be seen at times after the app launches. If you also experience the same issue, then you’ve come to the right place as this post will guide you in fixing it.
There are a lot of possible reasons why this kind of problem occurs. It could be that the app was not able to launch properly or the internet got disconnected when the app was about to launch. It is also possible that the Firewall has blocked the app from connecting to the internet or that the antivirus program is preventing the app from making contact with its database. Aside from that, it is possible that the account you are using on your computer is preventing Google Drive from connecting to the internet due to some configuration errors.
Follow the suggestions provided below to fix the connection issue with Google Drive.
Option 1 – Configure the Firewall
As mentioned, the Windows Firewall might be blocking the app from contacting its database so, in this option, you have to allow Google Drive through the Firewall. To do so, follow these steps:
In the Windows Start Search, type “firewall” and click on the “Allow an app or feature through Windows Firewall” option from the search results.
After that, you will see a list of apps, and here, click on the “Change Settings” button.
Next, scroll down and make sure to check both the “Public” and “Private” options for Google Drive.
Now click on Ok to save the changes made and then try to launch Google Drive again.
Option 2 – Try to launch Google Drive again
Google Drive might have not launched properly that’s why it can’t connect to its servers so you can try to launch it again and see if it helps.
Tap the Ctrl + Shift + Esc keys to open the Task Manager.
Next, go to the Processes tab and click on the “View” option located at the top.
After that, uncheck the “Group by Type” option and click on the “Google Drive Sync” from the list of processes.
Then click on the “End Task” option and close the Task Manager.
Launch Google Drive again and see if the issue is now resolved.
Aside from Firewall, antivirus programs, especially the third party ones, are also known to block files applications the instant it detects a threat to the system. Thus, your antivirus program might be the reason why you can’t download anything on your Windows 10 computer. To fix this, you can try to disable the antivirus program on your computer in the meantime and then try to launch Google Drive again. Do not forget to enable them again as disabling them can leave your computer vulnerable to cyber threats.
Option 4 – Try to create a new account
There are times when a certain configuration for a user account might be blocking some elements of the Google Drive app. In such cases, you can try to create a new account to fix the problem.
Click on the Windows key and then click on the icon for Settings.
From there, click on the Accounts button and select the “Family & Other People” option from the left pane.
Next, click the “Add someone else to this PC” option.
After that, click on the “I don’t have this person’s sign-in information” option and select the “Add a user without a Microsoft Account” setting.
Type in the credentials for the new account you are creating and click on Next.
After the account is created, click on the account and then select the “Change account type” option.
Click on the drop-down menu and select the “Administrator” option and then click on OK.
Now sign out of the current account and sign in to the new one and then open Google Drive again.
Gaming on the computer has become one of the most used past-time activities among people of all ages. And since we are still in pandemic it has only risen as activity. People can acquire a lot of games at various discounts on various platforms and enjoy them at the leisure of their home.
Among many game platforms and stores, Electronic art's Origin is one of the bigger ones, and having some titles that could not be found anywhere else coupled with the ability to have access to almost the whole game catalog with one monthly subscription make it one of the most used clients.
Sadly as with every piece of software Origin's client is not perfect by any means and it can behave strangely from time to time.
Hello everyone and welcome to errortools.com, today we will fix Origin error code 10 which oddly enough can appear out of nowhere and can even appear on the very end of installation for the chosen game. If you have managed to come by this error you are in luck to be here because we have a couple of fixes for it.
I know that you might be excited to play the game so let's go and do some fixing
Check Server status
Before diving into technicality and before we start deleting files and fixing things you should check the Server status. This seems maybe like something you should not do but if the server has experienced some kind of downtime or it is in maintenance Origin will throw this error in the client. Unexpected situations can cause various server issues all of a sudden and the first thing is to check are servers online and working. There are various ways to check server status from official origin website to Electronic arts twitter channel to Reddit and many more online server status websites. If it turns out that the server is to be blamed for this error then sit back and wait for EA to resolve the issue, there is not much you can do anyway.
Delete OriginThinSetupInternal.exe
After some research, it has come to light that originthinsetupinternal.exe can cause this specific error. The best solution is to delete the file and then run Origin as administrator so the file is remade new.
First, make sure that Origin is fully closed, check the taskbar and if it lurks there right-click on it and click on quit
Run file explorer and go into the folder where Origin is installed, by default it is C:\Program Files (x86)\Origin
Locate OriginThinSetupInternal.exe and delete it
Then locate origin.exe and right-click on it and then click on Run as administrator
Reinstall Origin client
If the previous solution has not solved the issue then Origin might have some corrupted files inside it. It is known that the Origin client can produce some bad files if the installation has been forcefully canceled. The best thing is to reinstall the completely whole client.
Press ⊞ WINDOWS + R to open the run dialog
Inside run dialog type in Control panel and press ENTER
In the control panel locate programs and features group and double click on it
Locate Origin, click to select it, and on top click on uninstall
After uninstall process is completed start file explorer and go to the folder where Origin was installed, by default it is C:\Program Files (x86). Locate the Origin folder and delete it.
Go to the official origin website and download the new client installation.
After the download is finished double click on it and follow onscreen instructions.
Disable antivirus
If every solution so far has not been able to remove error then obviously something else is interfering with the origin client and installation functioning. Altho not advisable, turn OFF your security suite including both firewall and antivirus and try installing the game again. There is the possibility that the origin client or some game file has been marked as false positive by security software thus preventing it from executing properly.
A lot of users prefer to use Microsoft OneDrive when it comes down to cloud storage as it does not only come with the seal of approval from Microsoft but it’s also primarily good and better compared to other cloud storage services. However, that doesn’t mean that OneDrive isn’t without any issues. For one, you might encounter an issue where the OneDrive thumbnails do not show in File Explorer in Windows 10. If you are currently experiencing this problem, read on as this post will help you fix it.
As you know, you can add OneDrive to your Windows 10 computer and have all the files locally synchronize to the cloud and so on. This means that whatever is available in the cloud will be seen on your computer. It is smooth and definitely saves you a lot of time which is why a lot of users prefer to use it. So if you suddenly not see any thumbnails in OneDrive, then that would be a problem.
You are actually not the only one having this problem as there are other users who reported getting the same issue recently about the picture thumbnails that no longer show up in the OneDrive folders in the File Explorer. At the time of writing, it isn’t clear yet what the cause of the issue really is. Even so, there are still potential fixes you can check out to resolve it, and the sooner you do it, the better as this can be a major problem. To get started, refer to the instructions given below.
Option 1 – Try to disable Files on Demand
The first thing you can do to fix the problem is to disable the Files on Demand. This is what you have to do to get things under control.
First, right-click on the OneDrive icon located in the taskbar and go-to of OneDrive.
After that, click on More and Settings. This will open a new window where you have to click on the Settings tab and uncheck the “Files on Demand” service.
Once done, restart your computer and check if you can now see the thumbnails in the OneDrive folder. However, if it didn’t work, then proceed to the next given option below.
Option 2 – Try to change the icon view
The next thing you can do to fix the problem is to change the icon view. It is possible that the problem might have something to do with the size of the icons than anything else. So you have to change the icon view and to do that, follow these steps:
First, open Control Panel in Windows 10.
Next, in the search box, type “folder” and then click on the File Explorer Options.
From there, click on the View tab and uncheck the “Always show icons” option, and make sure that showing thumbnails is active.
Now go back to Control Panel and type “system” in the search box. This will open a new window where you have to select the “View advanced system settings” option.
Then under the Performance section, click on Settings and click on the option that allows you to show the thumbnails instead of icons.
When you connect your TV via HDMI cable Windows will recognize it as another monitor and will control the display settings for your HDMI connection. In most cases using it as the extended desktop will work fine, issues will arise when you play video on it. Video playing applications can override Windows settings which can lead to strange results on the screen. Here in this guide, we will tackle with reasons and solutions to this particular issue. Solutions provided are not meant to be followed in the way they are presented but as a silent rule, they go from most common one to most rare so it is advisable to try them in the order presented.
FIXING RESOLUTION ISSUES
The first thing when experiencing resolution issues on your TV connected to a PC is to check TV settings. There is very likely a chance that you will need to manually adjust picture settings on the TV itself using TV controls.
On older models of TV, there is an overscan option which can lead to different resolutions and screen sizes. Overscan is a technology that was used in order to help content creators to deliver consistent pictures on different screen sizes and aspect ratios but how technology has advanced and everything including aspect ratio was standardized overscan itself has become a relic of the past. If you are unable to access or see edges of your desktop on the TV screen it is very likely that overscan is the issue. In order to fix this be sure to select HDTV's aspect ratio to fit the screen setting in the picture setting.
Sadly finding this option on your TV will be different from manufacturer to manufacturer and even from model to model of the same manufacturer so we can not cover all models but in most cases option is located under picture settings or advanced options. Sometimes you will face even different overscan settings instead of classic ft to screen options, in this case, experiment with the setting until you find one which will work. If you have it, find settings in the user manual of your TV.
Luckily you have managed to find the proper option on your TV set and have chosen the right aspect ratio for display. If everything works ok there is no need for the next step but if you experience a different resolution than desired on your TV follow this next guide on how to change the resolution of the TV on your PC.
Press the ⊞ Windows and type Change Display Settings. Click on the top result.
Once the Display Settings App opens, you’ll see two screens (or more if you’ve got multiple HDMI outputs connected). Make sure you select the right display for the HDMI TV before making any changes. You can do this by clicking on Identify.
You’ll see the number from the screenshot above displayed on the monitors for a brief period. Depending on which screen is set to your primary display, make sure you change the settings for the HDMI monitor.
Select the HDMI monitor from the available displays.
Scroll down until you see the current resolution settings for your HDMI monitor.
You can change the resolution settings and test different values that match your HDMI TV’s configuration.
Once you change the setting, Windows will apply the new resolution for a limited time and revert if you don’t accept the new setting.
Once you’ve found the best resolution for your TV, select Keep Changes to keep the new resolution.
You are all set now, make sure that you have the latest drivers on your system and enjoy using your TV as a second monitor.
Diablo 2 resurrected has hit official release and servers seem to be finally taken care of and everything seems to be running smoothly now. The game also received great praise from gamers and attracted old players of the original Diablo 2 game.
Speaking of old players of old Diablo 2, they can transfer their old characters into remaster and continue playing them within this new great HD environment. There are some steps and requirements but we are here to help and transferred characters will bring full stash, inventory, and equipped items with them.
Requirements
There are not many requirements for this transfer to occur but they must be respected in order to be successful. The first thing is a minor requirement and somewhat annoying but it needs to be done, firstly fire up Diablo 2 resurrected and create a character, any kind of character with any kind of name, any kind of class. This strange requirement is to actually create a character folder and register it inside D2 resurrected so we can copy old ones there.
The second requirement will be that characters that you wish to be transferred must be offline characters. Old battle net online characters cannot be transferred at this moment and probably will not be in the future as well. So for all of you that wish to transfer online characters, bad luck, for the rest of us casuals playing offline single-player mode, we can enjoy our characters.
Process of diablo 2 character trasfer
The process itself of transferring characters when previously mentioned requirements are met is just a simple and copy operation. If you have somewhere backed your characters go into your backup folder and copy files in c:\users\*current user*\saved games\*diablo 2 resurrected folder*
If you do not have characters backed up and just have old Diablo 2 installed and playing it, you can go to c:\users\*current user*\saved games\*diablo 2 folder* and just copy all characters files into c:\users\*current user*\saved games\*diablo 2 resurrected folder*
Your old characters end with .d2s extension, grab all that you want to transfer, and copy them into D2R. Take note that copied characters cannot be brought back into Diablo 2, once they are copied into Diablo 2 resurrected all further progress on them will be tied to the new game.
Conclusion
That’s it about the transfer process and requirements for it. Fire up the new game version and enjoy.
TPM 2.0 requirement for Windows 11 has produced a lot of discussions since it was announced. A lot of somewhat older hardware seems to be left behind with this decision from Microsoft.
So naturally, when something like this is announced, especially when it is stated it is the must-have thing, people find a way to break it and to prove it is not the case.
In that spirit, I am proud to present you with not one but three-way you can install Windows 11 on hardware that does not has TPM 2.0. Please note that by bypassing this you will not be able to use some Windows 11 features tied to modules like Device encryption, vTPM in Hyper-V, and all TPM-related services.
I will cover methods from the most simple and straightforward ones to the more complicated using registry editor.
Bypass TPM with changing installation media
For this method to work you will need both Windows 10 ISO and Windows 11 ISO since it will require some file copying between them.
You will also need Rufus or another tool to make a new installation media once files are copied
All you have to do in this method is to go into your Windows 10 ISO and delete the install.esd, then just copy install.wim from Windows 11 installation media into the same place, and you are done.
Make install ISO with Rufus and install Windows 11.
Change DLL on installation media method
For this method, you will need everything like in the previous one and the process is almost the same, but this time instead of migrating the whole installation file, we will just replace the appraiserres.dll file.
Copy appraiserres.dll file from your Windows 10 installation media over the same file on Windows 11 installation and you are good to go.
Bypassing TPM via registry editor
If for some reason previous easy solutions have not worked for you do not lose hope just yet, there is one more way you can bypass TPM.
In this given method you will not need Windows 10 installation media but the process is a little more complicated than previous ones.
Create Windows 11 media installation
Start the installation process
Click the Next button.
Select region, language, and time when asked. You can change these settings later.
Click the Install now button.
If your device was already activated, click the I don’t have a product key option to continue.
Click the Next button.
Select the edition of Windows. When you’re installing the OS on an existing device, Windows won’t activate if you select the incorrect edition.
Click the Next button.
Select the I accept the license terms option and click next.
Select Custom: Install Windows only (Advanced)
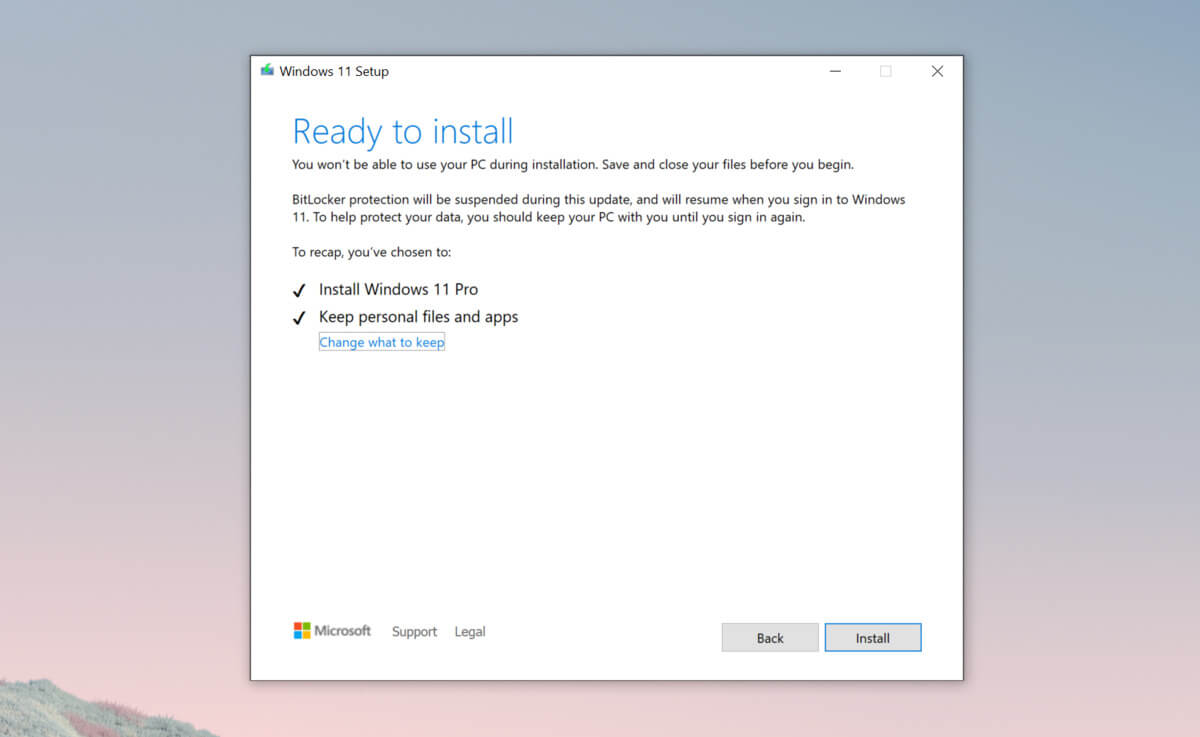
During the Windows installation screen, now you will see a message stating that the PC can’t run Windows 11 if you do not have TPM 2.0
On this screen, press SHIFT + F10 to open Command Prompt window.
Launch the registry editor, type regedit.exe in Command Prompt, and press ENTER
Create a new key “LabConfig” by right-clicking on the Setup key and select New > Key under HKEY_LOCAL_MACHINE\SYSTEM\Setup.
Type LabConfig and press ENTER.
Right-click on the LabConfig key.
Select New > DWORD (32-bit) value.
Create two values: BypassTPMCheck and BypassSecureBootCheck.
Set their DWORD32 value to 1.
Press ENTER.
Close the Registry Editor.
Type exit in the Command Prompt and press ENTER or close its window.
Press the back button in the Windows installation setup if it still says “This PC can’t run Windows 11”.
Accept the terms & conditions.
Select Custom: Install Windows only (Advanced) option and configure the partition with the current installation.
You have probably heard a lot of good things about gaming mice, how they are better feeling, better in any way possible and it is all true, everything you heard is actually true, they are superior in any way to a regular mouse but with one big disadvantage, and that would be the price. While you can find a regular mouse for pocket change, a gaming mouse is in comparison very expensive even for entry-level ones.
In this article we will explore all advantages and compare it with the regular one so you can come up with your own conclusion about do you really need one for yourself or if you are fine with regular.
Price
As stated price is one factor that does not favor gaming mice. Regular mouse for a personal computer goes around 10 or 20 USD, while entry-level in gaming one will be 40 USD and can go up to 250 USD, this large gap in price is usually determining factor why people pick up regular one. If you are on a really tight budget go for the regular one, but if you can afford a gaming one get it without second thoughts.
Software
This is where you will see the big difference between mice. Regular ones when connected are recognized and the driver is automatically installed and you can use it, same goes with gaming ones but with one big difference, you have an option to install additional manufacturers' software specially tailored for your mouse. In the application, you will be able to access some features that are specific to the mouse model that you could not set in typical Windows mouse properties. Beside more options software can also have features like setting your profiles and saving them to be recalled when you need them on the fly.
Sensitivity of mouse
The sensitivity of the mouse is measured in dots per one inch or short DPI, this is directly shown on your screen by how fast your mouse can move, higher sensitivity means your mouse will move faster across the screen and lower means it will move slower. All gaming mice come with buttons and settings that will allow you to change DPI on the fly and you can choose precise DPI settings in the software.
The regular mouse comes with DPI around 800 and goes to 1200 typically and does not have usually the option to change this while gaming mice start at 400 and can go as high as 26000 with the option to change it. Some regular mice can have only 1 option of DPI, usually very cheap ones.
Polling rates in mice
Pooling rate is the measurement of how often your mouse reports where it is positioned on the computer. The higher the pooling rate, the more responsive your mouse will be and vice versa. It is measured in hertz (Hz) and regular mice have them around 125Hz that is enough if you are using a computer for office, internet, and mail work.
If you are working in design or gaming you will need more than 125Hz polling rate, luckily gaming mice come with a minimum of 500Hz as an entry point and some hi-end models are going as far as 8000Hz. This very high pooling rate will get some extra load on your CPU but the mouse itself will be maximally responsive and will respond even to the smallest moves.
Ergonomics
Regular mice are well just mice, they are typical shape and size, gaming mice are made with ergonomics in mind. How they are made for extensive daily use of several hours per day they are constructed in a way to offer a pleasant and pain-free experience.
If you work on a computer for long periods of time consider gaming an ergonomic mouse since it will take the strain from hands and place them in a more natural position.
Macro keys
Gaming mice most of the time come with more keys compared with regular ones and good thing is that via its software you can tie certain actions to these extra keys making work or gaming more pleasant and quicker.
Components and material quality
In order to make regular mice more affordable and cheaper materials and quality of components had to suffer. Gaming mice have millions of guaranteed clicks by companies that make them before they break and regular ones usually do not guarantee a single one. This is due of course quality of materials that have been used in constructing these devices.
In the long term, if you use a gaming mouse for typical daily tasks it will outlive your regular one and on the side offer you more pleasant and responsive use along the way.
Kernel Mode Heap Corruption is the error message that the Windows operating system throws when it encounters a blue screen of death or BSOD error during PC startup or launching specific programs such as video games. It is mainly caused due to software conflicts, driver issues (especially graphics card driver), and computer hardware malfunctioning.
The good news is that this error is easily fixable.
Follow the next steps in order to fix the error:
Rollback graphic card driver
Press ⊞ WINDOWS + X to open Windows secret menu and click on device manager
Expand Display adapters section
Right-click on your GPU and choose properties
In properties window go to the driver tab and click on Roll back driver
Select the reason for operation and click on YESReboot your PC
Update corrupted and outdated drivers
How is this error mostly driver issue, updating and fixing bad drivers can fix it very easily. As in the previous step, you will need to open the device manager and go through all drivers and manually check for updates for each one, update as necessary or reinstall ones you might think have gone rogue. If you are not experienced enough with this kind of task install some automatic solution for this task like DriverFix
Check for software issues
If this error started happening after the installation of new software it is very likely that the application is causing problems. Try uninstalling or disabling the application to see if it will fix the issue. You can also boot Windows in safe mode to see if the error will happen there, if Windows is working fine in safe mode, it is likely that issue is on the software side.
Run SFC scan
Press ⊞ WINDOWS + X and choose Command prompt (admin)
In command prompt type in sfc /scannow and press ENTERWait for the process to be finished and Reboot the system


 Skinning of applications is not new to PC users, but did you knew you could skin Steam?
With skin, you can customize the UI and style of the client to what you want making it more personal and to your liking. First thing is to find the skin that you would like to install. There are a lot of sites where you could find custom made Steam skins but we would recommend
Skinning of applications is not new to PC users, but did you knew you could skin Steam?
With skin, you can customize the UI and style of the client to what you want making it more personal and to your liking. First thing is to find the skin that you would like to install. There are a lot of sites where you could find custom made Steam skins but we would recommend 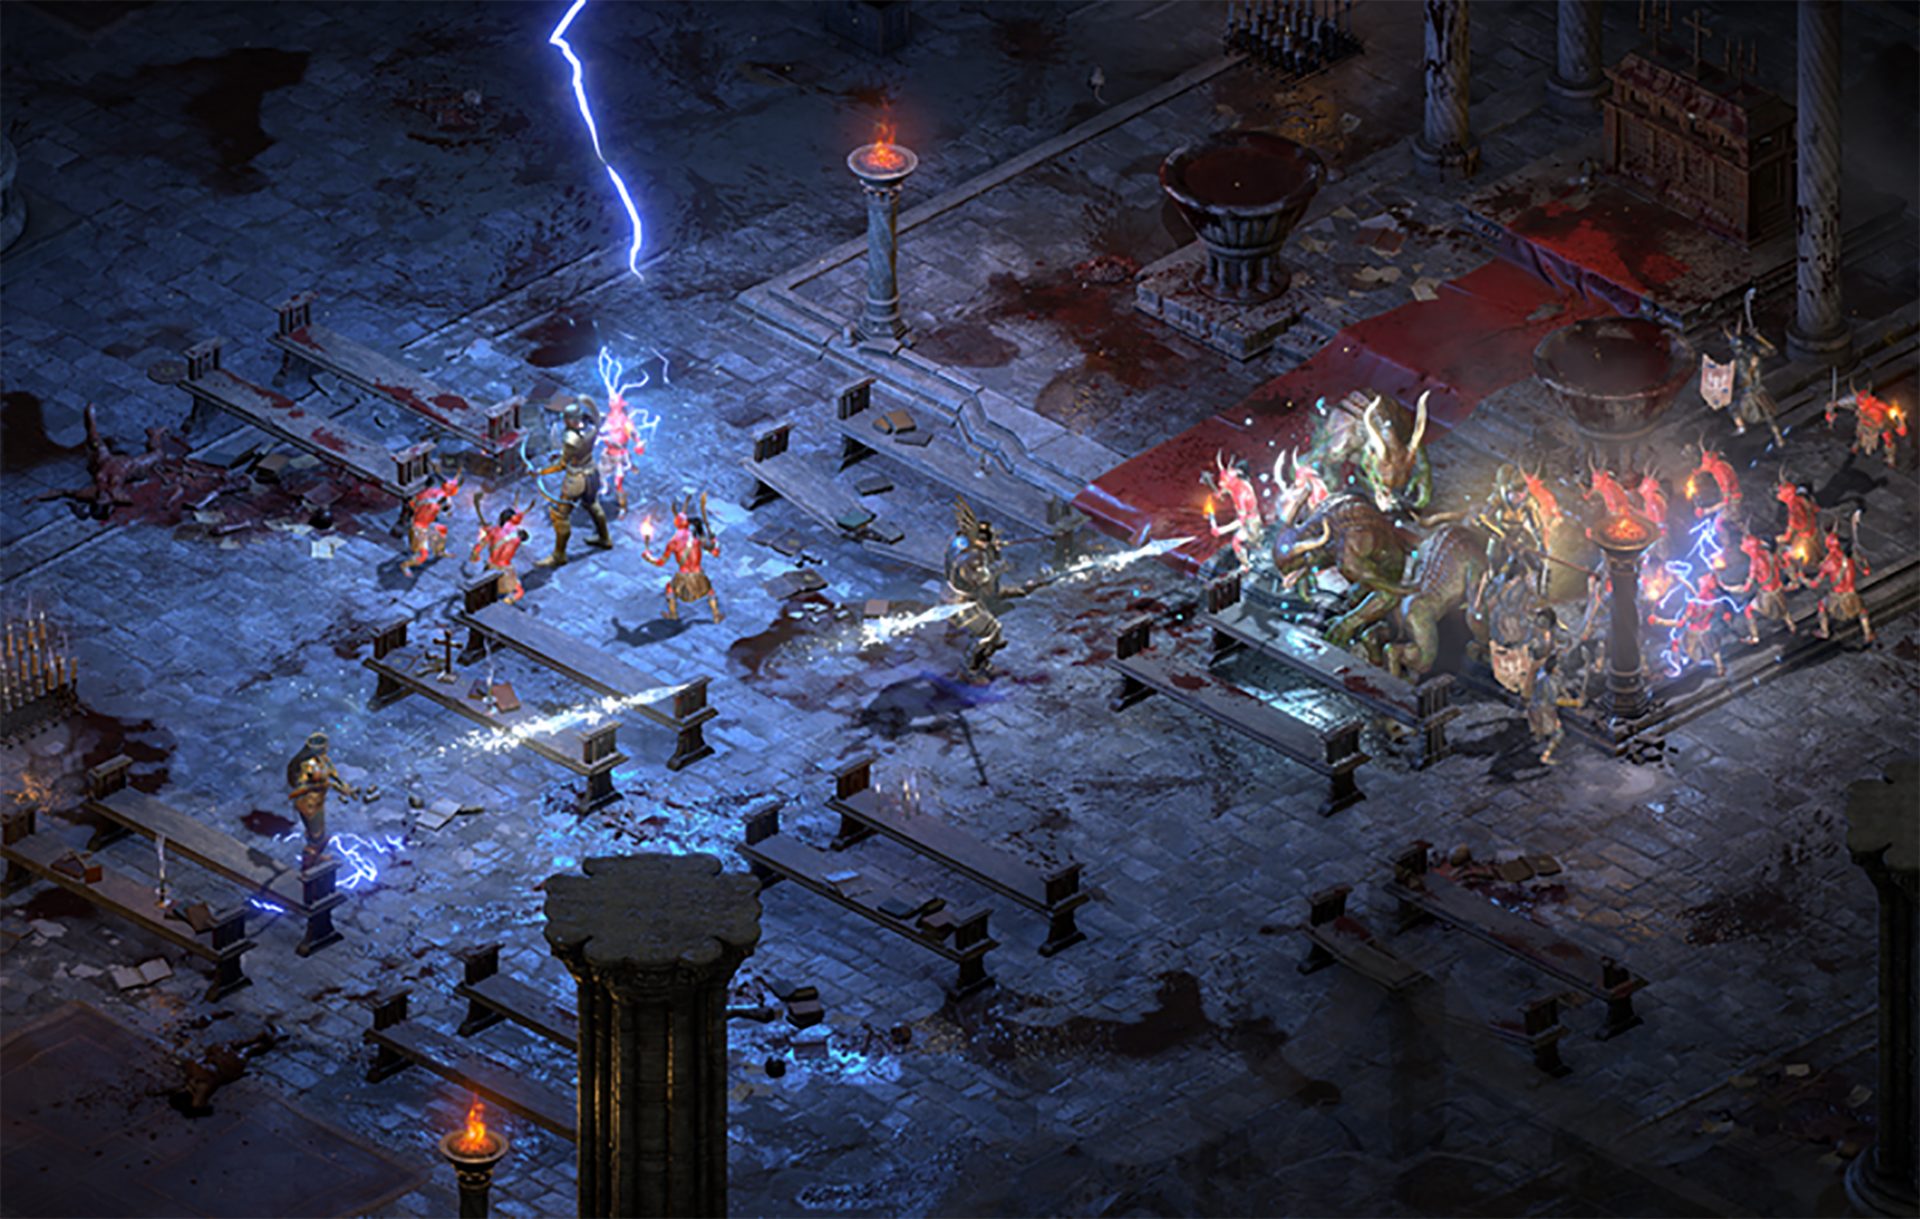 Speaking of old players of old Diablo 2, they can transfer their old characters into remaster and continue playing them within this new great HD environment. There are some steps and requirements but we are here to help and transferred characters will bring full stash, inventory, and equipped items with them.
 Bypass TPM with changing installation media