As you know, the Google Drive service is a Backup and Synchronization service provided by Google. It was launched way back in April 2012 which provides users with the options to synchronize, store and share files by uploading them to Google’s servers where they stay until they are deleted personally by the users and can be accessed anywhere using the Google Account that’s used to upload them.
Recently, a lot of users reported that they were unable to connect to Google Drive from their Windows 10 computers. This kind of problem has been noticed in the middle of the upload process and can be seen at times after the app launches. If you also experience the same issue, then you’ve come to the right place as this post will guide you in fixing it.
There are a lot of possible reasons why this kind of problem occurs. It could be that the app was not able to launch properly or the internet got disconnected when the app was about to launch. It is also possible that the Firewall has blocked the app from connecting to the internet or that the antivirus program is preventing the app from making contact with its database. Aside from that, it is possible that the account you are using on your computer is preventing Google Drive from connecting to the internet due to some configuration errors.
Follow the suggestions provided below to fix the connection issue with Google Drive.
Option 1 – Configure the Firewall
As mentioned, the Windows Firewall might be blocking the app from contacting its database so, in this option, you have to allow Google Drive through the Firewall. To do so, follow these steps:
In the Windows Start Search, type “firewall” and click on the “Allow an app or feature through Windows Firewall” option from the search results.
After that, you will see a list of apps, and here, click on the “Change Settings” button.
Next, scroll down and make sure to check both the “Public” and “Private” options for Google Drive.
Now click on Ok to save the changes made and then try to launch Google Drive again.
Option 2 – Try to launch Google Drive again
Google Drive might have not launched properly that’s why it can’t connect to its servers so you can try to launch it again and see if it helps.
Tap the Ctrl + Shift + Esc keys to open the Task Manager.
Next, go to the Processes tab and click on the “View” option located at the top.
After that, uncheck the “Group by Type” option and click on the “Google Drive Sync” from the list of processes.
Then click on the “End Task” option and close the Task Manager.
Launch Google Drive again and see if the issue is now resolved.
Aside from Firewall, antivirus programs, especially the third party ones, are also known to block files applications the instant it detects a threat to the system. Thus, your antivirus program might be the reason why you can’t download anything on your Windows 10 computer. To fix this, you can try to disable the antivirus program on your computer in the meantime and then try to launch Google Drive again. Do not forget to enable them again as disabling them can leave your computer vulnerable to cyber threats.
Option 4 – Try to create a new account
There are times when a certain configuration for a user account might be blocking some elements of the Google Drive app. In such cases, you can try to create a new account to fix the problem.
Click on the Windows key and then click on the icon for Settings.
From there, click on the Accounts button and select the “Family & Other People” option from the left pane.
Next, click the “Add someone else to this PC” option.
After that, click on the “I don’t have this person’s sign-in information” option and select the “Add a user without a Microsoft Account” setting.
Type in the credentials for the new account you are creating and click on Next.
After the account is created, click on the account and then select the “Change account type” option.
Click on the drop-down menu and select the “Administrator” option and then click on OK.
Now sign out of the current account and sign in to the new one and then open Google Drive again.
If you got an error code of 0x80072EE2 while trying to download a Windows 10 update then it could be that something is blocking the Windows Update service on your Windows 10 PC and is preventing it from connecting to the Microsoft server. In addition, the error code 0x80072EE2 also indicates “ERROR_INTERNET_TIMEOUT” and together with this message, you might also see a message as Windows Update encountered an unknown error or you might also find it hard to search for new updates. So in this post, you will be guided on how you can fix the Windows Update error code 0x80072EE2. Make sure to follow the steps below carefully.
Option 1 – Restart your computer and try installing the Updates again
You can restart your computer and then try installing the updates once again. There are instances when a simple restart resolves Windows Update errors. Aside from that, it would also be better if you make sure that your internet connection is working and that it’s stable. And so after you restart your computer, check for updates once again and see if you’re still getting the error or not.
Option 2 – Run the Windows Update Troubleshooter
Running the built-in Windows Update troubleshooter is one of the things you can first check out as it is known to automatically resolve any Windows Update errors like error code 0x80072EE2. To run it, go to Settings and then select Troubleshoot from the options. From there, click on Windows Update and then click the “Run the troubleshooter” button. After that, follow the next on-screen instructions and you should be good to go.
Option 3 – Try to disable your antivirus program
Disabling the antivirus program or any security software installed in your computer is always a good idea you can try when the Windows Update process does not go smoothly. So before you try updating your computer again, make sure to disable the antivirus or security program and once the Windows Update is done, don’t forget to enable the antivirus program back again.
Option 4 – Try to restart the Background Intelligent Transfer Service
The Background Intelligent Transfer Service or BITS is a part of the Windows Update service and is the one that manages the background download of Windows Update, as well as scans for new updates and so on. And if Windows Update is experiencing some problems, you can try restarting BITS but make sure that you have admin privileges to do so.
Tap the Win + R keys to open the Run dialog box.
Next, type “services.msc” in the field and hit Enter to open Windows Services.
From the list of Services, look for the Background Intelligent Transfer Service and double-click on it to open Properties.
After that, you need to set the Startup type to “Automatic (Delayed Start) and click on Apply.
Now click the Stop button to stop BITS and then click the Start button to restart the service.
Click OK to save the changes made and then restart your PC.
Option 5 – Try installing the updates in a Clean Boot State
It could be that some third-party application is the one that’s causing the problem so it’s best if you put your computer in a Clean Boot state. During this state, you can start the system with a minimum number of drivers and startup programs that will surely help you in isolating the root cause of the issue.
Log onto your PC as an administrator.
Type in MSConfig in the Start Search to open the System Configuration utility.
From there, go to the General tab and click “Selective startup”.
Clear the “Load Startup items” check box and make sure that the “Load System Services” and “Use Original boot configuration” options are checked.
Next, click the Services tab and select the “Hide All Microsoft Services” check box.
Click Disable all.
Click on Apply/OK and restart your PC. (This will put your PC into a Clean Boot State. And configure Windows to use the usual startup, just simply undo the changes.)
After that, try to install the Windows app again.
Note: If you are able to install the app without any trouble at all then it means that the error is caused by some third-party application on your computer. You need to look for the culprit and uninstall it once you found it.
Option 6 – Run Microsoft’s online troubleshooter
Running Microsoft’s online troubleshooter might also help you fix the Windows update error code 0x80072EE2. This online troubleshooter is known to help in fixing Windows Update errors, it scans your computer for issues that might be causing the problem and then fixes them automatically.
If you wish to continue where you have left off when you signed out of Windows follow this guide and learn how to continue your work after signing in, restart apps in your Windows.
You can set Windows 10 to Automatically save your restartable apps when you sign out and restart them after you sign in. Here’s how:
Right-click on the Windows logo to open the secret menu
Select Settings
Click open Accounts
From the left side, select Sign-in options
Scroll down till you see Restart apps setting
Toggle the Automatically save your restartable apps when you sign out and restart them after you sign in setting to On position
Aro2012 is a PC Optimizer Software that typically comes bundled with other software. Even though Aro2012 poses no threat itself, the programs that it comes bundled with may pose a problem to your computer.
From the Author: ARO is an advanced repair and optimization utility designed to help improve and maintain computers running the Windows operating system (both 32- and 64-bit). ARO focuses on finding errors that hide out in the Windows registry, identifying PC and web browser clutter that may be hindering PC performance, and ensuring computers have adequate security solutions installed and up to date. With its advanced scanning engine, ARO provides deep scanning capabilities to identify and repair registry errors. ARO also searches for and removes “junk” files that accumulate over time and can put a damper on PC performance.
When installed Aro2012 creates a startup entry that allows it to run each time the computer is started. It also adds a task scheduler that allows it to run at various times.
About Potentially Unwanted Applications
Have you ever found an unwanted program on your computer system and pondered how it got there since you are sure you didn’t purposefully download and never gave authorization to be installed? A PUA / PUP (potentially unwanted application / potentially unwanted program) is a piece of software that comes bundled with freeware/shareware and you agree to install on your computer. These are programs you definitely don’t want on your PC since it doesn’t give any beneficial service.
The term PUP was first coined to outline this downloadable crapware as something other than malicious software. The reason is, most PUPs get into a PC not because they slip via the security holes, for instance, but because the users have installed them by themselves – 100 % unintentionally needless to say. PUPs might not be malware but nevertheless, they are dangerous programs for your laptop or computer. At best, these types of unwanted programs provide hardly any benefit, and at worst, they can be quite harmful to your computer.
What do PUPs do on your PC, precisely?
Most Potentially Unwanted Programs comes in the form of adware, which typically aims to exhibit lots of annoying pop-up ads, banners, coupons, and bargains on web pages you explore. PUPS also comes in the form of unwanted toolbars or browser plug-ins. Not only they entirely take up space on your computer screen, but toolbars could also manipulate search engine results, track your surfing activities, decrease your internet browser’s overall performance, and slow down your internet connection to a crawl.
They could appear innocent but PUPs tend to be spyware. And in the large majority of the cases, end-users will not be aware that they’re installing an unwanted program. These are software programs that don’t do anything useful to you; in addition to taking up space on your hard disk drive, they will also slow down your computer, often modify settings without your permission, and the list of frustrating features goes on and on.
How can you avoid ‘crapware’
• Read the fine print so that the end-user license agreement (EULA) you’re accepting is only for the program you actually intend to download.• Always choose “Custom” or “Advanced” installation and never blindly click the Next button, which should let you uncheck any “foistware” software programs you do not want.• Have a solid anti-virus program such as Safebytes Anti-malware that can protect your computer from PUPs. As soon as you install this software, protection from malware and PUPs is already turned on.• Avoid installing a freeware application you will not use. Nowadays ‘freeware’ isn’t actually freeware – but “crapware” bundling nonsense.• Don’t download software programs from pop-ups, online advertisements, file sharing websites, as well as other unreliable sources; look out for any preset, unwanted options when downloading the program. Avoid visiting blogs and sites that support pirated programs.
What To Do When You Cannot Install Any Anti-Malware?
Practically all malware is inherently unsafe, but certain kinds of malicious software do a lot more damage to your computer than others. Some malware is designed to interfere with or prevent things that you’d like to do on your computer. It may well not permit you to download anything from the net or it will prevent you from accessing some or all of the websites, especially the antivirus sites. If you’re reading this, odds are you’re stuck with a malware infection that is preventing you to download and install the Safebytes Anti-Malware program on your computer. Although this type of issue will be harder to get around, there are some actions you can take.
Install in Safe Mode
If the malware is set to load at Windows startup, then booting in safe mode should avoid it. Only minimal required applications and services are loaded when you start your computer into Safe Mode. To launch your Windows XP, Vista, or 7 computers in Safe Mode with Networking, follow the instructions below.
1) At power-on/startup, hit the F8 key in 1-second intervals. This should bring up the Advanced Boot Options menu.2) Use the arrow keys to select Safe Mode with Networking and hit ENTER.3) Once this mode loads, you should have internet access. Now, get the virus removal application you need by using the internet browser. To install the program, follow the guidelines within the setup wizard.4) Immediately after installation, do a complete scan and let the software get rid of the threats it detects.
Download the antivirus program in a different internet browser
Web-based viruses could be environment-specific, aiming for a particular internet browser or attacking specific versions of the browser. If you seem to have a trojan attached to Internet Explorer, then switch over to a different internet browser with built-in security features, such as Chrome or Firefox, to download your favorite antivirus program – Safebytes.
Install and run anti-malware from a Thumb drive
Another option is to create a portable antivirus program on your USB flash drive. Adopt these measures to use a thumb drive to clean your corrupted system.
1) Make use of another virus-free computer to download Safebytes Anti-Malware.2) Insert the USB drive on the same computer.3) Double-click the Setup icon of the antivirus software to run the Installation Wizard.4) Select the USB flash drive as the destination for saving the software file. Follow the on-screen instructions to finish the installation process.5) Now, insert the pen drive into the corrupted PC.6) Run the Safebytes Anti-malware directly from the flash drive by double-clicking the icon.7) Simply click “Scan Now” to run a scan on the affected computer for viruses.
SafeBytes Anti-Malware: Lightweight Malware Protection for Windows PC
Want to install the very best anti-malware software for your laptop or computer? There are plenty of applications available that come in paid and free versions for Windows systems. Some of them are excellent, some are ok types, and some will ruin your PC themselves! You need to pick out a product that has obtained a good reputation and detects not only viruses but other kinds of malware also. On the list of strongly recommended applications by industry experts is SafeBytes Anti-Malware, the most dependable program for Microsoft Windows.
SafeBytes can be described as a powerful, real-time antivirus application that is designed to assist the typical computer user in protecting their computer from malicious threats. Using its outstanding protection system, this software will quickly detect and get rid of most of the security threats, including adware, viruses, browser hijackers, ransomware, trojans, worms, and PUPs.
SafeBytes has got a plethora of wonderful features that can help you protect your computer from malware attacks and damage. A few of them are given as below:
Active Protection: SafeBytes provides round-the-clock protection for your personal computer limiting malware attacks instantly. It’ll continuously monitor your laptop or computer for hacker activity and also gives users superior firewall protection.
Most Reliable AntiMalware Protection: With a critically acclaimed malware engine, SafeBytes gives multilayered protection which is designed to catch and remove viruses and malware which are concealed deep in your computer.
Extremely Speed Scanning: SafeBytes’s very fast malware scanning engine lessens scanning times and extends battery life. At the same time, it will effectively detect and remove infected computer files or any internet threat.
Website Filtering: Through its unique safety ranking, SafeBytes notifies you whether a website is safe or not to access it. This will ensure that you’re always certain of your online safety when browsing the web.
Minimal CPU and RAM Usage: This software is lightweight and will run quietly in the background, and will not affect your computer efficiency.
Premium Support: Support service is readily available for 24 x 7 x 365 days through email and chats to answer your queries.
Technical Details and Manual Removal (Advanced Users)
To eliminate Aro 2012 manually, go to the Add or Remove programs list in the Control Panel and choose the program you want to get rid of. For web browser plug-ins, go to your web browser’s Addon/Extension manager and select the add-on you intend to disable or remove. It is also advised to reset your web browser to its default state to fix corrupt settings.
To ensure complete removal, find the following registry entries on your computer and remove them or reset the values accordingly. Please keep in mind that only professional users should try to manually edit the registry because removing any single critical system file results in a serious issue or perhaps a PC crash. Additionally, some malicious programs have the capability to defend against its deletion. Completing this task in Safe Mode is advised.
As you know, Windows has a built-in Automatic Maintenance feature that takes care of important tasks such as security scanning and updating, Windows software updates, Disk Defragmentation, System Diagnostics, Disk Volume Errors, and many more. So if you receive an error message saying, “Windows is unable to run automatic maintenance, The maintenance schedule is unavailable”, then this post will guide you in what you can do to resolve this issue.
Here are some suggestions you can try if the Automatic Maintenance in your Windows 10 PC is not able to run.
Option 1 – Enable Automatic Maintenance
It is possible that Automatic Maintenance has been disabled so you can try enabling Automatic Maintenance on your Windows 10 PC. To do so, follow these steps:
Go to Control Panel.
From there, select System and Security > Security and Maintenance > Automatic Maintenance.
After that, set the time you want to run the Automatic Maintenance and then check the checkbox saying, “Allow scheduled maintenance to wake up my computer at the scheduled time”.
Click OK to save the changes.
On the other hand, you can also enable Automatic Maintenance via the Registry Editor. But before you proceed, you need to create a System Restore Point first.
Tap the Win + R keys to open the Run dialog box.
After that, type “Regedit” in the field and hit Enter to open the Registry Editor.
Next, look for the “MaintenanceDisabled” key and then double click on it to open it and then set its value to “0”.
Click OK and exit the Registry Editor.
Restart your computer.
Option 2 – Check the Task Scheduler Services status
Majority of the tasks in Windows 10 run via services. So it is most likely that either the Service has been stopped or is set to the manual which is why Windows is unable to run Automatic Maintenance. Thus, you need to change it to automatic mode.
Tap the Win + R keys to open Run.
Type “services.msc” in the field and hit Enter to open Services.
Next, look for the Task Scheduler service and tap the T key on your keyboard which should take you to the services that start with T.
Double click on the Task Scheduler service and select the Automatic option under the Startup Type.
If it is not started yet, click on the Start button.
Then click Apply and OK to save the changes.
Option 3 – Check the Status in Task Scheduler
You can also try checking the status in the Task Scheduler. Just open the Task Scheduler > Task Scheduler Library > Microsoft > Windows > TaskScheduler. From there, make sure that Idle Maintenance, Maintenance Configurator, and Regular Maintenance are enabled.
Option 4 – Run the System File Checker
The SFC or System File Checker scan could detect and automatically repair damaged system files that could be causing the Automatic Maintenance issue. SFC is a built-in command utility that helps in restoring corrupted files as well as missing files. It replaces bad and corrupted system files with good system files. To run the SFC command, follow the steps given below.
Tap Win + R to launch Run.
Type in cmd in the field and tap Enter.
After opening Command Prompt, type in sfc /scannow and hit Enter.
The command will start a system scan which will take a few whiles before it finishes. Once it’s done, you could get the following results:
Windows Resource Protection did not find any integrity violations.
Windows Resource Protection found corrupt files and successfully repaired them.
Windows Resource Protection found corrupt files but was unable to fix some of them.
Option 5 – Run the DISM tool
The DISM tool is another command-line tool in the Windows operating system that could help users fix various corrupted system files. To use it, follow these steps:
Open the Command Prompt as admin.
Then type in this command: DISM /Online /Cleanup-Image /RestoreHealth
The DISM command you entered will repair the corrupted system image. Do not close the window if the process takes a while as it will probably take a few minutes to finish.
Finally upgraded to Microsoft’s newest OS, but the performance is a bit sluggish? Here are a few useful tips you may not have thought about that could significantly transform your experience!
How to speed up Windows 11?
1. Disable startup programs
There are many programs that launch right on startup that really aren’t essential. This, in turn, causes your PC to launch and run more slowly.
To check which programs are enabled on startup, go into the Task Manager and select the Startup tab. Find every program that doesn’t need to launch immediately, right-click on it and press ‘Disable’.
This will not shut down the program in that instant. It’ll just prevent it from running automatically as you turn on your PC. You can always launch it manually when you need it.
2. Expand your memory and storage
If you want your PC to run super smoothly, you need to have enough memory to support that. This is especially significant for those of you who love to multitask. Upgrading your RAM gives your PC more space to store the temporary data it needs to complete processing tasks. In other words, processing takes a lot less time.
Your long-term storage is equally important. Hopefully at this point you’re already using SSD over HDD, since this type of storage offers a faster boot time.
Credit: Marc Pezin on Unsplash
In any case, we recommend expanding your storage capacity. The more files and data you store, the more there is to load, significantly influencing your PC’s speed. Larger storage capacity means new data and essential updates can be stored comfortably, preventing any strain on your PC’s performance.
3. Clean up disk space
If you aren’t willing to upgrade your storage just yet, the least you can do is clean up your storage right now.
Aside from manually deleting stuff you no longer need, you can also get rid of temporary files that clutter up your storage and eat up performance for no reason. To get to them, click Windows + X and select ‘Run’ (or just type it in the search bar).
A small window will pop up, where you need to type %temp%. This will take you to a whole folder full of all the temporary files you can remove without thinking twice.
For those who upgraded from Windows 10, there’s a neat trick to get rid of potential leftover files you don’t need on your brand new iteration. Only do this if you’re 100% sticking with Windows 11, though. Go to System > Storage > Temporary files. Make sure to only leave ‘Previous Windows Installation’ and ‘Windows Update Clean-up’ checked and click on ‘Remove files’.
Lastly, make use of Windows 11’s fantastic Storage Sense feature. Turning it on will enable your PC to constantly watch out for junk or unused files to optimize your PC’s performance to the maximum.
4. Install pending updates
This one should go without saying, but pending updates can be detrimental to your Windows 11 performance. The longer you leave them untouched, the more bugs the outdated programs and patches can cause. So, make sure to regularly check for updates and install them as soon as they’re available.
5. Disable visual effects
As cool as visual effects, animations, shadows and transparency are, they can also put quite a toll on your computer’s speed. On a newer setup this generally shouldn’t be a problem, but if you do notice a drop in performance, definitely consider turning off some of these settings.
To do this you can go to the Control Panel, System Properties and click the ‘Advanced’ tab. In the Performance section, choose Settings. If you’d like a quicker way to get to the dialog (Performance Options) with Visual Effects, you can also type sysdm.cpl in the search bar.
Once there, you can either have your PC choose what’s best, choose the best appearance or the best performance. The other option is to manually toggle the effects off and on. The biggest obstacles to speed are taskbar animations, window shadows, control/element animations and animations upon minimizing/maximizing.
Credit: Windows on Unsplash
In the same vein, you should go to Settings > Personalization > Colors and disable Transparency, to prevent your computer from doing overtime just to hit the aesthetic appeal.
6. Get rid of bloatware
Bloatware is one of the biggest culprits of slow computer speed.
Pre-installed software that’s pretty much useless but takes up valuable system resources has been around since day one. No matter which device or platform you’re talking about. Luckily, a lot of it is removable, making it easy to lighten the load on your device.
To boost your Windows 11 computer, go to Settings > Apps > Installed apps.You’ll probably see a bunch of apps you don’t want or need. Click on the three dots next to each one you want to remove and press ‘Uninstall’.
Aside from helping optimize performance, removing bloatware has another great benefit. Unfortunately, often this pre-installed software is quite vulnerable, exposing you to great risk of cyberattacks. So, removing it definitely improves your device’s security and gives you at least some peace of mind.
Summary
These are a few of our fastest tips for boosting performance. There are other, more complex and time-consuming ways, of course. If you’ve tried these quick ones and still need advice on how to improve your PC’s speed, feel free to reach out!
If you are trying to connect an external device to your computer but you suddenly encounter an error that says, “Device requires further installation”, then you’ve come to the right place as this post will guide you on how exactly you can fix this error.
In most cases, USB sticks, headphones, speakers, and other external devices, install drivers automatically once you connect them to your computer which means that the drivers are downloaded and installed in the system as soon as the external device is plugged in. However, if the driver has become corrupted or outdated, you might encounter an error like the
“Device requires further installation”
Aside from corrupted or outdated drivers, the error could also be caused by pending updates, an incorrect version of the Intel PROSet Wireless driver, or checking the wrong event. Whatever the cause is, this post will provide you with some potential fixes that can help you resolve the problem. But before you troubleshoot the problem, ensure that your Windows 10 computer is updated to its latest version and you must also not forget to check that you’re checking the correct event on the Event Viewer. Once you have these things covered, proceed to the instructions below.
Option 1 – Try to update the device drivers to the latest version
One of the most likely root causes of the “Device requires further installation” error is either outdated or corrupted drivers in your computer. This kind of problem is more common on several devices like scanners and printers for which the drivers are provided with them.
First, boot your computer into Safe Mode.
After that, tap the Win + R keys to launch Run.
Type in devmgmt.msc into the box and tap Enter or click OK to open the Device Manager.
After that, a list of device drivers will be displayed. From there, look for any outdated device drivers and click on each one of them.
After that, right-click on each entry of the device drivers and select the “Uninstall Device” option from the menu.
Now restart your computer.
After restarting your computer, go to the Settings app and Check for Updates in the Windows Update section.
Note: You also opt to download the latest versions of the device drivers directly from the website of the manufacturer. Once you’ve downloaded them, you can install them into your computer right away and then try connecting the external device again. On the other hand, you can also try to reinstall the device drivers.
Option 2 – Try to install the latest version of the Intel PROSet Wireless driver
A lot of users who experience the problem reported that their wireless driver wasn’t also working properly and it was then found that it was caused by the outdated Intel PROSet wireless driver. Thus, to fix the problem, you need to install the latest version of this driver from the intel.com website and install it on your computer. When you download the driver, make sure that your computer is running an Intel system and then download the correct driver depending on whether your computer is a 64-bit system or a 32-bit one.
Code 29 is a Device Manager error commonly seen whenever a hardware device driver reports a problem. This error code indicates that the resources needed for operation are not available.
The computer hardware basically requires drivers to interface with the operating system. Drivers comprise multiple components and are supplemented with other resources provided by the BIOS (a physical chip on the motherboard).
The BIOS contains a set of basic input and output instructions for the computer system to boot, load drivers, and more.
Its firmware provides resources that drivers require to interface with other essential components. However, when the firmware fails to provide the requested resources, the device drivers stop functioning; this results in error codes like code 29.
Error code 29 is usually displayed in the following format:
“This device is disabled because the firmware of the device did not give it the required resources” Code 29
Solution
Error Causes
Error code 29 may be triggered due to several reasons. These include:
Outdated drivers
Corrupted drivers
BIOS misconfiguration
The device firmware is corrupt
Previous attempt to update the driver failed
To avoid inconvenience and to ensure your computer keeps working at its optimal pace, it is recommended that you repair error code 29 on your PC immediately. Delay may limit you from using certain hardware attached to your system properly.
Further Information and Manual Repair
To repair error code 29, you don’t have to hire a professional and spend hundreds of dollars. Here are some quick and effective DIY methods that you can try to resolve this issue in minutes even if you don’t have any technical background.
Method 1 - Reboot Your PC
Sometimes, error codes like code 29 may pop up on your computer screen due to some temporary glitch with the hardware. Rebooting can resolve the issue easily.
Therefore, before you do anything, try restarting your PC. It could be all you need to repair code 29. However, if the error code continues to persist, try the other methods given below.
Method 2 - Clear the CMOS
This may sound technical but it isn’t. To begin, with CMOS is an acronym for Complimentary Metal Oxide Semiconductor.
It is a term that is used to describe motherboard memory that contains the BIOS settings. Clearing CMOS helps reset the BIOS settings to their default manufacturer levels. It’s easy to do and is an effective troubleshooting step to resolve error code 29.
To do this, simply:
Enter the BIOS setup utility by restarting your PC
Watch for an entering setup message
Enter the BIOS access key. Usually, the key is F2 or F12. However, the key may differ from manufacturer to manufacturer. You may want to check the manufacturer’s website first to find out the BIOS access key before you restart your PC.
‘Reset BIOS settings’ to their default factory levels.
Method 3 - Enable the Device in the BIOS
Error code 29 may appear if a device is disabled. In such a scenario, simply follow the same steps as discussed in method 2, and in the advanced BIOS settings, look for disabled devices.
Enable the devices in the BIOS so that you use them easily.
This will hopefully resolve the issue. If it doesn’t, then this means the error code 29 is caused by either corrupted or outdated drivers. Try method 4 to resolve this issue successfully.
Method 4 - Identify the Problematic Device Drivers and Update them
Whether the error code 29 is caused by a misconfigured, corrupted, or outdated driver, simply update the new driver version to resolve. When doing it manually, you will first have to find and identify the problematic device drivers in the Device Manager.
You can access the Device Manager by going to the start menu and then simply typing Device Manager in the search bar.
Access the Device Manager and the properties to identify problematic drivers. Problematic drivers are normally displayed with a yellow exclamation mark.
Once you have spotted problematic drivers, simply update new drivers to resolve them. Though there is nothing technical about it but it may be time-consuming.
Method 5 - Install Driver Assist to Update Drivers Automatically and Regularly
A good alternative to manual driver update is DriverFIX. Simply download and install DriverFIX on your PC to update all problematic drivers in seconds. This is a cutting-edge program designed to resolve all kinds of device driver problems.
It is user-friendly and compatible with all Windows versions.
The intelligent programming system deployed inside this software program enables it to identify and detect all problem drivers automatically thereby sparing you from the hassle.
Furthermore, it also matches the drivers with the latest and compatible versions and updates them on a regular basis.
It takes the guesswork out of finding misconfigured and corrupted drivers and fixes driver-related problems and error codes like code 29 right away.
Click here to download DriverFIX to repair Device Manager error code 29 on your system without any hassle.
In 2014 Proton mail started as an end-to-end encrypted email service offering secure and private email services. Proton mail is still live and going with the same dedication to privacy and security but the company has expanded its offering into cloud storage drive services.
Starting as a public beta at the end of 2020, Proton Drive is keeping its privacy and security policy philosophy with the new service. Proton Drive is the newest service besides Proton Calendar, Proton VPN, and Proton Mail.
Drive has end-to-end encryption for everything on it including files themselves, filenames, folder structure, folder names, extensions, and file sizes. This means that you and only you can access your files. Servers are located in Geneva, Switzerland and they are under Swiss privacy laws making sure that your files are protected. Proton services in general are all open source so anyone can take a look at them to be sure that nothing is lurking under the hood. For now, sync is done either via the android app or web interface but the desktop client will come soon since currently, it is under development.
Sadly free plan of Proton Drive will give you only 1GB of storage which is much less than other services and sadly payments plans are also not so jaw-dropping going for $4 USD per month for a 200GB plan or with Proton ultimate subscription that will set you $10 behind but you will get 500GB of drive storage. Of course, if you value privacy for your files these options are good but if you do not mind that part other services have much better options.
All in all Proton Drive is a great cloud storage solution if you need privacy and well worth the investment. With the ultimate subscription, you will get enough space for most people and company needs with other services and guaranteed privacy and security, on the other hand, if you just need a large amount of cloud storage not caring too much about privacy other options are better.
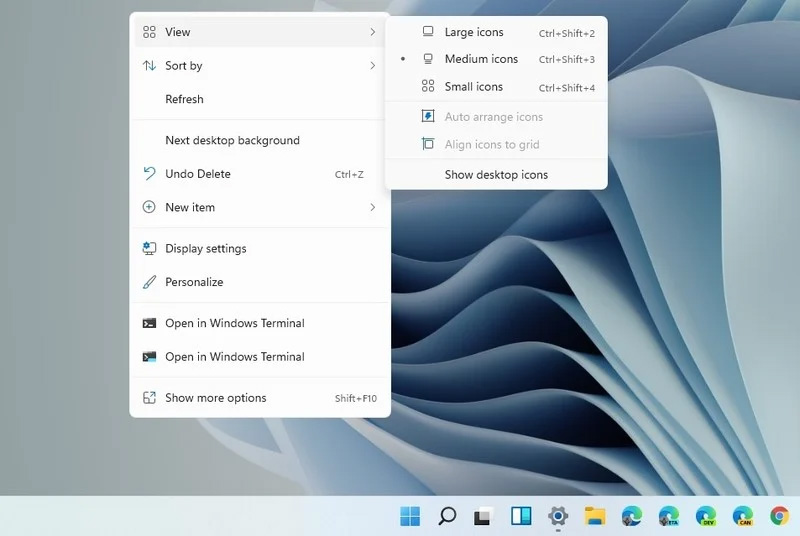
Windows 11 brought with it a simplified right-click menu that has limited options. If you would like to bring the old Windows 10 right-click menu you will have to do some registry tweaking but it is doable.
Since this requires registry tweak, please follow given solution step by step
Press Start and type RegEdit
Click on Registry Editor
Inside registry editor find next key:
Computer\H_KEY_CURRENT_USER\SOFTWARE\CLASSES\CLSID\
Right click in the right part of editor window and select New > Key
Type in as a name: {86ca1aa0-34aa-4e8b-a509-50c905bae2a2}
Right click on {86ca1aa0-34aa-4e8b-a509-50c905bae2a2} key and select New > Key again to create new key inside this one
Name inside key InprocServer32
Double click the “(Default)” key in InprocServer32 to open it
When the Default key opens close it without making any changes by clicking on OK. This will make its value property Blank instead of value not set
Close Registry Editor
Restart your PC
Once the system is up if the followed solution is applied you will now have an old school menu once right-click is used.
SMB which stands for “Server Message Block”, is a protocol used for file sharing. It provides the Read and Writes operating on network devices. Thus, it is why it is widely used when accessing a server-based in Linux. Its latest version is the SMB2 which follows after SMB1. The SMB2 contains more fixes to vulnerabilities that were found in SMB1. The predecessor was vulnerable since it served as a gateway to various modern ransomware which is why Microsoft disabled it by default starting with Windows 10 v1709.
When you try to share a file, you will get the following error message:
“Microsoft Windows Network: You can’t connect to the file share because it is not secure. This share requires the obsolete SMB1 protocol, which is unsafe and could expose your system to attack. Your system requires SMB2 or higher.”
In this post, you will be guided on how to check if the SMB2.0 version can be installed on your Windows 10 computer. To get started, follow the steps below.
Step 1: Tap the Win + X keys to open the Device Manager.
Step 2: After that, click on the Windows PowerShell (Admin) option.
Step 3: In the Windows PowerShell window, type the following command and hit Enter:
Note: After entering the command, you will see the following content on your screen which means that your Windows 10 computer is now capable of running the SMB2 protocol
Now all that’s left for you to do is to enable the SMB 2 protocol on your Windows computer by enabling the SMB 1 protocol first and then upgrading it to SMB 2 afterward. Refer to the steps below for more details.
Step 1: Tap the Win + I keys to open the Settings app.
Step 2: Then type in “control panel” in the search area and click on Control Panel from the search results.
Step 3:After opening Control Panel, click on Programs. From there, select the “Turn Windows features on or off” option under the larger menu of Programs and Features.
Step 4: After that, Windows Features will appear on your screen. And from there, make sure that you select SMB 1.0/CIFS File Sharing Support and then click on OK.
Step 5: Now let it install all the required files and then restart your computer to apply the changes made successfully. After your computer has restarted, the SMB 2 protocol should now be supported on your Windows 10 computer.
Note: On the other hand, you can also enter the following command in the Windows PowerShell window. Just make sure you have admin rights to enable it.


 Since this requires registry tweak, please follow given solution step by step