As you know, one of the most popular browsers these days is the Google Chrome browser. Browsing the web every day using your Chrome browser, leaves a trail of browsing history. Google uses the browser history to streamline and make the browsing experience a lot better. But there are times when Chrome users experience trouble in deleting their web browsing history, data, cookies, and cache. In this post, you will be guided through specific settings that will help you in getting rid of the browsing history in Chrome.
There are several options you can take in clearing the browsing history in Chrome. But before you try them, you can try the basic one first using the following steps:
First, click on the three-dotted icon and click on History from the menu.
Next, click on the Clear browsing data option and select “All time”.
Then select the type of history you want to delete.
After that, click on the Clear Data button.
If clearing the browsing history in Chrome the old way didn’t work, then you can try to check out the options provided below.
Option 1 – Clear the cache using the File Explorer
The first thing you can do is to clear the cache by using File Explorer. To get started, refer to these steps:
From the given locations above, replace “YOUR USERNAME” with the user profile name you use and then search for a file named “Cookies”.
Now delete its contents.
Option 2 – Reset Chrome
Resetting Chrome can also help you fix the error. This means that you will be restoring its default settings, disabling all the extensions, add-ons, and themes. Aside from that, the content settings will be reset as well and the cookies, cache, and site data will also be deleted. To reset Chrome, here’s what you have to do:
Open Google Chrome, then tap the Alt + F keys.
After that, click on Settings.
Next, scroll down until you see the Advanced option, once you see it, click on it.
After clicking the Advanced option, go to the “Restore and clean up option and click on the “Restore settings to their original defaults” option to reset Google Chrome.
Now restart Google Chrome.
Option 3 – Try to clean reinstall Chrome
There are instances when programs leave files behind after you’ve uninstalled them and the same thing can happen to Chrome so before you reinstall Chrome, you have to make sure that you have deleted the User Data folder. To do so, refer to the following steps:
Hit the Win + R keys to open the Run dialog box.
Next, type “%LOCALAPPDATA%GoogleChromeUser Data” in the field and hit Enter to open the User Data folder.
From there, rename the default folder and name it something else, e.g. “Default.old”.
After that, install Google Chrome again and check if the issue is now fixed.
This post will guide you in fixing high CPU, Memory, and Disk usage problems caused by NTOSKRNL.exe. NTOSKRNL stands for “NT Operating System Kernel. This file is a kernel image that is responsible for a lot of systems-based processes such as Hardware Virtualization, Process, and Memory. Aside from that, it is also the one that compresses the old pages of memory that reduces the overall amount of memory being used. If you notice that your computer is running slowly and you find that the NTOSKRNL.exe file is hogging your resources such as disk usage, CPU usage as well as memory usage, then read on as this post will guide you in fixing the problem caused by NTOSKRNL.exe.
Make use of the options given below to resolve the issues caused by NTOSKRNL.exe.
1] Scan your computer for potential malware
There might be a good chance that your computer might be infected with malware. And this malware might be associated with the NTOSKRNL.exe file and hence making it consume a lot of system resources. So, I would really recommend you to make sure that your Antivirus is up to date and then scan your computer with it specifically the C:/Windows/System32 folder because this is the location where the NTOSKRNL.exe file is located.
Option 1 – Put your computer in a Clean Boot State
The first thing you have to do is to put your computer in a Clean Boot State as this can help you in finding any incompatible programs that are causing the problem.
Log onto your PC as an administrator.
Type in MSConfig in the Start Search to open the System Configuration utility.
From there, go to the General tab and click “Selective startup”.
Clear the “Load Startup items” check box and make sure that the “Load System Services” and “Use Original boot configuration” options are checked.
Next, click the Services tab and select the “Hide All Microsoft Services” check box.
Click Disable all.
Click on Apply/OK and restart your PC. (This will put your PC into a Clean Boot State. And configure Windows to use the usual startup, just simply undo the changes.)
From there, start to isolate the problem by checking which one of the programs you installed recently is the root cause of the problem.
Once you’ve found any incompatible programs, you need to uninstall them. Refer to the steps below to do so.
In the search box, type in “control” and then click on Control Panel (desktop app) among the search results.
After that, select Programs and Features from the list which will give you a list of all the programs installed on your computer.
From there, look for the concerned program and select it and then uninstall it.
Note: If you have downloaded the app from the Windows Store, you can simply right-click on it from the application list and then uninstall it.
Option 2 – Update or rollback drivers
If the first option didn’t work for you, then it’s time to either update or roll back the device drivers. It is most likely that after you updated your Windows computer that your driver also needs a refresh. On the other hand, if you have just updated your device drivers then you need to roll back the drivers to their previous versions. Whichever applies to you, refer to the steps below.
Open the Devices Manager from the Win X Menu.
Then locate the device drivers and right-click on them to open the Properties.
After that, switch to the Driver tab and click on the Uninstall Device button.
Follow the screen option to completely uninstall it.
Finally, restart your computer. It will just reinstall the device drivers automatically.
Note: You can install a dedicated driver on your computer in case you have it or you could also look for it directly from the website of the manufacturer.
Option 3 – Try to run the DISM tool
If the first two options didn’t work, then running the Deployment Imaging and Servicing Management might. Using this built-in tool, you have various options such as the “/ScanHealth”, “/CheckHealth”, and “/RestoreHealth”.
Open the Command Prompt with admin privileges.
Then type in the following commands and make sure to hit Enter right after you type each one of them:
Dism /Online /Cleanup-Image /CheckHealth
Dism /Online /Cleanup-Image /ScanHealth
exe /Online /Cleanup-image /Restorehealth
Do not close the window if the process takes a while as it will probably take a few minutes to finish.
Option 4 – Try to stop the Runtime Broker process
The RuntimeBroker.exe or the Runtime Broker process is the one that monitors access to Windows APIs to make sure that the apps do not violate the core security of Windows. This process usually leaves a very small footprint. However, there are times when it consumes more resources than it’s supposed to and does not release memory after the work is done that results in a memory leak. As a result, it affects NTOSKRNL.exe which is why you have to stop the Runtime Broker process. To do so, refer to these steps:
Tap the Ctrl + Shift + Esc to open the Task Manager.
After opening Task Manager, go to the Processes tab and look for the Runtime Broker process.
Once you find it, check if it is using more than 15% of your memory. If it is, then you most likely have an issue with an app installed on your computer.
Select the Runtime Broker process and right-click on it and then click on the End Task option to end its process.
Option 5 – Try to run the Performance Troubleshooter
Tap the Win + R keys to open the Run dialog box.
Type “msdt.exe /id PerformanceDiagnostic” in the field and hit Enter to open the Performance troubleshooter.
Then click on Next to get started. Wait until the process is completed.
Option 6 – Try using the Windows Performance Toolkit
You can also use the Windows Performance Toolkit in finding the root cause of the problem. Just refer to the following steps to use this toolkit.
Search for “cmd” in the Cortana Search box and click on Command Prompt from the search results to open it.
Next, type in the command given below or copy and paste it and then hit Enter:
After executing the command, wait for at least 60 seconds and then check the logs of the Windows Performance toolkit which is stored in a file named cpuusage.etl in the folder located at C:/Windows/System32. From there, you should see a list of all the causes of the System Resources being hogged.
In the latest Windows 11 fiasco, it is reported that the operating system is slowing down some SSD drives. Good thing is that it does not affect all of SSD on the market but the ones which it is affecting can see even a 45% of speed drop.
Microsoft has not published a solution to this issue, but users point out two potential problems. The first is a security mechanism based on disk virtualization, which is supposed to slow down the performance of SSDs.
The second, in turn, is related to the place of installation of Windows 11 – users indicate that if the performance test is performed on a medium with no files associated with the system, its performance results are similar to the parameters given by the manufacturer.
Transfer speeds were to be slightly improved with the latest Windows 11 update 22000.348. However, users are still waiting for a solution to the problem that significantly reduces the efficiency of SSD media.
More information
The details described leading to speculation that the problem could be related to drivers that Microsoft is providing. On further tests, all Nvme drives that use the Microsoft driver have this problem, but Intel 905P, which has its own driver provided by Intel, is working at full power,”.
In today's IT world, if you want a computer for typical day-to-day actions and gaming, there are 3 primary ways you can go. An Apple computer with its proprietary hardware and operating system or a typical machine with Windows or Linux operating system.
Each system has both advantages and disadvantages and picking the right one might be difficult for some users. From hardware differences to specific software and operating system, each system is aimed at a different type of work, and in this article, we will explore each one and help you in choosing the right one for you.
Apple ecosystem
Apple has managed to create a unique ecosystem of its own devices, from its iMac desktop computers to more professional MAC studio and power MAC and all the way to tablet iPad and iPhone are powered by Apple's own operating system that connects all of these devices into one large system. So if you really need one singular ecosystem this is a huge advantage.
The ecosystem on the side, MAC computer systems are great, some would argue best for coding, design, video work, and sound editing. MAC M2 chip is optimized for all of these tasks and a specially tailored operating system is just the icing on the cake. Specific Apple-made software like a logic pro or final cut also helps a lot to position MAC systems on top of the line.
Reading all of this you might think hey this is the computer for me, it does everything! Sadly the truth is not like that. The first thing that is difficult on MAC systems and a maybe big reason that it is not so adopted outside professional working environment is lack of games. If you are a gamer or plan on using MAC for gaming, well I have some bad news. The second big turn-off is that MAC systems tend to be more expensive than PC systems, yes components are of higher quality but rest assured that you will pay for also for branding.
Get MAC as your workstation for serious work and for good tech support, if you need a plain home computer keep reading.
Windows PC machine
There is no better feeling than assembling your own computer, tweaking hardware to make a monster and despite haters hating, Windows is the best all-around operating system on the market. It is supporting the largest variety of hardware and the largest variety of software.
The best platform for serious gaming and streaming Windows machine has cemented itself as a multimedia powerhouse. But, this kind of computer is not alien to being also a professional machine, you can practically do everything that you can do on Apple or Linux machine inside Windows, yes some things might require extra steps or will be slightly slower but in the end, being able to do anything is the greatest strength of Windows machine.
Of course, every system has its flaws and Windows is not immune to that. One of the biggest is being the operating system for every hardware ever made and every software as well while keeping legacy support for old software and hardware, basically, its biggest strength is in the same time its biggest weakness leading to sometimes stability issues. Also being able to place any kind of hardware can also lead to the same stability issues. Executing something a little slower than other systems and having some extra steps can also be looked upon as weaknesses.
Linux system
First and perhaps for some people, the biggest advantage of the Linux operating system is its price, it is completely free! Other advantages include the great server and networking included in the OS itself, the large amount of customization, and unmatched stability. The ability to write scripts inside the OS terminal is also a great thing and coding is much more streamlined and friendlier than on other machines.
The power of Linux is the ability to change anything, even on the system layer, no other operating system will let you change the basic functionality of the OS itself while Linux will let you do this. It is also the only operating system you can fully use by booting it up from a USB stick and having the same experience as it was installed on a local hard drive. Among other OS mentioned earlier, Linux is by far the lightest one, taking the smallest amount of memory among the three.
The bad side of the Linux machine is the steep learning curve, among the three mentioned operating systems rest assured Linux is the most difficult to learn and be comfortable in it. The operating system will require you to know the hardware and how computers work in order to fully use its potential. Other things that place it behind are not so wide hardware support compared to Windows and the somewhat confusing distro model.
Linux versions come in form of different distro packages and first-time users will face many of them being left in awe of which one to choose. Also installing drivers and software via a package system can also be a tedious task as well, often being that some version of the driver will not work on the newer version of the Linux distro.
Get a Linux machine if you are well versed in computer technology, if you want great customization of the OS itself or if you do not want to spend money on OS and software since almost entire Linux software is open source.
Being in the Microsoft Windows insider program will let you get a hands-on new Windows 11, but some people just want Windows 11 without being in the insider program.
Well, people beware! It was detected that some groups have been releasing fake Windows 11 installers with malware into them.
There’s one malicious file called 86307_windows 11 builds 21996.1 x64 + activator.exe. Based on the filename, one might guess that it includes Windows 11 build 21996.1, and on top of that, there’s something in it that will automatically activate Windows for you. It comes in at 1.75GB, so for some people, that might seem reasonable. It starts out looking like a normal installer, and then there’s a second installer that calls itself a download manager. If you accept the nonsense agreement that’s included, you get a bunch of malware.
This is just one example of malicious installers running amok internet, but there are more of them with different software placed inside. Malware can be anything from adware to a Trojan virus. The adware usually isn’t super dangerous. It’s just malware that’s meant to inject your PC with advertisements. Viruses can be more of an issue, and they can be harder to get rid of if your machine is infected.
Windows Defender does a good job of getting rid of this stuff. The only problem is that if you’re downloading Windows 11 from shady sources, you’re probably already set to click through the dozen or so warnings that pop up telling you not to install it.
The solution will be to get Windows from a trusted source of roll inside the insider program and get it from Microsoft directly.
Error 1713 is essentially a programming error. It has specifically been designed in Microsoft applications. This is intended to allow customers to continue using the appropriate setup tool.
The error can be quite annoying and is used by manufacturers to determine what caused the error so that counteractive methods can be employed. The number 1713 is simply the hexadecimal code that informs where the instruction was loaded when the error occurred.
Solution
Error Causes
As far as the causes of Error 1713 are in question, the primary cause is damaged, misconfigured, or corrupt windows system files. There are several other factors that lead to the occurrence of Error 1713.
For instance, if the applications or hardware on your system has been improperly deleted, installed, or uninstalled, Error 1713 will occur.
Similarly, Error 1713 is triggered when the computer has recovered from an attack by some virus, spyware, malware, or adware only recently. This attack corrupts the file and so the error appears. Incorrect system shutdown can also be blamed for this error.
All the scenarios listed above actually damages the registry entries in Windows system files.
The corrupt or damaged files will then lead to improperly linked or missing information. It goes without saying that such problems will keep the applications from performing in the desired manner and this makes it even more crucial to fix this error as soon as it appears.
Further Information and Manual Repair
Two of the most useful workarounds for Error 1713 are listed below.
This solution is for advanced users. Restart your computer. Log on to it as the admin in the safe mode. Now go to the Start button and follow this path All Programs-> Accessories-> System Tools->System Restore. Now an option will appear asking you to ‘Restore your computer to an earlier time’. Select it. This option will actually appear in a new window. Click Next. A list of restore points will be displayed to you. Select the most recent restore point before the occurrence of the error and press Next. Now click on the Next button that appears in the confirmation window. Restart your computer as soon as the restoration is finished.
This solution is for novice users. Download a 1713 repair utility available online. Install this program and use it to scan your system. After the scan is complete, click on repair to fix the error.
If you are trying to update your Windows 10 computer but are not able to do so since your computer is running low on storage then this obviously indicates that there is not enough disk space available on your drive where Windows 10 has been installed. As you know, when Windows 10 downloads the update packages, it extracts them in a separate folder which means that there should be enough space on that particular folder for the update to begin with. Windows do not really check systems for any adequate space requirements before it even initializes the update or upgrades and you only get to know about it right when the update process starts.
On Windows 10 thin clients or the ones with embedded systems that have limited storage space, when Windows Update runs, the update initialization may fail because as pointed out, Windows does not check systems for adequate space requirements so you may have to do the work for them by making sure that your disk has enough space available. Here are some suggestions you can follow to resolve Windows 10 update issues on computers with low storage space.
Option 1 – Delete the files from the Download folder
Since you are going to delete everything manually, you need to create a backup for all your important files which you may have placed in the Download folder. After you create backup copies of important files, delete the files from this folder or you could simply tap the Shift + Del keys to remove the files permanently after you selected them all.
Option 2 – Change the Windows Update Folder location
You might have to change the Windows Update folder location where Windows download all the files need to update the operating system if you cannot really create some space on your primary driver. So all you have to do is set the drive with enough space available for the update to be completed.
Option 3 – Uninstall apps and programs you no longer use
In some cases, apps and programs take up a lot of space on your drive. So if there are programs or apps that you no longer use, you can uninstall them to save storage space. To do so, follow these steps:
In the search box, type in “control” and then click on Control Panel (desktop app) among the search results.
After that, select Programs and Features from the list which will give you a list of all the programs installed on your computer.
From there, look for the apps and programs that you no longer use and right-click on each one of them and click on Uninstall.
Option 4 – Move files to another drive
This is another thing you can try. You can move files, especially the ones with large sizes, to another drive to make up space on your drive. After that, install the updates once again.
Option 5 – Reduce on-drive files from Cloud services
If you are using tons of cloud backup services such as OneDrive and Dropbox, you might want to consider reducing the number of files you have on those cloud backup services. You can do what you’ve done on option number three and have those files moved to another drive to free up storage space.
Option 6 – Empty the contents in Recycle Bin
As you know, the files that are deleted from your computer goes to the Recycle Bin first. So if you have not emptied Recycle Bin for a long time now, the files you delete are still actually taking up space on your drive. Thus, you need to empty the contents in the Recycle Bin to save storage space.
Option 7 – Clean up temporary files
You can use the Windows 10 Storage Sense feature which can clean all the temporary files from your computer. To use Storage Sense, follow the steps below.
Open Setting > System > Storage from the WinX Menu.
From there, you will see a list of all the local and connected storage devices along with the details on the free space.
Now make sure that the Storage Sense feature is turned On then go find a link that says “Free Up Space” and click it to open.
After that, a screen which is the built-in program in Windows 10 will appear and will scan your computer for the following junk files so you can free up disk space:
Windows Upgrade Log Files
System created Windows Error Reporting Files
Thumbnails
Temporary Internet Files
Previous Windows Installation Files
Delivery Optimisation Files
DirectX Shader Cache
Choose the files you want to get rid of and then click on the remove files option. Note that you’ll have an idea of the total size as you select any of the junk files listed above.
Could not connect to the System Event explanation: Although logging into a Windows 10 computer may seem like a simple process, it’s actually not since the Windows operating system has built a mechanism in a way that any third party or malware intervention would not compromise access to the system. This mechanism is supported by numerous services, functions, and DLL files. And Microsoft has been taking this security to a whole new level with the introduction of Windows Hello.
Recently, a number of users reported getting the “Windows could not connect to the System Event Notification Service service. Please consult your system administrator” error when logging into their computers. While some users also reported that although they can log in, they encounter the same error message from the Notification area. There are several options you can check out to resolve the error. You have to check the status of several Windows Services and make sure that they are running. You also have to reset Winsock as well as run the System File Checker scan.
Option 1 – Check for certain Windows Services
First, you need to tap the Win + R keys on your keyboard to open the Run dialog box.
Next, type “services.msc” in the field and click OK or tap Enter to open the Windows Services Manager.
After that, you will see a list of services and from there, look for the following Windows Services:
DHCP Client
System Event Notification Service
Windows Font Cache Service
Now make sure that the Startup Type of each service is started and running.
Option 2 – Try resetting the Winsock drivers
In the Start Search, type “command prompt” and right-click on Command Prompt from the search results, and then select the “Run as administrator” option.
After opening Command Prompt, execute this command: netsh winsock reset
Note: If you are using IPv4, execute the “netsh int ipv4 reset” instead. On the other hand, if you are using IPv6, execute the “netsh int ipv6 reset”
Now exit Command Prompt and see if the error is now fixed.
Option 3 – Try running System File Checker or SFC scan
You could also run System File Checker or SFC scan to fix the BSOD error. It is a built-in command utility that helps in restoring corrupted files as well as missing files. It replaces bad and corrupted system files with good system files. To run the SFC command, follow the steps given below.
Tap Win + R to launch Run.
Type in cmd in the field and tap Enter.
After opening Command Prompt, type in sfc /scannow
The command will start a system scan which will take a few whiles before it finishes. Once it’s done, you could get the following results:
Windows Resource Protection did not find any integrity violations.
Windows Resource Protection found corrupt files and successfully repaired them.
Windows Resource Protection found corrupt files but was unable to fix some of them.
If you are using UEFI and you encountered an error message that says, “Selected boot image did not authenticate”, then read on as this post will show you what to do it fix it. This kind of error indicates that UEFI is having an issue in figuring out if the boot image has tampered with. UEFI offers Secure Boot and if the boot image seems to be invalid, you won’t be allowed to boot into your computer. Aside from that, it could be that you may be using endpoint encryption and the software can’t validate the certificate.
To fix the “Selected boot image did not authenticate” error in UEFI, you need to first check if the error has given any reference to any software that you might have for encryption. If it has, then you need to disable the Encryption tool to resolve the problem. In addition, you could also try to disable Secure Boot or perform Startup Repair in case the disabling Encryption tool didn’t work. For more details, make sure to use each one of the options provided below as a reference.
Option 1 – Try to disable the Encryption tool
The first thing you can do to fix the “Selected boot image did not authenticate” error is to disable the Encryption tool. Many users reported that some encryption tools like the ESET Endpoint Encryption won’t let them boot into the computer if the system manufacturer does not include the correct certifications as a part of the UEFI BIOS. And since there is no way to bypass this, you have to disable Secure Boot in order for you to boot into your computer.
Option 2 – Disable the Secure Boot in the BIOS
Disabling the Secure Boot in the BIOS settings is definitely recommended to resolve the error. To disable Secure Boot, here’s what you have to do:
First, boot your computer into Windows 10.
Next, go to Settings > Windows Update. From there, check if there is anything that you have to download and install if you see any available updates. Usually, OEMs send and update the list of trusted hardware, drivers, and operating systems for your computer.
After that, go to the BIOS of your computer.
Then go to Settings > Update & Security > Advanced Startup options. If you click on Restart Now, it will restart your computer and give you all the advanced options.
Next, select Troubleshoot > Advanced Options. As you can see, this screen offers you further options including System restore, Startup repair, Go back to the previous version, Command Prompt, System Image Recovery, and UEFI Firmware Settings.
Select the UEFI Firmware Settings which will take you to the BIOS.
From there, go to the Security > Boot > Authentication tab where you should see Secure Boot. Note that every OEM has its own way of implementing the options so it varies.
Next, set Secure Boot to Disabled and set Legacy Support to On or Enabled.
Save the changes made and exit. Afterward, your computer will reboot.
Option 3 – Try to run the Automatic Repair Utility
If disabling Secure Boot did not fix the problem, you might also want to run the Automatic Repair utility in fixing the error. To do so, follow the steps below.
You can start by booting into the Advanced Recovery Mode.
After that, select Troubleshoot > Startup Repair.
Next, follow the on-screen instructions that appear on the screen and finish the Automatic Repair process.
Now check if the block is gone once the reboot is completed.
When it comes to booting an operating system on a computer, one of the most essential pieces of software you can use is the UEFI. In fact, a lot of users now prefer to use UEFI instead of BIOS. It also depends on whether the UEFI or the BIOS is supported on the motherboard. Recently, a number of users reported an issue with UEFI where they were unable to find it under the Advanced Options screen where it’s supposed to be located.
The missing UEFI Firmware settings in the Advanced Options could be caused by several reasons. It is possible that the access to the UEFI menu is blocked or it could also be due to the Extra Fast Startup feature being enabled. It is also possible that the operating system is installed in Legacy mode.
There are several options to try to fix this issue. You need to check if your computer supports UEFI or you could also try to disable Fast Startup or bypass the Extra Fast Startup feature. You can also use a boot to UEFI shortcut as well as check the CMOS battery.
Option 1 – Try checking if your computer supports UEFI
The first thing you have to do is to verify if your computer supports UEFI. If your computer does not support UEFI, then it’s no wonder why you don’t see the UEFI Firmware settings in the Advanced Options.
Option 2 – Try turning off Fast Startup
First, boot your computer in Safe Mode.
Once your computer is booted in Safe Mode, tap the Win + R keys to open the Run dialog box and type in “control” to open the Control Panel.
Next, click on the Hardware and Sound section and click on Power Options.
Afterward, select the “Choose what the power buttons do” option from the left side menu pane.
Now click on Change settings that are currently unavailable and uncheck the entry that says, “Turn on fast startup (Recommended)”.
Then click on Save Changes and restart your computer and see if it has fixed the problem or not.
Option 3 – Try bypassing the Extra Fast Startup feature
As mentioned, the missing UEFI Firmware settings could be due to the Extra Fast Startup feature. To fix it, you have to disable this feature. All you have to do is tap and hold the Shift key and click on the Shutdown button from the Start button. This will boot your PC with the UEFI booting from the beginning and then use the hotkey for your motherboard to boot into the UEFI setup.
Option 4 – Try using a boot to UEFI shortcut
Right-click on any empty space on your Desktop and select New > Shortcut.
This will open a new mini window. And here, you have to type this in the text field: shutdown /r /fw
After that, click on Next and name the desktop shortcut and then click on Finish.
Next, right-click on the newly created shortcut and select Properties.
Click on the Advanced button and select the “Run as administrator” option.
Now click OK to save the changes made. Each time you execute this shortcut, your computer will automatically be booted to the UEFI Firmware Settings.
Option 5 – Try to check the CMOS battery
Another thing you can do is check the CMOS battery physically on the motherboard and see if it has to be replaced since a damaged CMOS battery can also cause the issue with the missing UEFI Firmware settings.
Option 6 – Set your computer from Legacy to UEFI
If applicable, you can try to set your computer from Legacy to UEFI to resolve the problem.
In the Windows Search box, type “command prompt” and from the search results that appear, right-click on Command Prompt and select the “Run as administrator” option.
After that, execute this command: mbr2gpt.exe /convert /allowfullOS
Now, wait until the process is completed since you can track its process on your screen.
Once it’s done, go to Settings > Update & Security > Advanced Startup options and from there, click on Restart Now. This will restart your computer and give you advanced options.
Next, select Troubleshoot > Advanced Options where you will see further options including System Restore, Startup Repair, Go back to the previous version, Command Prompt, System Image Recovery, and UEFI Firmware Settings.
Now select the UEFI Firmware Settings. This will take you to the BIOS. Boot Mode is typically available under Boot > Boot Configuration. Once you’re there, set it to UEFI and then save the changes you’ve made. After that, your computer will restart.
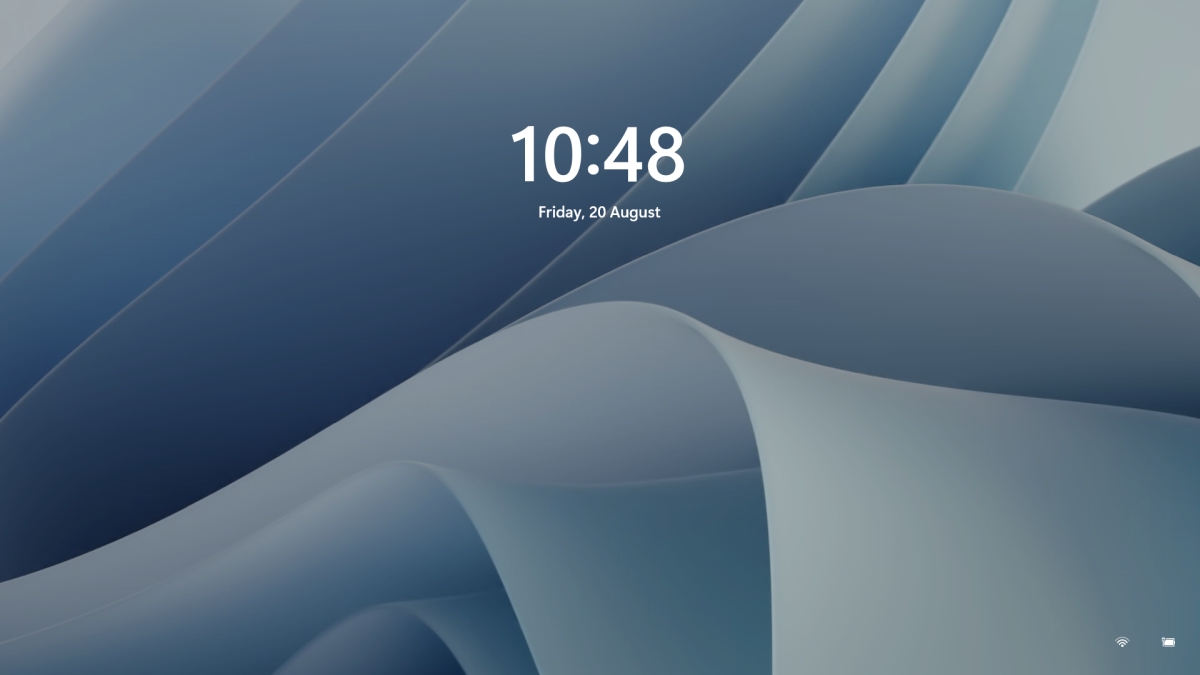
Same as in Windows 10, Windows 11 also features a lock screen. IN this lock screen by default, you will see a clock and date above the standard Windows 11 background. Not all users will be happy with this choice but do not worry, you can choose and customize your lock screen to better suit your idea of it.
To personalize the lock screen do:
Right-click on Desktop and select Personalize
Click on the lock screen
Choose one of three options and customize it
Personalize Your Lock Screen
this option will let you set a custom image or slideshow for your lock screen. Choose either one that best suits you. Under selecting picture or pictures for the slide show you can uncheck the option to see tips, tricks, and facts on your lock screen.
Lock screen status
when clicking on this option you can select the application widget that you wish to be shown on the lock screen like weather, mail, calendar, etc. Choose if you would like one by clicking on it.
Show the lock screen background picture on the sign-in screen
as self-explanatory this switch will enable or disable chosen lock screen wallpaper on your login credentials screen.
Close settings
All settings will be automatically saved and applied and when you wish to lock the screen easiest way is to press ⊞ WINDOWS + L shortcut on your keyboard.

 Microsoft has not published a solution to this issue, but users point out two potential problems. The first is a security mechanism based on disk virtualization, which is supposed to slow down the performance of SSDs.
The second, in turn, is related to the place of installation of Windows 11 – users indicate that if the performance test is performed on a medium with no files associated with the system, its performance results are similar to the parameters given by the manufacturer.
Transfer speeds were to be slightly improved with the latest Windows 11 update 22000.348. However, users are still waiting for a solution to the problem that significantly reduces the efficiency of SSD media.
Microsoft has not published a solution to this issue, but users point out two potential problems. The first is a security mechanism based on disk virtualization, which is supposed to slow down the performance of SSDs.
The second, in turn, is related to the place of installation of Windows 11 – users indicate that if the performance test is performed on a medium with no files associated with the system, its performance results are similar to the parameters given by the manufacturer.
Transfer speeds were to be slightly improved with the latest Windows 11 update 22000.348. However, users are still waiting for a solution to the problem that significantly reduces the efficiency of SSD media.


 To personalize the lock screen do: