Hello and welcome to errortools another tutorial which aims to make your computer life easier and more relaxed. This time we will be talking about how to switch sound output devices in Windows 10 in a matter of seconds between Headphones and external speakers, Between 2 different speakers, or any other audio output device in general.
Windows 10 with its updates has really gone from OK to one of the greats, little hacks and shortcuts which every update has introduced have really made life easier.
Now, your typical switching from one audio output device to another can be accomplished with your standard go to settings, go to devices, choose audio, pick one which you prefer and click on OK. This way altho nothing wrong with it is a little slow and if you need to switch your output devices several times in a single day often it can be time-consuming as well. Lucky for you we have a quick solution for you.
Switching guide
All right, now in order to be able to actually switch between your audio output devices make sure that all of them are working and that they are plugged in. For example, make sure that both of your headphones and speakers are turned ON and plugged in. Once you have confirmed that everything is in working order:
Click with a left mouse button on a speaker icon located on the right part of your taskbar next to the clock
Click on the small up arrow on the right next to your current audio output device.
The list will open, choose, and left click with the mouse button on your choice.
And that's it, you have changed your default audio output device in a matter of seconds.
The good thing about this method is that Windows will remember output audio levels for each device.
Potential issue
If by any chance when switching your audio devices this way freezes volume control just go to the task manager and restart Windows Explorer.
Rapid Media Converter is a Potentially Unwanted Program that usually comes bundled with other unwanted software. Many users reported being unaware they had installed the application. It also generates additional advertising, and for this reason, it is classified as Adware and flagged for optional removal by several AVs.
From the Author: Howard Software / Applon runs off an ad-supported platform. During general internet usage on sites where Applon Support operates, users may see advertisements in form of shopping results and new tabs. The type of ad is dependent on the content of the page as you generally browse the internet. Applon is not related to or endorsed by the underlying website. These advertisements will be identified with the Applon Name or Logo.
About Browser Hijackers
Adware is programs created to show advertisements on users’ PCs with or without their consent. A kind of malware, it comes bundled up with the software application that a person either installs or accesses. Shareware or free software programs are generally packaged with adware. When adware penetrates your computer without you knowing and transfers information about you or your PC to 3rd parties, then it happens to be spyware. Other sorts of adware might take control of your internet browser and redirects you to websites that you don’t really want to check out.
Adware is a common problem in most computer systems and these are really detrimental to your device. Adware/Spyware is usually downloaded and/or installed accidentally by users while exploring the net and people face lots of difficulties at the same time when it comes to removing adware from their computers.
Adware could be dangerous for computer users in numerous ways. It could cause advertisements (popups, ad banners, and in-text) to show up constantly when you’re online or perhaps disrupt your computer experience when not connected to the net. When infected with adware for a long time, your computer will perform at slow processing speed, take a longer time to start up and shut down, easily get frozen up while loading websites, and even get the blue screen of death (BSOD). More often than not, adware is a legitimate revenue source for many companies that offer software to customers at zero cost. But adware generated advertisements tends to be more aggressive than normal ads which can greatly impair system performance or possibly result in a total crash.
The adware will damage your PC should you allow it on your personal computer for a long period. A sensible way to block adware from corrupting your PC is to employ a reliable antimalware program such as Safebytes Anti-Malware on your computer. This software will give complete all-around protection to make sure that your laptop or computer doesn’t get infected again with spyware and adware.
Take the following measures to prevent adware from overtaking your system: Downloading software online should come from trustworthy websites and also be selective about what you install on your computer; Always read the end-user license agreement (EULA) of any application you plan to install; Beware of clickable ads particularly those that advertise special deals, coupons, or any other suspicious deals.; Avoid installing toolbars, because toolbars from less reputable websites always contain adware, which might slow your PC and in some cases infect your computer outright.
What to Do if Malware Stops You From Downloading Antivirus?
Every malware is bad and the extent of the damage will vary greatly with regards to the type of infection. Certain malware goes to great lengths to prevent you from installing anything on your computer system, especially antivirus software. So what you should do when malware prevents you from downloading or installing Anti-Malware? There are a few fixes you could try to get around with this particular obstacle.
Start Windows in Safe ModeIf any virus is set to load immediately when Windows starts, getting into Safe Mode may block the attempt. Since just the minimum programs and services launch in Safe Mode, there are hardly any reasons for conflicts to happen. Listed here are the steps you have to follow to start into the Safe Mode of your Windows XP, Vista, or 7 computers (visit Microsoft website for instructions on Windows 8 and 10 PCs).
1) At power-on/startup, tap the F8 key in one-second intervals. This should bring up the Advanced Boot Options menu.2) Use the arrow keys to select Safe Mode with Networking and hit ENTER.3) As soon as this mode loads, you should have the internet. Now, make use of your web browser normally and go to https://safebytes.com/products/anti-malware/ to download and install Safebytes Anti-Malware.4) Following installation, do a complete scan and allow the software program to delete the threats it detects.
Obtain the anti-malware software using an alternate browser
Some malware only targets specific web browsers. If this is your situation, utilize another browser as it could circumvent the computer virus. If you appear to have a trojan attached to Internet Explorer, then switch to an alternate web browser with built-in security features, such as Firefox or Chrome, to download your preferred anti-malware program – Safebytes.
Create a bootable USB anti-virus drive
Here’s another solution which is using a portable USB antivirus software that can scan your computer for malware without the need for installation. Adopt these measures to run the anti-virus on the affected computer system.
1) On a clean computer, download and install Safebytes Anti-Malware.2) Connect the USB flash drive to a USB slot on the clean computer.3) Double-click on the downloaded file to run the installation wizard.4) Choose the USB flash drive as the destination for saving the software file. Follow the on-screen instructions to finish the installation.5) Transfer the USB drive from the uninfected computer to the infected computer.6) Double-click the EXE file to open the Safebytes program from the thumb drive.7) Click on the “Scan Now” button to begin the malware scan.
SafeBytes AntiMalware Overview
Are you looking to download the best anti-malware software program for your laptop or computer? You can find many applications in the market which come in paid and free versions for Microsoft Windows systems. A few of them do a great job in eliminating malware threats while some will harm your PC by themselves. You must be careful not to choose the wrong application, especially if you buy premium software. While considering the trustworthy programs, Safebytes Anti-Malware is certainly the highly recommended one.
Safebytes is among the well-established computer solutions firms, which provide this all-inclusive anti-malware application. With its most advanced virus detection and repair technology, this software will help you protect your PC against infections brought on by different kinds of malware and similar internet threats, including adware, spyware, computer viruses, worms, trojan horses, keyloggers, ransomware, and potentially unwanted program (PUPs).
SafeBytes has fantastic features when compared with various other anti-malware programs. The following are some of the good ones:
Robust, Anti-malware Protection: Built on a highly acclaimed anti-virus engine, this malware removal application has the capacity to find and remove several stubborn malware threats like browser hijackers, PUPs, and ransomware that other common antivirus software will miss.
Live Protection: SafeBytes provides totally hands-free live protection and is set to observe, prevent and eliminate all threats at its first encounter. It’ll regularly monitor your pc for hacker activity and also provides end-users with sophisticated firewall protection.
High-Speed Malware Scanning Engine: SafeBytes Anti-Malware has a multi-thread scan algorithm that works up to 5x faster than any other anti-malware software.
Safe Web Browsing: SafeBytes checks the links present on a webpage for possible threats and informs you whether the website is safe to check out or not, through its unique safety ranking system.
Light-weight: This program is light-weight and can work quietly in the background, and that does not have an effect on your PC efficiency.
24/7 Customer Support: For any technical queries or product support, you can obtain 24/7 expert assistance through chat and email.
To sum it up, SafeBytes Anti-Malware is really great for securing your computer against all sorts of malware threats. There is no doubt that your computer will be protected in real-time as soon as you put this software program to use. For top protection and the best value for your money, you can’t get better than SafeBytes Anti-Malware.
Technical Details and Manual Removal (Advanced Users)
If you don’t want to use malware removal software and prefer to get rid of Rapid Media Converter manually, you might do so by going to the Add/Remove Programs menu in the control panel and removing the offending software; in cases of web browser extensions, you can remove it by going to the browser’s Add-on/Extension manager. You will definitely also want to reset your web browser.
To be certain of complete removal, find the following Windows registry entries on your system and delete it or reset the values appropriately. Please keep in mind that this is for advanced users only and could be difficult, with incorrect file removal causing additional system errors. Additionally, certain malicious programs have the capability to defend against its removal. Doing this in Safe Mode is advised.
Windows 11 has some cool animations including fading effects which make working in it feels nice and futuristic but the cost of this is that there is a slight delay to certain actions performed. If you want the snap fast feature in Windows 11 and do not care about this eye candy there is an easy way to turn animations off inside it.
First, open Windows Settings by pressing ⊞ Windows + I on your keyboard
Alternatively, click on Start, search for Settings, and then click its icon.
When Settings appears, look in the sidebar and select Accessibility.
In Accessibility settings, click on Visual Effects.
In Visual Effects, switch Animation Effects to Off.
That’s it, changes will be applied automatically, you can close settings and continue working inside Windows 11 without animations and fades.
You can always switch animations back On via settings if you change your mind.
If you suddenly encounter the SYSTEM_PTE_MISUSE – 0x000000DA Blue Screen error while using your Windows 10 computer, read on as this post will provide you some potential fixes to resolve this kind of Blue Screen of Death (BSOD) error.
There are many potential causes for the SYSTEM_PTE_MISUSE – 0x000000DA BSOD error. However, incompatible hardware detection and hardware recognition failure are some of the topmost culprits. Another thing that could trigger this kind of BSOD error is system file corruption which means that if a system driver for particular hardware ends up getting corrupted, it won’t be able to recognize the external device and will eventually crash the system with the SYSTEM_PTE_MISUSE – 0x000000DA Blue Screen error.
The SYSTEM_PTE_MISUSE bug check has a value of 0x000000DA which indicates that a page table entry or PTE routine has been improperly used. To fix this error, here are some suggestions that might help but before you get started troubleshooting the problem, make sure that you create a System Restore Point first.
Option 1 – Try to disable PIT Security in the BIOS
If you are using a Dell computer and it throws up this kind of Blue Screen error, you need to go to the BIOS and uncheck the PIT Security and see if it helps in fixing the problem.
Tap the F2 key during the boot phase to enter the BIOS.
Once you’re in the BIOS, go to the Security tab and to the PIT Security section.
From there, uncheck the “PIT On” box to disable PIT Security.
Now restart your computer and check if the Blue Screen error is fixed or not.
Option 2 – Check for any incompatible devices
The next thing you can do to troubleshoot the SYSTEM_PTE_MISUSE Stop error is to plug in and out each one of the different hardware that is connected to your computer. Doing so will help you determine which one of the hardware is the one that’s triggering the error to pop up. You will also know what hardware drivers or anything else that could be causing this error which includes external devices like mouse, keyboard, printer, as well as internally attached components like the Graphics card and so on.
Option 3 – Try to update, rollback or disable device drivers
To fix the SYSTEM_PTE_MISUSE Stop error, you can also try to roll back, or update, or disable device drivers. It is most likely that after you updated your Windows computer that your driver also needs a refresh. On the other hand, if you have just updated your device drivers then you need to roll back the drivers to their previous versions. Whichever applies to you, refer to the steps below.
Open the Devices Manager from the Win X Menu.
Then locate the device drivers and right-click on them to open the Properties.
After that, switch to the Driver tab and click on the Uninstall Device button.
Follow the screen option to completely uninstall it.
Finally, restart your computer. It will just reinstall the device drivers automatically.
Note: You can install a dedicated driver on your computer in case you have it or you could also look for it directly from the website of the manufacturer.
Option 4 – Run the System File Checker Scan
System File Checker or SFC is a built-in command utility that helps in restoring corrupted files as well as missing files. It replaces bad and corrupted system files to good system files. Thus, you can try running it to resolve the SYSTEM_PTE_MISUSE Blue Screen error. To do so, follow the steps given below.
Tap Win + R to launch Run.
Type in cmd in the field and tap Enter.
After opening Command Prompt, type in sfc /scannow
The command will start a system scan which will take a few whiles before it finishes. Once it’s done, you could get the following results:
Windows Resource Protection did not find any integrity violations.
Windows Resource Protection found corrupt files and successfully repaired them.
Windows Resource Protection found corrupt files but was unable to fix some of them.
Restart your computer.
Option 5 – Run the Blue Screen Troubleshooter
The Blue Screen troubleshooter is a built-in tool in Windows 10 that helps users in fixing BSOD errors like SYSTEM_PTE_MISUSE – 0x000000DA. It can be found in the Settings Troubleshooters page. To use it, refer to these steps:
Tap the Win + I keys to open the Settings panel.
Then go to Update & Security > Troubleshoot.
From there, look for the option called “Blue Screen” on your right-hand side and then click the “Run the troubleshooter” button to run the Blue Screen Troubleshooter and then follow the next on-screen options. Note that you might have to boot your PC into Safe Mode.
0x800ccc7d is an SSL (Secure Sockets Layer) error message code that occurs in applications like Microsoft Outlook or Outlook Express. The error message is displayed as: ‘ unknown error 0x800ccc7d- secure sockets layer ’.
Many offices use Microsoft Outlook for email communication and sending instant messages within the office. This is a highly functional application that enables users to interact with peers efficiently, manage contacts, journals, and reminders.
However, the error 0x800ccc7d may hamper your ability to send and receive emails efficiently. Therefore it is advisable to repair it right away.
Solution
Error Causes
The error 0x800ccc7d is triggered by the following causes:
Damaged profile in Outlook
Incorrect email account settings
The Outlook installation is corrupt and damaged. This usually happens due to issues in hard disk storage.
The outgoing SMTP server does not support secure connections
Further Information and Manual Repair
If you come across 0800ccc7d error code while using Microsoft Outlook or Outlook Express, then don’t you worry! This problem can be easily resolved. In fact, it is so easy to repair that you can do it by yourself even if you are not a technical expert.
Here are some ways to fix the 0800ccc7d SSL Outlook error:
Solution 1: Use Scanpst.exe
You may not know this but Microsoft offers an inbuilt Outlook Repair tool. This tool is technically known as Scanpst.exe. This tool is useful when you need to repair Basic header corruption. However, it may not be the best choice if the problem is big and complex.
Solution 2: Reset Your Outlook Settings
Sometimes this error message may occur when the STMP server requires authentication or does not recognize the senders' email addresses. In this scenario, you should check your Outlook settings to make sure that your STMP username and server are correct. For this follow this procedure:
Go to the Tools menu and then click on Accounts
Now click on your email account then check its properties
Click general and make sure that your email address is created in your account’s control panel. If not, then edit and create.
Next, click servers and see if the box next to the option that says My server requires authentication is checked or not. If not, then check it to resolve the error.
Solution 3: Disable any Anti-Virus
Another alternative to resolve this error is to disable any Anti-virus or Firewall you have installed on your PC. Once you disable it then try sending or receiving the email again. This usually works.
Solution 4: Download 0x800ccc7d Repair Tool
The fourth solution available to resolve this issue is by downloading the 0x800ccc7d repair tool. Though it is similar to Microsoft Outlook built-in scanpst.exe tool, but as compared to it the 0x800ccc7d repair tool is a highly functional tool.
There are many 0x800ccc7d repair tools available but we recommend you to Restoro.
This tool is a third-party tool that can deal, scan, and fix 0x800cc7d error in no time. What makes this repair tool an excellent choice is that it can repair all broken PST files and emails, recover Outlook items, retrieve deleted files, recover password-protected data, split files to recover oversize PST files, and more.
To access and install the 0x800ccc7d repair tool all you need to do is download it here and install it on your PC. Now run it to scan errors. Once the errors are scanned, hit the repair tab to resolve.
So, next time when you experience the error 0x800ccc7d, try using these solutions to fix the problem right away!
As you know, the Windows 10 operating system, as well as other Windows versions, comes with the Windows Firewall. In Windows 10, the firewall allows users to install and run a third-party firewall. This kind of firewall works independently to block any suspicious activity on your computer. However, recently, some users reported that they are getting a notification on the Startup saying,
“Windows Firewall and <Third party firewall name> Firewall are both turned off; tap or click to see available options”.
This particular error could be caused by a lot of factors but when you manually check the firewall, you’ll find that there really is nothing wrong with both the Windows Firewall and the third party firewall. So if both the Windows Firewall and third-party firewalls like McAfee, Comodo, and many others are both turned off in Windows 10, then you need to do several things to resolve the problem – you need to check the supporting services that are required and uninstall and then reinstall the third party firewall on your computer. For more instructions, refer to the options provided below.
Option 1 – Try enabling all the supporting services for the firewall
The first thing you can do to resolve the error with the firewall is to check all of its supporting services by following these steps:
Tap the Win + R keys to open the Run utility and type “services.msc” in the field and then hit Enter to open the Windows Services Manager.
Next, look for the Windows Defender Firewall service among the given list of services.
Once you found it, make sure that its Startup Type is set to Automatic and that the status of the service is Running. So if it’s not running, just click on the Start button.
In addition, you also have to make sure that the following services’ status is set as follows:
Xbox Live Networking Service: Manual
Base Filtering Engine: Automatic
Once done, start the firewall again and check if the error is now fixed or not.
Option 2 – Try to uninstall and reinstall the third-party firewall
It is possible that the firewall error might be due to an error with the compatibility of the installation in Windows 10 and the third-party firewall. Thus, the next thing you can do is to uninstall the third-party firewall and then reinstall it again. Once you have uninstalled the third-party firewall, you can download its latest version from its official website and install it again. This should fix the error with the firewall.
Wondering if upgrading to Windows 11 will boost your gaming experience? We can’t give you a straightforward answer, sadly. But we can take you through the tweaks you can expect if you have all the right requirements and help you make a final decision.
Is Windows 11 good for gaming?
Essentially, the answer to this question is yes. Microsoft has definitely added a bunch of enhancements and features to its latest OS to give gamers the best possible experience. However, you have to keep in mind that this may not work out smoothly for every single user.
Whether you’ll be able to fully take advantage of the Windows 11 gaming features really depends on your setup. As expected, Windows 11 has more demanding system requirements than its predecessor.
Credit: Florian Olivo on Unsplash
So, unless your hardware can run the new OS comfortably, you might not be able to make the most of all these gaming perks. In that case, we recommend you first upgrade your hardware and then make the switch. Be prepared to be a little surprised by a few other interesting changes in comparison to Windows 10, though!
For some of the new gaming features to work, it’ll also be necessary for you to have an NVMe SSD and an HDR-compatible monitor. So let’s take a look at 4 big improvements you can expect if your setup is compatible.
Gaming enhancements on Windows 11
1. Enjoy faster loading speed with DirectStorage
For this powerful feature to work, you need a compatible graphics card and, as stated before, an NVMe SSD. It’s also important for your GPU to support the DirectX 12 graphics API at least. And since we’re on that subject, you’ll be happy to know that Windows 11 has also introduced a new version of the API called DirectX 12 Ultimate.
Now, what does DirectStorage do? It’s a new feature designed to make full use of the speedy storage of NVMe SSDs. It also transfers game data directly onto the graphics card, lightening the load on your CPU. Normally the CPU would have to decompress the data first, but DirectStorage helps bypass this. That’s how loading times are reduced and games run more smoothly.
2. Fully immerse yourself through Game Mode
Windows 11’s Game Mode is certainly a welcomed addition. When you turn on Game Mode, usage of background apps that aren’t essential to your game is reduced. This results in the game you’re running becoming a priority process. This way, it uses your hardware and system resources to the max. Ultimately, the Game Mode means less lag and higher frame rates so you can play undisturbed and fully enjoy your gaming session.
3. Vibrant visual experience thanks to AutoHDR
For this one you’ll absolutely need an HDR-compatible monitor. Basically, HDR (High Dynamic Range) means a wider range of contrasts and colors that can be displayed on a monitor.
Windows 10 has an HDR feature, but you have to turn it on and off manually (“Use HDR”). Plus, users have reported that, if left on, it results in an unappealing appearance of content other than movies and games.
Windows 11 fixes that problem with its AutoHDR feature. Toggling it results in the system automatically adjusting the color contrast, balance and brightness based on what you’re currently looking at. For gamers, this means vivid imagery in every single game, resulting in a supreme visual experience. You can check out Microsoft’s own video showcasing the power of AutoHDR.
Aside from AutoHDR, another way Windows 11 improves the visual aspect is through its support for refresh rates of up to 360Hz.
4. Xbox Game Pass & Game Bar
It’s no secret that Microsoft wants to integrate Windows and Xbox. We’ve seen some attempts with Windows 10, but they’re pretty wonky compared to the new OS.
Windows 11’s built-in Xbox Game Bar enables quite a few options all gamers desire. You can take screenshots and videos of your game and send them, for starters. Furthermore, you can use it to see audio settings and monitor your PC’s performance without having to leave the game or open the Task Manager.
Widgets are also a really cool part of the Game Bar. You can choose from a wide variety of widgets, such as Xbox Achievements, Spotify, Gallery, Xbox Social and more.
Moreover, the Xbox Game Pass has been streamlined on Windows 11. Game Pass is a subscription service that unlocks hundreds of awesome games and supports cloud streaming. Do keep in mind that the games are only unlocked for a certain period of time, as the selection rotates once in a while.
What can you do for a better gaming experience?
Windows 11 does offer tweaks that require zero input from you. However, there are a few things you can do manually to get even more out of your new OS while gaming.
Turn off enhanced pointer precision. Most games enhance precision by default, so having this feature on might interfere with that.
Make sure to select your high performance graphics card for each game. Go to Settings > Gaming > Game Mode and tap ‘Graphics’ from the ‘Related settings’ menu. Find the game you want to adjust, click on ‘Options’ and choose your high performance graphics card to be the default setting. While there, you can also turn on ‘Hardware-accelerated GPU scheduling’ at the top.
Disable unnecessary apps and programs. As long as they aren’t essential to running your game, they might take up valuable system resources, so disable them to make space for your gaming requirements.
Check for pending updates and install them. It’s well-known that out-of-date software causes bugs, latency and crashes. The same goes for your GPU drivers.
Use the High-performance power plan (Control Panel > Power Options > Additional plans) to maximize the use of resources for the best possible performance.
Summary
Windows 11 has done quite a bit for avid gamers. We hope your setup is compatible with all these new features and you can experience these enhancements ASAP!
In the latest news, Microsoft has reached a deal to purchase Activision Blizzard for 67.8 billion. Now franchises like Warcraft, Starcraft, Overwatch, Call of duty, Diablo are now the property of Microsoft and I am sure that some of these games we can expect to be included in the Xbox game pass.
This is the second large game company acquisition by Microsoft, Acquiring Bethesda first and a big hit to Sony since Xbox will now have more games in its catalog and as exclusives.
Of course, the sale has to go through the standard closing conditions and completion of regulatory review and Activision Blizzard’s shareholder approval before it’s finalized. Assuming that all goes well, the deal is slated to be completed during the fiscal year 2023, which is July 1, 2022, through June 30, 2023.
As we near the end of 2022 we look at the current best antivirus software for popular platforms, why they are the best, and why you should get them.
Avira, a great free Antivirus
Avira has been around a long time with its free antivirus version of the larger protection suite. It had its ups and downs but the latest versions are really great. With high-speed scans and low system impact, Avira antivirus is really one of the best free antivirus software currently on the market.
The software itself has also received UI & UX updates making it straightforward and easy to use. The virus scanning engine is the same as in paid version that ranks among the top engines in the world for this type of work. The package also gives you some great browser protection and a good firewall as well, there is really no excuse to skip on this if you want a free solution.
The only thing that we would say is not so great in Avira is reporting some false positives, sometimes even for MS updates, it is rare but it can happen.
Malwarebytes, a powerful Windows antivirus
Malwarebytes Premium is easy to use, simple antivirus solution that shies away from complicated UI, and simply put, it just works. Its scanning engine is well-known and places among the top and best in the world often finding some malware that other can miss.
Another great thing is its integration with Windows itself, it is one of the rare applications that can and will work incredibly well beside your typical Windows protection tools so you can have both of them running at the same time.
Installation and running are really simple and every typical PC user will find it as easy as walking in the park. On the other hand, sadly system impact is a little high and it will have issues running on lower-end systems due to its memory requirements.
Intego MAC Internet Security X9, the best Mac antivirus
Gone are the days when MAC had no virus issues, since MAC rose in popularity among the users, also rose the number of viruses and malware. The system itself has some great protection built it inside but for more security and better control of it, you will need a third-party dedicated solution.
Intego was made by Mac antivirus experts who have been building this kind of software last 25 years. The interface is easy to use and premade presets are really helpful, but the security suite can also be customized to fit your needs and desires.
Since this is only available as a security suite, you are getting a firewall and some other security tools along with your antivirus that will run as a part of it.
The bad side is that scans can sometimes run slow, most of the time they are OK in terms of speed but occasionally they can switch to slower speeds and impact scanning time to some annoying times. Also, there is no webcam protection nor VPN service included where others on this list have them.
Bitdefender mobile security: best Android protection
While protection is not only needed for your gaming or workstation, software suites that are dealing with mobile and tablet security exist. The best of them is the Bitdefender antivirus mobile suite. Low on system resources and low on performance impact with the really great virus detection rate Bitdefender is at the top of suites for your phone.
Consistent high virus detection packed with low battery impact is great but the suite comes with tons of other tools as well like browser security tools, email protection, and real-time link and notification protection.
The application will always scan each file and newly installed application in the background and alert and cut off any found threat. App itself is easy to install and use and most of the time it will do everything in the background for you but offer you customization if you need it.
The package also includes VPN and application lock that will let you protect the critical applications from being accessed as well as an online account scanner. Anti-theft and anti-loss tools, which allow you to find, remotely lock or wipe a stolen or lost device, add yet another layer of protection.
One thing that is missing from this great package is fraudulent call protection. Newer Android phones have this feature inside but it would be nice if Bitdefender had it as well.
Bitdefender, the best antivirus software
Now that we have covered specific cases of each platform, there is one player that has all of them covered and with a quality product, that player is BitDefender and it is great. Personally, this is my protection suite of choice and as I type this it is running in the background.
Bitdefender has it all, low system impact, as a matter of fact, it is one, if not, the lowest performance impact engine on the market currently and that is packed with a great and highly consistent virus & malware detection suite. Along with real-time malware protection, browser security, and anti-spam tools, you also get anti-phishing defenses, ransomware protection, and a strong firewall.
Bitdefender scores are very high in both the zero-day threat and real-world protection tests at AV-Test, an established organization that tests antivirus software. Despite being tested against tens of thousands of well-known and widespread malware threats, the software consistently achieves a 100% blocking rate.
The suite also comes with a restricted free VPN and with parental controls as well. Webcam and microphone protection are also included in the suite and on top of all, it has great pricing plans and constant discounts.
BitDefender is really a great package and it might sound too good, but after years and years of personally using it I have not had single malware or virus issue, the only thing that I would put as a negative is that system is severely slowed down when system scans are performed so be sure to run or schedule them when you are not using your computer. This, of course, can put some people off and I will admit it is a serious drawback but for me, the security of my workstation is more important than leaving the computer for 20 or so minutes in order to perform a full scan of the system.
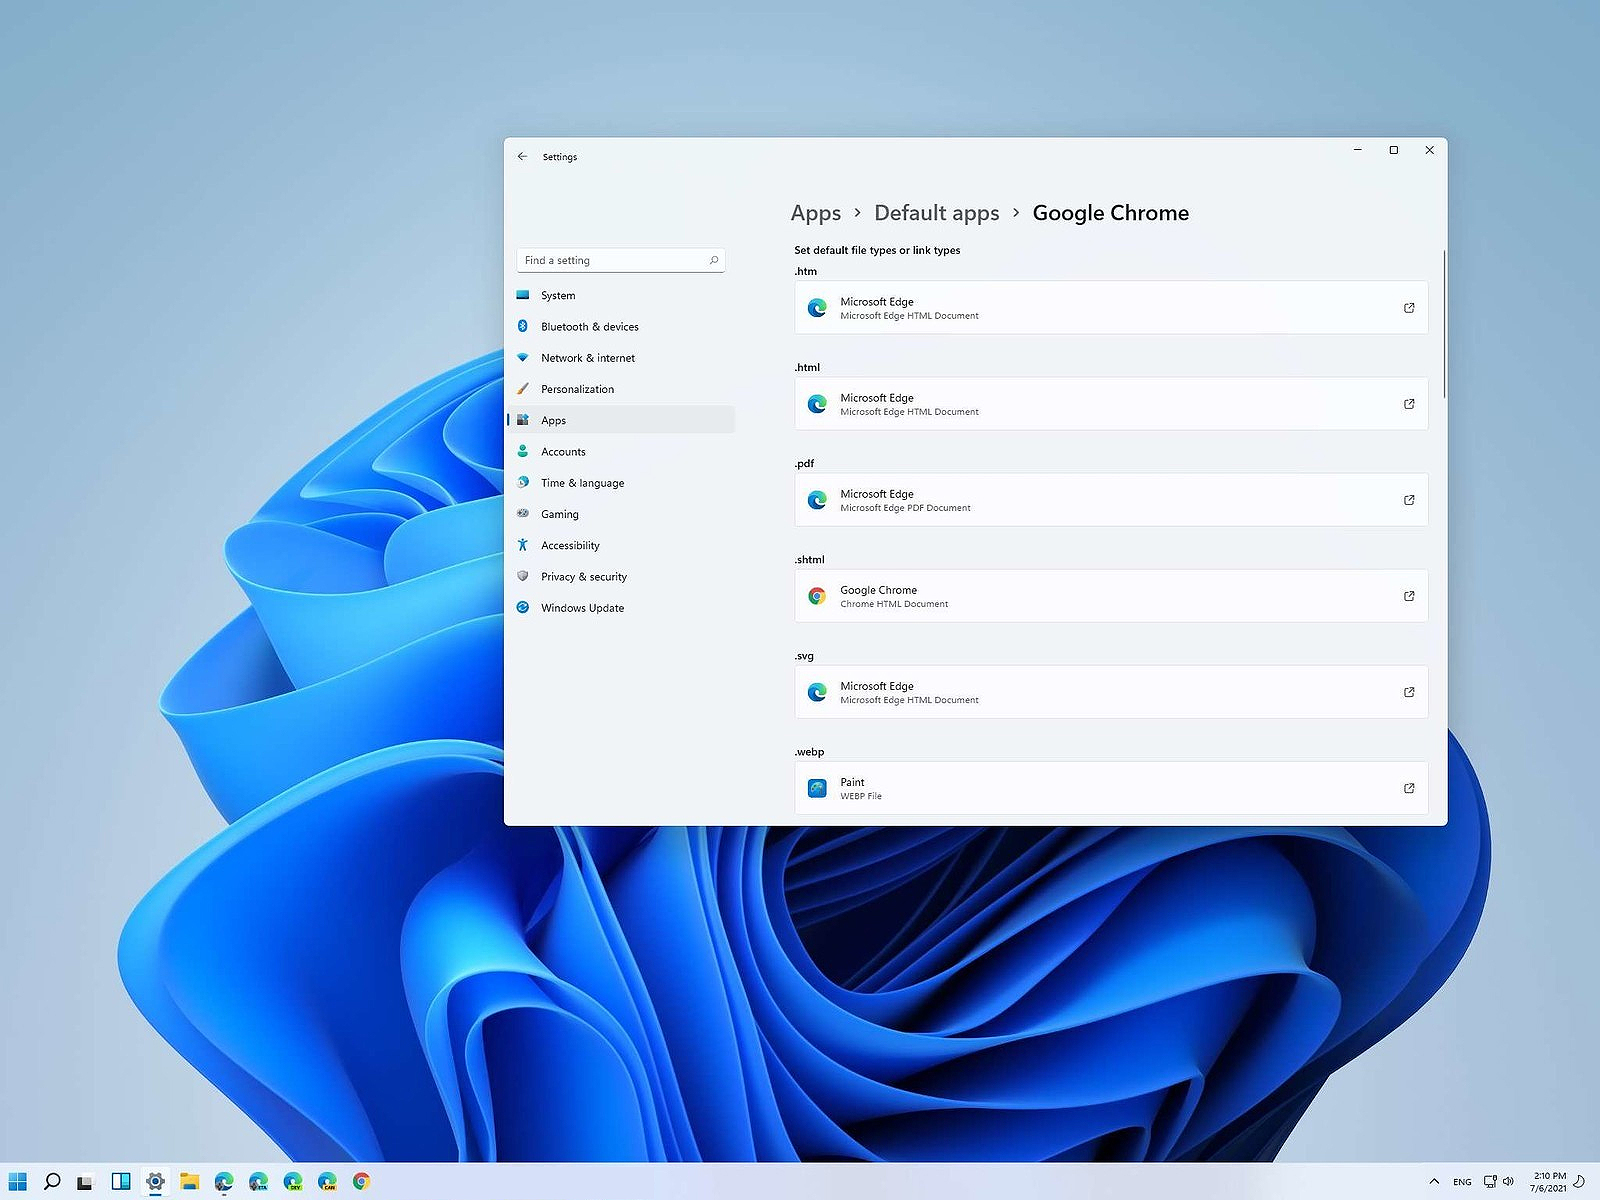
Same as in previous Windows versions, Windows 11 will also use certain applications as default ones for opening certain file types and file extensions. And yes, same as in previous versions it will come preconfigured for certain file types and associated applications like for example photos for pictures.
Of course, users usually have their own favorite applications for certain file types and much more prefer to open them inside the application of their choice instead of the default one.
We can change the default application like in previous Windows versions but this time there are two ways and overall more control of this process. Windows 11 has settings for choosing default file type applications and default file extension applications giving you more control of this process.
The opening setting for apps
Whatever you wish to change default application or default extension application you will need to open settings for default application. Follow steps to quickly go into it.
Press ⊞ WINDOWS + I to open settings
Select Apps on left
On the right part select Default Apps
Now you are in settings for choosing default applications
Choosing default application by file type extension
This is considering by Microsoft as a typical way to set default applications inside Windows 11. Once you are inside the settings app there is a box labeled Enter a file type or link type. Inside the search box, type in file extension that you wish to associate the application with like .JPG, .TXT, or other.
If the file extension is not associated with any application you will be presented with a Choose a Default button, if however, the file extension is already associated with the app, you will need to click on the app box itself.
In any case, a pop-up will appear and ask How do you want to open YOUR FILE EXTENSION files from now on? Choose Application from the list of presented ones and click on OK.
Choosing default file type
Another method is to select the default application by file type selecting application for it. In the settings screen, under the search box, you will have a list of installed applications. Choose the application that you would like to associate a file type with and click on it. On the next details screen scroll down and select the file type that you want to associate with the selected application and click on OK.
Other/third method
There is also the third method for choosing the default application for file type but it includes some surfing on your hard drive and it can be more time-consuming for first-time settings. But it is fairly quick when you need to only use it once on some new file type (for example you have a new application installed and want to switch just one file type extension to that application).
Locate the file that you want to associate with the application and right-click on it. Select Open With from the menu and then Choose Another App. Pop up will appear, select the application that you would like to use, and check the box beside Always use this app to open CHOOSEN EXTENSION files followed by clicking on the OK button.
Hello and welcome to another problem-solving tutorial on errortools.com. Today we will be solving error 0x80070057, we could not format the selected partition which occurs during setup and installation when performing a clean install of Windows from a USB drive.
So, you have backed up your files and decided to format and do clean WIndows installation, you have your USB ready, you reboot the system, plug in USB, start Windows setup, choose the hard drive on which you want to do a clean install and then this happens.
This error is very frustrating and it annoys pretty much anyone who encountered it but do not worry we have a solution for you.
First thing is to confirm the error prompt, Click on the OK button and then on X to exit Windows 10 installation wizard. Click on yes to confirm that you want to exit the setup.
You will find yourself in original installation windows.
On that screen choose and click on Repair your computer. Choose an option screen that will pop up, click on Troubleshoot. In the advanced options, click on the command prompt.
Once you are in command prompts type DISKPART and hit ENTER
In the diskpart prompt type LIST DISK and hit ENTER again.
type SELECT DISK #, where # is listed disk number where you would like to install Windows.
type LIST VOLUME in order to list volumes in the selected disk and hit ENTER
You need to select the volume on which you would like to place your WINDOWS, to do this type in SELECT VOLUME #, where # is the listed number of the volume
Finally, type FORMAT FS=NTFS and hit ENTER
You have successfully formated a given volume, you can now exit DISKPART and return to setup, to exit DISKPART simply type exit and hit ENTER.
Leave command prompt as well by again typing exit and hitting ENTER
You will be returned to Choose an option screen, click on Turn off your PC.
Your drive has been successfully formatted and it is ready for clean Windows installation, you can now restart your Windows 10 installation and the process will complete without errors.

 Windows 11 has some cool animations including fading effects which make working in it feels nice and futuristic but the cost of this is that there is a slight delay to certain actions performed. If you want the snap fast feature in Windows 11 and do not care about this eye candy there is an easy way to turn animations off inside it.


 This is the second large game company acquisition by Microsoft, Acquiring Bethesda first and a big hit to Sony since Xbox will now have more games in its catalog and as exclusives.
Of course, the sale has to go through the standard closing conditions and completion of regulatory review and Activision Blizzard’s shareholder approval before it’s finalized. Assuming that all goes well, the deal is slated to be completed during the fiscal year 2023, which is July 1, 2022, through June 30, 2023.
This is the second large game company acquisition by Microsoft, Acquiring Bethesda first and a big hit to Sony since Xbox will now have more games in its catalog and as exclusives.
Of course, the sale has to go through the standard closing conditions and completion of regulatory review and Activision Blizzard’s shareholder approval before it’s finalized. Assuming that all goes well, the deal is slated to be completed during the fiscal year 2023, which is July 1, 2022, through June 30, 2023. 


 Same as in previous Windows versions, Windows 11 will also use certain applications as default ones for opening certain file types and file extensions. And yes, same as in previous versions it will come preconfigured for certain file types and associated applications like for example photos for pictures.
Of course, users usually have their own favorite applications for certain file types and much more prefer to open them inside the application of their choice instead of the default one.
We can change the default application like in previous Windows versions but this time there are two ways and overall more control of this process. Windows 11 has settings for choosing default file type applications and default file extension applications giving you more control of this process.
Same as in previous Windows versions, Windows 11 will also use certain applications as default ones for opening certain file types and file extensions. And yes, same as in previous versions it will come preconfigured for certain file types and associated applications like for example photos for pictures.
Of course, users usually have their own favorite applications for certain file types and much more prefer to open them inside the application of their choice instead of the default one.
We can change the default application like in previous Windows versions but this time there are two ways and overall more control of this process. Windows 11 has settings for choosing default file type applications and default file extension applications giving you more control of this process.
 This error is very frustrating and it annoys pretty much anyone who encountered it but do not worry we have a solution for you.
First thing is to confirm the error prompt, Click on the OK button and then on X to exit Windows 10 installation wizard. Click on yes to confirm that you want to exit the setup.
You will find yourself in original installation windows.
On that screen choose and click on Repair your computer. Choose an option screen that will pop up, click on Troubleshoot. In the advanced options, click on the command prompt.
Once you are in command prompts type DISKPART and hit ENTER
In the diskpart prompt type LIST DISK and hit ENTER again.
type SELECT DISK #, where # is listed disk number where you would like to install Windows.
type LIST VOLUME in order to list volumes in the selected disk and hit ENTER
You need to select the volume on which you would like to place your WINDOWS, to do this type in SELECT VOLUME #, where # is the listed number of the volume
Finally, type FORMAT FS=NTFS and hit ENTER
You have successfully formated a given volume, you can now exit DISKPART and return to setup, to exit DISKPART simply type exit and hit ENTER.
Leave command prompt as well by again typing exit and hitting ENTER
You will be returned to Choose an option screen, click on Turn off your PC.
Your drive has been successfully formatted and it is ready for clean Windows installation, you can now restart your Windows 10 installation and the process will complete without errors.
This error is very frustrating and it annoys pretty much anyone who encountered it but do not worry we have a solution for you.
First thing is to confirm the error prompt, Click on the OK button and then on X to exit Windows 10 installation wizard. Click on yes to confirm that you want to exit the setup.
You will find yourself in original installation windows.
On that screen choose and click on Repair your computer. Choose an option screen that will pop up, click on Troubleshoot. In the advanced options, click on the command prompt.
Once you are in command prompts type DISKPART and hit ENTER
In the diskpart prompt type LIST DISK and hit ENTER again.
type SELECT DISK #, where # is listed disk number where you would like to install Windows.
type LIST VOLUME in order to list volumes in the selected disk and hit ENTER
You need to select the volume on which you would like to place your WINDOWS, to do this type in SELECT VOLUME #, where # is the listed number of the volume
Finally, type FORMAT FS=NTFS and hit ENTER
You have successfully formated a given volume, you can now exit DISKPART and return to setup, to exit DISKPART simply type exit and hit ENTER.
Leave command prompt as well by again typing exit and hitting ENTER
You will be returned to Choose an option screen, click on Turn off your PC.
Your drive has been successfully formatted and it is ready for clean Windows installation, you can now restart your Windows 10 installation and the process will complete without errors.