How to Fix the Blue Screen Locale ID 1033 Error Code

What is the Blue Screen Locale ID 1033 Error?

Blue screen locale id 1033 error as the name suggests, is a type of BSoD error. This error may occur during Windows startup, program load, or while the program is running. The error indicates poor PC maintenance and occurs without any warning.

The error message is prompted in the following format:

Problem signature:
Problem Event Name: BlueScreen
OS Version: 6.0.6002.2.2.0.16.7
Locale ID: 1033

When the error occurs, the computer screen turns blue and the user is unable to view or access the program. It is advisable to fix the error right away, virtually because BSoD is a critical PC error, it can pose serious threats to your system.

Error Causes

The two most common causes of the occurrence of the Blue Screen Locale ID1033 error code are:

  • Registry issues
  • Viral infection

Further Information and Manual Repair

You don’t need to hire a technician or be a computer whiz to resolve Blue Screen Locale ID1033 error code. Here are some methods that you can try to resolve this error on your PC. These methods are easy to perform and result-driven.

Method 1: Perform a PC Scan by Downloading an Anti-Virus

Since this error is indicative of a viral infection, it is suggested you perform a PC scan by installing an antivirus on your system. Make sure you download an antivirus that is powerful and has the ability to scan all kinds of viruses.

Method 2: Clean and Repair the Registry

Another alternative method is to clean and repair the registry.

The Registry is a component of the PC that stores all information and activities performed on the PC. This includes both important and unnecessary files like junk files, cookies, internet history, temporary files, invalid entries, bad registry keys, and more.

These files not only accumulate in the registry but also damage and corrupt it thereby generating error codes like the Blue Screen Locale ID1033 error code.
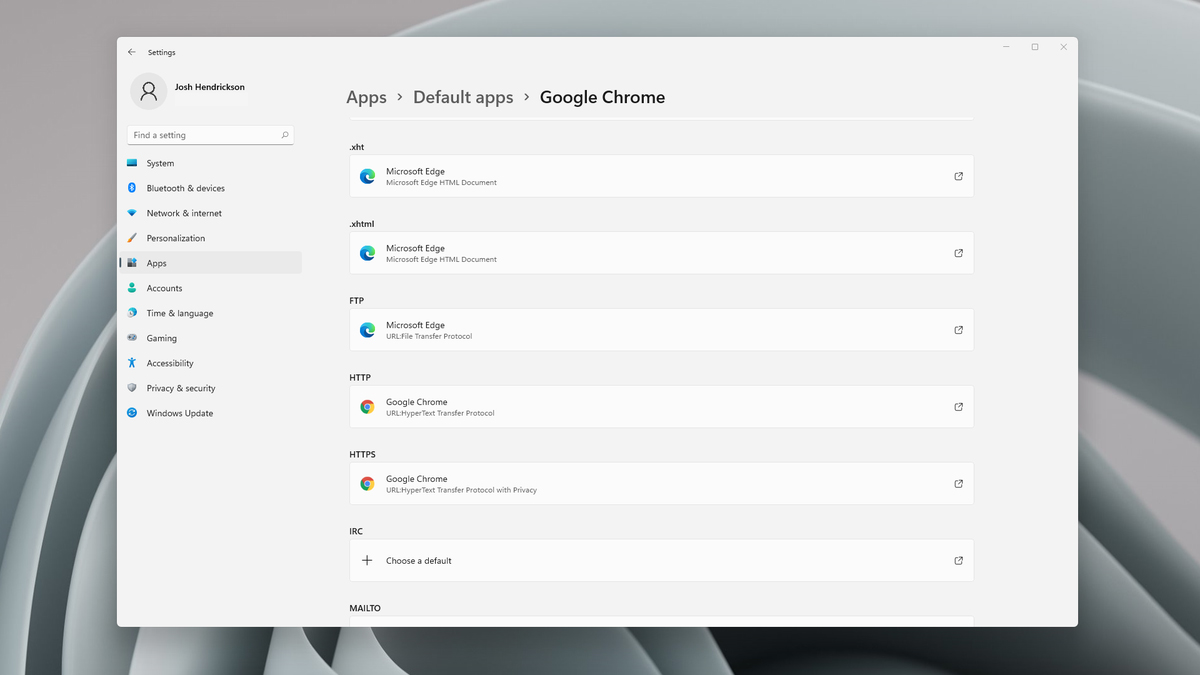
Do You Need Help with Your Device?

Our Team of Experts May Help
Troubleshoot.Tech Experts are There for You!
Replace damaged files
Restore performance
Free disk space
Remove Malware
Protects WEB browser
Remove Viruses
Stop PC freezing
GET HELP
Troubleshoot.Tech experts work with all versions of Microsoft Windows including Windows 11, with Android, Mac, and more.

Share this article:

You might also like

INET_E_RESOURCE_NOT_FOUND
The previous Windows versions all came with Microsoft's browser Internet Explorer. A lot of users love it because not only that it is easy to use. It is also very fast. Users didn’t have to worry about compatibility because it is almost always compatible with its Windows Version. When they introduced Windows 10, they changed the name of the browser from Internet Explorer to Microsoft Edge. It is faster and more user-friendly compared to its predecessors. But after the Creator Update, some experienced receiving the inet_e_resource_not_found error code. In contrary to what everyone expects, you actually don’t have to uninstall and reinstall the Microsoft Edge App. What you can do is reset the browser in your Apps & Features Settings in your Microsoft Settings.

To reset the browser you can follow the steps below:

  1. Click on the Windows icon and go to settings.
  2. Click on Apps and this will bring you to the Apps & Features page. Look for Microsoft Edge from the list of Apps and click on it.
  3. Choose Advance Option
  4. Scroll down then Under Reset, click on repair or reset. When you repair it will fix the existing problem but the data that caused the problem may still be present and can still cause problems. If you click on reset, it will delete all the cache and cookies that are installed in your browser but it will save your Favorites as well as your bookmarks.

Another way to resolve this is by disabling the feature TCP Fast Open on Microsoft Edge. To disable this, go ahead and follow the steps below:

  1. Open the Microsoft Edge browser.
  2. Type in about: flags on the Address (URL) bar.
  3. Under Networking, uncheck the Enable TCP Fast Open.
  4. Close your Microsoft Edge browser and open a new one.
Flushing the DNS also worked for other Users. Sometimes, the error code the inet_e_resource_not_found is caused by a corrupted DNS cache. There are 2 ways to flush your DNS. The first option is to use the command prompt to run the command.
  1. To access the Command prompt or CMD, you can search for it on Cortana or you can click on the Windows icon to access the Programs, scroll down to the Windows System folder and click on it.
  2. A drop-down menu will show up, click on Command Prompt which is the first on the list.
  3. Type in the code ipconfig /flushdns and press enter.
  4. There will be a message that will show that says Windows IP configuration successfully flushed the DNS Resolver Cache
  5. Exit the CMD by typing exit and press enter.
The easiest way to do this is to Press the keys Window + R on your keyboard. Type in ipconfig /flushdns in the search box and hit enter or click on OK. These are only some of the ways to resolve the inet_e_resource_not_found. There are other ways to further troubleshoot this issue such as reinstalling your Wifi Adapter Driver or adjusting the DNS Server Address. But most of the time, users are able to resolve the issue with the steps provided above.
Read More
Computer gets stuck on Preparing to configure
If you suddenly find your Windows 10 computer stuck on the “Preparing to configure” screen for quite a long time now after you run Windows Update, read on as you will be guided on how you can fix that issue in this post. During an update process, there’s a lot of things that go on in the background which is why Windows Updates take quite a while before it finishes. It can be at 25%, 50%, or even 100% but the only message you’re going to see on your screen is the “Preparing to configure Windows, Don’t turn off your computer”. However, if you notice that the Windows Update is taking a longer time than it’s supposed to, the first option is to wait some more but if it’s still the same, then there’s definitely something wrong. This kind of issue occurs when Windows Update fails to configure in short correctly download and install the update. When this happens, it will revert all the changes which are why you were advised to wait for a couple of hours. There are two possibilities why your computer is stuck on the “Preparing to configure Windows, Don’t turn off your computer” screen. The first one is that the Windows 10 operating system is installing any updates. The second one is when the user profile takes time to load or encounters an error. There are several options you can try to fix the problem. You can try running System Restore or boot your computer in Safe Mode or repair the corrupted profile via Registry Editor. You might also want to try using installation media to boot and repair your computer if the other options didn’t work.

Option 1 – Perform System Restore

  • Tap the Win + R keys to open the Run dialog box.
  • After that, type in “sysdm.cpl” in the field and tap Enter.
  • Next, go to the System Protection tab then click the System Restore button. This will open a new window where you have to select your preferred System Restore point.
  • After that, follow the on-screen instructions to finish the process and then restart your computer and check if the problem is fixed or not.
Note: If you can’t boot into the desktop of your computer, you can run System Restore in the Advanced Startup Options by following these steps:
  • Boot your computer into the Advanced Startup Options screen.
  • From there, you will see some options to troubleshoot when you can’t log in to Windows in the usual way.
  • Now select Troubleshoot > Advanced Options > Command Prompt.
  • After that, type “rstrui” and hit Enter to execute the command which will start the System Restore process.
  • Once it’s done, restart your computer.

Option 2 – Boot your computer in Safe Mode

You can try to tap the F8 key if you have it enabled in your Windows 10 computer, as you start your system to boot into Safe Mode. Once your computer is in Safe Mode, you can access the Start Menu and the Mouse and Keyboard. Aside from that, you can also access your files and other built-in tools in Windows such as Command Prompt, PowerShell, Computer Manager, Device Manager, Event Log Viewer, and many more. On the other hand, if you haven’t enabled the F8 key, you can just go to the Advanced Startup options to boot your computer into Safe Mode. Once you’re there, select Troubleshoot > Advanced Options > Startup Settings > Restart > Tap the number 4 key. After that, your computer will restart in Safe Mode. If you want to reboot into Safe Mode with Networking instead, you can tap the number 5 key and for Safe Mode with Command Prompt, tap the number 6 key. Once your computer is in Safe Mode, you can use any of the built-in tools to restore your computer or troubleshoot the problem that’s causing your computer to get stuck at the “Preparing to configure” screen.

Option 3 – Try to repair your corrupted profile via Registry

In this third option, you can try to repair the corrupted profile using the Registry but before you proceed, take note that you can only try this if you can boot into your desktop and if you can, make sure to create a System Restore Point and then follow the steps below.
  • Tap the Win + R keys to open the Run dialog box.
  • Then type “Regedit” in the field and hit Enter or click OK to open the Registry Editor.
  • Next, go to this registry key: ComputerHKEY_LOCAL_MACHINESOFTWAREMicrosoftWindows NTCurrentVersionProfileList
  • Once you’ve opened the registry key, you should see a list of all the user profiles on your computer. Now click on each S-1-5 folder and look for the “ProfileImagePath” entry and double click on it to check which user account it is related to. You will see a path like “CUsersACK” where “ACK” is the username.
  • You should know which of the user account is corrupted. Just look for a key named “RefCount” and change its Value data to “0” and click OK. And if it isn’t available, simply right-click on the right pane and create it.
  • After that, double click on the key named “State” and make sure that the Value data is “0” and click OK.
  • Exit the Registry Editor and restart your computer to apply the changes made.

Option 4 – Try to use installation media to boot and repair your computer

Another thing you can try to resolve the issue is to use the Windows installation bootable media so you can boot and repair the operating system. To use it, follow these steps:
  • You need to first create an installation media which has the dame version of the operating system installed in your computer.
  • After that, once you reach the Install Windows screen, click on the “Repair your computer” link.
  • Wait until the repair is completed and then shut down your computer
  • Now once your computer has restarted, check if it can now boot properly.
Read More
Easy Guide to Resolving Error Code 16

Error Code 16 - What is it?

Code 16 is a type of Device Manager error code. Windows XP users are most likely to encounter it. This error pops on XP systems that are running legacy or not plug-and-play hardware.

Error code 16 is displayed in the following format:

‘Windows cannot identify all the resources this device uses. (Code 16)’

Solution

driverfix boxError Causes

Error code 16 occurs when you use a peripheral device such as an external drive or a printer and that device is not properly or completely configured. Though the device may have been recognized before Windows fails to verify its configuration. Simply put, error code 16 appears when devices are partially configured.

In addition to this, another cause of error 16 is outdated or corrupt device drivers. Devices often fail to run successfully because of driver problems.

Device drivers are programs that provide instructions to control different devices attached to the computer system such as audio devices and printers to name a few.

Though error code 16 is not fatal like other PC error codes such as BSoD; however, it may hamper your ability to use certain devices installed on your system and lower your work productivity.

To avoid inconvenience, it is advisable to resolve the error immediately to avoid inconvenience.

Further Information and Manual Repair

PC error codes are often considered technical and difficult to resolve which is why many prefer to hire a professional for the repair job rather than doing it themselves.

Small repair jobs like fixing error code 16 by a professional computer programmer may cost you hundreds of dollars.

So, why incur so much cost when you can repair it easily by yourself even if you are not a technical whiz.

Error code 16 is easy to repair.

Here are some effective DIY methods that you can use for resolving error code 16 on your PC. These methods require no technical background, knowledge or expertise for that matter. Just simply follow the instructions and resolve the error code 16 issue.

Let’s get started…

Method 1 - Setup from the Disk that Came with the Hardware Device

Run setup from the disk that came with the hardware device, or you can simply copy the setup software file to your hard drive/flash drive. Refer to the vendor’s direction to set up.

If for any reason you’re unable to find the directions, simply uninstall the device. Then go to the start menu, Control Panel, and select ‘Add New Hardware’.

Now pick the appropriate hardware and follow the steps that the Wizard suggests. This is most likely to resolve the error code.

Nonetheless, if the error code still persists, then try method 2.

Method 2 - Allocate More PC Resources

Another alternative method to resolve error code 16 is to allocate more PC resources to the device. To specify additional resources:

  • Go to the start menu
  • Type Device Manager
  • Then go to the Device properties and click the resources
  • Here specify the device in the Device Manager
  • If you see a resource with a question mark, assign that resource to the device
  • However, if for any reason the resource is unable to change, then simply click ‘Change Setting’.
  • If Change Settings is not available, then click the box to the ‘Use Automatic Settings’ box. This will make the option available.

Method 3 - Install DriverFIX

As previously stated above, device manager error codes like error code 16 may also occur due to driver problems. If this is the underlying reason for error code 16 on your system, then the best way to resolve it is to install DriverFIX.

DriverFIX is user-friendly, advanced, and feature-filled software deployed with an intelligent programming system, which detects all problematic device drivers automatically in seconds.

It matches these drivers with their latest versions and updates them smoothly without any hassle, resolving error code 16 right away.

And furthermore, once you install this software on your PC, you don’t have to worry about driver problems anymore typically because it updates drivers on a regular basis with compatible and new versions, ensuring that your computer functions properly. It is easy to install and is compatible with all Windows versions.

Click here to download DriverFIX to repair error code 16

Read More
Some update files aren’t signed, 0x800b0109
Windows Updates are checked for their validity every time they are downloaded from Microsoft servers just like how browsers check websites for a valid certificate. And so if you got an error message saying, “ Some update files aren’t signed correctly, error code 0x800b0109 ” while trying to update your computer, it indicates that the Windows service was unable to verify the validity of the Windows Update. To fix this error, you can try out the options prepared in this post.

Option 1 – Reboot your computer and try again

Save your work and reboot your computer and then try checking for updates again. In some cases, all you need is a restart to fix errors like error code 0x800b0109.

Option 2 – Try to update Windows after an hour or so

There are times when the issue is from Microsoft’s end. It could be that there’s some issue with Microsoft’s server so it would be better if you give it an hour or so before trying to run Windows Update again.

Option 3 – Try running the Windows Update Troubleshooter

Running the built-in Windows Update troubleshooter is one of the things you can first check out as it is known to automatically resolve any Windows Update errors like Error 0x8007001E. To run it, go to Settings and then select Troubleshoot from the options. From there, click on Windows Update and then click the “Run the troubleshooter” button. After that, follow the next on-screen instructions and you should be good to go.

Option 4 – Delete the contents in the Temporary folder

You can also try deleting the contents in the Temporary folder – all the downloaded, pending, or failed Windows 10 updates. You can do that using the simple and easy steps below.
  • Tap the Win + R keys to open the Run dialog box.
  • Then type “%temp%” in the field and press Enter to open the Temporary folder.
  • After that, select all the folders and files within the Temp folder and delete all of them.

Option 5 – Clear the contents in the Software distribution and Catroot2 folders

  • Open the WinX Menu.
  • From there, open Command Prompt as admin.
  • Then type in the following command – don’t forget to hit Enter right after typing each one of them.
net stop wuauserv net start cryptSvc net start bits net start msiserver
  • After entering these commands, it will stop the Windows Update Service, Background Intelligent Transfer Service (BITS), Cryptographic, and the MSI Installer
  • Next, go to the C:/Windows/SoftwareDistribution folder and get rid of all the folders and files thereby tapping the Ctrl + A keys to select them all and then click on Delete. Note that if the files are in use, you won’t be able to delete them.
After resetting the SoftwareDistribution folder, you need to reset the Catroot2 folder to restart the services you just stopped. To do that, follow these steps:
  • Type each one of the following commands.
net start wuauserv net start cryptSvc net start bits net start msiserver
  • After that, exit Command Prompt and restart your computer, and then try to run Windows Update once more.

Option 6 – Install the updates in a Clean Boot State

You might want to try putting your computer in a Clean Boot state and then install Windows Updates again without any trouble. During this state, you can start the system with a minimum number of drivers and startup programs that will surely help you in isolating the root cause of the issue.
  • Log onto your PC as an administrator.
  • Type in MSConfig in the Start Search to open the System Configuration utility.
  • From there, go to the General tab and click “Selective startup”.
  • Clear the “Load Startup items” check box and make sure that the “Load System Services” and “Use Original boot configuration” options are checked.
  • Next, click the Services tab and select the “Hide All Microsoft Services” check box.
  • Click Disable all.
  • Click on Apply/OK and restart your PC. (This will put your PC into a Clean Boot State. And configure Windows to use the usual startup, just simply undo the changes.)
  • After that, try to install the Windows Updates or upgrade again.
Read More
How to Fix the Waol.exe Error

Waol.exe Error - What is it?

Waol.exe is an executable file located in a subfolder of "C:\Program Files" - usually C:\Program Files\America Online 9.0a. Waol.exe is not a core file but it is an important part of AOL (American Online) utilities. It ensures the AOL programs run smoothly on your system. The Waol.exe error occurs when the AOL program fails to execute and run properly. The error message is displayed in the following format:

“Waol.exe has encountered a problem and needs to close. We are sorry for the inconvenience.’

Solution

Restoro box imageError Causes

Waol.exe error typically occurs when this executable file gets infected by a virus, Trojan, adware, or spyware. When this happens the file location also changes. Therefore the best way to verify if your PC is under attack by malicious software is to check the Waol.exe file location on your PC. If the file is found in some other location instead of its correct disk location, then you must immediately fix this error before the damage sets it. Malicious software like viruses and spyware are notorious for slowing down PC performance and besides they give access to hackers to break into your system and manipulate your confidential and private data saved on your PC. This exposes you to serious privacy errors and data security dangers including identity thefts, cybercrime, and data breaches. Furthermore, viruses can also corrupt the computer’s registry and lead to system failure and crashes.

Further Information and Manual Repair

To resolve Waol.exe error many PC users seek an antivirus. Though this also helps resolve the issue but you should know that an antivirus has certain limitations. It is known to slow down the system speed and will only remove viruses from your PC. This means if the virus has affected the registry of your PC, it will not resolve that, and to repair your registry you may then have to download a registry cleaner separately on your system thereby reducing the PC speed even more. To ensure all kinds of malware are removed and registry issues resolved along with system speed optimization, it is recommended to download Restoro. This is an advanced, innovative, and multi-functional PC repair tool deployed with a variety of powerful utilities. These include a registry cleaner and a system optimizer. It is safe, efficient, user-friendly, and compatible with all Windows versions including Vista, XP, Windows 7, 8, 8.1, and 10. The antivirus feature embedded inside this software detects scans and removes all malicious programs infecting your PC immediately. It resolves all your system’s privacy issues and makes sure that your system is inaccessible to hackers. Besides this, the registry cleaner removes files cluttering and damaging the registry and also restores it. With the help of the system stability detector, it detects errors causing PC slowdowns and resolves them too thereby boosting the speed of your PC dramatically. To resolve Waol.exe error right away, click here to download Restoro today.
Read More
Fix Windows Update Error 0x8024A10A
The Windows Update service, just like other services in Windows 10 may sometimes experience some issues and stop behaving properly. One of the issues you might encounter as you use the Windows Update service is the Windows Update error 0x8024A10A. This kind of error code signifies that the Windows Update service is shutting down. So if you encounter this error, read on as this post will guide you on how you can fix it. When you receive the Windows Update error 0x8024A10A, you may see this error message on your screen: “USO_E_SERVICE_SHUTTING_DOWN indicates that the WU Service is shutting down. This may happen due to a very long period of time of inactivity, a system hang leading to the service being idle and leading to the shutdown of the service. Ensure that the system remains active and the connections remain established to complete the upgrade.” You could try to restart your computer to resolve the problem since there are instances when a simple restart can fix errors. However, if it does not work, you might find the options provided below useful.

Option 1 – Try to restart the Windows Update Service

The first thing you can do to fix Windows Update error 0x8024A10A is to restart the Windows Update Service from the Services Manager. To do so, follow these steps:
  • In the Cortana search box, type “services” and click on the Services icon to open the Services Manager. Alternatively, you can also tap the Win + R keys to launch the Run prompt and then type “services.msc” in the field and hit Enter to open the Services Manager.
  • After opening the Services Manager, look for the Windows Update Service.
  • Once you found it, right-click on it and check if the Service is stopped. If it is, then select the Start option. On the other hand, if the Windows Update Service is already started, just select the Restart option.
  • After that, try to run the Windows Update again and see if the error 0x8024A10A is now fixed.

Option 2 – Run the Windows Update Troubleshooter

Since the Windows Update troubleshooter reviews the status of the services that support the process, it would prompt and fix it if there is anything that’s not right. Thus, you might want to run a built-in Windows Update troubleshooter to resolve the Windows Update error. It is one of the things you can check out as it is known to automatically resolve any Windows Update errors like error 0x8024A10A. To run this troubleshooter, go to Settings and then select Troubleshoot from the options. From there, click on Windows Update and then click the “Run the troubleshooter” button. After that, follow the next on-screen instructions and you should be good to go.

Option 3 – Run Microsoft’s online troubleshooter

Aside from the Windows Update troubleshooter, running Microsoft’s online troubleshooter might also help you fix the Windows Update Error 0x8024A10A. This online troubleshooter is known to help in fixing Windows Update errors, it scans your computer for issues that might be causing the problem and then fixes them automatically.

Option 4 – Try to run the Windows Update Service in a Clean Boot State

There are some instances that some conflicting programs installed in your computer might be the one that’s causing Windows Update error code 0x8024A10A. To identify which program is causing the problem, you need to put your computer in a Clean Boot State. To do so, follow the steps below.
  • Log onto your PC as an administrator.
  • Type in MSConfig in the Start Search to open the System Configuration utility.
  • From there, go to the General tab and click “Selective startup”.
  • Clear the “Load Startup items” check box and make sure that the “Load System Services” and “Use Original boot configuration” options are checked.
  • Next, click the Services tab and select the “Hide All Microsoft Services” check box.
  • Click Disable all.
  • Click on Apply/OK and restart your PC. (This will put your PC into a Clean Boot State. And configure Windows to use the usual startup, just simply undo the changes.)
  • Now try to run the Windows Update Service again and see if Windows Update error 0x8024A10A is now gone.
Read More
How To Repair Error Code C0000135

Error Code C0000135- What is it?

C0000135 is a blue screen of death error code (BSoD) also referred to as the ‘Stop’ error. This error code usually pops up on the screen at startup. The system stops and displays the error code:

Stop: c0000135 {Unable to Locate DLL} The dynamic link library FILE_NAME could not be found in the specified path Default Load Path

Solution

Restoro box imageError Causes

There are multiple reasons behind the error code C0000135 BSoD such as:
  • Missing and damaged .DLL files which is linked to registry corruption
  • Malware attack
  • Viral infection
When this error code pops, the computer screen turns blue and hampers your ability to use Windows successfully. Nonetheless, if the error C0000135 is not repaired timely this error can cause a great deal of damage to your PC. It puts you at risk of:
  • Data Loss with possibly no chances of recovery
  • System Failure and crash
  • Cybercrime if malware is the underlying cause of the occurrence of the error code C0000135
To avoid serious PC damages and inconvenience it is advisable to repair this error immediately.

Further Information and Manual Repair

There are two ways to fix the error code C0000135:
  1. Hire a Professional
  2. Download Error Tools PC Repair

Hire a Technician

Hiring a professional can be costly. You may have to pay hundreds of dollars to the technician to resolve this issue. However, the latter option is not only money-saving but also time-saving, convenient, and simple. In fact, it is so easy that even if you have no technical knowledge you can still work your way around it and repair the error in seconds.

Download Restoro

Restoro is a top-quality, efficient, and multi-functional PC fixer. It is integrated with cutting-edge technology. It has a comprehensive suite of advanced utilities like an intuitive registry cleaner, powerful anti-virus, and a smart system stability detector. All of these exciting and highly functional features are combined together in one. With this helper, you don’t need to search for the underlying cause of the error. When you experience the BSoD error code C0000135 on your system all you have to do is run it for a scan and its intuitive in-built technology will detect the issues and causes in no time and display them to you in the form of a comprehensive scan report. Once the scan is complete, you just have to hit the repair tab to resolve it. It’s that easy and fast! Restoro is powered by a highly functional registry cleaner. This cleaner helps detect all the errors related to the registry. It cleans the unnecessary files cluttering and damaging the hard disk including the junk files, invalid registry entries, internet history, and the files from the programs that you have uninstalled on your PC. These files acquire a lot of disk space and damage .dll files as well. Overloaded registry also slows down the system and the CPU and RAM then require more power to start and function. The registry cleaner embedded in the Restoro removes and wipes out all this unnecessary clutter, clears up the disk space and repairs the damaged files, and corrupted registry, and thus resolves the error code C0000135 on your system. Restoro also serves as a system optimizer. And when you repair issues on your PC with this helper, you’ll see a massive difference in the speed and performance of your computer. It will run smoothly and boot efficiently. Restoro is safe to use. It is bug-free and used widely by PC users experiencing different types of PC-related issues including the error code C0000135. It has easy navigation and a user-friendly interface. You can download and run Restoro on all Windows versions. Click here to download Restoro today!
Read More
Fix Windows Update Error Code 0x80246017
Updating your Windows 10 computer isn’t always as easy as it should be since there are times when you might encounter some errors along the way. One of these errors is the error code 0x80246017 that comes with the error message “WU_E_DM_UNAUTHORIZED_LOCAL_USER”. According to Microsoft, the cause of this particular Windows Update error is that “The download failed because the local user was denied authorization to download the content”. So if you got this error when you tried updating your computer, read on as this post will provide you some suggestions on how you can fix it. Before you troubleshoot the problem using the options given below, make sure that you are logged in as administrator. If you are already logged in as an administrator, follow each one of the options carefully.

Option 1 – Try to check the status of some Windows Update Services

  • Tap the Win + R keys to open the Run dialog box.
  • Next, type “services.msc” in the field and hit Enter or click OK to open Services.
  • From the list of Services, look for the following services and make sure that their Startup type is as follows:
    • Windows Update – Manual (Triggered)
    • Background Intelligent Transfer Service – Manual
  • After that, check if the Service status of the listed services above is set to Running. If they’re not, click on the Start button to start these services and then check if you can now enable the Windows Update service or not.

Option 2 – Try to grant Full Control of the System Volume Information directory

  • First, tap the Win + X key combination and then select Command Prompt (Admin) from the given menu.
  • After opening Command Prompt with admin privileges, type the following command and tap Enter to execute it:
c md.exe /c takeown /f "C:System Volume Information*" /R /D Y && icacls "C:System Volume Information*" /grant:R SYSTEM:F /T /C /L
  • Once the command is executed, it will run a batch of tasks and will show each one of their statuses on the command line window and once they’re done, exit Command Prompt.
  • Now restart your computer and see if it fixed the problem or not.

Option 3 – Try to disable your antivirus program or Firewall

Disabling the antivirus program or Firewall or any other security software installed in your computer is always a good idea you can try when the Windows Update process does not go smoothly. So before you try updating your computer again, make sure to disable the antivirus or security program and once the Windows Update is done, don’t forget to enable the antivirus program back again.

Option 4 – Try running the DISM tool

You can try running the Deployment Imaging and Servicing Management or DISM tool to fix the Windows Update error. Using this built-in tool, you have various options such as the “/ScanHealth”, “/CheckHealth”, and “/RestoreHealth”.
  • Open the Command Prompt with admin privileges.
  • Then type in the following commands and make sure to hit Enter right after you type each one of them:
    • Dism /Online /Cleanup-Image /CheckHealth
    • Dism /Online /Cleanup-Image /ScanHealth
    • exe /Online /Cleanup-image /Restorehealth
  • After that, wait until the process is finished and do not close the window as the process will probably take a couple of minutes.
  • Once it’s done, restart your computer.

Option 5– Run the Windows Update Troubleshooter

If the DISM tool didn’t work in fixing the error, you could also try running the Windows Update Troubleshooter as it could also help in fixing any issues related to Windows Update including the Windows Update error code 0x80246017. To run it, go to Settings and then select Troubleshoot from the options. From there, click on Windows Update and then click the “Run the troubleshooter” button. After that, follow the next on-screen instructions and you should be good to go.

Option 6 – Run Microsoft’s online troubleshooter

Running Microsoft’s online troubleshooter might also help you fix the Windows Update error code 0x80246017. This online troubleshooter is known to help in fixing Windows Update errors, it scans your computer for issues that might be causing the problem and then fixes them automatically.
Read More
A Guide to Fixing Error 0x80070652 Windows 10

Error Code 0x80070652 – What is it?

Error code 0x80070652 occurs when Windows users attempt to upgrade their operating system while another program is in the process of being downloaded. It may also occur due to problems related to previously failed update attempts within Window Update. When this Windows 10 upgrade occurs, Windows users fail to access the version of Windows they are attempting to download. Instead, a message box occurs stating that error code 0x80070652 has occurred on the device. If this error message is not rectified, it could give birth to other Windows 10 errors such as error code 0x80072EE2.

Solution

Restoro box imageError Causes

Error code 0x80070652 may result from Windows 10 users attempting to download another program while upgrading their operating system. It may also be caused by an issue related to previous installations of updates. For instance, in some cases, your previous installation of the Windows process may have been interrupted or it was simply not completed properly. This causes any other upgrade process that follows to result in error code 0x80070652.

Further Information and Manual Repair

But what can be done in such a situation to resolve the error code? Windows users have several options available. For instance, they can wait on any additional program that may be in the process of downloading to complete the process before attempting to upgrade Windows. They may also troubleshoot problems related to any failed updates or select a system restore point in which the error code was not present.

The manual repair methods Windows 10 users choose may involve any of the solutions mentioned previously. The choice is largely dependent on the user and his determination to fix the error code. However, note that automated tools or Windows repair technicians may also provide solutions to PC issues like error code 0x80070652.

Method One: Verify and Troubleshoot Failed Upgrades

Since previously failed updates within Windows Update can lead to the occurrence of error code 0x80070652, Windows 10 users will need to verify which of these failed updates occurred by checking the history section of the Windows Update tool. Once you’ve been able to verify that failed updates have occurred in the recent past, you’ll need to troubleshoot these problems to rectify the error code. Follow the instructions below to check for updates that have failed to install properly via Windows Update.

  • Step one: Type Windows Update in the Search box near Start Menu
  • Step two: Select Windows Update settings
  • Step three: Select Update history
  • Step four: Review updates from the most recent to least recent to see which updates have failed
  • Step five: Click failed updates for more details and troubleshoot accordingly.

Once you’ve completed the troubleshooting of any updates which failed, proceed by rebooting your device. You may then reattempt to upgrade to the latest version of Windows 10 once no other program is in the process of being downloaded.

If the problem causing error code 0x80070652 was related to failed updates of the past, these issues will likely be resolved once you successfully troubleshoot them. However, if the error code reoccurs, apply the next manual repair solution mentioned in this article.

Method Two: Download Updates Manually via Microsoft Download Center

Another option available to users is simply downloading updates manually by visiting the official Microsoft website, specifically the Windows section which provides downloads. To successfully complete this process, ensure you look for stand-alone packages of these downloads available on the website. You will need to know the Microsoft Knowledge Base (KB) article number related to the specific update(s) which failed.

Once a Windows user has verified the KB article number of the specific update, download it from the Microsoft website, then select Run to install the update. Reboot your PC, then check Windows Update to see if you are able to successfully complete the Windows 10 upgrade.

If the upgrade fails, you may need to implement the next manual repair method as is mentioned below.

Method Three: Use Windows System Restore

One of the best options for Windows 10 users facing certain PC problems is to apply System Restore. This allows them to reset their machine for a period of time in which the problem was not present. This is known as the restore point. To apply this manual repair method, follow the steps below.

  • Step one: In the search box beside the Start Menu, type System Restore
  • Step two: Select Create a restore point
  • Step three: Select the System Protection tab then Configure or Create
  • Step four: Provide details regarding a system restore point of your choice
  • Step five: Select Create, then OK.

Method Four: Download an Automated Tool

If you wish to always have at your disposal a utility tool to fix these Windows 10 and other related issues when they do arise, download and install a powerful automated tool.

Read More
The PrintNightmare vulnerability finally fixed
PrintNightmare vulnerability has been a struggling issue for Microsoft in the past weeks, each time it seems to be addressed and fixed something new popped up and it still had issues. Microsoft finally addressed the issue but with a price. The default behavior of Point and Print is changed. From this fix onward, the Point and Print driver installation and update behavior will require administrator privileges, which should prevent the exploit to the Windows Print Spooler that could be used by malicious individuals to gain administrative privileges in Windows. The drawback of this fix from Microsoft is that non-elevated users may have difficulty adding or updating printers. Microsoft feels that the security risks caused by PrintNightmare are worth the tradeoff, though. If you really want to let non-elevated users add printers, you can follow the instructions in this Microsoft Support article to disable this mitigation with a registry key. However, doing so will expose you to this known vulnerability and isn’t recommend.
Read More
1 2 3 171
Logo
Copyright © 2023, ErrorTools. All Rights Reserved
Trademark: Microsoft Windows logos are registered trademarks of Microsoft. Disclaimer: ErrorTools.com is not affiliated with Microsoft, nor claims direct affiliation.
The information on this page is provided for information purposes only.
DMCA.com Protection Status