TCI/IP or as known as Internet protocol is one that controls packets that are sent over the internet and makes sure that each one has reached its destination so you can pleasantly browse your favorite websites. The setting for the given protocol is stored locally on your machine and most of the time, everything works fine and good, but sometimes, these settings can get corrupted.
Malware or other software can temper with setting making TCP/IP making it wrong and throwing nondescript connection errors in your face. If you are faced with this issue worry not because fixing this issue is really easy.
Before we actually go and fix the issue please do scan your system with your protection suite just to be sure that if there is any kind of malware on the system it is properly removed from it.
Resetting TCP/IP
First thing is to open search and find PowerShell, press the Windows key on the keyboard, and type in PowerShell so search results are shown. Click on Run as administrator to open PowerShell in elevated mode.
Once PowerShell is opened type indie it:
netsh IP reset and press ENTER. The task will start executing and at this point you will see a lot of Resetting, OK! messages. Once everything is finished restart your PC and you are good to go.
If you encounter a Blue Screen error that points out to the CMUDA.sys, read on as this post will guide you in fixing it. The CMUDA.sys file is a Windows operating system driver file that is related to the USB Device Audio capabilities of a computer. There are times when this file causes Blue Screen error due to some conflicts in RAM or some incompatible firmware or hard disk issues, corrupted drivers or malware infection, and so on.
There are various Blue Screen errors that are related to the CMUDA.sys file such as:
KMODE EXCEPTION NOT HANDLED
PAGE FAULT IN A NONPAGED AREA
IRQL NOT LESS OR EQUAL
SYSTEM THREAD EXCEPTION NOT HANDLED (CMUSBDAC.sys)
In most cases, the CMUDA.sys file usually triggers the SYSTEM_THREAD_EXCEPTION_NOT_HANDLED Blue Screen error. Although this Blue Screen error may seem complicated, its workarounds are straightforward so you won’t have any problems in following them.
Option 1 – Try to update or rollback your device drivers
If the first option didn’t work for you, then it’s time to either update or roll back the device drivers. It is most likely that after you updated your Windows computer that your driver also needs a refresh. On the other hand, if you have just updated your device drivers then you need to roll back the drivers to their previous versions. Whichever applies to you, refer to the steps below.
Open the Devices Manager from the Win X Menu.
After opening the Device Manager, locate the device drivers that are marked with a small yellow exclamation mark icon and right-click on each one to open their Properties. On the other hand, you can also look for sub-entries under Sound, video, and game controllers like the C-Media USB Audio Class
After that, switch to the Driver tab and click on the Uninstall Device button.
Follow the screen option to completely uninstall it.
Finally, restart your computer. It will just reinstall the device drivers automatically.
Note: You can install a dedicated driver on your computer in case you have it or you could also look for it directly from the website of the manufacturer. You can download the as C-Media USB Audio Class driver from the cmedia.com website.
Option 2 – Try to recreate the CMUDA.sys file
The first thing you can try is to recreate the CMUDA.sys file. Every time your Windows 10 PC boots up, it looks for all the system drivers in place and if it is unable to find them, it tries to create them. Which is why if you remove your corrupt driver file, chances are, you might get a fixed file recreated just for you. How? Refer to the steps below.
Boot your Windows 10 PC in Safe Mode.
Then open File Explorer and navigate to this location: C:/Windows/System32/drivers
From there, look for the file named sys and rename it to CMUDA.old.
Note: As you can see, the file’s extension has changed from .sys to .old.
Now restart your computer and check if the CMUDA.sys Blue Screen error is now fixed.
Option 3 – Run the Blue Screen Troubleshooter
The Blue Screen troubleshooter is a built-in tool in Windows 10 that helps users in fixing BSOD errors. It can be found on the Settings Troubleshooters page. To use it, refer to these steps:
Tap the Win + I keys to open the Settings panel.
Then go to Update & Security > Troubleshoot.
After that, look for the option called “Blue Screen” on your right-hand side and then click the “Run the troubleshooter” button to run the Blue Screen Troubleshooter and then follow the next on-screen options. Note that you might have to boot your PC into Safe Mode.
On the other hand, you can also try running the online Windows 10 Blue Screen troubleshooter from Microsoft. It is a wizard that could help you fix any Stop errors related to the CMUDA.sys file and will offer you helpful links as you use it.
Option 4 – Try running the DISM tool
You can try running the Deployment Imaging and Servicing Management or DISM tool to fix the Wdf01000.sys Blue Screen error. Using this built-in tool, you have various options such as the “/ScanHealth”, “/CheckHealth”, and “/RestoreHealth”.
Open the Command Prompt with admin privileges.
Then type in the following commands and make sure to hit Enter right after you type each one of them:
Dism /Online /Cleanup-Image /CheckHealth
Dism /Online /Cleanup-Image /ScanHealth
exe /Online /Cleanup-image /Restorehealth
Do not close the window if the process takes a while as it will probably take a few minutes to finish.
Option 5 – Run System Restore
Running System Restore might also help in fixing Blue Screen errors related to the CMUDA.sys file.
Tap the Win + R keys to open the Run dialog box.
After that, type in “sysdm.cpl” in the field and tap Enter.
Next, go to the System Protection tab then click the System Restore button. This will open a new window where you have to select your preferred System Restore point.
After that, follow the on-screen instructions to finish the process and then restart your computer and check if the problem is fixed or not.
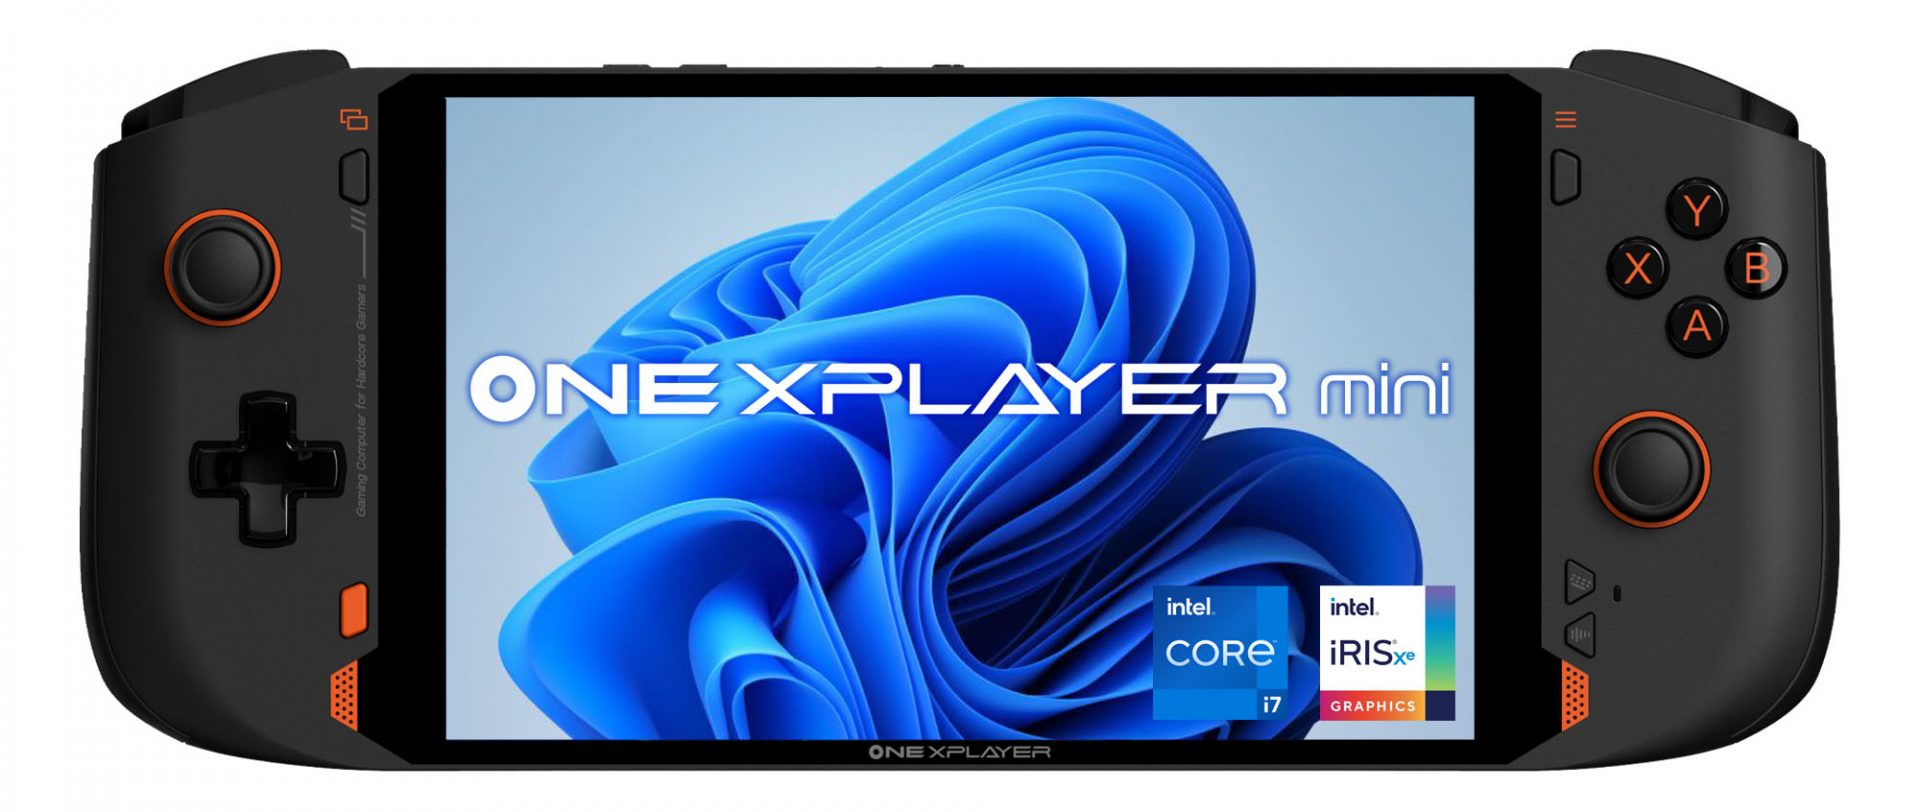
OneXPlayer is a direct competitor to Valve’s upcoming steam deck. This device is clearly inspired by Valve’s offering and it shows all over the place, from its looks to its purpose and aims to PC gamers as a handheld device.
Hardware under the hood
This device is packing a 7-inch 1080p display, 11th generation Intel Core i7-1195G7 CPU, stunning 16GB of RAM, 512GB SSD drive with the option to purchase 1TB or 2TB model. GPU of choice is Intel iris Xe Graphics that is in our opinion a bottleneck in the whole system and for more demanding games, we believe switching them to 720p would be a better option. Everything here is powered with a 10455 mAh lithium-ion battery.
OneXPlayer inputs and other stuff
Handheld is equipped with dual bumpers and dual linear triggers. The console comes with dual speakers on both sides of it. Inside the console, there is an aluminum heat sink with copper heat pipes and a fan in order to cool internal hardware. On the outside, we have two USB-C ports and one USB-A port for connections, and of course, a headphone jack for headphones. The console comes with Wi-Fi 6 and Bluetooth 5.0 for wireless connectivity.
Price
The base entry model will cost you a whopping $1.259, 1TB model $1.399 and 2TB one will go as far as $1,599. With this kind of price, I am not sure it can come up as a winner against Valve. Sure it is packing fully licensed Windows 11 that will for sure offer more options than Stem’s OS based on Linux but even with that advantage I do not think it justifies such a big price difference.
Conclusion
Of course, this kind of console or handheld PC will still find its customer base, many users will probably like it since it comes Windows ready out of the box. Sure, you can place Windows on Steam deck as well but you will need to know how, where everything is ready and you can run beside steam other launchers without issues like origin, uplay, gog, etc.
How this will be accepted by community time will tell but it is good to see that there is variety and competition in handheld PC space.
Are you trying to update your Windows 11 OS and are receiving a 0x800f0905 error? Do not sweat and do not worry we have a couple of solutions that you can try in order to fix this issue. How this error is tied to various things like misconfigured settings, corrupt system files, and more there is no way to present one simple solution that will solve everything in one click.
Therefore we are presenting a couple of solutions that will fix your issue, it is advisable to follow them as presented since they will go from the most common to the more complex one.
Run the troubleshooter
The most common fix and one that will actually repair things most of the time is simply running the Windows Update troubleshooter.
Press ⊞ WINDOWS + I to open the Settings app
Click on System on the left
Click on Troubleshoot in the right part
Click on Other Troubleshooters
Find the Windows Update section and click on Run
Let troubleshooter finish
Reset Windows update components
If the previous solution did not work we will need to do things manually. Follow the steps as presented in order to reset Windows update components.
Press ⊞ WINDOWS + S to open search
Type in Terminal
Select Run as administrator
Click on Yes on the User account control (UAC) pop up
Press CTRL + SHIFT + 2 to open Command prompt
Inside command prompt type each line of a command followed by ENTER after each line: net stop bits net stop wuauserv Del “%ALLUSERSPROFILE%Application DataMicrosoftNetworkDownloaderqmgr*.dat” Ren %Systemroot%\SoftwareDistribution\DataStore DataStore.bak Ren %Systemroot%\SoftwareDistribution\Download Download.bak Ren %Systemroot%\System32\catroot2 catroot2.bak exe sdset bits D:(A;;CCLCSWRPWPDTLOCRRC;;;SY)(A;;CCDCLCSWRPWPDTLOCRSDRCWDWO;;;BA)(A;;CCLCSWLOCRRC;;;AU)(A;;CCLCSWRPWPDTLOCRRC;;;PU) sc.exe sdset wuauserv D:(A;;CCLCSWRPWPDTLOCRRC;;;SY)(A;;CCDCLCSWRPWPDTLOCRSDRCWDWO;;;BA)(A;;CCLCSWLOCRRC;;;AU)(A;;CCLCSWRPWPDTLOCRRC;;;PU) cd /d %windir%\system32 regsvr32.exe atl.dll regsvr32.exe urlmon.dll regsvr32.exe mshtml.dll regsvr32.exe shdocvw.dll regsvr32.exe browseui.dll regsvr32.exe jscript.dll regsvr32.exe vbscript.dll regsvr32.exe scrrun.dll regsvr32.exe msxml.dll regsvr32.exe msxml3.dll regsvr32.exe msxml6.dll regsvr32.exe actxprxy.dll regsvr32.exe softpub.dll regsvr32.exe wintrust.dll regsvr32.exe dssenh.dll regsvr32.exe rsaenh.dll regsvr32.exe gpkcsp.dll regsvr32.exe sccbase.dll regsvr32.exe slbcsp.dll regsvr32.exe cryptdlg.dll regsvr32.exe oleaut32.dll regsvr32.exe ole32.dll regsvr32.exe shell32.dll regsvr32.exe initpki.dll regsvr32.exe wuapi.dll regsvr32.exe wuaueng.dll regsvr32.exe wuaueng1.dll regsvr32.exe wucltui.dll regsvr32.exe wups.dll regsvr32.exe wups2.dll regsvr32.exe wuweb.dll regsvr32.exe qmgr.dll regsvr32.exe qmgrprxy.dll regsvr32.exe wucltux.dll regsvr32.exe muweb.dll regsvr32.exe wuwebv.dll netsh winsock reset net start bits net start wuauserv
Well, that was a lot of typing or copy and pasting line by line followed by ENTER after each one but hopefully, your issue is solved. These provided solutions fixed most users' issues with this error but if for some reason this is not the case for you, move to the next step.
Run the SFC scan
If you are still having 0x800f0905 error after previous attempts do the following:
Press ⊞ WINDOWS + S to open search
Type in Terminal
Select Run as administrator
Click on Yes on the User account control (UAC) pop up
Press CTRL + SHIFT + 2 to open Command prompt
Type in sfc /scannow and press ENTER
Wait for the scan to finish
Reboot the computer
Perform a system restore
If for any reason previous solutions have not provided you with the solution we will try to fix the issue by performing system restore.
Press ⊞ WINDOWS + S to open search
In the text box type in Create a restore point
Click on the closest match in search results, should be Create a restore point
Click on System Restore or on Next if there are no points created
Choose to restore a point from the list and click on next
Review settings and click on Finish
Wait for the process to finish and for the computer to restart
Manually install update
If for any reason Windows still cannot install the update, try installing it manually.
Go to Windows 11 update history and find the Knowledge base (KB) number for the latest version
Go to the official Microsoft Update Catalog
Paste the KB number in the search box and press ENTER
Click on DOWNLOAD
Double click on the downloaded file to launch the installer
Follow on-screen instructions and install the update
Perform Windows 11 reset
If nothing worked, reset your Windows 11 to its factory settings to fully repair and reset the whole operating system.
Direct replacement for Apple M1 Chip is near. There were some M1 Chips versions like M1 MAX and M1 ULTRA that were upgrades of the existing M1 chip, but the new and upcoming M2 is something different and it is aiming to replace M1 completely.
Made in a 5-nanometer design, with 20 billion transistors and 100GB/s of unified memory bandwidth is meant to increase performance over M1. It has the same M1 8 core design with 4 high-efficiency cores and 4 high-performance ones.
All CPU and GPU cores are faster than their M1 equivalents and Apple states that when running M1 and M2 at the same power level M2 will perform 25% faster. The first version of the chip will place focus on power efficiency so if you are more on side of being a power user wait for the MAX or ULTRA version of M2.
Tech details of M2
M2 system on a chip like its predecessor M1 combines both CPU and GPU on a single chip with shared memory in order to increase performance compared to systems that have separate CPU and GPU. M2 so far has been only announced for MacBook Air and the 13-inch MacBook Pro that suppose to hit the market somewhere around July this year. Of course, we expect that M2 is included in future iPad series or Mac Mini series as well.
So, you just made some popcorns, dimmed light, relaxed in from of the TV, pressed play on your application and Blu-ray drive can not read your movie.
Your movie night failed sadly, but there is hope and in this article, we are going to explore and offer you solutions on what to do when something like this happens so you do not miss another movie night and some hard-earned relaxation.
Please note that in this article we are assuming that you are using a Blu-ray player on your PC, so some of the solutions presented are meant only for this case.
So the first thing that you are supposed to do is to check the disc itself. You can turn the disc around and visually check the disc for fingerprints and scratches which can be fatal for disc playing, alternatively, you can try to play the same disc on another device and if it fails there also it is not the disc, it is your drive.
So if it is no issue with the disc let's see that seems to be a problem with the drive. The common thing that could stop disc reading are cables, check all connections and cables in the back of your device to be sure that everything is plugged in correctly and nicely.
After checking cables if the issue persists lens cleaning is the next step. Over time lens from the Blu-ray, the device becomes dirty and dust accumulates on it, there are special cleaning discs on market made especially for this purpose, to clean the dirty lens of optical devices. If you have one put it in and clean your lens. After lens cleaning with a specialty disc, a good idea would be to use compressed air in a can to reduce the dust inside so no excess dust will accumulate quickly again on the lens itself.
So the device is cleaned and checked and still no disc playing?
Update firmware first. In order to accomplish this visit your device manufacturer's website and follow instructions there on how to upgrade firmware.
If this did not helped also update or reinstall device drivers. Go to device manager and update drivers for your device by right-clicking on it and choosing update driver.
If none of the things helped, go to command prompt as administrator and type in SFC /scannow, leave the process to finish, and reboot.
Error Code 0x80004002 is a Windows-based error code that affects Windows 10 and previous operating systems, including Windows XP, Vista, Windows 7, and Windows 8. In most instances, the message box that shows Error Code 0x80004002 pops up as you attempt to install new software or programs on your machine.
Common symptoms include:
Problems running programs that once worked
Slow response time of your computer to commands entered with the keyboard or mouse
Trouble shutting down or starting up your machine
Error message regarding your registry, updates, or response time.
There are a number of different solutions that you can use to attempt to resolve Error Code 0x80004002. Because there are multiple causes to the issue, some of the methods used to successfully address the problems at hand are fairly simple, while others require advanced knowledge or abilities to complete. If the methods below are not successful in the resolution of the issue or if you aren’t confident in your skills to implement these methods, contact a qualified Windows repair technician to assist you. Once this error message is not rectified, you could be exposing your computer to other error messages, including error code 0x80240020.
Solution
Error Causes
There are many different issues that can contribute to the appearance of Error Code 0x80004002. The most common causes for this particular error message include:
Errors in registry files
Missing system files that have accidentally been associated with other programs and deleted
Viruses or malware that cause corruption in program or system files
Installations that have failed to complete fully
Further Information and Manual Repair
Due to the number of causes that can contribute to Error Code 0x80004002, there are a number of methods that you can use to attempt to resolve the issues behind the error. While some of these methods are fairly easy to implement, others may require you to use programs like registry cleaners and driver installation wizards, so if you are not comfortable using these kinds of software, contact a certified Windows repair technician to assist you.
Here are the top ways that you can attempt to address Error Code 0x80004002:
Method One: Run Your Windows Registry Cleaner
Many different registry cleaning tools exist on the Internet, but not all of these are provided by trustworthy sources. Rather than trusting a file from an unknown publisher, you can use the registry cleaning program included in your Windows software package.
Run this tool to complete a scan of your files, discovering which ones may need to be repaired. In most cases, the registry cleaner itself can repair the necessary files and resolve the error.
It is always a good idea to restart your computer after you have run the registry cleaning tool to ensure that your machine can accurately assess the newly repaired files.
Method Two: Update Your Drivers and Software
In some cases, Error Code 0x80004002 arises when drivers are out of date. If you believe that this is the case, you can check on the status of your various drivers by going into the settings for your operating system and selecting the “Update Drivers” option.
You can also check your system for any necessary updates to your Windows software, which may serve to address the error code.
After you have checked and installed any necessary drivers, make sure to restart your computer to fully apply any changes that the installation process has introduced.
Method Three: Reinstall Your Windows Software
In some cases, the best way to address the missing or corrupt files that can cause Error Code 0x80004002 is to simply reinstall your copy of Windows. Always make sure to back up your files before reinstalling your software.
Method Four: Run Your Virus Scan Software
Because Error Code 0x80004002 can also be caused by malware or a virus, you can run your virus scan software to detect and resolve the problem. After doing so, run the registry repair tool to fix any affected files and restart your computer.
Method Five: Use An Automated Tool
If you wish to always have at your disposal a utility tool to fix these Windows 10 and other related issues when they do arise, download and installa powerful automated tool.
So, what is Electron bot, and why it even matters if it is in the MS store. Electron bot is malware that somehow found its way inside MS Store via game clones of popular games temple run and subway surfer. This infiltration led to the infection of around 5000 systems over the globe in a very short period of time.
This malware is a backdoor that gives complete system control to the attacker. Any type of execution can be performed remotely in real-time. Usually, this kind of attack was aimed at a spread of click fraud over popular social media like Facebook, google, youtube, etc.
Primary goal
Electron Bot's primary goals in the ongoing campaign analyzed by researchers are:
SEO poisoning – Create malware-dropping sites that rank high on Google Search results.
Ad clicking – Connect to remote sites in the background and click on non-viewable advertisements.
Social media account promotion – Direct traffic to specific content on social media platforms.
Online product promotion – Increase store rating by clicking on its advertisements.
These functions are offered as services to those who want to increase their online profits illegitimately, so the gains for the malware operators are indirect.
Publishers that contain malware
For now, users may take note of the publishers who released confirmed malicious game apps using the following names:
The speed at which the CPU runs varies depending on any Windows laptop or desktop. And in case you don’t know, the CPU does not run at full speed all the time as it depends on how the operating system distributes the load so it works accordingly. However, there are instances when it runs at full speed especially if your Windows 10 computer is on a heavy workload. But if you find that even when your computer is already on a heavy workload and the CPU is still not running at full speed, then you need to look into this situation. To verify that your CPU’s speed, you can use any CPU stress test tool.
This kind of issue is common on laptops compared to desktop computers since laptop runs on battery. The Intel Processor on laptops uses the Speed Stepping Technology which means that when you are doing some small tasks on your laptop, the processor’s speed is reduced. On the other hand, if this happens when you are using a heavy application, it can be due to a low charge on the laptop’s battery. Thus, Windows will try its best to keep the computer running for as long as possible by reducing the CPU speed or processor. But there are times when you are ready to sacrifice battery to make sure that the work gets done on time. To achieve that, here are some options you can check out.
Option 1 – Try setting the processor state to the maximum in Power Options
Type “control” in the search box to view the classic Control Panel as well as the popular options.
Next, click on Power Options > Change plan settings > Change advanced power settings.
Then navigate to Processor power management > Maximum processor state.
Now select 100% when it is on Battery and Plugged in.
After that, expand the System cooling policy option and make sure to set it as Active to make sure that the battery won’t overheat.
Finally, apply the changes made to all the profiles of the power management and restart your computer. This will ensure that your CPU will run at maximum power at all times.
Option 2 – Try to update or disable the Intel Power Management driver
The next option you can try is to update or disable the Intel Power Management driver. The Intel-powered computers have dedicated software that controls CPU speed and Fan speed when it needs to save battery. You can try disabling it temporarily and check if there are any changes with the CPU fan speed.
First, restart your computer by holding the Shift key to boot your computer into Troubleshooting or Advanced mode.
Next, go to Troubleshoot > Advanced Options > Command Prompt.
Then change the directory to C:/Windows/System32/driver and then rename the file named “Intelppm” by entering the “ren intelppm.sys intelppm.sys.bak”.
Now restart your computer.
Note: If you were not able to find the drivers in C:/Windows/System32/driver, check if they are available under C:/Drivers/IntelPPM. After that, the CPU speed should change now with the Intel driver missing from the system. And in case you want to enable it, simply follow the same steps given above and rename the file again.
Option 3 – Try disabling the IPPM using the Command Line or Registry Editor
Command Prompt:
Tap the Win + R keys to open the Run dialog box and type “cmd” and tap Enter to open Command Prompt.
Next, type this command and hit Enter: sc config intelppm start= disabled
The “sc config” command you entered modifies the value of a service’s entries in the registry as well as in the Service Control Manager database.
Registry Editor:
Tap the Win + R keys to open the Run dialog box and type “Regedit” in the field and hit Enter to open the Registry Editor.
Next, navigate to HKEY_LOCAL_MACHINESYSTEMCurrentControlSetServicesintelppm.
From there, double click on the intelppm and change the Start key value to
Now close the Registry Editor and reboot your computer.
Note: The steps given will make sure that the CPU will run at maximum power at all times.
Wondering if upgrading to Windows 11 will boost your gaming experience? We can’t give you a straightforward answer, sadly. But we can take you through the tweaks you can expect if you have all the right requirements and help you make a final decision.
Is Windows 11 good for gaming?
Essentially, the answer to this question is yes. Microsoft has definitely added a bunch of enhancements and features to its latest OS to give gamers the best possible experience. However, you have to keep in mind that this may not work out smoothly for every single user.
Whether you’ll be able to fully take advantage of the Windows 11 gaming features really depends on your setup. As expected, Windows 11 has more demanding system requirements than its predecessor.
Credit: Florian Olivo on Unsplash
So, unless your hardware can run the new OS comfortably, you might not be able to make the most of all these gaming perks. In that case, we recommend you first upgrade your hardware and then make the switch. Be prepared to be a little surprised by a few other interesting changes in comparison to Windows 10, though!
For some of the new gaming features to work, it’ll also be necessary for you to have an NVMe SSD and an HDR-compatible monitor. So let’s take a look at 4 big improvements you can expect if your setup is compatible.
Gaming enhancements on Windows 11
1. Enjoy faster loading speed with DirectStorage
For this powerful feature to work, you need a compatible graphics card and, as stated before, an NVMe SSD. It’s also important for your GPU to support the DirectX 12 graphics API at least. And since we’re on that subject, you’ll be happy to know that Windows 11 has also introduced a new version of the API called DirectX 12 Ultimate.
Now, what does DirectStorage do? It’s a new feature designed to make full use of the speedy storage of NVMe SSDs. It also transfers game data directly onto the graphics card, lightening the load on your CPU. Normally the CPU would have to decompress the data first, but DirectStorage helps bypass this. That’s how loading times are reduced and games run more smoothly.
2. Fully immerse yourself through Game Mode
Windows 11’s Game Mode is certainly a welcomed addition. When you turn on Game Mode, usage of background apps that aren’t essential to your game is reduced. This results in the game you’re running becoming a priority process. This way, it uses your hardware and system resources to the max. Ultimately, the Game Mode means less lag and higher frame rates so you can play undisturbed and fully enjoy your gaming session.
3. Vibrant visual experience thanks to AutoHDR
For this one you’ll absolutely need an HDR-compatible monitor. Basically, HDR (High Dynamic Range) means a wider range of contrasts and colors that can be displayed on a monitor.
Windows 10 has an HDR feature, but you have to turn it on and off manually (“Use HDR”). Plus, users have reported that, if left on, it results in an unappealing appearance of content other than movies and games.
Windows 11 fixes that problem with its AutoHDR feature. Toggling it results in the system automatically adjusting the color contrast, balance and brightness based on what you’re currently looking at. For gamers, this means vivid imagery in every single game, resulting in a supreme visual experience. You can check out Microsoft’s own video showcasing the power of AutoHDR.
Aside from AutoHDR, another way Windows 11 improves the visual aspect is through its support for refresh rates of up to 360Hz.
4. Xbox Game Pass & Game Bar
It’s no secret that Microsoft wants to integrate Windows and Xbox. We’ve seen some attempts with Windows 10, but they’re pretty wonky compared to the new OS.
Windows 11’s built-in Xbox Game Bar enables quite a few options all gamers desire. You can take screenshots and videos of your game and send them, for starters. Furthermore, you can use it to see audio settings and monitor your PC’s performance without having to leave the game or open the Task Manager.
Widgets are also a really cool part of the Game Bar. You can choose from a wide variety of widgets, such as Xbox Achievements, Spotify, Gallery, Xbox Social and more.
Moreover, the Xbox Game Pass has been streamlined on Windows 11. Game Pass is a subscription service that unlocks hundreds of awesome games and supports cloud streaming. Do keep in mind that the games are only unlocked for a certain period of time, as the selection rotates once in a while.
What can you do for a better gaming experience?
Windows 11 does offer tweaks that require zero input from you. However, there are a few things you can do manually to get even more out of your new OS while gaming.
Turn off enhanced pointer precision. Most games enhance precision by default, so having this feature on might interfere with that.
Make sure to select your high performance graphics card for each game. Go to Settings > Gaming > Game Mode and tap ‘Graphics’ from the ‘Related settings’ menu. Find the game you want to adjust, click on ‘Options’ and choose your high performance graphics card to be the default setting. While there, you can also turn on ‘Hardware-accelerated GPU scheduling’ at the top.
Disable unnecessary apps and programs. As long as they aren’t essential to running your game, they might take up valuable system resources, so disable them to make space for your gaming requirements.
Check for pending updates and install them. It’s well-known that out-of-date software causes bugs, latency and crashes. The same goes for your GPU drivers.
Use the High-performance power plan (Control Panel > Power Options > Additional plans) to maximize the use of resources for the best possible performance.
Summary
Windows 11 has done quite a bit for avid gamers. We hope your setup is compatible with all these new features and you can experience these enhancements ASAP!
During the Microsoft Windows 10 upgrade, certain users have experienced an issue with error code 8024001F. Users should note that this error is also known as Windows Update 8024001F and 0x8024001F. This error code is relatively common and is usually caused by a faulty internet connection. Thanks to this common reasoning, the error is generally fixed easily, and users are able to restart their Microsoft Windows 10 upgrade.
Common symptoms include:
A dialog box appears with the Error Code 8024001F when attempting to upgrade to Microsoft Windows 10.
Your current version of Windows is unable to recognize the need for an update to Microsoft Windows 10.
Solution
Error Causes
With only three issues causing error code 8024001F, it is relatively easy to determine your particular issue and then follow the steps below to rectify the situation.
Your computer is not connected to the internet.
The Windows firewall is interfering with the Microsoft Windows 10 update.
Your third-party antivirus and firewall software is interfering with the Microsoft Windows 10 update.
Your system is infected with the Conficker worm, which is preventing the Microsoft Windows 10 update from processing correctly.
Microsoft Support asks that you contact them directly for further assistance if you are able to rule out these three reasons for error code 8024001F.
Further Information and Manual Repair
Error code 8024001F is easily corrected using one of the following methods. Each of these methods should be convenient and comfortable for a basic computer user at home. If at any time you are unsure or feel you need more assistance, Microsoft Support asks that you contact them directly for more guided support.
Windows will then run the Troubleshooter, attempting to detect any known issues with your system.
Depending upon the results you should be able to follow the on-screen prompts which will alleviate the update issue.
Method 2- Correct your internet connections
Closeout of the error code 8024001F dialog box.
Close the Microsoft Windows 10 updater.
Attempt to access the internet through your normal browser.
** If you can successfully access the internet, then an internet connection is not the cause for this error code.
If you are unable to access the internet verify that you are plugged into your network, both at the router/wall and at your computer jack.
If you use a router, verify that all of the lights are on and active (showing an active internet connection).
Establish an internet connection if possible. If you are unable to establish an internet connection, you may need to contact your internet provider.
If you are able to reestablish an internet connection, then you should have no problem running your Microsoft Windows 10 update.
Method 3- Adjust the Windows Update settings
Log into your current version of Windows as the Administrator (enter a password if prompted).
Click the START button on your keyboard or screen.
Search for the term “admin”, press ENTER
Click the “administrative tools” option
Select the “services” file, re-enter your password.
Open the Windows Update file by right-clicking on the name.
Choose the “properties” option
Under the GENERAL tab, make sure that the “startup type:” is set to AUTOMATIC (DELAYED START)
Under the “Service Status” header, click the START button.
Click OK
Restart the Microsoft Windows 10 update.
Method 4- Scan for the Conficker Worm
Access the web address to be directed to the Microsoft Safety Scanner.
Run this free scanner provided by Microsoft to verify if the Conficker Worm is your issue.
If this worm is causing your error, Microsoft will walk you through the steps necessary to remove the worm.
Method 5- Firewall and Anti-Virus software
If you are using the Windows firewall or a third-party anti-virus and firewall software, disable these programs.
Run the Microsoft Windows 10 upgrade.
After the upgrade is complete, turn your antivirus and firewall software back on.
Users should not have a problem employing the above methods. Start with the simplest solutions first, and then work your way to the more intricate methods. In some cases, depending on why this particular error code was caused, you may have to use a powerful automated tool to have it resolved.


 Hardware under the hood
 Therefore we are presenting a couple of solutions that will fix your issue, it is advisable to follow them as presented since they will go from the most common to the more complex one.


