The Error Code 0x80200056 will appear in a few different instances, though always applies to an interrupted download. Windows 10 will quickly discover that their upgrade and/or download did not work correctly. Not every user who upgrades to Microsoft Windows 10 will face this issue, only a select few random instances will occur.
Common symptoms include:
 Error Causes
This error can be caused by a number of common problems, the first of which is the easiest to diagnose.
None of these causes should overtly affect the operation of your PC, but merely prevent the upgrade and/or download from functioning correctly. If your PC is exhibiting other operating system errors in addition to Error Code 0x80200056, it would be wise to contact Microsoft Support before the issues lead to a possible catastrophic failure.
With the very recent release of Microsoft Windows 10, we are seeing a number of users discuss Error Code 0x80200056. Luckily, there are three different methods that any home user can perform to alleviate the error and complete the Microsoft Windows 10 download successfully.
Use if your PC restarted accidentally during the upgrade, or if you accidentally signed out of Windows during the upgrade.
The following solution methods will apply if corrupted files, date/time changes, or third-party software interference is the issue causing Error Code 0x80200056.
The following solution methods will apply if corrupted files, date/time changes, or third-party software interference is the issue causing Error Code 0x80200056.
To use a powerful tool to resolve Windows 10 upgrade Error Code 0x80200056 issue, download a powerful tool.
Click here to download Restoro.
If any of these methods do not allow for the successful upgrading of your Windows system, contact the Microsoft Support team. Make sure to include in your message to support what fixes you have attempted, and what the outcomes were. As Microsoft Windows 10 is so incredibly new, there are bound to be issued while the program is in its infancy. Fortunately, a majority of these issues should be worked out by Microsoft relatively quickly.

net stop wuauserv net stop bits
net start wuauserv net start bitsSince the folder has already been flushed, it will be populated afresh the instant your restart your computer and open Windows Update.
DISM.exe /Online /Cleanup-Image /RestoreHealth /Source:C:RepairSourceWindows /LimitAccessNote: The Windows Upgrade error, with error code 80240020 is an expected error message that happens when the upgrade requires customer user action. Thus, you need to do the following steps to resolve this particular Windows Upgrade error.
The installer has encountered an unexpected error installing this package. This may indicate a problem with this package. The error code is 2503. Called RunScript when not marked in progress The installer has encountered an unexpected error installing this package. This may indicate a problem with this package. The error code is 2503. Called Install Finalize when no installation is in progress
Error CausesEncountering errors is never a pleasant experience and fixing errors can sometimes take a large amount of time. Also depending on your expertise and knowledge about computers and the operating systems themselves could be determining factor would you try to wrestle with error.

We will explore and analyze the advantages of both methods so you can choose and know when to apply one and when to reach for the other.
Full control is the main advantage of manually solving errors, when you go deep dive into manually fixing problematic issues you are one that has control. Complete freedom is also another, sometimes fixing things can be done in several different ways and when you are the man behind the wheel, you are the one that can choose how to approach and what solution to apply in order to solve the issue.
The main disadvantage that some users might encounter is that they will need to know ins and outs of computer and operating systems' workings. Of course, the more complicated errors, the more knowledge it will require in order to apply the proper fix. There is also a risk to break something else if the person that is doing the fixing is not fully competent so this is also something to think about.
Another thing that goes against manual fixing is the time it will require in order to actually fix it, some more complex stuff will probably depend on searching for some external resources like searching for compatible drivers for example, or navigating complex registry keys inside Windows.
If you are a user that has no knowledge about how the operating system works, if you do not know what is a registry or how to properly navigate through the Windows folder then the automated solution is for you. The main advantage of automated systems is that you can easily fix errors without any kind of technical knowledge and usually with just one click of a button.
Saving time is also one of the advantages of fully automated solutions because they will work much faster than manually locating the problem and then fixing it. Also, most of these systems will have in place active monitoring that will check always if your system is in top form and alert you when something is not right.
Automated solutions are great, they can solve various issues and errors without any knowledge from the user, but they are not perfect. Like security suites sometimes an automated system can misinterpret something as an error when in fact it is not and fixing it could mean some apps not working anymore, luckily you can choose would you like to apply the suggested solution. So if you are using one do not just click fix without looking at what it is trying to fix and maintain.
Another problem with this is the price it is carrying, manually solving your computer error will cost you your time and knowledge but good automated software will come with a price tag. Some people might not be too happy to pay for this kind of application but at the end of the day, it will still be cheaper than a professional technician. The last thing that you should be aware of is that in order for the app to do its work properly it will need to be active all the time, now for modern computers, this is not the issue but for some older ones with a small amount of memory might lead to some slowing them down. This is a price to be paid in order to have your system always errors free.
This depends on your knowledge and time available, professional IT technicians will not need this type of solution nor will power users but for most common people this will offer computers free of errors for an affordable price.
You may experience error code 24 when you try to use a device on your PC that is not properly installed or its driver is corrupted. Code 24 is a Device Manager error and it pops up on your computer screen in the following format:
“This device is not present, is not working properly, or does not have all its drivers installed. (Code 24)”
 Error Causes
Error code 24 may be triggered due to several reasons. However, the most common causes for this error code include:
It is recommended to resolve the error code to ensure your PC works at its optimal performance. Error code 24 can lower the device functionality and PC performance dramatically.
Since this error code can mean several different things, troubleshooting it can be quite tricky but to make it simple to resolve, we have listed down some easy methods to repair error code 24.
Try these methods to fix error 24 on your PC and ensure your system works at its optimal pace. Let’s get started….
Problems with BIOS, the controlling software in the PC motherboard, can sometimes trigger hardware conflicts resulting in Device Manager error code pop-ups.
In such a scenario, it is advisable to update BIOS. To update, go to your PC motherboard manufacturer’s website. Here you will be able to find instructions on updating BIOS.
Follow the instructions carefully to resolve error code 24 on your system. If the error code still persists, then try other methods discussed below.
If you experienced code 24 on your PC after installing new devices, then it is advisable to remove them to resolve the error code.
If the device is attached to your computer, then simply disconnect and remove it immediately. Once you disconnect it, reboot your system to activate changes.
If device removal does not resolve the problem, then consider updating the device driver. Code 24 is also related to driver problems.
It can occur if a device driver is corrupted or outdated. In such an event, it is advisable to update the driver by installing the new and latest device driver version on your PC.
For doing this, simply download the latest device driver version from the manufacturer’s website and update it.
Finding problematic drivers and the latest device driver versions to update them, however, can be time-consuming and sometimes even frustrating. To avoid being in this situation, it is advisable to download DriverFIX.
DriverFIX is a cutting-edge, user-friendly and an innovative program exclusively designed to resolve device driver related issues and problems on computer systems
It is integrated with the newest technology and intelligent programming system that enables and empowers PC users like you to repair device driver error codes in seconds.
Once you install this software on your PC, simply run it. The software program instantly detects all problematic drivers and updates them with their latest versions available on the internet.
All this is done in mere seconds and it’s not time-consuming at all. Moreover, device driver updates are performed frequently to ensure that you don’t experience any driver problems again.
Click here to download DriverFIX and repair Device Manager error code 24 right away.
Error CausesFree Download Manager is a software program developed by FreeDownloadManager.ORG. According to the publisher:
This software downloads files and converts videos. Its features include integration with all browsers, support of downloads from RapidShare, BitTorrent support, adjusting traffic usage, resuming broken downloads, and adds BitTorrent support, flash video download, upload manager, portable mode, and remote control.
During setup, the program creates a startup registration point in Windows in order to automatically start when any user boots the PC. It adds a browser extension to help it cache files you are downloading over your browser. The software is designed to connect to the internet and adds a Windows Firewall exception in order to do so without being interfered with. It also hooks up to start automatically and cache every download even if it's turned off.
This software comes bundled with video converters that some anti-virus programs marked as malware and therefore it is considered a potentially unwanted program.
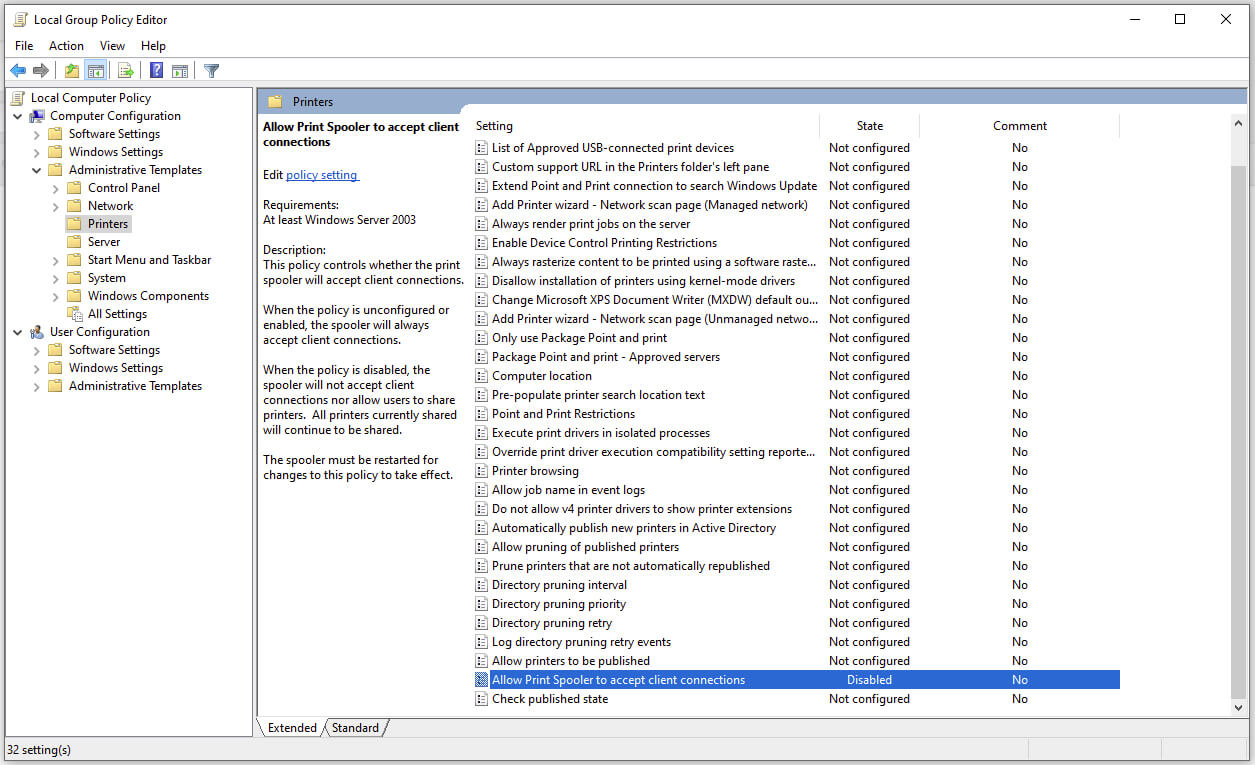 Microsoft is once again advising its customers to disable Windows print spooler after a new vulnerability that allows hackers to execute malicious code on machines has emerged. While a patch fixing the flaw will be released in due course, the most effective workaround currently on the table is to stop and disable the print spooler service entirely.
"An elevation of privilege vulnerability exists when the Windows Print Spooler service improperly performs privileged file operations. An attacker who successfully exploited this vulnerability could run arbitrary code with SYSTEM privileges. An attacker could then install programs; view, change, or delete data; or create new accounts with full user rights."