Logo

Install Remote Server Administration Tools

RSAT or Remote Server Administration Tools for Windows 10 is a collection of programs for IT experts. It helps in managing Servers from a Windows 10 PC and starting with the Windows 10 v1809 or the October 2018 update, users have to install the Remote Server Administration Tools for Windows 10 as Features on Demand or as Optional Features.

The program includes the Microsoft Management Console or MMC snap-ins, Server Manager, consoles, Windows PowerShell cmdlets, and providers as well as command-line tools for managing roles and features that run on the Windows Server. So if you have updated your Windows 10 pc to v1809 or later then the RSAT tool has to be installed as a set of Features on Demand right from Windows 10. You can install RSAT Tools on Windows 10 Enterprise or Windows 10 Professional and once you install it, make sure that you do not install RSAT tools from the Microsoft Download page directly.

Step 1: Open Settings and then go to Apps > Apps & Features.

Step 2: Next, click on Manage Optional Features.

Step 3: After that, click on Add a Feature which will load all the optional features one can install.

Step 4: Now scroll to find the listing of all 18 RSAT tools and depending on what you need, click and install them.

Step 5: Then go back to where you should see the progress of the installation. Click on the Manage Optional Features page to check the status.

Note: If you are well-versed with the command line or automation, you can also install Remote Server Administration Tools for Windows 10 via DISM /add-capability. And when you install anything via Features on Demand, they stay across Windows 10 version upgrades.

On the other hand, if you feel that you don’t need a particular RSAT feature, you have the option to uninstall it using the Manage Option Features. However, bear in mind that some tools depend on one another which means that if you uninstall anything that has a dependency, it will only fail that’s why you need to be careful.

To uninstall an RSAT feature, here’s what you have to do:

Step 1: Go to Settings > Apps > Manage Optional Features.

Step 2: After that, look for the list of installed feature that appears before this.

Step 3: Now select the feature you want to uninstall and go back.

If you have some system-related issues that need to get fixed, there is a one-click solution known as [product-name] you could check out to resolve them. This program is a useful and efficient tool that could repair corrupted registries and optimize your PC’s overall performance. Aside from that, it also cleans out your computer for any junk or corrupted files that help you eliminate any unwanted files from your system. This is basically a solution that’s within your grasp with just a click. It’s easy to use as it is user-friendly. For the complete set of instructions in downloading and using it, refer to the steps below.

Do You Need Help with Your Device?

Our Team of Experts May Help
Troubleshoot.Tech Experts are There for You!
Replace damaged files
Restore performance
Free disk space
Remove Malware
Protects WEB browser
Remove Viruses
Stop PC freezing
GET HELP
Troubleshoot.Tech experts work with all versions of Microsoft Windows including Windows 11, with Android, Mac, and more.

Share this article:

You might also like

The Extended Attributes Are Inconsistent Error
One of the most critical errors inside your Windows operating system is The Extended Attributes Are Inconsistent error. This error means that your operating system has been corrupted and it may produce many annoying issues like for example time lags, random crashes, and even freezing of the system when running multiple applications. There are a lot of reasons for this error, from the registry to faulty application installations to sometimes even hardware issues like bad RAM memory or bad hard drive. Mostly issue is due to corrupted files inside Windows and most often people only think that resetting the PC or complete reinstallation is the only way to fix this problem. Although reinstalling the system or resetting the PC will solve this error for sure there are other less time-consuming ways to fix this error. The Extended Attributes Are Inconsistent Error
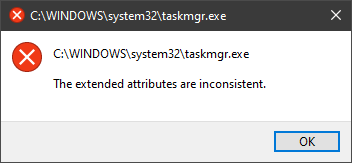
In this guide, we will show you common ways in fixing Extended Attributes are inconsistent errors inside your Windows that are easy to do and less time-consuming than complete reinstallation of the system.

Fixing Extended Attributes Are Inconsistent error

Run SFC scan

  1. Press ⊞ WINDOWS + X to open the hidden menu
  2. Click on command prompt (admin)
  3. In command prompt type in SFC /scannow and press ENTER
  4. Wait for the operation to complete
  5. Reboot your PC

Use System Image Repair Tool

  1. Press ⊞ WINDOWS + X to open the hidden menu
  2. Click on command prompt (admin)
  3. In command prompt type in Dism /Online /Cleanup-Image /RestoreHealth and press ENTER
  4. Wait for the operation to complete
  5. Reboot your PC

Change all user accounts to the administrator

  1. Press ⊞ WINDOWS + R to open the run dialog
  2. Type in netplwiz and press ENTER
  3. Select a first user account and click on Properties
  4. Click on the Group Membership tab
  5. Choose Others from the options
  6. Select administrator (if all accounts are already administrators change all to users)
  7. Repeat process for all other accounts
  8. Click OK to save settings

Change Windows Sound scheme to default

  1. Right-click on the sound icon in the taskbar
  2. Click on Sound options
  3. Go to the Sounds tab
  4. In Sound Scheme click and choose Windows Default
  5. Under Program Events choose Windows User Account Control
  6. Click on the drop-down menu and choose None
  7. Click on Apply
  8. Click on OK

Downgrade the Sound driver

  1. Press ⊞ WINDOWS + X to open the hidden menu
  2. Click on Device Manager
  3. Find your Audio driver and right-click on it
  4. Click on uninstall and then on OK
  5. Reboot your system

Do System Restore

If none of the provided solutions have worked, perform a system restore to the last point where everything was working fine.

Reset PC

If even system restore has not solved the issue or you do not have valid point in system restore time, perform Reset this PC and hopefully, the error will be finally fixed.

Conclusion

If all of the provided methods have not managed to repair this error that checks your hardware, your computer might have some faulty components if after complete PC reset error persists.
Read More
Makecab.exe is running & consuming CPU
The Makecab.exe process that’s running on your Windows 10 computer is a program that compresses the Component-Based Servicing log or CBS log files and they can get really huge if they’re not compressed. As a result, it would utilize important space on your operating system although makecab.exe does not consume high CPU resources in doing so. However, there are times when it recreates thousands of instances of itself and could cause overconsumption of system resources which slows down your computer. So when the makecab.exe process causes high CPU usage in your system, this could mean that there is a failed Windows Update. In addition, the high CPU usage of the makecab.exe process could also mean that your computer is infected with a virus or malware. Whichever the case is, you can check out several possible solutions that are given in this post to resolve the problem.

Option 1 – Try to delete log file using File Explorer

The CBS log files could reach up to 20GB size and so if you delete them, it would help in saving space in your computer and since they’re not much of use, deleting them won’t negatively affect the system at all. To delete the CBS log files, all you have to do is open the File Explorer and then go to C:/Windows/Logs/CBS and from there, open the CBS log files and delete them all. Doing so should ease the load in the makecab.exe process since it no longer has to compress the CBS log files. As a result, the process would be more relaxed. After that, you can restart your computer and check if the problem’s now fixed.

Option 2 – Try deleting the log file via Command Prompt

You can also try to delete the log files using an elevated Command Prompt. Refer to these steps to do so:
  • Type “command prompt” in the Windows Search bar and then right-click on the related search result and select the “Run as administrator” option.
  • Next, type the following command and hit Enter to execute it:
del /f %windir%logscbs*.log
  • Restart your computer afterward once the command has been executed. This should end the high disk usage by makecab.exe, if not, proceed to the next given options below.

Option 3 – Uninstall any suspicious programs you’ve installed recently

If you have recently installed some programs on your Windows 10 computer, and since then you’ve experienced high CPU usage brought on by makecab.exe, then you might want to uninstall those programs.
  • Tap the Win + R keys to open the Run dialog box
  • Then type “appwiz.cpl” in the field and hit Enter to open the Programs and Features in Control Panel.
  • From there, look for the suspicious programs you’ve installed, select them and then click on Uninstall to remove them.
  • After that, restart your computer and try to install the latest version of the program again. It should work now. If not, proceed to the next available option below.

Option 4 – Try running Disk Cleanup

You might want to run the Disk Cleanup utility as it is a useful tool that could delete temporary and useless files on your computer.
  • Tap the Win + R keys to open the Run dialog box and then type “cleanmgr” in the field and hit Enter to open the Disk Cleanup window.
  • After that, select the drive you want to clean.
  • Now click OK to clean the disk and restart your computer.

Option 5 – Try to run System File Checker scan

System File Checker or SFC is a built-in command utility that helps in restoring corrupted files and missing files. It replaces bad and corrupted system files to good system files. To run the SFC command, follow the steps given below.
  • Tap Win + R to launch Run.
  • Type in cmd in the field and tap Enter.
  • After opening Command Prompt, type in sfc /scannow
The command will start a system scan which will take a few whiles before it finishes. Once it’s done, you could get the following results:
  1. Windows Resource Protection did not find any integrity violations.
  2. Windows Resource Protection found corrupt files and successfully repaired them.
  3. Windows Resource Protection found corrupt files but was unable to fix some of them.
  • Restart your PC.

Option 6 – Try scanning your computer using Windows Defender

As mentioned, the high CPU usage of makecab.exe might be caused by some malware or virus in the system and so to eliminate it, you have to scan your computer using security programs like Windows Defender.
  • Tap the Win + I keys to open Update & Security.
  • Then click on the Windows Security option and open Windows Defender Security Center.
  • Next, click on Virus & threat protection > Run a new advanced scan.
  • Now make sure that Full Scan is selected from the menu and then click the Scan Now button to get started.
Read More
Repairing a corrupt Group Policy in Windows
If you recently made some changes in your Windows 10 computer using the Group Policy Editor but they were not reflected and you got errors instead, it could be that your Windows computer wasn’t able to read the Group Policy file (registry.pol). To resolve this kind of issue, you have to repair the potentially corrupted Group Policy using the options given in this post. .As you know, Group Policy is a feature in the Microsoft Windows Active Directory which allows an admin to make changes in the features on Windows PCs that are on the network. So if the modifications you just made weren’t successfully applied, then there could be something wrong with the registry.pol file on the client or it could also be that the Group Policy folder is missing. To fix this issue in the Group Policy, you need to refer to the given suggestions below and make sure that you have admin privileges as you execute them.

Option 1 – Try to delete or recreate the missing registry.pol file

The entire settings of the Group Policy are stored in the registry.pol file so if it went missing, all the changes you make will not be reflected. The good thing is that you can recreate it but if the file exists and is corrupted, you need to delete it first before you recreate it.
  • First, go to the C:/Windows/System32/GroupPolicy/Machine location.
  • And from there, check if the registry.pol file exists or not. If it’s there, just delete it permanently by tapping the Shift + Delete keys.
  • Now it’s time to recreate the file. Just open Windows PowerShell with admin privileges by tapping Win + X + A keys.
  • After opening PowerShell, type this command: gpupdate /force
  • The command you entered will recreate the registry.pol file and will refresh the Group Policy. Restart your computer.

Option 2 – Try recreating the secedit.sdb file

The security settings of Group Policy are stored in the secedit.sdb file so if you made some changes to security and they weren’t reflected, you can try to delete and recreate the secedit.sdb file instead of deleting the Group Policy file. All you have to do is navigate to the C:/WINDOWS/security/Database folder and look for the secedit.sdb file and rename it or move it to another folder. After that, restart your computer. Once your computer has restarted, the secedit.sdb file will be created again.

Option 3 – Try to reset the Group Policy to default

You can also try to reset the Group Policy back to its default state. There are several ways you can do that. You can either use the gpupdate or the secedit command in the Windows PowerShell to do that. Resetting the Group Policy will resolve any issues that could be caused by its current settings.

Option 4 – Try to perform System Restore

System Restore can also help resolve the Group Policy issue. It could be that prior to the issue, you’ve made some changes in the system that might have affected the Group Policy. To undo these changes, perform System Restore.
  • First, tap the Win + R keys to open the Run dialog box.
  • After that, type in “sysdm.cpl” in the field and tap Enter.
  • Next, go to the System Protection tab then click the System Restore button. This will open a new window where you have to select your preferred System Restore point.
  • After that, follow the on-screen instructions to finish the process and then restart your computer and check if the problem is fixed or not.

Option 5 – Use the DISM tool

You can also try running the Deployment Imaging and Servicing Management or DISM tool. This tool will repair the Windows System Image as well as the Windows Component Store in your Windows 10 computer. So if there are any missing or corrupted folders and files, the DISM tool can restore and repair them. As a result, any system consistencies and corruptions will be fixed. To run this tool, follow these steps:
  • Tap the Win + X keys and click on the “Command Prompt (Admin)” option.
  • After that, input each one of the commands listed below sequentially to execute them:
    • Dism /Online /Cleanup-Image /CheckHealth
    • Dism /Online /Cleanup-Image /ScanHealth
    • Dism /Online /Cleanup-Image /RestoreHealth
  • Once you’ve executed the commands given above, restart your computer.
Read More
Computer boots to the BIOS when you turn it on
A number of users reported lately that their Windows 10 PCs automatically boots into the BIOS whenever they start their computers. And when they tried to exit the BIOS and restart their computers, it still boots into the BIOS. If you are one of the users who experience the same problem, worry not for this post will walk you through what you can do to resolve the problem. Each time a Windows 10 computer boots, it goes through a lot of processes and one of them is where it checks the computer for any hardware issue such as hard drives, peripherals, as well as external devices. So if it finds some issue, the computer will halt the boot process and will boot into the BIOS. To fix this, there are several suggestions you can try. You have to check if you’ve pressed any key, especially the F2 or F12, or Del keys. You also have to check the peripherals and external devices in your computer or update the BIOS or reset it. For more information, make sure to follow each one of the options laid out below.

Option 1 – Try to check for any pressed key

The first thing you can do is to check for any pressed key. This might not make any sense but a pressed key can actually cause this problem. So you have to check if you have the F2 or F12 or Del buttons pressed since these are hardware keys that are usually set by the OEM to boot into the BIOS.

Option 2 – Try checking the physical device connections

You might also want to try checking if there are other devices that are connected to your PC. This is because the configuration of the BIOS or UEFI might be configured in a way that any external device connected to the computer has a higher boot priority compared to the hard disk.  And if it’s really the case, the externally attached disk might be the drive your computer is trying to boot into and not the hard disk. In such cases, Pen Drives, USB storage devices, CDs, DVDs, and so on, are included in this category of physical device connections.

Option 3 – Try to set a proper boot device

If the Boot Manager wasn’t able to locate a proper boot device, then it could be the reason why your computer boots into the BIOS when you turn it on. Thus, you have to check if there is an available proper boot device. You can usually find it under the Boot priority section. However, if you’re unable to locate your hard drive or SSD under the Boot device, then you have to change the hard drive but you have to check first if it is properly plugged in and that it works on other computers. If it works on other PCs, then the problem lies in the motherboard of your computer, and in that case, you have to consult its manufacturer.

Option 4 – Try to update the BIOS

Updating the BIOS can help you fix the issue but as you know, BIOS is a sensitive part of a computer. Even though it is a software component, the functioning of the hardware depends on it largely. Thus, you must be careful when modifying something in the BIOS. So if you don’t know much about it, it’s best if you skip on this option and try the other ones instead. However, if you are well-versed in navigating the BIOS, then follow the steps below.
  • Tap the Win + R keys to open the Run dialog box.
  • Next, type “msinfo32” in the field and press Enter to open System Information.
  • From there, you should find a search field on the bottom where you have to search for the BIOS version and then press Enter.
  • After that, you should see the developer and version of the BIOS installed on your PC.
  • Go to your manufacturer’s website and then download the latest version of BIOS on your computer.
  • If you are using a laptop, make sure that you keep it plugged in until you have updated the BIOS.
  • Now double click on the downloaded file and install the new BIOS version on your computer.
  • Now restart your computer to apply the changes made.
Note: If updating the BIOS didn’t help, you might want to consider resetting it instead.

Option 5 – Try resetting the BIOS/UEFI configuration

You might also want to reset the BIOS configuration which will lead to arranging the boot configuration since it is intended by the manufacturer. Note that this will get rid of any blockage in the boot process. All you have to do is take out the CMOS battery for a couple of seconds and then put it back again. After that restart, your computer and will be booted directly into Windows. Resetting the BIOS would also get rid of any password set for BIOS and you need to change your CMOS battery in case it didn’t work.
Read More
System Image Backup 0x807800A1 & 0x800423F3
System image backup error 0x807800A1 & 0x800423F3 appears when you are trying to create a system image backup and the operation fails to do so. If you’re faced with any of these error codes, try our recommended solutions in the order presented below and resolve the issue.

Check Volume Shadow Copy & Software Protection Services

To restart the Volume Shadow Copy Service (VSS) on Windows 10, do the following:
  • Press ⊞ Windows + X to bring up the Windows menu.
  • Click on command prompt (admin)
  • In the command prompt window, type the commands below and hit Enter after each line:
net stop vss net start vss
Once the commands execute successfully, try the system image backup again. The operation should complete successfully. You need to also check if the Software Protection Service is disabled. If it is, then Start it and ensure that it is set to default which is Automatic (Delayed Started).

Create System Image using PowerShell

Command lines are less prone to errors provided the syntax is correct, unlike GUIs that can suffer a glitch every now and then. To create a system image with PowerShell do the following:
  1. Open the Windows PowerShell as administrator. To create a System Image in Windows 10 using PowerShell, you will have to run the Wbadmin command.
  2. Inside the Powershell window type, then press Enter: wbadmin start backup-backup target: E:-include: C:-quiet-allCritical E: is the target drive where you’re going to save the system image, and C: is the system root drive where Windows is currently installed
  3. To extract the created system image, starting over from Windows 10 USB installation media, select advanced startup or open run and type: C: \ Windows \ System32 \ Shutdown.exe / r / o

Use third-party imaging software

If the previous two solutions have not managed to solve the issue there is always an option to use a third-party imaging solution. There are free open source and buying options offering various advantages each. Find out which one works best for you and use it.
Read More
Fix error 0x8007000d in Windows
Hello everyone and welcome to another quick tutorial for your Windows error, this time we will wrestle with error 0x8007000d.

Let's begin:

1. Browse to "C:\Windows\SoftwareDistribution\Download" and delete the contents of the folder. 2. Press ⊞ WINDOWS + X > Click Command Prompt (Admin) then type "wuauclt.exe /updatenow". Hit Enter 3. Open Control Panel > Windows Update and Windows 10 should begin downloading. Press ⊞ WINDOWS + X Click Command Prompt (Admin) Type in at the prompt OR Copy and Paste these one at a time : (Hit ENTER after each)
Dism /Online /Cleanup-Image /CheckHealth Dism /Online /Cleanup-Image /ScanHealth Dism /Online /Cleanup-Image /RestoreHealth
also

Run the Windows Update Troubleshooter and check if it helps:

  1. Press ⊞ WINDOWS + X and select the Control panel.
  2. In the search box, type troubleshooter, and then click Troubleshooting.
  3. Under System and Security, click Fix problems with Windows Updates.
Read More
Steam updates including storage management
Valve has released a big update to its online store and distribution platform Steam. Among typical bugs fixing and making the user experience a little more fluid, we have received some major updates as well. Please take note that you need to update Steam itself to the latest version in order to get new features.

steam libraryStorage management Page update

The storage management page has received a complete redesign and UX overhaul and it is now much easier to manage your game libraries and create new ones. The page itself looks and feels a little console more like but thanks to that it offers a much easier and clearer look and feel. steam storage manager
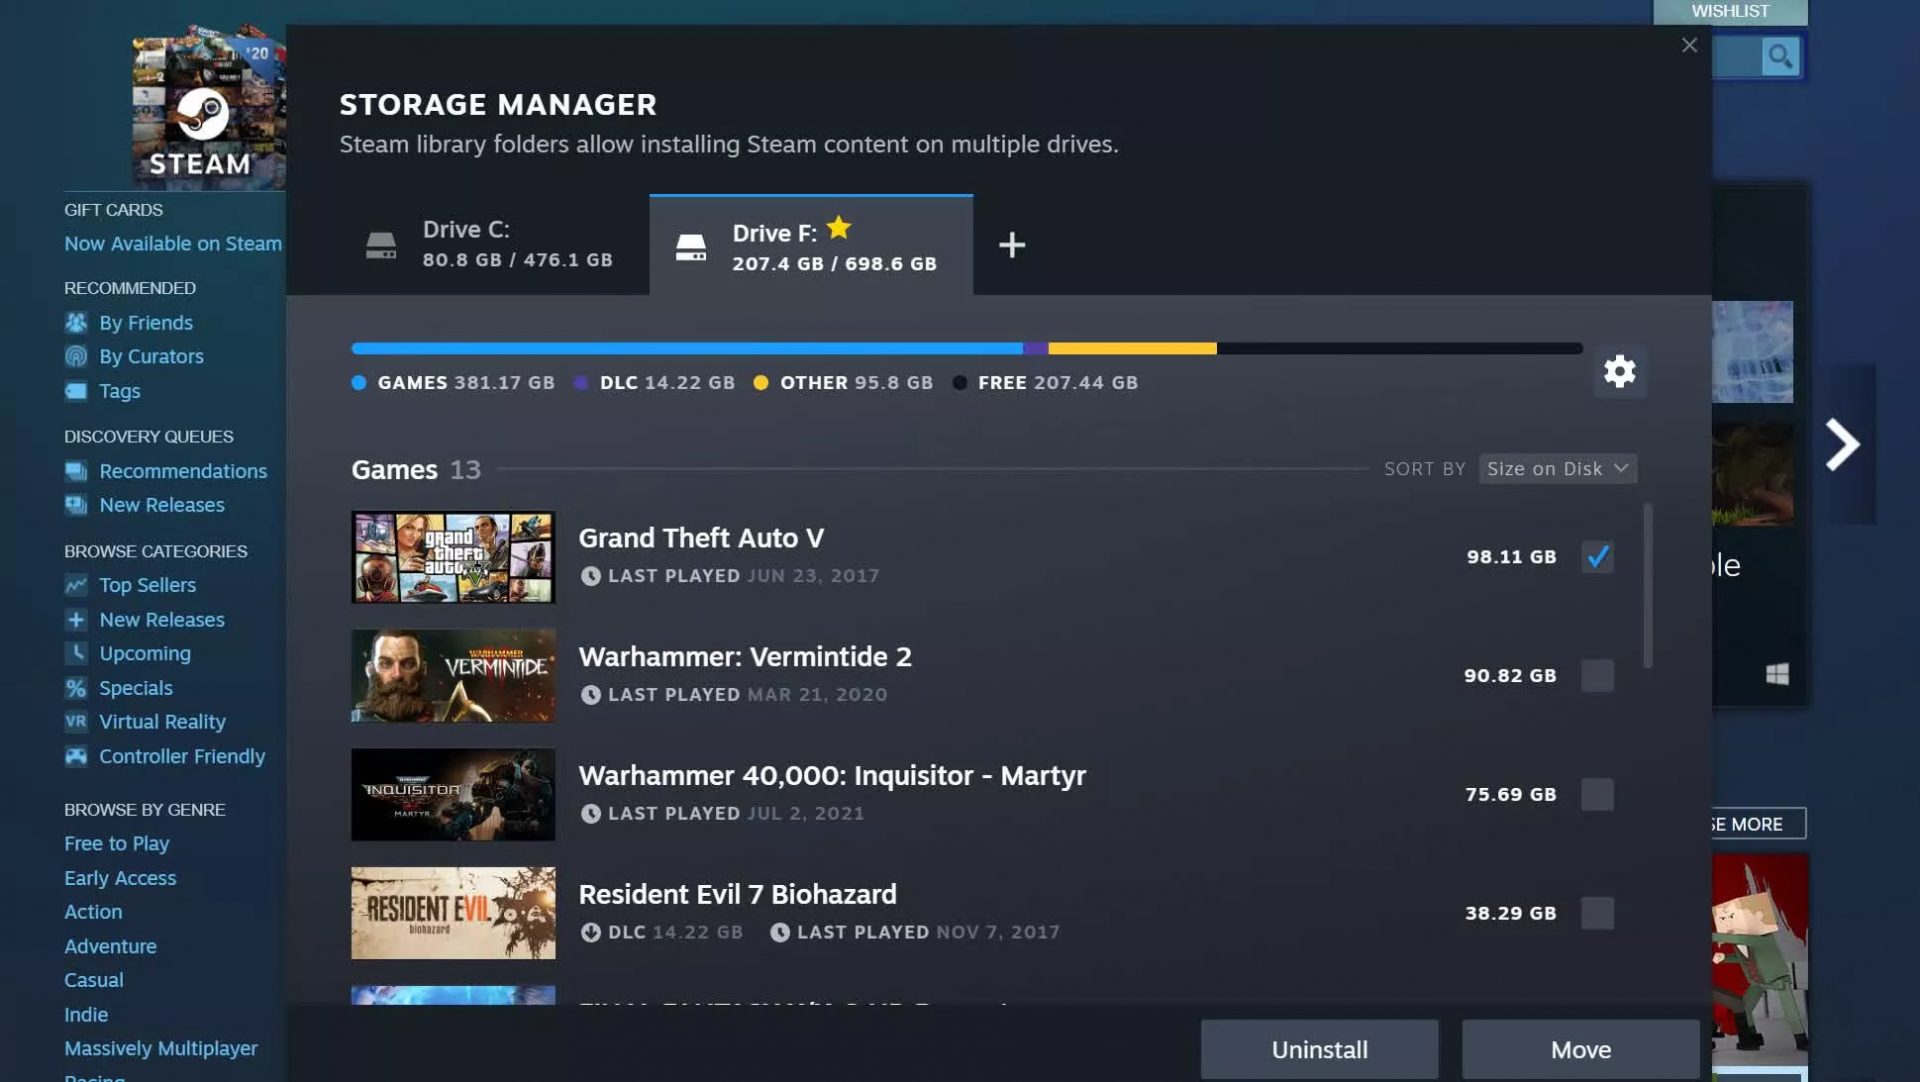
Another thing with the Steam store management page is the ability to move installation files from one location to another. Let’s say that you have two or more hard disk drivers in your machine and that you have SSD that you use for running stuff since it is fast and larger and slower one for storage. Now you can easily and quickly move one installation from one to another in order to take advantage of your faster SSD for quicker LOAD game times without making a new installation.

Steam Download page improvements

The download page has also received some love from Valve by enabling us to now see the installation progress. So far on the download page of Steam, you would only get download progress but it has been updated to show installation progress after download as well now making it more straightforward and giving you a general idea of how much more time there is to wait in order to start gaming. steam download page
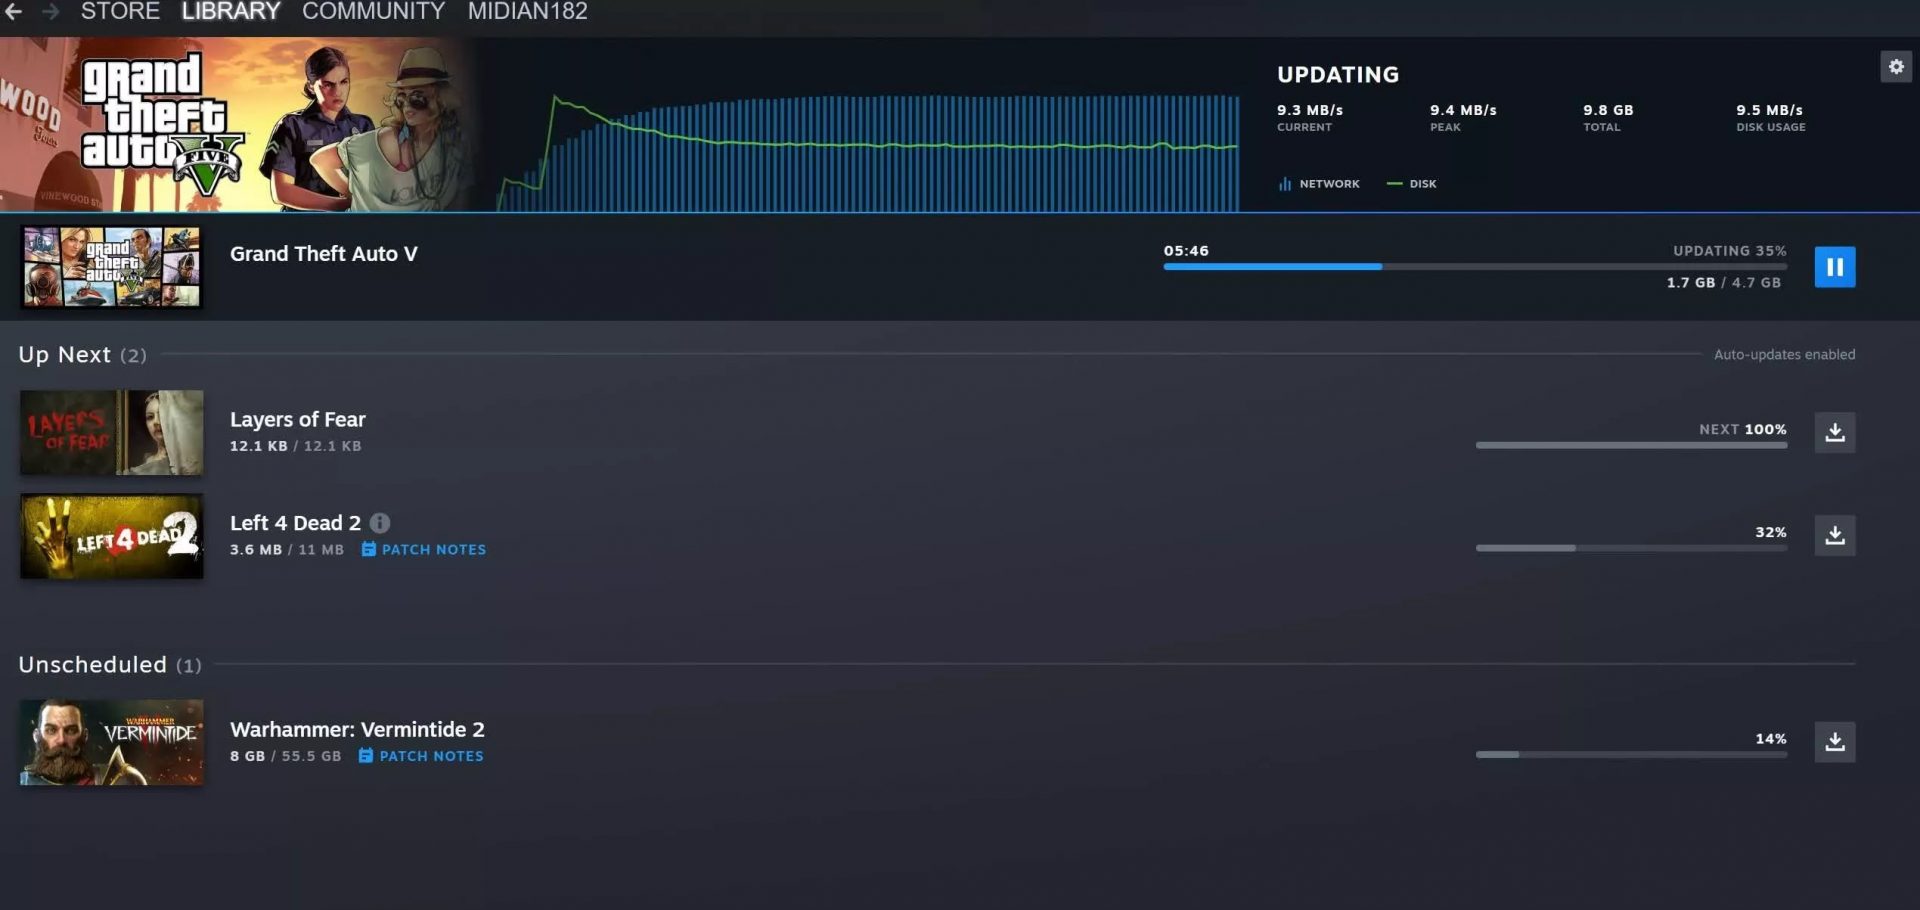
Also, you can now drag and drop items in the download bracket to reorder download orders or place them as active downloads to start downloading right away.
Read More
Windows could not start Update service
If you got an error message saying, “Windows could not start the Windows Update service on Local Computer, Error 87. The parameter is incorrect” while you were trying to start the Windows update service on your computer, then this post could help you resolve the problem. Along with this error, you might also get any of these error codes such as 0x80240034, 0x80244019, 0x80070643, and so on. Aside from these error codes, you will also notice that the Windows Update service has been stopped. To fix this issue, here are a couple of suggestions that might help but before you go on, you need to create a System Restore point first.

Option 1 – Try checking Services Dependencies

Dependencies of a Windows Service in Windows 10 are when windows services depend on other services. Such is the case with the Windows Update service – it also depends on three different services such as the Remote Procedure Call or RPC service, DCOM Server Process Launcher, and the RPC Endpoint Mapper. Meaning to say, if two of these services are not working as expected, then the dependant service will also be affected. This could be the reason why the Windows Update service could not start.
  • Tap the Win + R keys to open the Run dialog box.
  • Next, type “services.msc” in the field and hit Enter to open Windows Services.
  • From the list of Services, look for the following services:
    • Remote Procedure Call (RPC) Service
    • DCOM Server Process Launcher
    • RPC Endpoint Mapper
  • After you find these services, double click on each one of them and check whether the Startup type for all is set to Automatic and the Service status is set to Running or not.
  • If the service status is not running, then click the Start button. Afterward, check if you can now run the Windows Update service.

Option 2 – Check the Background Intelligent Service and the Cryptographic Service

  • Tap the Win + R keys to open the Run dialog box.
  • Next, type “services.msc” in the field and hit Enter or click OK to open Services.
  • From the list of Services, look for the following services and make sure that their Startup type is as follows:
    • Background Intelligent Transfer Service – Manual
    • Cryptographic Service ­– Automatic
  • After that, check if the Service status of the listed services above is set to Running. If they’re not, click on the Start button to start these services and then check if you can now enable the Windows Update service or not.

Option 3 – Reset Windows Update components

If the first two options did not work then you might want to reset the Windows Update components manually. Follow the steps below to reset them.
  • Open Command Prompt with admin privileges.
  • After that, type each one of the following commands and hit Enter after you key in one after the other.
    • net stop wuauserv
    • net stop cryptsvc
    • net stop bits
    • net stop msiserver
Note: The commands you entered will stop the Windows Update components such as Windows Update service, Cryptographic services, BITS, and MSI Installer.
  • After disabling WU components, you need to rename both the SoftwareDistribution and Catroot2 folders. To do that, type each one of the following commands below, and don’t forget to hit Enter after you type one command after the other.
    • ren C:WindowsSoftwareDistribution SoftwareDistribution.old
    • ren C:WindowsSystem32catroot2 Catroot2.old
  • Next, restart the services you’ve stopped by entering another series of commands. Don’t forget to hit Enter after you key in one command after the other.
    • net start wuauserv
    • net start cryptsvc
    • net start bits
    • net start msiserver
  • Close Command Prompt and reboot your PC.

Option 4 – Run the Windows Update Troubleshooter

If resetting the Windows Update components didn’t work, you could also try running the Windows Update Troubleshooter as it could also help in fixing any issues related to Windows Update including this one. To run it, go to Settings and then select Troubleshoot from the options. From there, click on Windows Update and then click the “Run the troubleshooter” button. After that, follow the next on-screen instructions and you should be good to go.

Option 5 – Try removing a value from the Windows Registry

If running the Windows Update troubleshooter didn’t help and you receive a message instead saying, “Service Registration is Missing or Corrupt”, you can try to remove a value from the Windows Registry.
  • Tap the Win + R keys to open the Run dialog box.
  • Then type “Regedit” in the field and hit Enter to open the Windows Registry.
  • Next, navigate to this path: HKEY_LOCAL_MACHINESOFTWAREMicrosoftWindowsSelfHostApplicability
  • From this path, look for a value named “ThresholdOptedIn” and if you find it, delete it.
  • Exit the Registry Editor and see if you can now enable the Windows Update service.
Read More
Changing the Primary and Secondary monitor
If you are using a dual monitor setup on your computer and you wish to change the Primary and Secondary monitor in Windows 10, then you’ve come to the right place as this post will guide you on how exactly you can do that. A lot of users use more than one monitor to be more productive so having dual monitors helps a lot. So if you have more than one monitor, know that you can actually select any monitor as the primary monitor after installing Windows. Changing the primary and secondary monitor in Windows 10 does not really require you to install any third-party application since you can get the job done by simply making some alterations in the Windows 10 Settings panel. You won’t have any problem in making such alterations since it is quite simple – from modifying the wallpaper to scaling and so on.

To get started, follow the instructions given below carefully.

Step 1: First, tap the Win + I key combination to open the Windows 10 Settings app and go to System and click the Display tab. Step 2: Next, look for the Identify button located on your right-hand side and then click on it. This button will help you check which one is the primary and the secondary monitor. Step 3: After that, select the desired monitor that you want to set as the primary one from the drop-down menu. Step 4: After that, mark the checkbox for the “Make this my main display” option. Step 5: After choosing the primary monitor, this will automatically set the other monitor as the secondary monitor. Restart your computer. So that’s how you change the primary and secondary monitor on your Windows 10 computer. Note that you can always go back to the previous setting of your monitor by following the same instructions provided above.
Read More
How to Fix Error Code 0xc004f034 in Windows 10

Error Code 0xc004f034 – What is it?

Error code 0xc004f034 occurs when Windows 10 users fail to activate their operating system. This activation error code affects not only Windows 10 but those using other versions of the Windows operating system including Windows 8.1. Users experiencing this problem will notice the following common symptoms which occur:

  • Inability to activate Windows 10 operating system
  • Message box with error code 0xc004f034

Solution

Restoro box imageError Causes

Error code 0xc004f034 usually results from issues related to activation servers. In such cases when servers are busy, users will not be able to complete the activation process which would result in access to their Windows 10 edition of choice. The error code may also result from issues related to your product key. For this reason, be sure to use the correct product key when you attempt to activate Windows 10.

Further Information and Manual Repair

The completion of manual repair methods can be an effective way to correct issues like error codes in Windows 10. To begin, however, ensure you follow the instructions as given as making even a slight mistake will result in unfavorable results. If, for whatever reason, you have trouble completing the steps suggested below, feel free to contact a Windows repair technician. This type of IT professional is usually equipped with knowledge and expertise to access your particular situation. Otherwise, see the manual repair methods listed below and complete at least one method to fix error code 0xc004f034.

Method One: Ensure You Enter a Valid Product Key

If there is a problem with your product key, you will need to ensure you fix it before you can resolve error code 0xc004f034. Follow the instructions below after ensuring you have a valid product key.

  • Step one: Click the Start button then select Settings
  • Step two: Select Update & security then Activation
  • Step three: Click the Change product key
  • Step four: Type in your valid product key with its 25 characters in the correct order

Your system will activate Windows 10 if the issue was related to the use of an invalid product key. However, attempt manual method two if error code 0xc004f034 reappears and you are unable to complete the activation process.

Method Two: Reattempt Windows 10 Activation Until Process Completes

In many cases, error code 0xc004f034 occurs simply due to a busy server. This was the case in 2015 in particular when Windows users first received access to editions of Windows 10 like Windows 10 Pro. To complete this process, you will need to follow the instructions below, repeating the last step until the activation occurs.

  • Step one: Click the Start button then select Settings
  • Step two: After selecting Settings, click Update & Security
  • Step three: Select Windows Update then the Check for updates tab
  • Step four: Click Activate Windows 10 update

If this method is successful, you will finally be able to update your system to the Windows 10 edition of your choice. This process may take just a few minutes – and several attempts – before you resolve the issue. Remember to be patient. However, contact a Windows repair technician to evaluate your system if the issue persists for more than a few days.

Method Three: Use an Automated Tool

If you wish to always have at your disposal a utility tool to fix these Windows 8 and other related issues when they do arise, download and install a powerful automated tool.
Read More
1 2 3 171
Logo
Copyright © 2023, ErrorTools. All Rights Reserved
Trademark: Microsoft Windows logos are registered trademarks of Microsoft. Disclaimer: ErrorTools.com is not affiliated with Microsoft, nor claims direct affiliation.
The information on this page is provided for information purposes only.
DMCA.com Protection Status