 in the menu, on the bottom choose taskbar settings. Once the settings dialog opens, on the right side locate the taskbar location on screen.
 Click on the dropdown menu and choose the desired location for the taskbar.
 If you got an Activation Error 0xC004F211 after having installed or upgraded your Windows 10 PC, then this indicates that some hardware in your computer has changed which’s causing the error to pop up. Windows might not be able to determine if the key is used on a new computer or if it’s still the same one if you have just removed or upgraded old hardware. But worry not for this post will guide you in fixing the Windows Activation Error 0xC004F211 on your Windows 10 computer.
When you encounter this error, you will see the following error message on your screen:
“Cannot activate Windows 10. Try activating again later. If that doesn’t work, contact support. Error code: 0xC004F211.”
Note that although hardware changes cause this error, the minor ones don’t really cause any issues with activation, however, if you have made any significant hardware change such as replacing your motherboard, it will most likely cause the activation error. In such cases, the Windows Activation system will treat this as new hardware and you will need a new license for that.
Even if your Windows 10 computer has a genuine key, it might still fail to get activated which results in the Windows Activation Error 0xC004F211. Thus, before you do other troubleshooting steps, you need to run the Windows 10 Activation Troubleshooter first. To do so, follow these steps:
In addition, there is an exception offered by Microsoft – if you are connected to a Microsoft account prior to the hardware change, then you can most certainly use the same license key to reactivate Windows 10 again. Microsoft calls this an “Exception path” which should be fixed easily by the Windows Activation Troubleshooter as pointed out earlier. However, if the Windows Activation Troubleshooter isn’t able to resolve the error you can try purchasing a new license. In such rate case, even if you do have a Microsoft account available on your Windows 10 computer, and if Windows was never activated, this solution will not work. And if you haven’t connected your Microsoft account with your Windows 10 computer prior to the major hardware change, then your only option left is to purchase a new license. For you to do that here are some steps you can follow.
Note: If you are an IT administrator, you need to keep in mind that there is a limit to the number of times you can reactivate Windows on your computer. Moreover, if you don’t see any option to reactivate the license, and it is a work computer, you need to contact your organization’s tech support.
 in the menu, on the bottom choose taskbar settings. Once the settings dialog opens, on the right side locate the taskbar location on screen.
Click on the dropdown menu and choose the desired location for the taskbar.
in the menu, on the bottom choose taskbar settings. Once the settings dialog opens, on the right side locate the taskbar location on screen.
Click on the dropdown menu and choose the desired location for the taskbar. 
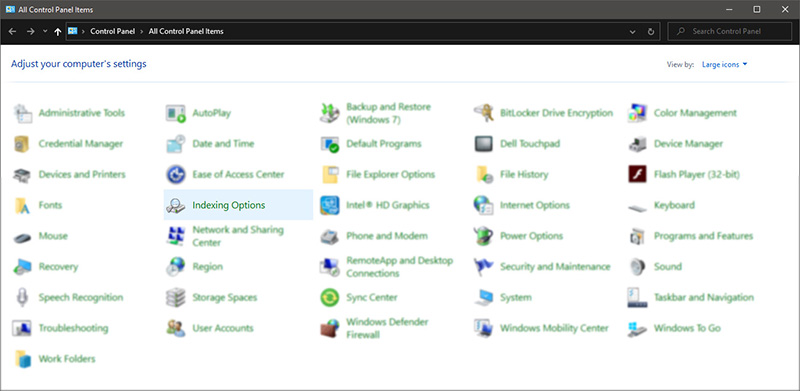
 Once you are in the control panel, switch your view to large icons and locate Indexing options.
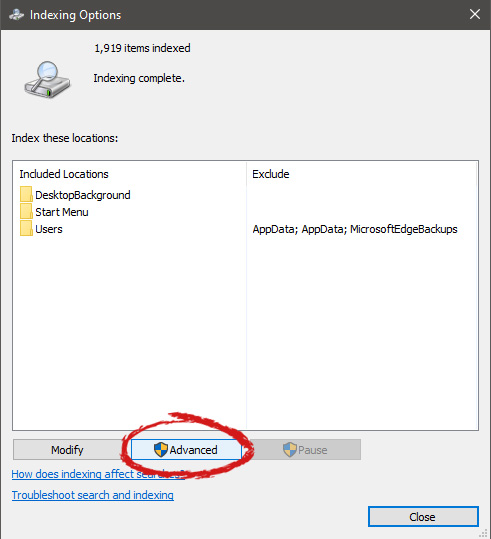
 Inside indexing options, click on advanced.
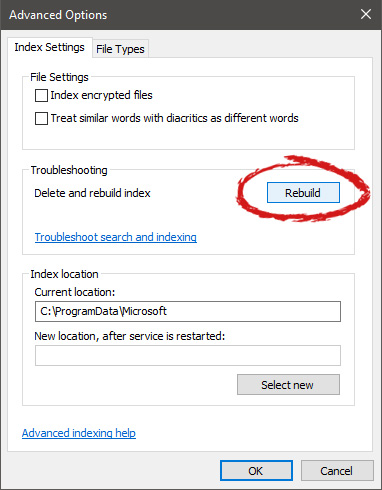
 In advanced options click on the rebuild and confirm.
 Leave your computer to finish and your searches should be working fine now.
  With its Rift model, Oculus set itself as a big player in VR. Now the company is slowly bowing out of the dedicated, tethered VR headset with its latest Quest 2 designed to primarily be a standalone headset.
In case you do not know, tethered headset means that the headset itself is connected to your PC and is using its power to drive your VR experience.
Now technical specifications of Quest 2 are pretty OK and it can drive stuff pretty decently and if you want you can purchase the dedicated cable to connect it to your PC for the full experience of games requiring more capable hardware.
Oculus Quest 2 is the cheapest headset on this list and with its stable performance, is highly recommended.
With its Rift model, Oculus set itself as a big player in VR. Now the company is slowly bowing out of the dedicated, tethered VR headset with its latest Quest 2 designed to primarily be a standalone headset.
In case you do not know, tethered headset means that the headset itself is connected to your PC and is using its power to drive your VR experience.
Now technical specifications of Quest 2 are pretty OK and it can drive stuff pretty decently and if you want you can purchase the dedicated cable to connect it to your PC for the full experience of games requiring more capable hardware.
Oculus Quest 2 is the cheapest headset on this list and with its stable performance, is highly recommended.
 Although the headset itself is nothing revolutionary or special its controllers are. They can track individual finger movements, making games (that take advantage of them) much more immersive than the standard trigger grips on other controllers.
The Index's higher refresh rate makes for smoother action, as well, which is another nice bonus. If you already have an HTC Vive or Vive Cosmos Elite, and their base stations (not the regular Cosmos), you can buy only the controllers.
Although the headset itself is nothing revolutionary or special its controllers are. They can track individual finger movements, making games (that take advantage of them) much more immersive than the standard trigger grips on other controllers.
The Index's higher refresh rate makes for smoother action, as well, which is another nice bonus. If you already have an HTC Vive or Vive Cosmos Elite, and their base stations (not the regular Cosmos), you can buy only the controllers.
 The PlayStation VR is compelling thanks to Sony backing its development, plus the PlayStation 4's affordability and availability compared with gaming PCs. All you need is the headset, a PlayStation 4, and a PlayStation Camera (now included with most PlayStation VR bundles).
Not really the best of the bunch but still one of the top ones for console gaming. Sony is working on a new PlayStation VR system for the PlayStation 5, with redesigned controllers. The new headset hasn't been revealed yet, but the company has released a preview of the new controllers.
The PlayStation VR is compelling thanks to Sony backing its development, plus the PlayStation 4's affordability and availability compared with gaming PCs. All you need is the headset, a PlayStation 4, and a PlayStation Camera (now included with most PlayStation VR bundles).
Not really the best of the bunch but still one of the top ones for console gaming. Sony is working on a new PlayStation VR system for the PlayStation 5, with redesigned controllers. The new headset hasn't been revealed yet, but the company has released a preview of the new controllers.
 HP headset is one which you get if you want the best image quality in VR headset, sadly controllers did not follow the same quality of headset itself. But this is still a pretty decent headset overall and worth the purchase.
 HTC's Vive Cosmos is the upgraded version of the Vive. It features a higher resolution and replaces the external base stations with outward-facing cameras for motion tracking. It's a comprehensive package for whole-room VR.
HTC recently released the Vive Pro 2, a high-end VR headset targeting both enterprise users and consumers. This new headset features a 2,448-by-2,448 resolution display for each eye, making it the highest-resolution headset currently available. It's also more expensive than the Cosmos Elite.
Sadly one thing that is bringing this headset down is the price.
HTC's Vive Cosmos is the upgraded version of the Vive. It features a higher resolution and replaces the external base stations with outward-facing cameras for motion tracking. It's a comprehensive package for whole-room VR.
HTC recently released the Vive Pro 2, a high-end VR headset targeting both enterprise users and consumers. This new headset features a 2,448-by-2,448 resolution display for each eye, making it the highest-resolution headset currently available. It's also more expensive than the Cosmos Elite.
Sadly one thing that is bringing this headset down is the price. “0x800f081E-0x20003, The installation failed in the SECOND_BOOT phase with an error during BOOT operation”In case you don’t know, Microsoft distributes special “N” editions of Windows in Europe and the “KN” editions in Korea. These editions are the same as the standard editions of Windows except that they do not have the Windows Media Player as well as the multimedia playback features. Thus, when the Windows Upgrade fails with the error code and error message and it doesn’t provide much information as to why the update couldn’t be installed, there is something you can do about it to fix the error. Since Windows uses generic error codes and so if you see the error code 0x800f081e, you have to check the error log first. For more details, follow the instructions laid out below. Step_1: You need to navigate to C:$WINDOWS.~BTSourcesPanther and from there look for the text file named “setuperr.log” and open it with a text viewer/editor program like Notepad. Step_2: After opening the setuperr.log file, you should see content that’s similar to this:
C:WINDOWSSoftwareDistributionDownload80b2677d6e15a2a206625bb25a7124feamd64_Microsoft-Windows-MediaPlayer-Package~~AMD64~~10.0.17134.1. Error: 0x800F081E 2019-09-10 20:26:57, Error SP Operation failed: Add [1] package C:WINDOWSSoftwareDistributionDownload80b2677d6e15a2a206625bb25a7124feamd64_Microsoft-Windows-MediaPlayer-Package~~AMD64~~10.0.17134.1. Error: 0x800F081E[gle=0x000000b7]Note: From the content above, it is clear that the Windows Upgrade failed due to complete due to the Windows Media Player. It could be that the log file may contain other error messages and other error codes and if you see the error code 0x800f081e from the list, then you need to uninstall the Media Feature Pack. Step_3: You have to uninstall the Media Feature Pack.
 1. File-infecting Virus
Error code 0xd0000272 is an activation error code that occurs when Windows users are unable to activate their Windows operating system. This error code features common symptoms which include the following:
 Error Causes
When error code 0xd0000272 occurs in Windows 10, it is usually due to issues related to the Windows activation servers. In such a case where the error code occurs due to an activation server that is temporarily unavailable, users may need to wait for a few hours until the activation server is available. Their copy of Windows will then be automatically activated. Once the activation process is not done accordingly, you might encounter other Windows 10 errors such as error code 0xc004f034.
As is the case with many activation error codes, Windows 10 users can perform several manual repair methods to determine the cause as well as fix the error code affecting their device. Instead of passively waiting to see if your activation error code will be fixed on its own, resolve error code 0xd0000272 through the manual repair methods available. Below are simple instructions that when followed can lead to your success.
Check Settings to verify if your machine is connected to the Internet. This is one of the causes of various error codes which affect Windows 10. Also, this manual method is a simple process that can help Windows users recognize or eliminate factors that may or may not be affecting their system. To check your Internet connection, follow the simple instructions below.
Once you’ve been able to verify an Internet connection or troubleshoot any issues related to your network, go to Update & security. Make an attempt to activate your system. If you are successful, you will be able to access all the features and benefits offered via your copy of Windows. However, move to the next manual method below if error code 0xd0000272 reoccurs.
Your inability to activate Windows 10 may be related to an issue with Windows Update. To verify whether or not Windows Update is functioning properly, run Windows Update Troubleshooter.
You’ll need to visit the Microsoft website to access their Windows Update Troubleshoot tool. Once you’ve downloaded the troubleshooter, run the tool. After running the tool, check if you are able to access Windows Update services as well as activate Windows 10. If the problem with error code 0xd0000272 persists, however, follow the instructions provided for manual repair method three detailed below.
Another option available to individuals experiencing error code 0xd0000272 in Windows 10 is to manually disable their machine’s proxy settings. After disabling the proxy settings, remember to open the Windows Update tab to complete the activation process. See the instructions provided below to disable proxy settings.
Once you have successfully disabled your proxy settings, open Windows Update. Select the activation option to access your copy of Windows 10. If you are unable to complete the activation process, however, contact a Windows repair technician.
This occurs when the Windows Firewall service is missing. The service doesn’t start due to permission errors on various registry keys. It is a critical blue screen of death error code that turns the computer screen blue and causes the Windows to shut down. If this error code is not fixed it may start appearing more and more frequently resulting in total system corruption.“There was an error opening the Windows Firewall with Advanced Security snap-in. The Windows Firewall with Advanced Security snap-in failed to load. Restart the Windows Firewall service on the computer you are managing. Error code: 0x6D9”
Error Causes