We couldn’t update system reserved partition” - What is it?
Customers will most likely encounter the “We couldn’t update system reserved partition” error when upgrading to Windows 10 from Windows 7 or Windows 8.1. This error may also come with error code 0xc1900104 or error code 0x800f0922.
Solution
 Error Cause
“We couldn’t update system reserved partition” Windows 10 upgrade error is normally caused by too little space on the System Reserved Partition (SRP). The System Reserve Partition is an additional small partition created by Windows, which stores boot files. The SRP can be filled up with security apps and third-party anti-virus. Once this partition has insufficient space, the system will not be able to upgrade to Windows 10.
Further Information and Manual Repair
Caution: The following steps are complex and need to be done by experienced users especially using the command line. Once an error is made in entering commands, there’s a chance that your device can be put in a no-boot situation, or data stored on the device can possibly get lost.
To upgrade to Windows 10, your device needs to have at least 15MB free space on the System Reserved Partition. Follow the procedure below and then try upgrading again.
First, know if the System Reserved Partition is whether in GPT or MBR partition style:
- Open the Run window by pressing the Windows key + R. Type msc in the window then press Enter.
- Right-click on the Disk where SRP is located then select
- Click over the Volumes
- On the Partition Style line, you’ll see which partition style your device is using, either Master Boot Record (MBR) or GUID Partition Table (GPT)
Second, determine which method you will need:
Depending on what partition style your device has and whether you’re currently on Windows 7 or Windows 8/8.1, there are various methods you need to do.
Method 1: Windows 7 or 8/8.1 with GPT partition
- Click on the Start button and search for cmd. In the results, right-click on Command Prompt then choose Run as administrator. The command prompt window will appear.
- Type mountvol y: /s at the command prompt then press Enter. This command will add the Y: drive letter where you can access the System Partition.
- Type taskkill /im explorer.exe /f then hit Enter. Afterward, restart explorer in Admin mode by typing exe and hitting Enter.
NOTE: While in Admin mode, some apps like OneNote will not run.
- Open File Explorer then type Y:EFIMicrosoftBoot in the address bar. Hit Enter.
- Choose the language folders you want to permanently delete. Language folders are named with four letters split with a hyphen. For instance, you want to delete the German language: choose de-DE.
- Optional: You can also delete unused font files for more space. Type Y:EFIMicrosoftBootFonts in the address bar then press enter.
- Once you permanently deleted the unnecessary files, reboot the device to return to explorer.exe to normal mode and remove the Y: drive letter.
Method 2: Windows 7 with MBR partition
Doing this method will make a permanent, but small increase in the free space of the device’s SRP.
- Delete language folders
a. Open the Run window by pressing the Windows key + R. Type diskmgmt.msc then hit Enter.
b. Select System Reserve partition then right-click on it.
c. Choose Change Drive Letter and Paths then select Add.
d. Type Y for the drive letter then click OK.
e. Click on the Start button and search for cmd. In the results, right-click on Command Prompt then choose Run as administrator. The command prompt window will appear.
f. Type Y: at the command prompt then press Enter.
g. Once you’ve switched to drive Y, type takeown /d y /r /f . then hit Enter.
NOTE: Ensure that the space and period after “f” is included in order for the command to work properly
h. Type icacls Y:* /save %systemdrive%NTFSp.txt /c /t then hit Enter to back up the permission to the drive.
NOTE: Ensure that all files are marked as successful and that no files are marked as failed.
i. Type whoami then hit Enter. Record the username that appears. Afterwards, type icacls . /grant <username you got from whoami>:F /t then press Enter.
NOTE: Ensure that there’s no space between the username and “:F” or the command will not work.
j. In the File Explorer, open the SRP drive and select the Boot folder. Choose the language folders you want to permanently delete. Language folders are named with four letters split with a hyphen. For example: de-DE is the German language while en-US is the U.S. English language.
2. Truncate the NTFS Log:
a. Open the Command Prompt then type chkdsk /L Y: to check the size of the NTFS Log. If the NTFS Log size is less than 5000KB, you need not truncate the file.
b. Type chkdsk /L:5000 /X /F then hit Enter to truncate the NTFS Log.
c. Return to Disk Management window. Select Action menu then select Check if the device’s SRP now has a larger amount of free space. Once there’s enough space, right click the System Reserve Partition then select Change Drive Letter and Paths. Choose Y: then select Remove.
3. If there’s still not enough available space after truncating the NTFS Log, resize the USN journal:
a. Open the command prompt then type fsutil usn queryjournal Y: to display the size in hex value. Convert the hex value to decimal then divide it by 1048576. The result you will get will be in MB. If the journal size is 30MB or more, proceed with truncating the file.
NOTE: To convert the Hex value to Decimal, open the Calculator app in Windows then choose View menu. Select Programmer then choose Hex. Type the Hex value then choose Dec.
b. Type fsutil usn deletejournal /D /N Y: then hit Enter to delete the journal. Type fsutil usn createjournal m=1500 a=1 Y: to recreate the journal having the new log size value.
- Restore permissions
a. Type icacls Y: /restore %systemdrive%NTFSp.txt /c /t in the Command Prompt. Check if the files were successfully processed before proceeding. If you see a message saying some files failed while processing, this is normal since some of the files have already been deleted before performing a backup. However, if there are no successful files indicated, the command was not properly executed.
b. Type icacls . /grant system:f /t then hit Enter to adjust the ACL back to System. Now, you can set the owner of the drive by typing icacls Y: /setowner “SYSTEM” /t /c then press Enter.
c. Check if the device’s SRP now has enough free space by going back to Disk Management and refreshing the data. If the SRP already has sufficient space, you can now remove the drive letter. Right-click on the System Reserved Partition then choose Change Drive Letter and Paths. Select the Y: drive then choose Confirm deleting the drive letter by clicking OK.
Method 3: Windows 8/8.1 with MBR partition
This method makes a larger, but temporary, increase in the SRP free space.
1. Be sure you have an external drive having at least 250 MB free space and formatted as NFTS.
2. Open Run by pressing the Windows key + R. Type mscthen to choose the Recovery Partition. Right-click on it then choose Change Drive Letter and Paths.
3. Select Add then type Y for the drive letter, click
4. Click on the Start screen then type cmd in the search bar. In the results, right-click on Command Prompt then choose Run as administrator. The command prompt window will appear.
5. Switch to another drive by typing Y: in the command prompt. Once you’re in the drive Y, type takeown /d y /r /f .
NOTE: Ensure that space and period after “f” are included in order for the command to work properly.
- Type whoami then hit Enter. Record the username that appears. Afterward, type icacls . /grant <username you got from whoami>:F /t then press Enter.
NOTE: Ensure that there’s no space between the username and “:F” or else the command will not work.
- Once the command is completed, type attrib -s -r –h Y:RecoveryWindowsREwinre.wim then hit Enter.
- Open File Explorer and check the drive letter of the external drive you’re using (In this case, let’s assume F: is the drive letter of the external drive so when you see F: for the rest of the steps, this means the drive letter of the external drive you’re using).
- Type mkdir F:RecoveryWindowsRE in the Command Prompt then hit Enter. Afterward, type xcopy Y:RecoveryWindowsREwinre.wim F:RecoveryWindowsREwinre.wim /h
- Type C:WindowsSystem32Reagentc /SetREImage /Path F:RecoveryWindowsRE /Target C:Windows to map the new path
- Verify if the copy was successfully done then type del Y:RecoveryWindowsREwinre.wim /F
- Return to Disk Management window. Click on the Action menu then hit Check if the device’s SRP now has a larger amount of available space. Once there’s enough space, you can proceed with the upgrade.
- Upon completion of the upgrade, move back the wim file to the Recovery Partition. At this point, you can re-map now the location by:
- Open the Command Prompt then type xcopy F:RecoveryWindowsREwinre.wim Y:RecoveryWindowsREwinre.wim /h and press Enter.
- Type C:WindowsSystem32Reagentc /SetREImage /Path Y:RecoveryWindowsRE /Target C:Windows to re-map to the original path.
- Return to the Disk Management window. Right-click on the Recovery Partition then choose Change Drive Letter and Paths. Select the Y: drive then choose Remove.
Method: Download a Powerful Automated Tool
Not inclined to go through a long and technical process (as highlighted above)?
Download and install a powerful automated tool and get the job done in a jiffy.

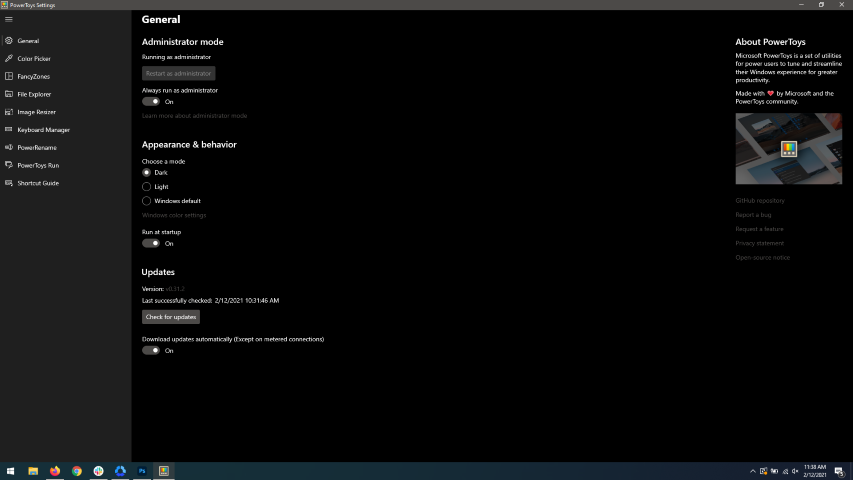 When opened you will be greeted with general settings window. These are settings for power toys themselves, Here you can check for updates, change the looks of power toys, run it on system startup and run them as administrator. Set them up so they best suit your needs.
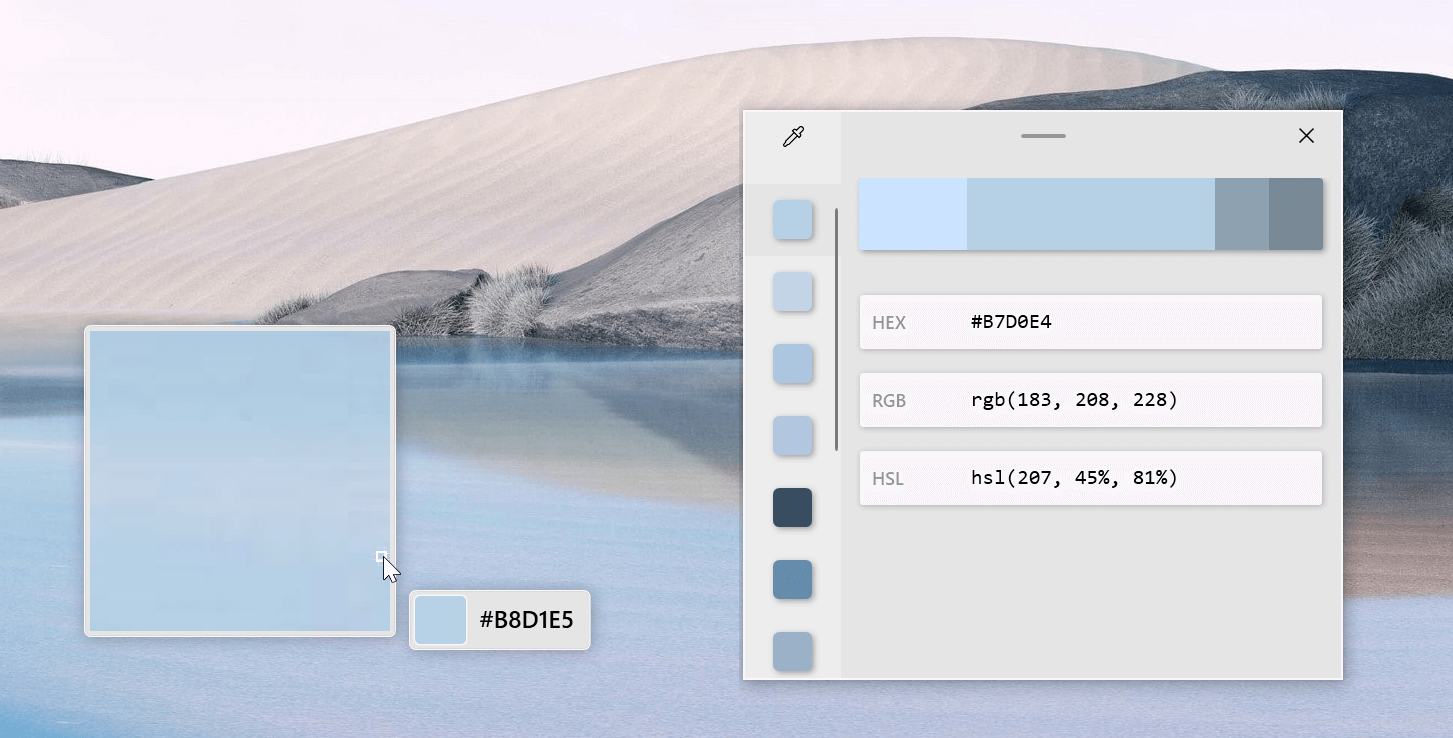 The color picker will let you as the name suggests pick colors, it will sample colors from running applications and windows, snap their values, and place them in the clipboard. A useful application if you are working as a graphic designer, want to create some cool word document, or just want to compare the difference between colors.
After the Color Picker is activated, hover your mouse cursor over the color you would like to copy and left-click the mouse button to select a color. If you want to see the area around your cursor in more detail, scroll up to zoom in. The copied color will be stored in your clipboard in the format that is configured in the settings (HEX by default). The editor lets you see the history of picked colors (up to 20) and copy their representation in any predefined string format. You can configure what color formats are visible in the editor, along with the order that they appear. This configuration can be found in PowerToys settings. The editor also allows you to fine-tune any picked color or get a new similar color. Editor previews different shades of currently selected color - 2 lighter and 2 darker ones. Clicking on any of those alternative color shades will add the selection to the history of picked colors (appears on the top of the colors history list). Color in the middle represents your currently selected color from the history of the colors. By clicking on it, the fine-tuning configuration control will appear, which will let you change the HUE or RGB values of the current color. Pressing OK will add newly configured color into the history of the colors.
The color picker will let you as the name suggests pick colors, it will sample colors from running applications and windows, snap their values, and place them in the clipboard. A useful application if you are working as a graphic designer, want to create some cool word document, or just want to compare the difference between colors.
After the Color Picker is activated, hover your mouse cursor over the color you would like to copy and left-click the mouse button to select a color. If you want to see the area around your cursor in more detail, scroll up to zoom in. The copied color will be stored in your clipboard in the format that is configured in the settings (HEX by default). The editor lets you see the history of picked colors (up to 20) and copy their representation in any predefined string format. You can configure what color formats are visible in the editor, along with the order that they appear. This configuration can be found in PowerToys settings. The editor also allows you to fine-tune any picked color or get a new similar color. Editor previews different shades of currently selected color - 2 lighter and 2 darker ones. Clicking on any of those alternative color shades will add the selection to the history of picked colors (appears on the top of the colors history list). Color in the middle represents your currently selected color from the history of the colors. By clicking on it, the fine-tuning configuration control will appear, which will let you change the HUE or RGB values of the current color. Pressing OK will add newly configured color into the history of the colors.
 FancyZones is a window manager utility for arranging and snapping windows into efficient layouts to improve the speed of your workflow and restore layouts quickly. FancyZones allows the user to define a set of window locations for a desktop that are drag targets for windows. When the user drags a window into a zone, the window is resized and repositioned to fill that zone. When first launched, the zones editor presents a list of layouts that can be adjusted by how many windows are on the monitor. Choosing a layout shows a preview of that layout on the monitor. The selected layout is applied automatically.
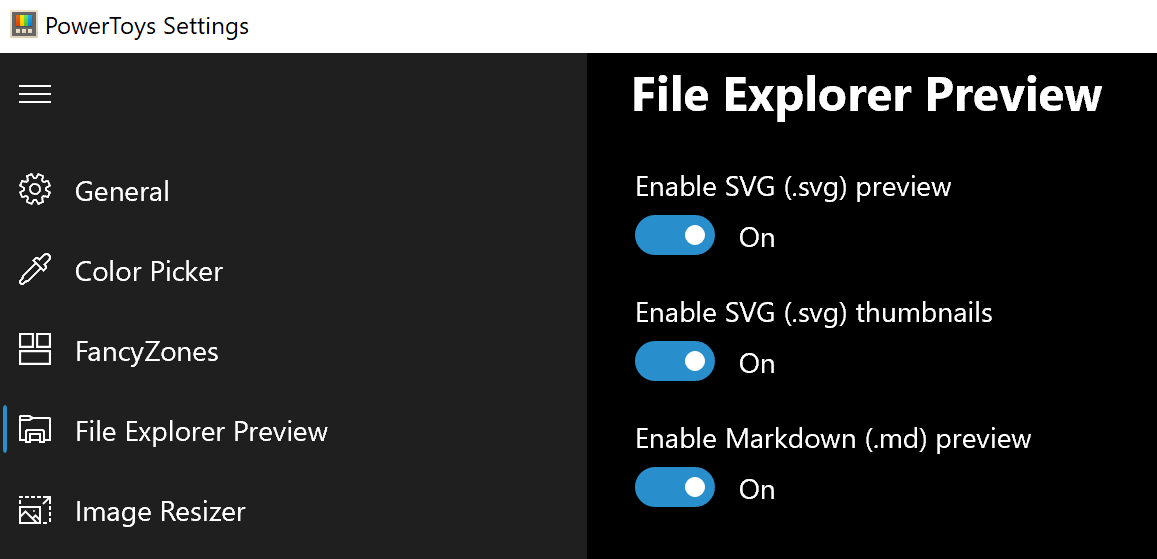 Only 3 options here but maybe some are important to you. This extension lets you enable SVG file preview in File Explorer, enable Markdown preview, and enable SVG thumbnails. Turn on each one you might need.
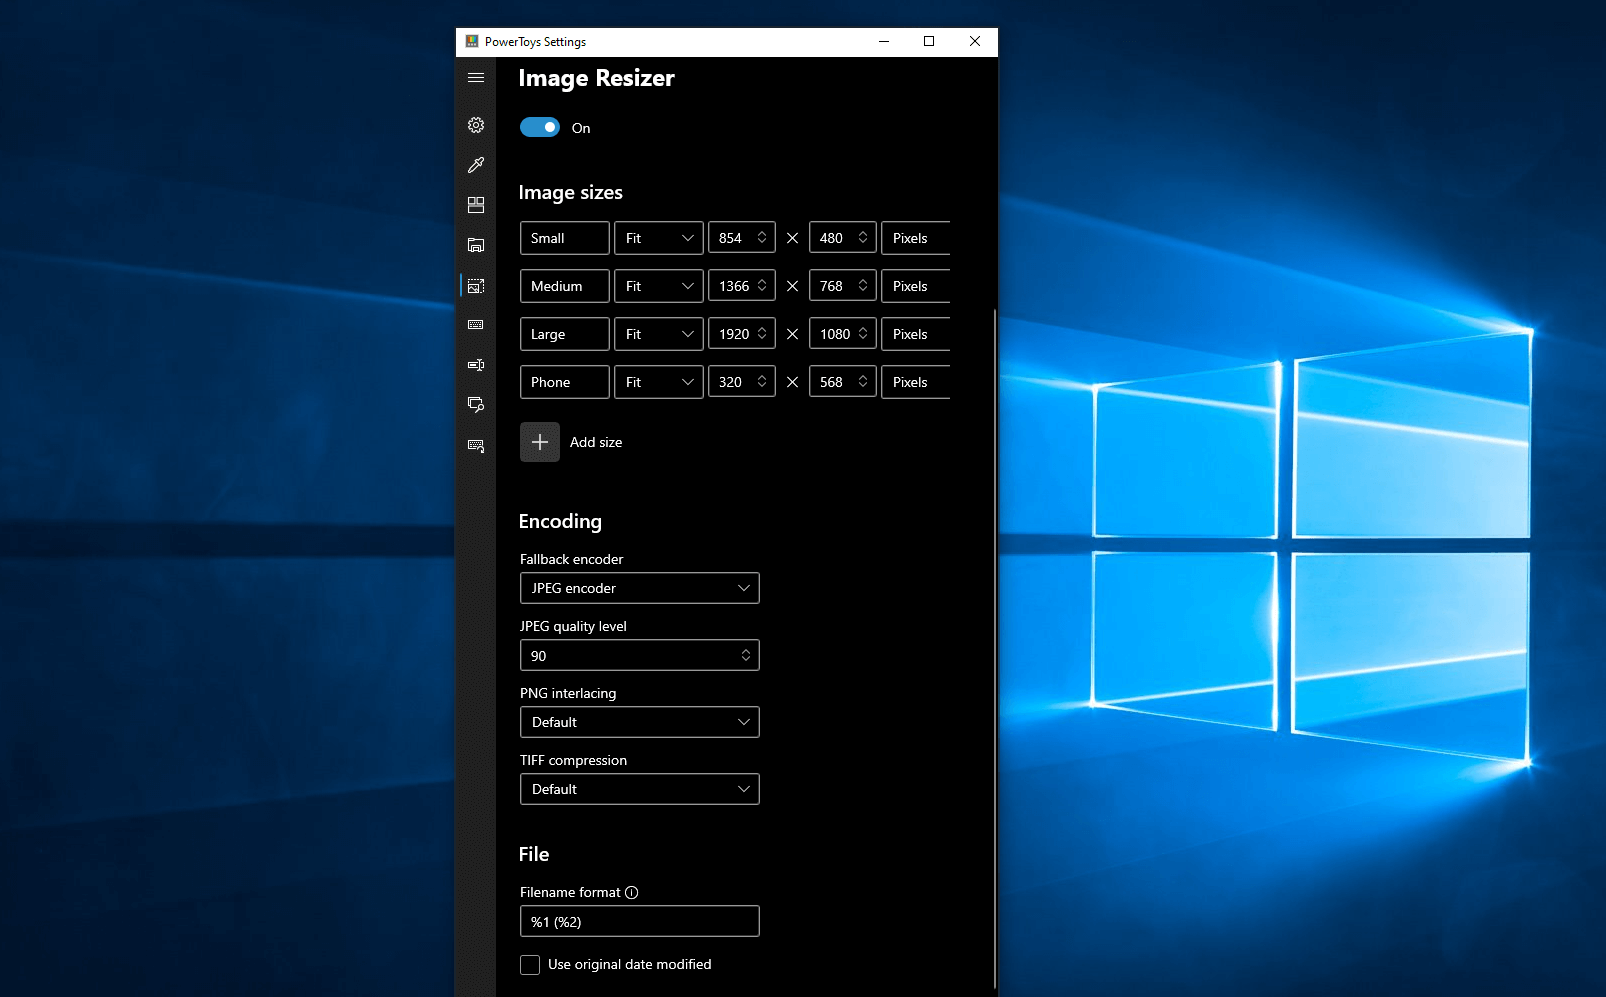 Image Resizer is a Windows shell extension for bulk image-resizing. After installing PowerToys, right-click on one or more selected image files in File Explorer, and then select Resize pictures from the menu. You can specify your own sizes if you want, you can resize when dragging files, you can overwrite files or make new copies of new sizes, and many more options. A very useful tool I am sure plenty of users can use since this eliminates the need for pictures or any other image application for common resizing tasks.
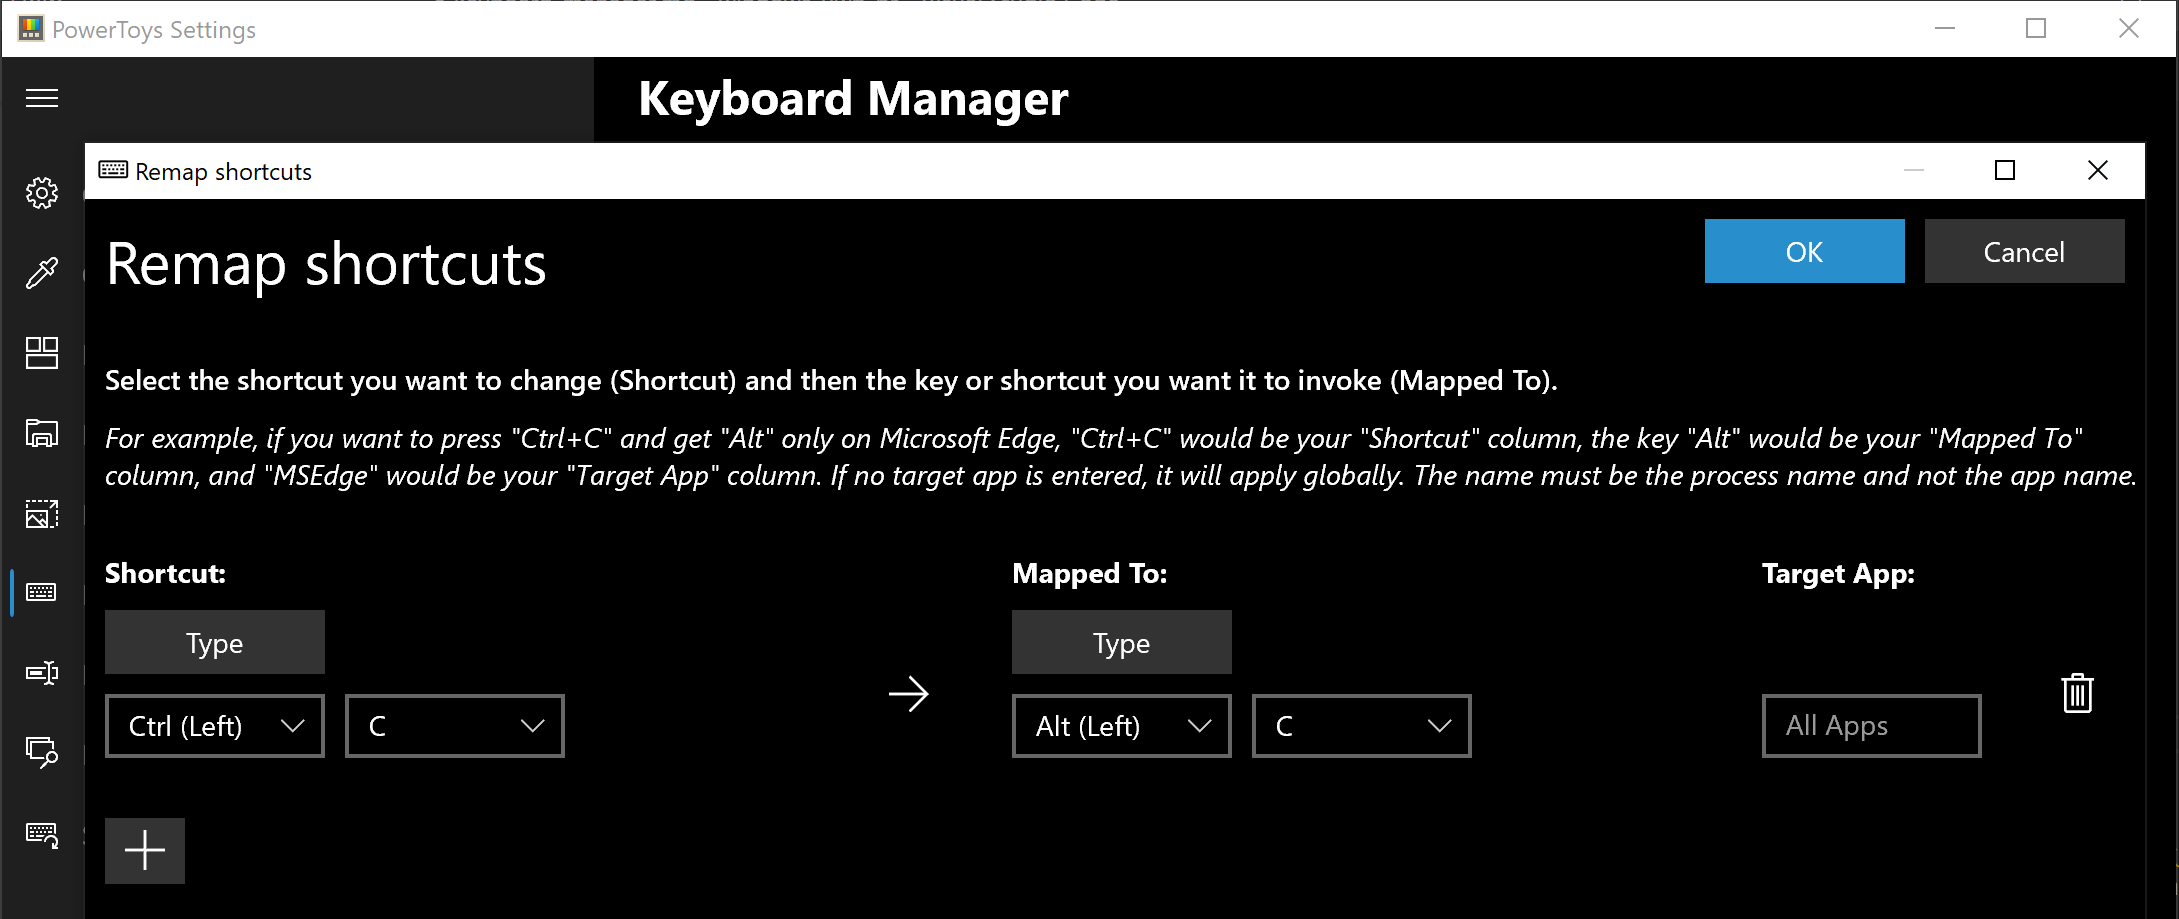 The PowerToys Keyboard Manager enables you to redefine keys on your keyboard. For example, you can exchange the letter A for the letter D on your keyboard. When you select the A key, a D will display. You can also exchange shortcut key combinations. For example, the shortcut key, Ctrl+C, will copy the text in Microsoft Word. With the PowerToys Keyboard Manager utility, you can exchange that shortcut for ⊞ Win+C). Now, ⊞ Win+C) will copy text. If you do not specify a targeted application in PowerToys Keyboard Manager, the shortcut exchange will be applied globally across Windows. PowerToys Keyboard Manager must be enabled (with PowerToys running in the background) for remapped keys and shortcuts to be applied. If PowerToys is not running, key remapping will no longer be applied.
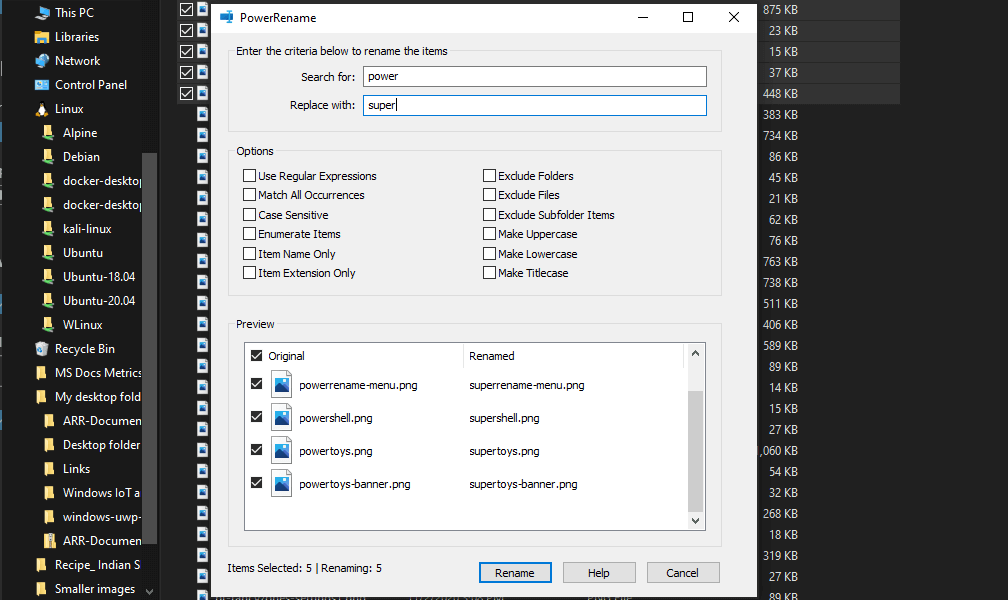 PowerRename is a bulk renaming tool that enables you to:
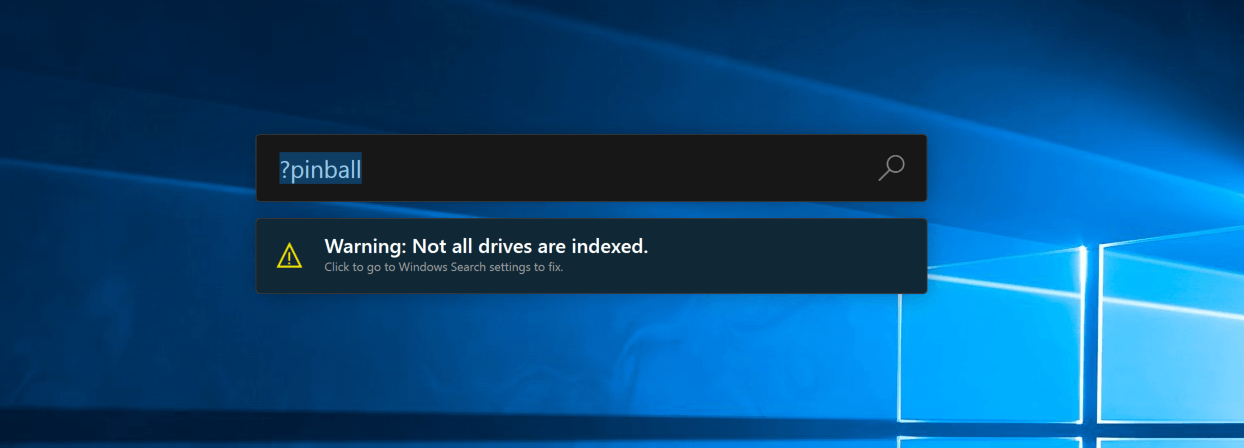 PowerToys Run is a quick launcher for power users that contains some additional features without sacrificing performance.
PowerToys Run features include:
PowerToys Run is a quick launcher for power users that contains some additional features without sacrificing performance.
PowerToys Run features include:
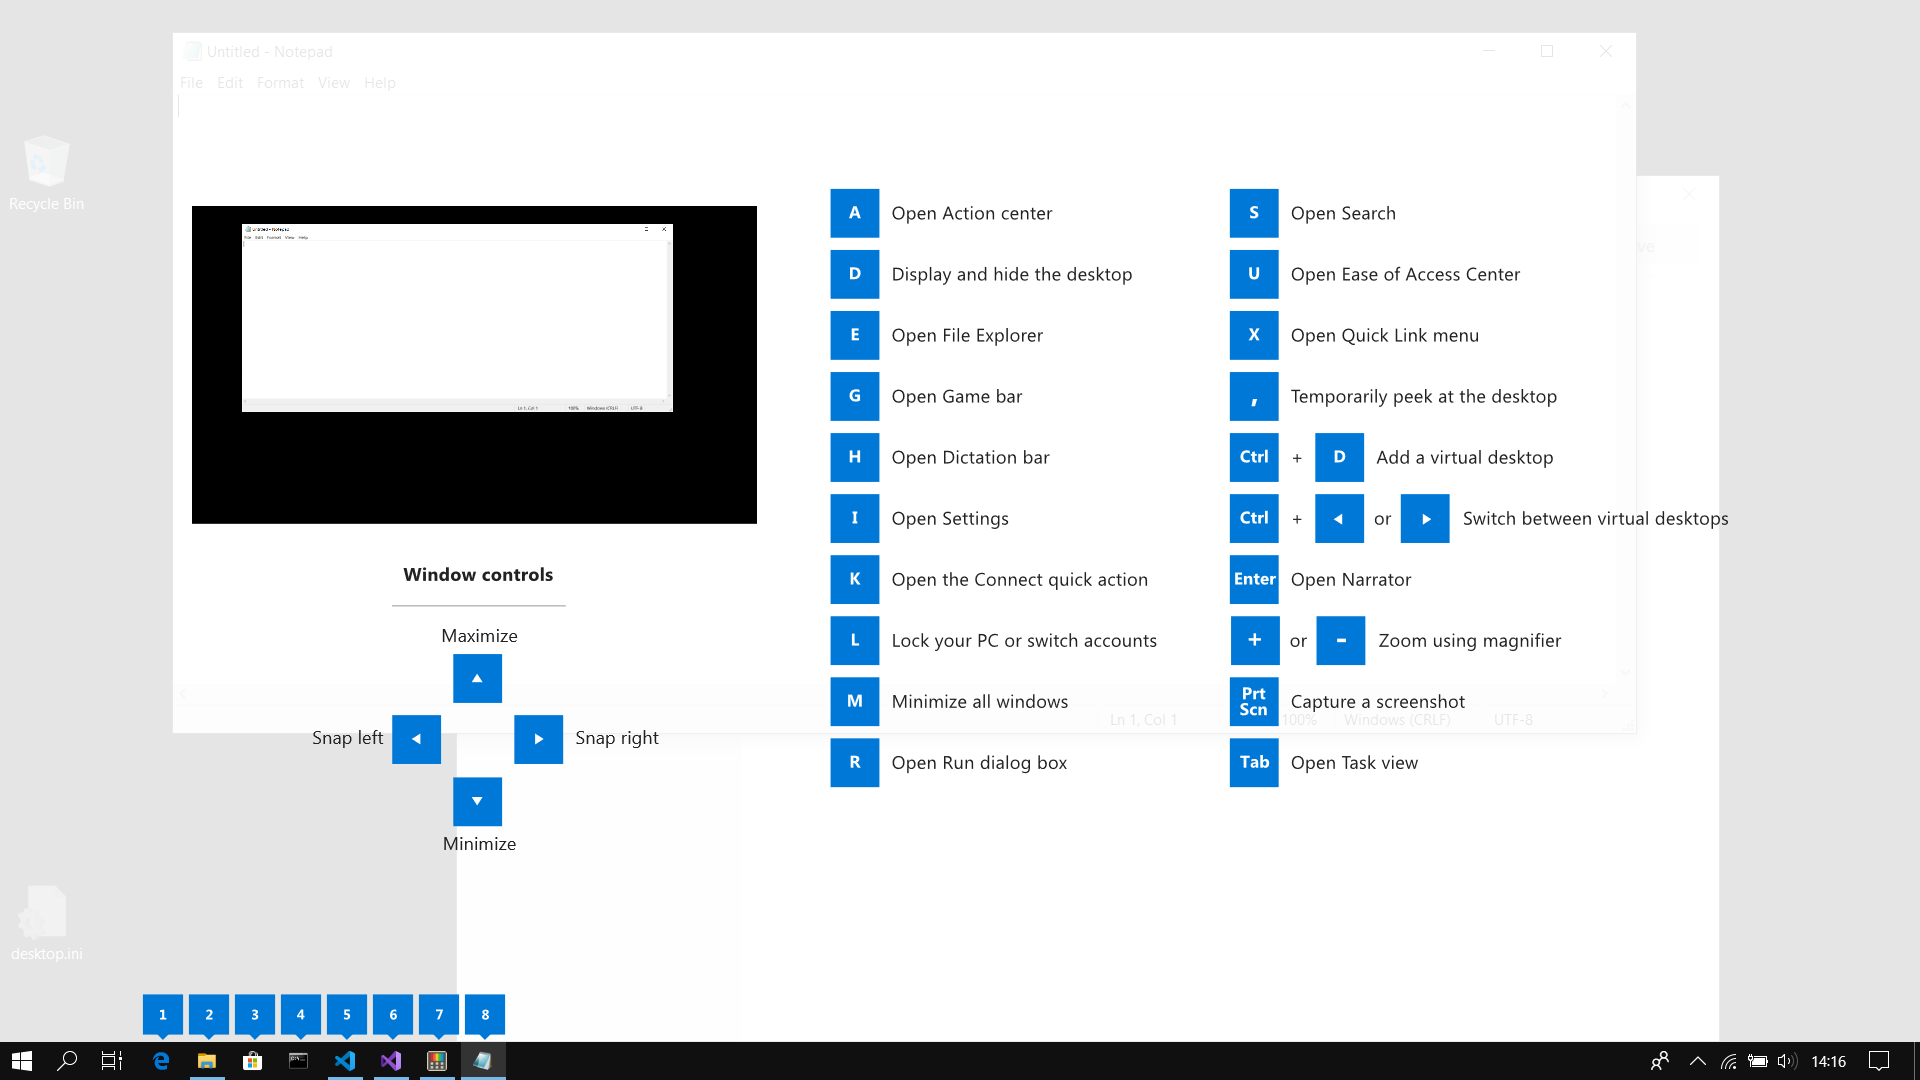 This guide uses PowerToys to display common keyboard shortcuts that use the Windows ⊞ key. Windows key keyboard shortcuts can be used while the guide is being shown and the result of those shortcuts (active window moved, arrow shortcut behavior changes, etc) will be displayed in the guide. Releasing the Windows ⊞ key will make the overlay disappear. Tapping the Windows ⊞ key will display the Windows Start menu.
Hey, you made it till the end, thank you for reading and I hope to see you soon.
This guide uses PowerToys to display common keyboard shortcuts that use the Windows ⊞ key. Windows key keyboard shortcuts can be used while the guide is being shown and the result of those shortcuts (active window moved, arrow shortcut behavior changes, etc) will be displayed in the guide. Releasing the Windows ⊞ key will make the overlay disappear. Tapping the Windows ⊞ key will display the Windows Start menu.
Hey, you made it till the end, thank you for reading and I hope to see you soon.  Many Linux users if not all of them can run their distros from a USB drive but did you know you can run Windows 10 from a USB drive as well?
Microsoft has introduced all the way back to Windows 8 one feature called Windows To Go and it kept it in Windows 8.1 and in Windows 10 as well.
This feature is intended as a convenient way for workers to carry their corporate environments with them, but having your own copy of Windows on a thumb drive could be handy for backup purposes, too, or if you frequently use public machines that lack your preferences/applications or that have a restricted OS.
Many Linux users if not all of them can run their distros from a USB drive but did you know you can run Windows 10 from a USB drive as well?
Microsoft has introduced all the way back to Windows 8 one feature called Windows To Go and it kept it in Windows 8.1 and in Windows 10 as well.
This feature is intended as a convenient way for workers to carry their corporate environments with them, but having your own copy of Windows on a thumb drive could be handy for backup purposes, too, or if you frequently use public machines that lack your preferences/applications or that have a restricted OS.
 With its Rift model, Oculus set itself as a big player in VR. Now the company is slowly bowing out of the dedicated, tethered VR headset with its latest Quest 2 designed to primarily be a standalone headset.
In case you do not know, tethered headset means that the headset itself is connected to your PC and is using its power to drive your VR experience.
Now technical specifications of Quest 2 are pretty OK and it can drive stuff pretty decently and if you want you can purchase the dedicated cable to connect it to your PC for the full experience of games requiring more capable hardware.
Oculus Quest 2 is the cheapest headset on this list and with its stable performance, is highly recommended.
With its Rift model, Oculus set itself as a big player in VR. Now the company is slowly bowing out of the dedicated, tethered VR headset with its latest Quest 2 designed to primarily be a standalone headset.
In case you do not know, tethered headset means that the headset itself is connected to your PC and is using its power to drive your VR experience.
Now technical specifications of Quest 2 are pretty OK and it can drive stuff pretty decently and if you want you can purchase the dedicated cable to connect it to your PC for the full experience of games requiring more capable hardware.
Oculus Quest 2 is the cheapest headset on this list and with its stable performance, is highly recommended.
 Although the headset itself is nothing revolutionary or special its controllers are. They can track individual finger movements, making games (that take advantage of them) much more immersive than the standard trigger grips on other controllers.
The Index's higher refresh rate makes for smoother action, as well, which is another nice bonus. If you already have an HTC Vive or Vive Cosmos Elite, and their base stations (not the regular Cosmos), you can buy only the controllers.
Although the headset itself is nothing revolutionary or special its controllers are. They can track individual finger movements, making games (that take advantage of them) much more immersive than the standard trigger grips on other controllers.
The Index's higher refresh rate makes for smoother action, as well, which is another nice bonus. If you already have an HTC Vive or Vive Cosmos Elite, and their base stations (not the regular Cosmos), you can buy only the controllers.
 The PlayStation VR is compelling thanks to Sony backing its development, plus the PlayStation 4's affordability and availability compared with gaming PCs. All you need is the headset, a PlayStation 4, and a PlayStation Camera (now included with most PlayStation VR bundles).
Not really the best of the bunch but still one of the top ones for console gaming. Sony is working on a new PlayStation VR system for the PlayStation 5, with redesigned controllers. The new headset hasn't been revealed yet, but the company has released a preview of the new controllers.
The PlayStation VR is compelling thanks to Sony backing its development, plus the PlayStation 4's affordability and availability compared with gaming PCs. All you need is the headset, a PlayStation 4, and a PlayStation Camera (now included with most PlayStation VR bundles).
Not really the best of the bunch but still one of the top ones for console gaming. Sony is working on a new PlayStation VR system for the PlayStation 5, with redesigned controllers. The new headset hasn't been revealed yet, but the company has released a preview of the new controllers.
 HP headset is one which you get if you want the best image quality in VR headset, sadly controllers did not follow the same quality of headset itself. But this is still a pretty decent headset overall and worth the purchase.
 HTC's Vive Cosmos is the upgraded version of the Vive. It features a higher resolution and replaces the external base stations with outward-facing cameras for motion tracking. It's a comprehensive package for whole-room VR.
HTC recently released the Vive Pro 2, a high-end VR headset targeting both enterprise users and consumers. This new headset features a 2,448-by-2,448 resolution display for each eye, making it the highest-resolution headset currently available. It's also more expensive than the Cosmos Elite.
Sadly one thing that is bringing this headset down is the price.
HTC's Vive Cosmos is the upgraded version of the Vive. It features a higher resolution and replaces the external base stations with outward-facing cameras for motion tracking. It's a comprehensive package for whole-room VR.
HTC recently released the Vive Pro 2, a high-end VR headset targeting both enterprise users and consumers. This new headset features a 2,448-by-2,448 resolution display for each eye, making it the highest-resolution headset currently available. It's also more expensive than the Cosmos Elite.
Sadly one thing that is bringing this headset down is the price.