 in the menu, on the bottom choose taskbar settings. Once the settings dialog opens, on the right side locate the taskbar location on screen.
 Click on the dropdown menu and choose the desired location for the taskbar.
 The Boot Configuration Data or BCD files have the instructions required by the Windows operating system in order to properly boot the computer. So if you experience any trouble when you boot your computer, then it is possible that it is due to some misconfiguration or even corrupted Boot Configuration Data files. And if you also encounter an error saying,
“The boot configuration data store could not be opened”
while you try to carry out any command on the bcedit.exe, then you’ve come to the right place as this post will guide you on how you can fix this error in Windows 10.
This kind of error could pop up if the system is not able to locate the specified file. It is also possible that the requested system device can’t be found or that the boot configuration data store could not be opened. In addition, when you open the System Configuration or MSConfig, you might notice that there is no Boot data, and according to the reports, is that when you try to dual boot the computer, the installer will replace the default bootloader.
In case you don’t know, Windows’ earlier versions were stored in the “Boot.ini” file. You can find the entry in the EFI firmware boot manager of the EFI-based operating system which is located at EFIMicrosoftBootBootmgfw.efi.
Whatever the cause of the error is, there are several suggestions you can check out to resolve the problem. You can try to set an entry option value in BCD or enable the Advanced options menu, as well as rebuild the BCD. Before you proceed with the troubleshooting options provided below, make sure that you boot your computer into the Advanced Recovery Mode first since that’s where you can find Command Prompt under the Advanced Options. In addition, you also have to suspend or disable BitLocker and Secure Boot on your PC.
Note: When you select the legacy option, the Advanced Options menu will be available during the computer boot up and then you can select into which operating system you can boot your computer into.
The first thing you can do to resolve the issue is to Rebuild Boot Configuration Data or BCD files.
 in the menu, on the bottom choose taskbar settings. Once the settings dialog opens, on the right side locate the taskbar location on screen.
Click on the dropdown menu and choose the desired location for the taskbar.
in the menu, on the bottom choose taskbar settings. Once the settings dialog opens, on the right side locate the taskbar location on screen.
Click on the dropdown menu and choose the desired location for the taskbar. “Installer encountered an error: 0x80070424, The specified service does not exist as an installed service.”While you’ll see the following error message in the Windows Store:
“The were some problems installing updates, but we’ll try again later. If you keep seeing this and want to search the web or contact support for information, this may help: (0x80070424).”To fix this error, you can try to re-register the Background Intelligent Transfer Service DLL file or run the Windows Update and Store apps troubleshooters. You can also reset the Windows Update-related folders or the Microsoft Store or fix the Windows Update files by using the DISM tool. On the other hand, you can also use the Registry Editor or check Windows Services. For more details regarding these potential fixes, refer to each one of the given options below.
net stop wuauserv net start cryptSvc net start bits net start msiserver
net start wuauserv net start cryptSvc net start bits net start msiserver
chkdsk /f /r
 Error Causes
“It looks like you don’t have permission to save changes to this file. Try saving a copy instead.”There are several options you can explore to resolve this error. You can try updating the Microsoft Photos app or verify the ownership of the destination folder. You can also re-register and reinstall the app. For more detailed instructions, make use of the options provided below.
Set-ExecutionPolicy Unrestricted
Get-AppXPackage -AllUsers | Foreach {Add-AppxPackage -DisableDevelopmentMode -Register "$($_.InstallLocation)AppXManifest.xml"}Note: In the command given, do not forget to replace the “PackageFullName” with the actual package name for the Photos app. After executing the command, it will uninstall the Photos app from your computer so you need to install it again from the Windows Store by simply looking for it. Once you found it, just click on install to start the installation process.
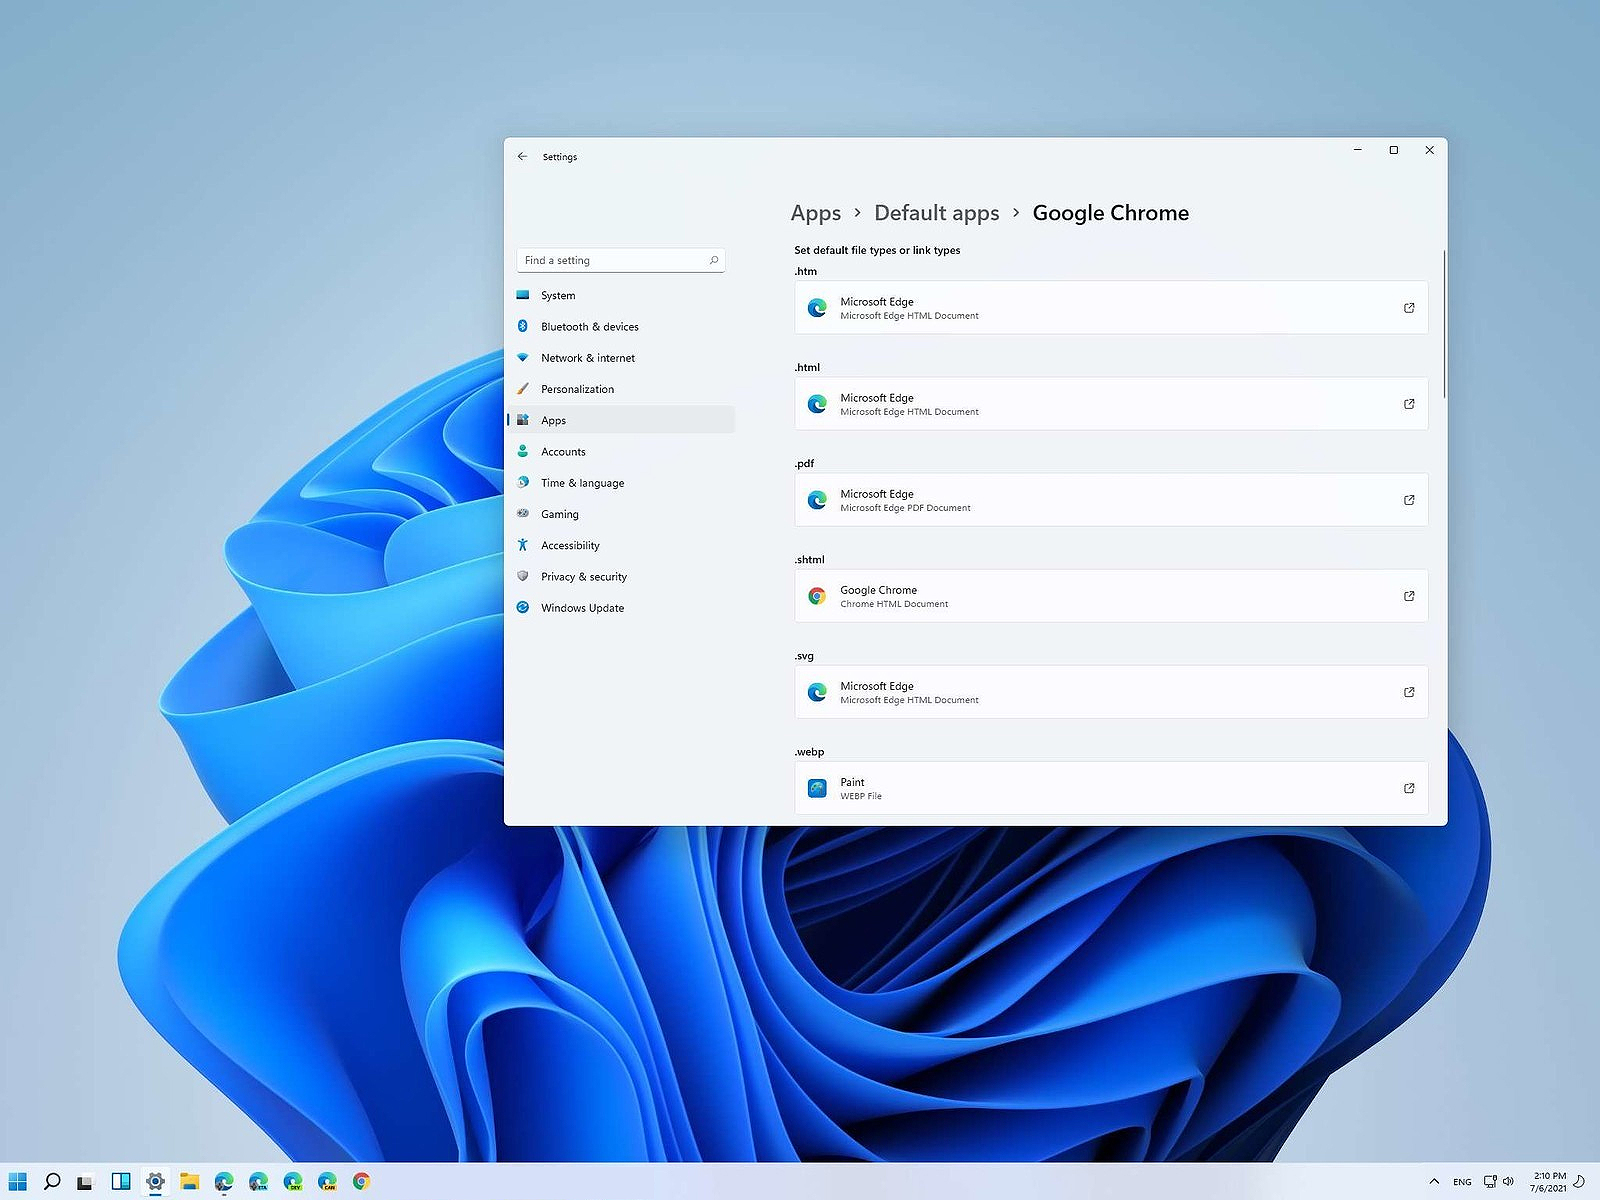 Same as in previous Windows versions, Windows 11 will also use certain applications as default ones for opening certain file types and file extensions. And yes, same as in previous versions it will come preconfigured for certain file types and associated applications like for example photos for pictures.
Of course, users usually have their own favorite applications for certain file types and much more prefer to open them inside the application of their choice instead of the default one.
We can change the default application like in previous Windows versions but this time there are two ways and overall more control of this process. Windows 11 has settings for choosing default file type applications and default file extension applications giving you more control of this process.
Same as in previous Windows versions, Windows 11 will also use certain applications as default ones for opening certain file types and file extensions. And yes, same as in previous versions it will come preconfigured for certain file types and associated applications like for example photos for pictures.
Of course, users usually have their own favorite applications for certain file types and much more prefer to open them inside the application of their choice instead of the default one.
We can change the default application like in previous Windows versions but this time there are two ways and overall more control of this process. Windows 11 has settings for choosing default file type applications and default file extension applications giving you more control of this process.