There are instances when you might encounter an error that says, “Something went wrong, We couldn’t start your program” when you open any Office program. This could be due to an issue with the Office file and any Office app you open throws the same error message. This applies to Office 2019/2016, Office 365 Home, Office for Business as well as Business editions. In this post, you will be guided in what you can do to resolve this error.
There are several potential fixes for this error, you might only have to restart your computer or you may have to repair Office from Apps and Features or you could also uninstall and install it back again. For more details, follow each one of the provided options below.
Option 1 – Restart your computer
You might be unable to launch any Office app due to some background process that got stuck or there might be some glitch in the system. Thus, the first thing you can do to resolve the error is simply restarting your computer. Once you’ve restarted your computer, open the Office app again or you could also try to sign in back with your Microsoft account that’s connected to Office. If you’re not quite sure which account you were using, you can follow these steps:
Open any Office app.
Then click on File and look for your name located in the top-right portion.
Now click on it. This will display the email or Microsoft account that’s related to Office.
Option 2 – Try repairing Office from Apps and Features
Since Windows 10 offers some repair features that could replace some of the core files with the original files, you can take advantage of such a feature to fix the “Something went wrong, We couldn’t start your program” error when opening any Office app.
Open Windows settings and click the Apps and Features option.
Next, scroll down until you see the Microsoft Office installation option. Select it and click on Modify.
This will open a window and from there, select Quick Repair or Online Repair and click on the Repair button.
Note: When you choose to repair, you might be given two options which depend on how Microsoft Office was installed. For instance, it was installed via Web Installer or Offline Installer (MSI-based). In Web Installer, select Online Repair > Repair when you’re prompted on how you would like to repair Office. While in MSI-based, you have to select Repair under “Change your installation” and then click on Continue. The repair process makes sure that the app data remains untouched.
Option 3 – Try to uninstall and reinstall Office
If neither of the two given options above worked, then you might want to uninstall Office and reinstall it. All you have to do is download the Microsoft Office Uninstall tool from the official site of Microsoft and run it. This will remove any incomplete Office installation as well as unwanted files. It will also get rid of all the Office apps and settings on your computer.
The previous Windows versions all came with Microsoft's browser Internet Explorer. A lot of users love it because not only that it is easy to use. It is also very fast. Users didn’t have to worry about compatibility because it is almost always compatible with its Windows Version.
When they introduced Windows 10, they changed the name of the browser from Internet Explorer to Microsoft Edge. It is faster and more user-friendly compared to its predecessors. But after the Creator Update, some experienced receiving the inet_e_resource_not_found error code.
In contrary to what everyone expects, you actually don’t have to uninstall and reinstall the Microsoft Edge App. What you can do is reset the browser in your Apps & Features Settings in your Microsoft Settings.
To reset the browser you can follow the steps below:
Click on the Windows icon and go to settings.
Click on Apps and this will bring you to the Apps & Features page. Look for Microsoft Edge from the list of Apps and click on it.
Choose Advance Option
Scroll down then Under Reset, click on repair or reset. When you repair it will fix the existing problem but the data that caused the problem may still be present and can still cause problems. If you click on reset, it will delete all the cache and cookies that are installed in your browser but it will save your Favorites as well as your bookmarks.
Another way to resolve this is by disabling the feature TCP Fast Open on Microsoft Edge. To disable this, go ahead and follow the steps below:
Open the Microsoft Edge browser.
Type in about: flags on the Address (URL) bar.
Under Networking, uncheck the Enable TCP Fast Open.
Close your Microsoft Edge browser and open a new one.
Flushing the DNS also worked for other Users. Sometimes, the error code the inet_e_resource_not_found is caused by a corrupted DNS cache. There are 2 ways to flush your DNS. The first option is to use the command prompt to run the command.
To access the Command prompt or CMD, you can search for it on Cortana or you can click on the Windows icon to access the Programs, scroll down to the Windows System folder and click on it.
A dropdown menu will show up, click on Command Prompt which is the first on the list.
Type in the code ipconfig /flushdns and press enter.
There will be a message that will show that says Windows IP configuration successfully flushed the DNS Resolver Cache
Exit the CMD by typing exit and press enter.
The easiest way to do this is to Press the keys Window + R on your keyboard. Type in ipconfig /flushdns in the search box and hit enter or click on OK.
These are only some of the ways to resolve the inet_e_resource_not_found. There are other ways to further troubleshoot this issue such as reinstalling your Wifi Adapter Driver or adjusting the DNS Server Address. But most of the time, users are able to resolve the issue with the steps provided above.
Distributed Component Object Model or DCOM is a module on Windows computers that allows computers to run programs over a network to another computer. It is a software component from Microsoft that allows COM objects to communicate with each other while that program is remotely running over the network. The COM Model is another extension of the DCOM model which both work together in order for the intended task to be executed. To make this module work, there are three components needed such as the Class Identifier or CLSID, the Programmatic Identifier or PROGID, and the Application Identifier or APPID.
However, DCOM does not always work as expected as it could still encounter some errors. One of them is error 1084. Because of this error, the execution of programs in a remote computer on the network would be interrupted. So if you encounter the DCOM error 1084 when you try to start a service like running the DISM tool or in other scenarios on your Windows 10 computer, then this post could help you. Refer to the instructions given below to start troubleshooting the problem.
Option 1 – Try checking the status of DCOMLAUNCH Service or DCOM Server Process Launcher and its 3 dependencies
The DCOM Server Process Launcher service launches both COM and DCOM servers in response to object activation requests. This is why if this service is stopped or disabled, the programs that are using COM and DCOM won’t properly function. So you need to make sure that the DCOMLAUNCH service is running.
In the Cortana search box, type “services” and click on the Services icon to open the Services Manager. Alternatively, you can also tap the Win + R keys to launch the Run prompt and then type “services.msc” in the field and hit Enter to open the Services Manager.
Next, check the following services:
DCOM Service Process Launcher
Background Tasks Infrastructure Service
Local Session Manager
Remote Procedure Call (RPC)
Then right-click on each one of the services and click on their Properties.
After that, select Automatic from the drop-down menu of Startup Type and make sure that all the aforementioned services are Running.
Now click OK for each one of the services.
Option 2 – Troubleshoot the problem in a Clean Boot State
There are instances that some conflicting programs installed in your computer might be the one that’s causing DCOM error 1084. To identify which program is causing the problem, you need to put your computer in a Clean Boot State. To do so, follow the steps below.
Log onto your PC as an administrator.
Type in MSConfig in the Start Search to open the System Configuration utility.
From there, go to the General tab and click “Selective startup”.
Clear the “Load Startup items” check box and make sure that the “Load System Services” and “Use Original boot configuration” options are checked.
Next, click the Services tab and select the “Hide All Microsoft Services” check box.
Click Disable all.
Click on Apply/OK and restart your PC. (This will put your PC into a Clean Boot State. And configure Windows to use the usual startup, just simply undo the changes.)
From there, start to isolate the problem by checking which one of the programs you installed recently is the root cause of the problem.
Option 3 – Try to use the DISM tool
You might want to repair potentially corrupted files in your system as having them could also trigger the DCOM error 1084. To repair these corrupted system files, you can run the DISM commands:
Tap the Win + X keys and click on the “Command Prompt (Admin)” option.
After that, input each one of the commands listed below sequentially to execute them:
Dism /Online /Cleanup-Image /CheckHealth
Dism /Online /Cleanup-Image /ScanHealth
Dism /Online /Cleanup-Image /RestoreHealth
Once you’ve executed the commands given above, restart your computer and check if the DCOM error is now fixed.
Option 4 – Reset your computer
Tap the Win key or click on the Start button located in the Taskbar.
Then click on the Power button at the bottom right portion of the screen.
Next, press and hold the Shift key on your keyboard and then click on Restart. This will restart your Pc into the Advanced Startup options.
Note: Once you have access to the Advanced Startup options, you have to go to the setting which allows you to Reset your Windows 10 PC. All you have to do is select Troubleshoot > Reset this PC to reach the following screen
Afterward, select either the “Keep my files” option and then proceed to the next on-screen instructions that follow to reset your Windows 10 computer without losing your files.
Ntdll.dll is a type of DLL (Dynamic Link Library) error. DLL errors are some of the most common but complicated errors to troubleshoot and resolve by PC users. The Ntdll.dll error message is displayed in the following formats:
"STOP: 0xC0000221 unknown hard error C:WinntSystem32Ntdll.dll
"NTDLL.DLL Error!"
"STOP: C0000221 unknown hard error SystemRootSystem32ntdll.dll"
"[PROGRAM NAME] caused a fault in module NTDLL.DLL at [ANY ADDRESS]"
"AppName: [PROGRAM NAME] ModName: ntdll.dll"
"Crash caused in ntdll.dll!"
"Unhandled exception at [ANY ADDRESS] (NTDLL.DLL)"
You may come across the ‘Ntdll.dll error’ pop-up either when you try to run a program or after using it or while the program is running. It may also appear when Windows starts or shutdowns or even during Windows installation.
Solution
Error Causes
The Ntdll.dll error code can be triggered due to numerous reasons such as:
DLL file corruption due to hard drive bad entries
Missing DLL files
Corrupt hardware drivers
Viruses
DLL file misconfiguration
It is recommended to resolve this error code immediately on your PC to avoid inconvenience and serious PC damages like program lockouts, system failure, freeze, and crash
Further Information and Manual Repair
All the causes for ‘Ntdll.dll’ are linked with the registry.
The registry is the main database of your system. It saves all the activities and files on your PC including the important data file and unnecessary files such as the junk files, temporary internet files, and obsolete files, files of the programs installed, bad entries, invalid registry keys, and cookies.
These files take up also hard drive space thereby causing dll file damage, disk fragmentation, and data overload. Ntdll.dll error may also occur to due viral infection and malware attack.
There are 2 ways to resolve the Ntdll.dll error. One is to install 2 separate tools, the registry cleaner, and antivirus, and run them separately to scan for errors. This option is time-consuming and running an antivirus can also slow down the speed of your computer.
Therefore we recommend that you opt for the second alternative that is to download Restoro.
Why Restoro.
This is an advanced, innovative, and multi-functional PC repair tool embedded with several powerful PC repair utilities like a registry cleaner, an antivirus, and a system optimizer. This is a one-stop solution for all your PC errors.
It is user-friendly, safe, efficient, and compatible with all Windows versions. The registry cleaning feature scans for all registry issues.
It wipes out all the unnecessary files from the hard drive, repairs the damaged dll files, and restores the registry, thereby resolving the Ntdll.dll error code right away.
The privacy error utility functions like an antivirus. It detects and removes all the malicious software like viruses, malware, Trojans, and spyware. Simultaneously, the system optimizer feature boosts the PC speed.
Click here to download Restoro and resolve the Ntdll.dll error on your PC today!
In case you don’t know, Windows 10 now allows users to check the Bluetooth battery level of devices. More often than not, the accessories or peripherals users use for their Windows 10 devices are connected to it using Bluetooth technology. This high-speed low-powered wireless technology is designed to link mobile devices, computers, and other network devices over a short distance wirelessly.
Monitoring the battery level of a device where Bluetooth is enabled isn’t an easy task as most of these devices do not support the Bluetooth battery monitor or the battery level display. And even when on devices that do, you still have to install additional software to find it. However, Windows 10 eliminates this requirement and all you have to do is add a Bluetooth device and connect that Bluetooth device. How? Follow the instructions provided below.
Step 1: Adding a Bluetooth Device
The easiest way to get your Bluetooth device battery to be displayed on your Windows 10 screen is to simply add a Bluetooth device. To do so, follow these sub-steps:
First, turn on the Bluetooth mode on your device.
Next, go to Windows Settings > Devices > Bluetooth & other devices.
From there, click on the “+” button next to the ‘Add Bluetooth or other devices” option and select the type of device you want to add.
Step 2: Connecting the Bluetooth Device
Once you’ve added the device, it will be visible under the “Add a device” screen.
Now select the newly added Bluetooth device and click the “Done” button.
After that, it will now be connected. Go back to the “Bluetooth & other devices” window and scroll down to the section of “Mouse, Keyboard, and Pen”.
From there, move the cursor alongside the connected device to display its battery level.
Keep in mind that there are several ways in which you can display the battery information of the Bluetooth device. However, Windows 10 understands only one of them per se. So if your device is not a Bluetooth Low Energy device, Windows 10 won’t be able to show its battery information and won’t display its battery level.
I do not know about you, but I prefer to set my Windows to be more to my liking and not how Microsoft thinks it should be. Let’s face it, not all users feel comfortable whit Microsoft settings and idea how things should be.
One of the things I particularly did not like even in Windows 10 is icons that come by default on my taskbar, now so far, well until the latest Windows 11 update you could remove default taskbar icons the same way as in Windows 10, just right-click on them and unpin, sadly with latest update build on Windows 11 this option has been removed.
In order to remove default icons from the taskbar, one must go now to Windows 11 settings and choose from there which one you would like to be placed on it. Of course, this is nothing game-breaking but it still feels strange why the standard option has been removed, it just makes no sense but lately not many things that come from Microsoft do.
Isn’t it annoying when you get an error message pop up stating ‘Cannot find propsys.dll” or “propsys.dll not found” when you start your computer or open a particular program?
The propsys.dll file is crucial to the Windows operating system. This file is located in one of the following locations: "C:\Windows", C:\Program Files, C:\WINDOWS\system32, or C:\Program Files\Common Files". And the propsys.dll error indicates that the propsys digital library file is damaged and corrupt.
The propsys.dll error may lead to a very unstable operating system.
It may also hamper your ability to access many programs on your computer, lead to program and system crash and slow down the system’s performance. Therefore, to avoid these system threats, it is advisable to fix the error immediately.
Solution
Error Causes
The common causes of propsys.dll file error are:
Registry problem
The propsys.dll file is damaged due to a virus or spyware
Improper software removal
Hardware Failure
The propsys.dll error message is displayed in either of the following forms:
Propsys.dll not found
Cannot find [Path]propsys.dll
This application failed to start because propsys.dll was not found. Reinstalling the application may fix this problem
The propsys.dll file is missing
Further Information and Manual Repair
There are many ways to fix the propsys.dll error. However, for optimum results from the fix, you must first identify the cause of the error and then choose the solution accordingly.
Recommended Solution for Registry Issue
If you use your system daily the resulting wasted/invalid/junk entries may dilate the registries.
This can result in registry malfunctioning which may result in a propsys.dll error on your screen. When this happens, it is advisable to use a registry cleaner to fix the problem.
Registry cleaner helps clean up the junk entries and repairing the corrupted registries.
For this, you will first have to download a registry cleaner repair tool. Download and install the software on your computer. After downloading it, click the start scan button to run. This helps scan and diagnose system errors on your computer in seconds.
Once the scanning is complete, click on the fix button to repair the registry problem.
Recommended Solution for File Damage and Corruption
Use the ‘System Restore’ option to restore corrupt and damaged files. The ‘System Restore’ function will help you get a fresh copy back and simultaneously help fix the error. Here’s how to use and access the ‘System Restore’ function on your computer:
Simply go to the start menu and in the search box type restore. Once you type, it will show you the system restore option. Now select ‘choose a different restore point’. After this, you will be presented with a list of restore points.
Choose a point that you believe happened before the propsys.dll error. Confirm your selection and restart.
Another alternative solution for file damage is to run a virus scan of your entire system; the damage could be related to a virus or malware infection.
Recommended Solution for Hardware Failure
If a propsys.dll error occurs due to hardware failure, then it is advisable to update the drivers for hardware devices that you think are related to propsys.dll. For example, if you receive the propsys.dll error when you play a 3D video game, then try updating the driver for your video card.
Afraid of the growing threats online? As you should be. But we’re here to show you what kinds of malware are out there and what you can do to keep them at bay.
Malware definition
Malware comes from the term malicious software. It’s software designed to attack and exploit devices and networks to the advantage of the hacker who made it.
Malware can be transmitted in different ways. Most commonly this happens via infected USB drives, downloadable files or malicious websites. Depending on the type and ultimate goal, the consequences of a malware attack can range from negligible to catastrophic.
Credit: Ed Hardie on Unsplash
What kinds of malware are there?
1. Virus
A virus is typically spread via infected files, websites or links. It’s one of the oldest malware types and one of the most difficult to get rid of. That’s because, once activated, it replicates itself - hence the name.
It can perform different kinds of attacks, depending on what the creator wants to achieve. The main characteristic of a virus is that it really doesn’t show itself until you activate the host. So that’s a scary thought for sure.
2. Adware
Sometimes an ad blocker isn’t enough to fight off unwanted ads. And some of them can, unfortunately, be malicious. They may redirect you to infected sites or prompt downloads of risky files. Even just opening a malicious site can lead to data theft.
So, definitely be careful when clicking around. Even if an ad seems completely legitimate, you can never be too sure.
3. Ransomware
Through ransomware, cybercriminals gain access to a user’s data and use it to extort them for money. Basically, the user is threatened with data deletion or even exposure if a ransom isn’t paid by a specific deadline.
This is a particularly nerve-wracking type of malware. If it targets an individual, it preys upon their sense of anxiety, fear, guilt and even shame. If it targets a business (which is a lot more common), it preys upon not only that business’s profit but also every single one of their customers and their data.
4. Trojans
This type of malware disguises itself very well as a legitimate-looking program. Once you download it, hackers can get full access and control of your device, data and network. They can even be hidden in games, apps and attachments. They cannot self-replicate, though, so we guess that’s… good news?
5. Worms
Worms can replicate, just like viruses, but you don’t need to actually activate the infected program for them to get going. They can be used for various purposes, ranging from data deletion to file encryption to support a ransomware attack.
Credit: Growtika on Unsplash
6. Spyware
Spyware refers to malicious software that stays hidden on your computer and monitors your activity. The best-known type is keyloggers. This can be used to steal sensitive data like passwords and banking information.
7. Rootkits
Rootkits are among the most dangerous types of malware. They allow administrative access and full control of a device, which lets hackers continue hijacking all your data and monitoring your activity without your knowledge.
8. Botnets
Botnets are networks made up of bots - computers that cybercriminals have infected with malicious software. Bots and botnets give hackers remote access to users’ devices and allow them to spy on your camera, take screenshots, memorize passwords and launch Distributed Denial of Service attacks. This one truly makes your hair stand on end.
What can you do about it?
You know the old adage - better safe than sorry. And trust us, malware attacks are such a pain in the you-know-what that you really don’t want to be sorry.
Luckily, there are simple solutions that can shield you from most digital threats these days. What you want to be looking at is a solid antivirus program. Well, technically, you need an antimalware program, but since the latter evolved from the former, we still mostly refer to them as antivirus software. The majority of antimalware programs these days don’t just shield you from potential risks online, but include additional features as well. For example, some Bitdefender antivirus packages also include parental control and a VPN. And Bitdefender is not just for PCs either - it offers protection for your beloved iPhone or Android as well. You can throw in a password manager in there too, for an additional layer of security.
Credit: Dan Nelson on Unsplash
If you aren’t too concerned about all these various threats or feel like you don’t need extra security, you can at least take a step to protect your information from being exposed to lurking cybercriminals as you’re browsing. This can be done through a good VPN like Surfshark, which hides your identity in the digital space and prevents your data from being tracked.
Choosing the right protective software is especially important if you have children with access to the Internet, since they’re unfortunately even more vulnerable to malicious attacks. If you aren’t sure what the right kind of antimalware program is right for you, you can reach out to us and we’ll be happy to help keep your entire household or office digitally secure.
The bottom line
The truth is that there’s no way to be 100% protected in the online world. Hackers are constantly coming up with new ways to infiltrate our devices. But malware-battling software evolves along with them and there’s still plenty you can do to keep risks away. Stay safe!
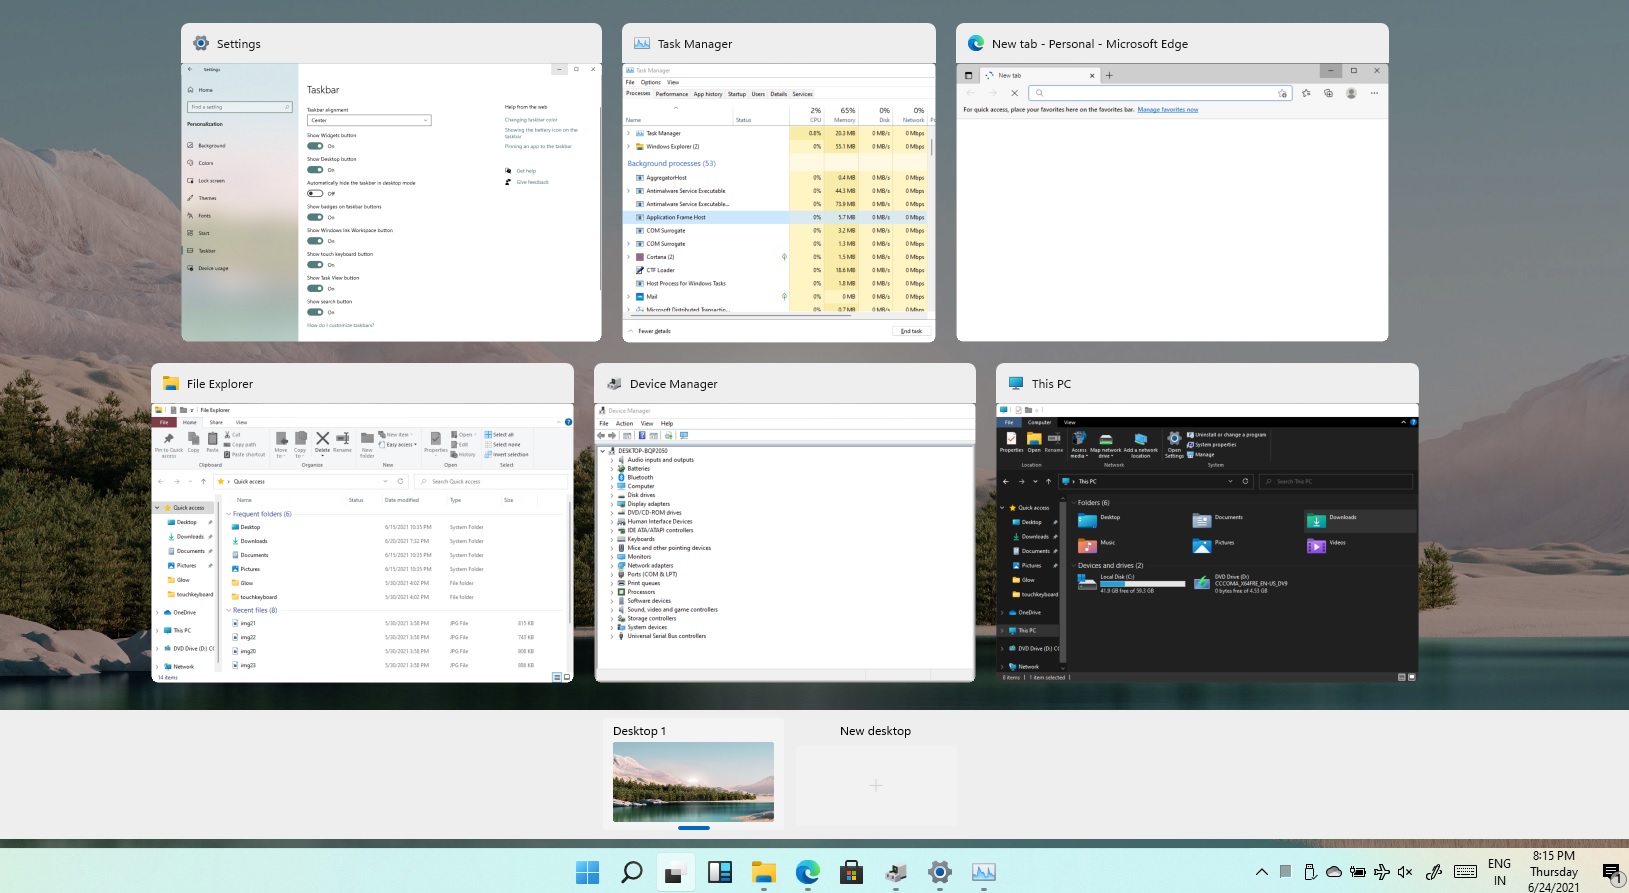
Task View feature inside Windows 11 is actually a great feature, letting you quickly view open windows and virtual desktops. How Task view itself could be reached with keyboard shortcut combination of ⊞ WINDOWS + TAB some users will prefer this way of using it and thus button on the taskbar is something you do not want or need.
There is a very easy way to remove mentioned button and I will show you how to do it.
Right-click the taskbar button itself and click on Hide From Taskbar.
That’s it, you have done it.
Now in order for you to bring it back if you change your mind, you will have to do some extra steps but it is nothing difficult.
Right-click on the taskbar and click on Taskbar settings, you will be lead to Personalization > Taskbar.
Inside locate Taskbar Items and switch Task View to ON, you will see the Task View button right away showing itself again.
Special folders like music, pictures, download, videos, etc, can be placed as shortcuts in the start menu inside Windows 11 for easy access.
Shortcuts will appear in the start menu on the bottom as simple glyphs. They are not present in the start menu by default so it needs to be turned ON first.
If you want to place these icons in your Star menu follow this step-by-step guide and you will have them in no time.
Open Windows settings
In settings go to Personalization > Start
In Start click on Folders
On the given list of Settings, File Explorer, Documents, Downloads, Music, Pictures, Videos, Network, and Personal folder click on the switch beside them if you want them as shortcuts in the Start menu. You can choose whichever you want.
Close settings
You can revisit the settings menu to add more icons or remove some of them later if you wish so.
If you are starting to get into the “wonderful” world of coding there is a high chance that you have heard of GitHub or Git for short and there is a slight chance that you might be confused about what exactly GitHub is. If this is the case, we are welcoming you to go through our article and find everything about it and why it is so popular and used all around the world.
What exactly is GitHub?
If we want to go all technical and just point the obvious we could say that GitHub is basically a WEB site and cloud service used for storing and managing code in all languages. But to truly understand why you should use GitHub and not Dropbox or any storage service instead you need to understand concepts like Version Control and Git.
Version Control
Version control is meant to help developers to work separately on different parts of codes and update is separately not breaking the original one. Take note that this option is meant when there is a big project and has more than one coder working on it. If you are a solo coder on your personal project this might not be anything groundbreaking for you personally.
But let’s now assume that you are part of a team and that your task is to edit only one function of a project and other people working will also have their tasks. With version control, you could take only part of the code and work on it and once you are finished merge it back into the main repository. All changes in the main code are automatically tracked and can be easily reverted back if needed.
The good stuff is that rolling back can be used only let’s say on a code you submitted and other changes made to the source can be kept. As you can see this makes a very good and efficient working space and a good coding environment.
Git
Git itself is a specific version control system, an open-source version control system to be more precise created by Linus Torvalds in 2005. It is a distributed version control system, which means that the entire codebase and history is available on every developer’s computer, which allows for easy branching and merging.
Currently, over 87% of worldwide developers are using Git on a daily basis.
So GitHub is?
GitHub is a profit company that offers a cloud-based Git repository hosting service, in other words, it automates and makes it easy for everyone to use Git for version control and collaboration. It focuses on user interface and ease of use so even beginner coders can use it right away without any large confusion and using command lines and setting it themselves manually.
GitHub also has a free personal plan in which you can host a public code repository completely free. This option placed GitHub very popular with open source projects.
If you are a company you can purchase a plan to have a private code repository shared only to members of your team or company.
Conclusion
As stated almost every developer on a planet uses some version of Git, many of them are on GitHub and there is a lot of open source projects on it. Some employers even ask to see your GitHub repository when deciding if they want to employ you, think of it as a portfolio for coders.
There is not a single disadvantage and not a single argument against using it, especially it has a personal free option. So if you want to look better and more professional in the coding world go, make an account and place some code on it, share it with the world, and see how it goes. You might even get some help on projects from other coders if you need it.


 I do not know about you, but I prefer to set my Windows to be more to my liking and not how Microsoft thinks it should be. Let’s face it, not all users feel comfortable whit Microsoft settings and idea how things should be.
One of the things I particularly did not like even in Windows 10 is icons that come by default on my taskbar, now so far, well until the latest Windows 11 update you could remove default taskbar icons the same way as in Windows 10, just right-click on them and unpin, sadly with latest update build on Windows 11 this option has been removed.
In order to remove default icons from the taskbar, one must go now to Windows 11 settings and choose from there which one you would like to be placed on it. Of course, this is nothing game-breaking but it still feels strange why the standard option has been removed, it just makes no sense but lately not many things that come from Microsoft do.
I do not know about you, but I prefer to set my Windows to be more to my liking and not how Microsoft thinks it should be. Let’s face it, not all users feel comfortable whit Microsoft settings and idea how things should be.
One of the things I particularly did not like even in Windows 10 is icons that come by default on my taskbar, now so far, well until the latest Windows 11 update you could remove default taskbar icons the same way as in Windows 10, just right-click on them and unpin, sadly with latest update build on Windows 11 this option has been removed.
In order to remove default icons from the taskbar, one must go now to Windows 11 settings and choose from there which one you would like to be placed on it. Of course, this is nothing game-breaking but it still feels strange why the standard option has been removed, it just makes no sense but lately not many things that come from Microsoft do.
I do not know about you, but I prefer to set my Windows to be more to my liking and not how Microsoft thinks it should be. Let’s face it, not all users feel comfortable whit Microsoft settings and idea how things should be.
One of the things I particularly did not like even in Windows 10 is icons that come by default on my taskbar, now so far, well until the latest Windows 11 update you could remove default taskbar icons the same way as in Windows 10, just right-click on them and unpin, sadly with latest update build on Windows 11 this option has been removed.
In order to remove default icons from the taskbar, one must go now to Windows 11 settings and choose from there which one you would like to be placed on it. Of course, this is nothing game-breaking but it still feels strange why the standard option has been removed, it just makes no sense but lately not many things that come from Microsoft do. 


 Task View feature inside Windows 11 is actually a great feature, letting you quickly view open windows and virtual desktops. How Task view itself could be reached with keyboard shortcut combination of ⊞ WINDOWS + TAB some users will prefer this way of using it and thus button on the taskbar is something you do not want or need.
There is a very easy way to remove mentioned button and I will show you how to do it.
Right-click the taskbar button itself and click on Hide From Taskbar.
That’s it, you have done it.
Now in order for you to bring it back if you change your mind, you will have to do some extra steps but it is nothing difficult.
Right-click on the taskbar and click on Taskbar settings, you will be lead to Personalization > Taskbar.
Inside locate Taskbar Items and switch Task View to ON, you will see the Task View button right away showing itself again.
Task View feature inside Windows 11 is actually a great feature, letting you quickly view open windows and virtual desktops. How Task view itself could be reached with keyboard shortcut combination of ⊞ WINDOWS + TAB some users will prefer this way of using it and thus button on the taskbar is something you do not want or need.
There is a very easy way to remove mentioned button and I will show you how to do it.
Right-click the taskbar button itself and click on Hide From Taskbar.
That’s it, you have done it.
Now in order for you to bring it back if you change your mind, you will have to do some extra steps but it is nothing difficult.
Right-click on the taskbar and click on Taskbar settings, you will be lead to Personalization > Taskbar.
Inside locate Taskbar Items and switch Task View to ON, you will see the Task View button right away showing itself again.  If you want to place these icons in your Star menu follow this step-by-step guide and you will have them in no time.
 What exactly is GitHub?