Rtl70.bpl Error - What is it?
To understand Rt170.bpl error code, it is important to have a good understanding of .bpl files first.
BPL is the abbreviation of Borland Package Library. BPL is a developer file format used by Borland. It contains dynamic link libraries which are used for constructing Borland programs. BPL files are most commonly used for Borland Delphi programs.
Delphi competes with Visual Basic as an offering for an object-oriented visual programming approach to application development.
There are many programs/applications on your system that use rtl70.bpl file format to run successfully on Windows PC.
The rtl70.bpl error occurs when this file gets damaged or corrupted. It fails to execute the command and run the application on your system. When your computer experiences this problem with this file, the following error messages are likely to appear:
- rtl70.bpl is not responding
- Runtime error: rtl70.bpl
- Symantec User Session has encountered a problem and needs to close. We are sorry for the inconvenience. Application Name: rtl70.bpl
This error code exposes you to system freeze, crash, abrupt system shutdowns, blue screen of death errors, and it also reduces your PC performance.
Solution
 Error Causes
The potential causes of rtl70.bpl error code includes:
- DLL file was damaged due to viral infection or spyware
- DLL file was overwritten by an incompatible version
- Poor program installation
- Too many invalid and obsolete registry entries stored in the RAM
- Related Registry entries are corrupt
Further Information and Manual Repair
Here are some of the best yet simple solutions for you to resolve rtl70.bpl error on your PC:
1. Reboot Your PC
Sometimes this error can be resolved by simply restarting your system. Try rebooting your system and running .bpl supported program. If the program runs after you reboot your PC, then that’s great! But you should keep in mind that this is a temporary solution. The error may reappear anytime soon.
So, it is advisable to consider a long-term solution for repairing the error code for the longest time.
2. Uninstall and then Reinstall the Program Causing the Error
If the error occurred after a certain program installed on your system, it is advisable to uninstall it and then reinstall the program. Simply go to the control panel, select Add/Remove program option and uninstall the program that you recently installed that could be triggering the rtl70.bpl error code.
Now reinstall and run it on your system. If the error is resolved, then this means the poor installation was the cause. If not, then this means the cause of the error is related to the registry.
3. Registry Restore to Fix rt170.bpl error
There are two ways to go about it.
The first one is to click on the start menu, type registry editor, and press run. This will open the
registry editor. Now click on the computer option then click file and import. This helps restore the registry but it is possible that the problem might persist.
The error code may pop up again. Also, if the registry is damaged due to viral infection, then this solution may not work and you may still experience the error on your system. Then you will also have to download an antivirus which may further reduce the speed of your PC.
However, the best way to restore the registry and to get rid of the error code for the longest time is to download Restoro. This is a new, user-friendly, high and multi-functional repair tool that functions as a registry cleaner and a system optimizer.
It cleans the registry by scanning and removing all the unnecessary and obsolete files saved in RAM such as junk files, internet history, invalid registry entries, and more. It also repairs the damaged dll files and restores the registry thereby resolving the rtl70.bpl error.
Restoro is easy to use, safe, efficient, and compatible on all Windows versions.
To get started and resolve the rtl70.bpl error code in just a few seconds on your system
click here and download Restoro.

 In the menu choose device manager and click on it.
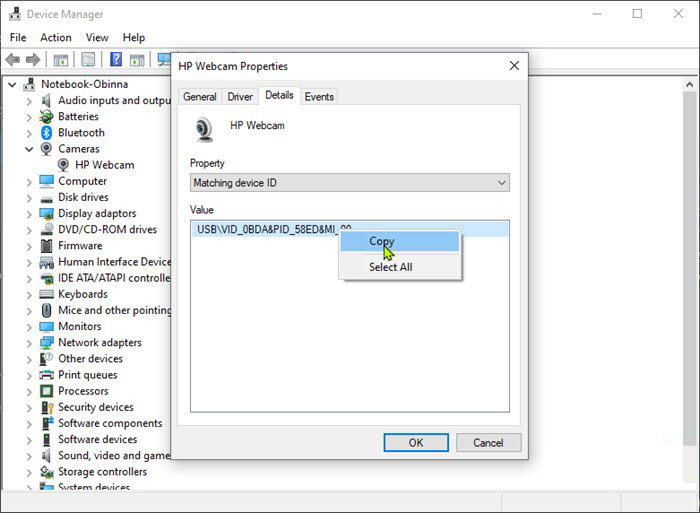
 When the device manager opens, expand the Imaging devices or Cameras section.
Right-click Integrated Camera or the primary webcam, and click Properties.
Go to the Details tab.
Under the Property section, click to select Matching device ID from the drop-down.
Right-click the value and select Copy
When the device manager opens, expand the Imaging devices or Cameras section.
Right-click Integrated Camera or the primary webcam, and click Properties.
Go to the Details tab.
Under the Property section, click to select Matching device ID from the drop-down.
Right-click the value and select Copy
 The next step is to download and install Windows Driver Kit (WDK)
 In today's world any professional, whatever be design, print, web design or similar is using one or more Adobe programs. Adobe has cemented itself as a must-have software for any kind of serious and even amateur work. Sadly in the latest Windows 11 adobe software in some instances can slow down your computer and put some hard load on the CPU. If you are one of these unfortunate users, keep reading because we have a few things you can do to solve this.