- Press ⊞ WINDOWS to open the start menu and click on the settings
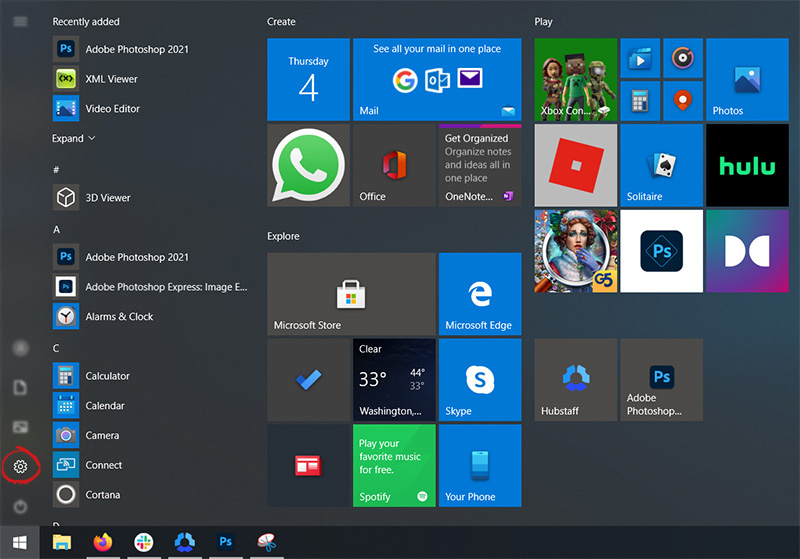
- On settings, screen click on system

- When the system dialog opens go to Power & Sleep and on the right side change all values to never.

This error 80070490 code may occur when you try to update your PC either through the Microsoft Update website or with a Windows update. The error message is displayed in the following format:
Error 80070490 (Element not found)
 Error Causes
Error Code 80070490 is triggered because of a couple of reasons. It indicates the file CBS Manifest that is needed to install Windows update is corrupt or damaged.
CBS (Component Based Servicing) Manifest is the file that is used to help your computer recognize various components inside your PC.
Another reason for error occurrence is registry corruption.
If the registry that stores all the information and activities performed is not cleaned frequently, the obsolete files saved in the registry like the junk files, bad entries and cookies eventually accumulate and corrupt it thereby generating such error codes.
Here are some effective and proven methods that you can try by yourself to resolve error code 80070490 on your PC.
Download the System Update Readiness Tool from the Windows website and run it on your PC.
This tool is designed to detect and scan for abnormalities and inconsistencies that could be preventing and causing problems during the system update.
Once you have downloaded and scanned your PC, try to install the updates again. If the error still persists, try other methods illustrated below.
Here are the steps that you need to follow to repair Windows:
When the Windows installation is complete, restart your PC and then run Windows update.
If the cause of error code 80070490 on your PC is related to registry corruption, then it is advisable to download Restoro. This is an advanced and easy-to-use PC Repair Tool embedded with a registry cleaner.
The registry cleaner scans your entire PC, removes all obsolete and unnecessary files corrupting the registry, and cleans it right away.
Click here to download Restoro to repair error code 80070490

“There were some problems installing updates, but we’ll try again later. If you keep seeing this and want to search the web or contact support for information this may help: (0x8024002e)”.Common symptoms include:
Error Causes“Windows Resource Protection did not find any integrity violations.” This means you do not have any missing or damaged system files.OR you may receive a message saying:
“Windows Resource Protection could not perform the requested operation.”To resolve this problem, run the System File Checker in safe mode and make sure that the PendingDeletes and PendingRenames folders exist under %WinDir%WinSxSTemp.
OR you may also receive a message saying, “Windows Resource Protection found corrupt files and successfully repaired them. Details are included in the CBS.Log%WinDir%LogsCBSCBS.log.” OR you may receive a message saying, “Windows Resource Protection found corrupt files but was unable to fix some of them. Details are included in the CBS.Log%WinDir%LogsCBSCBS.log.”
Digital Publisher: GreenTree Applications srl Product Version: YTD Video Downloader 4.8.9.7 Original File Name: YTDStub.exe Entry Point: 0x0000323C
 Valve has officially announced that Steam Deck will be compatible with Windows 11 despite TPM 2.0 Microsoft requirements.
From the beginning, Deck was announced like a mini handheld PC device. Powered with new Steam OS 3.0 based on Linux. However, besides out-of-the-box OS it was also stated that Deck will be a personal device meaning that other PC-based operating systems could be installed on it and even run your typical applications in it.
Since Microsoft announced Windows 11 hardware requirements, specifically the TPM 2.0 requirement many users voiced concern that Steam Deck will not be able to connect to Windows 11
TPM 2.0 is something that Microsoft requires for every internal and hardware component that is to connect on a Windows 11 device. This is to ensure that only trusted devices would be included in the array of a PC setup and avoid any problems like malicious hardware injecting software into a system.
This would also minimize the compromise Windows would have, as unverified or untrusted devices connect to a Windows PC.
However, Valve and AMD are ensuring us that Deck will not have any issue connecting to a PC running Windows 11 or even if you wish to transform Deck itself into a Device running Windows 11.
Valve has officially announced that Steam Deck will be compatible with Windows 11 despite TPM 2.0 Microsoft requirements.
From the beginning, Deck was announced like a mini handheld PC device. Powered with new Steam OS 3.0 based on Linux. However, besides out-of-the-box OS it was also stated that Deck will be a personal device meaning that other PC-based operating systems could be installed on it and even run your typical applications in it.
Since Microsoft announced Windows 11 hardware requirements, specifically the TPM 2.0 requirement many users voiced concern that Steam Deck will not be able to connect to Windows 11
TPM 2.0 is something that Microsoft requires for every internal and hardware component that is to connect on a Windows 11 device. This is to ensure that only trusted devices would be included in the array of a PC setup and avoid any problems like malicious hardware injecting software into a system.
This would also minimize the compromise Windows would have, as unverified or untrusted devices connect to a Windows PC.
However, Valve and AMD are ensuring us that Deck will not have any issue connecting to a PC running Windows 11 or even if you wish to transform Deck itself into a Device running Windows 11. “We couldn’t install Windows 10 We’ve set your PC back to the way it was before you started installing Windows 10 0x8007002C-0x4001E, The installation failed in the SECOND_BOOT phase with an error during PRE_OOBE operation.”To resolve the 0x8007002C-0x4001E, The installation failed in the SECOND_BOOT phase error, here are some suggestions that might help.
net stop wuauserv net start cryptSvc net start bits net start msiserver
net start wuauserv net start cryptSvc net start bits net start msiserver

A solid reason to switch to Mac from Windows PC is Mac OS. Based on Linux, offers more stability and better security than Windows but you will not be able to find a vast array of applications on it.
Even when Mac OS X (the first big one) was first introduced, it looked and felt like ages beyond Windows (Microsoft just recently made a slick and modern design with Windows 11). Under the hood, it turned out that the operating system itself is stable and incredibly fast & responsive. If you value stability and easiness of use, Mac OS is the Operating system for you.
This one is easy, if you are already invested in apple devices like iPhone and iPad, having an apple computer is one step forward into the apple ecosystem and one more step into easy sharing of documents and data between devices.
Calendars, emails, photos, videos, documents, and many more can easily be shared and synched between devices with a single apple ID making workflows much easier than on other operating systems.
Developers all around the world say that developing on Mac is much better and smoother than on PC, this has probably to do something with OS being based on Linux but whatever the case is, it is much smoother and it just feels better. Apple laptops are often the go-to choice of developers for a reason.
Also if you are in the development business for applications and services aimed at iPhone or iPod then there is no really another way than to be into the apple ecosystem and own apple hardware.
A lot of professional-grade software exists for both the Windows platform and Mac OS but there is some software that exists exclusively for Apple hardware like Final Cut Pro or Logic Pro. Both applications are used by professionals and are industry-standard software.
Logic pro is used by industrial audio specialists all around the world and is used in professional studios. Final Cut Pro is also used worldwide by video editors and if you are specializing in any of these two fields Mac seems like a very reasonable platform since the software can not be found on Windows. These two are examples, there are other similar applications that are only available on Mac OS
Apple hardware is made of high-quality materials and components and it is proven over time that it lasts longer than usual. There are iPhones out there that have 13 years and they are still working, G3 and G4 Macs that are still functional.
When buying Apple products they will outlive other ones if treated properly so in the end you could be saving money by purchasing them.
Error CausesiLivid is a video download manager for YouTube and other third-party video-hosted websites. iLivid download manager has powerful features that make it the fastest and easiest way to download hosted files. iLivid includes XBMC plug-ins that let you play almost all popular audio and video formats, in any available protocol and in any media type: streaming, CDs, DVDs, and RAR and archived files from your hard drive.
Livid is a program developed by Bandoo Media Inc. Upon installation, it defines an auto-start registry entry which allows the program to run on each boot for the user who installed it. A scheduled task is added to Windows Task Scheduler in order to launch the program at various scheduled times. The software is designed to connect to the Internet and adds a Windows Firewall exception in order to do so without being interfered with.
Multiple Anti-Virus scanners have detected iLivid as a possible Malware and are therefore not recommended.