
Error Code 0x80070017- What is it?
Error Code 0x80070017 is an error code that is most often associated with Windows 10 installations, although it has also been encountered by users on previous versions of the Windows operating systems. It is usually encountered as users attempt to install a new version of the software on their machine.
Common symptoms include:
- A vague error message regarding the inability of the system to copy over the necessary files pops up as users attempt to install a new version of the Windows operating system on their computer
While it can be hard to tell what the exact cause of Error Code 0x80070017 is on your specific device, the good news is that there are two primary methods that can be used to fix the problem and to allow you to proceed with your installation. These two methods do require some degree of technical knowledge and/or skill, so if you don’t feel like you have the ability to undertake them on your own, be sure to get in touch with a trusted computer repair professional to assist you.
Solution
 Error Causes
The most basic cause of Error Code 0x80070017 is that some of the files that are needed by the system to complete the installation are either not being found by the computer or are believed to be corrupted by the system. When this happens, security features within the software prevent it from completing the installation process, so as to avoid damage to the computer.
Error Code 0x80070017 can be disruptive to your installation process, but there are two basic methods that can be employed to resolve it.
Further Information and Manual Repair
While it can be frustrating to encounter Error Code 0x80070017 on your Windows machine, there are two methods that can be used to try to resolve the problem. One of these methods is extremely simple, even for the most basic users, while the second method takes a little bit more skill and technical knowledge. If you aren’t able to complete these methods on your own, be sure to get in touch with a qualified computer repair technician that can assist you. Here are the best ways to attempt to resolve Error Code 0x80070017 on your device:Method One: Clean Your Physical Disk
If you purchased a physical disk version of the installation files for your Windows operating system, remove the disk from your drive and clean it using a microfiber or other lint-free cleaning cloth. As you wipe down the disk, do not use any chemicals, and be sure to wipe gently from the center towards the outside edge rather than the other direction, as failure to do so can damage the disk irreparably.
In some cases, you may need to contact Windows support if you believe that there is an error on the disk itself, such as a scratch, that would prevent the disk from being used as needed in the installation process. They may be able to offer you a replacement disk or you may be able to download a digital copy of the version that you are attempting to install on your machine.
Method Two: Use the Chkdsk Utility
To determine if there may be an error within the disk drive itself, place the installation disk into the drive and restart the system. Go through the prompts until you see the option to “repair your computer.” Choose the operating system that you are using, go into the menu for System Recovery, and type in the words “Chkdsk/r” to begin to use the tool.
Whenever you run a tool like Chkdsk on your computer, it is important to restart your machine afterward to ensure that any changes that have been made are able to be fully applied and accepted by the operating system that you are running. Following a two-year investigation by the California Department of Fair Employment and Housing, the state has filed a lawsuit against Activision Blizzard for fostering a "frat boy" culture in which female employees are allegedly subjected to unequal pay and sexual harassment.
As reported by Bloomberg, Activision Blizzard is being accused by the state of California of discriminating against female employees at nearly all levels of employment, including in regards to compensation, promotion, assignments, and termination. The state alleges Activision Blizzard’s leadership has failed to address any of these outstanding issues or prevent them from occurring within the workplace. You can read the full details of the lawsuit here.
The suit, filed Tuesday in the Los Angeles Superior Court, says Activision Blizzard, which is made up of about 20 percent women, assigns women, and women of color, to "lower paid and lower opportunity levels" with lower starting pay for similar work as their male counterparts.
The documents also accuse Activision Blizzard of fostering a "pervasive 'frat boy' workplace culture in the office. Male employees are said to drink "copious amounts of alcohol" as they make their way through cubicles and "often engage in inappropriate behavior toward female employees."
Male employees are said to come to work hungover, play video games during work "while delegating their responsibilities to female employees, engage in banter about their sexual encounters, talk openly about female bodies, and joke about rape."
The lawsuit also cites one particular incident where a female employee, who was already subjected to intense sexual harassment at the company, committed suicide during a work trip with a male supervisor who allegedly brought inappropriate, sexual items with him on the trip.
The lawsuit is asking for an injunction that will force Activision Blizzard to comply with workplace protections, as well as deliver unpaid wages, pay adjustments, back pay, and lost wages and benefits for female employees.
Following a two-year investigation by the California Department of Fair Employment and Housing, the state has filed a lawsuit against Activision Blizzard for fostering a "frat boy" culture in which female employees are allegedly subjected to unequal pay and sexual harassment.
As reported by Bloomberg, Activision Blizzard is being accused by the state of California of discriminating against female employees at nearly all levels of employment, including in regards to compensation, promotion, assignments, and termination. The state alleges Activision Blizzard’s leadership has failed to address any of these outstanding issues or prevent them from occurring within the workplace. You can read the full details of the lawsuit here.
The suit, filed Tuesday in the Los Angeles Superior Court, says Activision Blizzard, which is made up of about 20 percent women, assigns women, and women of color, to "lower paid and lower opportunity levels" with lower starting pay for similar work as their male counterparts.
The documents also accuse Activision Blizzard of fostering a "pervasive 'frat boy' workplace culture in the office. Male employees are said to drink "copious amounts of alcohol" as they make their way through cubicles and "often engage in inappropriate behavior toward female employees."
Male employees are said to come to work hungover, play video games during work "while delegating their responsibilities to female employees, engage in banter about their sexual encounters, talk openly about female bodies, and joke about rape."
The lawsuit also cites one particular incident where a female employee, who was already subjected to intense sexual harassment at the company, committed suicide during a work trip with a male supervisor who allegedly brought inappropriate, sexual items with him on the trip.
The lawsuit is asking for an injunction that will force Activision Blizzard to comply with workplace protections, as well as deliver unpaid wages, pay adjustments, back pay, and lost wages and benefits for female employees.

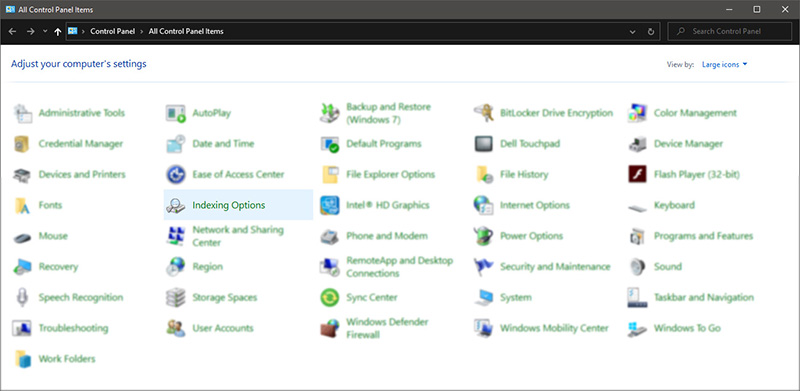
 Once you are in the control panel, switch your view to large icons and locate Indexing options.
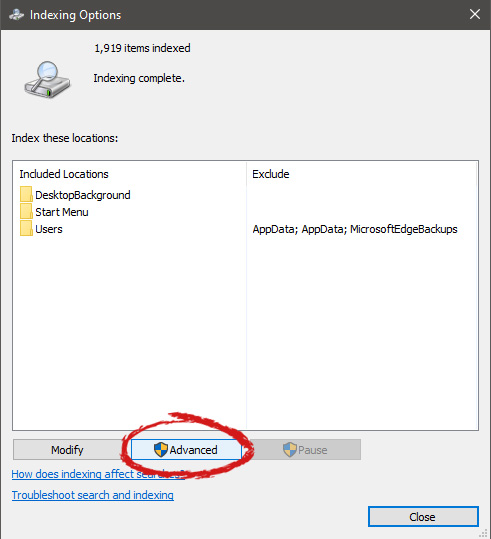
 Inside indexing options, click on advanced.
 In advanced options click on the rebuild and confirm.
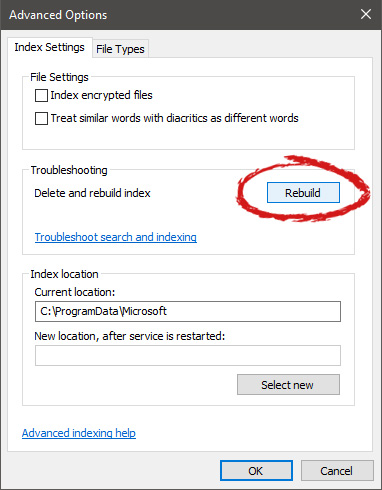 Leave your computer to finish and your searches should be working fine now.