Could not find this item, no longer in path

If you were trying to copy, move modify or delete a folder or a file in your computer but you’re not able to do so and encountered an error instead that says, “Could not find this item, This is no longer located in <path>, Verify the item’s location and try again”, then you’ve come to the right place as this post will guide you on how you can fix this error.

You can encounter this error when you delete, rename, open or copy a certain file which is often created by third-party software and lacks important information like file format, and so on. Although you can see these files in File Explorer, you might not be able to perform some operations in them. To fix this problem, you need to check out the given suggestions below.

Option 1 – Try to rename the file via Command Prompt

If you were trying to rename the file but unable to do so, you can achieve that by executing a command in Command Prompt. Make sure to follow the steps carefully.

  • Type in “Command Prompt” In the Start menu to search for it or you could also click the search button right next to the Start menu and then right-click on the related result and select the option “Run as administrator” to open Command Prompt with admin privileges.
  • Next, type in “cd” followed by the path where the file is located with this format – “C:/Folder1/Folder2/Folder3”. However, you have to omit the problematic file this time. To put it simply, the last folder in the command must be the folder where the file is located.
  • After inputting the command, press Enter on your keyboard and then use the set of commands given below. Note that each command is a new line so you need to tap Enter after copying each line.
    • DIR /A /X /P
    • RENAME (the current name of the problematic file) (a non-problematic name)
    • EXIT

Note: Make sure that you only input the current name and the new name separated by a space. You must not write the brackets in the command. If everything goes well, you will now be able to operate the file like you used to before.

Option 2 – Try to delete the file using Command Prompt

On the other hand, if you were trying to delete the file instead of renaming it, you can execute another command in Command Prompt.

  • Open Command Prompt with admin privileges like what you did earlier.
  • Once you’ve opened Command Prompt, copy and paste the command given below and tap Entre after you do so. You also have to make sure that you key in the correct path where the file is located as well as its name.

rd /s \?X:badfolderpath

Note: In the command above, “X” is the placeholder letter so you must input the letter that corresponds to the drive’s letter where the file is located.

  • After that, you will see the “Operation completed successfully” message on your screen. If you don’t, check if you’ve really inputted the correct location of the file or its name.

Option 3 – Delete the file without any extension

If the file you were trying to delete does not have an extension, this means that Windows does not know what to do with this file which is why it’s throwing an error message. The best thing to do in such cases is to delete the file especially if it takes up a lot of memory. To delete these kinds of files, here’s what you have to do:

  • Follow the first two steps from the previous option above so you can navigate to the location of the file accurately just be careful in inputting the folders.
  • Don’t forget to tap Enter right after each command and then use the next command below so you can delete the affected file which has no extension:

del *.*

  • After you’re done, open the File Explorer and then check if the file is now deleted or not.

Do You Need Help with Your Device?

Our Team of Experts May Help
Troubleshoot.Tech Experts are There for You!
Replace damaged files
Restore performance
Free disk space
Remove Malware
Protects WEB browser
Remove Viruses
Stop PC freezing
GET HELP
Troubleshoot.Tech experts work with all versions of Microsoft Windows including Windows 11, with Android, Mac, and more.

Share this article:

You might also like

Microsoft Surface Go 2 review

The new upgraded Surface Laptop Go 2 is the new iteration of the affordable original Surface Laptop Go aimed to offer good performance at a lower price of under $1000. The new version is not anything vastly different from the original but it comes with much-needed upgrades.

microsoft surface go 2 laptop

The biggest and main upgrade is the CPU, the Surface Laptop Go 2 is packing now Intel Core i5 1135G7, an Intels 11th generation CPU that should increase battery life. The laptop is also coming with an improved WEB camera and the cheapest one comes now with 128GB of storage instead of 64GB. Price went up from $550 to $599 which is not a big increase considering what was upgraded.

The bad news of new models is that sadly they are still packing only 4GB of RAM, that's really not enough for most applications released in 2022 and the screen is having a relatively low resolution of 1536 X 1024.

Microsoft is still offering all the color variations as in its first offering but added as well a new Sage color that is muted green in tint.

When we look at hardware it seems a little weak but for this price, there is not much competition in the field, and after all this line of models is aimed to provide good performance for an affordable price. If you really need something better you will go with a standard Surface or MAC book instead.

The new laptops are available to pre-order at Best Buy and Microsoft’s online store, and they’ll start shipping on June 7.

Read More
How to Fix Windows 10 Error Code 0x800705b4

Error Code 0x800705b4 - What is it?

Error Code 0x800705b4 is an error that will appear when the computer is not stable, and very critical system files will fail to respond or they will start going missing. This will happen when the computer is not being maintained properly. The problem should be solved immediately to avoid any further damage or loss of data. This error code may be regarded as one of the most severe computer problems that can present itself.

Common symptoms include:

  • There will be a failure to install updates and a display of the error message.
  • The Error Code 0x800705b4 will display itself.
  • After a system update, the computer will not be able to install new drivers.

Solution

Restoro box imageError Causes

Windows 10 update error 0x800705b4 can be caused when the user wants to update their windows system when important dll registries or files are missing or are corrupt. This will also happen when the user is trying to install or uninstall programs in a way that is wrong, or it may be infected with a Trojan virus. Additionally, this error code will be displayed when a PC's drivers are either outdated or installed the wrong way. There could be a registry error, a failure to update by the operating system, or even a device failure to update automatically.

Further Information and Manual Repair

There are several ways to resolve the appearance of error code 0x800705b4 on Windows devices. If you are not familiar with fixing error codes on a computer or are having trouble fixing this one, consider contacting a Windows technician to help with fixing the error. The computer must be run on administrator mode no matter which steps you are taking or which methods you are using. Depending on which version of Windows you are using, the steps for each method may differ slightly, but the basic process will remain the same.

Method One: Fixing it with updates

Start the computer in safe mode to begin troubleshooting for error code 0x800705b4. When the computer is starting up, press F8—this will enter the computer into safe mode.

You will now need to manually update your computer's outdated drivers. To do this, click on Start. Then, type in Device Manager into the search box to see if there are any outdated or corrupt issues with the drivers.

Method Two: Run an SFC scan

This will allow users to find files in Windows that are corrupt, damaged, or lost.

  • Start the Command Prompt. To do this, click Start and then type in cmd inside of the search box to see the icon.  Right-click and choose to Run as administrator. If asked, enter the password for the administrator.
  • When viewing the command prompt, type in “sfc/scannnow” and then press enter. This will be scanning all of the protected system files and will fix the corrupt files. Do not close the command prompt before it is done.

Method Three: System Restore

This is the most efficient way to fix any problem or system status. System backup is vital when performing this.

Click on the Start button, and then type in “system restore” inside of the search box. Right click on System Restore, and then choose Run as Administrator. This could also be found in the Control Panel. Now you will choose the time point in which to restore the system. You will be able to choose the recommended or specific restore based on the situation. Now you can review the restore point and then click Finish.

Method Four: For Windows 10

  • You may need to update the Windows Defender in the security center. To locate this, click Start, Settings, Update and Security, Windows Defender.
  • Go to the Windows Updates and click on Advanced Options. Click on the option that will get updates for more Microsoft products.
  • Restart the computer, and then check for updates again. This update process will be able to be done without a problem. When a message comes up that says “Your device is up to date” you will need to click Advanced Options once again and check for update options.
  • Check for updates one more time and now the proper updates should be able to be downloaded and installed properly.

Method Five: Use An Automated Tool

If you wish to always have at your disposal a utility tool to fix these Windows 10 and other related issues when they do arise, download and install a powerful automated tool.
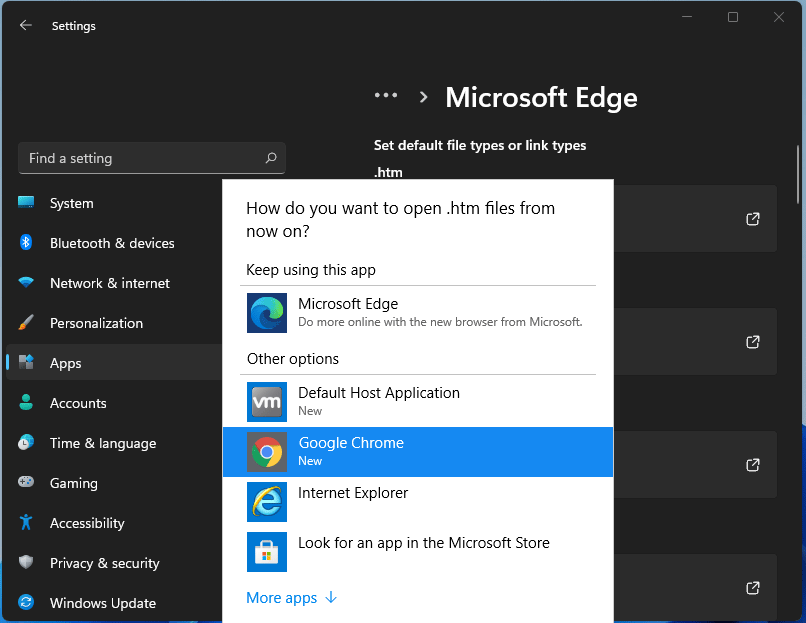
Read More
Fix can not open EXE file in Windows 10
Can not open and run EXE file in Windows is not a new issue and sadly it can still happen from time to time, luckily this step by step solution will help you to resolve this problem fast and effective in no time. Try the below solutions in no particular order and I hope that you will solve the issue fast and be able to return to using the computer like it never happened
  1. Run SFC scan

    As the EXE file not opening issue lies in the Windows OS, the SFC tool will be able to identify the cause and fix this issue. Press ⊞ WINDOWS + X and choose command prompt (admin) in command prompt type: sfc /scannow Press ENTER
  2. Check registry and modify if needed

    Sometimes value in the registry key is wrong and can cause this error, in order to check if this is the case, we will open the registry editor and find out Press ⊞ WINDOWS + R to bring run dialog up type in it: RegEdit and press ENTER In the left pane of the Registry Editor window, click on the HKEY_CLASSES_ROOT to expand the section Scroll down to find out the .exe registry and click on it Go to the right pane of the window and double-click on the Default and set the Value Data as exefile Click on the OK button Next, located the given in the window: HKEY_CLASSES_ROOT>exefile>shell>open>command Click on the “Command” in the left pane of the window In the right pane of the window double-click on the Default and set Value Data as “%1” %* Click on the OK button Restart your computer and check if the issue persists
  3. Turn off Firewall and defender

    If you have a firewall and antivirus active there might be a chance of a conflict and that firewall or antivirus is preventing the EXE file from starting, disable your firewall and anti-virus and try again to open the EXE file.
  4. Turn off user account control

    User account control can also like a firewall prevent some files from executing, go into accounts and turn off user account control to see if this might be an issue preventing you from opening the file.
Read More
Chrome won’t clear Browsing History and Data
As you know, one of the most popular browsers these days is the Google Chrome browser. Browsing the web every day using your Chrome browser, leaves a trail of browsing history. Google uses the browser history to streamline and make the browsing experience a lot better. But there are times when Chrome users experience trouble in deleting their web browsing history, data, cookies, and cache. In this post, you will be guided through specific settings that will help you in getting rid of the browsing history in Chrome. There are several options you can take in clearing the browsing history in Chrome. But before you try them, you can try the basic one first using the following steps:
  • First, click on the three-dotted icon and click on History from the menu.
  • Next, click on the Clear browsing data option and select “All time”.
  • Then select the type of history you want to delete.
  • After that, click on the Clear Data button.
If clearing the browsing history in Chrome the old way didn’t work, then you can try to check out the options provided below.

Option 1 – Clear the cache using the File Explorer

The first thing you can do is to clear the cache by using File Explorer. To get started, refer to these steps:
  • Tap the Win + E keys to open File Explorer.
  • Next, navigate to the following paths:
    • C:/Users/YOURUSERNAME/AppData/Local/GoogleChrome/User Data/DEFAULT/Cache
    • C:/Users/YOURUSERNAME/AppData/Local/GoogleChrome/User Data/PROFILENAMECache
  • From the given locations above, replace “YOUR USERNAME” with the user profile name you use and then search for a file named “Cookies”.
  • Now delete its contents.

Option 2 – Reset Chrome

Resetting Chrome can also help you fix the error. This means that you will be restoring its default settings, disabling all the extensions, add-ons, and themes. Aside from that, the content settings will be reset as well and the cookies, cache, and site data will also be deleted. To reset Chrome, here’s what you have to do:
  • Open Google Chrome, then tap the Alt + F keys.
  • After that, click on Settings.
  • Next, scroll down until you see the Advanced option, once you see it, click on it.
  • After clicking the Advanced option, go to the “Restore and clean up option and click on the “Restore settings to their original defaults” option to reset Google Chrome.
  • Now restart Google Chrome.

Option 3 – Try to clean reinstall Chrome

There are instances when programs leave files behind after you’ve uninstalled them and the same thing can happen to Chrome so before you reinstall Chrome, you have to make sure that you have deleted the User Data folder. To do so, refer to the following steps:
  • Hit the Win + R keys to open the Run dialog box.
  • Next, type “%LOCALAPPDATA%GoogleChromeUser Data” in the field and hit Enter to open the User Data folder.
  • From there, rename the default folder and name it something else, e.g. “Default.old”.
  • After that, install Google Chrome again and check if the issue is now fixed.
Read More
A Quick Guide to Fixing the Stop C00002lA Fatal System Error

Stop C00002lA Fatal System Error- What is it?

C00002lA Fatal System Error is a blue screen of death error that may occur when you start your Windows NT 4.0 based computer. This error causes the screen to turn blue and the system also shuts down. The stop C000021A error message is displayed in the following format:

Stop c000021a {Fatal System Error} The session manager initialization system process terminated unexpectedly with a status of 0xc0000017 (0x00000000, 0x0000000) The system has been shut down.

Error Causes

The stop C000021A error occurs when either Crsrss.exe or Winlogon.exe fails. When the Windows NT kernel identifies that either of these processes has failed, it stops and the error code stop C000021A appears on the computer screen. Here are some of the underlying causes for the stop C0000021A error:
  • The incompatible third-party program
  • Hard disk issues
  • Service pack installation has failed
  • Mismatched system files have been installed
  • Bad and invalid registry keys

Further Information and Manual Repair

To resolve the stop C000021A Fatal System Error on your PC try the following solutions:
  • Remove Incompatible Third Party Programs

If the error occurred after you recently installed a new program, then it is advisable to remove that program. The error occurs due to the incompatibility of the program. To remove the program go to the start menu and click on the control panel. Now click on Add/Remove Program tab and double click on the program name that you recently installed and remove it from the list. Once removed, not reboot your PC. Reinstall a compatible program and run it. It is most likely to resolve the issue. However, if the stop C000021A error still occurs, then it means the problem is critical. It is related to the registry.
  • Repair and Restore the Registry

This procedure is slightly long and tricky. To try it, you need to be technically sound. Here’s what you have to do: first create a parallel installation of Windows NT. Start your PC to the parallel installation and then open the Registry Editor. On the Registry Editor’s Windows menu click HKEY_LOCAL_MACHINE on Local Machine and then click Load Hive. Now type the path %systemroot%system32configsystem into the System hive of the prior installation. Then click open. Here you will be prompted to enter the name of the key, type TEST. Note the setting for the current DWord value in the preceding registry key. This is 0x1 and is denoted by CURRENT:Reg_Dword: 0x1. This value indicated that the Current Control Set for your original Windows NT installation corresponds to ControlSet001 in this window. Now if the value is 2, it indicated that the Current Control Set corresponds to ControlSet002. Now locate the following registry key: HKEY_LOCAL_MACHINETESTControlSetXXXControlSession Manager. XXX is the Current Control Set Value. And delete any pending file rename operation entries. Then click TEST hive and then click Unload Hive. After that again repeat the process, open the registry menu and click load hive, here type the path %systemroot%system32configSoftware to the Software hive of the prior installation and then click open. Now you type TEST 2 when you are prompted for the name of the key. Remove any pending file rename operations entries in the following registry keys: HKEY_LOCAL_MACHINETEST2MicrosoftWindowsCurrentVersionRunOnce HKEY_LOCAL_MACHINETEST2MicrosoftWindowsCurrentVersionRunOnceEx Now click TEST2 hive and then click unload hive. Quit the Registry Editor and then restart your original installation. This will resolve the stop C000021A error.
Read More
How to Fix Error 0x00000643

Error 0x00000643 - What is it?

This is a Windows Vista printer error. It occurs when you try to use the plug-and-play service to install a WSD printer on your PC. WSD is the abbreviation for Web Services for Devices. It is a Microsoft API to simply programming connections to web service enabled devices such as printers, file shares and scanners.  The error 0x00000643 code is displayed in the following format:
“Operation could not be completed (error 0x00000643)”

Solution

Restoro box imageError Causes

The error 0x00000643 may occur due to multiple reasons, including:
  • No suitable driver installed for your printer
  • A firewall or other security program is too restrictive
  • Registry file has invalid entries
  • Virus and Trojan
  • Outdated system drivers

Further Information and Manual Repair

To resolve this error code on your PC, you don’t have to hire a professional technician and spend hundreds of dollars to perform system repair. You can resolve it all by yourself, even if you are not a computer programmer or lack technical expertise. Here are some of the easiest and proven methods to fix the error 0x00000643 on your PC:

1. Update Outdated Drivers

This can be done by accessing the ‘Device Manager’. All you have to do is, go to the start menu and type Device Manager in the start search box. Then click on the Device Manager in the list. On the action menu, click the scan for hardware changes or update the driver.

2. Delete the WSD Port to Resolve Error

Go to the start menu and type printers in the search box. Click printers in the given program list and then click the option add a new printer. After that, select the existing WSD port and any printer driver. Now delete the printer. The WSD will be deleted automatically. Once this is done, connect the printer to your computer. You will see the plug-and-play service will begin to install the printer again. This process is most likely to resolve the issue and reinstall your printer.

3. Disable Firewall

Sometimes the error may occur if the security programs are too restrictive such as the Firewall. To fix the problem simply disable Firewall.

4. Viral Infection

If the underlying cause of the error is a viral infection, then download a powerful antivirus and run it on your PC. Scan for viruses and delete them.

5. Registry Invalid Entries

If you don’t clean the registry regularly, this overloads with unnecessary, redundant and obsolete files like cookies, internet history, junk files, bad registry keys and invalid entries. This damages the registry and generates such error codes. Although you can resolve and repair the registry manually, but that method is slight tricky and time consuming. It may require technical expertise. However, another quick and easy way to clean and restore the registry and resolve error 0x00000643 on your system is to download Restoro. This is a next-generation, advanced, and highly functional PC Repair Tool. It is deployed with an intuitive algorithm and multiple utilities such as a smart registry cleaner, a powerful antivirus, and a system optimizer. The registry cleaning utility detects all registry issues on your PC, removes invalid entries cluttering the registry, and repairs it right away thereby resolving error 0x00000643. The antivirus simultaneously detects malware on your PC and removes them while the system optimizer boosts the speed of your computer significantly. Restoro is bug-free, safe, and efficient. It has simple navigations and a user-friendly interface. This software is compatible with all Windows versions including Vista. To fix error 0x00000643 on your system in seconds, click here to download Restoro now!
Read More
Blinking or Flashing Desktop After login - Windows 10 Upgrade

Blinking or Flashing Desktop After login - What does it mean?

Upon updating to Windows 10, some users might encounter a blinking or flashing desktop after logging in. This will result in a repetitive restarting of explorer or you won’t be able to make the start menu and shortcut keys work. In addition, the network icon might not appear in your taskbar as well. Other Windows 10 error messages include error code 0xc000021a.

Solution

Restoro box imageError Causes

Your blinking or flashing desktop after logging in might be the result of problems with the bushell.dll shell extension, which is a part of the Norton Security Suite. Another possible cause for this annoying problem is an issue with your display driver since not all systems will use the same display driver and will depend on what graphics card you use.

Further Information and Manual Repair

In fixing the bothersome blinking or flashing desktop after logging in problem, you can do a manual repair method to address the root problem. You need to be familiar with the Windows command line to successfully go through the process. However, if you are not knowledgeable or confident enough to do this on your own, it would be best to seek help from a professional. Or, you might want to consider using an automated tool to solve the issue.

You need to identify first what’s causing the blinking or flashing of your desktop after login to properly address the issue. The following methods can be done if your issue is caused by bushell.dll shell extension issue:

Method One: Forcefully Terminate Process

  1. Press on Ctrl+Alt+Del then select Task manager
  2. Start a Command Prompt as an administrator by choosing the File menu then Run New Task.
  3. Type exe. Make sure to tick the checkbox “Create this task with administrative privileges.”

NOTE: Text input is most probably affected by the explorer restarts so you might need to repeatedly type some letters or to carefully input texts.

  1. In the Command Prompt, type taskkill /f /im explorer.exe. This will stop the blinking or flashing.
  2. Type cd “Program Files” afterward, type dir /s bushell.dll to locate where the dll is. (For example, purposes, use c:\program files\Norton Security Suite\Engine6422.5.2.15 as the location)
  3. If the dll file is not found, you can try repeating step 5 but this time, use “Program Files (x86)” However, you can proceed with the next step if you already located where the bushell.dll is.
  4. Type cd ”c:\program files\Norton Security Suite\Engine 6422.5.2.15” to change the name of the directory you found the dll in.
  5. Type ren bushell.dll bushell-crash.dll
  6. Restart now the system by typing shutdown /r /f /t o in the command line.

Method Two: Uninstall Programs

  1. Log out then go to the sign in screen
  2. Press the Shift key as you simultaneously click on the Power button on the screen.
  3. Continue pressing on the Shift key as you click
  4. Continue pressing on the Shift key as you wait for the Advanced Recovery Options menu to appear.
  5. Once the Advance Recovery Options menu appears, click on Troubleshoot then select Advanced options.
  6. Click on the Startup Settings then select
  7. Boot on Safe Mode by pressing 4 on your keyboard.
  8. Log in then press Windows key + X.
  9. Select the Device Manager then expand Display Adapter.
  10. On your Display Adapter, right-click then select
  11. Exit Device Manager
  12. If in case you also have an older Antivirus utility, you should uninstall it as well.
  13. Restart

NOTE: You might need to download the latest Video Driver on a working computer. Save it in a thumb drive then copy and install it on your computer. If in case there is no native Windows 10 driver, you can also download the latest Windows 7 or Windows 8.1 video driver. Afterward, install it in compatibility mode.

Method Three: Use Microsoft System Configuration Utility

  1. Log out then go to the sign in screen
  2. Press the Shift key as you simultaneously click on the Power button on the screen.
  3. Continue pressing on the Shift key as you click
  4. Continue pressing on the Shift key as you wait for the Advanced Recovery Options menu to appear.
  5. Once the Advance Recovery Options menu appears, click on Troubleshoot then select Advanced options.
  6. Click on the Startup Settings then select
  7. Boot on Safe Mode but this time, choose 5 to start in Safe Mode with networking.
  8. Check if your problem is present or not in Safe Mode. If not, then you are on the right track.
  9. Press on the Windows key + R then type msconfig to start up your exe file.
  10. Click on the Services tab then choose Disable All. Afterward, click on
  11. Once you’re prompted to reboot your computer, go ahead and reboot in Normal Mode. Check if the issue is still present.
  12. If the blinking or flashing desktop after login is gone, then you can just do a process of elimination.
  13. Start-up on your exe again then begin bringing up services a few at a time.
  14. You can turn on all other services except for the following which causes the blinking or flashing desktop after login problem: Problem Reports and Solutions Control Panel Support •Windows Error Reporting Service.
Read More
Fix Windows Setup Error code 0x80070006
Windows 10 setup is a bit complicated which is why it’s uncommon to encounter errors along the way. One of these errors you can encounter when running Windows Setup is the error code 0x80070006. If you are trying to fix this error, you’ve come to the right place as this post will guide you on how to do so. When you get the error code 0x80070006, you will see the following error message:
“Windows cannot install required files. Network problems may be preventing Windows from accessing the file. Make sure the computer is connected to the network and restart the installation. Error code: 0x80070006.”
As stated in the error message, this kind of error in Windows Setup is due to an unstable or unreliable network connection. Such problems can also be triggered by network hardware which includes the network adapters and the network routers. To fix this error, you need to check your internet connection and router or run the built-in network troubleshooter. You could also try using a different USB port or recreate a bootable USB drive as well as get a new Windows image file.

Option 1 – Try checking your internet connection and router

As mentioned, this Windows 10 setup error could be due to an unstable internet connection. To fix it, the first thing you have to do is to check the status of your internet connection and see if it is stable and has enough speed to run the setup. If it’s slow, then it’s no wonder that the setup process failed. To fix that, you can try to reboot your router from its admin panel or you can just turn it off manually and then turn it back on after a couple of seconds. In addition, you also have to check if it’s plugged in properly.

Option 2 – Try to run the Network Adapter troubleshooter

The next thing you can do is to run the Network Adapter troubleshooter. This built-in troubleshooter can help resolve any network issues. It can reset the adapters, remove cached settings, and many more. To run it, follow these steps:
  • Go to Settings > Update & security and from there select Troubleshoot.
  • Next, scroll down and select the “Network Adapter” option from the right pane.
  • Then click on the Run Troubleshooter” button.
  • After that, your computer will check for any possible errors and will pinpoint the root cause of the problem if possible.

Option 3 – Try to use a different USB port

You might want to check the integrity of the USB port where connected the device if you are using a bootable USB storage device to run the setup for Windows 10. All you have to do is switch the USB port or try to use another bootable USB device and see if it fixes the problem.

Option 4 – Try recreating the Windows 10 installation USB

Recreating the Windows 10 installation USB might help in fixing the problem. You can use a USB drive to do so but make sure that it has a great read-write speed. Follow the steps below to recreate Windows 10 installation USB”
  • Click this link and then click the Download Tool Now button.
  • Next, click the “Use the tool to create installation media (USB flash drive, DVD, or ISO file)…” option and follow the next given instructions on the screen.
  • Now select the ISO file option in step 5.
  • After that, you should now have an ISO file.
  • Next, go to the location where you’ve downloaded the ISO file.
  • Then right-click on the Windows 10 ISO file and select the Open with option and then select File Explorer.
  • Now click on “setup.exe” and follow the next instructions that appear on the screen. When asked, you have to select either Nothing (clean install) or Keep personal files only option. Take note that you must not select the “Keep personal files, apps, and Windows settings since it doesn’t really work.

Option 5 – Try getting a new Windows image file

If none of the four given options above worked, you might want to get a newer installation image using the Windows Media Creation tool. After that, create the bootable USB drive and once completed and then try to run the Windows 10 setup again.
Read More
A Quick Guide to Fixing Files.exe Error

Files.exe Error - What is it?

To understand what Files.exe Error code is, it is first important for you to know what EXE stands for, and EXE files function. EXE is the abbreviation for Executable. It is a file extension for an executable file format. This file contains a program that is a particular file type capable of being executed or run as a program. The Windows Operating System contains literally thousands of executable files. Every program that you have installed on your PC runs because the .exe application files execute the tasks. Files.exe are also used by websites that are not entirely static to display properly. There are thousands and thousands of exe files on your PC that are supported by millions of Dynamic Link Library (DLL) files. It is advisable to run executable files from publishers you trust because these files can potentially change your computer settings and harm your PC. The files Exe error code occurs when you are unable to open and run executable files. The error message is often displayed in either of the following formats:
  • ‘Access Deny’, ‘Runtime error ‘
  • Windows cannot find FileName.exe
  • Windows cannot find FileName.exe. This program is needed for opening files of type "ProgramName".
  • Windows cannot find ProgramName. Make sure you typed the name correctly

Solution

Restoro box imageError Causes

The files Exe error code can be triggered due to multiple causes:
  • Corrupt registry
  • Viral infection- This changes the default configuration for running exe files
  • Missing files
  • Invalid registry entries
If this error occurs on your PC, it is advisable to fix it immediately to ensure your desired programs run smoothly. Also, if not fixed timely it can lead to serious PC damages like system failure, registry corruption and also put you at risk of privacy errors if the cause of this error is viral infection and spyware.

Further Information and Manual Repair

To resolve the files.exe error on your PC, try the solutions given below:

Clean and Restore the Registry Manually

If the files.exe error occurs on your system due to registry corruption, then to resolve it you need to clean it and restore it back. You can do this manually and automatically. The manual way is slightly time-consuming and tricky. If you are not a computer programmer and don’t have sound technical expertise, then you may find the manual procedure of cleaning the registry complex. However, we’ll be discussing both methods one by one. The registry is the main database of the PC. It saves all the files on your system including both important and unnecessary files and obsolete files like bad keys, invalid registry entries, temporary files, cookies, internet history, and junk files. It is important to delete these files from the registry because they take up a lot of disk space and also damage and corrupt the registry. And when this happens, you start experiencing file.exe errors. To clean and repair the registry manually, here’s what you should do:- First, go to the start menu and then click run.
  • Now type ‘command.com’ and press enter.
  • After this, type the following commands: “cd” press enter then “cd windows” press enter.
  • Type copy ‘regedit.exe regedit.com” and press enter again.
  • After that type ‘start regedit.com” and press enter. Now navigate to and select the key: HKEY_CLASSES_ROOTexefileshellopencommand.
  • Once you select the key, in the right pane double click the default value.
  • Delete the current value data and simply insert “%1”%*.
  • Close the Regedit (registry editor) utility. Now try running your desired program; it is most likely to resolve the error if it occurred due to registry corruption.

Clean & Restore Registry Automatically with Restoro

To clean and restore the registry automatically in seconds, run a deep Registry system scan using Restoro. This is a powerful registry cleaner deployed with intuitive algorithms that scan for all types of registry issues on the system. It wipes out all the unnecessary files in seconds, clearing up the cluttered disk, and also simultaneously repairs and restores the registry. In just a few simple clicks the error is resolved.

Run an Antivirus

If the files.exe error code is triggered by viral infection and spyware, then to resolve it install and run an antivirus. However, once you install an antivirus, your PC speed may slow down dramatically. This is often compromise users have to make to keep viral infection and malware away from their systems. But you don’t have to make this compromise if you download Restoro. This tool is more than just a powerful registry cleaner. It is embedded with multiple utilities that help remove practically all types of PC-related issues. These utilities include antivirus and a system optimizer. The antivirus utility scans and removes all malicious software on your system and while the system optimizer module boosts your system’s speed. Total System Care is safe, multi-functional, and efficient software. It is compatible with all Windows versions. To resolve files.exe error on your PC, click here to download Restoro NOW!
Read More
SoftwareUpdater Malware Removal Guide

Software Updater is an ad-supported browser extension hijacker that claims to update your PC programs and drivers. In addition to managing the installation of your selected software, this install manager will make recommendations for additional free software that you may be interested in. Additional software may include toolbars, browser add-ons, game applications, anti-virus applications, and other types of applications. The hijacked homepage, softwareupdater.com, did not have valid legal privacy and disclaimer policies on its website as of publication date.

This software adds a Windows Task Scheduler in order to launch the program at various times, including system startup. The software has access to all installed applications on your PC and can install bundled products with unwanted malware. It is also commonly distributed in bundles with unwanted software. Several anti-virus programs have classified this software as malware and are therefore not recommended.

About Browser Hijackers

Browser hijacking means that a malicious code has control over and modified the settings of your internet browser, without your consent. They’re made to interfere with browser programs for several purposes. The idea is to force users to visit specific sites that are trying to increase their visitor traffic and produce higher ad revenue. It may appear harmless, but most of these sites are not legitimate and could present a severe threat to your online safety. Browser hijackers can even allow other malicious programs without your knowledge to further damage your computer.

How to determine if your web browser is hijacked

The common symptoms that indicate having this malicious software on your computer are: 1. home page is changed 2. you find new unwanted bookmarks or favorites added, typically directed to advertisement-filled or pornography websites 3. the default search engine has been changed and your browser security settings have been lowered without your knowledge 4. you find unwanted new toolbars added 5. you may find many pop-up ads on your computer screen 6. your internet browser has become unstable or starts running sluggishly 7. you can’t go to specific websites such as home pages of anti-malware software.

Exactly how browser hijacker infects computers

Browser hijackers infect PCs in numerous ways, including via a drive-by download, a file-share, or an infected email. Many web browser hijackings come from add-on software, i.e., browser helper objects (BHO), toolbars, or extensions added to web browsers to provide them additional functionality. Also, certain freeware and shareware can put the hijacker in your PC through the “bundling” technique. Some of the well-known hijackers are SoftwareUpdater, Conduit Search, Babylon Toolbar, OneWebSearch, Sweet Page, and CoolWebSearch. Browser hijackers may record user keystrokes to collect potentially valuable information leading to privacy issues, cause instability on systems, drastically disrupt user’s browsing experience, and eventually slow down the computer to a point where it will become unusable.

Browser Hijacker Malware – Removal

Certain hijackers could be removed by just uninstalling the related free software or add-ons through the Add or Remove Programs in the Windows Control Panel. In some cases, it can be a tough task to identify and get rid of the malicious piece because the associated file could be running as part of the operating system process. Besides, browser hijackers might modify the Computer registry so it can be extremely tough to fix manually, especially when you are not a very tech-savvy person.

How To Get Rid Of Malware That Is Preventing Anti-Malware Installation?

Malware can cause many different types of damage to PCs, networks, and data. Some malware is meant to restrict or prevent things that you want to do on your computer system. It may not permit you to download anything from the net or stop you from accessing some or all of the internet sites, especially the anti-virus websites. If you’re reading this now, you’ve perhaps recognized that a malware infection is a reason for your blocked internet traffic. So how to proceed if you need to install an anti-virus software like Safebytes? Even though this type of problem can be difficult to circumvent, there are a few actions you can take.

Install the anti-virus in Safe Mode

In Safe Mode, you can change Windows settings, un-install or install some software, and eliminate hard-to-delete viruses and malware. In the event, the virus is set to load immediately when PC boots, shifting into this particular mode can prevent it from doing so. To start the computer into Safe Mode, hit the “F8” key on your keyboard right before the Windows boot screen comes up; Or after normal Windows boot up, run MSCONFIG, check “Safe Boot” under Boot tab, and click Apply. As soon as you restart into Safe Mode with Networking, you could download, install, as well as update the anti-malware program from there. At this point, you could run the antivirus scan to remove viruses and malware without hindrance from another malicious application.

Switch to an alternate browser

Some malware only targets certain internet browsers. If this sounds like your situation, utilize another browser as it might circumvent the virus. The best solution to avoid this problem is to select a web browser that is well known for its security measures. Firefox contains built-in Malware and Phishing Protection to help keep you secure online.

Install and run anti-malware from your flash drive

To effectively remove the malware, you might want to approach the issue of running anti-virus software on the affected computer system from a different perspective. Adopt these measures to run the antivirus on the affected PC. 1) Download the anti-malware program on a virus-free PC. 2) Mount the USB drive onto the same computer. 3) Run the setup program by double-clicking the executable file of the downloaded application, which has a .exe file extension. 4) Pick a thumb drive as the place when the wizard asks you exactly where you want to install the program. Follow the on-screen instructions to complete the installation. 5) Disconnect the pen drive. You can now use this portable anti-malware on the infected computer. 6) Double-click the anti-malware program EXE file on the flash drive. 7) Run Full System Scan to detect and get rid of all types of malware.

Features of SafeBytes Anti-Malware

Want to install the best anti-malware software for your computer system? You can find many applications available that come in paid and free versions for Windows systems. Some of them do a great job in getting rid of threats while some will affect your PC themselves. You must be careful not to choose the wrong application, especially if you purchase a paid software. Among few good programs, SafeBytes Anti-Malware is the strongly recommended software for the security-conscious individual. SafeBytes anti-malware is really a powerful, highly effective protection application made to assist users of all levels of IT literacy in identifying and eliminating harmful threats from their computers. Through its cutting-edge technology, this software protects your PC against infections brought on by different types of malware and similar threats, including spyware, adware, computer viruses, worms, trojan horses, keyloggers, ransomware, and potentially unwanted program (PUPs). SafeBytes possesses a plethora of great features that can help you protect your laptop or computer from malware attack and damage. The following are some of the best ones: Real-time Active Protection: SafeBytes delivers complete and real-time security for your laptop or computer. They are very efficient in screening and getting rid of different threats because they are constantly revised with new updates and safety measures. Best AntiMalware Protection: This deep-cleaning anti-malware application goes much deeper than most antivirus tools to clean your personal computer. Its critically acclaimed virus engine finds and disables hard to remove malware that conceals deep inside your computer. Safe Browsing: SafeBytes gives an instant safety rating about the web pages you’re about to check out, automatically blocking unsafe sites and make sure that you’re certain of your online safety while browsing the net. Lightweight Tool: SafeBytes is a lightweight and easy-to-use antivirus and antimalware solution. As it uses minimal computer resources, this application leaves the computer’s power exactly where it belongs: with you actually. Premium Support: You may get absolutely free 24/7 technical support from their computer experts on any product queries or computer security issues.

Technical Details and Manual Removal (Advanced Users)

If you wish to manually remove SoftwareUpdater without the use of an automated tool, it may be possible to do so by removing the program from the Windows Add/Remove Programs menu, or in cases of browser extensions, going to the browsers AddOn/Extension manager and removing it. You will likely also want to reset your browser. To ensure the complete removal, manually check your hard drive and registry for all of the following and remove or reset the values accordingly. Please note that this is for advanced users only and may be difficult, with incorrect file removal causing additional PC errors. In addition, some malware is capable of replicating or preventing deletion. Doing this in Safe Mode is advised.

The following files, folders, and registry entries are created or modified by SoftwareUpdater

Files: C:Program FilesSoftware UpdaterSoftwareUpdater.exe C:Program FilesSoftware Updatersuscan.exe C:Program FilesSoftware Updater C:Program FilesSoftware Updater cpprest120_xp_1_4.dll C:Program FilesSoftware Updater cpuidsdk.dll C:Program FilesSoftware Updater DriversHQ.SDK.REST.Win32.dll C:Program FilesSoftware Updater msvcp120.dll
Read More
1 2 3 171
Logo
Copyright © 2023, ErrorTools. All Rights Reserved
Trademark: Microsoft Windows logos are registered trademarks of Microsoft. Disclaimer: ErrorTools.com is not affiliated with Microsoft, nor claims direct affiliation.
The information on this page is provided for information purposes only.
DMCA.com Protection Status