Windows 10 supports various devices to get connected to which makes it quite a flexible operating system. The connection varies on the fact that the device can be connected either with Bluetooth or other wireless and wired connection. However, no matter how great the features are, there a few times when they bring in some bugs too. One of these bugs won’t allow you to either remove or reinstall the Bluetooth mouse and keyboard device from your Windows 10 computer. So if you are currently experiencing this problem, read on as this post will guide you in fixing it.
Before you go over the suggestions laid out below, you need to create a System Restore Point first since, in one of the options, you will be making some changes with the registry files as well as some critical Windows settings. Once you have that covered, refer to the following options.
Option 1 – Configure the Bluetooth Services
The first thing you can do is configure Bluetooth Services.
Tap the Win + R key combination to open the Run dialog box.
After that, type “services.msc” in the field and hit Enter to open the Windows Services Manager.
You will then see a list of services and from there, look for the following services and make sure that their default values are set as follows:
Bluetooth Audio Gateway Service – Manual (Triggered)
Bluetooth Support Service – Manual (Triggered)
Bluetooth User Support Service – Manual (Triggered)
Now click on the Start button to start all the aforementioned services and then check if you can now remove or reinstall the Bluetooth mouse and keyboard device.
Option 2 – Try running the Bluetooth Troubleshooter
As you know, Windows 10 has various troubleshooters with user-friendly interfaces where you can utilize them to fix issues in your PC. And since you’re dealing with some Bluetooth problem, you have to run the Bluetooth Troubleshooter.
Open the Windows 10 Settings.
Then go to Update & Security > Troubleshoot.
You should find the option for Bluetooth on your right-hand side – click on it then click on the “Run the troubleshooter” option.
Now follow the next screen options.
Option 3 – Try to reinstall or update the Bluetooth driver
The issue might have something to do with the Bluetooth drivers. It could be that it is outdated and needs to be updated or that you recently updated it and since then you have trouble removing the Bluetooth device and so to fix the issue, you can update, roll back or uninstall the Bluetooth drivers. How? Follow the steps below.
Tap the Win + X keys to open the Device Manager.
Next, look for the Bluetooth device and right-click on it.
Select the option “Update driver”.
After that, a new popup window will appear. In there, select the option, “Search automatically for updated driver software”.
Note: Checking the update may take a few minutes so you’ll have to wait until it finishes. If it is able to find an update, you must install it.
Option 4 – Get rid of any interference
If you have several wireless devices in the same room as your PC then it might have caused interference with the current connection in your PC which is why you have to switch off all the other devices and then try removing reinstalling the Bluetooth mouse and keyboard devices again.
Option 5 – Remove or reinstall the Bluetooth devices in a Clean Boot State
You might want to uninstall or remove the Bluetooth Devices while your computer is in a Clean Boot State. Putting your computer in this state will surely help especially if there are some processes that prevent the Bluetooth devices from being removed or reinstalled.
Log onto your PC as an administrator.
Type in MSConfig in the Start Search to open the System Configuration utility.
From there, go to the General tab and click “Selective startup”.
Clear the “Load Startup items” check box and make sure that the “Load System Services” and “Use Original boot configuration” options are checked.
Next, click the Services tab and select the “Hide All Microsoft Services” check box.
Click Disable all.
Click on Apply/OK and restart your PC. (This will put your PC into a Clean Boot State. And configure Windows to use the usual startup, just simply undo the changes.)
After that, try to reinstall or remove the Bluetooth mouse and keyboard devices again.
Windows Updates are important and though it is not recommended for any user to turn it off completely, there are just some remote cases where you might have to keep it off. Such are the cases when you want to use your Windows 10 computer just for gaming and you don’t want Windows Update to interrupt it because of some messy driver update. A lot of users have in fact want to disable Windows 10 updates completely. Although you can always use the built-in option to delay Windows Updates or make Windows 10 inform you before downloading the updates, however, there are instances when Windows 10 Update may enable itself even after you turn it off or delay it. To resolve this issue, read on.
You may have to disable the Windows Update Medic Service if Windows Update just keeps on starting and turning itself back on even after turning it off in Windows 10 on top of turning off the Automatic Windows Update Service or wuauserv and setting a Guest Log on. To get started, refer to the instructions prepared below.
Option 1 – Change the Log on account of the Windows Update Service
It appears that one of the major upgrades in Windows 10 has made sure that Windows 10 enables back the Windows Update Service all on its own even if the service has been set to disable by the administrator. And that’s the important thing here, Windows 10 uses admin credentials in order to ensure that it can re-enable the Windows Update Service each time it is in a disabled state. So in this fix, you can prevent the Windows Update Service from changing the account credentials used to run it.
Tap the Win + R keys to open the Run prompt with admin privileges.
Then type “services.msc” and click OK or hit Enter to open Services.
After that, locate the Windows Update Service from the list. Once you see it, double-click on it to open its Properties.
From there, click the Stop button to stop the service.
Next, go to the Log On tab and select the “Log on as ‘Guest” option which is the Guest account.
Just leave the password blank and then click Apply to save the changes made.
Note: After you made the changes, every time the Windows 10 Update Service attempts to run, you might get an error message that states, “Windows could not start the Service” or “The account specified for this service is different from the account specified for other services running in the same process”.
This is what makes this fix a lot better compared to other software or batch file to keep turning off the Windows Update Service. You did not exactly disable the service but you just changed the account used to run the Windows Update service and since there is a password, the service never really works. On the other hand, Windows Defender can’t be stopped using this trick as it will keep getting an update.
Option 2 – Try to disable the Windows Update Medic Service using the Windows Update Blocker
Aside from changing the Log on account of the Windows Update Service, there is also another way you can prevent the service from enabling itself after you disable it. This alternative you can use is the Windows Update Blocker. This is a new Windows Service that was introduced in the recent Windows 10 versions. You can use this service to disable the service.
You might have experienced a situation where your Windows computer was interrupted due to some battery issues or power failure. It could be that the upgrade process was interrupted because you’ve signed out of your computer or you restarted it by accident. In this case, you will most likely get a Windows Update or Upgrade error 0x80200056. If you are getting this error, read on as this post will guide you in fixing it.
This kind of error pops up when the upgrade process was interrupted and could be caused by anything but the baseline here is that your computer was restarted accidentally or someone could have signed out your PC. To resolve the problem, here are some fixes you ought to try:
Option 1 – Try updating or upgrading your computer again
This is the basic thing to do since the process was suddenly interrupted. Just log in to your account and restart the Windows Update or Upgrade process but make sure that your internet connection is stable and that you don’t touch anything so as not to interrupt the upgrade/update process again.
Option 2 – Check if your PC is plugged in or if the battery is full
It is always best to update your computer always when you’re really sure that the power won’t fail. If you’re using a desktop computer, make sure that everything is plugged in. And if you’re using a laptop when this error occurred, make sure that its battery is at 100% but it’s better if you just plug it into power just in case as there are times when the Windows update or upgrade gets stuck for too long like for hours so it will really help if your device is connected to power.
Option 3 – Try running the Windows Update Troubleshooter
Running the built-in Windows Update troubleshooter could also help you resolve the Windows Update errors as well as the error 0x80200056. To run it, go to Settings and then select Troubleshoot from the options. From there, click on Windows Update and then click the “Run the troubleshooter” button.
Option 4 – Delete the contents in the SoftwareDistribution folder
The Software Distribution folder in the Windows operating system is a folder that can be found in the Windows directory and is used to store files temporarily which might be required to install the Windows Update on your PC. Thus, it is required by the Windows Update and maintained by WUAgent. A lot of users tried deleting the files in this folder to fix the problem and so far it has worked. Like them, you can try clearing the Windows Update cache by simply deleting the contents of the folder named “SoftwareDistribution” since Windows apparently can’t clear and re-download the update contents once they are corrupted. Thus, deleting the contents of this folder will make Windows download the contents again which will fix the problem. To do that, follow the steps below.
Open the WinX Menu.
From there, open Command Prompt as admin.
Then type in the following command – don’t forget to hit Enter right after typing each one of them.
net stop wuauservnet stop bits
After entering these commands, it will stop the Windows Update Service and the Background Intelligent Transfer Service.
Next, got to the C:\Windows\Software\Distribution folder and get rid of all the folders and files thereby tapping the Ctrl + A keys to select them all and then click on Delete. Note that if the files are in use, you won’t be able to delete them.
Once all the contents in the Software Distribution folder are deleted, restart your PC and then go back to Command Prompt and input the following commands again.
net start wuauservnet start bits
Since the folder has already been flushed, it will be populated afresh the instant your restart your computer and open Windows Update.
Option 5 – Try running the System File Checker scan
System File Checker or SFC is a built-in command utility that helps in restoring corrupted files as well as missing files. It replaces bad and corrupted system files to good system files that might be causing the error 0x80200056. To run the SFC command, follow the steps given below.
Tap Win + R to launch Run.
Type in cmd in the field and tap Enter.
After opening Command Prompt, type in sfc /scannow
The command will start a system scan which will take a few whiles before it finishes. Once it’s done, you could get the following results:
Windows Resource Protection did not find any integrity violations.
Windows Resource Protection found corrupt files and successfully repaired them.
Windows Resource Protection found corrupt files but was unable to fix some of them.
Option 6 – Run the Chkdsk utility to repair hard disk errors
You can also run the Chkdsk utility to resolve the Windows Update error 0x80200056. If your hard drive has issues with integrity, the update will really fail as the system will think that it’s not healthy and that’s where the Chkdsk utility comes in. The Chkdsk utility repairs hard drive errors that might be causing the problem.
Open Command Prompt with admin privileges.
After opening Command Prompt, execute the commands listed below, and don’t forget to hit Enter right after you type in each one of them and if you have installed Windows to some different directory, you must replace “C” with the name of the drive you’ve installed Windows with.
chkdsk C: /r /x
chkdsk C: /f
Option 7 – Run the DISM tool to repair the Windows Update client
The Windows update/upgrade error 0x80200056 might be caused by some issues in the Windows Update client so you need to run the DISM tool to repair it. Note that you have to use another computer or another Windows from a shared network to fix it.
If you encounter a Windows Update error with an error code 0x80070652 and an error message saying, “ERROR_INSTALL_ALREADY_RUNNING”, then it indicates that there was a previous Windows Update that was not installed successfully. This kind of Windows Update error typically happens when it gets stuck and so to resolve it, here are some suggestions that might help.
Option 1 – Restart your computer and try installing the Updates again
You can restart your computer and then try installing the updates once again. There are instances when a simple restart resolves Windows Update errors. Thus, after you restart your computer, check for updates once again and see if you’re still getting the error or not.
Option 2 – Try running the Windows Update troubleshooter
You might also want to run the Windows Update Troubleshooter as it could also help in fixing Windows Update error code 0x80070652. To run it, go to Settings and then select Troubleshoot from the options. From there, click on Windows Update and then click the “Run the troubleshooter” button. After that, follow the next on-screen instructions and you should be good to go.
Option 3 – Try downloading the Windows Update that failed
If the Windows Update that has failed is not a feature update and only a cumulative update, you can download the Windows Update and install it manually. But first, you need to find out which update has failed, and to do so, refer to the following steps:
Go to Settings and from there go to Update and Security > View Update History.
Next, check which particular update has failed. Note that Updates that have failed to install will be displayed under the Status column which has a label of “Failed”.
After that, go to the Microsoft Download Center and look for that update using its KB number and once you find it, download and then install it manually.
Note: You can also use the Microsoft Update Catalog, a service from Microsoft that provides a list of software updates that can be distributed over a corporate network. With the help of this service, it can be easier for you to find Microsoft software updates, drivers as well as fixes.
Option 4 – Try to restart the Background Intelligent Transfer Service
The Background Intelligent Transfer Service or BITS is a part of the Windows Update service and is the one that manages the background download of Windows Update, as well as scans for new updates and so on. And if Windows Update is experiencing some problems, you can try restarting BITS but make sure that you have admin privileges to do so.
Tap the Win + R keys to open the Run dialog box.
Next, type “services.msc” in the field and hit Enter to open Windows Services.
From the list of Services, look for the Background Intelligent Transfer Service and double-click on it to open Properties.
After that, you need to set the Startup type to “Automatic (Delayed Start) and click on Apply.
Now click the Stop button to stop BITS and then click the Start button to restart the service.
Click OK to save the changes made and then restart your PC.
Option 5 – Try to update Windows after a couple of minutes or an hour
There are times when the issue is from Microsoft’s end. It could be that there’s some issue with Microsoft’s server so it would be better if you give it a couple of minutes or an hour or so before trying to run Windows Update again.
Mscomctl.ocx is a Microsoft library Windows Common Controls file. The Mscomctl.ocx error occurs when this file is either lost or gets corrupt.
The error is displayed on the screen when the user tries to run a program that is dependent on this file. It appears as:
“Component 'MSCOMCTL.OCX' or one of its dependencies not correctly registered: a file is missing or invalid”
Solution
Download Available to Completely Repair the Error Mscomctl.ocx
Error Causes
Installing and then uninstalling a large number of applications on the Windows operating system often corrupts or unregisters the Mscomctl.ocx library.
This message will continue to appear on the screen until you re-register the library file again on your system.
Further Information and Manual Repair
You don’t need to have the sound technical knowledge or call a professional to resolve Mscomctl.ocx error on your PC. The Mscomctl.ocx error is easy to repair and can be fixed in a couple of minutes.
Here are 2 solutions to repair the Mscomctl ocx error code on your system:
Cause: Error occurs because the Mscomctl ocx file is unregistered
Solution:
Go to the start menu and type ‘Mscomctl.oxc and press enter
Copy the ‘Mscomctl.ocx’ file and paste it in "C:WindowsSystem32" folder
Now click the start menu again and type ‘CMD’ in the search box. This will open your computer's command prompt.
Once this opens, type either of the following commands and then press enter. If you have a 64-bit operating system, then type: Regsvr32 "C:WindowsSysWOW64MSCOMCTL.OCX” and if you have 32-bit operating system, then you should type ‘Regsvr32 "C:WindowsSystem32MSCOMCTL.OCX"
By doing this, you will be able to register the Mscomctl.ocx file on your PC and then you will no longer receive Mscomctl.ocx error code.
Cause: Error code occurs because the Mscomctl.ocx file is missing
Solution:
First search for MScomctl ocx on your local drive to see if it is missing.
If the file is missing, then download the MScomctl.exe file from a reliable website.
Now extract the file to your C:WINDOWSsystem32 directory
Then click start and run.
Now type ‘REGSVR32 MSCOMCTL.OCX’ and press enter
Please note to implement any of the two solutions stated above, you will need administrator rights. If you have the administrator rights then only can you make the above registry changes.
Therefore to make the following changes you will have to access the PC using the Administrator account.
Simply follow the instructions given above to repair this error code problem right away!
Originally Microsoft has imagined its widgets menu as Microsoft-only widgets but it seems that they have changed their mind.
Due to the latest leak, it seems that Microsoft will open the widgets menu to 3rd party developers as well but at launch, it will be only official widgets. It was hinted that later widgets menu will be open to developers who want to bring their own stuff into it.
Distribution, date, and technology that will need to be used in order to create your widget have not been discussed nor leaked at a given time but in some way, I am very glad that at least some customization will be in Windows 11.
It is funny and amusing how some things that were in Windows Vista are getting back like glass design, round corners, and widgets. Let’s just hope Windows 11 will be a better Windows than Vista was.
Still sitting on the fence about upgrading to Windows 11 because you don’t know what to expect? Interestingly, the new edition somehow manages to be both a total revamp and still very similar to its predecessor in many ways. It’s really something to experience for yourself.
We do want to give you a sneak peek, though. So here’s an overview of the biggest changes Windows 11 brings to the table.
What’s different in Windows 11?
1. Visual changes
The first thing anyone will notice after switching to Windows 11 is the striking visual difference. The entire interface is smoother, cleaner and more minimalistic than on Windows 10, even resembling the macOS in some instances. Perhaps the most obvious change in appearance is the Start menu and Taskbar location, which is now at the bottom center. It’s actually very neat, but if you’re someone who loves familiarity, don’t worry, you can move it back to the left.
Centralized Taskbar and Start menu
Moreover, you’ll notice that the Taskbar includes a Microsoft Teams icon by default (which you can, of course, remove) and that Live Tiles are gone. The News and Interests section has also been removed - or, shall we say, replaced. As opposed to Windows 10, news, weather forecasts and other information are now displayed as widgets.
To add to the cleanliness of the UI, Microsoft also enhanced the ‘Snap Layouts’ feature to help you better organize your windows and maximize screen real estate. It’s similar to app grouping on your smartphone. In Windows 10 this feature is slightly restricted, as it requires some manual resizing and dragging. In Windows 11, you can just hover over the minimize/maximize option on a window, select a layout and throw the windows in there.
Snap Layouts
2. New accessibility features
Microsoft has certainly paid attention to accessibility with Windows 10, but Windows 11 takes this to a whole new level.
One of the ways Windows 11 has taken things up a notch is by adding the long-awaited ‘Live Captions’ feature and advanced Narrator options.
Live Captions apply both to media played on your PC as well as your own speech when you’re using the microphone. Keep in mind that, as with almost all kinds of subtitles, you have to be prepared for a potential delay. However, it’s barely noticeable and doesn’t take away from the usefulness of this awesome new feature whatsoever.
As for the Narrator, there are three new voice packs to choose from. Microsoft has tried to put emphasis on a more natural voice than we are used to. So, now you can choose between Aria, Jenny and Guy, who will read pretty much anything off your screen out loud. Aside from this, Microsoft has also expanded the list of braille displays supported by the Narrator feature. For users with anxiety or trouble concentrating, a welcomed addition is the Focus app, which is no longer part of the Clock app. It’s now separate and called ‘Focus Sessions’, automatically triggering the Do Not Disturb mode when activated. It blocks all pop-ups and flashes and lets you work in peace until you’re ready to switch it off.
3. Android apps
Android users may rejoice! Windows 11 supports the use of your favorite applications now.
Microsoft has done this by integrating the Amazon Appstore to the Windows 11 Microsoft Store. From there, you can download your favorite Android apps and use them on your PC in a smartphone-like window.
Unfortunately not too many apps are supported at this time, but Microsoft is working on making the emulation possible for many more. Also, the option is only available in specific regions at this moment - check out if you’re one of the lucky ones.
4. Improved gaming performance
Avid gamers will be happy to hear that Microsoft has put some effort into streamlining Windows 11 for their gaming needs.
To give gamers a supreme visual experience, Windows 11 offers the ‘Auto HDR’ feature. As long as your monitor is HDR-compatible, this feature will automatically adjust the colors, brightness and contrast of games without any input from you.
Another update is DirectStorage, which we were introduced to in Windows 10 already. In Windows 11, it’s been improved to tweak loading times and overall gaming performance efficiency even better. The predisposition for it to work optimally is that your device has an NVMe SSD.
The Xbox Game Bar also helps gamers towards a smoother experience. It allows in-game screenshots, viewing processes that are running (similar to the Task Manager), monitoring the CPU and GPU performance and frame rate, integrating the Xbox App and more. There’s also a number of widgets you can now use with the Game Bar, for example the Spotify widget.
Xbox Game Bar
Another cool addition is the Xbox Game Pass, which unlocks hundreds of games to play on your Xbox App, with new additions coming in every month.
5. Smart App Control
Aside from a sleek new look and better accessibility for all users, Windows 11 also comes with a security power-up. Bear in mind that this feature is only available on clean Windows 11 installs.
Smart App Control (SAC) is an AI-powered new feature designed to protect your PC from potential threats. It blocks untrustworthy apps and adware and helps detect potentially unwanted apps, maintaining your PC’s performance and keeping your system safe.
It comes with an ‘Evaluation’ mode, which you should definitely select when running SAC for the first time. That way, the app monitors your usage and assesses whether you’re a candidate for SAC. Some users need it to be on all the time, for others it might be too distracting. Evaluation mode will turn SAC on or off based on your usage.
Don’t disable SAC again unless you’re absolutely sure you don’t need it, since reenabling it will require a fresh install. We recommend you don’t turn it off, as it is a neat feature protecting your data and files from malware at all times.
Summary
Have we piqued your interest in trying Microsoft’s latest OS? It’s a pretty exciting new iteration, but we’ll let you find out for yourself. We hope you like it!
Hello and welcome to errortools another tutorial which aims to make your computer life easier and more relaxed. This time we will be talking about how to switch sound output devices in Windows 10 in a matter of seconds between Headphones and external speakers, Between 2 different speakers, or any other audio output device in general.
Windows 10 with its updates has really gone from OK to one of the greats, little hacks and shortcuts which every update has introduced have really made life easier.
Now, your typical switching from one audio output device to another can be accomplished with your standard go to settings, go to devices, choose audio, pick one which you prefer and click on OK. This way altho nothing wrong with it is a little slow and if you need to switch your output devices several times in a single day often it can be time-consuming as well. Lucky for you we have a quick solution for you.
Switching guide
All right, now in order to be able to actually switch between your audio output devices make sure that all of them are working and that they are plugged in. For example, make sure that both of your headphones and speakers are turned ON and plugged in. Once you have confirmed that everything is in working order:
Click with a left mouse button on a speaker icon located on the right part of your taskbar next to the clock
Click on the small up arrow on the right next to your current audio output device.
The list will open, choose, and left click with the mouse button on your choice.
And that's it, you have changed your default audio output device in a matter of seconds.
The good thing about this method is that Windows will remember output audio levels for each device.
Potential issue
If by any chance when switching your audio devices this way freezes volume control just go to the task manager and restart Windows Explorer.
To restart Windows explorer:
The Error Code 0x80070057 is rather typical with Win7.
Customers of Win7 maintain reporting that each moment they strive to install this Operating system, it shows this problem error.
Often, the total information that comes with this specific error is:
"Error Code 0x80070057: The parameter is wrong"
When this problem happens, you will end up struggling to move private documents from one person to another.
Solution
Error Causes
You could get the error message when you attempt installing Win7,
"An Internal Error has occurred. Incorrect parameters".
If this happens to you, realize that you are dealing with malfunction code 0x80070057. This error occurs mostly when you are trying to build a full backup of your Windows 7 OS.
The primary source of Error 0x80070057 is huge registry values.
Extensive registry values usually occur when you are trying to back up your Windows 7 OS. This means that you need to immediately create a bigger virtual memory space to avert the occurrence of the error.
Error Code 0x80070057 can be a result of incompatibility between the motherboard and some drivers.
Check whether the computer's motherboard and the installed drivers are compatible. If you can't do this effectively on your own, it might be a good idea to enlist the services of a qualified technician.
The Problem Signal 0x80070057 has a close Connection with RAID Installations
RAID installations have a tendency of sparking off the Error Code 0x80070057. If you experience this error while using RAID, first turn off the RAID setup and check whether that resolves the problem.
Further Information and Manual Repair
Error Code 0x80070057 is repairable. Thus, there's absolutely no cause for alarm when you see it with respect to your own Windows 7 Operating System. So what can you do to resolve it?
a) Increase Virtual Memory: This is perhaps the most common solution to Error Code 0x80070057. In most cases, simply raising the virtual memory especially on Windows 7 Operating-System completely eliminates the error. Moreover, you don't have to be technically advanced to effect the change. Simply follow these steps:-
Click the Start Button and visit Control Panel
Click System Security, and proceed to System.
Click the Advanced System Settings, subsequently proceed to the Advanced Level Tab.
Click Change, which can be under the Virtual Memory
Change the virtual memory value. For instance, you can customize entirely from 2000MB to 6000MB.
Click Set, then Ok. You are done
As with each additional change you make with respect to your Computer, you will have to conclude by re-booting it. This way you make certain that they'll stay as you've established them and apply the necessary modifications.
If the error still persists after attempting the preceding fix, download a registry-cleaning software. The software will clean up your disk and free up memory thus increasing the available virtual memory for your computer. This should solve your persistent Error Code 0x80070057.
Even with the new Groove Music in Windows 10, a lot of users still prefer to use the old Windows Media Player. This isn’t surprising since Windows Media Player still remains to be one of the best players you can find. However, that does not mean that it is without flaws as it could still encounter some issues from time to time.
One of the issues you might encounter when using the Windows Media Player is when you try to burn DVDs or CDs but end up failing due to an error that pops up that says, Windows Media Player cannot detect the length of the file. At the time of writing, it isn’t clear yet what the real cause of the error is. However, there are several fixes that are provided in this post for you to check out so you can resolve the problem. You can try to get rid of any unsupported files from the burning list or you could also try running the Windows Media Player troubleshooters. Aside from that, you could also try to drag and drop music or change the burning speed. For more details, refer to the following options.
Option 1 – Get rid of the unsupported files from the burning list
You must get rid of the unsupported files from the list of files to burn. This list can be found on the right-hand side of the Windows Media Player. One of the indications that a file is causing problems is when there is a white cross in a red circle next to the file. You can simply click on that icon to remove the file from the burning list. Once you’ve gotten rid of all the unsupported files, try to burn your files to the CD or disk once more.
Option 2 – Try running the Windows Media Player troubleshooters
The next thing you can do to fix the error is to run the built-in troubleshooters for the Windows Media Player. Windows 10 actually comes pre-packed with three troubleshooters designed for Windows Media Player. They can help in fixing the “Windows Media Player cannot detect the length of the file” error. To run these troubleshooters, simply tap the Win + R keys to open the Run dialog box and type “msdt.exe -id WindowsMediaPlayerConfigurationDiagnostic” for the Windows Media Player Settings troubleshooter or type “msdt.exe -id WindowsMediaPlayerLibraryDiagnostic” for the Windows Media Player Library troubleshooter, or type “msdt.exe -id WindowsMediaPlayerDVDDiagnostic” for the Windows Media Player DVD troubleshooter.
Option 3 – Try to drag and drop music
Another thing you can check out is to drag and drop all the tracks into the Windows Media Player before you burn them. All you have to do is open the folder where the tracks are located and highlight all of them and then drag them to the Windows Media Player. It should now be able to detect the length of each one of the tracks without any errors.
Option 4 – Try to change the burning speed
Since the burning speed is set to fastest by default, you can try to change the burning speed to resolve the problem. Just open the Options window and then go to the Burn tab. From there, select either Medium or Slow burning speed and save the changes made. Now try to burn your files to the CD or disk once again.
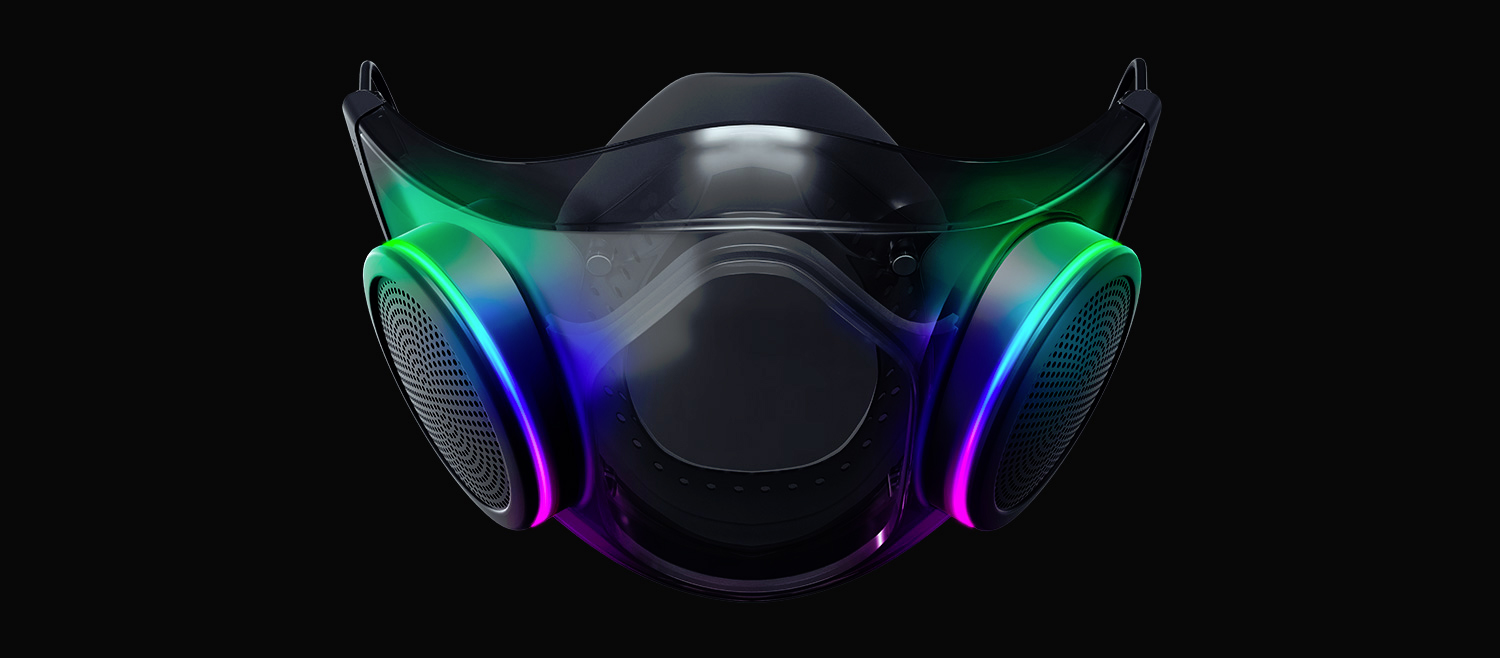
The world today is still sadly under pandemic and by the looks of it, COVID-19 is here to stay, well at least for some time in the near future. Razer seems to think so as well since their upcoming gear is not really what you would expect.
Enter Hazel, a new and upcoming Razer smart mask.
Protection
Hazel mask has a high bacterial surgical N95 filter with fluid resistance that will protect you against large droplets and splashes. A detachable active ventilator regulates airflow and is capable of filtering around 95% of airborne particles. Mask comes with a special charging case that has an auto sterilization UV light that will kill bacteria and viruses inside the case interior while it charges.
When the mask is recharging it will change color from red to green visually showing the level of the current charge. Mask of course has easy to replace filters inside ventilators and Razer is standing by that fully charged mask will last enough for full-day use.
An active ventilation system brings cool air while releasing breathing heat at the same time drastically reducing CO2 inside the mask that could produce dizziness and headache.
Silicon guard is on its edge gluing to around your face in order to prevent exterior air sneaking inside the mask and positioning it firmly so it does not rest on your lips in order for easier and clearer communication.
Hazel personalization and technical features
Hazel has a clear and transparent design making it better for social interaction since other people will be able to see your lips and smiles thus making it more natural. A low light mode that turns on automatically when it is dark outside is also aimed for easier communication.
Speaking of communication, the mask comes with voice Amp technology that has a built-in mic and amplifier thus making your voice lines clear so you are not muffled when wearing the mask itself. Your friends and other people will be able to hear you like you are not wearing a mask at all.
Thicker air loops apply less pressure on ears and can be adjusted for a more secure fit, while the mask itself can be custom-made to fit your face shape.
And of course Hazel comes with 16.8 million colors and a suite of effects with Razer Chroma RBG


 Originally Microsoft has imagined its widgets menu as Microsoft-only widgets but it seems that they have changed their mind.
Due to the latest leak, it seems that Microsoft will open the widgets menu to 3rd party developers as well but at launch, it will be only official widgets. It was hinted that later widgets menu will be open to developers who want to bring their own stuff into it.
Distribution, date, and technology that will need to be used in order to create your widget have not been discussed nor leaked at a given time but in some way, I am very glad that at least some customization will be in Windows 11.
It is funny and amusing how some things that were in Windows Vista are getting back like glass design, round corners, and widgets. Let’s just hope Windows 11 will be a better Windows than Vista was.
Originally Microsoft has imagined its widgets menu as Microsoft-only widgets but it seems that they have changed their mind.
Due to the latest leak, it seems that Microsoft will open the widgets menu to 3rd party developers as well but at launch, it will be only official widgets. It was hinted that later widgets menu will be open to developers who want to bring their own stuff into it.
Distribution, date, and technology that will need to be used in order to create your widget have not been discussed nor leaked at a given time but in some way, I am very glad that at least some customization will be in Windows 11.
It is funny and amusing how some things that were in Windows Vista are getting back like glass design, round corners, and widgets. Let’s just hope Windows 11 will be a better Windows than Vista was. 


 The world today is still sadly under pandemic and by the looks of it, COVID-19 is here to stay, well at least for some time in the near future. Razer seems to think so as well since their upcoming gear is not really what you would expect.
Enter Hazel, a new and upcoming Razer smart mask.
The world today is still sadly under pandemic and by the looks of it, COVID-19 is here to stay, well at least for some time in the near future. Razer seems to think so as well since their upcoming gear is not really what you would expect.
Enter Hazel, a new and upcoming Razer smart mask.