Logo

Fix Communication with service process failed

This post will guide you in fixing the “Communication with service process failed” error in Windows 10. This error is related to the Intel Driver and Support Assistant application. Although this error does not reportedly cause any loss of functionality in the computer, however, it still indicates that there is something wrong with some of your driver modules.

Intel has taken a bold step and combined its older modules into this new application (Intel Driver and Support Assistant) recently. This application enables users to scan their computers for any available updates from Intel. This is the main application of Intel and provides users a way to update their driver software automatically instead of manually updating it. However, with the recent reports submitted by some users, it seems that something is wrong with this application, and users to have to deal with the “Communication with service process failed” error. This error might be caused by several reasons, for one, it could be that the application is corrupted or incomplete in its nature which is possible since this is still a developing and newly released app. It could also be that there are other utilities or modules that conflict with the Intel software. Whichever the reason may be, you can try out the options given below to resolve the problem but before you proceed, make sure that you have an administrator account as well as an active and stable internet connection.

Option 1 – Disable DSATray in Startup

If you receive this error message every time you start your computer then this means that the application is not able to launch properly. Like pointed out, it could be that it is still incomplete in nature or it conflicts with other applications. Thus, you can try to disable the service from the startup and check if it fixes the problem.

  • Tap the Win + R keys to open the Run dialog box.
  • Then type “taskmgr” in the field and hit Enter to open the Task Manager.
  • After that, go to the Startup tab and look for the Intel Driver and Support Assistant app.
  • Right-click on the app and select Disable.
  • Restart your PC and check if the error is now fixed or not

Option 2 – Reinstall the Intel Driver and Support Assistant

If the first option did not work, you can try reinstalling the Intel Driver and Support Assistant app. To do so, follow these steps:

  • In the search box, type in “control” and then click on Control Panel (desktop app) among the search results.
  • After that, select Programs and Features from the list which will give you a list of all the programs installed on your computer.
  • From there, look for Intel Driver and Support Assistant and select it and then uninstall it.
  • After you have the app uninstalled, open your browser and go to Intel’s official website. From there, download the driver utility manually.
  • Once the download is finished, right-click on it and select “Run as administrator” and install the app on your PC with elevated access.
  • Restart your PC and then check if the error is now fixed.

Do You Need Help with Your Device?

Our Team of Experts May Help
Troubleshoot.Tech Experts are There for You!
Replace damaged files
Restore performance
Free disk space
Remove Malware
Protects WEB browser
Remove Viruses
Stop PC freezing
GET HELP
Troubleshoot.Tech experts work with all versions of Microsoft Windows including Windows 11, with Android, Mac, and more.

Share this article:

You might also like

Quick Guide to Fixing 0x0000007E Error

What is 0x0000007E Error Code?

If you’ve been experiencing a 0x0000007E error code pop message on your PC frequently then you need to get it fixed before it causes serious damage to your system. 0x0000007E is a Stop error or Blue Screen of Death error code. This error message turns your computer screen blue and locks you out of the program running on your computer. It freezes your system and hampers your ability to perform any type of task on your PC.

Solution

Restoro box imageError Causes

Error 0x0000007E, a blue screen of death error triggers registry issues. It’s not easy to narrow down the cause of 0x0000007E as it results due to many reasons like memory overload, cluttered disk space, viral infection, malware attack, and if the hardware malfunctions. Ignoring 0x0000007E error pop up is not wise. It is more like a warning of the serious damage that can happen to your PC if it is not fixed timely. It also leads to slowing down the system and increases boot time. This error message exposes you to dangerous Windows PC threats like registry corruption and damage. Registry corruption can lead to system crash and failure and you may also lose all your important data saved on your PC.

Further Information and Manual Repair

Install Restoro

You don’t always have to spend hundreds of dollars to hire a technician to fix error pop-ups on your PC try using Restoro Restoro is an advanced and multi-functional PC repair tool with a comprehensive suite of powerful features designed to resolve almost all types of PC errors in seconds including 0x0000007E error code. It is a next-generation PC repair tool that serves as a system optimizer, anti-virus, and quality registry cleaner. Its built-in intuitive technology enables Restoro to scan, identify and repair the ultimate cause of the error code 0x0000007E in just a few seconds. Eventually, it spares you from the hassle of finding the root cause of the 0x0000007E error message and then selecting a tool specifically designed to resolve only that particular cause with limited features. This highly functional PC error tool is the answer for all your registry issues. By running Restoro on your PC, you can fix the 0x0000007E BSOD error code and avoid registry corruption.

Why Restoro?

The smart registry cleaner utility embedded in this tool enables it to scan for registry errors and clear up disk space accumulated by junk files, internet temporary files, invalid entries, and other types of unnecessary files taking up a good chunk of your disk space. This clutter also slows down your PC performance as it requires more power than it has to run the system because of the excess load on the RAM. However, by wiping out the clutter with this helper, you can optimize the speed of your PC and see a significant difference in its performance. Restoro backup feature enables you to create backup files for safety purposes. Furthermore, it has several other built-in value-adding features like privacy error utility and system stability utility for enhanced functionality. To resolve the error code 0x0000007E in seconds, all you need to do is download and install Restoro on your system and run it to scan for errors. In a few seconds, you will see a scanning report with comprehensive details of the types of PC damages. To fix the issue right away, create backups and click ‘fix’ to resolve. In just a few clicks you can repair your PC. Download Restoro Today!
Read More
An Easy Guide to Resolve Xpcom.dll Error

Xpcom.dll Error Code - What is it?

To understand the Xpcom.dll error better, first, you need to know what Xpcom.dll file is. Xpcom.dll is basically a typical DLL (Dynamic Link Library) file. It is associated with Firefox developed by Mozilla Foundation for the Windows Operating System. DLL file contains small programs similar to exe (executable) files. Just like any other DLL file, Xpcom.dll helps loads and run programs smoothly. Xpcom.dll functions as a shared file that can be used to run multiple programs on your PC. Xpcom.dll error code occurs when Windows cannot properly load the xpcom.dll file. The error may pop up on the screen in any one of the following formats:
  • "Xpcom.dll not found."
  • "The file xpcom.dll is missing."
  • "Cannot register xpcom.dll."
  • "Cannot find C:\Windows\System32\xpcom.dll."
  • "This application failed to start because xpcom.dll was not found. Re-installing the application may fix this problem."
  • "Xpcom.dll Access Violation."
  • "Cannot start Firefox. A required component is missing: xpcom.dll. Please install Firefox again."
The xpcom.dll error can occur during program installation or while rebooting your PC or when shutting it down.[/section]

Solution

Restoro box imageError Causes

It is difficult to narrow down a single cause of this error code simply because the Xpcom.dll error code may be triggered due to several reasons. Some of the common causes include:
  • Invalid or corrupt xpcom.dll registry entry
  • Viral infection
  • Outdated PC drivers
  • Another program overwrote the required version of xpcom.dll
  • Xpcom.dll file is accidentally deleted or uninstalled
  • Mozilla Foundation hardware failure

Further Information and Manual Repair

Here are the best, quick and easy DIY methods to resolve Xpcom.dll error code on your system within minutes:

Method 1: Update Window Drivers

To resolve the xpcom.dll error on your system, try updating Window drivers. To do this simply use the driver update wizard from within Device Manager. The driver update wizard walks you through the entire drive update process, making it easy and hassle-free for you to update drivers.

Method 2: Download and Install Xpcom.dll File

Since DLL are shared files and used to run and load multiple programs, it is possible that you might have accidentally removed this file while uninstalling a program on your system. This is the reason why the Xpcom.dll file goes missing. To retrieve the Xpcom.dll file simply go to the recycle bin. Reinstall the deleted program. However, if it still doesn’t resolve the error, then it is advisable to download and install the Xpcom.dll file from a trusted DLL file website over the internet.

Method 3: Scan for Viruses and Repair the Registry

If the error code occurs due to malware infection or is related to registry issues, then simply download Restoro. This is a user-friendly and multi-functional PC Fixer deployed with 6 scanners including a powerful antivirus and a registry cleaner. It is compatible with all Windows versions. Simply run it to remove all types of viruses infecting your system and clean/repair the registry. Click here to download Restoro and resolve the Xpcom.dll error on your PC.
Read More
How to clear cache inside Windows 11
Cache files are temporary files that have been created by various applications and services when used.  As temporary files, they are safe to be removed and deleted from the system since the application or service will create new ones when needed but sadly will not remove old ones, this task is left to OS itself. windows 11 cacheAutomatic Windows cleanups can mostly take care of these things but for top-notch performance clearing cache manually is a far better option. We will here explore various cache temporary files, where they are, and how to clean them. Sit back and let’s do some cleaning!

Clear cache using Disk Cleanup

  1. Open Start menu and search Disk Cleanup
  2. Click on it in search results
  3. Click on the drives drop-down menu and select the drive where is Windows 11 installed
  4. In the Files to Delete section enable all boxes and click on OK
  5. Click on delete Files to confirm

Clear Microsoft store cache

  1. Press ⊞ WINDOWS + R to open the run dialog
  2. Type in WSReset.exe and press ENTER
  3. Black blank windows will appear, wait for the window to close itself and you are done

Clearing location cache

  1. Press ⊞ WINDOWS + I to open location history
  2. Select Privacy & Security
  3. In the App Permissions section click on Location
  4. On-Location page click on Clear

Clear and flush DNS

  1. Press Start and search for Windows Terminal
  2. Click on Terminal in search results
  3. Type in: ipconfig /flushdns and press ENTER
And that is that!
Read More
Fix cannot open IPv4 Properties in Windows 10
Many Windows 10 users often change the IP addresses of their computers’ network adapter in order to connect to the internet or network they belong to in times when there is no automatic connection for their computers. In most cases, access to modifying this setting is restricted for some odd reason even if you are an administrator. So if you are one of the users whose Windows 10 VPN IPv4 Properties are not working, this post can help you remedy that so that you can open and edit the IPv4 Properties on your Windows 10 PC. The common way to change IP settings is by going to Settings > Network and then to Internet > Change adapter options > Select Network adapter > right click and open Properties. From there, you can select TCP/IP 4 and modify it. If you aren’t able to do this, refer to the instructions laid out below to troubleshoot the problem in accessing the IPv4 Properties.

Option 1 – Try using PowerShell to manually set the IPv4 properties

As you are not able to set it using the interface, you can do so using PowerShell instead. Note that this option will only work for you if you run PowerShell with administrator privileges. After opening PowerShell, according to many users, you have to run the this command – set-DnsClientServerAddress -InterfaceAlias “Ethernet” -ServerAddresses xxx.xx.xxx.xxx,x.x.x.x,xxx.xx.xxx.xxx,x.x.x.x Usually, Ethernet is the name of your network adapter which is set by default. If you want to see the actual name of your network adapter, you can just type this command and tap Enter after doing so – Get-NetAdapter -physical | where status -eq 'up' After entering the given command, you will see a list of active Ethernet adapter in your computer as you can see on the image above. Note that the 4 sets of X like the one on the image below should match with the sequence:

Option 2 – Try editing the rasphone.pbk files

The rasphone.pbk files stores property for the connections and since you are not able to access the IPv4 properties, it is most likely that it has been disabled here. The good thing is that you can open these files and edit them using Notepad. Refer to the steps below to do so.
  • Open the Windows Explorer and then enable the show hidden files option.
  • After that, look for the files at this location – C:Users <username>AppDataRoamingMicrosoftNetworkConnectionsPbk_hiddenPbkrasphone.pbk
  • Then right-click on it and select the “Open with” option and choose the Notepad app.
  • After opening the file, look for “IpPrioritizeRemote” from the long list.
  • Once you found it, set its value from “1” to “0”.
  • After that, look for “IPInterfaceMetric” and set its value to “1” and tap Ctrl + S to save the changes you’ve made, and then exit and try accessing the IPv4 properties again. It should work, but if you’re still unable to access it, try the next option below.

Option 3 – Enable the Split Tunneling if you use VPN

All data goes back and forth when you are using a VPN service on your computer. And since you are using VPN, it could be that it disables the IPv4 interface. If that’s the case, you need to stay connected with both the local network and VPN and to do so, you have to enable Split Tunneling. How? Follow these steps:
  • Open PowerShell with administrator privileges.
  • Next, type in “Get-VpnConnection” and tap Enter. After doing so, it will give you the exact name of your VPN.
  • After that, type in “Set-VpnConnection -Name “yourVPNName” -SplitTunneling $True” and tap Enter. Once you enter the command, it will free your IPv5 settings so that you can change it to connect with your local network if you prefer it to.
Read More
Cannot find a system image on this computer
If you are trying to restore your computer using a System Image that has been created by the Windows Backup and Restore tool but encountered an error message instead that says, “Windows cannot find a system image on this computer”, you’ve come to the right place as this post will walk you through in fixing this error. Here’s the complete context of the error message:
“Windows cannot find a system image on this computer, Attach the backup hard disk or insert the final DVD from a backup set and click Retry. Alternatively, close this dialog for more options.”
In the error message, you are offered two choices – to either Retry or Cancel the operation. You can try to select Retry to try again but you will most likely get the same error if you do so. This kind of error can occur if the name of the WindowsImageBackup folder or any of its sub-folders has been modified. On the other hand, this error can also pop up if this folder or any of its sub-folders have gone missing or have become corrupted. To resolve the error, you can try to move the WindowsImageBackup folder or check its sub-folders. You can also try to isolate the System Image file or rename the System Image folder or remove all the unwanted sub-folders as well as use Command Prompt in Repair mode.

Option 1 – Try to move the WindowsImageBackup folder

The WindowsImageBackup folder must be stored in the root of the volume where it is stored, in line with the functioning of the System Restore utility. For example, if the WindowsImageBackup folder is stored in the “C:/Backups/System Restore Backups/New” location, then you have to move it to the C: drive as well.

Option 2 – Try to check the subfolders of the WindowsImageBackup folder

The classification of folders and files plays an important part to restore in restoring a computer from a System Restore point. Thus, if have modified the names of any files or folders inside the WindowsImageBackup folder, then you need to set the defaults. After that, run System Restore again and check if it fixes the error.

Option 3 – Try to isolate the System Image file

If the System Image file is stored in a USB storage device along with various System Restore images, then it’s no wonder why you’re getting this error. To set things right, you have to make sure that the System Restore image you wish to restore your computer from, is the only one that’s present at the root of the USB storage device.

Option 4 – Try renaming the System Image folder

If you have renamed the System Image folder prior to running System Restore, then it is most likely the reason why you’re getting the “Windows cannot find a system image on this computer” error. This error pops up because the System Restore utility in Windows 10 looks out for the WindowsImageBackup folder so if you have renamed it, you need to change its name back to what it originally was to fix the error.

Option 5 – Try to remove all the sub-folders of the WindowsImageBackup folder

If you have stored some foreign files inside the WindowsImageBackup folder, you need to get rid of them right away and return the folder to its default state as this folder must be left alone and should not be meddled with if you want to run System Restore smoothly.

Option 6 – Try to use Command Prompt in Repair Mode

  • Open Command Prompt while your computer is in the Repair Mode.
  • Next, type and enter this command where you need to replace “<Partition Letter>” with your drive’s letter: dir <Partition Letter>
  • After you’ve found the WindowsImageBackup folder in any of the partitions, type and enter this command: dir <Parition Letter>WindowsImageBackup /s
  • The command you entered will display all the contents of the folder exceeding 10 GB in total size. You can check and confirm the integrity of the folder and if you find that the integrity is violated, then it is the reason why you’re getting the error.
Read More
How to Get Rid of Email Access Online

Email Access Online is a browser extension published by Polarity Technologies Ltd. That offers users quick and easy access to emails and weather reports. While this might sound interesting and useful, there is nothing this extension offers that cannot be solved with a few simple bookmarks.

While installed Email Access Online monitors the user's browser activity and records visited websites, clicked links, and bought products, this data is later used to serve partner ads if the user looks for the covered categories, additionally, it will hijack your new tab page, changing your search engine to Yahoo to allow easier ad placement.

Browsing the internet with this extension enabled will result in additional ad placement, pop-up ads, and sponsored links throughout your browsing sessions.

Upon further investigation, it was discovered that this extension is a repack of MyEmailXP, which was a repack of Fast Email Checker. Due to its suspicious delivery methods and information gathering, several anti-virus scanners have marked this extension as a browser hijacker and it is recommended to remove it from your computer.

About Browser Hijackers

Browser hijacking means that a malicious code has taken control over and modified the settings of your web browser, without your consent. Browser hijacker malware is designed for many different reasons. The idea is to force users to visit specific websites which are aiming to increase their visitor traffic and generate higher advertisement income. It may appear naive, but the majority of such websites are not legitimate and can present a significant risk to your online safety. In a worst-case scenario, your internet browser could be hi-jacked to download malicious software that can do a lot of damage to your PC.

Major signs that your internet browser has been highjacked

There are many signs that could indicate a browser hijacking: 1. the home page of the web browser is changed suddenly 2. you observe new unwanted bookmarks or favorites added, usually directed to ad-filled or porn websites 3. the default search engine is changed and the web browser security settings have been brought down without your knowledge 4. you see unwanted new toolbars added 5. your internet browser will display constant pop-up windows 6. your web browser starts running sluggishly or presents frequent errors 7. Inability to navigate to particular sites, especially anti-malware and other computer security software websites.

So how does a computer get infected with a browser hijacker

There are a number of ways your computer can get infected by a browser hijacker. They usually arrive through spam e-mail, via file sharing websites, or by a drive-by-download. They could also come from add-on software, also referred to as browser helper objects (BHO), web browser extensions, or toolbars. Browser hijackers sneak to your computer in addition to free software application downloads that you unintentionally install along with the original. The presence of any browser hijacker on your system could substantially diminish the web browsing experience, monitor your internet activities that lead to critical privacy concerns, create system stability problems and finally cause your PC to slow down or to a practically unusable condition.

How to repair a browser hijack

Certain kinds of browser hijackers can be effortlessly removed from your PC by deleting malicious software programs or any other recently installed shareware. However, most hijacking codes are certainly not very easy to remove manually, as they go deeper into your operating system. And there’s no denying the very fact that manual repairs and removal methods can certainly be a difficult job for an inexperienced PC user. Besides, there are several risks connected with fiddling around with the system registry files. Anti-malware program is incredibly effective when it comes to discovering and removing browser hijackers that regular anti-virus application has missed. To get rid of any kind of browser hijacker from your computer, you can download the following certified malware removal application – SafeBytes Anti-Malware.

What you can do if Virus Stops You From Downloading Antivirus?

Practically all malware is bad, but certain kinds of malicious software do much more damage to your PC than others. Some malware goes to great lengths to stop you from downloading or installing anything on your personal computer, especially anti-malware software. If you are reading this right now, you’ve probably realized that virus infection is the reason behind your blocked net traffic. So what to do when you want to install an anti-malware application such as Safebytes? There are a few actions you can take to circumvent this issue.

Make use of Safe Mode to fix the issue

If the malware is set to run automatically when Windows starts, getting into safe mode may block this attempt. Since only the bare minimum programs and services start-up in “Safe Mode”, there are rarely any reasons for conflicts to happen. You will need to do the following to remove malware in Safe mode. 1) At power on/start-up, tap the F8 key in one-second intervals. This will bring up the Advanced Boot Options menu. 2) Use the arrow keys to choose Safe Mode with Networking and press ENTER. 3) When you are into this mode, you will have access to the internet again. Now, use your internet browser normally and navigate to https://safebytes.com/products/anti-malware/ to download Safebytes Anti-Malware. 4) Once the software is installed, let the diagnostic scan run to remove viruses and other threats automatically.

Obtain the antivirus software in an alternate browser

Certain viruses may target vulnerabilities of a particular web browser that obstruct the downloading process. If you seem to have a virus attached to Internet Explorer, then switch to an alternate browser with built-in safety features, such as Firefox or Chrome, to download your favorite antivirus program – Safebytes.

Run anti-virus from a pen drive

Here’s yet another solution which is using a portable USB anti-malware software package that can scan your computer for viruses without needing installation. Follow these steps to run the anti-malware on the infected PC. 1) Make use of another virus-free computer to download Safebytes Anti-Malware. 2) Plug the Flash drive into the uninfected computer. 3) Double-click on the downloaded file to run the installation wizard. 4) Choose the drive letter of the USB drive as the location when the wizard asks you exactly where you want to install the anti-virus. Follow activation instructions. 5) Now, insert the USB drive into the infected system. 6) Double click the Safebytes Anti-malware icon on the thumb drive to run the software. 7) Click on “Scan Now” to run a complete scan on the infected computer for malware.

Let's Talk About SafeBytes Anti-Malware!

Nowadays, anti-malware software can protect your PC from different forms of internet threats. But wait, how to select the right one among plenty of malware protection application that is available on the market? As you may be aware, there are numerous anti-malware companies and tools for you to consider. Some of them are good, some are ok types, while some will affect your computer themselves! When looking for an antivirus program, select one which gives solid, efficient, and full protection against all known computer viruses and malware. On the list of the recommended tool by industry experts is SafeBytes Anti-Malware, well-known security software for Microsoft Windows. SafeBytes anti-malware is really a powerful, highly effective protection software intended to help end-users of all levels of IT literacy in identifying and removing malicious threats from their computers. Once you have installed this tool, SafeBytes advanced protection system will ensure that absolutely no viruses or malware can seep through your personal computer.

SafeBytes possesses a plethora of amazing features that can help you protect your computer from malware attacks and damage. The following are some of the great features included in the application.

Real-time Active Protection: SafeBytes offers a totally hands-free active protection and is set to observe, prevent and wipe out all threats at its first encounter. It’ll constantly monitor your pc for hacker activity and also gives users superior firewall protection. Anti-Malware Protection: Using its advanced and sophisticated algorithm, this malware removal tool can detect and remove the malware threats hiding in your PC effectively. High-Speed Malware Scanning Engine: This computer software has got one of the fastest and most efficient virus scanning engines in the industry. The scans are extremely accurate and take a short amount of time to complete. Web Security: SafeBytes gives an instant safety rating on the pages you are about to check out, automatically blocking risky sites and making sure that you’re certain of your online safety while browsing the web. Lowest Memory/CPU Usage: SafeBytes gives you complete protection from online threats at a fraction of the CPU load due to its enhanced detection engine and algorithms. Fantastic Tech Support Team: For any technical inquiries or product guidance, you could get 24/7 expert assistance through chat and email. SafeBytes will keep your personal computer protected from most advanced malware threats automatically, thus keeping your online experience safe and secure. You now may know that this particular software does more than just scan and delete threats on your computer. If you want advanced forms of protection features and threat detections, buying SafeBytes Anti-Malware could be well worth the dollars!

Technical Details and Manual Removal (Advanced Users)

To remove Email Access Online manually, navigate to the Add/Remove programs list in the Windows Control Panel and choose the program you want to remove. For browser plug-ins, go to your browser’s Addon/Extension manager and choose the plug-in you want to remove or disable. You will probably also want to reset your internet browser. To make sure of complete removal, find the following Windows registry entries on your system and eliminate it or reset the values accordingly. However, this is a difficult task and only computer professionals can perform it safely. Additionally, certain malware is capable of replicating itself or preventing deletion. You’re suggested to do this process in Windows Safe Mode.
Registry: HKEY LOCAL MACHINE\SOFTWARE\Microsoft\Internet Explorer\SearchScopes\675942D5-E956-4670-9ADE-6982CF23558F
Read More
Fix Windows 10 Error Code 0x800703e3

Error Code 0x800703e3, What is it?

Error Code 0x800703e3 is an error that arises on Windows 10, as well as on many of the past versions of the Windows operating system, dating back to Windows 7. It is an error that is associated with a number of different causes, and therefore, there are many different ways to attempt to resolve the error.

Common symptoms include:

  • Programs running slowly or locking up
  • Computer freezing or going to a blue screen
  • Report of an error message

In most cases, users experience Error Code 0x800703e3 when they attempt to install new software or upgrade their programs and operating systems on their Windows machine. Error Code 0x800703e3 is fairly simple to fix and many of the methods used do not require advanced computer skills or knowledge. However, if you have any difficulty in implementing the steps below on your device, it is recommended that you contact a qualified computer repair technician to assist you.

Solution

Restoro box imageError Causes

There are a number of different causes for Error Code 0x800703e3. The most common ones that Windows users experience are:
  • Incomplete installations interfering with system files
  • Outdated operating system or programs
  • Updates left unfinished for long periods of time
  • Manual cancellation of the installation process
  • Malware or viruses
  • Corrupted files in the operating system
  • Redundancy in the installations of a program on the device

Further Information and Manual Repair

As there are many different things that can cause Error Code 0x800703e3 to appear on your Windows device, there are many methods that you can use to attempt to resolve the error. While many of these are easy to complete for basic users, some of the methods below require familiarity with advanced computing techniques. If you have trouble using the methods below, contact a qualified Windows repair technician.

Here are the top ways to resolve Error Code 0x800703e3:

Method One:  Update Your Device Drivers and Registries

The best place to start in resolving Error Code 0x800703e3 is to open up your settings for your drivers and check to see if any updates are necessary. After updating your drivers, it is important to restart your computer to allow any changes to take effect.

Secondarily, you can also run the Windows Registry Repair tool to see if there are any system files in your library that can be fixed, removed, or added automatically by the repair wizard. Again, it is important that you restart your computer after the tool has finished its scan and repair process to ensure that all necessary changes become fully active and recognized by the system.

Method Two:  Check for System and Program Updates

If it has been a while since you last updated your software and operating system, open up the settings for your system updates. Always restart your computer after a system update has been completed to allow the necessary changes to take effect.

Remember that it is important to regularly update both your Windows operating system and your programs to ensure that there is not a backlog of updates to be completed.  This can help to keep your computer in optimum health and eliminate future errors during installations and standard operation of your computer.

Method Three:  Restore Your System

In some cases, the best way to address Error Code 0x800703e3 is to reinstall the Windows operating system on your machine. If the core issue of the error is that there is a missing or damaged system file, this is the best way to address the problem quickly and efficiently. Before you attempt to reinstall the Windows operating on your machine, make sure that all of your programs and information have been backed up in a secure manner so that you can restore these items after the installation is complete.

Method Four:  Remove Recently Added Programs

If you just began to experience the error after installing a new program, try removing the new program from your machine using the “uninstall” process, then restart your computer.

If you have any difficulty in completing the above methods on your own or if the problem has not been fully resolved using these methods, get in touch with a certified Windows technician who can help you to fix the issues at hand and get your computer up and running again.

Method Five: Use An Automated Tool

If you wish to always have at your disposal a utility tool to fix these Windows 10 and other related issues when they do arise, download and install a powerful automated tool.
Read More
How to Fix INTERNAL_POWER_ERROR in Windows
This post will guide you through fixing the INTERNAL_POWER_ERROR Blue Screen Error on your Windows 10 computer. If you encounter this kind of Blue Screen of Death error, this means that the policy manager experienced a fatal error which in turn means that it can happen because of Drivers or Software or even due to external hardware. And so to resolve the issue, here are some suggestions that might be of help.

Option 1 – Update the Device drivers

As mentioned, the INTERNAL_POWER_ERROR BSOD error might have something to do with the drivers. It could be that the drivers are outdated so you need to update them in order to resolve the issue.
  • Tap the Win + R keys to launch Run.
  • Type in devmgmt.msc into the box and tap Enter or click OK to open the Device Manager.
  • After that, a list of device drivers will be displayed. If you see a red or yellow sign that shows up against the driver, right-click on the driver’s name and select “Update Driver Software” or “Uninstall”. And if you find any drivers with a label saying, “Unknown device”, you need to update them as well.
  • Select the “Search automatically for updated driver software” option and then follow the instructions to complete the process.
  • Restart your PC.

Option 2 – Check the Device performance and health

You can also try checking the device's performance and health in the Windows Defender Security Center.
  • Open the Windows Defender Security Center.
  • From there, check if there is a yellow exclamation icon in the Device performance and health section.
  • After that, click on the View report option and you might see Health Report that points towards Storage Capacity, Device Drivers, or Apps and Software which should give you an idea of what the root cause of the problem really is.

Option 3 – Try to run the Chkdsk utility

Running the CHKDSK utility might also help you resolve the INTERNAL_POWER_ERROR Blue Screen error. If your hard drive has issues with integrity, the update will really fail as the system will think that it’s not healthy and that’s where the CHKDSK utility comes in. The CHKDSK utility repairs hard drive errors that might be causing the problem.
  • Open Command Prompt with admin privileges.
  • After opening Command Prompt, execute the following command and hit Enter:
chkdsk /f /r
  • Wait for the process to be completed and then restart your computer.

Option 4 – Try increasing the size of the Hibernation file

  • In the Cortana search box, type “command prompt” in the field, and from the search results that appear, right-click on Command Prompt and select “Run as administrator”.
  • Next, type in the following command and hit Enter to execute it:
powercfg /hibernate /size 100
  • Note that the default size of the Hibernation file is 75% and after executing the command, it should increase to 100%. Now exit Command Prompt and check if the problem’s now fixed or not.

Option 5 – Try to run the troubleshooters

Blue Screen Troubleshooter:

  • Tap the Win + I keys to open the Settings panel.
  • Then go to Update & Security > Troubleshoot.
  • From there, look for the option called “Blue Screen” on your right-hand side and then click the “Run the troubleshooter” button to run the Blue Screen Troubleshooter and then follow the next on-screen options. Note that you might have to boot your PC into Safe Mode.

Performance Troubleshooter:

  • Tap the Win + R keys to open the Run dialog box.
  • Type “msdt.exe /id PerformanceDiagnostic” in the field and hit Enter to open the Performance troubleshooter.
  • Then click on Next to get started. Wait until the process is completed.

System Maintenance Troubleshooter:

  • Tap the Win + R keys to open the Run dialog box.
  • Type “msdt.exe /id MaintenanceDiagnostic” in the field and hit Enter to open the System Maintenance Troubleshooter.
  • After that, click on Next to start troubleshooting the problem and wait until it’s done then check if it fixes the problem or not.

Option 6 – Uninstall the programs you installed recently

Chances are, some programs that you just installed might be the one that’s causing the BSOD error. Thus, you need to uninstall the program to resolve the problem.
  • In the search box, type in “control” and then click on Control Panel (desktop app) among the search results.
  • After that, select Programs and Features from the list which will give you a list of all the programs installed on your computer.
  • From there, look for the concerned program and select it and then uninstall it.
Note: If you have downloaded the app from the Windows Store, you can simply right-click on it from the application list and then uninstall it.

Option 7 – Run Windows Defender offline

You also have the option to run Windows Defender offline and scan your computer to see if any malware has infected the computer and the one that’s causing the INTERNAL_POWER_ERROR Blue Screen Error.
Read More
Disable Windows print spooler in PowerShell
The third time is charm saying goes but not when we are talking about Microsoft. Print spooler is again in focus, in a bad way. This is the third print spooler vulnerability to emerge in just five weeks. While a critical flaw was originally identified and patched in June, a similar flaw came to light shortly after and was subsequently patched (with mixed success). print spooler
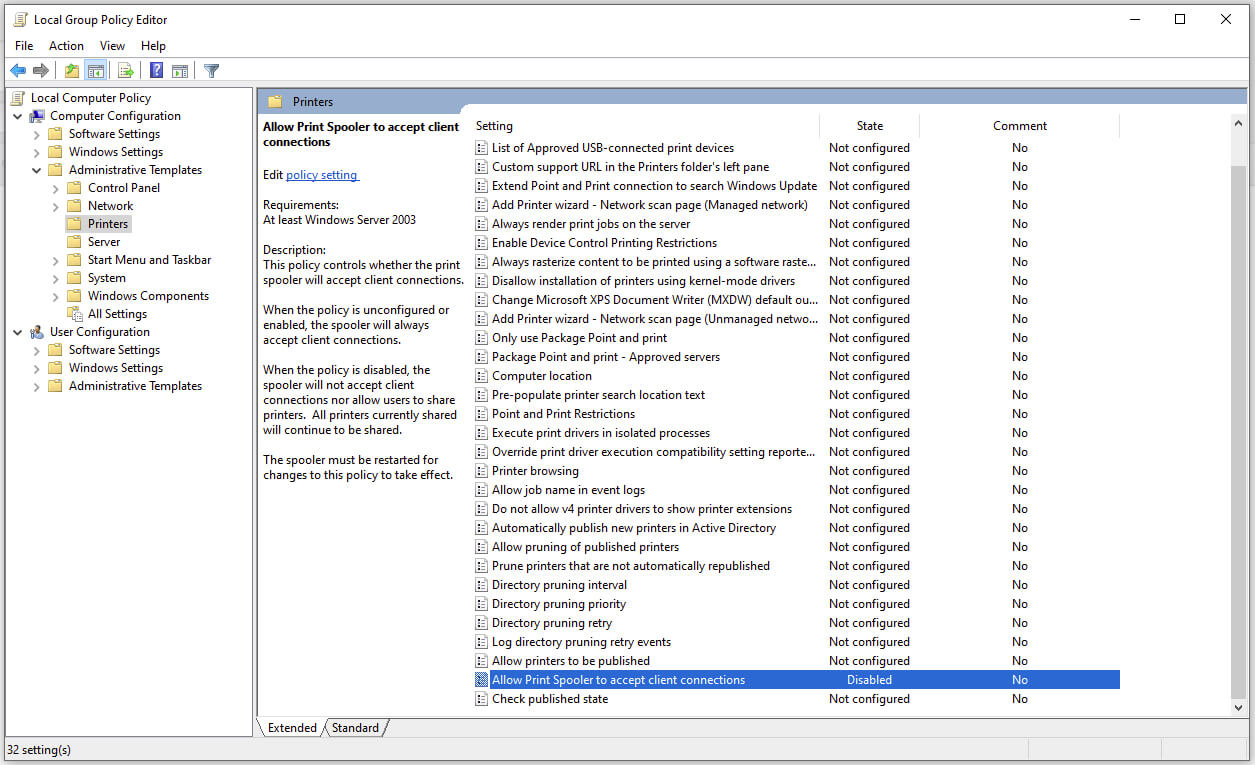
Microsoft is once again advising its customers to disable Windows print spooler after a new vulnerability that allows hackers to execute malicious code on machines has emerged. While a patch fixing the flaw will be released in due course, the most effective workaround currently on the table is to stop and disable the print spooler service entirely.
"An elevation of privilege vulnerability exists when the Windows Print Spooler service improperly performs privileged file operations. An attacker who successfully exploited this vulnerability could run arbitrary code with SYSTEM privileges. An attacker could then install programs; view, change, or delete data; or create new accounts with full user rights."

Stop this service right away or you are risking a potential attack.

  1. Press ⊞ WINDOWS + X to open the hidden menu
  2. Click on Power Shell (admin)
  3. In Power Shell type in the following command to check if spool service is running: Get-Service -Name Spooler followed by ENTER
  4. If spooler service is running type in the next command to stop it: Stop-Service -Name Spooler –Force and press ENTER
  5. Then follow with this command to disable it at startup: Set-Service -Name Spooler -StartupType Disabled followed with ENTER
That’s it, we hope a patch will come soon for all the people that are using network printing and indeed need this service running in order to do work.
Read More
Fix Bad Image Error Status 0xc000012f
When you run a program in Windows 10, error 0xc000012f may pop up, mentioning that the files and binaries you’re trying to run are corrupted. Error 0xc000012f means Bad Image, denoting that the program’s executable or one of the supporting modules is corrupt. Or there is probably a DLL mismatch. This error usually manifests itself after a windows update or after installation of some application, in order to fix it follow the steps below:
  1. Perform SFC scan

    Press ⊞ WINDOWS + X to open the Windows menu keyboard with windows and x markedFrom the menu choose command prompt (admin) Windows menu command prompt adminIn command prompt type sfc /scannow and press ENTER Leave the computer for the operation to be completed and Reboot your computer
  2. Run DISM

    Press ⊞ WINDOWS + X to open the Windows menu keyboard with windows and x markedFrom the menu choose command prompt (admin) Windows menu command prompt adminin command prompt type: DISM.exe /Online /Cleanup-image /Restorehealth and press ENTER wait for the process to be finished and Reboot your computer
  3. Reinstall application

    If this error has been popping up after the application install remove the installed application and install it again. There is the possibility that the application installer has by accident corrupted some files, reinstalling it might fix the issue.
  4. Uninstall Windows update

    In some cases, Windows update can introduce this issue, go to Windows updates, into advanced options, and uninstall the latest update to see if this will fix the error.
  5. Install Visual C++ Redistributable

    Go to the official Microsoft website and download C++ redistributable package and install it
  6. Install new windows update

    If there is a new Windows update install, there is a chance that in the last update something went wrong and it is very likely that it was fixed in the last one.
Read More
1 2 3 171
Logo
Copyright © 2023, ErrorTools. All Rights Reserved
Trademark: Microsoft Windows logos are registered trademarks of Microsoft. Disclaimer: ErrorTools.com is not affiliated with Microsoft, nor claims direct affiliation.
The information on this page is provided for information purposes only.
DMCA.com Protection Status