Error 0x80070571 - What is it?
If you are a Windows 7 user and you also have a Maxtor One Touch 4 external hard drive installed on your PC, then you may come across the error code 0x80070571.
The error code is displayed in the following format:
"The disk structure is corrupt and unreadable. Error 0×80070571"
Solution
 Error Causes
Here are some of the common causes of the error 0×80070571:
- Changed Windows files or settings
- Maxtor 750G driver damaged or corrupt
- Damaged or corrupt registry keys
- System files are missing or broken
In short, the error code 0×80070571 indicates an unhealthy system and is a surefire sign of poor PC maintenance.
It is advisable to repair and resolve the error immediately especially if the underlying cause of the error is related to the registry. Such errors can expose your PC to serious threats like system failure, crashes, and valuable data loss. And retrieving data is often the hardest.
Further Information and Manual Repair
To resolve the error 0×80070571 on your system, you don’t need to be a computer programmer or hire a technician either.
We have listed down the best and simplest ways to fix this error on your system. These solutions are so easy to follow and execute that it requires no technical expertise whatsoever.
So, let’s get started:
Solution 1: Update The Maxtor 750G Driver
The best way to fix the error 0×80070571 on your system is to update the
Maxtor 750G driver. This can be easily done by either contacting the manufacturer or downloading the updated version from Maxtor’s official website.
Solution 2: Update Windows
For the smooth running of the PC, it is crucial to keep Windows updated. Therefore, update Windows on your PC. To do this, go to the
Windows Update option in the control panel. This will show your updated status. Turn it on and click on update.
Solution 3: Clean the Registry
The registry basically stores all the activities and information on your PC. This includes both important and unimportant data including the junk files, cookies, internet history, bad registry keys and invalid entries.
Such files if not removed, take up a lot of disk space. It corrupts the registry and damages the system files as well.
Furthermore, it also leads to disk fragmentation because of which new files are stored in fragments in different locations and this is exactly why it takes a long time to call system files. The registry damage and corruption then generates various errors on your PC and one of them is error 0×80070571.
The best way to clean and restore the registry is to download Restoro.
This is a highly functional and next-generation registry cleaner.
It is embedded with a smart algorithm that detects and scans all registry issues and errors on your system in seconds. It removes all the unnecessary and obsolete files accumulated and cluttering your PC. Furthermore, it fixes the damaged system files and restores the registry right away.
It has a sophisticated and an easy to use interface that enables users to work around it without any hassle or technical expertise. It is compatible with all Windows versions.
In addition to this, this tool is also deployed with several other value-added utilities such as an antivirus, a system optimizer and Active X controls, and a class ID scanner.
It is safe and efficient.
Click here to download Restoro on your PC and repair error 0×80070571 today!

 Razer is a well-known brand among PC gamers and users, it started as a peripheral manufacturer focused on keyboards and mouse but after years passed Razer expanded its inventory offerings. It soon started offering headphones and lately has branched into wider product lines like gaming chairs and protection masks.
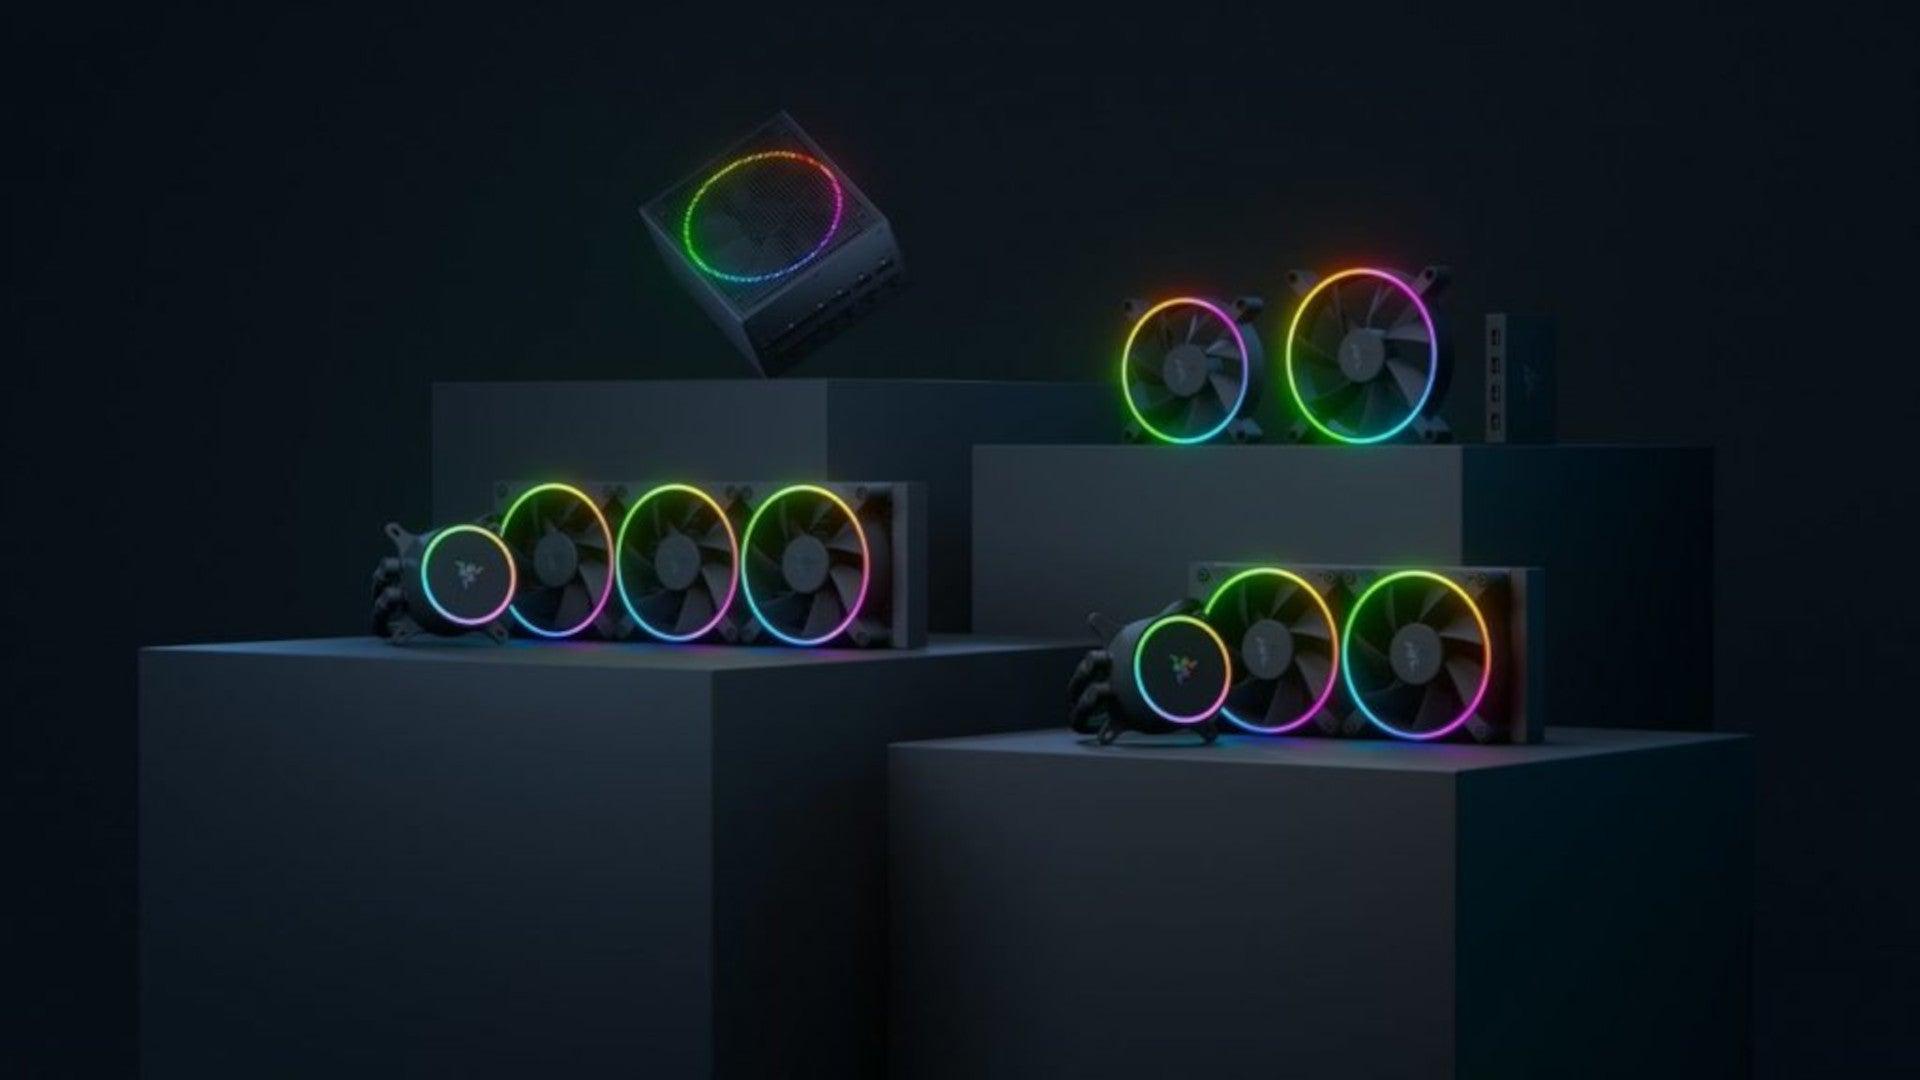
It is not a big surprise that Razer is expanding into other branches of the PC industry. This time, however, it has revealed not one but three new hardware for your PC. Case fans, all in one liquid cooler and power supply.
There are not many details about the products themselves but one thing is one hundred percent confirmed, they come with Razer Chroma, all of them, even the fans.
Razer is a well-known brand among PC gamers and users, it started as a peripheral manufacturer focused on keyboards and mouse but after years passed Razer expanded its inventory offerings. It soon started offering headphones and lately has branched into wider product lines like gaming chairs and protection masks.
It is not a big surprise that Razer is expanding into other branches of the PC industry. This time, however, it has revealed not one but three new hardware for your PC. Case fans, all in one liquid cooler and power supply.
There are not many details about the products themselves but one thing is one hundred percent confirmed, they come with Razer Chroma, all of them, even the fans.
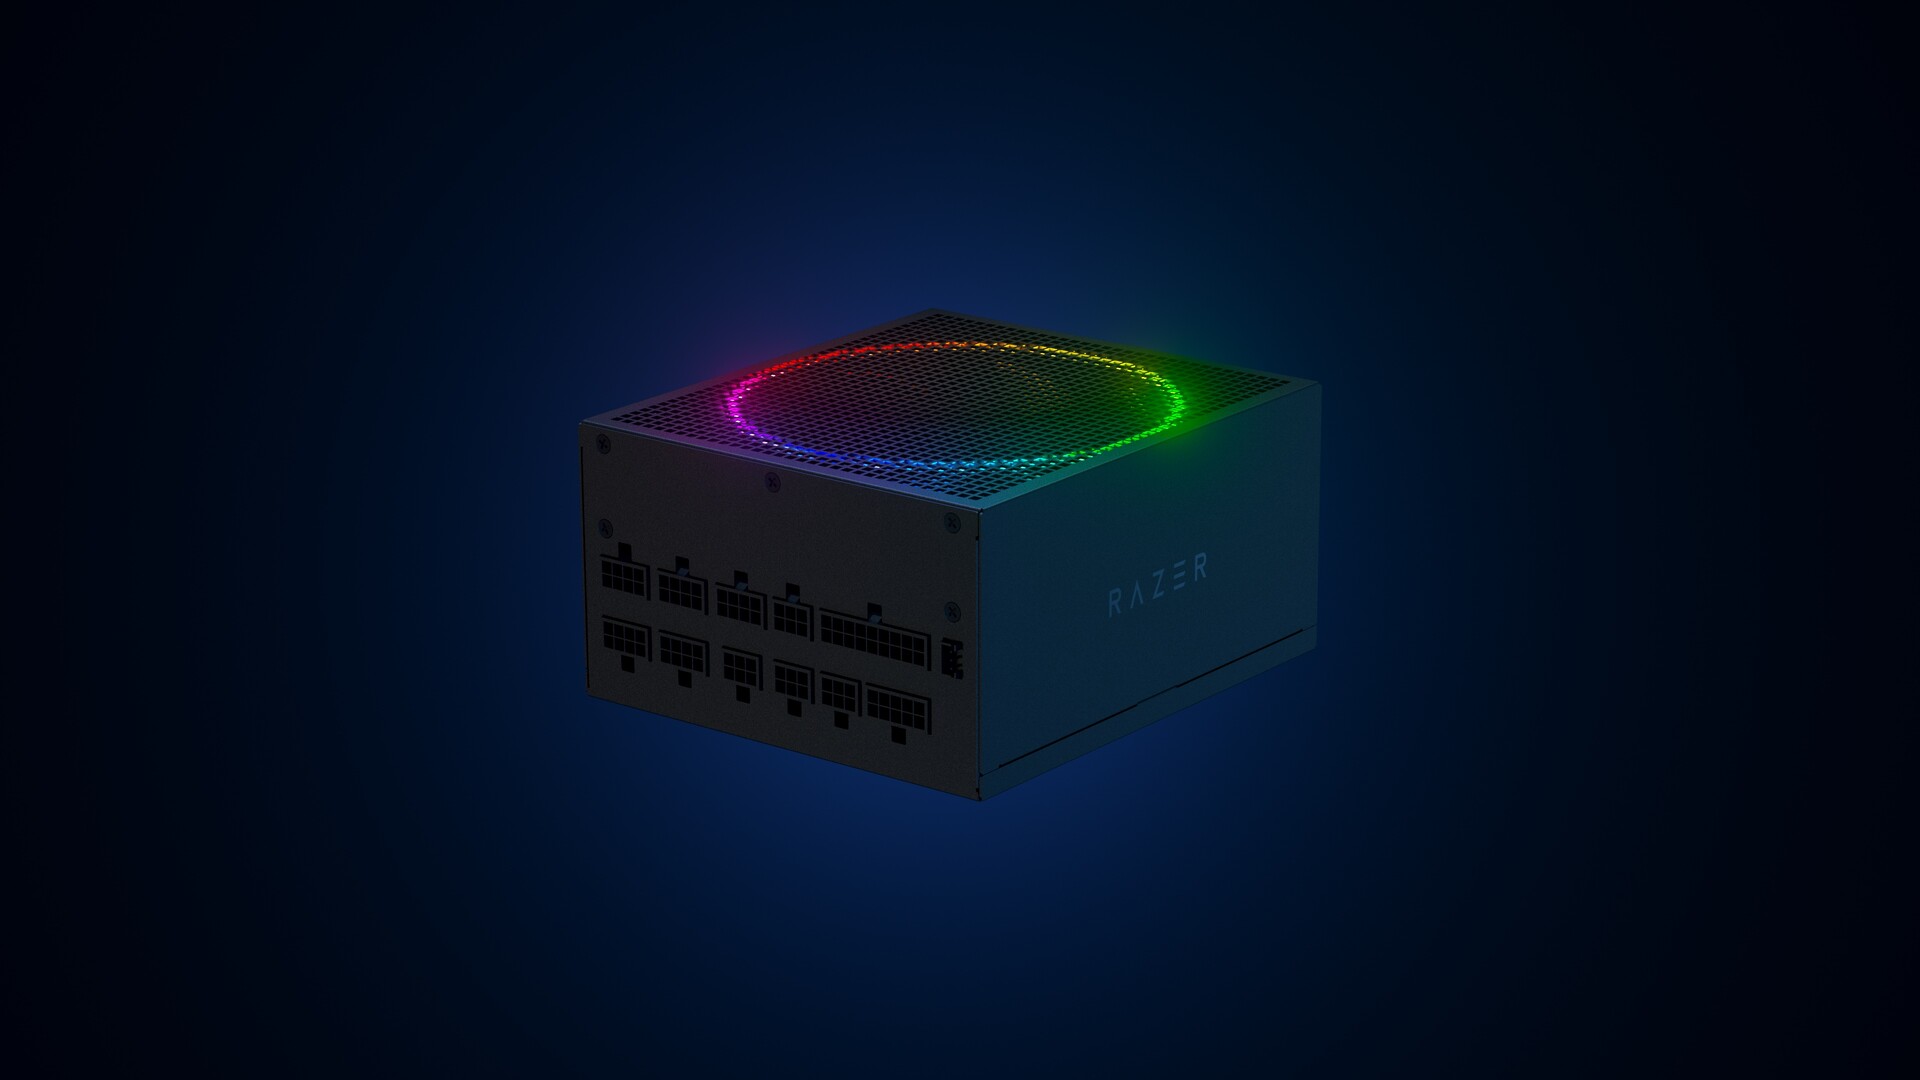 Most interesting for me personally is Razers Katana, the power supply unit. It is a modular power supply ranging from 750W to 1200W with the additional option of Titanium rated one with an impressive 1600W of power. Power supply will start shipping in early 2022 and at the time of writing this article no price range has been released.
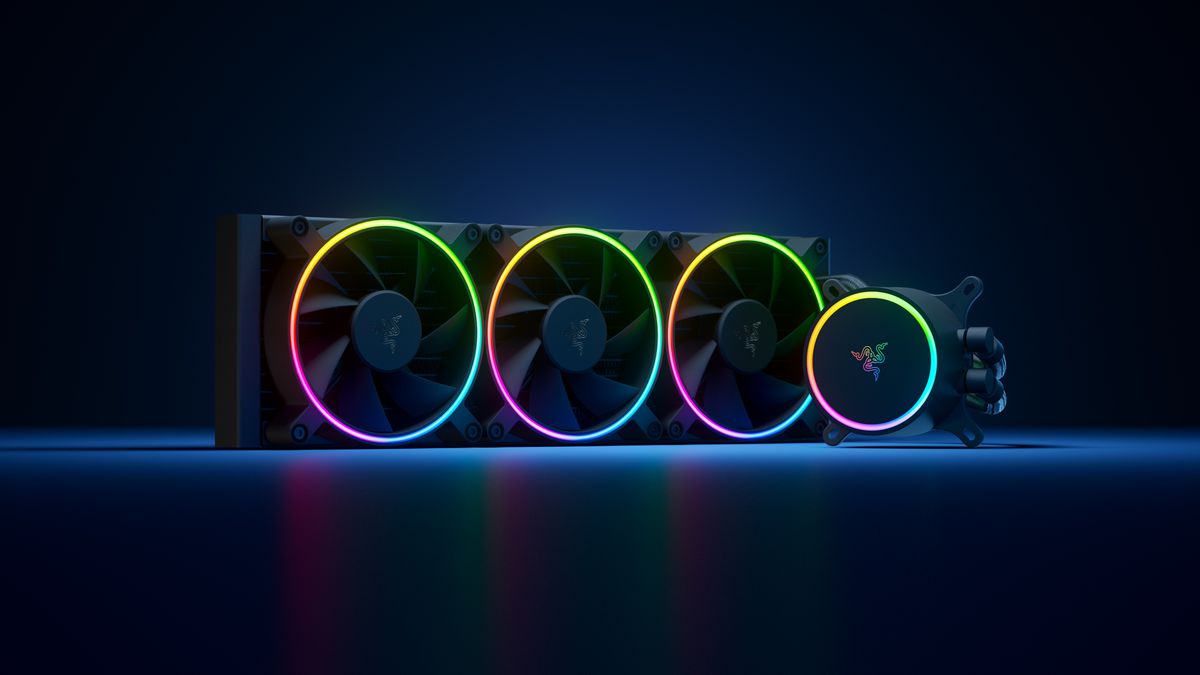 Hanbo liquid cooler will feature an optimized intake design so it can ensure greater heat transfer and fluid dynamic for improved reliability and silent operation. Radiator comes in 240mm size with two fans and a larger one of 360mm with three fans. The pump will be able to rotate in any direction of full 360 degrees so it can fit in any case. Hanbo will be released in November this year but no pricing has been released so far.
 Kunai fans will boast high static pressure performance with lowered noise. They will go as far as 2200rpm for the 120mm version where the 140mm version will go up to 1600rpm. They will come with addressable LEDs and up to eight fans will be able to be connected to Razer’s PWM fan controller that will come with a magnet at the back for easy attachment to any steel part of PC casing.
PWM will use Razer’s Synapse software to customize pulse width modulation in order to improve airflow and noise. PWM will be priced at $49.99 in the Razer Store and it is available for preorder. Fans are priced at $44.99 for one 120mm or $129.99 for a three-pack of 120mm. One 140mm will go for $49.99 and a three-pack will be $129.99.
Kunai fans will boast high static pressure performance with lowered noise. They will go as far as 2200rpm for the 120mm version where the 140mm version will go up to 1600rpm. They will come with addressable LEDs and up to eight fans will be able to be connected to Razer’s PWM fan controller that will come with a magnet at the back for easy attachment to any steel part of PC casing.
PWM will use Razer’s Synapse software to customize pulse width modulation in order to improve airflow and noise. PWM will be priced at $49.99 in the Razer Store and it is available for preorder. Fans are priced at $44.99 for one 120mm or $129.99 for a three-pack of 120mm. One 140mm will go for $49.99 and a three-pack will be $129.99.  Guide
Guide From the menu choose command prompt (admin)
 In command prompt type sfc /scannow and press ENTER
Leave the computer for the operation to be completed and Reboot your computer
In command prompt type sfc /scannow and press ENTER
Leave the computer for the operation to be completed and Reboot your computer Once the device window opens, click once on printers and scanners, and on the right window go to the bottom and uncheck Let windows manage my default printer.
 Unchecking that box will let Windows know that we do not wish anymore for him to set our default printers according to their use. Once the checkbox is clear go up to your printer list and click on the printer you wish to use as the default one. I will choose Microsoft Print to PDF as my default printer and click on it. Once the printer is clicked option menu will appear.
 When the option menu appears under the printer name, click on Manage which will take you to the printer management screen. When you are on the manage screen, click on the Set as default button, and you are done.
