As you know, Windows operating system comes with tons of features. Some of which are not intended to be used by normal customers or users directly which means that only a small percentage of the huge user base of the operating system leverages the use of such features. However, they’ve added some major value to the feature list of the operating system. You can find these features under the “Turn Windows Features on and off” option. This indicates that if you want to, you can just type in “Turn Windows Features on and off” in the search box and then enable any feature that you want to enable. Aside from that, there are other ways you can disable or enable the optional Windows Features in your Windows 10 computer.
Option 1 – via Control Panel
Open Control Panel and select Uninstall a Program.
After that, select the “Turn Windows features On or Off” option on the left side.
Option 2 – via Command Prompt
Tap the Win + X combination on your keyboard or right-click on the Start button and then click on Command Prompt (Admin). Alternatively, you can also type “cmd” in the Cortana search box and right-click on the Command Prompt icon, and select the “Run as administrator” option.
If a User Account Control or UAC prompt appears, click on Yes.
Next, type in the following command to see the list of the available features.
DISM /online /get-features /format:table | more
Now all you have to do is copy the name of the feature that you want to enable and for you to do that, you need to execute the following command:
DISM /online /enable-feature /featurename:[Enter the name of the feature here] –All
Note: Now if you want to disable a feature that’s already enabled in your computer, refer to these sub-steps:
First, you need to check what features are enabled, and for you to find out, enter this command: DISM /online /get-features /format:table | find “Enabled" | more
And if you want to check the detailed information about a particular feature, you can enter this command: DISM /online /get-featureinfo/featurename:[Enter the name of the feature here]
Option 3 – via Windows Powershell
As you know, the Windows Powershell is a very important tool in Windows 10, and a powerful one at that since you can do a lot of things using this command line. So while you use this tool you need to populate the list of available features first and then you have to download the feature your desired feature.
Search for PowerShell in the Cortana search box and then run it with administrator privileges.
Next, type in the following command to populate the list of available features:
Get-WindowsOptionalFeature –Online
After that, enter the following command to install any feature you want to enable from the list of available features:
You also have the option to fetch the latest features from an updated offline source. The source could be an ISO any other type of image or just a folder. So you need to decide if you want to use Windows Powershell or Command Prompt.
If you want to use Command Prompt, just enter this command: exe /online /enable-feature /featurename:< /All /Source:<Enter the path of the feature here>
If you want to use Windows Powershell, use this command: Install-WindowsFeature –Source “<Enter the path of the feature here>”
Note: If you want to get the latest features, you need to get the latest version of the image of the operating system that you are trying to install the feature from.
Kernel_Data_Inpage_Error is a BSOD (blue screen of death) error.
Also, know as a 0x0000007A Stop error. This bug check indicates that the requested page of kernel data from the paging file failed to be read into memory. In simple words, this means that Windows has trouble reading from the memory.
This can apply to both kinds of memory: stored memory on your hard drive and also the dynamic memory in your RAM.
The Kernel_Data_Inpage_Error turns your computer screen all blue, stops the program being executed, and sometimes even leads to abrupt system shut down.
Error Causes
Kernel_Data_Inpage_Error may occur due to numerous reasons. The exact cause of this error can easily be found by going through the code displayed in the parameter of 0x00000007A.
Let’s take a look at Kernel_Data_Inpage_Error parameter codes and the underlying causes of its occurrence:
0xC0000009A- This parameter code triggers missing nonpaged pool resources
0xC0000009C- This represents the installed hard disk drive has bad sectors.
0xC0000000E- This indicates a hardware failure or an incorrect drive configuration
Further Information and Manual Repair
No matter what the cause for Kernel_Data_Inpage_Error may be, it is advisable to fix it immediately as blue screen of death error codes are considered to be critical PC errors that can cause serious damages and even result in valuable data loss.
Here are a couple of ways to repair this issue on your system:
1. Call the ‘Chkdsk’ (check disk) command on your system.
Windows XP, Vista, and 7 users can call this command, by pressing Windows Key +F and type in ‘chkdsk’ and run.
However, you can’t run it while actively using Windows but you can always schedule it to start automatically the next time your computer turns on. Wrap up what you need and then reboot. Chkdsk disk checking process can take a long time, especially on large and slow hard drives.
To run this command on Windows 8, open Windows search by pressing Windows Key+ F and then type ‘cmd’. Then right-click on the command prompt and choose the option ‘Run as Administrator’.
To continue with the disk checking process, here you will be prompted to provide your administrator authentication.
Once you insert the administrator authentication, type the command ‘Chkdsk C:/f/r/x” where the letter ‘C’ indicates the drive you want to examine and repair. Run it to scan for Kernel_Data_Inpage_Errors on your system. Chkdsk command will detect and repair errors on the hard drive and then automatically reboot.
Limitations to this Solution:
‘Chkdsk’ is a value-adding inbuilt disk checking tool in PC new Window versions; nonetheless, this command has certain limitations.
It is time-consuming. You may have to wait for a long time for it to scan your system. Also when disk check is running, you will have to stop all other activities on your system. Furthermore, Chkdsk does not scan and fix all registry errors and other PC-related errors.
So, you can’t be 100% sure that it will resolve all the Kernel_Data_Inpage_Errors on your PC.
Spying via some malicious app on the target phone is not a new thing but it can be very uncomfortable and even against the law in some countries.
Infecting the target phone can be done in various ways, another person can intentionally download and install applications on it, and you can install them via some phishing attacks or by an online scam. Once installed this piece of software presents a very serious invasion of privacy since it can track text messages, track phone location in real-time, record calls in real-time, eavesdrop on calls, take control of the camera and microphone, and many other applications.
Here are some common symptoms of mobile phones infected with spyware.
Symptoms of spyware
Random reboots Slow performance Strange text messages Overheating Unusual high data usage Non-familiar apps in the app list The fast drain of the battery Long shutdown time Strange interference and sounds during calls Signs of activity during standby mode
If your phone exhibits any of these symptoms you might have a spyware app installed and running on it.
Common spy apps
There are many apps that have been designed to spy on people that can be downloaded in the app store or on Google Play today. Most of these spyware apps are aimed at parents wanting to keep an eye on and protect their children. However, these can be used by anyone in order to spy on a target person via their phone.
Below is a list of common apps that can be used to spy on you. Many spyware apps require a phone to be ‘jailbroken’ or ‘rooted’ before being installed, this is when the phone’s operating system is changed to allow the phone to become unlocked and customizable.
mSpy : An undetectable spying app for iOS devices. It can be used to read your chats, see your location, view your email, check your call history, record your keystrokes, and more.
Spyera : This app requires rooted and jail-broken iPhones to work. It can go undetected and monitors phone calls and your call history. It even allows call recording and eavesdropping on live calls.
Flexispy : Flexispy prides itself as the #1 phone monitor for parents and can monitor everything from calls to social texts.
Umobix : This powerful spyware app has a dashboard that allows users to easily monitor someone’s location, calls, texts, keystrokes, all major social media, and more. You can detect Umobix because it heats up the infected phone and greatly affects the battery life of the infected device.
Ikey Monitor : Although it requires the device to be rooted for Android or jailbroken for iPhones, this spy app captures keystrokes, passwords, and screenshots, allows for call recording and supports multiple languages.
Clevguard : Available for both iOS and Android, Clevguard allows users to track GPS and Wi-Fi locations, capture screenshots remotely, and more. Due to a recent update, the spy app drains the target phone’s battery significantly.
Remove spyware from your phone
If any of the beforementioned apps are present on your phone you need to remove them right away.
Go to your phone settings and remove the malicious applications, then download some protection suite and scan the whole phone for any other trace of software remains or other malware apps.
If you encounter the MUP_FILE_SYSTEM Blue Screen error with a value of 0c00000103, then it indicates that the multiple UNC provider or MUP has got an invalid of unexpected data. This can lead to the fact that the MUP cannot channel a remote file system request to a network redirector, the UNC, or Universal Naming Convention provider.
There are several ways you can fix the MUP_FILE_SYSTEM Blue Screen Error on your Windows 10 computer, you can try to check the hardware of your computer physically, update or rollback some device drivers, run the Driver Verifier Manager, remove any hardware you’ve installed recently or fix issues related to IRQ.
Use the given options below as reference to fix the MUP_FILE_SYSTEM Blue Screen Error.
Option 1 – Try to physically check the hardware
The first thing you can do is to check the physical status of the hardware in your computer. You can clean the dust off the hardware components like the Network Card of the computer. You might want to use a small blower or you could also use a soft cloth and run the components gently. Make sure that you don’t damage any parts with moisture or cause harm to any circuits while you carry out this task.
Option 2 – Try to rollback, update several device drivers
You can try to roll back, update or disable certain device drivers on your computer to resolve the MUP_FILE_SYSTEM Blue Screen error.
First, boot your computer into Safe Mode.
After that, tap the Win + R keys to launch Run.
Type in devmgmt.msc into the box and tap Enter or click OK to open the Device Manager.
After that, a list of device drivers will be displayed. From there, look for the device drivers related to the Network Card, Chipset, Disk Drive, and the Graphics Drivers and any other driver related to MUP.sys and SwapBuffers.sys system files
After that, right-click on each entry of the device drivers and select the “Update Device” option from the menu.
Now follow the next on-screen instructions that appear and then restart your computer.
After restarting your computer, check if the Stop error is now fixed.
Option 3 – Configure the Driver Verifier Manager
The Driver Verifier Manager is another tool in Windows that could help you fix driver-related issues. And so if you want to fix the MUP_FILE_SYSTEM Blue Screen error you need to use the Driver Verifier Manager:
Type in the keyword “Verifier” in the Cortana search box to search for Verifier in Windows 10.
After that, select the option “Create custom settings”.
Make sure that you have checked everything except the options “DDI compliance checking” and “Randomized low resources simulation”.
Next, select the option “Select driver names from a list” option.
Afterward, you have to select all the drivers from any unofficial or third-party provider. To simply put it, you have to select all the drivers that are not supplied by Microsoft.
Then click on the Finish button.
Open Command Prompt as administrator and execute this command – verifier /querysettings
The command you just executed will display the Driver Verifier settings so if you see any of the flags enabled boot your Windows 10 PC into Safe Mode.
Open the Command Prompt as admin again and run this command – verifier /reset
The command will reset the Driver Verifier. Once the process is done, restart your PC and check.
Option 4 – Try to disconnect or disable newly installed hardware
In this option, you will have to disable or remove the hardware you’ve just installed recently since external devices could be the one that’s causing the Blue Screen of Death error to appear. To do that, just disconnect any external device that’s connected to your computer physically and then check if it fixes the MUP_FILE_SYSTEM Blue Screen error.
Option 5 – Try fixing IRQ-related issues
The Stop error might have something to do with an issue related to IRQ. You can verify it by switching your PCI Cards around. Aside from that, you can also check if the IRQ2 is assigned to a COM Port that is unavailable at that time.
Option 6 – Run the Blue Screen Troubleshooter
The Blue Screen troubleshooter is a built-in tool in Windows 10 that helps users in fixing BSOD errors like MUP_FILE_SYSTEM. It can be found in the Settings Troubleshooters page. To use it, refer to these steps:
Tap the Win + I keys to open the Settings panel.
Then go to Update & Security > Troubleshoot.
From there, look for the option called “Blue Screen” on your right-hand side and then click the “Run the troubleshooter” button to run the Blue Screen Troubleshooter and then follow the next on-screen options. Note that you might have to boot your PC into Safe Mode.
Option 7 – Perform a System Restore
Performing System Restore might help you in fixing the Blue Screen error. You can do this option either by booting into Safe Mode or in System Restore. If you are already in the Advanced Startup Options, just directly select System Restore and proceed with the next steps. And if you have just booted your PC into Safe Mode, refer to the steps below.
Tap the Win + R keys to open the Run dialog box.
After that, type in “sysdm.cpl” in the field and tap Enter.
Next, go to the System Protection tab then click the System Restore button. This will open a new window where you have to select your preferred System Restore point.
After that, follow the on-screen instructions to finish the process and then restart your computer and check if the problem is fixed or not.
A general rule of thumb, which is followed by most users, is to download the specific missing DLL file and place it within the software’s installation directory. However, this can be harmful to your system as hackers often upload popular malicious DLL files to target systems. Thus, you should avoid downloading DLLs from the internet. And follow these steps to fix the DLL error:
Restart your computer
System restore to an earlier state
Run a malware/virus scan
Update all the hardware drivers
Running SFC /scannow command in command prompt
Then do as the error suggests, reinstall the program if it’s feasible. Game files can take several hours to install and therefore, reinstallation can be a cumbersome job. Also, frustrating if the error appears after reinstallation.
Update device drivers manually, such as graphics drivers, DirectX software if you see DLL missing error while running game
Windows 11 has some cool animations including fading effects which make working in it feels nice and futuristic but the cost of this is that there is a slight delay to certain actions performed. If you want the snap fast feature in Windows 11 and do not care about this eye candy there is an easy way to turn animations off inside it.
First, open Windows Settings by pressing ⊞ Windows + I on your keyboard
Alternatively, click on Start, search for Settings, and then click its icon.
When Settings appears, look in the sidebar and select Accessibility.
In Accessibility settings, click on Visual Effects.
In Visual Effects, switch Animation Effects to Off.
That’s it, changes will be applied automatically, you can close settings and continue working inside Windows 11 without animations and fades.
You can always switch animations back On via settings if you change your mind.
The printer can stop working for many various reasons, some of them are however tied to the printer driver itself. In this guide, we will address issues and provide you with advice on how to get your printer back in working order in no time.
All of that being said let us fix your Printer driver issue.
Check to see if the printer is plugged and that it has toner or colors and paper in the tray
The simplest solutions are the best ones, and most of the time simplest issues are overlooked. To eliminate any basic issues check the printer cable does it has paper in the tray and check the status of toner or colors in it.
Check if Windows troubleshooter will resolve the issue
Bring up settings and choose devices, under devices click on printers and scanners. On the far right top, you have a link to start the troubleshooter, click on it. Windows built-in tools could resolve issues and fix them for you. If by any chance Windows is not able to find or resolve issues move to the next step.
Check if the Device Manager is reporting an error and update the driver
If the hardware is functioning properly then the issue might be in Windows not detecting device or driver malfunction. In any case, the Device Manager will be the one who will report this problem. In order to check to see if the driver is properly working press ⊞ WINDOWS + X to open the hidden start menu.
Once it opens, click on Device Manager to open it,
If you have a driver device error inside Windows, you should see it immediately when entering the Device Manager, it will have a yellow exclamation mark beside it. Right-click on it and choose update driver.
Reinstall driver
If driver update failed or you already have the latest drivers, reinstalling them could fix the issue since drivers might have corrupted during installation of some update or application. Follow steps from point 3 to get to the driver in Device Manager, then right-click on it but instead of update choose to uninstall. Reboot Windows once the driver is uninstalled and Windows will install a new one automatically. If you do not want to update drivers automatically install the latest driver for your device, then reboot.
Check Windows update
Check to see if the latest Windows update is installed, update your Windows if needed
Fix driver issue with DRIVERFIX
If everything else fails, get DRIVERFIX, a premium solution for your PC issues, and fix driver errors.
The World of Superhero movies has gone through some interesting variations, from good ones to bad ones, from big-budget ones to small ventures, even from large well-known characters to niche ones.
No matter what you think of some of them no one would disagree that since the release of Iron Man and starting Marvel cinematic universe superheroes movies exploded in popularity.
Following the Superhero craze, let’s see what is coming up in comic books transferred to big screens with their release dates.
List of upcoming movies
Shang-Chi and the Legend of the Ten Rings, Sept. 3, 2021Trailer
Venom: Let There Be Carnage, Oct. 15, 2021Trailer
Eternals, Nov. 5, 2021Trailer
Spider-Man: No Way Home, Dec. 17, 2021Trailer
Morbius, Jan. 28, 2022Trailer
The Batman, March 4, 2022Trailer
Doctor Strange in the Multiverse of Madness, March 25, 2022
Thor: Love and Thunder, May 6, 2022
DC League of Super-Pets, May 22, 2022
Black Panther: Wakanda Forever, July 8, 2022
Black Adam, July 29, 2022Trailer
Spider-Man: Into the Spider-Verse 2, Oct. 7, 2022
The Flash, Nov. 4, 2022
The Marvels, Nov. 11, 2022
Aquaman and the Lost Kingdom, Dec. 16, 2022
To develop a good understanding of the Sysdata.xml error code, it is first important to learn what is sysdata.xml file and its function. Sysdata.xml is a type of XML file. The .XML file extension is an Extensible Markup Language file.
XML-based formats have now become the default for many office productivity tools including Microsoft Office and LibreOffice. Furthermore, it has also come into common use for the interchange of data over the internet.
Sysdata.xml error code usually pops up when .XML based applications are unable to run and crash while loading. This is a type of BSoD (Blue Screen of Death) error code.
Common symptoms include:
System freeze
The screen turns blue
Sudden system shut down
Solution
Error Causes
The Sysdata.xml error code is triggered due to multiple reasons such as:
Faulty hardware
Malware or viral infection
Registry issues
No matter what the reason may be, it is advisable to fix this error code right away without any delays. This is a fatal error and can result in a system crash and loss of data. And recovering valuable lost data is the hardest.
Further Information and Manual Repair
Here are some of the effective and easy do it yourself methods to resolve this error on your system:
Method 1: Fix Faulty Hardware
Hardware issues may arise due to many reasons like manufacturing issues or voltage fluctuations. Electrical storms can cause power surges which may affect the hardware causing it to fail.
The best way to resolve this is to download the latest drivers for the problematic devices or alter the device configuration in the BIOS setup program.
To reconfigure the BIOS simply restart your PC and before Windows starts, press Del Key to access your BIOS.
Now find the factory reset option.
Select the option and press the button to load your factory defaults.
After that save changes and confirm your selection.
Reboot your PC to activate the changes.
Method 2: Scan for Viruses
Sometimes viruses and malware can disguise themselves in the .XML files which can cause them to get corrupted.
To resolve the issue, it is advisable to download a powerful antivirus and scan your entire PC for viruses. Remove the detected viruses to resolve the Sysdata.xml error on your system.
Method 3: Repair the Registry
If the registry is not cleaned frequently, it loads with unnecessary and obsolete files like the junk files and cookies.
These files clutter and damage the registry and eventually corrupt it and the important files like .XML files stored in it. To resolve the issue it is recommended to download Restoro.
It is a user-friendly and powerful PC Fixer embedded with a registry cleaner. It scans your entire PC for registry-related errors and removes them immediately. It cleans the cluttered registry and restores the damaged files thereby repairing the issue right away.
Click here to download Restoro.
Error Code 0x80072F8F manifests in one main way. It is known to appear as early as Windows 7, and mainly deals with an error that occurs in the update process, or when the computer is trying to connect to the online activation service. It can appear when the activation fails to verify the product key. The error code will present itself when the system realizes that the PC's date and time are incorrect. Error Code 0x80072F8F will also appear if the computer has determined that the time zone settings on the computer are not accurate.
When Windows is going through the installation process and is verifying all of the information associated with the computer, Error Code 0x80072F8F will arise, indicating that the information in the computer's settings is not valid. Correct times and dates are necessary when using serial validation keys to install Windows. When these settings are outside of the tolerated window, the problem will arise.
Error Causes
There is only one main symptom to look out for, and it will manifest during a Windows installation. In the midst of the installation, the computer will not be able to proceed with the installation if Error Code 0x80072F8F has popped up. Because the information cannot be verified, Windows will not be able to continue the installation process when the time settings are not accurate. This interrupts the process, causing the need to edit the settings, restart the computer, and try again. It is imperative to be sure that the date and time on the computer are inside of the tolerated window for the serial key.
This error code will not give any information on how to correct it.
Windows Error 0x80072F8F is displayed on the screen.
The error code appears when typing the Windows serial key and proceeding.
Further Information and Manual Repair
When experiencing Error Code 0x80072F8F, the date and time need to be corrected in the computer settings menu, and then verify the correct time zone settings. There are a few different ways to edit the time and date settings, and one may need to even edit the time zone settings. After this, restarting the computer may be needed. When booting into Windows, the validation code should be activated within 30 days of obtaining the serial number.
Method One
Check the time and date settings.
Open the Start menu.
Select Settings, then Time and Language, then Date and Time.
Check and make sure that the PC is operating at the correct time and date.
Method Two
Ensure that the computer is connected to the internet.
Enter “network troubleshooter” into the search box located on the taskbar.
Select “Identify and Repair Network Problems”.
Follow the instructions that are given on-screen. This will fix any problems that the network is experiencing.
Method Three
Review the timezone.
Open the Start menu.
Select Settings, then Time and Language, then Date and Time.
Check to make sure that the correct timezone is selected from the drop-down menu.
Method Four
Reboot the PC and check if that fixes the problem. This may help in the event that the network troubleshooter does not detect a problem.
After completing these steps to edit the time, date, and time zone settings, it may be necessary to restart the computer. This is to ensure that the computer will save and recognize the new settings. After restarting, continue the process as intended and enter the product key. The computer will now be able to verify the product key since the time and date will be recognizable. The Windows installation should proceed as normal and complete successfully when the time, date, and time zone are inside of the parameters for the Windows product key.
In short, if it is not, the computer will not be able to recognize the product key, thus will not be able to install the Windows product. Generally, the fix is quite simple and does not take much time at all, but it is very important.
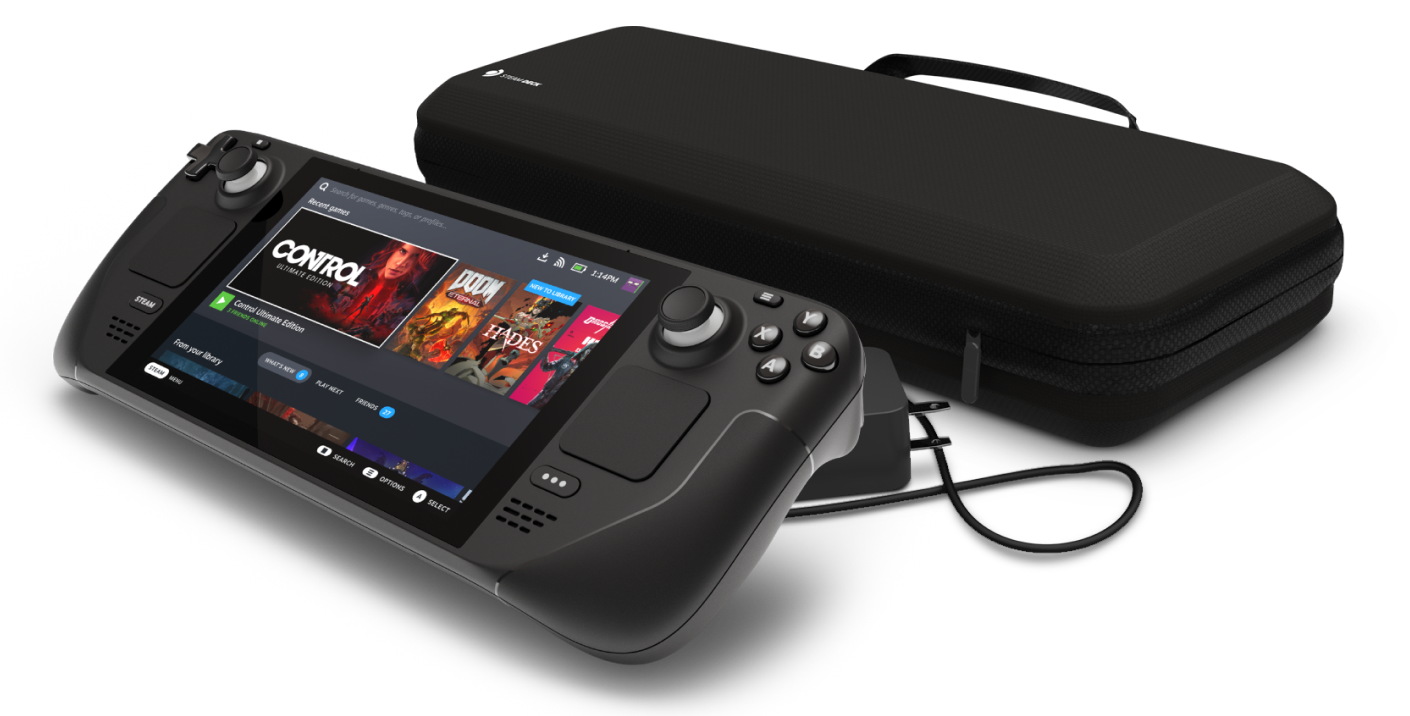
Steam Deck release is almost upon us and more news comes to light. The Latest officially confirmed technical detail is that the user will have access to device's BIOS and that dual booting will be officially supported.
This, of course, means that you will be able to have both Proton and Windows on your device letting you play anything that you wish if the hardware is strong enough. Valve also said that you can launch OS from an SD card! This of course will save space available for games themselves, especially for entry models with less than one available.
All of this information really pushes Deck into the territory of a handheld PC and not just another console and I must admit that this announcement left a smile on my face.


 Windows 11 has some cool animations including fading effects which make working in it feels nice and futuristic but the cost of this is that there is a slight delay to certain actions performed. If you want the snap fast feature in Windows 11 and do not care about this eye candy there is an easy way to turn animations off inside it.
 Once it opens, click on Device Manager to open it,
If you have a driver device error inside Windows, you should see it immediately when entering the Device Manager, it will have a yellow exclamation mark beside it. Right-click on it and choose update driver.
Once it opens, click on Device Manager to open it,
If you have a driver device error inside Windows, you should see it immediately when entering the Device Manager, it will have a yellow exclamation mark beside it. Right-click on it and choose update driver. The World of Superhero movies has gone through some interesting variations, from good ones to bad ones, from big-budget ones to small ventures, even from large well-known characters to niche ones.
No matter what you think of some of them no one would disagree that since the release of Iron Man and starting Marvel cinematic universe superheroes movies exploded in popularity.
Following the Superhero craze, let’s see what is coming up in comic books transferred to big screens with their release dates.
The World of Superhero movies has gone through some interesting variations, from good ones to bad ones, from big-budget ones to small ventures, even from large well-known characters to niche ones.
No matter what you think of some of them no one would disagree that since the release of Iron Man and starting Marvel cinematic universe superheroes movies exploded in popularity.
Following the Superhero craze, let’s see what is coming up in comic books transferred to big screens with their release dates.

 This, of course, means that you will be able to have both Proton and Windows on your device letting you play anything that you wish if the hardware is strong enough. Valve also said that you can launch OS from an SD card! This of course will save space available for games themselves, especially for entry models with less than one available.
All of this information really pushes Deck into the territory of a handheld PC and not just another console and I must admit that this announcement left a smile on my face.
This, of course, means that you will be able to have both Proton and Windows on your device letting you play anything that you wish if the hardware is strong enough. Valve also said that you can launch OS from an SD card! This of course will save space available for games themselves, especially for entry models with less than one available.
All of this information really pushes Deck into the territory of a handheld PC and not just another console and I must admit that this announcement left a smile on my face.