Logo

Cannot find a system image on this computer

If you are trying to restore your computer using a System Image that has been created by the Windows Backup and Restore tool but encountered an error message instead that says, “Windows cannot find a system image on this computer”, you’ve come to the right place as this post will walk you through in fixing this error. Here’s the complete context of the error message:

“Windows cannot find a system image on this computer, Attach the backup hard disk or insert the final DVD from a backup set and click Retry. Alternatively, close this dialog for more options.”

In the error message, you are offered two choices – to either Retry or Cancel the operation. You can try to select Retry to try again but you will most likely get the same error if you do so. This kind of error can occur if the name of the WindowsImageBackup folder or any of its sub-folders has been modified. On the other hand, this error can also pop up if this folder or any of its sub-folders have gone missing or have become corrupted. To resolve the error, you can try to move the WindowsImageBackup folder or check its sub-folders. You can also try to isolate the System Image file or rename the System Image folder or remove all the unwanted sub-folders as well as use Command Prompt in Repair mode.

Option 1 – Try to move the WindowsImageBackup folder

The WindowsImageBackup folder must be stored in the root of the volume where it is stored, in line with the functioning of the System Restore utility. For example, if the WindowsImageBackup folder is stored in the “C:/Backups/System Restore Backups/New” location, then you have to move it to the C: drive as well.

Option 2 – Try to check the subfolders of the WindowsImageBackup folder

The classification of folders and files plays an important part to restore in restoring a computer from a System Restore point. Thus, if have modified the names of any files or folders inside the WindowsImageBackup folder, then you need to set the defaults. After that, run System Restore again and check if it fixes the error.

Option 3 – Try to isolate the System Image file

If the System Image file is stored in a USB storage device along with various System Restore images, then it’s no wonder why you’re getting this error. To set things right, you have to make sure that the System Restore image you wish to restore your computer from, is the only one that’s present at the root of the USB storage device.

Option 4 – Try renaming the System Image folder

If you have renamed the System Image folder prior to running System Restore, then it is most likely the reason why you’re getting the “Windows cannot find a system image on this computer” error. This error pops up because the System Restore utility in Windows 10 looks out for the WindowsImageBackup folder so if you have renamed it, you need to change its name back to what it originally was to fix the error.

Option 5 – Try to remove all the sub-folders of the WindowsImageBackup folder

If you have stored some foreign files inside the WindowsImageBackup folder, you need to get rid of them right away and return the folder to its default state as this folder must be left alone and should not be meddled with if you want to run System Restore smoothly.

Option 6 – Try to use Command Prompt in Repair Mode

  • Open Command Prompt while your computer is in the Repair Mode.
  • Next, type and enter this command where you need to replace “<Partition Letter>” with your drive’s letter: dir <Partition Letter>
  • After you’ve found the WindowsImageBackup folder in any of the partitions, type and enter this command: dir <Parition Letter>WindowsImageBackup /s
  • The command you entered will display all the contents of the folder exceeding 10 GB in total size. You can check and confirm the integrity of the folder and if you find that the integrity is violated, then it is the reason why you’re getting the error.

Do You Need Help with Your Device?

Our Team of Experts May Help
Troubleshoot.Tech Experts are There for You!
Replace damaged files
Restore performance
Free disk space
Remove Malware
Protects WEB browser
Remove Viruses
Stop PC freezing
GET HELP
Troubleshoot.Tech experts work with all versions of Microsoft Windows including Windows 11, with Android, Mac, and more.

Share this article:

You might also like

Fix Netwtw04.sys BSOD Error in Windows 10
Blue Screen of Death errors or Stop errors are indications that something’s wrong with your computer. So when you encounter one, you must find out what the root cause of the problem is before it gets out of hand. One of the BSOD errors you might encounter on your Windows 10 computer is the “DRIVER IRQL NOT LESS OR EQUAL or SYSTEM THREAD EXCEPTION NOT HANDLED, Netwtw04.sys failed” error. As you know, system files or .sys files are some of the essential parts of the Windows operating system. It is a repository of system driver settings used by the Windows operating system in order to communicate with the connected hardware and devices. They are essential for the normal functioning of the operating system. A lot of Windows 10 users are facing this particular Blue Screen of Death error whenever they open an app or disconnect external devices from the system. The Netwtw04.sys file is a part of the Intel PROSet/Wireless Wi-Fi software. And so when you might encounter two kinds of Stop errors for the Netwtw04.sys driver file such as:
  1. “DRIVER_IRQL_NOT_LESS_OR_EQUAL What failed: Netwtw04.sys.” – This kind of error message signifies that a kernel-mode driver tried to access pageable memory at a process IRQL that was too high.
  2. “SYSTEM_THREAD_EXCEPTION_NOT_HANDLED What failed: Netwtw04.sys” – This error message indicates that the root cause of the error might be incompatible drivers with the operating system. In general, the root cause of the Netwtw04.sys BSOD error might be due to several reasons such as corrupted files, incorrect device driver configuration, malicious programs, outdated drivers, bad drivers, corrupted Windows Registry as well as some damaged or corrupted system files.
Whichever of the two error messages you got, you can try the troubleshooting options given below to fix the “DRIVER IRQL NOT LESS OR EQUAL or SYSTEM THREAD EXCEPTION NOT HANDLED, Netwtw04.sys failed” BSOD error.

Option 1 – Try to rollback your Network driver

If you have updated the driver software as of late and you suddenly got this BSOD error, you might have to roll back the device driver – in other words, switch back to the previous working version. To do that, follow these steps:
  • Tap the Win + R keys to launch the Run window and then type in the “devmgmt.msc” command and hit Enter to open the Device Manager window.
  • Under the Device Manager, you will see a list of drivers. From there, look for the Network Adapters and expand it.
  • Next, select the driver entries that are labeled appropriately other than anything in the context of the WAN Miniport.
  • Then select each one of them and double-click to open a new mini window.
  • After that, make sure that you’re on the Driver tab and if you are not, just navigate to it then click the Roll Back Driver button to switch back to the previous version of your Network adapters.
  • Now restart your computer to successfully apply the changes made.

Option 2 – Try to update the Network drivers

If the present Network driver is giving you a headache that is the “DRIVER IRQL NOT LESS OR EQUAL or SYSTEM THREAD EXCEPTION NOT HANDLED, Netwtw04.sys failed” BSOD error, then you need to update the Network drivers. To do so, here’s what you have to do:
  • Tap the Win + R keys to launch the Run window and then type in the “devmgmt.msc” command and hit Enter to open the Device Manager window.
  • Under the Device Manager, you will see a list of drivers. From there, look for the Network Adapters and expand it.
  • Then right-click on each one of the Network drivers and update them all.
  • Restart your PC and see if it helped in fixing the BSOD error.
Note: If updating the network drivers didn’t help in fixing the problem, you can also try to uninstall the very same drivers and restart your Windows 10 PC. After that, the system itself will reinstall the drivers you just uninstalled. Alternatively, you can also download and install the drivers from the manufacturer’s website directly.

Option 3 – Try running the System File Checker Scan

The SFC or System File Checker scan could detect and automatically repair damaged system files that could be causing the Netwtw04.sys failed BSOD error. SFC is a built-in command utility that helps in restoring corrupted files as well as missing files. It replaces bad and corrupted system files to good system files. To run the SFC command, follow the steps given below.
  • Tap Win + R to launch Run.
  • Type in cmd in the field and tap Enter.
  • After opening Command Prompt, type in sfc /scannow
The command will start a system scan which will take a few whiles before it finishes. Once it’s done, you could get the following results:
  1. Windows Resource Protection did not find any integrity violations.
  2. Windows Resource Protection found corrupt files and successfully repaired them.
  3. Windows Resource Protection found corrupt files but was unable to fix some of them.

Option 4 – Run the DISM Tool

The DISM tool is another command-line tool in the Windows operating system that could help users fix various corrupted system files. To use it, follow these steps:
  • Open the Command Prompt as admin.
  • Then type in this command: DISM /Online /Cleanup-Image /RestoreHealth
  • The DISM command you entered will repair the corrupted system image. Do not close the window if the process takes a while as it will probably take a few minutes to finish.

Option 5 – Run the CHKDSK Utility

Running the CHKDSK utility might also help you resolve the Netwtw04.sys failed BSOD error. If your hard drive has issues with integrity, the update will really fail as the system will think that it’s not healthy and that’s where the CHKDSK utility comes in. The CHKDSK utility repairs hard drive errors that might be causing the problem.
  • Open Command Prompt with admin privileges.
  • After opening Command Prompt, execute the following command and hit Enter:
chkdsk /f /r
  • Wait for the process to be completed and then restart your computer.
Read More
New focus sessions in Windows 11
focus sessionWindows and Devices chief Panos Panay has revealed new focus sessions feature that will be in Windows 11 on his Twitter account today. He himself is referring to it as a game-changer especially with Spotify integration.

So what is a focus session?

From the video clip provided on Twitter, we can see that focus session users will be able to choose a specific task from the previously made task list, choose songs that will play in the background while the task is active, and set a timer for the chosen task with breaks. Maybe the best comparison and explanation would be a desktop google calendar task with music, basically, that’s it. A neat and good organizer inside your Windows 11 operating system. I think that this is generally a good idea and for sure it will find its audience.
Read More
How to Fix Error Code 0x803f7001 in Windows

Error Code 0x803f7001 – What is it?

Error code 0x803f7001 results when users fail to update their Windows operating system. This often occurs when they seek to update from Windows 8 or 8.1 to Windows 10. Users will be able to identify error code 0x803f7001 because of the following common symptoms which occur:

  • Inability to upgrade your Windows operating system to Windows 10
  • Message box with error code 0x803f7001

Solution

Restoro box imageError Causes

The causes for error code 0x803f7001 are usually associated with the use of an unlicensed version of Windows 8 when upgrading to Windows 10. In such cases, the error code occurs when there is no valid Windows license or product key on your device.

Further Information and Manual Repair

To fix error code 0x803f7001, users may not necessarily need technical knowledge or the help of a Windows repair technician. Usually, the process is simple and can be resolved with the use of a valid product key. However, if users have trouble implementing the instructions found in the manual repair methods listed below, contact a Windows repair specialist for help or use an automated tool that provides the best solutions for problems like error code 0x803f7001.

Method One: Use a Valid Product Key

A product key is a 25-character code that enables users to activate their Windows operating system. To successfully activate your operating system and resolve error code 0x803f7001, enter the product key in the correct order. Once you have a valid product key in your possession, begin to resolve the error code by following the instructions below:

  • Step one: Click the Start button then select Settings
  • Step two: Select Update & security then Activation
  • Step three: Click the Change product key
  • Step four: Type in your valid product key. (Ensure you include the 25 characters of your product key in the correct order.)

Once you type in the valid product key, you should be able to successfully upgrade to the latest version of Windows. However, this method is only effective if the error code 0x803f7001 on your device is caused by issues related to the product key.

If the error code reappears after attempting manual repair method one, move to the next manual method suggested below.

Method Two: Reinstall Genuine Version of Windows 8

This method is crucial for you to perform if method one was not successful. Begin the reinstallation process by ensuring you have a genuine version of Windows 8. After reinstalling this version of your Windows operating system, attempt to upgrade to Windows 10 by following the instructions below:

  • Step one: Type Settings in the search box near the Start button or click the Start button and select Settings
  • Step two: After clicking Settings, select Update & Security
  • Step three: Select Windows Update then the Check for updates tab
  • Step four: Activate Windows 10 update

If this method is successful, you will no longer see error code 0x803f7001 pop up in a message box. You will also be able to access Windows 10, and all the benefits it provides users, on your device.

Method Three: Install an Automated Tool

Automated tools help PC users eliminate common issues such as Windows error codes. To address or rectify error codes like error code 0x803f7001 download a powerful automated tool on your machine. This tool enables users to access quick solutions. It also scans for and corrects issues that may result in error codes or poor PC performance.

Read More
Setting default applications in Windows 11
Setting default applications in Windows 11
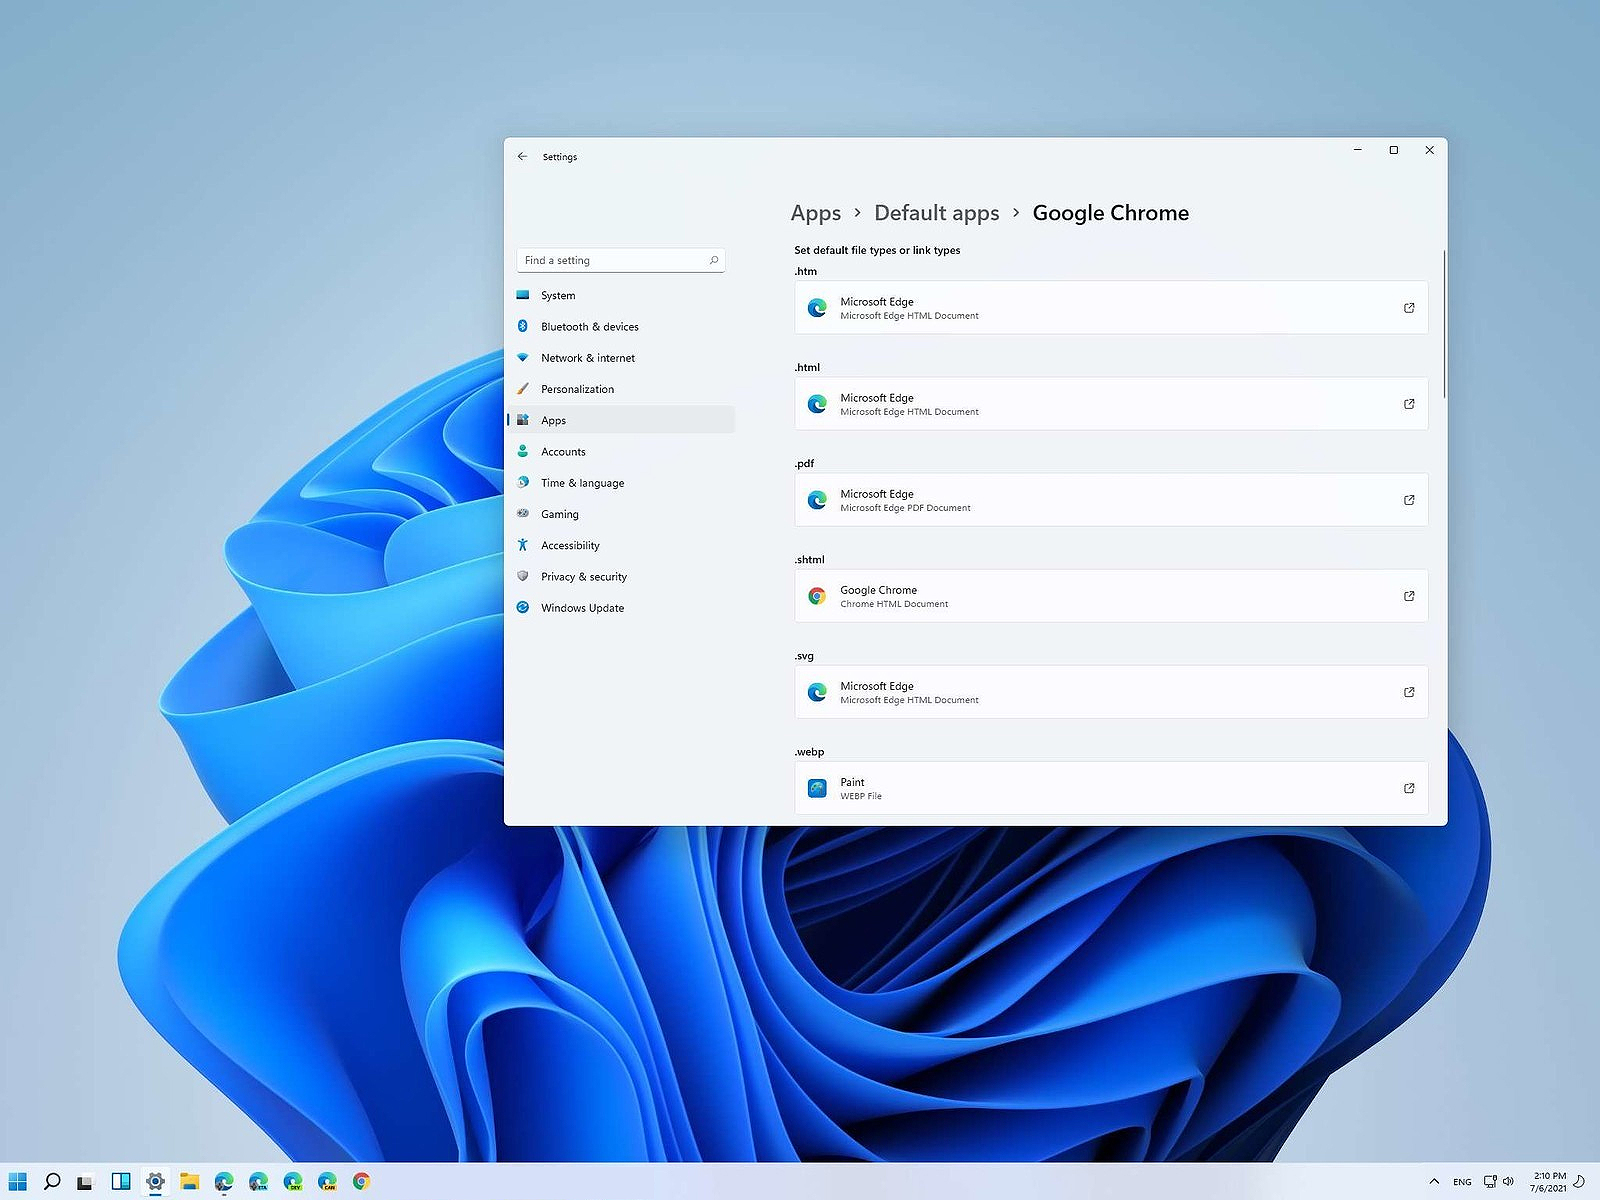
Same as in previous Windows versions, Windows 11 will also use certain applications as default ones for opening certain file types and file extensions. And yes, same as in previous versions it will come preconfigured for certain file types and associated applications like for example photos for pictures. Of course, users usually have their own favorite applications for certain file types and much more prefer to open them inside the application of their choice instead of the default one. We can change the default application like in previous Windows versions but this time there are two ways and overall more control of this process. Windows 11 has settings for choosing default file type applications and default file extension applications giving you more control of this process.

The opening setting for apps

Whatever you wish to change default application or default extension application you will need to open settings for default application. Follow steps to quickly go into it.
  1. Press ⊞ WINDOWS + I to open settings
  2. Select Apps on left
  3. On the right part select Default Apps
Now you are in settings for choosing default applications

Choosing default application by file type extension

This is considering by Microsoft as a typical way to set default applications inside Windows 11. Once you are inside the settings app there is a box labeled Enter a file type or link type. Inside the search box, type in file extension that you wish to associate the application with like .JPG, .TXT, or other. If the file extension is not associated with any application you will be presented with a Choose a Default button, if however, the file extension is already associated with the app, you will need to click on the app box itself. In any case, a pop-up will appear and ask How do you want to open YOUR FILE EXTENSION files from now on? Choose Application from the list of presented ones and click on OK.

Choosing default file type

Another method is to select the default application by file type selecting application for it. In the settings screen, under the search box, you will have a list of installed applications. Choose the application that you would like to associate a file type with and click on it. On the next details screen scroll down and select the file type that you want to associate with the selected application and click on OK.

Other/third method

There is also the third method for choosing the default application for file type but it includes some surfing on your hard drive and it can be more time-consuming for first-time settings. But it is fairly quick when you need to only use it once on some new file type (for example you have a new application installed and want to switch just one file type extension to that application). Locate the file that you want to associate with the application and right-click on it. Select Open With from the menu and then Choose Another App. Pop up will appear, select the application that you would like to use, and check the box beside Always use this app to open CHOOSEN EXTENSION files followed by clicking on the OK button.
Read More
Connecting Cortana on Windows and Android
Microsoft's anniversary update has come with many new features and improvements. One of these features is that Microsoft's Cortana can now be installed on your Android phone and as long as you are logged in to your Microsoft account on different devices, she can pass information between devices. You can not see battery life on your desktop PC, notifications, etc. There are some prerequisites in order to get this going, first is to have a Windows version 1607 or newer. The second is to have the last Android version

Installing Cortana on Android

  1. Download and install the Cortana app from the Google Play store.
  2. Open the app and accept the license terms.
  3. Enter the credentials for the Microsoft account you use to sign in to your PC.
  4. After a few seconds, Cortana will open.
  5. Click the settings button and select Sync Notifications.
  6. By default, missed calls, incoming messages, and low battery notifications will be turned on. You can turn this on\off from here. The only option off by default is for App notifications. Any non-system apps such as Facebook and Instagram can also send alerts to your Windows box. You can choose to enable the App notification sync option or leave it off.
  7. If you enable “App notification sync,” you will need to give Cortana permissions to read and control notifications on your phone.
  8. You can then select exactly which applications will be synched to your PC.
  9. Once done you can exit out of Cortana.

Configuring Cortana on PC

  1. Click the Windows button and type Cortana. Click the icon for Cortana and Search Settings.
  2. Scroll through the settings list and look for Send notifications between devices
  3. Click the switch to turn it on.
  4. Sign in to the same Microsoft account you used in the previous section
  5. Navigate back to the Cortana & Search settings tool.
  6. Click Edit Sync Settings. Make sure that your phone shows up on the list. You can also determine if you want PC notifications are sent to your phone.
With those settings in place, you should now start getting alerts for the items you enabled in your Action Center. As notices come in, you will see them pop up in a small bubble on the lower right of your screen. You can dismiss the notification or use the link to find a compatible app in the Windows store.
Read More
System Image Backup 0x807800A1 & 0x800423F3
System image backup error 0x807800A1 & 0x800423F3 appears when you are trying to create a system image backup and the operation fails to do so. If you’re faced with any of these error codes, try our recommended solutions in the order presented below and resolve the issue.

Check Volume Shadow Copy & Software Protection Services

To restart the Volume Shadow Copy Service (VSS) on Windows 10, do the following:
  • Press ⊞ Windows + X to bring up the Windows menu.
  • Click on command prompt (admin)
  • In the command prompt window, type the commands below and hit Enter after each line:
net stop vss net start vss
Once the commands execute successfully, try the system image backup again. The operation should complete successfully. You need to also check if the Software Protection Service is disabled. If it is, then Start it and ensure that it is set to default which is Automatic (Delayed Started).

Create System Image using PowerShell

Command lines are less prone to errors provided the syntax is correct, unlike GUIs that can suffer a glitch every now and then. To create a system image with PowerShell do the following:
  1. Open the Windows PowerShell as administrator. To create a System Image in Windows 10 using PowerShell, you will have to run the Wbadmin command.
  2. Inside the Powershell window type, then press Enter: wbadmin start backup-backup target: E:-include: C:-quiet-allCritical E: is the target drive where you’re going to save the system image, and C: is the system root drive where Windows is currently installed
  3. To extract the created system image, starting over from Windows 10 USB installation media, select advanced startup or open run and type: C: \ Windows \ System32 \ Shutdown.exe / r / o

Use third-party imaging software

If the previous two solutions have not managed to solve the issue there is always an option to use a third-party imaging solution. There are free open source and buying options offering various advantages each. Find out which one works best for you and use it.
Read More
Blizzard caught destroying evidence
Blizzard employeesCalifornia's Department of Fair Employment & Housing has widened its anti-discrimination lawsuit against Activision Blizzard and claims the publisher has been shredding vital documents relevant to the ongoing investigation. A recent report from Kotaku described the department as offering poorly paid, highly insecure positions, with a culture of hostility towards LGBTQ+ testers. The DFEH's rewording of "employees" to "workers" now hopes to take these contractors' experiences into account. "As a contract employee, I feel there's a lot of pressure to excel, impress, and move through the ranks as fast as you can before your contract ends and you're forced to go 3 months without income or find another job," Axios reports one worker saying. "I take pride in what I do, but it feels like it's never enough." Activision's contentious hiring of union-busting third-party law firm WilmerHale "directly interferes" with its own investigation, it says. By going to WilmerHale, Activision appears to be claiming that all work related to the investigation is privileged and can't be shared with DFEH. The suit also claims that Activision HR shredded documents related to "investigations and complaints", against its legal obligation to retain them during the investigation. The relevant parts of the updated lawsuit were shared by Axios reporters Stephen Totilo and Megan Farokhmanesh, the former also noting that the DFEH "fixed their misspelling of Bill Cosby's name". "DFEH is also informed and aware that documents and records have not been maintained as required by law or by the DFEH's Document Retention Notice," the complaint reads, "including but not limited to documents related to investigations and complaints were shredded by human resource personnel and emails are deleted thirty days after an employees separation."

Speculation and answer from Activision Blizzard

Blizzard employee Jessica Gonzalez suspects that the costs of fines associated with destroying these documents may have been an easier blow for Blizzard to take than any penalties drawn from their existence in helping the lawsuit go through. In an email to Kotaku, Activision denied the shredding allegations and issued a statement outlining steps it had taken to improve company culture—including the ousting of high-level executives like Blizzard president J. Allen Brack. The full statement reads: "Throughout our engagement with the DFEH, we have complied with every proper request in support of its review even as we had been implementing reforms to ensure our workplaces are welcoming and safe for every employee. Those changes continue today, and include:
  •     Several high-level personnel changes
  •     Revamped hiring and recruiting practices requiring diverse interview panels
  •     Greater transparency on pay equity
  •     Expanded and improved training and investigative capabilities for human resource and compliance staff
  •     Created investigation teams outside of business units to support greater independence
  •     Restructured divisions to support greater accountability
  •     Enhanced review processes to include evaluation of managers by employees
  •     Clear boundaries on workplace behavior with a zero-tolerance approach to harassment and other actions that diminish or marginalize.
"We strive to be a company that recognizes and celebrates the diverse talents and perspectives that lead to the creation of great, globally appealing entertainment. We have provided the DFEH with clear evidence that we do not have gender pay or promotion disparities. Our senior leadership is increasingly diverse, with a growing number of women in key leadership roles across the company. "We share DFEH’s goal of a safe, inclusive workplace that rewards employees equitably and is committed to setting an example that others can follow."

California and RIOT

Beyond Activision Blizzard, California's DFEH has also probed into League of Legends creator Riot Games, accusing the studio of dragging its heels over sexual harassment allegations dating back to 2019. Riot denied the allegations, telling us that it "will never retaliate against anyone for talking to any government agency".
Read More
How to fix windows 10 error code 0x80073712
Windows 10 has displayed one of the most efficient and user-friendly interfaces. However there have been many issues on the backend of this commonly praised operating system: For example, Windows Update is still a wonky and error-laded system application. One example of this error is Windows Update Error 0x80073712 which stands in the way of users just wanting to keep their PCs updated hassle-free. The error code 0x80073712 signifies that a file needed by Windows Update to function is either damaged, missing, or corrupted. However, this does not mean that your Windows version will forever stay as-is with no mode to update it. Windows Update Error 0x80073712 is perfectly fixable with the set of provided steps below and some of Windows’ built-in troubleshooting steps:

Solution 1: Open Windows Update Troubleshooter

  1. Open the Windows Update Troubleshooter by pressing the Window Key and  “S” keys simultaneously.
  2. Enter the word “Troubleshoot” in the search box and select the Troubleshoot result
  3. On the new window, select “Windows Update” to troubleshoot.
  4. Run the troubleshooter, then open Windows Update and try to install the update again.

Solution 2: Run the DISM tool

  1. Open the command prompt by pressing Windows Key and “S” key simultaneously
  2. Enter “cmd” in the search box. Right Click command prompt among the results and select “Run as administrator”
  3. In the Command Prompt window type the following and press the Enter key after every command
DISM.exe /Online /Cleanup-image /Scanhealth DISM.exe /Online /Cleanup-image /Restorehealth
  1. To close the Administrator: Command prompt window, type Exit, and then press Enter.
  2. Run Windows Update again.

Solution 3: Rename the Software Distribution folder

  1. Open the command prompt as previously mentioned
  2. Input the following command pressing Enter after every line net stop wuauserv net stop cryptSvc net stop bits net stop msiserver rename c:windowsSoftwareDistribution softwaredistribution.old net start wuauserv net start cryptSvc net start bits net start msiserver exit
  3. Restart the PC and run the updater if it works again.

Solution 4: Restart Windows Update Services

  1. Press the Windows logo key and R together to open Run -> Input services.msc -> and press Enter
  2. Search for the Windows Update service -> Check its status
  3. If it is not indicated, right-click on the service and select Start to force start your Windows Update
  4. If you see an error, locate the Startup Type option and set it to Automatic
  5. Now you should reboot your computer and see if your Windows Update is OK

Solution 5: Fix Registry Issues

If after all the aforementioned solutions, you still experience problems with Windows Update, the problem may lie in the registry that is either damaged or corrupted. You may choose to do manual editing of your Windows registry by opening your Windows registry editor. But doing so is risky as one wrong letter may do incalculable damage to your system. To do so safely for more inexperienced users., we recommend using a third-party registry cleaner/tools, many of which can be found online.
Read More
How to Fix Error Code 0x80060100 on Your PC

Error Code 0x80060100

Error Code 0x80060100 is an error that relates to the Windows Update process. It most commonly occurs when the Update process runs and cannot be completed, as the system appears to have necessary files corrupted or absent.

Common symptoms include:

  • Inability to begin the Windows Update process
  • Inability to complete the Windows Update process

While it can be frustrating when users are not able to complete their necessary updates for Windows 10, there are several solutions that are available to fix the problem at hand. Some of the methods that can be used are simple and accessible, even for beginners, while advanced methods of resolution are also available for users who are more confident in their abilities.

Error Code 0x80060100 appears on Windows 10 and earlier versions of the Windows operating systems. In most cases, the steps to resolve the problem remain the same, regardless of the system on which the error appears. This error code is also related to Error Code 0x800b0100, which appears in similar circumstances.

If the solutions below are not successful in resolving Error Code 0x80060100 on your machine, you may need to get in touch with a qualified repair technician who can assist you in the resolution of the issue at hand. Any repair technician used should be familiar with the needs of the Windows 10 update process.

Solution

Restoro box imageError Causes

The primary cause for the appearance of Error Code 0x80060100 on a Windows machine is that the Update files have had damage to them or are found to have elements missing that are necessary for the completion of the Update process.

Further Information and Manual Repair

If Error Code 0x80060100 has appeared on your Windows operating system as you are attempting to download, install, or run Windows Update, there are several steps that you can take to attempt to resolve the error. Some of these methods require advanced knowledge or skills, so if you are not confident in your ability to undertake the steps below, contact a qualified Windows repair technician to assist you in the process.

Here are the best ways to resolve Error Code 0x80060100:

Method One: Run the Troubleshooter for Windows Update

As you attempt to run the Windows Update process and experience difficulty, there is a tool that will usually appear on the screen called the Windows Update Troubleshooter. This process can scan the files being used for the update process and attempt to fix the errors on its own, retrieving or repairing any damaged files as it comes across them.

In most cases, this step on its own will resolve Error Code 0x80060100 on a computer. However, if you are still unable to run Windows Update after using the Troubleshooter, you may need to run a disk repair tool before proceeding.

Method Two: Restart Your Computer

In some cases, Error Code 0x80060100 can be resolved simply by restarting the computer that is affected by the error. Even if this step is not successful on its own, restarting after each of the other methods can allow necessary changes to take place and refresh the progress of the Windows Update process.

Method Three: Use the DISM Tool

This method requires some skill and knowledge of your operating system. To use this tool, follow the steps below:

  • Step One: From the right side of the screen, use your mouse to swipe inward and select the “Search” option.
  • Step Two: When the search box appears, enter in the words “command prompt".
  • Step Three: From the results that appear, right-click on the “Command Prompt” option, then choose the option to “Run as Administrator.” An administrator password may be required at this point.
  • Step Four: In the window that comes up, enter in the following words, hitting the “Enter” key after each:
    • Dism.exe /online /cleanup-image /scanhealth
    • Dism.exe /online /cleanup-image /restorehealth
  • Step Five: Type in “exit” to close the prompt window and hit the Enter key.
  • Step Six: Attempt to run the Windows 10 Update process again, restarting your computer as needed beforehand.

If the methods above are not successful in the resolution of Error Code 0x80060100, a qualified Windows repair technician may be able to assist you.

If you wish to always have at your disposal a utility tool to fix these Windows 10 and other related issues when they do arise, download and install a powerful automated tool.

Read More
Windows Sandbox item is greyed out
As you know, the functioning of the Windows Sandbox feature is supported by various components in the background of the Windows operating system. And the only way for you to enable the Windows Sandbox feature in your computer is through the Turn Windows features on or off utility. This feature will work directly on the basis of Virtualization which is also supported by Hyper-V. However, there are some reports claiming that some computers have the Windows 10 Sandbox item greyed out in the Turn Windows features on or off utility. Thus, in this post, you will be guided on what you can do to resolve such a problem in your Windows 10 computer. In this kind of problem, you should know that this has something to do with the Second Level Address Translation which is one of the important pillars of how the Windows 10 Sandbox feature functions. Thus, if the Second Level Address Translation or SLAT feature in Windows Sandbox is not supported by the CPU of your computer, there is no way for you to use Windows Sandbox on your computer. On the other hand, if SLAT is supported, then there is definitely something you can do to resolve the greyed-out Sandbox item in Windows 10.

To get started, follow the steps provided below.

Step 1: First, you have to boot into the BIOS of your PC. Step 2: After that, make sure that the following options are set to their respective configurations:
  • Hyper-V – Enabled
  • VM Monitor Mode – Yes
  • Virtualization – Enabled
  • Second Level Address Translation (VT-d or RVI) – Enabled
  • Data Execution Prevention – Enabled
Step 3: Once you’re done, save the configuration and then restart your Windows 10 computer as usual. Step 4: Once your computer has restarted, you should see the same option in the Turn Windows features on or off utility and it should no longer be greyed out. Then you can now enable the feature and follow the onscreen instructions need to use the feature as best as you can.
Read More
1 2 3 171
Logo
Copyright © 2023, ErrorTools. All Rights Reserved
Trademark: Microsoft Windows logos are registered trademarks of Microsoft. Disclaimer: ErrorTools.com is not affiliated with Microsoft, nor claims direct affiliation.
The information on this page is provided for information purposes only.
DMCA.com Protection Status