As you know, the functioning of the Windows Sandbox feature is supported by various components in the background of the Windows operating system. And the only way for you to enable the Windows Sandbox feature in your computer is through the Turn Windows features on or off utility. This feature will work directly on the basis of Virtualization which is also supported by Hyper-V. However, there are some reports claiming that some computers have the Windows 10 Sandbox item greyed out in the Turn Windows features on or off utility. Thus, in this post, you will be guided on what you can do to resolve such a problem in your Windows 10 computer.
In this kind of problem, you should know that this has something to do with the Second Level Address Translation which is one of the important pillars of how the Windows 10 Sandbox feature functions. Thus, if the Second Level Address Translation or SLAT feature in Windows Sandbox is not supported by the CPU of your computer, there is no way for you to use Windows Sandbox on your computer. On the other hand, if SLAT is supported, then there is definitely something you can do to resolve the greyed-out Sandbox item in Windows 10.
Step 1: First, you have to boot into the BIOS of your PC.
Step 2: After that, make sure that the following options are set to their respective configurations:
Step 3: Once you’re done, save the configuration and then restart your Windows 10 computer as usual.
Step 4: Once your computer has restarted, you should see the same option in the Turn Windows features on or off utility and it should no longer be greyed out. Then you can now enable the feature and follow the onscreen instructions need to use the feature as best as you can.

Stop 0x00000050 is an error code that is popularly known as the Blue Screen of Death (BSoD) error. This error occurs when Windows crashes on your system. Stop 0x00000050 error is displayed in a blue screen which is why it is called the BSoD error.
The error message appears in the following form:
Stop 0X00000050 (parameter1, 0, parameter3, parameter4)
PAGE_FAULT_IN_NONPAGED_AREA”
However, the parameters within the Stop 0x0000005 error message sometimes vary depending on your PC configuration.
 Error Causes
The most common causes of the Stop 0x0000005 error are:
Whatever the cause may be, the Stop 0x00000050 error message is alarming and should be fixed at the earliest as it indicates major system stability problems that can often lead to data loss and system corruption.
To fix and repair the Stop 0x0000005 error you don’t always have to hire an IT professional. In fact, fixing this error is quite easy and you can do it yourself regardless of whether you have a good know-how of computers or not.
So, let’s get started! Here are some the easy DIY solutions to fix the Stop 0x0000005 error:
Sometimes this error may occur due to a temporary issue like overheating of the computer components. When this happens all you need to do is switch off the computer and allow the components to cool down. Try starting up your computer after a couple of hours. If the blue screen of death does not occur again, then this means there is nothing to worry about and the problem is resolved.
However, if the error appears again on your screen, then you need to try something else to solve and fix this error on your PC. If the cause of the error is a faulty device driver, then it is advisable to disable and remove it. Try updating the latest version of the faulty device driver. Using updated software helps ensure your PC keeps running smoothly.
If the cause of the Stop 0x0000005 error code is your system's exposure to viruses and spyware, then you must immediately download a powerful antivirus program. After you download it, scan for viruses on your system. Once the scanning is complete, you will see a scan report showing viruses on your PC. Delete all of them and click on repair.
Furthermore, you can also add more RAM to prevent and fix the Stop 0x0000005 error message on your computer. This solution is suitable when you try to run a program on your PC and you get this error message.
‘Word cannot start the converter mswrd632.wpc’The error message mswrd632.wpc may pop up when computer users try to open certain MS Word documents using the .doc extension.
Error CausesHKEY_LOCAL_MACHINESYSTEMCurrentControlSetControlStorageDevicePolicies
CHKDSK [volume [[path] filename]] [/F] [/V] [/R] [/X] [/C] [: size]]Note: In the command given above, “[/F]” will try to fix the system errors while “[/R]” will be the one to fix the bad sectors.
EverydayLookup is a browser extension for Google Chrome developed by Mindspark Inc. This extension allows users to find what mobile network a certain number belongs to, to find out an area code of a country/town, or locate a town by zip code. While these features look promising and interesting, this extension comes with a downside.
When installed, this extension will change your default search engine, the home page, and new tab to search from MyWay.com, it will monitor user browsing activity, log searches, visited links, opened websites, and other information. This information is forwarded to Mindspark ad servers, then later sold/used to better target ads.
While browsing the internet with this extension you will see additional injected ads and sponsored content throughout your browsing sessions (even if the ads do not match your search queries). It can inject banners to websites, and sometimes even put an ad above website content making it extremely annoying to deal with.
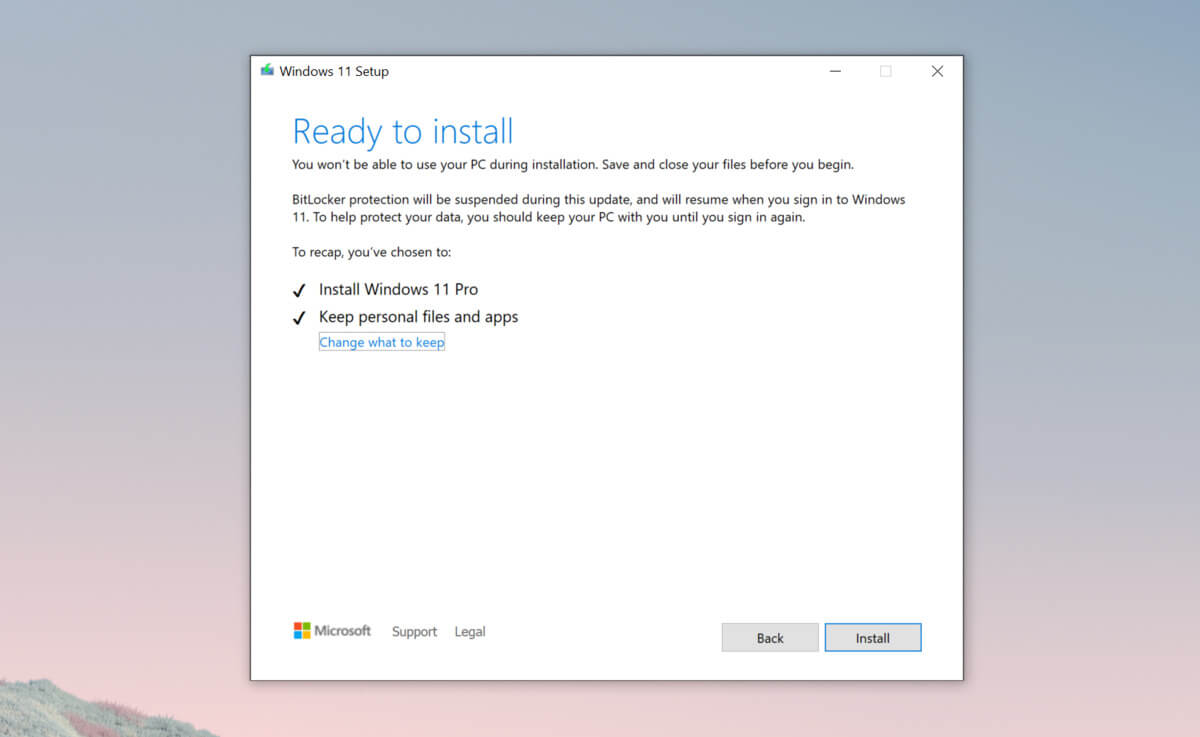 Bypass TPM with changing installation media
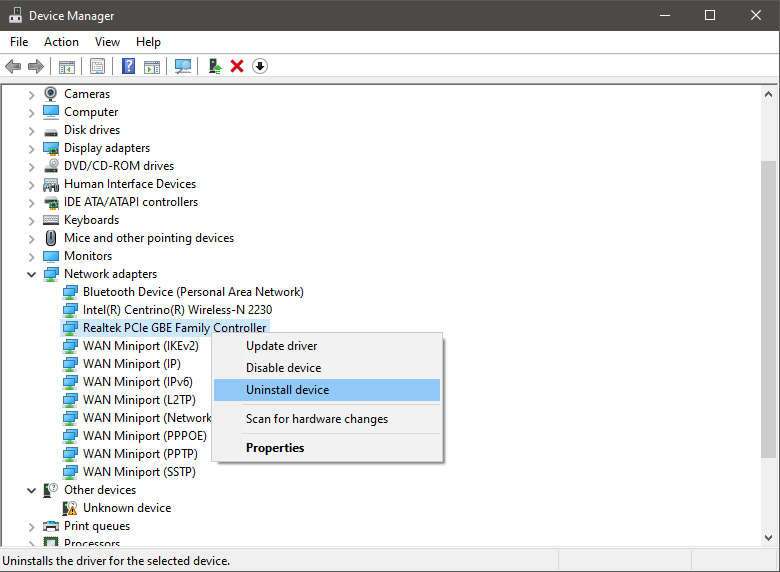
 In the Device Manager expand Network adapters, choose adapter, right-click on it and choose Uninstall.
 Install latest driver or reboot so Windows will install the driver automatically
In the Device Manager expand Network adapters, choose adapter, right-click on it and choose Update Driver.
Install latest driver or reboot so Windows will install the driver automatically
In the Device Manager expand Network adapters, choose adapter, right-click on it and choose Update Driver.

 In command prompt type next line and press ENTERDEL /F /S /Q /A “C:\Windows\System32\drivers\mfewfpk.sys
Reboot the system
In command prompt type next line and press ENTERDEL /F /S /Q /A “C:\Windows\System32\drivers\mfewfpk.sys
Reboot the system“\server is not accessible. You might not have permission to use this network resource. Contact the administrator of this server to find out if you have access permissions. Logon Failure: The target account name is incorrect.”If you are among the users who experience the same issue, read on as this post will help you resolve this error when accessing your server. But before you start troubleshooting the problem, you might want to perform System Restore, especially if tend to create one. To use System Restore, here’s what you have to do: