If you were trying to open File Explorer but it suddenly stopped working and you encounter an error message that states, “An attempt was made to reference a token that does not exist”, read on as this post will guide you in fixing this problem. This problem was initially reported after the April Update and Microsoft was able to fix it right after correcting the build. However, this effort seems futile for some users as recently, some reported getting the same error when they try to open not just Windows File Explorer but also with utilities like Microsoft Management Console or MMC, Visual Studio, Task Manager, Printer, Recycle Bin, etc.
Two of the most likely causes of this error are a troublesome Windows Update and corrupted system files. Whatever the cause is, here are some suggestions you can follow to fix the “An attempt was made to reference a token that does not exist” error.
You may have to re-register the ntdll.dll file using the regsvr32.exe before you can successfully install the program and fix the ntdll.dll file crash error. The Regsvr32 tool is a command-line utility that can be used to register and unregister OLE controls like DLL and ActiveX (OCX) control in the Windows operating system. Follow the steps below to use it.
Note: Replace “[DLL file]” with the name of the DLL file that was pointed out in the error.
The System File Checker or SFC scan could detect and automatically repair damaged system files that could be causing the “An attempt was made to reference a token that does not exist” error to pop up. SFC is a built-in command utility that helps in restoring corrupted files as well as missing files. It replaces bad and corrupted system files with good system files. To run the SFC command, follow the steps given below.
The command will start a system scan which will take a few whiles before it finishes. Once it’s done, you could get the following results:
This kind of error might have something to do with a Feature Update so you can try to revert your computer to a previous build of Windows 10 as it could help you fix the problem. In this case, it would better if you refrain from updating your Windows 10 computer until this problem is completely resolved by Microsoft.

Each time when you press WINDOWS + PrtScn key on your keyboard a screenshot is taken and saved on your Hard drive, to be more precise, it is saved in a specific folder which is in c:\Users\Your user name\Pictures\Screenshots. Now, this specific location is not anything that's bad but it is a little deep and not so user-friendly for quick access.
Luckily this default location can be changed into any folder that you like.
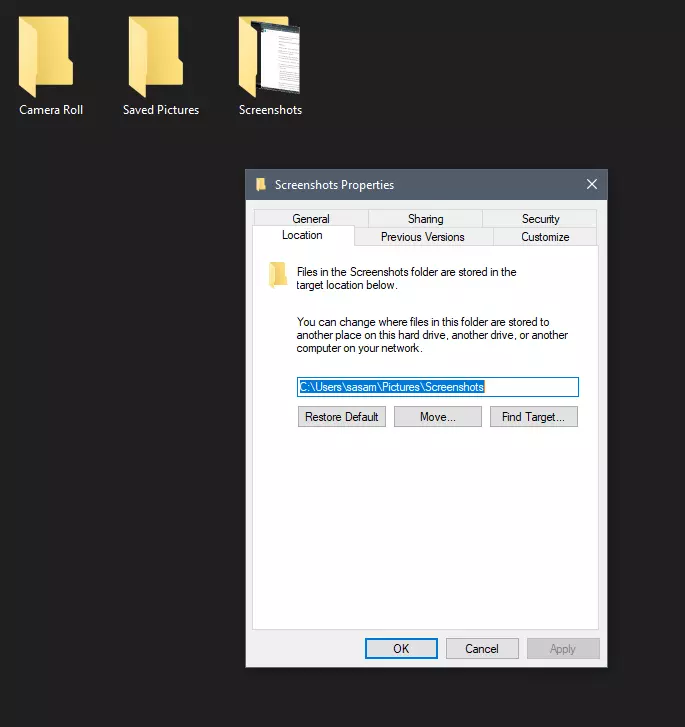
First thing is to open File Explorer and then navigate to your PC. Once you go to your PC, go to Pictures, and inside right-click on the Screenshots folder. If there is no screenshots folder inside, this means that since Windows was installed no screenshots were taken with WINDOWS + PrtScn key combination. Please note that just by pressing PrtScn you will create a screenshot but you will place it inside the clipboard ready to be pasted somewhere, with WINDOWS + PrtScn you are saving the screenshot directly in a file on your hard drive.
So once you clicked on the Screenshots folder, go to the bottom and click on properties. Inside properties go to the Location tab. In the location, tab clicks on MOVE and browse to your new location where you would like screenshots to be saved. Once you select the folder for screenshots, click on the Select Folder button and confirm with OK. After this, Windows will ask you would you like to move existing screenshots into the chosen folder. Click YES or NO, depending on your preference.
After this easy setup, all of your new screenshots will be placed now inside the chosen folder.
Thank you for reading and I hope to see you tomorrow. Take care.
Upon updating to Windows 10, some users might encounter a blinking or flashing desktop after logging in. This will result in a repetitive restarting of explorer or you won’t be able to make the start menu and shortcut keys work. In addition, the network icon might not appear in your taskbar as well. Other Windows 10 error messages include error code 0xc000021a.
 Error Causes
Your blinking or flashing desktop after logging in might be the result of problems with the bushell.dll shell extension, which is a part of the Norton Security Suite. Another possible cause for this annoying problem is an issue with your display driver since not all systems will use the same display driver and will depend on what graphics card you use.
In fixing the bothersome blinking or flashing desktop after logging in problem, you can do a manual repair method to address the root problem. You need to be familiar with the Windows command line to successfully go through the process. However, if you are not knowledgeable or confident enough to do this on your own, it would be best to seek help from a professional. Or, you might want to consider using an automated tool to solve the issue.
You need to identify first what’s causing the blinking or flashing of your desktop after login to properly address the issue. The following methods can be done if your issue is caused by bushell.dll shell extension issue:
NOTE: Text input is most probably affected by the explorer restarts so you might need to repeatedly type some letters or to carefully input texts.
NOTE: You might need to download the latest Video Driver on a working computer. Save it in a thumb drive then copy and install it on your computer. If in case there is no native Windows 10 driver, you can also download the latest Windows 7 or Windows 8.1 video driver. Afterward, install it in compatibility mode.
Error code 80073712 is one of the dozens of error codes affecting Windows 10 users. It occurs when users attempt to upgrade their operating system but experience a failure. The error code usually results from problems associated with missing or damaged files within Windows Update. Common symptoms of this error code include the following:
Error CausesIn the case of error code 80073712, the issues preventing Windows Update from completing the upgrade process are most likely due to problems with files within Windows Update. For instance, there may be corruption within the Component-Based Servicing (CBS) manifest.
Manual repair methods offer solutions to Microsoft users who are experiencing Windows error codes like the upgrade error code 80073712 in Windows 10. The manual repair methods in this article are not guaranteed to fix problems unrelated to this error code. Thus, be certain you are experiencing error code 80073712 before you attempt to implement the solutions provided below.
Since issues related to Windows Update may be causing error code 80073712 to occur, one of the best solutions you can consider is to run the Windows Update Troubleshooter. This troubleshooter will be able to detect and fix corruptions within Windows Update files or any other issues directly related to Windows Update. To implement this manual repair method, follow the steps listed below:
Once you run the troubleshooter, you should be able to verify and fix any errors within Windows Update files. Restart your machine after the troubleshooting process is complete them proceed by checking Windows Update to see if you are able to complete the upgrade. If Windows Update downloads the upgrade and the installation of the upgrade occurs, the problem has been resolved. Otherwise, error code 80073712 will reoccur, in which case you will need to move to manual repair method two.
Another option available to Windows users experiencing error code 80073712 is to download and run the Deployment Image Servicing and Management (DISM) tool. This tool checks for inconsistencies or corruptions that may be preventing Windows Update services from functioning correctly. To download and run the tool, follow the instructions below:
DISM.exe /Online /Cleanup-image /Restorehealth
Wait a few minutes to ensure that the process is complete. Once you’ve run the DISM tool, it will detect errors, for instance within registry data, and correct or replace them. Restart your machine after running this tool then check Windows Update. Attempt to download the upgrade to see if you have successfully resolved error code 80073712. If you experience an upgrade failure, move to the next manual repair method mentioned below.
The issues related to error code 80073712 may also be resolved by performing a clean install of Windows 10. This manual repair method ensures that any previous versions of your Windows operating system are removed before you attempt to access an upgrade. This can prove effective as it helps users avoid issues that would otherwise cause error codes or poor PC performance in cases where errors are present on one’s system.
To successfully perform a clean installation of Windows 10, be prepared to follow step-by-step procedures that include the following:If you wish to always have at your disposal a utility tool to fix these Windows 8 and other related issues when they do arise, download and install a powerful automated tool.
 In this article we are going to go through the best Stock Photo sites BUT, we will focus on ones that give you royalty-free Photos, so no paying stuff here, just the best of the free world.
Error Causes
In this article we are going to go through the best Stock Photo sites BUT, we will focus on ones that give you royalty-free Photos, so no paying stuff here, just the best of the free world.
Error Causes So, next time when you or your friends encounter this problem, try these quick fixes to repair the error without any hassle.
  Restart graphic driver