Error Code 0x8007007B (Code 0x8007007B) – What is it?
Error code 0x8007007B (Code 0x8007007B) is an error that occurs when you attempt to activate Windows 10, as well as Windows Server 2008, Windows Vista, Windows 7, Windows 8, or Windows Server 2012.
Common symptoms include:
You will see an error message like this: “Error 0x8007007B 'The filename, directory name, or volume label syntax is incorrect”.
If you are using volume-licensed media to install: Windows 7, Windows 8, Windows Vista Business, Windows Vista Enterprise, Windows Server 2008 R2, Windows Server 2008, Windows Server 2012, Windows 10.
Your computer is not connecting the activation wizard to a Key Management Service (KMS) host computer.
Solution
Further Information and Manual Repair
Error Code 0x8007007B usually occurs when a product key has been activated too many times. Blocking activation aids in avoiding abuse of the key. If abuse of the key is not the case, it is possible to get the key reset, or you may receive a new key altogether. When you are not sure that you can complete these methods yourself, as they do contain advanced steps, it would be wise to consult a computer repair technician to avoid making the problem any worse.
Generally, the solution can be simple; it is just dependent on how comfortable you are with getting technical in your computer. Volume licensed media means that the media has a preset number of times that it is allowed to be activated. This helps to avoid misuse of the product. Some people install the Windows 10 program multiple times on their computer if they are software developers or do certain types of software testing. It is important to know the cause in order to effectively find the solution.
Method One:
From the desktop screen, press the Windows key and S, type “Command Prompt”. Then, right-click on Command Prompt in the results. Select Run as Administrator. Click Yes when asked about requesting permission.
In the Command Prompt box, enter the command: slmgr.vbs -ipk xxxxx-xxxxx-xxxxx-xxxxx-xxxxx
The x's represent the product key. Replace these with your unique product key.
Type in the following command into the “Command Prompt” window: slmgr.vbs -ato
Click Enter
Restart your computer and try to activate windows again. It should not show the error code anymore.
Method Two:
While on the desktop, press the Windows key and R.
A window saying Run should open.
Type in the following command: Slui 3
Press ENTER and a window should appear.
This window asks for you to enter the operating system activation product key.
Enter this key in the space provided.
After entering this, click Activate.
Restart your computer now.
Check for activation. The Error code should be gone now.
Method Three:
Open the Command Prompt with access as administrator just as in Method One, and enter the following command: sfc /scannow
The command will complete the tasks. This will take some time so just let the computer do its thing and work. Let the sfc finish the scan.
When the scan is complete, restart the computer.
Check for the activation. The error code should be gone at this point.
If it is gone, revisit Method One or move on the Method Four.
Method Four:
Call the Microsoft Support Team and explain the problem in as much detail as you can give. Give the team the error code 0x8007007B and ask to have a different product key. When they give you the new product key, repeat Method 2. The Microsoft Support Team will either change your product key, or they will reset your current product key so that it can be used for activation again.
If your VPN software blocks and disconnects the Internet or Wi-Fi connection as soon as it is connected, read on as this post will give you fixes to resolve the problem. This kind of issue is odd but not unheard of. Many users use VPN for privacy and security but if it causes internet connection problems, you have to pin down the root cause of the problem and fix it in order to continue browsing the internet with privacy and security.
Here are some suggestions you need to check out to resolve the issue between your VPN software and network.
Option 1 – Try installing the latest version of the TAP adapter
Since all VPN software uses a TAP adapter which is mostly from OpenVPN, you might want to download and install the TAP adapter driver to resolve the problem.
Option 2 – Run the Network Adapter Troubleshooter
Open the Search bar on your computer and type in “troubleshoot” to open the Troubleshoot settings.
Next, scroll down and select the “Network Adapter” option from the right pane.
Then click on the Run Troubleshooter” button.
After that, your computer will check for any possible errors and will pinpoint the root cause of the problem if possible.
Option 3 – Configure the client computer to use the default gateway
This kind of connection problem can occur when you configure the VPN connection as the default gateway on the remote network. In such a case, the VPN settings override the default gateway settings (TCP/IP settings). Thus, you have to configure the client computers in order to use the default gateway setting on your local network for internet traffic as well as a static route on the remote network for VPN-based traffic.
Option 4 – Try to use the Google Public DNS
You might want to change your DNS to Google Public DNS as it could help you resolve the internet connection problem caused by your VPN. To do so, follow the steps below.
The first thing you have to do is right-click on the network icon in the Taskbar and select Network and Sharing Center.
Next, click on the “Change Adapter Settings” option.
After that, search for the network connection that you are using to connect to the internet. Note that the option might be “Wireless Connection” or “Local Area Connection”.
Right-click on your network connection and click on Properties.
Then select the new window to choose the “Internet Protocol 4 (TCP/IPv4)” option.
After that, click on the Properties button and click the checkbox in the new window for the option “Use the following DNS server addresses”.
Type in “8.8.8.8” and “8.8.4.4” and click OK and exit.
Option 5 – Try checking the settings of your VPN software
If your VPN software has a built-in “kill switch” it prevents any internet usage every time there is a problem in connecting with the VPN server which explains why your internet connection is disconnected when your VPN software is connected.
In addition, you could also try to change your VPN software’s protocol since all VPNs support multiple protocols. It could be that the protocol your VPN uses is blocked so try changing to another protocol and see if it fixes the problem.
Option 6 – Update the Network Adapter drivers
You might also want to update the Network Adapter drivers by following these steps:
Tap the Win + R keys to launch the Run window and then type in the “devmgmt.msc” command and hit Enter to open the Device Manager window.
Under the Device Manager, you will see a list of drivers. From there, look for the Network Adapters and expand it.
Then right-click on each one of the Network drivers and update them all.
Restart your PC and see if it helped in fixing the BSOD error.
Note: If updating the network drivers didn’t help in fixing the “Windows could not find a driver for your network adapter” error, you can also try to uninstall the very same drivers and restart your Windows 10 PC. After that, the system itself will reinstall the drivers you just uninstalled. Alternatively, you can also download and install the drivers from the manufacturer’s website directly.
To reinstall the network adapter driver, refer to these steps:
Open the Devices Manager from the Win X Menu.
Then locate the device drivers and right-click on them to open the Properties.
After that, switch to the Driver tab and click on the Uninstall Device button.
Follow the screen option to completely uninstall it.
Finally, restart your computer. It will just reinstall the device drivers automatically.
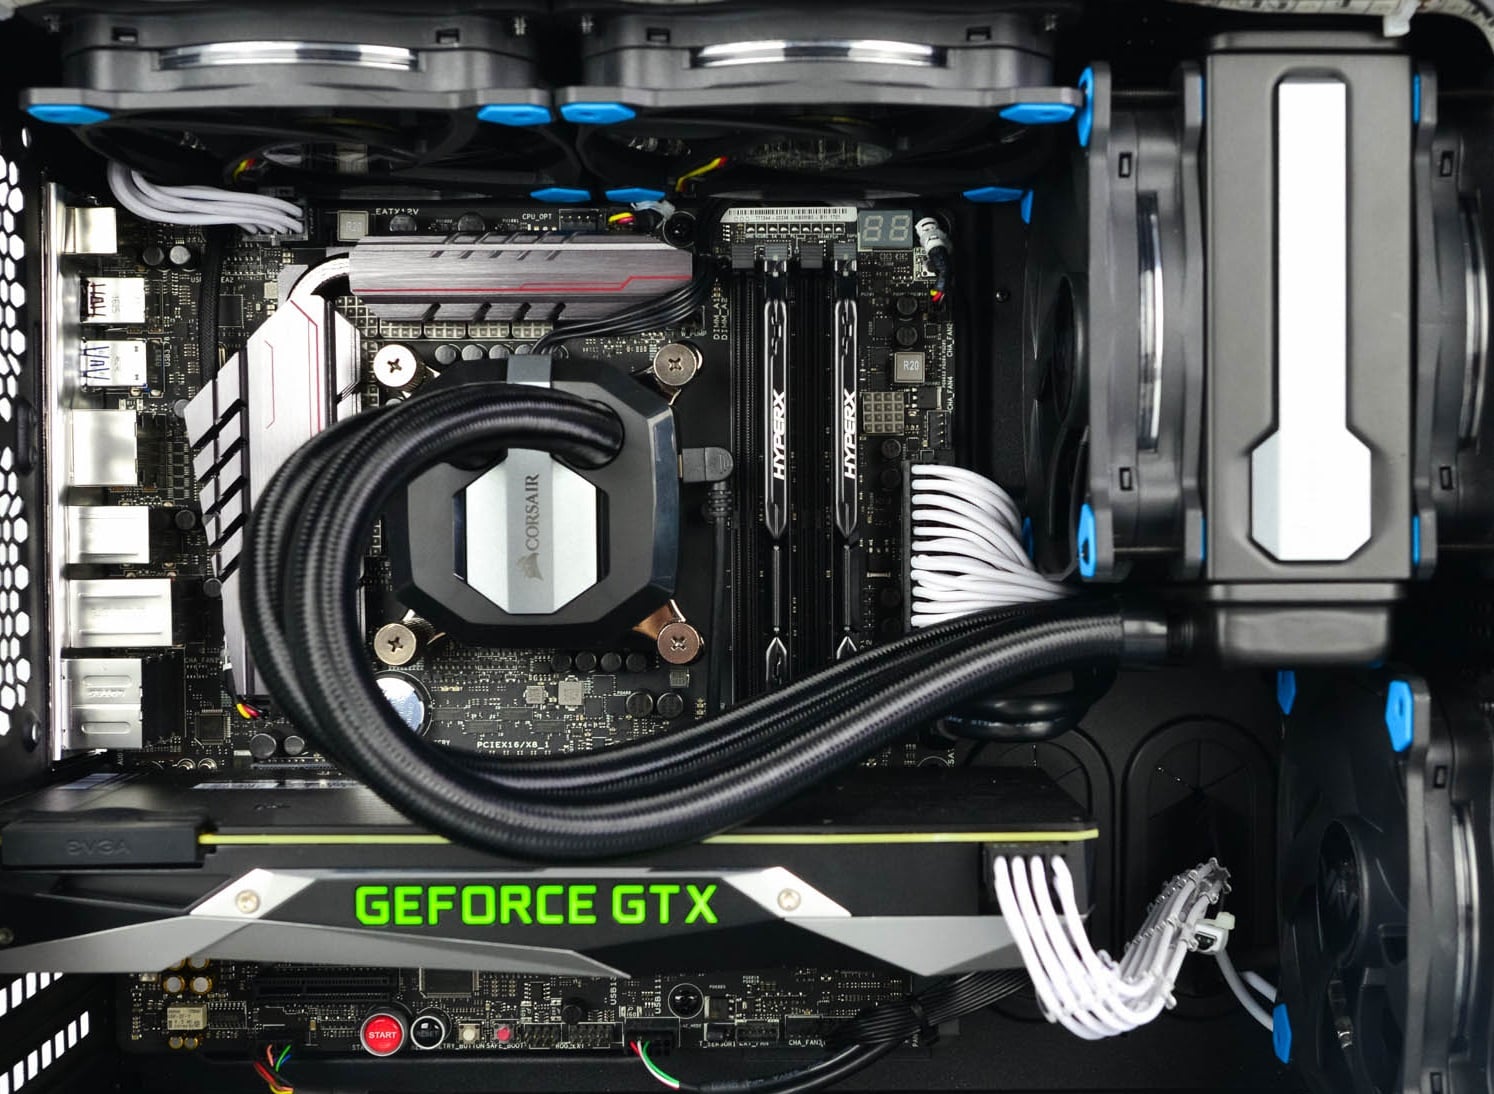
Building a custom PC is a great feeling but it can sometimes not be ideal and we are not talking about breaking or losing parts. What we mean is that choosing the right components can be sometimes a difficult task. Of course, picking a PC case can have its issues, choosing the right power supply can be tricky but pairing all components together, especially CPU and GPU can be tricky.
Builders with no depth knowledge and experience can sometimes choose improper CPU or GPU, picking one of them to be much more powerful than another thus not using it to its full potential because another component cannot handle stuff at the same speed. In order to not be trumped by this kind of stuff, there is a website that is completely free and you do not even need to be registered in order to use it.
Bottlenet calculator link here
What is even better, once you input your components you will get advice on what to change in order to tweak the system a little more to avoid bottlenecks even more. It is a very useful tool and we are advising you to use it in order to save money but not throwing it on some component that will be half used.
The new upgraded Surface Laptop Go 2 is the new iteration of the affordable original Surface Laptop Go aimed to offer good performance at a lower price of under $1000. The new version is not anything vastly different from the original but it comes with much-needed upgrades.
The biggest and main upgrade is the CPU, the Surface Laptop Go 2 is packing now Intel Core i5 1135G7, an Intels 11th generation CPU that should increase battery life. The laptop is also coming with an improved WEB camera and the cheapest one comes now with 128GB of storage instead of 64GB. Price went up from $550 to $599 which is not a big increase considering what was upgraded.
The bad news of new models is that sadly they are still packing only 4GB of RAM, that's really not enough for most applications released in 2022 and the screen is having a relatively low resolution of 1536 X 1024.
Microsoft is still offering all the color variations as in its first offering but added as well a new Sage color that is muted green in tint.
When we look at hardware it seems a little weak but for this price, there is not much competition in the field, and after all this line of models is aimed to provide good performance for an affordable price. If you really need something better you will go with a standard Surface or MAC book instead.
The new laptops are available to pre-order at Best Buy and Microsoft’s online store, and they’ll start shipping on June 7.
We have all experienced Windows errors over time and that can range from simple ones that will do very little to no harm and can be even system breaking making us lose our work or completely making the PC unusable. No one likes them but they happen, and usually, they happen once we least expect them.
No matter how frequent and unpleasant they might be there are ways to keep them at the minimum and even avoid them.
We will discuss steps that you can take in order to do this, simple tips and guides on how to keep your computer in top form and eliminate not just Windows, but any kind of errors altogether.
Keep your hardware clean
Believe it or not, some serious Windows errors like the dreaded blue screen of death can come from hardware issues not from the software at all. It is very important to keep your computer clean and with enough air flow so it can function properly.
Keeping applications on the drive might seem harmless but sadly that is not the case. Some applications have a certain impact on the system itself after all most of them are tweaking registry entries in Windows and sometimes having too many applications means an increased possibility of conflict over certain resources even when they are not running.
Some applications like adobe creative suite, for example, will have certain services always running in the background, and more of these kinds of applications you have, more services, more places for unexpected errors when they collide. Some of them will also install certain dependencies that could be problematic.
The general idea is: if you are not using it, uninstall it and you will be safer and more resilient to errors inside OS.
Do not use pirated or cracked software
Besides moral and law implications that using pirated or cracked software might bring you there are also certain other things that might be problematic. Certain "free" software might come packet with some problematic malware, for example, it is not uncommon for attackers to use some popular software to pack their malicious application with it.
Other things might be wrong and incomplete tweaking with application in order to bypass security and thus bringing some instability due to scripts needed to run in order to achieve this goal.
Keep your drivers updated
Errors can also come from old drivers or bad drivers, device manufacturers are not all-knowing and perfect, and sometimes drivers can wreak havoc on the system. Having updated drivers can minimize any kind of unexpected behaviors inside the operating system making it more stable and reliable.
You can check your driver version in the control panel inside the Windows OS and then compare it to the ones found on the manufacturer's site, if there are newer available it is recommended to download and install them,
Keep software updated
Applications can have bugs, and bugs can lead to certain errors both in the system and when using the app as well. It is in your best interest to get the latest patch or newer version of the software in order to avoid these unpleasant experiences.
Also, certain codecs and extensions that are installed directly in Windows can also have some unpredictable behavior, updating is the best solution to keep them in line.
Keep Windows updated
Same as with drivers and applications, Windows itself is not immune from bugs and some unpredictable issues. Luckily Microsoft is always working on fixes and features of Windows but in order to actually have benefited from that work, you will need to keep Windows updated. Sometimes a bad update can introduce some errors but you can always roll back to the previous and wait for them to fix everything and then download them all.
Check the health of your hardware regularly
Hardware components have their life cycle, more quality ones tend to last longer but eventually, they will reach the end of their lifecycle. There are a lot of testers for various components in your computer that can check different things and provide you with information about the state of your components.
If you are on Windows 11, Microsoft has included a basic health app inside OS, just type PC health check in search and start the app. For some more detailed information and advanced checks, you will have to use a custom application. There are plenty of them specialized for single components like RAM, SSD, etc. A simple google search with providing you with top results and most of them are free for personal use.
Remember, a faulty component or component that is reaching its life cycle can produce many errors inside the operating system.
Recently, a number of Windows 10 users getting an error on their computers that state, “Windows can’t find one of the files in this theme”. According to the affected users, this error occurs at random times even when they didn’t make any changes to their computer’s theme prior to getting the error. If you are one of these users, read on as this post will help you resolve this problem.
If you click on the Yes button of the dialog box where the error is displayed, it won’t fix the problem as you will still get the same error from time to time. This kind of error could be caused by the executable file named “SettingSyncHost.exe”. It is possible that this executable file is unable to sync your theme all over your computer. On the other hand, it could also be due to some problems with the active theme. To resolve this issue, you can try to change the active theme, or disable the custom screensaver or disable theme syncing on your computer, as well as run a System File Checker or run the DISM tool. For more instructions, follow the options given below.
Option 1 – Try to change the active theme
The first thing you can do to fix the error is to change the active theme of your computer since the SettingSyncHost.exe file might not be able to properly sync the theme on the computer.
Go to Settings and click on Personalization.
Next, click on Themes and scroll down to apply a theme, and change the theme of the operating system.
After that, tap the Win + R keys to open the Run dialog box and type “%windir%ResourcesThemes” in the field, and then tap Enter to open the folder where the theme files are located.
Once you’re done, right-click and select delete for the active theme to remove the theme and its resources. This should fix the root cause of the problem. If not you can try to create a new Windows 10 theme and save it.
Option 2 – Try to disable the custom screensaver
The custom screensaver is a part of the mechanism of the lock screen. Although they were needed in the earlier Windows versions to prevent the discoloration of CRT monitor screens, they are no longer needed in the current version of Windows. Thus, you can try to disable it as it could be the one that’s causing the problem.
Click on the Start button and go to Settings > Personalization > Lock screen.
Here, scroll down and click on the Screen Saver settings.
After that, select the “Screen saver to (None)” option from the drop-down menu. This will disable the custom screensaver.
Option 3 – Try to disable theme syncing on your computer
You could also try to disable the theme sync feature to fix the problem. This has worked out for some users. To do so, follow these steps:
Click on the Start button and go to Settings > Account > Sync your settings.
From there, toggle off Themes in the individual sync settings column. This will disable the Theme syncing.
Restart your computer and see if the problem is now fixed.
Option 4 – Run the DISM tool
The next thing you can do is run the DISM tool. This tool is known to repair potentially corrupted files in your system as having them could also system issues like the “Windows can’t find one of the files in this theme” error. To repair these corrupted system files, you can run the DISM commands:
Tap the Win + X keys and click on the “Command Prompt (Admin)” option.
After that, input each one of the commands listed below sequentially to execute them:
Dism /Online /Cleanup-Image /CheckHealth
Dism /Online /Cleanup-Image /ScanHealth
Dism /Online /Cleanup-Image /RestoreHealth
Once you’ve executed the commands given above, restart your computer and check if the problem is now fixed.
Option 5 – Run the System File Checker
System File Checker or SFC is a built-in command utility that helps in restoring corrupted files as well as missing files. It replaces bad and corrupted system files to good system files that might be the cause why you’re getting the “Windows can’t find one of the files in this theme” error. To run the SFC command, follow the steps given below.
Type “cmd” in the Start search and then right-click on the appropriate search result.
Next, select “Run as administrator” to open Command Prompt with admin privileges.
After opening Command Prompt, type in sfc /scannow
The command will start a system scan which will take a few whiles before it finishes. Once it’s done, you could get the following results:
Windows Resource Protection did not find any integrity violations.
Windows Resource Protection found corrupt files and successfully repaired them.
Windows Resource Protection found corrupt files but was unable to fix some of them.
Now restart your computer and see if the problem is fixed or not.
Installing Windows Updates in your Windows 10 computer does not always go smoothly as there are instances when you could encounter some errors along the way. One of these errors is error code 0x80244022 –WU_E_PT_HTTP_STATUS_SERVICE_UNAVAIL HTTP 503. This kind of error can be encountered when you check, download or install any updates. At the time of writing, it isn’t known yet what the exact cause of this error is. However, there are some potential fixes you can check out to fix it.
When this error occurs, you will see the following error message on your screen:
“There were some problems installing updates, but we’ll try again later. If you keep seeing this and want to search the web or contact support for information, this may help: (0x80244022).”
To fix error code 0x80244022, refer to the potential fixes provided below.
Option 1 – Disable the Proxy server
The first thing you can do is to try disabling the Proxy server as it might be the reason why you’re getting error 0x80244022 for Windows Updates. To disable the proxy server, refer to the steps below.
Tap the Win + R keys to open the Run dialog box.
Then type “inetcpl.cpl” in the field and hit Enter to pull up the Internet Properties.
After that, go to the Connections tab and select the LAN settings.
From there. Uncheck the “Use a Proxy Server” option for your LAN and then make sure that the “Automatically detect settings” option is checked.
Now click the OK and the Apply buttons.
Restart your PC.
Note: If you are using a third-party proxy service, you have to disable it. In addition, if you are also using a VPN, you can try to disable it as well.
Option 2 – Run the DISM tool
You can run the DISM tool as well to help fix the error code 0x80244022 during Windows Update. Using this built-in tool, you have various options such as the “/ScanHealth”, “/CheckHealth”, and “/RestoreHealth”.
Open the Command Prompt with admin privileges.
Then type in the following commands and make sure to hit Enter right after you type each one of them:
Dism /Online /Cleanup-Image /CheckHealth
Dism /Online /Cleanup-Image /ScanHealth
exe /Online /Cleanup-image /Restorehealth
Do not close the window if the process takes a while as it will probably take a few minutes to finish.
Option 3 – Perform a System File Checker scan
The SFC or System File Checker scan could detect and automatically repair damaged system files that could be causing error code 0x80244022 to appear when you try to update your Windows 10 computer. SFC is a built-in command utility that helps in restoring corrupted files as well as missing files. It replaces bad and corrupted system files with good system files. To run the SFC command, follow the steps given below.
Tap Win + R to launch Run.
Type in cmd in the field and tap Enter.
After opening Command Prompt, type in sfc /scannow and hit Enter.
The command will start a system scan which will take a few whiles before it finishes. Once it’s done, you could get the following results:
Windows Resource Protection did not find any integrity violations.
Windows Resource Protection found corrupt files and successfully repaired them.
Windows Resource Protection found corrupt files but was unable to fix some of them.
Once done, restart your computer.
Option 4 – Try disabling the Firewall or antivirus program
Disabling the antivirus program or Firewall or any other security software installed in your computer is always a good idea you can try when the Windows Update process does not go smoothly. So before you try updating your computer again, make sure to disable the antivirus or security program and once the Windows Update is done, don’t forget to enable the antivirus program back again.
Option 5 – Try resetting the Windows Update components
Open Command Prompt with admin privileges.
After that, type each one of the following commands and hit Enter after you key in one after the other.
net stop wuauserv
net stop cryptsvc
net stop bits
net stop msiserver
Note: The commands you entered will stop the Windows Update components such as Windows Update service, Cryptographic services, BITS, and MSI Installer.
After disabling WU components, you need to rename both the SoftwareDistribution and Catroot2 folders. To do that, type each one of the following commands below, and don’t forget to hit Enter after you type one command after the other.
Next, restart the services you’ve stopped by entering another series of commands. Don’t forget to hit Enter after you key in one command after the other.
net start wuauserv
net start cryptsvc
net start bits
net start msiserver
Close Command Prompt and reboot your PC.
Option 6 – Run the Windows Update Troubleshooter
You might also want to run the Windows Update Troubleshooter as it could also help in fixing Windows Update Error. To run it, go to Settings and then select Troubleshoot from the options. From there, click on Windows Update and then click the “Run the troubleshooter” button. After that, follow the next on-screen instructions and you should be good to go.
We’ve already covered disabling Security Questions If you want to disable Security Questions on your Windows 10 computer then you’ve come to the right place as this post will guide you in doing exactly that. In this post, you will be disabling Security Questions using a PowerShell script. This PowerShell script is called “Update-AllUsersQA”. It is designed to remove or disable the security questions and answers for local users on a Windows 10 computer. It lets administrators take control of the security questions in the environment and at the same time minimizes the risk that comes with them.
If a user has a Microsoft account that’s configured to sign in to Windows 10 then he will not probably notice the Password Recovery questions. On the other hand, if he has a chosen local account for installing Windows, he will e prompted to create three security questions that can be used to reset the password and log into the Windows 10 account in case there is any misfortune. However, if you do not have much use for these Security Questions, then you can definitely have them disabled using a simple PowerShell script which you can download from GitHub.
For more details on how to disable security questions in a Windows 10 machine, refer to the steps provided below.
Step 1: You need to first download the .ps1 file from the GitHub repository.
Step 2: Once you’ve downloaded the file, open the PowerShell window with admin privileges.
Step 3: After that, navigate to the folder where you had saved the .ps1 file. Then copy the address of the folder location.
Step 4: Next, change the directory by using the following command:
cd "folder location address"
Step 5: After that, enter the following script to disable the security questions:
Update-AllUsersQA
Once you’ve completed the steps above, the Security Questions should be disabled and you will be notified with a message stating that the feature has been disabled. On the other hand, if you have a change of heart and you want to enable the Security Questions back, here are some steps you need to take:
Step 1: First, open the PowerShell window as admin.
Step 2: Next, run the same script with one more parameter such as:
Update-AllUsersQA -answer SecretAnswer
Step 3: And that’s about it. Do not forget to replace the Secret Answer with your preferred one and once you’re done, it will be set as the answer for all the Security Questions.
Step 4: Now all that’s left to do is go to the Settings app to change the answer to the questions and you should be good to go.
JavaScript is a computer programming language used to make a website work smoothly with the internet. It helps to display visual effects, animations, and other web page functions.
You may come across the JavaScript Void (0) error message when there is a problem in loading JavaScript from a web page or the internet browser.
Error Causes
JavaScript Void (0) error is triggered by multiple reasons such as:
It can be due to a simple random Windows application glitch.
You are visiting an unsafe website that contains malware
JavaScript’s web browser implementation is broken due to poor program installation
Active X controls, Java applets, and active scripting, the key components of JavaScript are disabled
Registry issues like invalid or misconfigured registry keys
Further Information and Manual Repair
For JavaScript Void (0) error-free web surfing, it is advisable to repair the issue without any delays. Let’s take a look at different methods to resolve this error on your system.
Cause: Simple Random Glitch
Solution: If the cause for the JavaScript Void 0 error is a simple glitch, then it is advisable to restart your system and then run the program again.
Cause: JavaScript’s web browser implementation is broken
Solution: If you experience the JavaScript Void 0 error message after the installation of the new browser on your system, then poor installation of the program or program conflict is most likely to be the deep-rooted cause of this error code. To resolve it, uninstall the program and undo the recent changes.
Cause: Active X controls, Java applets, and active scripting, the key components of JavaScript are disabled
Solution: You should know that components including Active X controls, Java applets, and active scripting are all essential to JavaScript in order to make your browsers run properly. If these are disabled, you may come across the JavaScript Void (0).
To fix it open your browser and select the Tools tab. Then click the options button and select content. Here check the ‘enable JavaScript’ check box and click Ok to enable these components.
Cause: Registry Issues
Solution: If after performing all the solutions discussed above, you still come across JavaScript Void (0) error code, then you should know that the problem is bigger than what you expected. It triggers registry issues.
Either the cause of the error is misconfigured or invalid registry keys. To reconfigure the registry keys setting may be a challenging task and complex if you are not a computer programmer.
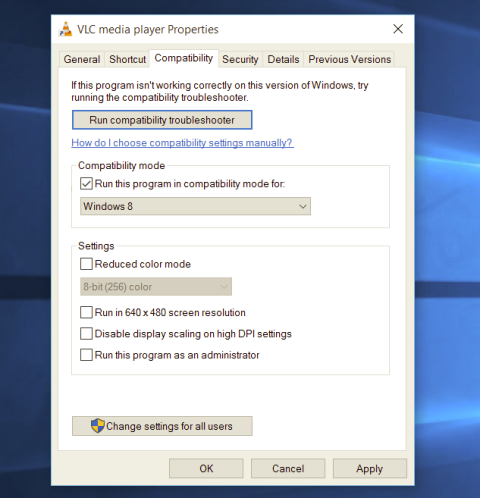
Each time you open an application inside your Windows 11 operating system, it is opened with standard privileges. Now, please note that your account privileges and application privileges are two different things, you might be the administrator of the system but when you open the app, it still opens with standard privilege.
Most of the time running applications with typical settings is fine but from time to time we might have some applications that will require running with administrator privilege in order to work properly. In this case, it is very easy to do it, you just right-click and choose run as administrator.
Although a very easy solution, it can be quite annoying if running the app is on a daily basis or even more times per day. If this is the case then right-clicking and choosing to run as administrator can be a daunting task, sometimes you can even forget to run it like this in heat of work and some unforeseen consequences might occur.
Luckily there is an easy hack so you can open the chosen application each time as an administrator with a simple double click each time.
Setting application to run as administrator always
Locate application executable file
Right-click on in and choose properties
Click on the Compatibility tab
Check the box next to Run this Program as an Administrator
Click on Apply
Click on OK
From now on each time you open an application normally with a double click, it will be opened as administrator privileges.
Keeping your system updated is a must and Windows updates are definitely a great way to do that. These updates are essential since they provide important security and various fixes for bugs in your Windows 10 computer. However, there are plenty of instances when you encounter issues with Windows Updates and one of them is when the Windows Updates turn off automatically at random times.
Some users reported that they saw a notification about Windows Updates being turned off. Note that the issue is not with the update itself since many users turned on the Windows Update and the system was properly updated. The issue is that the Windows Updates turned off all by itself.
There could be several reasons why the Windows Updates turned off by themselves. It could be due to the antivirus program installed on your computer. Antivirus programs are known to cause issues with other programs, Windows updates components included. This can occur due to false positives as well as odd compatibility issues. Aside from antivirus programs, the Windows Update service itself could also be the root cause of the problem. There could be a corrupted file in the Windows Update folder or it could be that the Windows Update service wasn’t started properly. Any of these issues can be resolved by following the troubleshooting options given below. Make sure to follow each one of them carefully for better results.
Option 1 – Try to disable your antivirus program
Disabling the antivirus program or any security software installed in your computer is always a good idea you can try when the Windows Update process does not go smoothly. So before you try updating your computer again, make sure to disable the antivirus or security program and once the Windows Update is done, don’t forget to enable the antivirus program back again.
Option 2 – Try to make some changes in the Registry
Tap the Wins key once and type in “command prompt” in the field.
From the search results, right-click on Command Prompt and select the “Run as administrator” option to run it with admin privileges.
After that, type the following command and hit Enter again:
sc config wuauserv start= auto
The command you entered will set the Windows Update to auto so you should be good to go.
Option 3 – Try to reset the Windows Update components
If by any chance that the second option didn’t work, resetting the Windows Update components could also help you resolve the problem. How? Refer to the following steps:
Open Command Prompt with admin privileges.
After that, type each one of the following commands and hit Enter after you key in one after the other.
net stop wuauserv
net stop cryptsvc
net stop bits
net stop msiserver
Note: The commands you entered will stop the Windows Update components such as Windows Update service, Cryptographic services, BITS, and MSI Installer.
After disabling WU components, you need to rename both the SoftwareDistribution and Catroot2 folders. To do that, type each one of the following commands below, and don’t forget to hit Enter after you type one command after the other.
Next, restart the services you’ve stopped by entering another series of commands. Don’t forget to hit Enter after you key in one command after the other.
net start wuauserv
net start cryptsvc
net start bits
net start msiserver
Close Command Prompt and reboot your PC.
Option 4 – Run the Windows Update Troubleshooter
Running the built-in Windows Update troubleshooter is one of the things you can first check out as it is known to automatically resolve any Windows Update errors. To run it, go to Settings and then select Troubleshoot from the options. From there, click on Windows Update and then click the “Run the troubleshooter” button. After that, follow the next on-screen instructions and you should be good to go.


 Builders with no depth knowledge and experience can sometimes choose improper CPU or GPU, picking one of them to be much more powerful than another thus not using it to its full potential because another component cannot handle stuff at the same speed. In order to not be trumped by this kind of stuff, there is a website that is completely free and you do not even need to be registered in order to use it.


 Most of the time running applications with typical settings is fine but from time to time we might have some applications that will require running with administrator privilege in order to work properly. In this case, it is very easy to do it, you just right-click and choose run as administrator.
Although a very easy solution, it can be quite annoying if running the app is on a daily basis or even more times per day. If this is the case then right-clicking and choosing to run as administrator can be a daunting task, sometimes you can even forget to run it like this in heat of work and some unforeseen consequences might occur.
Luckily there is an easy hack so you can open the chosen application each time as an administrator with a simple double click each time.
Most of the time running applications with typical settings is fine but from time to time we might have some applications that will require running with administrator privilege in order to work properly. In this case, it is very easy to do it, you just right-click and choose run as administrator.
Although a very easy solution, it can be quite annoying if running the app is on a daily basis or even more times per day. If this is the case then right-clicking and choosing to run as administrator can be a daunting task, sometimes you can even forget to run it like this in heat of work and some unforeseen consequences might occur.
Luckily there is an easy hack so you can open the chosen application each time as an administrator with a simple double click each time.