If by any chance you are working on a touchscreen PC, tablet, or any similar device and have no access to a hardware keyboard there is a way to place Touch Keyboard on your screen for easy typing, and you can enable icon on the taskbar for easy access.
Enabling the Touch Keyboard
Right-click on the Taskbar
Select Taskbar Settings
Go to Personalization > Taskbar
Click on Taskbar Corner Icons to expand it
Click on the switch next to Touch Keyboard to turn it ON
Close settings
The icon will immediately appear on the Taskbar in the lower right corner. Clicking the icon virtual keyboard will appear on the lower part of the screen.
You can use this keyboard to type in applications the same as you were typing on hardware one.
By taping on X in the upper right corner, you will hide the keyboard. Tap on the icon in Taskbar to bring it up again.
Hide the Taskbar icon
If you do not want to use Touch Keyboard anymore you can easily hide the icon:
Right-click on the Taskbar
Select Taskbar Settings
Go to Personalization > Taskbar
Click on Taskbar Corner Icons to expand it
Click on the switch next to Touch Keyboard to turn it OFF
0x80004001 is an error code that Windows users encounter quite commonly.
This error usually occurs when users try to update an old Windows application or attempt to run a certain application. When this error appears on the screen, the system automatically restarts to stop further processing. The error results in a blue screen after the system boots.
This blue screen is known as the Blue Screen of Death.
Error Causes
There are different files in the Windows operating system responsible for its smooth functioning. Sometimes problems like viruses or incorrect register entries corrupt or damage these files. This is when this 0x80004001 error appears.
Simply put, some of the most common causes that trigger 0x80004001 error are listed below as follows.
Irrespective of what causes this error, it is of utmost importance to troubleshoot it as soon as possible.
Further Information and Manual Repair
While there are several ways of troubleshooting this error, the two most useful approaches have been listed below as follows.
This solution is for advanced users. Start your system and log on to it as the administrator. Click on the Start button. Now select All Programs->Accessories->System Tools. Finally, click on System Restore. In a new window, select the option “Restore My Computer to an Earlier Time”. Now click on Next. A list of restore points will be displayed. Choose the most recent restore point from this list and click “Next”. Now click next on the confirmation Window again. Once the restoration is finished, the computer will restart itself and you will observe that the error no longer appears.
This solution is for beginner or novice users. Download a 0x80004001 error repair utility available online. Install this program on your computer and use it to scan for the error in your system. When the scan completes, find if any feature allows you to fix errors. If yes, click on it. Now restart your computer again. You will notice that the virus has disappeared. It is a good idea to use error repair utilities because they scan the system, diagnose the error and then perform the repair.
Use any of the methods listed above to get rid of the 0x80004001 error once and for all.
FullTab is a Browser Extension for Google Chrome, Firefox, and Internet Explorer. When installed this extension hijacks your home page, and changes your default search engine to http://search.fulltabsearch.com. This extension usually comes bundled with other freeware software, and while installed it monitors your internet browsing activity, visited links, clicked pages, and other private information that it later uses to distribute targeted unwanted ads in your search results.
While this extension is installed, you will see modified search results, injected ads, sponsored links, web page redirects, and sometimes even pop-up ads.
Several anti-virus scanners have detected this extension as a Browser Hijacker, and due to the information it is gathering from your computer it is not recommended to keep.
About Browser Hijackers
Browser hijackers (sometimes called hijackware) are a kind of malicious software that modifies web browser configuration settings without the user’s knowledge or consent. These hijacks appear to be increasing at an alarming rate globally, and they can be truly nefarious and sometimes harmful too. Browser hijackers are capable of doing more than just changing home pages. Usually, browser hijacking is utilized for earning advertising revenue that comes from forced ad clicks and website visits. Most people believe that such websites are legitimate and harmless but that is not the case. Almost every browser hijacker poses an actual threat to your online safety and it is necessary to categorize them under privacy risks. Browser hijackers can also let other vicious programs without your knowledge further damage your personal computer.
Browser hijacking signs and symptoms
There are numerous signs that indicate the web browser is hijacked:
1. your browser’s home page is suddenly different2. you find redirected to internet sites you never meant to visit3. the default web browser settings are modified and/or your default web engine is altered4. you find unsolicited new toolbars added5. unstoppable flurries of pop-up advertisements appear on your personal computer screen6. webpages load slowly and sometimes incomplete7. you can’t navigate to specific web pages, like computer security software-related sites.
Precisely how browser hijacker infects computers
There are many ways your PC can get infected with a browser hijacker. They usually arrive through spam e-mail, via file-sharing networks, or by a drive-by download. They are usually included with toolbars, BHO, add-ons, plug-ins, or browser extensions. Browser hijackers sneak to your pc in addition to free software application downloads also that you unintentionally install along with the original. Examples of popular browser hijackers include Fireball, GoSave, Ask Toolbar, CoolWebSearch, RocketTab, and Babylon Toolbar.
The presence of any browser hijacker on your system can considerably diminish the web browsing experience, record your internet activities that lead to troublesome privacy concerns, diminish overall computer performance and cause application instability as well.
Removal
Some browser hijacking can be quite easily corrected by identifying and removing the corresponding malware software through your control panel. However, most hijackers are very tenacious and require specialized tools to remove them. And there’s no denying the very fact that the manual fixes and removal methods can certainly be a difficult job for a rookie PC user. Additionally, there are many risks associated with tinkering around with the pc registry files.
Virus Blocking Access To Safebytes Website And Anti-Malware Downloads - What You Should Do?
All malware is inherently dangerous, but certain types of malicious software do much more damage to your computer than others. Some malware is meant to interfere with or block things that you’d like to do on your computer. It may not allow you to download anything from the net or prevent you from accessing a few or all sites, especially antivirus websites. If you are reading this article now, you have probably recognized that a malware infection is a reason behind your blocked internet traffic. So how to proceed if you want to install an antivirus program such as Safebytes? There are some actions you can take to get around this problem.
Start Windows in Safe Mode
Safe Mode is actually a special, basic version of Microsoft Windows where just minimal services are loaded to counteract viruses and other troublesome programs from loading. If the malware is blocking the internet connection and affecting your PC, running it in Safe Mode will let you download anti-malware and run a scan while limiting possible damage. In order to enter into Safe Mode or Safe Mode with Networking, press F8 while the computer is booting up or run MSCONFIG and look for the “Safe Boot” options under the “Boot” tab. After you restart into Safe Mode with Networking, you can download, install, as well as update the anti-malware program from there. Right after installation, run the malware scanner to eliminate most standard infections.
Utilize an alternate internet browser to download an antivirus program
Malicious program code could exploit vulnerabilities on a specific web browser and block access to all anti-virus software websites. If you appear to have a virus attached to Internet Explorer, then switch over to a different browser with built-in safety features, such as Firefox or Chrome, to download your preferred antivirus program – Safebytes.
Make a bootable USB anti-virus drive
Another solution is to store and run an antivirus program completely from a Thumb drive. Do these simple measures to clean up your affected computer using portable anti-malware.
1) On a virus-free computer, download and install Safebytes Anti-Malware.2) Put the pen drive into the uninfected PC.3) Double-click on the downloaded file to run the installation wizard.4) When asked, select the location of the pen drive as the place where you would like to store the software files. Do as instructed on the screen to finish up the installation process.5) Now, insert the USB drive into the corrupted PC.6) Run the Safebytes Anti-malware directly from the pen drive by double-clicking the icon.7) Hit the “Scan Now” button to start the virus scan.
Ensure the Safety of Your PC by Using SafeBytes Anti-Malware Software
Do you want to install the best anti-malware application for your laptop? There are many applications available in the market that comes in free and paid versions for Windows systems. Some of them are great, some are decent, and some will affect your PC themselves! You need to go with a tool that has obtained a good reputation and detects not only computer viruses but other types of malware too. While thinking about trustworthy applications, Safebytes Anti-Malware is certainly the highly recommended one.
SafeBytes anti-malware is a powerful, very effective protection application designed to assist users of all levels of IT literacy in finding and removing malicious threats from their personal computers. After you have installed this program, SafeBytes sophisticated protection system will make sure that absolutely no viruses or malicious software can seep through your computer.
SafeBytes has outstanding features when compared to various other anti-malware programs. A few of them are given as below:
Real-time Threat Response:SafeBytes provides round-the-clock protection for your personal computer restricting malware intrusions instantly. They’re extremely effective in screening and eliminating different threats because they’re regularly improved with new updates and safety measures.
World-class AntiMalware Protection: With its advanced and sophisticated algorithm, this malware removal tool can detect and get rid of the malware threats hiding within your PC effectively.
Quick Multithreaded Scanning: SafeBytes’s high-speed malware scanning engine cuts down scanning times and extends battery life. Simultaneously, it will effectively detect and eliminate infected computer files or any internet threat.
Web Security:Through its unique safety rating, SafeBytes alerts you whether a site is safe or not to access it. This will make sure that you’re always certain of your safety when browsing the world wide web.
Lightweight: This tool is not “heavy” on the computer’s resources, so you’ll not see any overall performance difficulties when SafeBytes is operating in the background.
24/7 Live Professional Support: You can obtain high levels of support round the clock if you’re using their paid software.
Technical Details and Manual Removal (Advanced Users)
To eliminate FullTab manually, navigate to the Add/Remove programs list in the Windows Control Panel and select the program you want to get rid of. For internet browser extensions, go to your web browser’s Addon/Extension manager and select the add-on you want to disable or remove. You’ll probably also want to reset your browser.
To ensure the complete removal, find the following Windows registry entries on your system and remove them or reset the values accordingly. However, this is a challenging task and only computer professionals could carry it out safely. Moreover, certain malware keeps replicating which makes it difficult to eliminate. You are advised to do this process in Safe Mode.
Still sitting on the fence about upgrading to Windows 11 because you don’t know what to expect? Interestingly, the new edition somehow manages to be both a total revamp and still very similar to its predecessor in many ways. It’s really something to experience for yourself.
We do want to give you a sneak peek, though. So here’s an overview of the biggest changes Windows 11 brings to the table.
What’s different in Windows 11?
1. Visual changes
The first thing anyone will notice after switching to Windows 11 is the striking visual difference. The entire interface is smoother, cleaner and more minimalistic than on Windows 10, even resembling the macOS in some instances. Perhaps the most obvious change in appearance is the Start menu and Taskbar location, which is now at the bottom center. It’s actually very neat, but if you’re someone who loves familiarity, don’t worry, you can move it back to the left.
Centralized Taskbar and Start menu
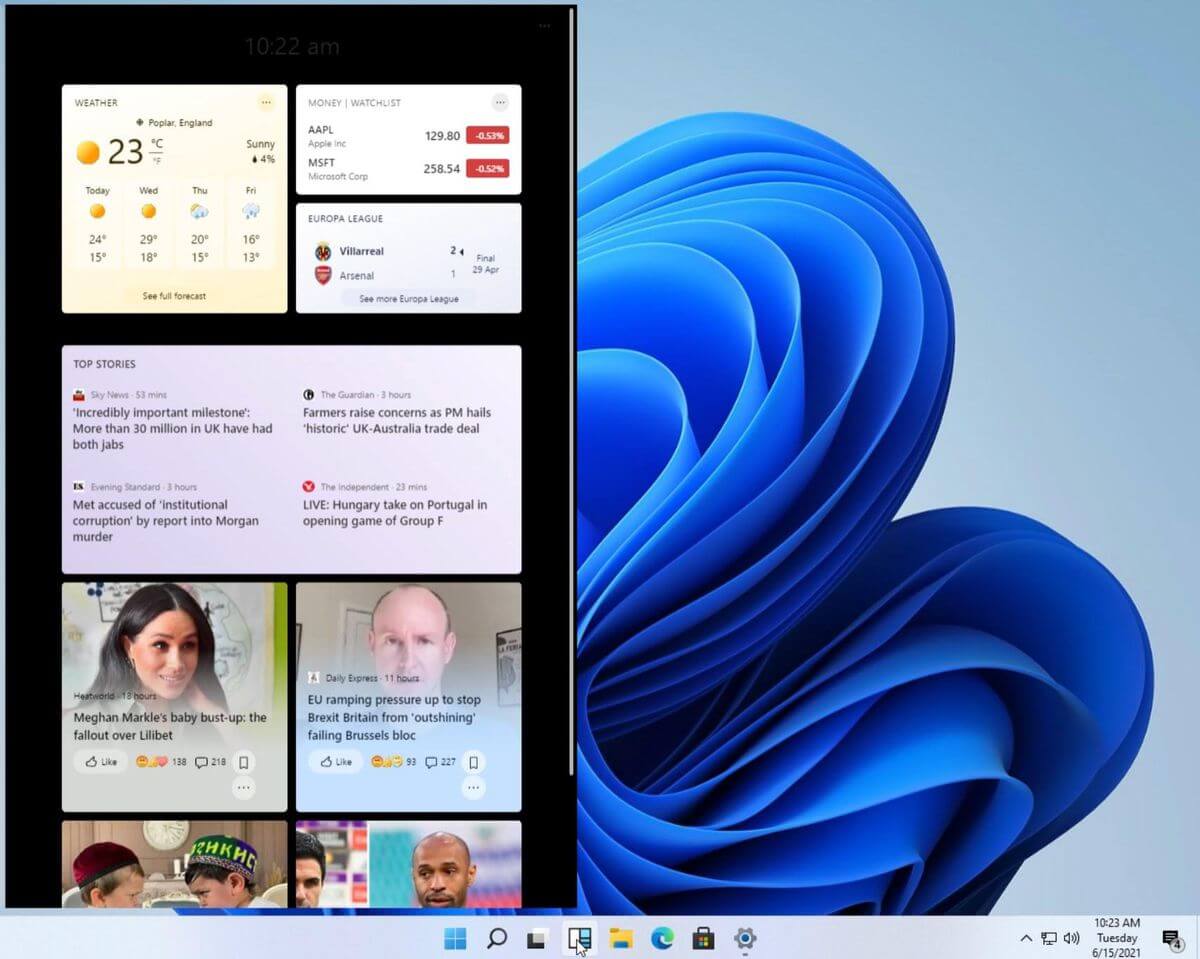
Moreover, you’ll notice that the Taskbar includes a Microsoft Teams icon by default (which you can, of course, remove) and that Live Tiles are gone. The News and Interests section has also been removed - or, shall we say, replaced. As opposed to Windows 10, news, weather forecasts and other information are now displayed as widgets.
To add to the cleanliness of the UI, Microsoft also enhanced the ‘Snap Layouts’ feature to help you better organize your windows and maximize screen real estate. It’s similar to app grouping on your smartphone. In Windows 10 this feature is slightly restricted, as it requires some manual resizing and dragging. In Windows 11, you can just hover over the minimize/maximize option on a window, select a layout and throw the windows in there.
Snap Layouts
2. New accessibility features
Microsoft has certainly paid attention to accessibility with Windows 10, but Windows 11 takes this to a whole new level.
One of the ways Windows 11 has taken things up a notch is by adding the long-awaited ‘Live Captions’ feature and advanced Narrator options.
Live Captions apply both to media played on your PC as well as your own speech when you’re using the microphone. Keep in mind that, as with almost all kinds of subtitles, you have to be prepared for a potential delay. However, it’s barely noticeable and doesn’t take away from the usefulness of this awesome new feature whatsoever.
As for the Narrator, there are three new voice packs to choose from. Microsoft has tried to put emphasis on a more natural voice than we are used to. So, now you can choose between Aria, Jenny and Guy, who will read pretty much anything off your screen out loud. Aside from this, Microsoft has also expanded the list of braille displays supported by the Narrator feature. For users with anxiety or trouble concentrating, a welcomed addition is the Focus app, which is no longer part of the Clock app. It’s now separate and called ‘Focus Sessions’, automatically triggering the Do Not Disturb mode when activated. It blocks all pop-ups and flashes and lets you work in peace until you’re ready to switch it off.
3. Android apps
Android users may rejoice! Windows 11 supports the use of your favorite applications now.
Microsoft has done this by integrating the Amazon Appstore to the Windows 11 Microsoft Store. From there, you can download your favorite Android apps and use them on your PC in a smartphone-like window.
Unfortunately not too many apps are supported at this time, but Microsoft is working on making the emulation possible for many more. Also, the option is only available in specific regions at this moment - check out if you’re one of the lucky ones.
4. Improved gaming performance
Avid gamers will be happy to hear that Microsoft has put some effort into streamlining Windows 11 for their gaming needs.
To give gamers a supreme visual experience, Windows 11 offers the ‘Auto HDR’ feature. As long as your monitor is HDR-compatible, this feature will automatically adjust the colors, brightness and contrast of games without any input from you.
Another update is DirectStorage, which we were introduced to in Windows 10 already. In Windows 11, it’s been improved to tweak loading times and overall gaming performance efficiency even better. The predisposition for it to work optimally is that your device has an NVMe SSD.
The Xbox Game Bar also helps gamers towards a smoother experience. It allows in-game screenshots, viewing processes that are running (similar to the Task Manager), monitoring the CPU and GPU performance and frame rate, integrating the Xbox App and more. There’s also a number of widgets you can now use with the Game Bar, for example the Spotify widget.
Xbox Game Bar
Another cool addition is the Xbox Game Pass, which unlocks hundreds of games to play on your Xbox App, with new additions coming in every month.
5. Smart App Control
Aside from a sleek new look and better accessibility for all users, Windows 11 also comes with a security power-up. Bear in mind that this feature is only available on clean Windows 11 installs.
Smart App Control (SAC) is an AI-powered new feature designed to protect your PC from potential threats. It blocks untrustworthy apps and adware and helps detect potentially unwanted apps, maintaining your PC’s performance and keeping your system safe.
It comes with an ‘Evaluation’ mode, which you should definitely select when running SAC for the first time. That way, the app monitors your usage and assesses whether you’re a candidate for SAC. Some users need it to be on all the time, for others it might be too distracting. Evaluation mode will turn SAC on or off based on your usage.
Don’t disable SAC again unless you’re absolutely sure you don’t need it, since reenabling it will require a fresh install. We recommend you don’t turn it off, as it is a neat feature protecting your data and files from malware at all times.
Summary
Have we piqued your interest in trying Microsoft’s latest OS? It’s a pretty exciting new iteration, but we’ll let you find out for yourself. We hope you like it!
Error Code 0x80070017 is an error code that is most often associated with Windows 10 installations, although it has also been encountered by users on previous versions of the Windows operating systems. It is usually encountered as users attempt to install a new version of the software on their machine.
Common symptoms include:
A vague error message regarding the inability of the system to copy over the necessary files pops up as users attempt to install a new version of the Windows operating system on their computer
While it can be hard to tell what the exact cause of Error Code 0x80070017 is on your specific device, the good news is that there are two primary methods that can be used to fix the problem and to allow you to proceed with your installation. These two methods do require some degree of technical knowledge and/or skill, so if you don’t feel like you have the ability to undertake them on your own, be sure to get in touch with a trusted computer repair professional to assist you.
Solution
Error Causes
The most basic cause of Error Code 0x80070017 is that some of the files that are needed by the system to complete the installation are either not being found by the computer or are believed to be corrupted by the system. When this happens, security features within the software prevent it from completing the installation process, so as to avoid damage to the computer.
Error Code 0x80070017 can be disruptive to your installation process, but there are two basic methods that can be employed to resolve it.
Further Information and Manual Repair
While it can be frustrating to encounter Error Code 0x80070017 on your Windows machine, there are two methods that can be used to try to resolve the problem. One of these methods is extremely simple, even for the most basic users, while the second method takes a little bit more skill and technical knowledge. If you aren’t able to complete these methods on your own, be sure to get in touch with a qualified computer repair technician that can assist you.
Here are the best ways to attempt to resolve Error Code 0x80070017 on your device:
Method One: Clean Your Physical Disk
If you purchased a physical disk version of the installation files for your Windows operating system, remove the disk from your drive and clean it using a microfiber or other lint-free cleaning cloth. As you wipe down the disk, do not use any chemicals, and be sure to wipe gently from the center towards the outside edge rather than the other direction, as failure to do so can damage the disk irreparably.
In some cases, you may need to contact Windows support if you believe that there is an error on the disk itself, such as a scratch, that would prevent the disk from being used as needed in the installation process. They may be able to offer you a replacement disk or you may be able to download a digital copy of the version that you are attempting to install on your machine.
Method Two: Use the Chkdsk Utility
To determine if there may be an error within the disk drive itself, place the installation disk into the drive and restart the system. Go through the prompts until you see the option to “repair your computer.” Choose the operating system that you are using, go into the menu for System Recovery, and type in the words “Chkdsk/r” to begin to use the tool.
Whenever you run a tool like Chkdsk on your computer, it is important to restart your machine afterward to ensure that any changes that have been made are able to be fully applied and accepted by the operating system that you are running.
Method Three: Use An Automated Tool
If you wish to always have at your disposal a utility tool to fix these Windows 10 and other related issues when they do arise, download and install a powerful automated tool.
Diablo has changed how action RPG games are made and has placed homework for many developers. Diablo 3 is 3rd continuation in the series and to the joy of many players worldwide it has brought some interesting things in the genre like teaming up with other friends to slay demon hordes together introducing much needed multiplayer element. Sadly sometimes we get the error that Diablo 3 can not connect or that the connection to the game server has been lost.
Keep reading and try provided solutions as they are presented to fix this issue and continue gaming.
100sOfRecepies is a Browser Extension developed by MindSpark Inc. that provides users with hundreds of recopies for breakfast, lunch, dinner, and dessert. This extension may appear very handy at the start, however, it may monitor your browser activity, and send it back to the developer to better serve ads. This extension injects itself into the System Registry allowing it to run each time your computer is restarted.
While browsing the internet with this extension installed you may see additional ads, sponsored links, and pop-up ads displayed in your browser.
Many anti-virus scanners have detected this extension as a Browser Hijacker and are therefore not recommended to keep on your computer.
About Browser Hijackers
Browser hijacking is actually a form of an unwanted program, often a web browser add-on or extension, which causes modifications in browser settings. They are made to disrupt web browser programs for various reasons. Usually, it’ll force users to predetermined sites which are aiming to increase their advertisement income. Nevertheless, it’s not that harmless. Your internet safety is compromised and it is also very annoying. In a much worst case, your browser could be hi-jacked to download malware that may do a great deal of damage to your laptop or computer.
Major symptoms that your web browser has been highjacked
The typical symptoms that indicate having this malware on your computer are:
1. the browser’s home page is changed2. bookmark and the new tab are also modified3. the default search engine is changed and the browser security settings have been lowered without your knowledge4. find new toolbars which you did not add5. unstoppable flurries of pop-up ads show up on your personal computer screen6. your web browser gets slow, buggy crashes often7. Inability to navigate to certain websites, particularly anti-malware and also other security software webpages.
How does a browser hijacker infect a computer?
There are several ways your computer can become infected with a browser hijacker. They generally arrive by way of spam e-mail, via file sharing websites, or by a drive-by-download. They could also come from add-on software, also known as browser helper objects (BHO), web browser plug-ins, or toolbars. Some browser hijackers spread in user’s computer systems using a deceptive software distribution technique known as “bundling” (generally through freeware and shareware). An example of some well-known browser hijacker includes Babylon, Anyprotect, Conduit, DefaultTab, SweetPage, RocketTab, and Delta Search, but the names are continually changing.
Browser hijackers could record user keystrokes to gather potentially valuable information that leads to privacy issues, cause instability on computers, drastically disrupt the user experience, and eventually slow down the PC to a point where it will become unusable.
Browser Hijacker Malware – Removal
Some browser hijacking could be quite easily stopped by discovering and eliminating the corresponding malware program from your control panel. But, most hijackers are hard to get rid of manually. No matter how much you try to remove it, it can come back over and over. Moreover, browser hijackers could modify the Computer registry so that it could be very tough to restore all of the values manually, particularly when you are not a very tech-savvy person.
Can't Install Safebytes Anti-malware due to the presence of Malware? Try This!
All malware is bad, but certain kinds of malicious software do a lot more damage to your PC than others. Some malware sits in between your computer and the internet connection and blocks some or all sites which you want to check out. It would also block you from adding anything to your machine, especially anti-virus programs. So what to do when malicious software keeps you from downloading or installing Anti-Malware? Do as instructed below to eliminate malware through alternate ways.
Eliminate malware in Safe Mode
In the event the malware is set to load at Windows start-up, then booting in safe mode should avoid it. Just the minimum required applications and services are loaded when you boot your computer in Safe Mode. Listed below are the steps you need to follow to start your computer into the Safe Mode of your Windows XP, Vista, or 7 computers (go to Microsoft website for instructions on Windows 8 and 10 computers).
1) At power-on/startup, press the F8 key in 1-second intervals. This will invoke the “Advanced Boot Options” menu.2) Choose Safe Mode with Networking with arrow keys and hit Enter.3) When this mode loads, you should have an internet connection. Now, use your internet browser to download and install Safebytes.4) As soon as the software program is installed, allow the scan run to remove viruses and other threats automatically.
Switch over to an alternate web browser
Malicious program code could exploit vulnerabilities on a particular web browser and block access to all anti-virus software sites. The best way to overcome this problem is to choose a browser that is known for its security measures. Firefox contains built-in Malware and Phishing Protection to keep you secure online.
Install and run anti-malware from the Thumb drive
To effectively get rid of the malware, you might want to approach the issue of running an anti-virus program on the affected PC from a different perspective. Do these simple measures to clear up your infected computer by using a portable antivirus.
1) On a virus-free PC, download and install Safebytes Anti-Malware.2) Insert the pen drive on the same PC.3) Run the setup program by double-clicking the executable file of the downloaded software, with a .exe file format.4) When asked, select the location of the USB drive as the place where you want to put the software files. Follow the instructions on the screen to finish off the installation process.5) Now, transfer the USB drive to the infected computer system.6) Double-click the EXE file to open the Safebytes program right from the thumb drive.7) Simply click “Scan Now” to run a scan on the affected computer for viruses.
Protect Your Computer and Privacy With SafeBytes Anti-Malware
To help protect your computer or laptop from a variety of internet-based threats, it’s important to install an anti-malware application on your personal computer. However, with countless numbers of antimalware companies in the marketplace, nowadays it’s tough to decide which one you should buy for your laptop. Some of them are excellent, some are ok types, while some will affect your PC themselves! You need to be careful not to pick the wrong product, particularly if you purchase a premium application. Amongst few good applications, SafeBytes Anti-Malware is the strongly recommended software for security-conscious people.
Safebytes is one of the well-established computer solutions firms, which provide this complete anti-malware software program. Through its cutting-edge technology, this software protects your personal computer against infections caused by different types of malware and similar internet threats, including adware, spyware, trojans horses, worms, computer viruses, keyloggers, potentially unwanted programs (PUPs), and ransomware.
SafeBytes carries a plethora of wonderful features which can help you protect your computer from malware attack and damage. Here are some of the good ones:
Robust Anti-malware Protection: By using a critically acclaimed anti-malware engine, SafeBytes provides multi-layered protection which is made to catch and remove threats that are concealed deep in your PC.
Active Protection: SafeBytes offers complete and real-time security for your PC. It’ll check your PC for suspicious activity at all times and shields your PC from unauthorized access.
Website Filtering: Through its unique safety rating, SafeBytes informs you whether a website is safe or not to visit it. This will assure that you’re always certain of your safety when browsing the online world.
Lightweight Utility: SafeBytes is really a lightweight application. It consumes an extremely small amount of processing power as it runs in the background therefore you will not observe any computer performance issues.
24/7 Premium Support: Skilled technicians are at your disposal 24/7! They will immediately fix any technical issues you may be experiencing with your security software.
Technical Details and Manual Removal (Advanced Users)
If you’d like to carry out the removal of 100sOfRecepies manually rather than using an automated software tool, you may follow these simple steps: Navigate to the Windows Control Panel, click on the “Add or Remove Programs” and there, select the offending program to uninstall. In cases of suspicious versions of web browser extensions, you can easily remove them through your browser’s extension manager. You may also want to reset your web browser settings, as well as delete browsing history, temporary files, and internet cookies.
To ensure the complete removal, find the following Windows registry entries on your system and delete them or reset the values appropriately. Please keep in mind that only advanced users should try to manually edit the registry because incorrect file removal leads to a major problem or even a PC crash. In addition, certain malware is capable of replicating itself or preventing deletion. It is recommended that you carry out the removal procedure in Safe Mode.
Blizzard is one of the most beloved game company which brought some of the most and greatest titles in PC gaming. Blizzard has released its own launcher in which you can launch games, sadly sometimes launcher does not want to work and fails to connect.
If this happens to you be sure to:
Reset your network devices to make sure your router hasn't become flooded with data.
Power cycling your modem and router allows them to reset and re-establish a connection to your ISP. Follow these steps to completely power cycle the devices in your network connection:Note: If your modem has a battery backup, you will need to take the battery out or use the reset button on the modem.
Shut down all computers connected to the modem/router.
Power down and unplug the modem and the router if you're using one.
Allow to sit for 60 seconds unplugged.
Plug in and turn on the modem and router, and allow them to completely boot up until the front panel connection lights on the modem show a steady connection.
Start the computer and allow it to completely boot up.
If you're using a wireless connection, optimize your internet connection to rule out a connection issue.
If you're experiencing issues with your low-speed or wireless internet connection, follow the steps below to troubleshoot the problem.
Try plugging your computer directly into your modem.
Shut down other programs that access the internet, such as other games or download programs.
Satellite, mobile phone, and WiMax internet connections are not stable connections and may cause further connection issues when playing Blizzard games. If possible, consider switching to a more stable connection.
Update your drivers and operating system to resolve any compatibility issues.
Out-of-date drivers and operating systems can cause a variety of issues and are one of the first things to check when a game is having problems. The instructions below will help you check and update your drivers.
Even new computers can have out-of-date drivers and operating systems because updates are released routinely.
Some games and programs might run fine on a system with old drivers, but outdated drivers can still create technical issues with specific games or programs.
Check our supported video cards articles to make sure your hardware is compatible:
Refer to the steps below to update drivers and software for your operating system.
Release and renew your IP and flush your DNS to resolve any network conflicts.
While on the desktop, press Windows Key and type CMD.
Right-click Command Prompt and select Run as administrator.
Type ipconfig /release in the command prompt.
Wait a few seconds for a reply that the IP address has been released.
Type ipconfig /renew in the command prompt.
Wait a few seconds for a reply that the IP address has been re-established.
Type ipconfig /flushdns in the command prompt.
Close the command prompt and attempt to make a connection.
Close all other applications to resolve software conflicts and free up resources.
Before trying the steps below, close unnecessary programs and restart your computer.
Identify Problematic Startup Items
Press Ctrl+Shift+Esc to open the Task Manager.
Click More Details.
Select the Startup tab.
Right-click on each item and select Disable.
Restart the computer.
If this resolves the issue, enable the startup application one at a time to determine which one is causing the problem. You will need to restart between each application you enable.
Note: To re-enable startup applications, follow steps 1-4 and select Enable.
Delete the Battle.net Tools folder to automatically rebuild outdated or corrupt files.
Close Blizzard processes.
Press Ctrl + Shift + Esc to bring up the Task Manager.
Click the Processes tab.
Select all Agent, Blizzard Battle.net desktop app, and game processes, and click End Process.
Navigate to the folder containing the Battle.net directory:
Press Windows Key + R to open the Run dialogue.
Type C:\ProgramData\ into the Open field and press Enter.
Delete the Battle.net folder.
Run Battle.net and update the game to see if the issue persists.
If the error persists after you try these steps, another program may be causing the problem. Restart your computer and delete the Battle.net folder one more time.
Note: The above steps may cause the Blizzard Battle.net desktop app to forget game install locations. If your games can’t be found, you will see Install on the Blizzard Battle.net desktop app game tab instead of Play. To find your installation, click Locate this game or run the game launcher.
The speed at which the CPU runs varies depending on any Windows laptop or desktop. And in case you don’t know, the CPU does not run at full speed all the time as it depends on how the operating system distributes the load so it works accordingly. However, there are instances when it runs at full speed especially if your Windows 10 computer is on a heavy workload. But if you find that even when your computer is already on a heavy workload and the CPU is still not running at full speed, then you need to look into this situation. To verify that your CPU’s speed, you can use any CPU stress test tool.
This kind of issue is common on laptops compared to desktop computers since laptop runs on battery. The Intel Processor on laptops uses the Speed Stepping Technology which means that when you are doing some small tasks on your laptop, the processor’s speed is reduced. On the other hand, if this happens when you are using a heavy application, it can be due to a low charge on the laptop’s battery. Thus, Windows will try its best to keep the computer running for as long as possible by reducing the CPU speed or processor. But there are times when you are ready to sacrifice battery to make sure that the work gets done on time. To achieve that, here are some options you can check out.
Option 1 – Try setting the processor state to the maximum in Power Options
Type “control” in the search box to view the classic Control Panel as well as the popular options.
Next, click on Power Options > Change plan settings > Change advanced power settings.
Then navigate to Processor power management > Maximum processor state.
Now select 100% when it is on Battery and Plugged in.
After that, expand the System cooling policy option and make sure to set it as Active to make sure that the battery won’t overheat.
Finally, apply the changes made to all the profiles of the power management and restart your computer. This will ensure that your CPU will run at maximum power at all times.
Option 2 – Try to update or disable the Intel Power Management driver
The next option you can try is to update or disable the Intel Power Management driver. The Intel-powered computers have dedicated software that controls CPU speed and Fan speed when it needs to save battery. You can try disabling it temporarily and check if there are any changes with the CPU fan speed.
First, restart your computer by holding the Shift key to boot your computer into Troubleshooting or Advanced mode.
Next, go to Troubleshoot > Advanced Options > Command Prompt.
Then change the directory to C:/Windows/System32/driver and then rename the file named “Intelppm” by entering the “ren intelppm.sys intelppm.sys.bak”.
Now restart your computer.
Note: If you were not able to find the drivers in C:/Windows/System32/driver, check if they are available under C:/Drivers/IntelPPM. After that, the CPU speed should change now with the Intel driver missing from the system. And in case you want to enable it, simply follow the same steps given above and rename the file again.
Option 3 – Try disabling the IPPM using the Command Line or Registry Editor
Command Prompt:
Tap the Win + R keys to open the Run dialog box and type “cmd” and tap Enter to open Command Prompt.
Next, type this command and hit Enter: sc config intelppm start= disabled
The “sc config” command you entered modifies the value of a service’s entries in the registry as well as in the Service Control Manager database.
Registry Editor:
Tap the Win + R keys to open the Run dialog box and type “Regedit” in the field and hit Enter to open the Registry Editor.
Next, navigate to HKEY_LOCAL_MACHINESYSTEMCurrentControlSetServicesintelppm.
From there, double click on the intelppm and change the Start key value to
Now close the Registry Editor and reboot your computer.
Note: The steps given will make sure that the CPU will run at maximum power at all times.
Microsoft has presented its next version of their flagship product, Windows 11, and feelings are divided among users.
Some users like it very much and eager to upgrade, some do not like the graphic overhaul it went through, but overall I think Microsoft has done a good job with it.
Here in this article, we will discuss some of the new features which Windows brings to the table, well at least ones that were showed, I am sure there are plenty more which we will see once OS has been released.
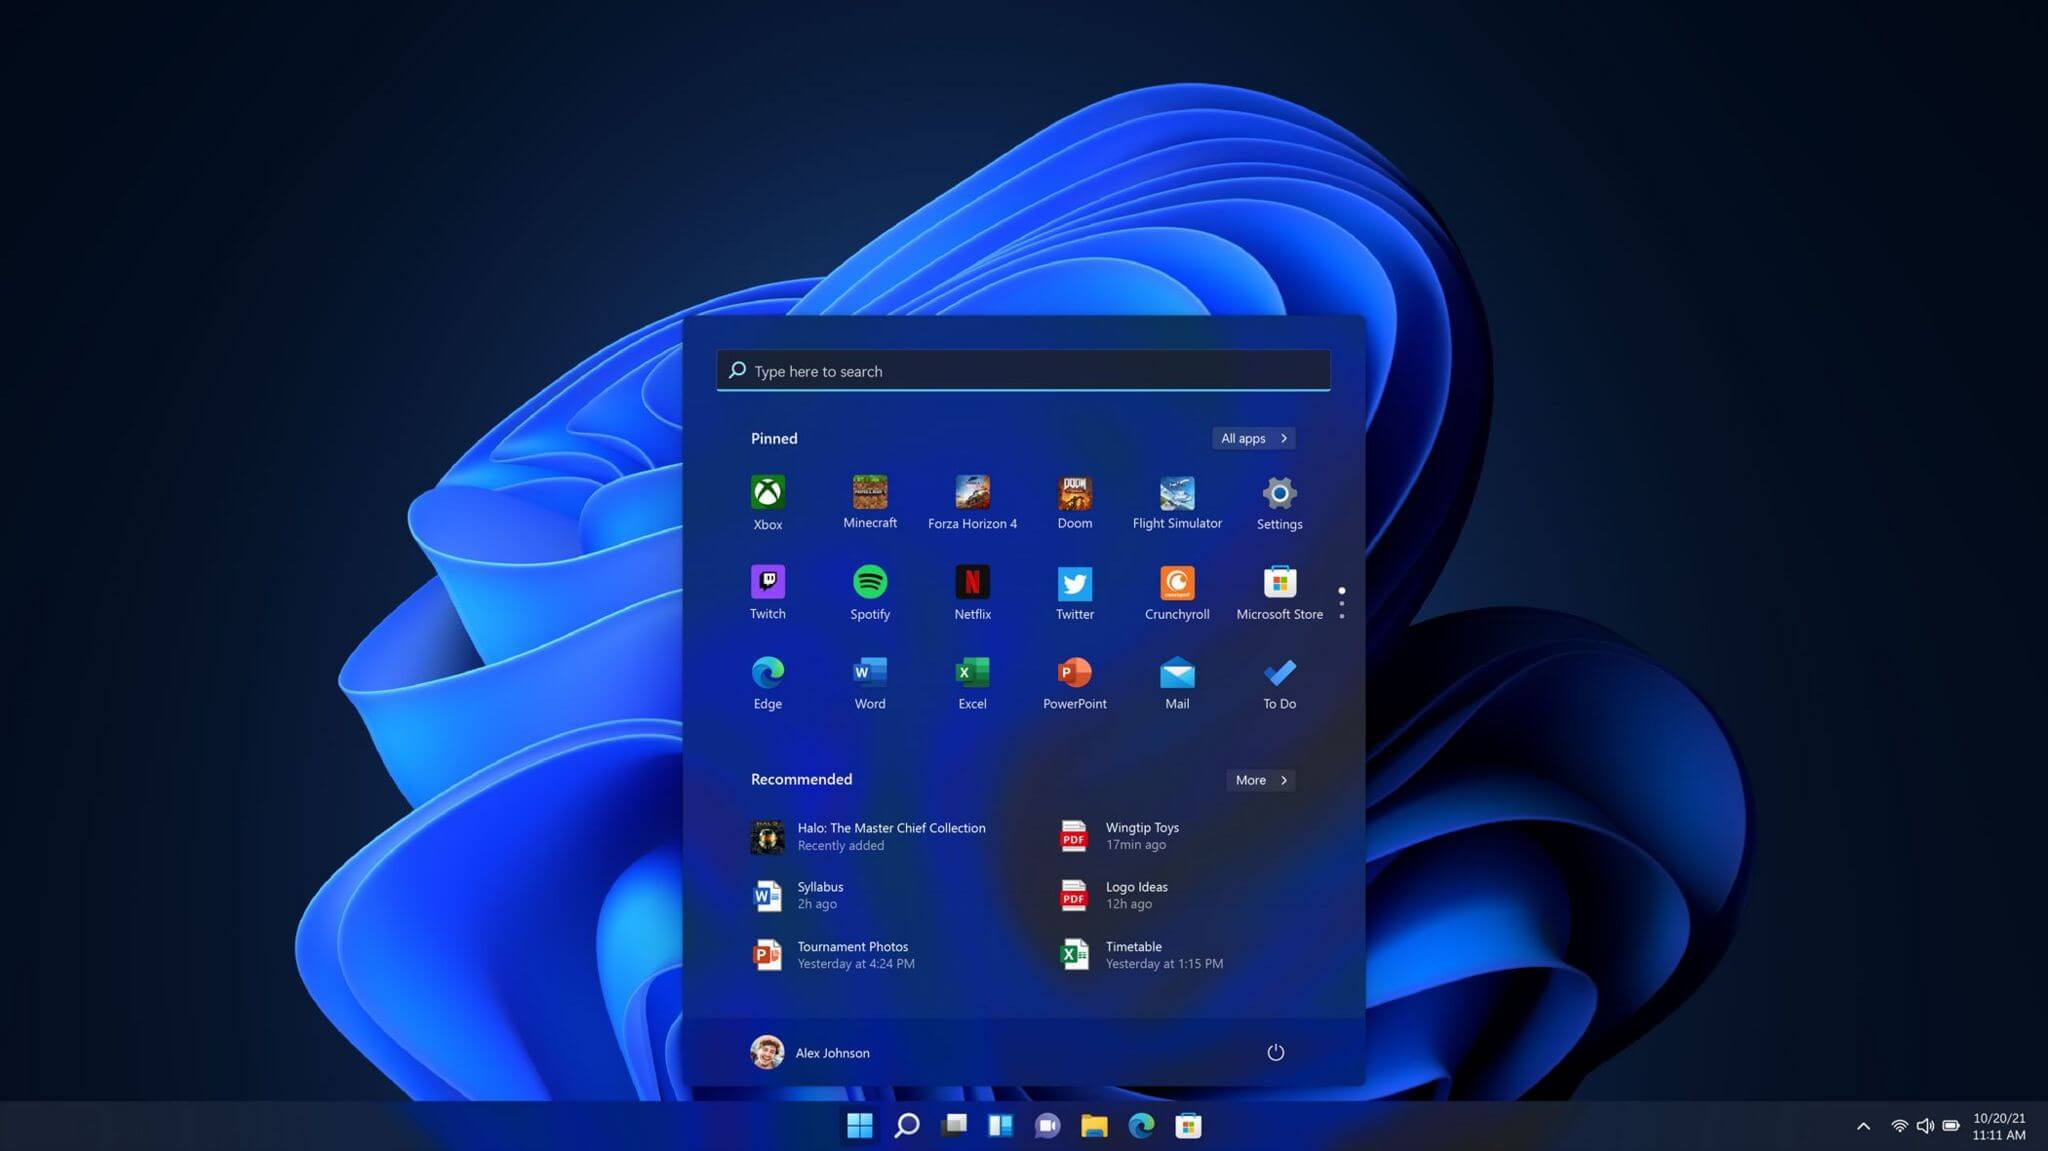
New Start menu
One of the first things that everyone saw when Microsoft has unveiled Windows 11 is its Start menu. Funny enough this is what has caused most of the divide among users, some find it interesting, and some do not like it. Truth is, it is different, and it is centered in the middle instead of the lower left part of the screen.
It has been confirmed however that the Start menu can be moved to any part of the screen so if you want, you could place it on the lower left as it has always been.
Live tiles do not longer exist in the Start menu, instead, we have styled simple icons.
Windows 11 Snap controls are great
If you have used the cascade option in previous Windows versions then it is most likely that you will like the new Snap controls.
You can quickly snap windows side by side, or arrange them in sections on your desktop just by hovering over maximize button on the title bar.
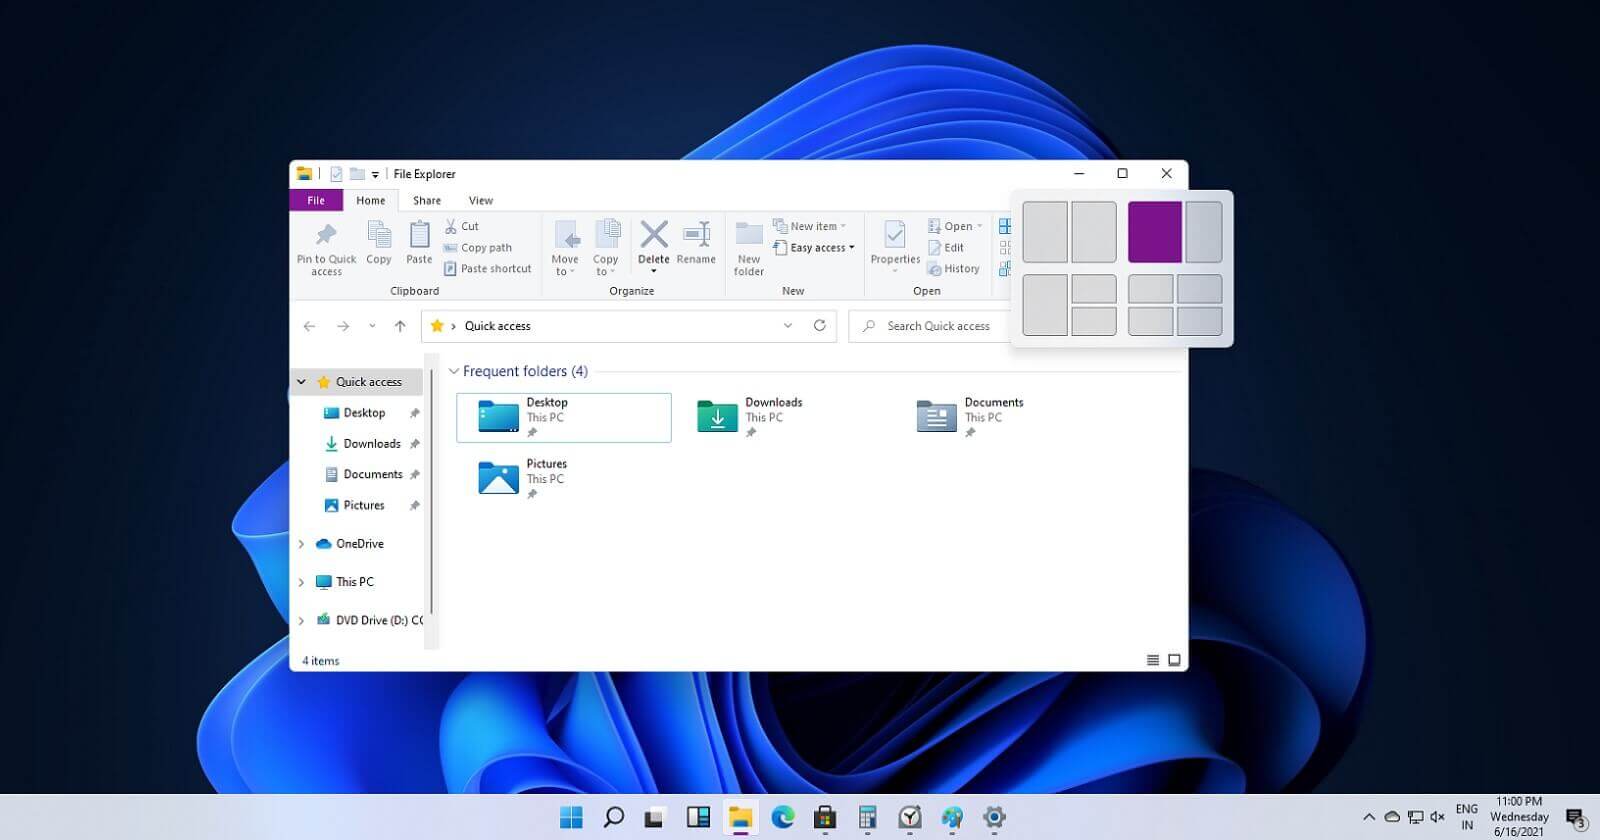
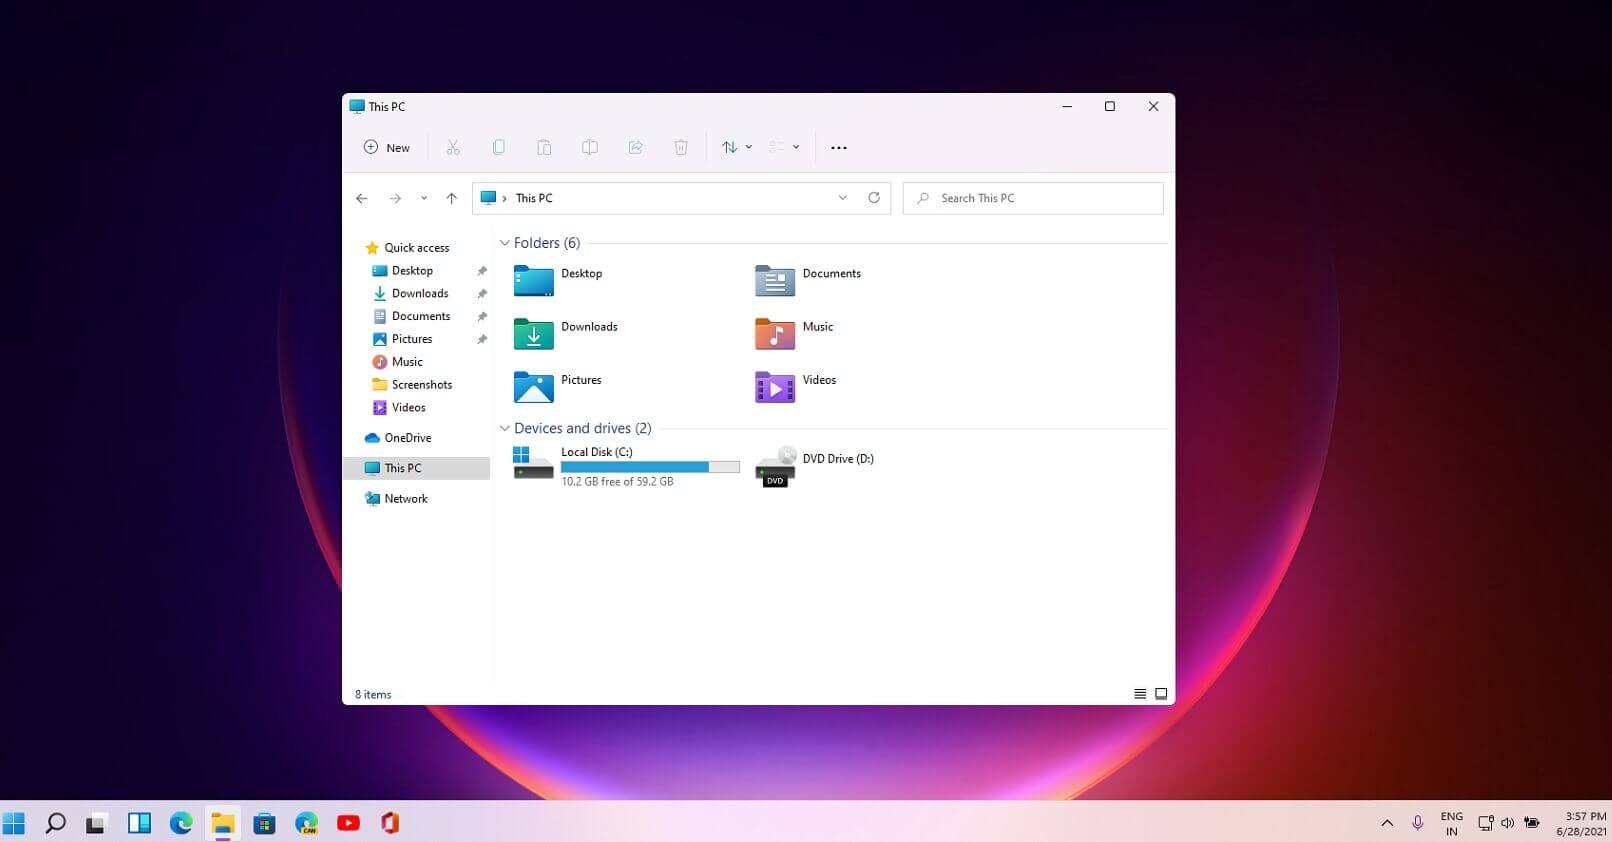
Windows 11 File Explorer
File explorer has gone through some visual and design changes, the ribbon on top has been completely removed and replaced with a header-like feature with a slick and clean design.
The header contains a nice organized and designed single row of icons like cut, paste, copy, rename, delete, and new folder icons.
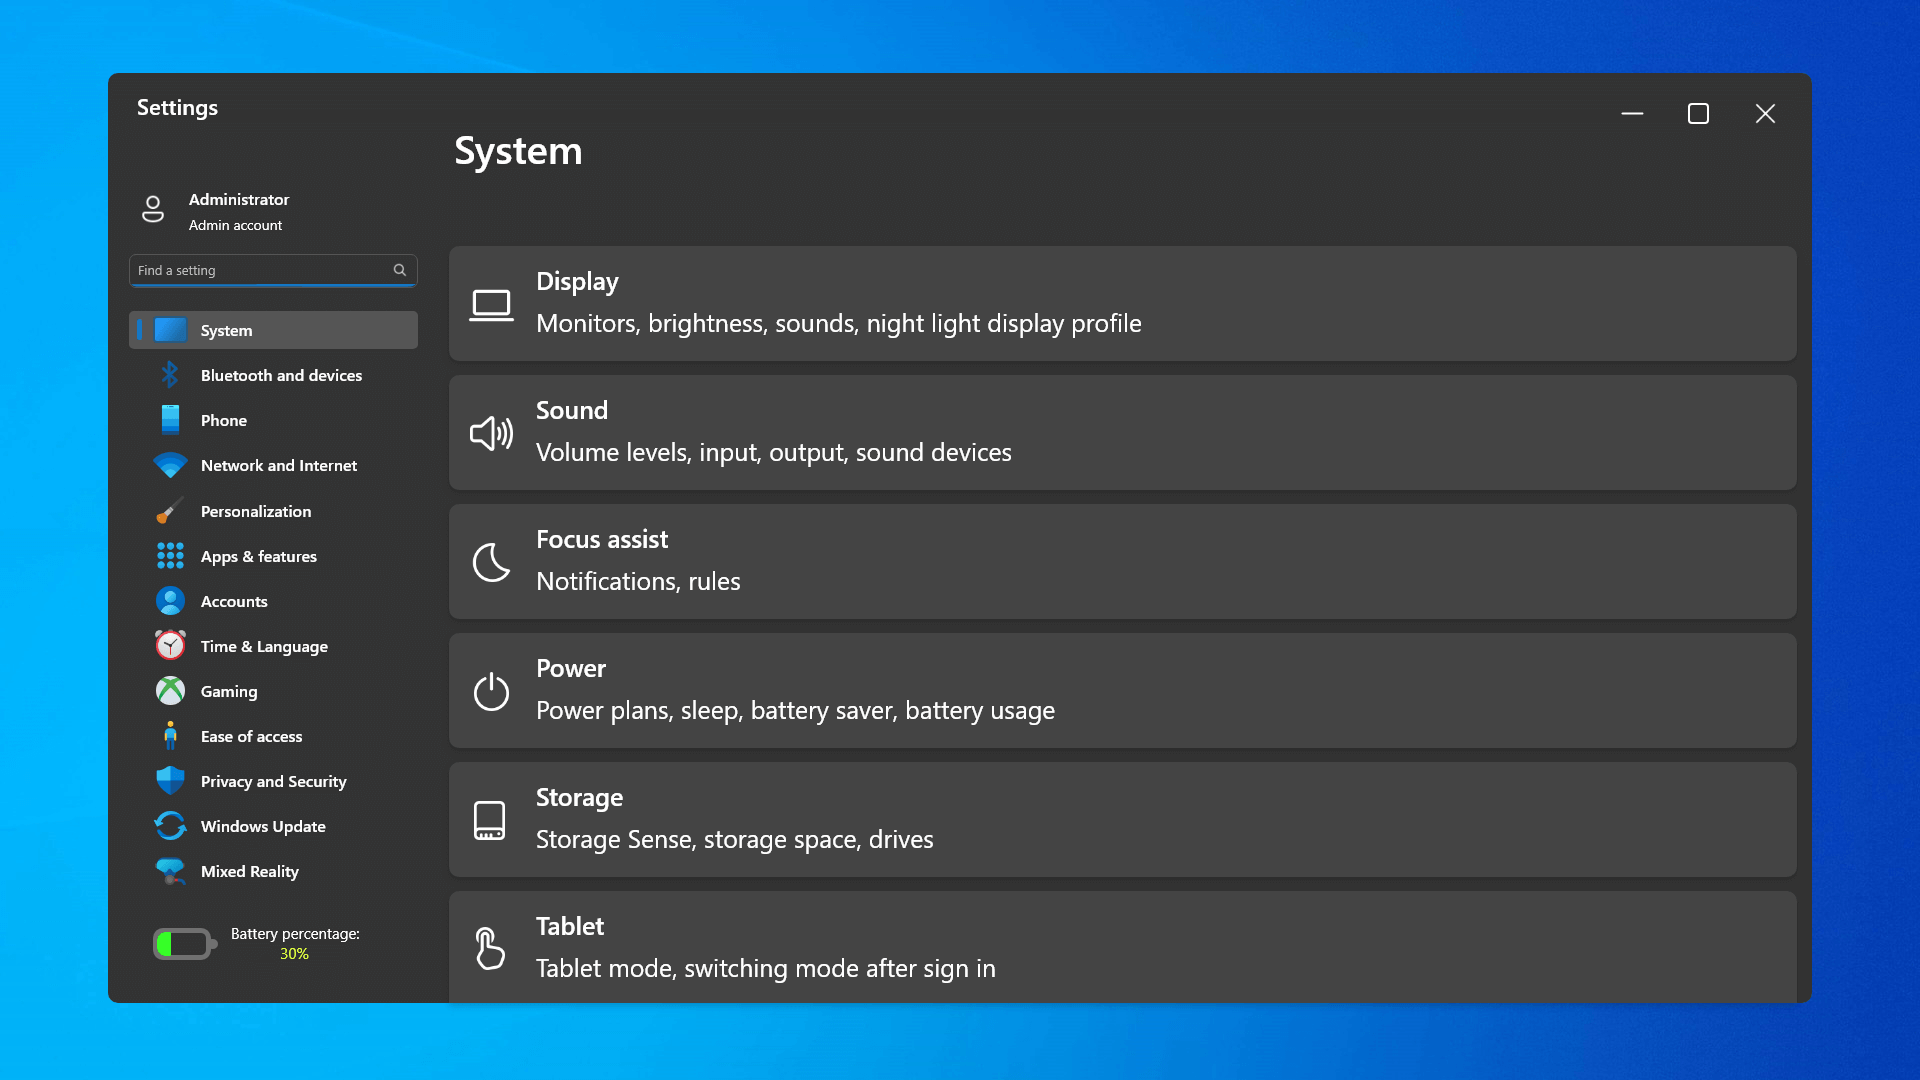
Settings app ovberhaul
The settings app also has gone through visual and design changes. It has a new design that is very visually appealing and navigation has been simplified and more organized. Finding the right and desired setting is much faster and clearer now.
Widget tab makes comeback in Windows 11
Yes, widgets are back but not like you remember them.
Instead of being all-time present at your desktop like once they used to be, now there is a button on the taskbar which brings the widget bar up that contains desired widgets. This way they are easily accessible and do not clutter desktops.
So far we have weather, news, calendar, and stocks widget but we will see how development on these goes. I expect to have community-made widgets like in old days for all of our needs.
XBOX app
The new Xbox app is now integrated into Windows 11, offering quick access to Xbox Game Pass games, the social parts of the Xbox network, and the Xbox store.
Security and TPM 2.0 in Windows 11
As widely known by now Windows 11 will require you to have a TPM 2.0 module capable CPU in order to install it.
This system requirement has caused a lot of controversies but essentially it seems that MS's goal is to protect your personal data by using this module.
The upside of course is that your data will be protected much more than in previous Windows versions, the downside, of course, will be that you will need newer hardware to run OS on it.
and that is essentially it, keep on tuned on more Windows 11 information and overall articles tied to PC and technology here at errortools.com
Valve has released a big update to its online store and distribution platform Steam. Among typical bugs fixing and making the user experience a little more fluid, we have received some major updates as well. Please take note that you need to update Steam itself to the latest version in order to get new features.
Storage management Page update
The storage management page has received a complete redesign and UX overhaul and it is now much easier to manage your game libraries and create new ones. The page itself looks and feels a little console more like but thanks to that it offers a much easier and clearer look and feel.
Another thing with the Steam store management page is the ability to move installation files from one location to another. Let’s say that you have two or more hard disk drivers in your machine and that you have SSD that you use for running stuff since it is fast and larger and slower one for storage. Now you can easily and quickly move one installation from one to another in order to take advantage of your faster SSD for quicker LOAD game times without making a new installation.
Steam Download page improvements
The download page has also received some love from Valve by enabling us to now see the installation progress. So far on the download page of Steam, you would only get download progress but it has been updated to show installation progress after download as well now making it more straightforward and giving you a general idea of how much more time there is to wait in order to start gaming.
Also, you can now drag and drop items in the download bracket to reorder download orders or place them as active downloads to start downloading right away.
 If by any chance you are working on a touchscreen PC, tablet, or any similar device and have no access to a hardware keyboard there is a way to place Touch Keyboard on your screen for easy typing, and you can enable icon on the taskbar for easy access.


 One of the first things that everyone saw when Microsoft has unveiled Windows 11 is its Start menu. Funny enough this is what has caused most of the divide among users, some find it interesting, and some do not like it. Truth is, it is different, and it is centered in the middle instead of the lower left part of the screen.
It has been confirmed however that the Start menu can be moved to any part of the screen so if you want, you could place it on the lower left as it has always been.
Live tiles do not longer exist in the Start menu, instead, we have styled simple icons.
One of the first things that everyone saw when Microsoft has unveiled Windows 11 is its Start menu. Funny enough this is what has caused most of the divide among users, some find it interesting, and some do not like it. Truth is, it is different, and it is centered in the middle instead of the lower left part of the screen.
It has been confirmed however that the Start menu can be moved to any part of the screen so if you want, you could place it on the lower left as it has always been.
Live tiles do not longer exist in the Start menu, instead, we have styled simple icons.
 If you have used the cascade option in previous Windows versions then it is most likely that you will like the new Snap controls.
You can quickly snap windows side by side, or arrange them in sections on your desktop just by hovering over maximize button on the title bar.
If you have used the cascade option in previous Windows versions then it is most likely that you will like the new Snap controls.
You can quickly snap windows side by side, or arrange them in sections on your desktop just by hovering over maximize button on the title bar.
 File explorer has gone through some visual and design changes, the ribbon on top has been completely removed and replaced with a header-like feature with a slick and clean design.
The header contains a nice organized and designed single row of icons like cut, paste, copy, rename, delete, and new folder icons.
File explorer has gone through some visual and design changes, the ribbon on top has been completely removed and replaced with a header-like feature with a slick and clean design.
The header contains a nice organized and designed single row of icons like cut, paste, copy, rename, delete, and new folder icons.
 The settings app also has gone through visual and design changes. It has a new design that is very visually appealing and navigation has been simplified and more organized. Finding the right and desired setting is much faster and clearer now.
 Yes, widgets are back but not like you remember them.
Instead of being all-time present at your desktop like once they used to be, now there is a button on the taskbar which brings the widget bar up that contains desired widgets. This way they are easily accessible and do not clutter desktops.
So far we have weather, news, calendar, and stocks widget but we will see how development on these goes. I expect to have community-made widgets like in old days for all of our needs.
Yes, widgets are back but not like you remember them.
Instead of being all-time present at your desktop like once they used to be, now there is a button on the taskbar which brings the widget bar up that contains desired widgets. This way they are easily accessible and do not clutter desktops.
So far we have weather, news, calendar, and stocks widget but we will see how development on these goes. I expect to have community-made widgets like in old days for all of our needs.
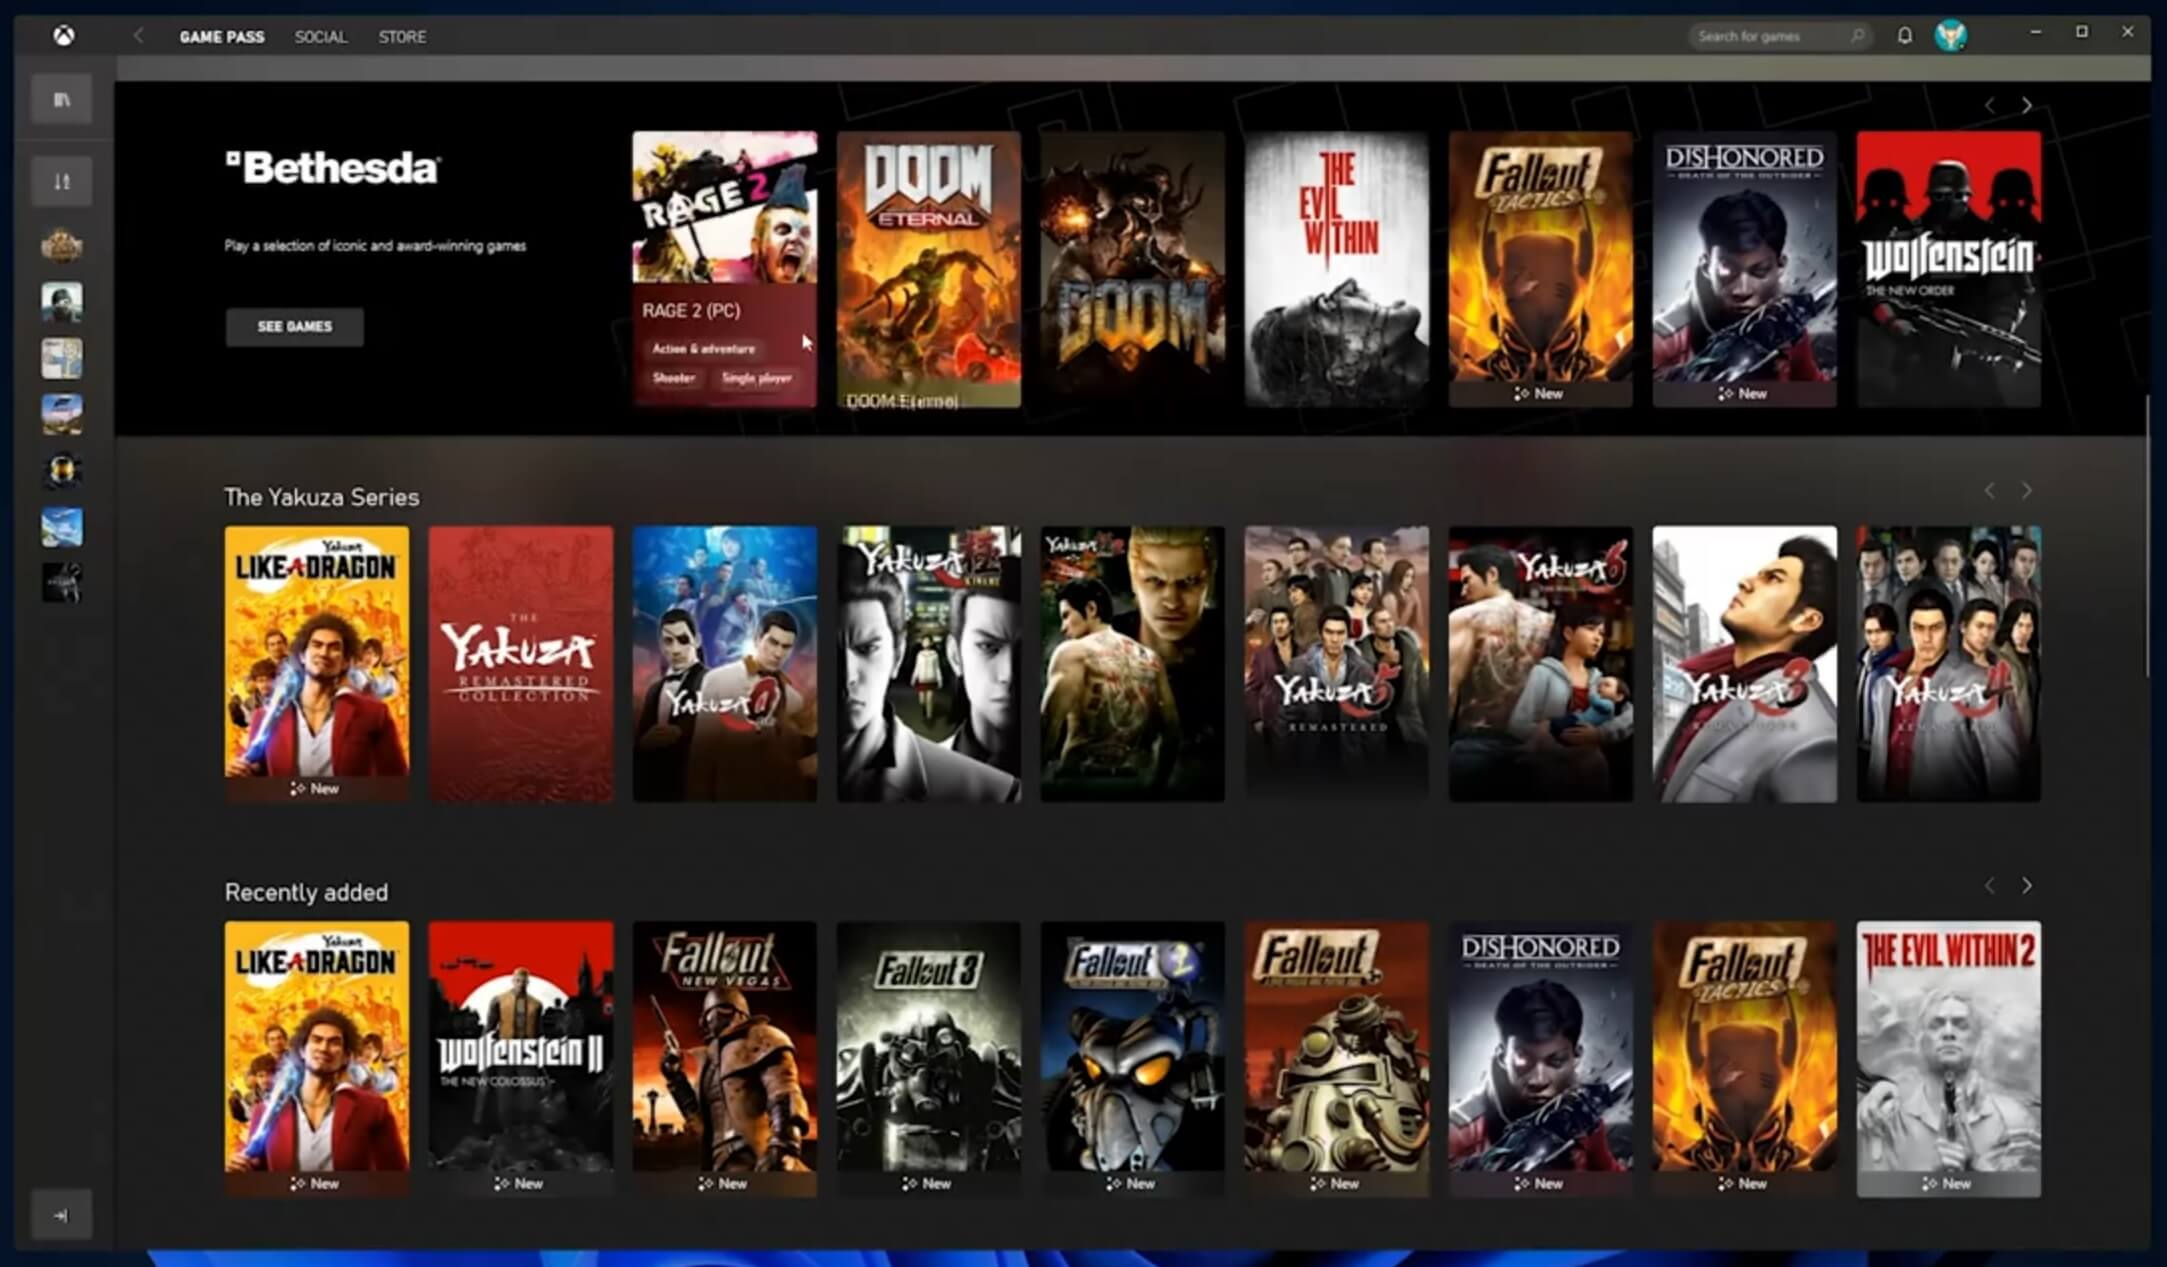 The new Xbox app is now integrated into Windows 11, offering quick access to Xbox Game Pass games, the social parts of the Xbox network, and the Xbox store.
 As widely known by now Windows 11 will require you to have a TPM 2.0 module capable CPU in order to install it.
This system requirement has caused a lot of controversies but essentially it seems that MS's goal is to protect your personal data by using this module.
The upside of course is that your data will be protected much more than in previous Windows versions, the downside, of course, will be that you will need newer hardware to run OS on it.
and that is essentially it, keep on tuned on more Windows 11 information and overall articles tied to PC and technology here at errortools.com
As widely known by now Windows 11 will require you to have a TPM 2.0 module capable CPU in order to install it.
This system requirement has caused a lot of controversies but essentially it seems that MS's goal is to protect your personal data by using this module.
The upside of course is that your data will be protected much more than in previous Windows versions, the downside, of course, will be that you will need newer hardware to run OS on it.
and that is essentially it, keep on tuned on more Windows 11 information and overall articles tied to PC and technology here at errortools.com 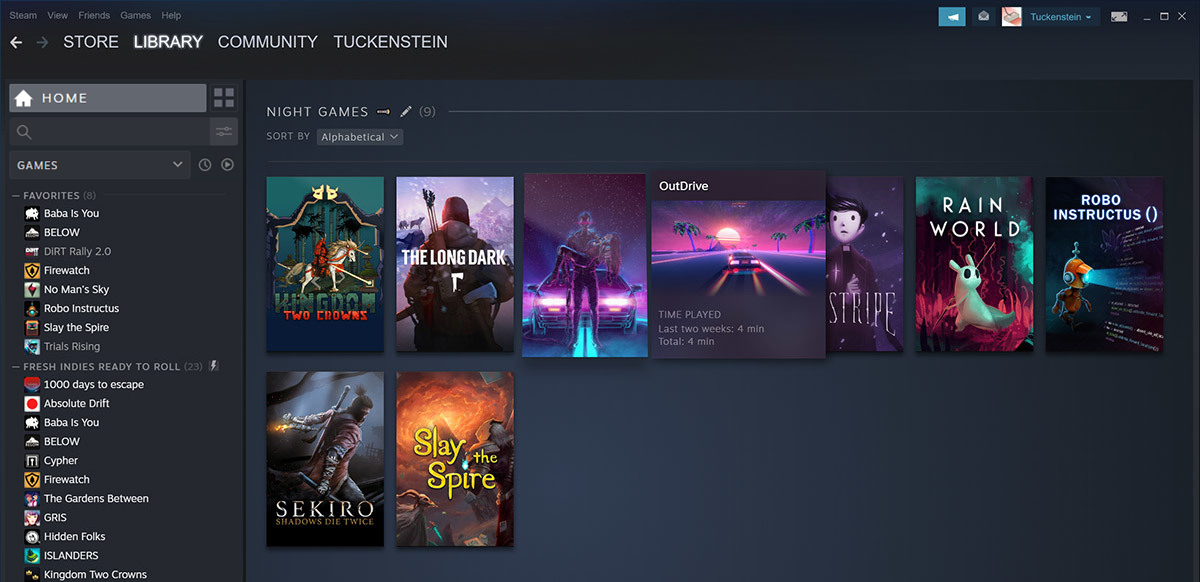 Storage management Page update
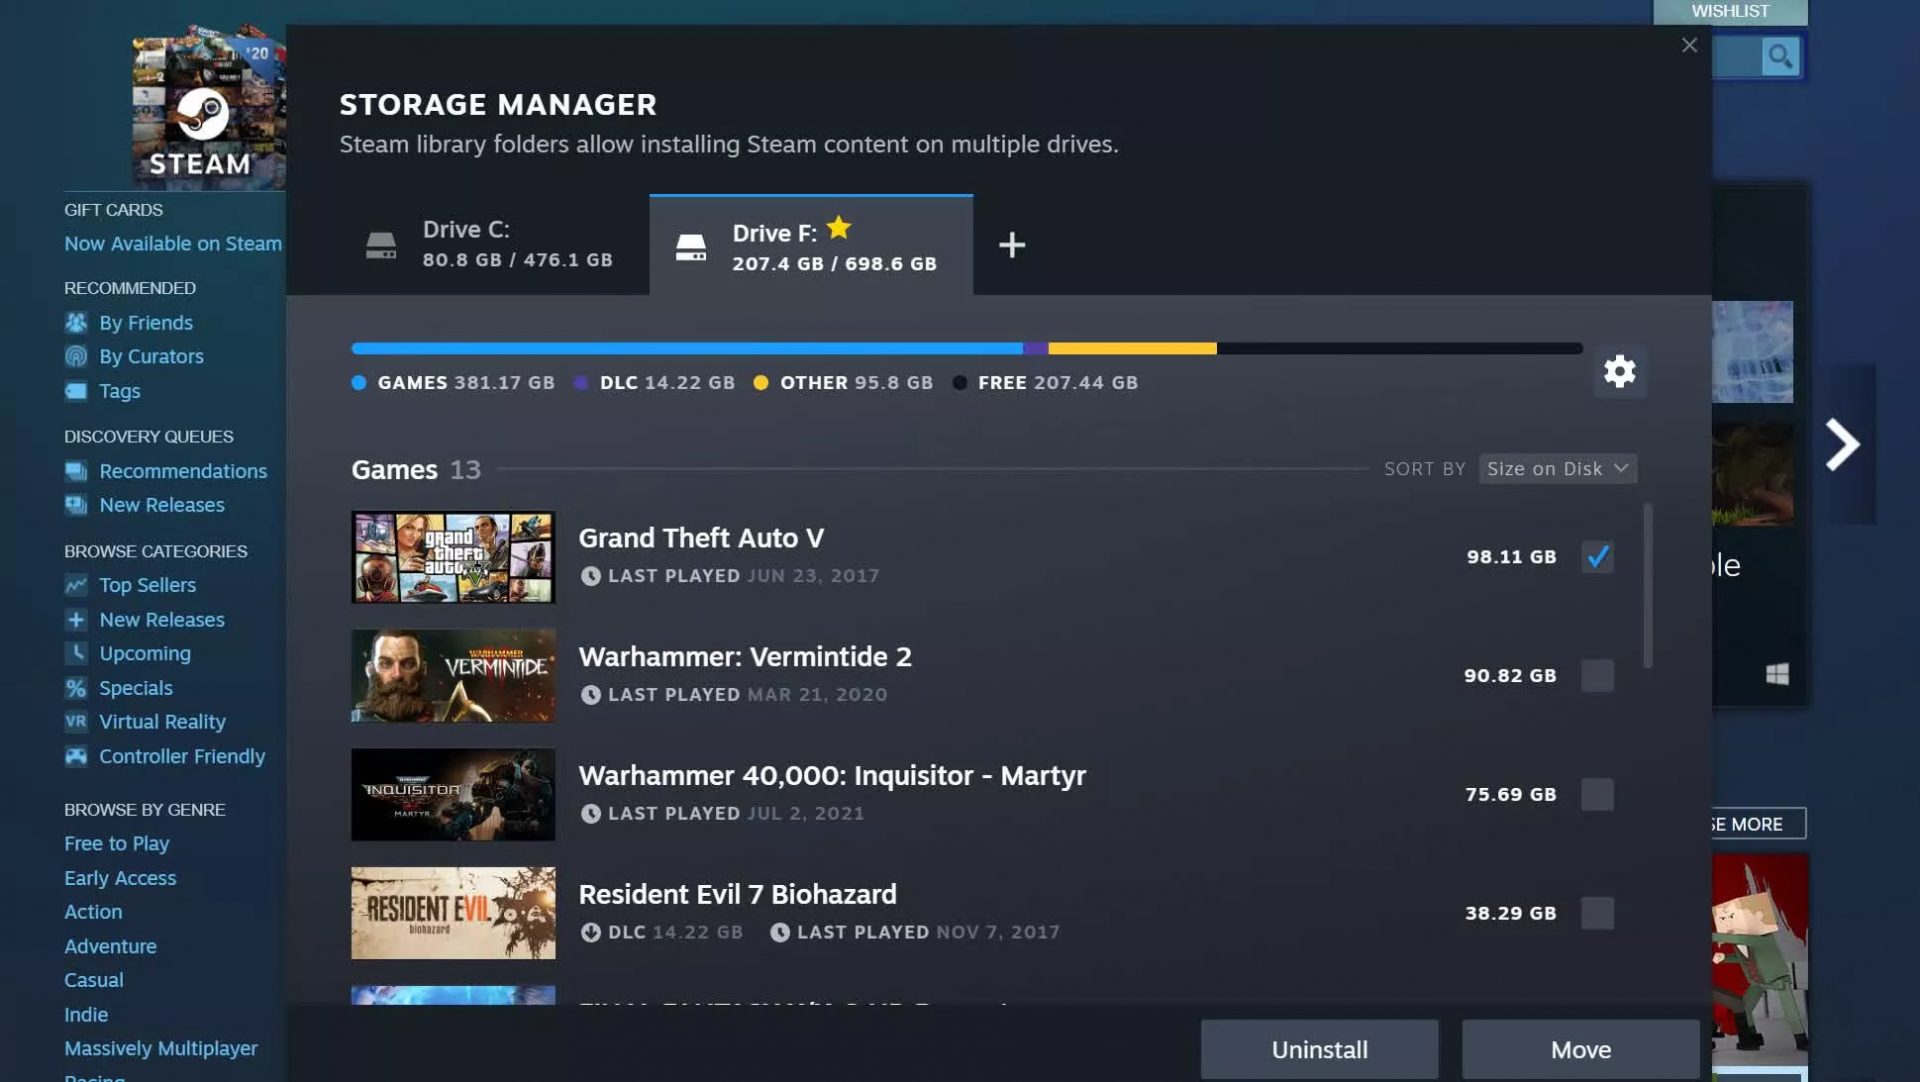 Another thing with the Steam store management page is the ability to move installation files from one location to another. Let’s say that you have two or more hard disk drivers in your machine and that you have SSD that you use for running stuff since it is fast and larger and slower one for storage. Now you can easily and quickly move one installation from one to another in order to take advantage of your faster SSD for quicker LOAD game times without making a new installation.
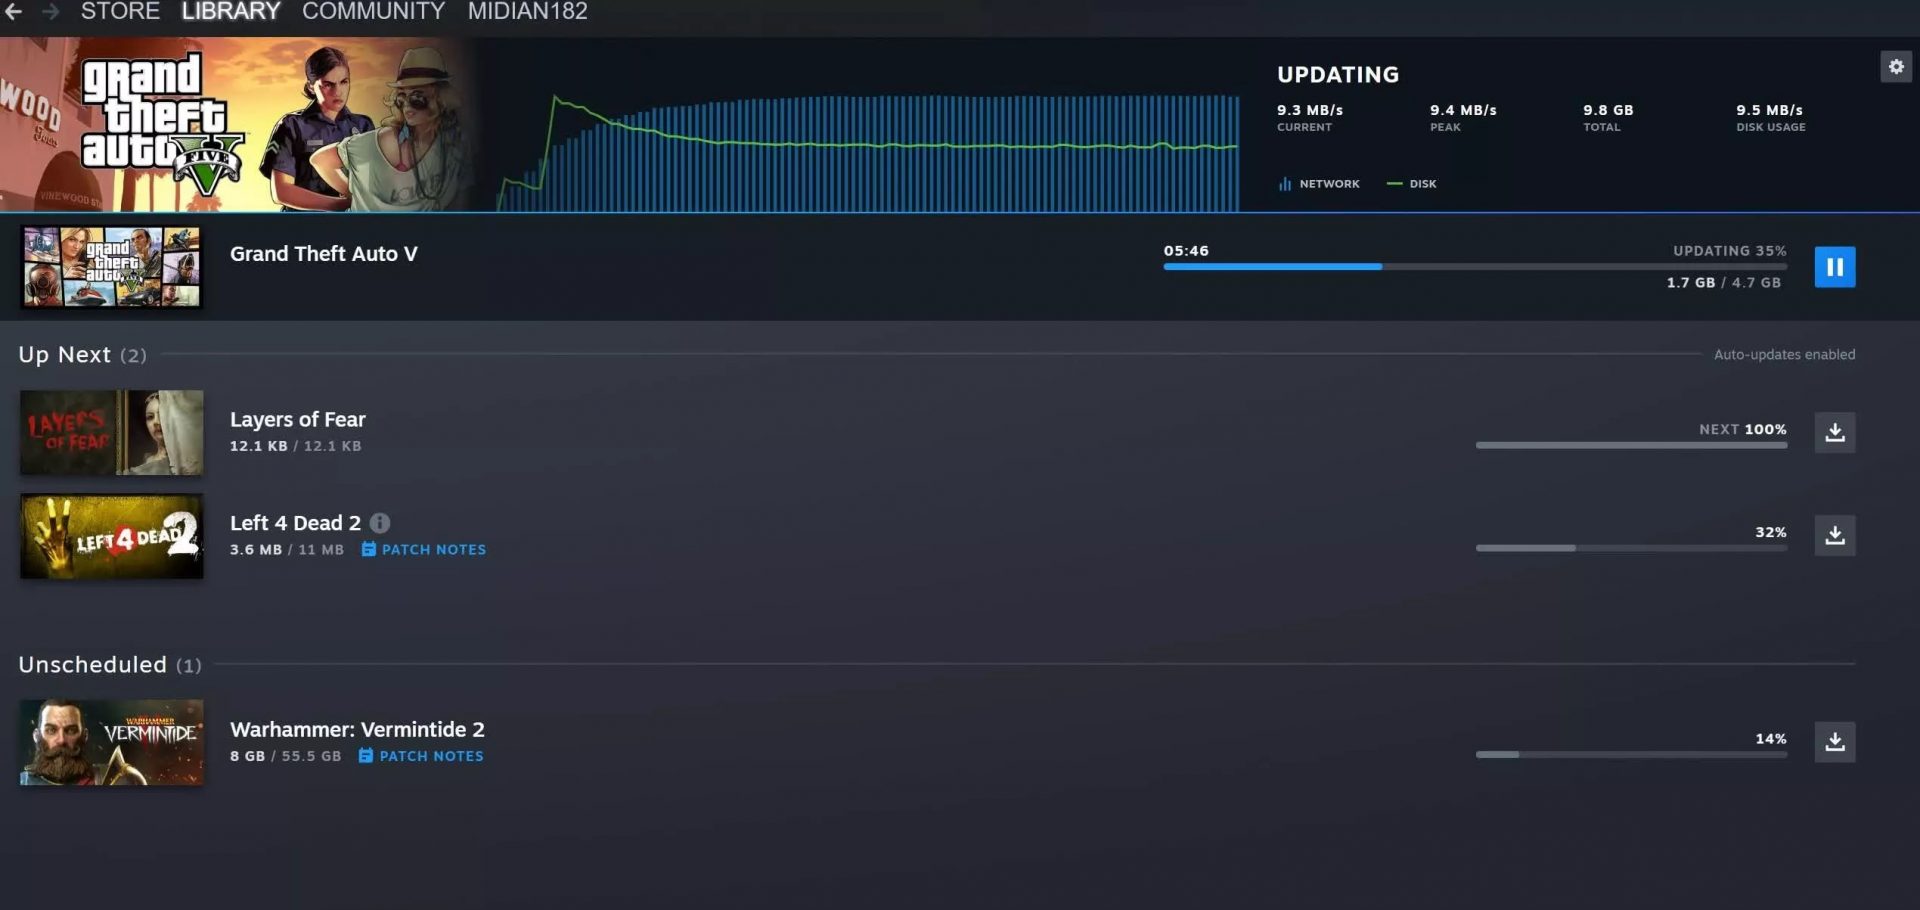 Also, you can now drag and drop items in the download bracket to reorder download orders or place them as active downloads to start downloading right away.