Every time a new drive or any storage device is connected to a Windows 10 computer, the operating system tends to allot a drive letter to it automatically. Not only that, as the OS also maps the location of the drive which helps it point the letter to the exact port location of the drive and serve requests from the user. As a result, it builds up a bit of cache as per the pattern in which the user uses the storage of the computer. This whole process is known as “Auto Mounting” which works for hard disks or optical drive readers that are connected using the SATA ports and even for USB drives that are connected using the USB ports.
There are several ways you can enable or disable the Auto-Mount feature in Windows 10. You can do it using the MountVol tool or the Registry Editor or the Diskpart utility. Before you proceed, it is recommended that you create a System Restore point first so that you can always undo the changes you made in case anything goes wrong.
Option 1 – Enable or disable Auto Mounting via MountVol tool
In this option, you will be using the mountvol command in the Command Prompt. Refer to the steps below.
Tap the Wins key once and type in “command prompt” in the field.
From the search results, right-click on Command Prompt and select the “Run as administrator” option to run it with admin privileges.
Next, type the following command and tap Enter to enable the Auto Mount feature:
mountvol /E
On the other hand, if you want to disable the Auto Mount feature, type the following command instead:
mountvol /N
After that, type the command below to remove all the previously assigned drive letters:
mountvol /R
Finally, restart your computer.
Option 2 – Enable or disable Auto Mounting via Registry Editor
Tap the Win + R keys to open the Run dialog box.
Then type “Regedit” in the field and tap Enter to open the Registry Editor.
After that, navigate to this registry key: ComputerHKEY_LOCAL_MACHINESYSTEMCurrentControlSetServicesmountmgr
Next, look for a DWORD named “NoAutoMount”. If you can’t find a DWORD with that name then simply create a new DWORD with the same name and make sure that the base is selected to Hexadecimal.
Now double click on that DWORD and change its value to 0 if you want to enable it, otherwise, input 1 as its value to disable it.
Restart your computer.
Option 3 – Enable or disable Auto Mounting via Diskpart utility
Tap the Wins key once and type in “command prompt” in the field.
From the search results, right-click on Command Prompt and select the “Run as administrator” option to run it with admin privileges.
After opening Command Prompt as admin, type the following command and hit Enter to launch the Diskpart utility:
diskpart
After that, a User Account Control prompt will appear. Just click on the Yes button.
Next, type the following command and hit Enter:
automount
Following the command you entered, you will an output that either says, “Automatic mounting of new volumes enabled” or “Automatic mounting of new volumes disabled” which means you can use it to check the status of Auto Mount.
Now if you want to enable the Auto Mount feature, type the following command and tap Enter:
automount enable
And if you want to disable the Auto Mount feature, just enter the following command:
automount disable
To remove all the assigned letter and history of drives that were connected previously, type the following command:
Microsoft has officially announced details about the newest upgrades to its office 365 suite moving forward along with its new OS release.
It seems that Microsoft has listened to its user base and feedback since Word, Excel, and PowerPoint are getting much-needed redesign taking into account many suggestions from the community.
The new office should feel more like an application suite guiding focus on the interconnection of applications themselves providing users with a much more natural experience of using them.
The new office features so far
From Microsoft themselves:
“This Office visual refresh is based on feedback from customers who asked for a more natural and consistent experience within and between your applications, specifically on Windows. With this update, we deliver an intuitive, coherent, and familiar user interface, using the Fluent Design principles, across all your applications: Word, Excel, PowerPoint, OneNote, Outlook, Access, Project, Publisher, and Visio. We aligned this visual refresh with the design of Windows 11 to provide seamless experiences on your PC.”
It is always refreshing to hear when a company listens to its user base and actually does what is needed instead of trying to invent the wheel.
How to switch
Since beta is already rolling and if you have an active 365 subscription to office suite visual refresh will be automatically available to all Office insiders running beta channel builds. It can be turned on and off using the coming soon feature in the top right corner of the menu in any application.
Just click on the megaphone icon to open the coming soon pane and apply settings to all office apps.
Note that The Coming Soon feature is not available in Access, Project, Publisher, or Visio. If you turn on the visual refresh in any of the 4 apps mentioned above (Work Excel, PowerPoint, or OneNote), it will also be available in these 4 apps.
Difference themselves
The Home tab menu still has a familiar look with a few tweaks. For example, accessing frequently used Word commands will be a lot easier. By navigating to Designer > Show Quick Access Toolbar, users can add a customizable shortcut ribbon to Word that houses conveniently placed options.
Also, the office will not match your Windows operating system color theme so if you have a dark theme enabled, the office will also have a dark color theme.
Color palettes are more neutral, corners are a bit softer but customizable ribbons are a win here for me.
Conclusion
There was not much said other than visual upgrades and small tweaks that were supposed to make your life easier but then again Windows 11 itself is in the same boat.
I am not sure if this is a great update offering just some visual tweaks and focus on workflow mechanics or just being plain lazy and trying to cash in visuals as a completely new product.
Windows 11 provides several different ways to make your cursor stand out and be easier to spot inside it. You can make the mouse pointer larger, invert it, or change its color.
Press ⊞ WINDOWS + I to open settings
Click on Accessibility in the sidebar
Select Mouse Pointer and Touch
Adjust mouse cursor size with size slider by clicking on circle and dragging it left or right
Under Mouse Pointer Style pick desired style from White, Black, Inverted, and Custom
White: The cursor is white with a black outline (standard setting)
Black: Cursor is black with a white outline
Inverted: Cursor automatically changes color to an inverted version of the color it is currently hovering over
Custom: You can pick the color for the cursor that you want.
And that is all about it, once you are done with pointer customization just close settings, all changes are saved automatically.
DuckDuckGo has risen in the public eye as a private search engine offering searches without tracking. A less known fact about DuckDuckGo is that they have their own browser, well they have it for the Android platform and it was stated that it is coming for desktops soon.
People were excited for this new browser for a few reasons, one of them being privacy and another that it is built from scratch, not using existing chromium runtime that assured users that privacy is the main focus. Still, lately, things got a little out of control. Duckduckgo is under fire from users since a security researcher has discovered that there is an exception for Microsoft trackers inside Browser.
The main feature of their browser is that it blocks tracking scripts and most online advertising with the goal of preventing servers from collecting data about your online behavior. Of course, tracking protection is never 100% effective since it requires a lot of manual labor from people to add sites and links to blocklists but it was discovered that DuckDuckGo has a defined exception in the browser for Microsoft owned ad networks and tracking scripts giving them free pass even when they are related to privacy compromisation.
Zach Edwards first pointed out the exception in a series of tweets, after noticing DuckDuckGo on iPhone and Android wasn’t blocking LinkedIn and Bing advertisements on Facebook’s Workplace site.
You can capture data within the DuckDuckGo so-called private browser on a website like Facebook's https://t.co/u8W44qvsqF and you'll see that DDG does NOT stop data flows to Microsoft's Linkedin domains or their Bing advertising domains.
DuckDuckGo’s CEO and founder, Gabriel Weinberg, replied with his own series of tweets.
Most of our other protections also apply to MSFT-owned properties as well. This is just about non-DuckDuckGo and non-Microsoft sites, where our search syndication agreement prevents us from stopping Microsoft-owned scripts from loading, though we can still apply protections post-load (like 3rd party cookie blocking). We are also working to change that.
DuckDuckGo says it uses over 400 sources for search engine results, including the company’s own web crawler, but typical link results are sourced most commonly from Bing. According to Weinberg, DuckDuckGo’s ability to use Bing search results depends on a carved-out exception for Microsoft’s ads in the mobile browser. A representative from DuckDuckGo told that third-party cookies from Microsoft services are still blocked.
Of course, the main aim and campaign of DUckDuckGo's rise was private search and private browsing so this kind of news did not go well among long supporters. The latest statement from them is as follows:
We have always been extremely careful to never promise anonymity when browsing, because that frankly isn’t possible given how quickly trackers change how they work to evade protections and the tools we currently offer. When most other browsers on the market talk about tracking protection, they are usually referring to 3rd-party cookie protection and fingerprinting protection, and our browsers for iOS, Android, and our new Mac beta, impose these restrictions on third-party tracking scripts, including those from Microsoft.
What we’re talking about here is an above-and-beyond protection that most browsers don’t even attempt to do — that is, blocking third-party tracking scripts before they load on 3rd party websites. Because we’re doing this where we can, users are still getting significantly more privacy protection with DuckDuckGo than they would using Safari, Firefox and other browsers. This blog post we published gets into the real benefits users enjoy from this approach, like faster load times (46% average decrease) and less data transferred (34% average decrease). Our goal has always been to provide the most privacy we can in one download, by default without any complicated settings.
To understand this error, first, it is important to understand what Flash.ocx actually is. Flash.ocx is basically a flash plug-in or ActiveX file that is responsible for the adobe flash player to work on the system.
The Flash.ocx error triggers due to issues in the Adobe flash player.
Solution
Error Causes
The error Flash.ocx may occur due to many reasons. These include:
Flash player corruption
Corrupted and broken Active X components
To this error code is not fatal but nonetheless it is still advisable to fix it right away to avoid inconvenience when using Flash player.
The inability to run the Flash Player smoothly will hinder you from watching videos on your PC and playing exciting web-based games.
Further Information and Manual Repair
To resolve this error on your system, you don’t have to hire a professional and spend hundreds of dollars. This error code is quite easy to fix. You don’t need to be technically sound to resolve this error code.
Simply follow the methods give below to fix the Flash.ocx error code in a few minutes.
Method 1: Reinstall the Flash Player
If the error occurs due to the corruption of the Flash Player, then it is advisable to reinstall the player on your PC. However, before you do that first remove the previous versions of Adobe Flash Player on your system.
If the previous corrupted version is not removed properly, then you will be unable to re-install it properly on your PC again.
Go to the Add/Remove Programs and find the Flash Player and uninstall it. Make sure the files are also removed from the registry.
Once you have successfully uninstalled the corrupted version, now go to the official website of Adobe Flash Player and download the utility from the website. Install it and run it on your system.
If it works, then this means the error is resolved. However, if the error still persists, then try method 2.
Method 2: Download Restoro to Fix Active X components
Another reason for Flash.ocx error code can be broken or corrupted Active X components.
If this is the issue, then the best way to resolve it is to download Restoro. This is a multi Reimagefunctional and advanced PC Fixer deployed with multiple high-performance scanners including Active X and Class scanner.
The Active X and Class scanner perform an entire PC scans for corrupt and broken Active X entries along with missing software paths and invalid combinations. After the scanning process is complete, it repairs and restores the components back to normal.
Thereby resolving the Flash.ocx error right away and ensuring smooth video browsing over the web.
Restoro is an efficient and a safe program. It has a user-friendly interface and easy navigations. It can be used by all level of users.
Besides the Active X scanner, it includes 5 more value-added utilities like a registry scanner and an antivirus to name a few. It is compatible with all Windows versions
Click here to download Restoro on your PC and resolve Flash.ocx error code now!
The latest Windows 11 update has brought with it not so popular widget from Windows 10, the weather widget that will reside into the taskbar and constantly show stuff like temperature, weather conditions, etc. The weather widget is not a bad thing but most users found it a little annoying and turned it off in Windows 10. If you wonder how can you do the same but this time inside Windows 11 please keep reading.
The first step is to right-click anywhere on the taskbar (in empty space) and choose Taskbar settings
Once the taskbar settings are opened, find Widgets and click on the switch on the far right to turn it off, immediately no more information will be shown on the taskbar and it will be free again. And that is all there is to it.
Windows uses 2 types of keys for its activation, KMS or MAK. These keys should work without any issues since they are elevated with higher permissions but in some cases, they are by accident run without their proper permission, and then we have access denied error or error 0x80070005
To resolve this issue please first check if not by any chance your antivirus or firewall is preventing slmgr.bs file to access the right permissions, that being said if the previous solution is not working note that you have to be an administrator of the system or have administrator privileges. As an administrator, you will have to use Software Licencing Management Tool or short SLMGR.VBS, a VBS file in Windows used for its activation purposes.
As an administrator, open Command prompt with admin permissions and then run slmgr.vbs
This will make sure that activation goes through, make sure to use proper options like:
It seems that Microsoft is going to offer subscription and sales of individual office applications in the Windows Store. The office package will still be available as a package but for the first time, we will get single applications as standalone ones available for purchase.
This is a very interesting decision by Microsoft and I fully support it, this time users will be able to pay less and to choose only applications that they need instead of paying for the whole package and not using it.
Windows 11 brought with it a simplified right-click menu that has limited options. If you would like to bring the old Windows 10 right-click menu you will have to do some registry tweaking but it is doable.
Since this requires registry tweak, please follow given solution step by step
Press Start and type RegEdit
Click on Registry Editor
Inside registry editor find next key:
Computer\H_KEY_CURRENT_USER\SOFTWARE\CLASSES\CLSID\
Right click in the right part of editor window and select New > Key
Type in as a name: {86ca1aa0-34aa-4e8b-a509-50c905bae2a2}
Right click on {86ca1aa0-34aa-4e8b-a509-50c905bae2a2} key and select New > Key again to create new key inside this one
Name inside key InprocServer32
Double click the “(Default)” key in InprocServer32 to open it
When the Default key opens close it without making any changes by clicking on OK. This will make its value property Blank instead of value not set
Close Registry Editor
Restart your PC
Once the system is up if the followed solution is applied you will now have an old school menu once right-click is used.
Virtual Reality or VR for short has come a long way from its infant stage and as 2022 is in half period we are looking at the VR market and reflecting on what has changed in one year. For starters, games have increased in quality and quantity while the hardware price has decreased making the whole VR experience a little closer to a wider audience.
Many companies have tried to get on the VR bandwagon but also many have failed. What remained are staples in VR hardware from large companies that have started with VR early and kept improving their headsets.
So with great pleasure, we are presenting the remaining best 3 virtual headsets so far of 2022 brought to you from Sony, Valve, and Meta.
SONY PLAYSTATION VR
If you want VR on consoles then there is really one option, and that is SONY VR. Premium Virtual Reality solution from SONY, sadly you can do this only on Playstation 4 and Playstation 5. Sony managed to pull off great quality hardware and packed with its exclusives on playstore at a very affordable price that is still cheaper than other products.
While waiting for the Sony PlayStation VR2 headset this one is still a great option and quality is still among the top of the game. From the time of its release until today, many AAA titles have been released for it as exclusives that you can not play any other way and some of them are really worth it.
VALVE Index
Altho there are headsets like HTC Vive Cosmos Elite that have some features that place it as a better solution than Valve Index, Index is still an overall better VR headset as a whole product but its price is something that is keeping it still way out of reach of your standard user. The price, however, is really an illusion since it applies only when buying the system first time, you see Valve has created this headset as a modular design system making it upgradable meaning that you can, for example, buy newer controllers only and they will work perfectly with rest of hardware.
The modular design will save you money when you want to upgrade your VR system but as said entry price is steep. Besides its somewhat higher price than competitors, it is also notable that Index is a positional tracking VR set which means that it relies on a base station in order to locate the user. This means that once set, it is not so easy to change its location of use.
However, its quality and steam use are unmatched, high-quality games and compatibility that no other headset with steam will even pull off probably make Index one of the 3 best headsets out there. Half-life Alyx, arguably and currently one of the best VR games ever made so far was specifically designed for Valve Index and other games are behaving also incredibly nice with this headset, so if you want a great powerhouse for PC VR gaming, you will no go wrong in purchasing Valve Index.
META QUEST 2
Cheapest of the three and coming in various iterations, Meta has established itself from the beginning as a leading player in VR technology with its oculus line of products. Quest 2 is the next product in their line and it comes with 128GB and 256GB versions.
Meta has removed the need for the Facebook account for its VR systems and now you can use them without the need to send any kind of data to meta. Priced fairly for its entry 128 models this standalone VR set improves in any way possible from its previous iteration and sets the bar for what will come in VR's future.
Offering both wired and wi-fi connection with its standalone battery Quest 2 also is packed with a large library of games and it is user friendly as your typical game console but still allows some under-the-hood tinkering if you wish so.
Also, Meta's Vr solution since it uses inside-out tracking makes it incredibly easy to just pick it up and carry it with you wherever you go.
Socket error 10013 is an error code that often pops on the screen when you try to access the server. This error code restricts your permission to access. It shows that your permission request was denied.
The error message is displayed in the following format:
“Socket.error: [Errno 10013] an attempt was made to access a socket in a way forbidden by its access permissions”
Solution
Error Causes
Narrowing down a particular reason for the cause of socket error 10013 is difficult, typically because this error code can be generated due to several reasons. Here are some of the common reasons for its occurrence on your PC:
High-security set up- Firewall or an antivirus program
Too many functions tied to the same driver confuses the socket
Outdated drivers
Malware
The good news is that the socket error 10013 is not fatal. However, it is advisable to fix and resolve the issue to avoid inconvenience.
Further Information and Manual Repair
Here are some of the best, quickest and easiest methods to work around the problem and resolve socket error 10013 without any hassle or delay.
Method 1 - Turn off Firewall
Believe it or not, a high level of internet security measures like Firewalls and anti-virus programs are a common cause of socket error 10013.
Firewalls are made to protect a computer from harmful connections but sometimes it may also restrict server connections, considering them as a threat to your system security.
Due to this, permission access is adamantly denied. To resolve this issue on your PC, the best way to go about is to turn off your Firewall or any other anti-virus programs installed on your system.
Once you turn off these programs, try accessing the server again. The majority of the time the issue is resolved by carrying this step. Nonetheless, if the error still persists, try the methods given below.
Method 2 - Check the Permissions section of the Firewall Program
Another way to resolve this is to check the permission section of the Firewall program and check for the server. If the server is not listed, contact the Internet Service Provider (ISP) and ask for help in adding the server to the list.
Method 3 - Update Drivers
The outdated driver may sometimes be the reason for the socket error 10013. The socket may no longer use the drivers installed on your PC which is why permission to access the server is not granted.
When this is the reason, try updating the drivers to resolve. For new drivers, visit the software manufacturers’ website, download, and install.
Method 4 - Scan for Viruses and Malware
Another alternative is to scan for viruses and malware. Sometimes the cause for the error is a viral infection. Therefore, remove them to resolve.
The best way is to download Restoro. This is a user-friendly and next-generation PC Fixer embedded with 6 scanners including a powerful anti-virus. It scans your entire PC and removes all types of viruses including malware, adware, spyware, and Trojans in seconds.
Click here to download Restoro.

 How to switch
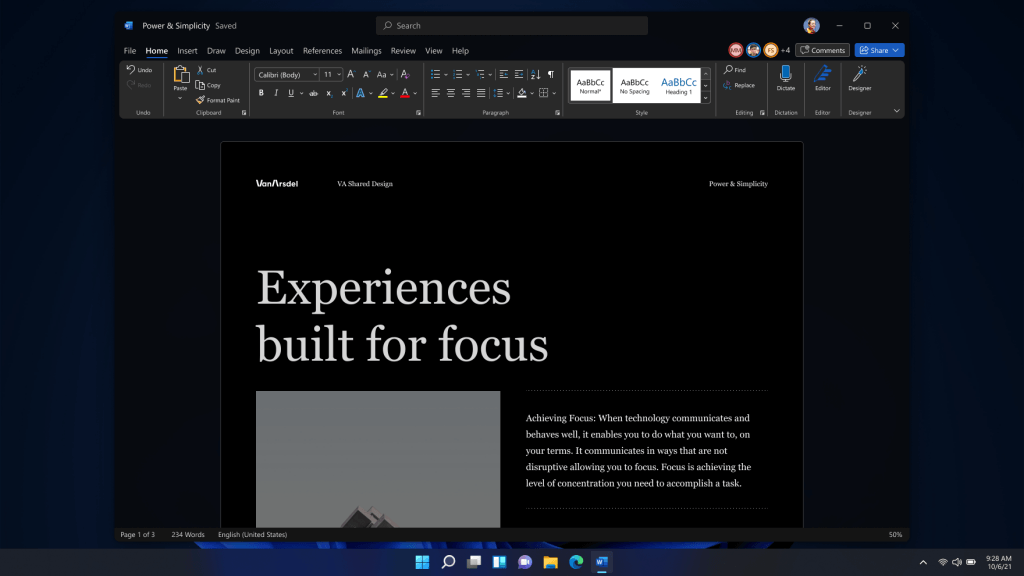 Conclusion
 Windows 11 provides several different ways to make your cursor stand out and be easier to spot inside it. You can make the mouse pointer larger, invert it, or change its color.


 The first step is to right-click anywhere on the taskbar (in empty space) and choose Taskbar settings
Once the taskbar settings are opened, find Widgets and click on the switch on the far right to turn it off, immediately no more information will be shown on the taskbar and it will be free again. And that is all there is to it.
The first step is to right-click anywhere on the taskbar (in empty space) and choose Taskbar settings
Once the taskbar settings are opened, find Widgets and click on the switch on the far right to turn it off, immediately no more information will be shown on the taskbar and it will be free again. And that is all there is to it.  This is a very interesting decision by Microsoft and I fully support it, this time users will be able to pay less and to choose only applications that they need instead of paying for the whole package and not using it.
 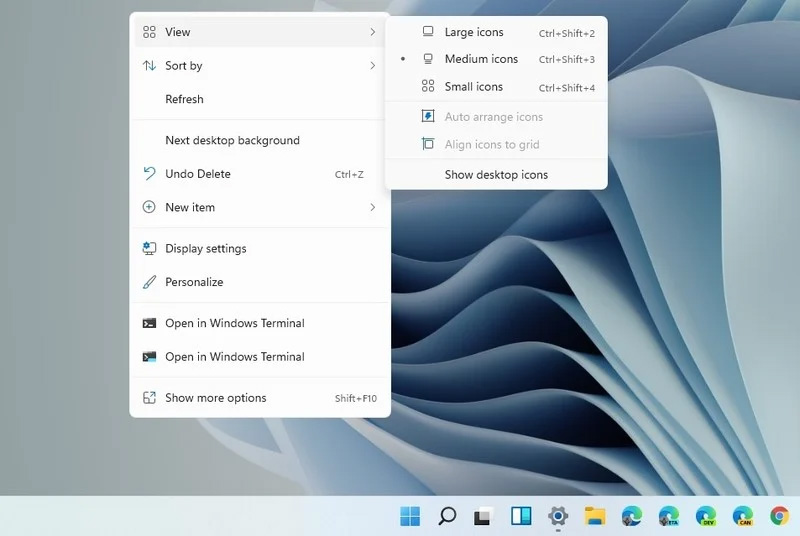 Since this requires registry tweak, please follow given solution step by step


