Disable the Notifications for any Apps

Since Windows 10 introduced the concept of notifications, almost any application installed on your computer sends you one. However, there are times when too many notifications can be quite annoying. Although some of them are important, most of them are not and are only getting in the way of your tasks. So if you don’t like to be flooded with tons of notifications on your Windows 10 computer, say no more as this post will help you out in disabling notifications for any apps installed.

And now with the new feature in Windows 10 called Focus Assist, you will be able to manage the level of notifications that you receive. This new feature also allows you to disable all notifications except for the ones from important or priority apps. You will just have to maintain a list of priority applications or you could also disable all the notifications except for the important ones like alarms. In addition, you could also set up some automatic rules such as the Focus Assist timings which means that you can make Focus Assist enabled for a certain period of time during the day or when you are duplicating your display or playing a game and whatnot. So if there is an application that keeps on spamming you with notifications, you can just disable the notifications for that application.

To get started on disabling notifications, refer to the steps given below.

  • Step 1: Go to Settings > System.
  • Step 2: From there, open Notifications and actions and then scroll down to the “Get notifications from these apps” section.
  • Step 3: After that, look for the application that you want to disable notifications for and click on the toggle button that corresponds to disabling notifications for that application. You could also click open to explore additional settings for that particular application.

Note: You can disable notifications or just the notification banners, your choice. Aside from that, you can also control the notification sound as well as its behavior when the computer screen is locked. What’s more, is that you can also adjust the number of notifications displayed in the Action Center or select the priority applications. As stated earlier, Windows 10 gives you control that allows you to customize every nook and cranny of the notification on your Windows 10 computer. Apart from applications, there are also other notifications-related settings that you can control including disabling notifications about tips, tricks, and suggestions as well as summary notifications from Windows Defender that you get every time you use or scan your computer.

Do You Need Help with Your Device?

Our Team of Experts May Help
Troubleshoot.Tech Experts are There for You!
Replace damaged files
Restore performance
Free disk space
Remove Malware
Protects WEB browser
Remove Viruses
Stop PC freezing
GET HELP
Troubleshoot.Tech experts work with all versions of Microsoft Windows including Windows 11, with Android, Mac, and more.

Share this article:

You might also like

Fix error code 16 in Windows 10
Access denied error code 16 is tied to websites, it is an error which you will encounter when trying to visit some specific website or if you are unlucky on all of the websites. Lucky for us this error is fixable and in order for us to do this, follow this guide for possible solutions.
  1. Check Date and Time, Incorrect date and time can often interfere with services in your Windows, browsers are not different and this can cause some websites not to be shown. Check your date and time and set it correctly if needed.
  2. Try to access the website from another device. If you manage to open a website on another PC or some other device then keep reading in order to find the solution, if you can not, then the problem is on the website itself.
  3. Turn off Firewall or antivirus. New antivirus and firewall applications can sometimes mark certain websites as malicious and will cut contact with them rendering them unable to be accessed or opened. Try turning the firewall and antivirus temporarily off and then try to access the website.
  4. Try opening web site in another browser. To eliminate browser-specific issues and their configuration, try opening the website in another browser.
  5. Disable PROXI server. Some applications, especially malicious ones can change your proxi setting in LAN. go to your LAN settings and turn off proxi if it is enabled.
  6. Reset your Browser. If this issue is caused by bad data in your browser or by its settings and preferences, resetting the complete browser will solve the issue.
  7. Use VPN. Sometimes the reason for you was not able to access some website might be because the site is not available for your region, to bypass this issue use VPN and reroute your location.
Read More
Fix MSVCR71.dll is missing in Windows 10
The program can’t start because MSVCR71.dll is missing from your computer, Try reinstalling the program to fix this problem.
If by any chance you have encountered this error know that you are not alone and that this is a solvable error. In this guide, we will show you how to fix this error. Usually, the MSVCR71.dll missing error is met when a new application is installed. So let us dive right into it and solve it.
  1. Reinstall application

    If only a certain application is reporting this error, try reinstalling it, there is a high possibility that by some mistake application was not properly installed and corrupted or removed the MSVCR71.dll file. If this is the case, reinstallation will help.
  2. Check recycle bin

    like mentioned above, if the application has by mistake deleted the file, open recycle bin and try to locate it there. If this is the case, restore it from recycle bin and everything should be back in normal working conditions.
  3. Download a new version of the file

    If the previous 2 methods failed and you still get the missing error, try downloading the file from Microsoft and placing it in C:\Windows\SysWOW64
  4. Reinstall C++ redistributable

    Having an incorrect C++ redistributable package can be an issue of the problem, get the latest version from Microsoft and reinstall it.
Read More
Completely Remove MixGames from Your Windows PC

mixGames is an Extension for Google Chrome that adds “Games:” functions to Google Chrome. In our testing, this function did not work and only redirects you back to the extension page. There are two variations of mixGames: mixGames Search, which changes the Chrome homepage to one managed by their own advertising-driven search; and mixGames Start, which changes the homepage in Chrome. These extensions utilize Searchalo to change search engine functions from the default or user-set preferences to Yahoo, injecting additional advertising. Due to the browser function modifications, mixGames is classified as potentially unwanted and is flagged for detection and optional removal by some Antivirus programs.

About Browser Hijackers

Browser hijacking is a common type of online fraud where your web browser configuration settings are altered to allow it to do things you do not intend. They are created to disrupt web browser programs for a variety of reasons. These are typically used to force hits to predetermined sites, manipulating web traffic to generate ad revenue. Nevertheless, it isn’t that innocent. Your internet safety is jeopardized and it is also extremely annoying. What’s more, hijackers can make the entire infected system fragile – other dangerous malware and viruses would use these opportunities to get into your system very easily.

Indications of browser hijack

There are various symptoms that could indicate a browser hijacking: 1. the browser’s home page is modified 2. new bookmarks pointing to pornographic websites are added to your favorite pages 3. the main web browser settings are modified and unwanted or unsafe resources are added to the trusted websites listing 4. you’re getting new toolbars you have never noticed before 5. your browser will display constant pop-up windows 6. your internet browser starts running sluggishly or exhibits frequent errors 7. you cannot go to certain sites like home pages of antivirus software.

Exactly how browser hijacker finds its way onto your computer

Browser hijackers infect computers by numerous means, including through a file-share, a drive-by download, or an infected e-mail attachment. Many internet browser hijackings come from add-on programs, i.e., browser helper objects (BHO), toolbars, or plug-ins added to web browsers to give them extra capabilities. A browser hijacker can be installed as a part of freeware, demoware, shareware, and fake programs. A good example of a well-known browser hijacker is the latest Chinese malicious software known as “Fireball”, which has infected 250 million computer systems globally. It works as a hijacker but can be turned into a full-functioning malware downloader later on. Browser hijacking can cause severe privacy problems and even identity theft, disrupt your web browsing experience by taking command over outbound traffic, substantially slows down your personal computer by depleting a lot of resources, and result in system instability at the same time.

How you can fix a browser hijack

Some hijackers can be easily removed by uninstalling the free software they were included with or by eliminating any extension you’ve recently added to your browser. But, the majority of hijacking codes aren’t easy to remove manually, since they go deeper into your operating system. Besides, browser hijackers can modify the Windows registry therefore it can be quite hard to restore all of the values manually, especially if you’re not a very tech-savvy individual.

How To Install Safebytes Anti-Malware On An Infected PC

All malware is bad and the consequences of the damage will vary according to the specific kind of malware. Certain malware types modify web browser settings by including a proxy server or change the computer’s DNS settings. In such cases, you will be unable to visit certain or all internet sites, and therefore unable to download or install the required security software to remove the infection. If you are reading this, you may have affected by a virus that stops you from downloading a computer security application like Safebytes Anti-Malware. Do as instructed below to remove malware by alternate methods.

Get rid of viruses in Safe Mode

In Safe Mode, you could modify Windows settings, uninstall or install some applications, and remove hard-to-delete viruses. In the event the malware is blocking internet access and affecting your computer, running it in Safe Mode allows you to download anti-malware and run a diagnostic scan while limiting possible damage. To get into Safe Mode or Safe Mode with Networking, press the F8 key while the PC is starting up or run MSConfig and find the “Safe Boot” options in the “Boot” tab. Once you are in Safe Mode, you can try to download and install your antivirus software program without the hindrance of the malware. Following installation, run the malware scanner to get rid of standard infections.

Switch over to an alternative browser

Some malware only targets specific internet browsers. If this sounds like your situation, make use of another internet browser as it could circumvent the computer virus. The ideal way to avoid this issue is to pick a web browser that is well known for its security features. Firefox contains built-in Malware and Phishing Protection to keep you secure online.

Create a portable USB antivirus for removing malware

Another option would be to make a portable antivirus program on your USB flash drive. Do these simple steps to clean up your affected computer using a portable antivirus. 1) On a clean computer, download and install Safebytes Anti-Malware. 2) Plug the USB drive into the uninfected computer. 3) Double-click the executable file to open the installation wizard. 4) Choose the drive letter of the pen drive as the location when the wizard asks you where you want to install the antivirus. Follow activation instructions. 5) Transfer the flash drive from the clean PC to the infected PC. 6) Double-click the EXE file to run the Safebytes program from the pen drive. 7) Run Full System Scan to detect and get rid of all types of malware.

Protect Your Computer & Privacy With SafeBytes Anti-Malware

These days, an anti-malware tool can protect your computer from different kinds of online threats. But how do choose the best one among several malware protection software that’s available on the market? You may be aware, there are lots of anti-malware companies and tools for you to consider. Some are well worth your money, but most aren’t. You have to be very careful not to choose the wrong application, especially if you purchase a paid software. Among few good applications, SafeBytes Anti-Malware is the highly recommended program for the security-conscious user. SafeBytes anti-malware is a powerful, very effective protection software intended to assist users of all levels of IT literacy in identifying and removing harmful threats out of their personal computers. Using its outstanding protection system, this software will quickly detect and remove the majority of the security threats, which include browser hijackers, viruses, adware, ransomware, PUPs, and trojans. SafeBytes anti-malware takes PC protection to a whole new level with its enhanced features. The following are some of the best ones: World-class AntiMalware Protection: Using its enhanced and sophisticated algorithm, this malware removal tool can identify and eliminate the malware threats hiding in your computer effectively. Active Protection: SafeBytes delivers complete and real-time security for your PC. It’ll constantly monitor your pc for hacker activity and also provides users with superior firewall protection. Website Filtering: Through its unique safety rating, SafeBytes alerts you whether a site is safe or not to visit it. This will assure that you’re always certain of your online safety when browsing the web. Faster Scan: This tool has one of the fastest and most efficient virus scanning engines in the industry. The scans are very accurate and take a short amount of time to complete. Low Memory/CPU Usage: SafeBytes is really lightweight software. It consumes an extremely small amount of processing power as it works in the background therefore you will not see any computer performance problems. 24/7 Assistance: You can get totally free 24/7 technical support from their computer experts on any product queries or computer security issues.

Technical Details and Manual Removal (Advanced Users)

If you do not wish to use malware removal software and like to remove mixGames manually, you may accomplish this by going to the Windows Add/Remove Programs menu in the control panel and removing the offending program; in cases of browser extensions, you could uninstall it by going to the browser’s Add-on/Extension manager. It is also suggested to factory reset your browser settings to their default state. Lastly, examine your hard disk for all of the following and clean your Windows registry manually to remove leftover application entries following an uninstallation. But bear in mind, this is a complicated task and only computer experts can perform it safely. In addition, certain malware is capable of replicating or preventing deletion. Completing this task in Safe Mode is recommended.
Registry: HKEY_CURRENT_USERSoftwareMicrosoftInternet ExplorerMain Default_Page_URL HKEY_LOCAL_MachineSoftwareClassesmixGame HKEY_CURRENT_USERSoftwareMicrosoftWindowsCurrentVersionRun .exe HKCUSoftwareMicrosoftWindowsCurrentVersionInternet Settingsrandom HKEY_LOCAL_MACHINESOFTWAREMicrosoftWindowsCurrentVersionrunrandom HKEY_CURRENT_USERSoftwareMicrosoftWindowsCurrentVersionInternet Settings CertificateRevocation = ’0
Read More
How to Resolve Internal Error 2753

Internal Error 2753 - What is it?

Internal error 2753 is associated with Windows Installer failure. The Windows Installer is basically an in-built software program in Windows 7 and 8. It installs all programs on the system smoothly, saves the program in the computer program files and in the Windows Registry. Though this can be carried manually Windows Installer makes the installation process much easier. However, internal error 2753 can cause a great deal of distress and frustration during program installation. This error prevents you from installing your desired program successfully.

Solution

Restoro box imageError Causes

The 2 known causes for Internal Error 2753 are:
  • Viral infection
  • Windows Installer not properly registered

Further Information and Manual Repair

To resolve internal error 2753 on your system, try the methods discussed below. These methods are easy and require no technical expertise. Let’s get started:

Method 1 - Remove All Malicious Programs

Malicious programs like viruses, malware, adware, Trojan and spyware can corrupt programs on your PC like Windows Installer. If this is the underlying cause of error code 2753, then simply download a powerful antivirus on your system. Run it to scan for all such malicious programs and remove them. Once your PC is clean, try installing your desired program. This will hopefully resolve the issue. If the error still pops up then try method 2.

Method 2 - Register Windows Installer Properly

To do this, go to the start menu and then open Run and type ‘cmd’ in the box, and press OK. This will open the DOS command window. In the command prompt type "regsvr32 vbscript.dll" and then press Enter to proceed. After that, you will see a message that will read as "DllRegisterServer in vbscript.dll succeeded." This means Window Installer files have been successfully registered on your PC.  Now you can try installing your desired program again. If the installation begins and completes successfully, then the error is resolved.

Method 3 - Undo Recent Changes

If nothing works, then use the Windows System Restore Utility tool to undo recent changes. This will bring back your PC in the former state before you experienced the error 2753 on your PC. To access System Restore Utility, press Start and type System Restore in the search box. Now follow the steps in the Wizard to choose a restore point. Once you select the point, reboot your system to activate changes.
Read More
Windows 10 Power Toys detailed guide
Hello and welcome everyone, today we will be talking about power toys, a great, completely free, open-source, Microsoft-supported Windows project which aims to provide Windows itself with powerful features not found natively in it. We will explore power toys completely here and explain each module and its features. The first thing is of course to download power toys themselves. You can find them here. After you download them, double click on the downloaded file and install. Start power toys, you will find them at the bottom of the taskbar, note that power toys need to be active in order to use their features. power toys
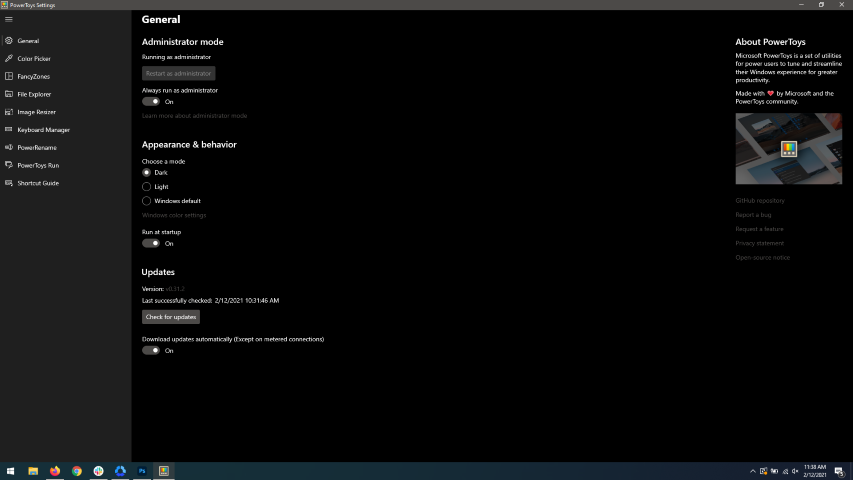
When opened you will be greeted with general settings window. These are settings for power toys themselves, Here you can check for updates, change the looks of power toys, run it on system startup and run them as administrator. Set them up so they best suit your needs.

Color Picker

Moving down next tab we have is Color picker. power toys colorpicker hex editor
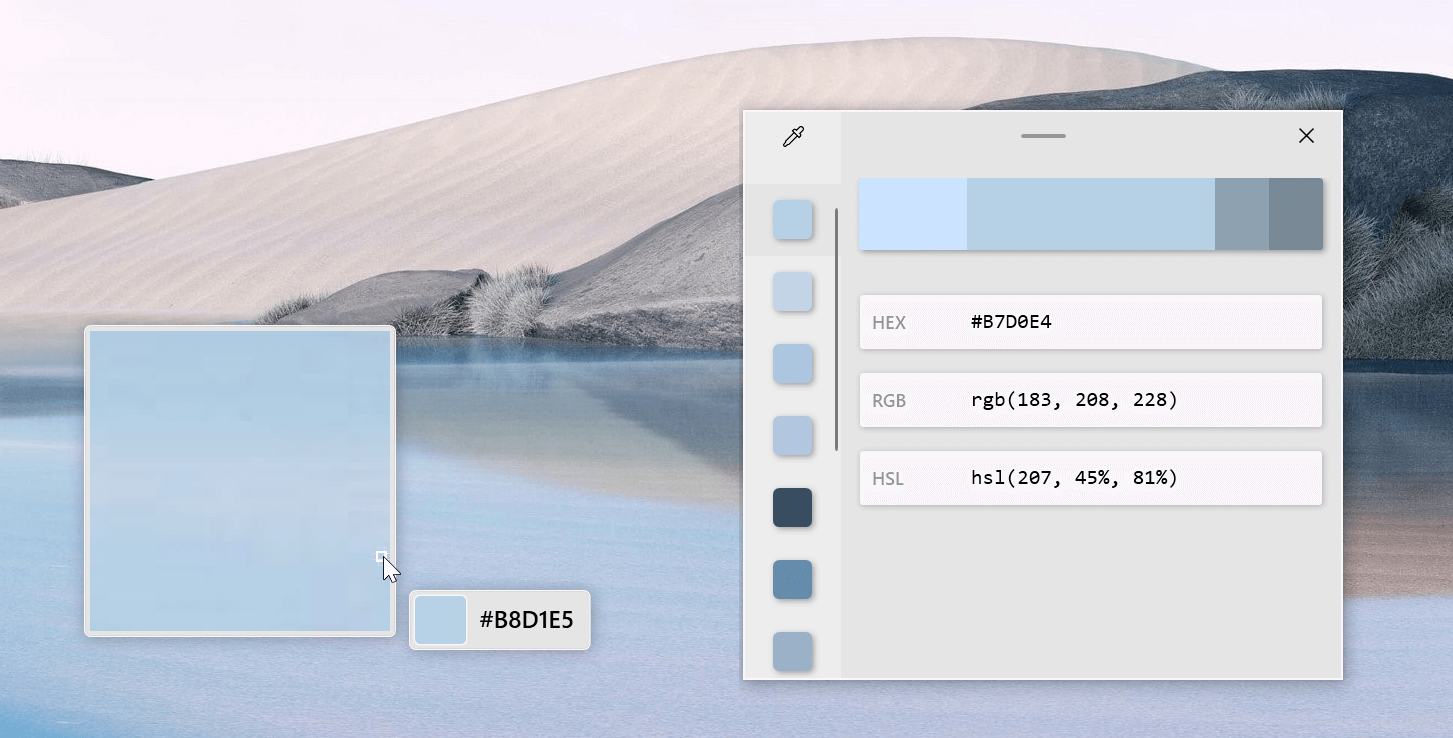
The color picker will let you as the name suggests pick colors, it will sample colors from running applications and windows, snap their values, and place them in the clipboard. A useful application if you are working as a graphic designer, want to create some cool word document, or just want to compare the difference between colors. After the Color Picker is activated, hover your mouse cursor over the color you would like to copy and left-click the mouse button to select a color. If you want to see the area around your cursor in more detail, scroll up to zoom in. The copied color will be stored in your clipboard in the format that is configured in the settings (HEX by default). The editor lets you see the history of picked colors (up to 20) and copy their representation in any predefined string format. You can configure what color formats are visible in the editor, along with the order that they appear. This configuration can be found in PowerToys settings. The editor also allows you to fine-tune any picked color or get a new similar color. Editor previews different shades of currently selected color - 2 lighter and 2 darker ones. Clicking on any of those alternative color shades will add the selection to the history of picked colors (appears on the top of the colors history list). Color in the middle represents your currently selected color from the history of the colors. By clicking on it, the fine-tuning configuration control will appear, which will let you change the HUE or RGB values of the current color. Pressing OK will add newly configured color into the history of the colors.

Fancy Zones

Moving down, we have fancy zones. power toys fancy zonesFancyZones is a window manager utility for arranging and snapping windows into efficient layouts to improve the speed of your workflow and restore layouts quickly. FancyZones allows the user to define a set of window locations for a desktop that are drag targets for windows. When the user drags a window into a zone, the window is resized and repositioned to fill that zone. When first launched, the zones editor presents a list of layouts that can be adjusted by how many windows are on the monitor. Choosing a layout shows a preview of that layout on the monitor. The selected layout is applied automatically.

File Explorer

Next, File Explorer. power toys settings file explorer
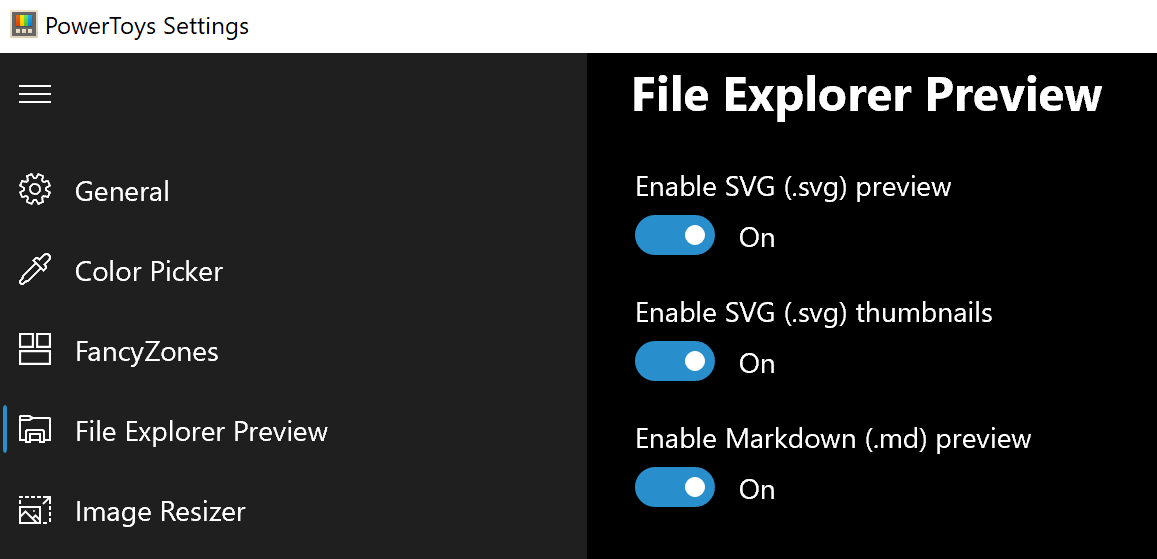
Only 3 options here but maybe some are important to you. This extension lets you enable SVG file preview in File Explorer, enable Markdown preview, and enable SVG thumbnails. Turn on each one you might need.

Image Resize

Next down the line, we have Image resize. power toys image resize
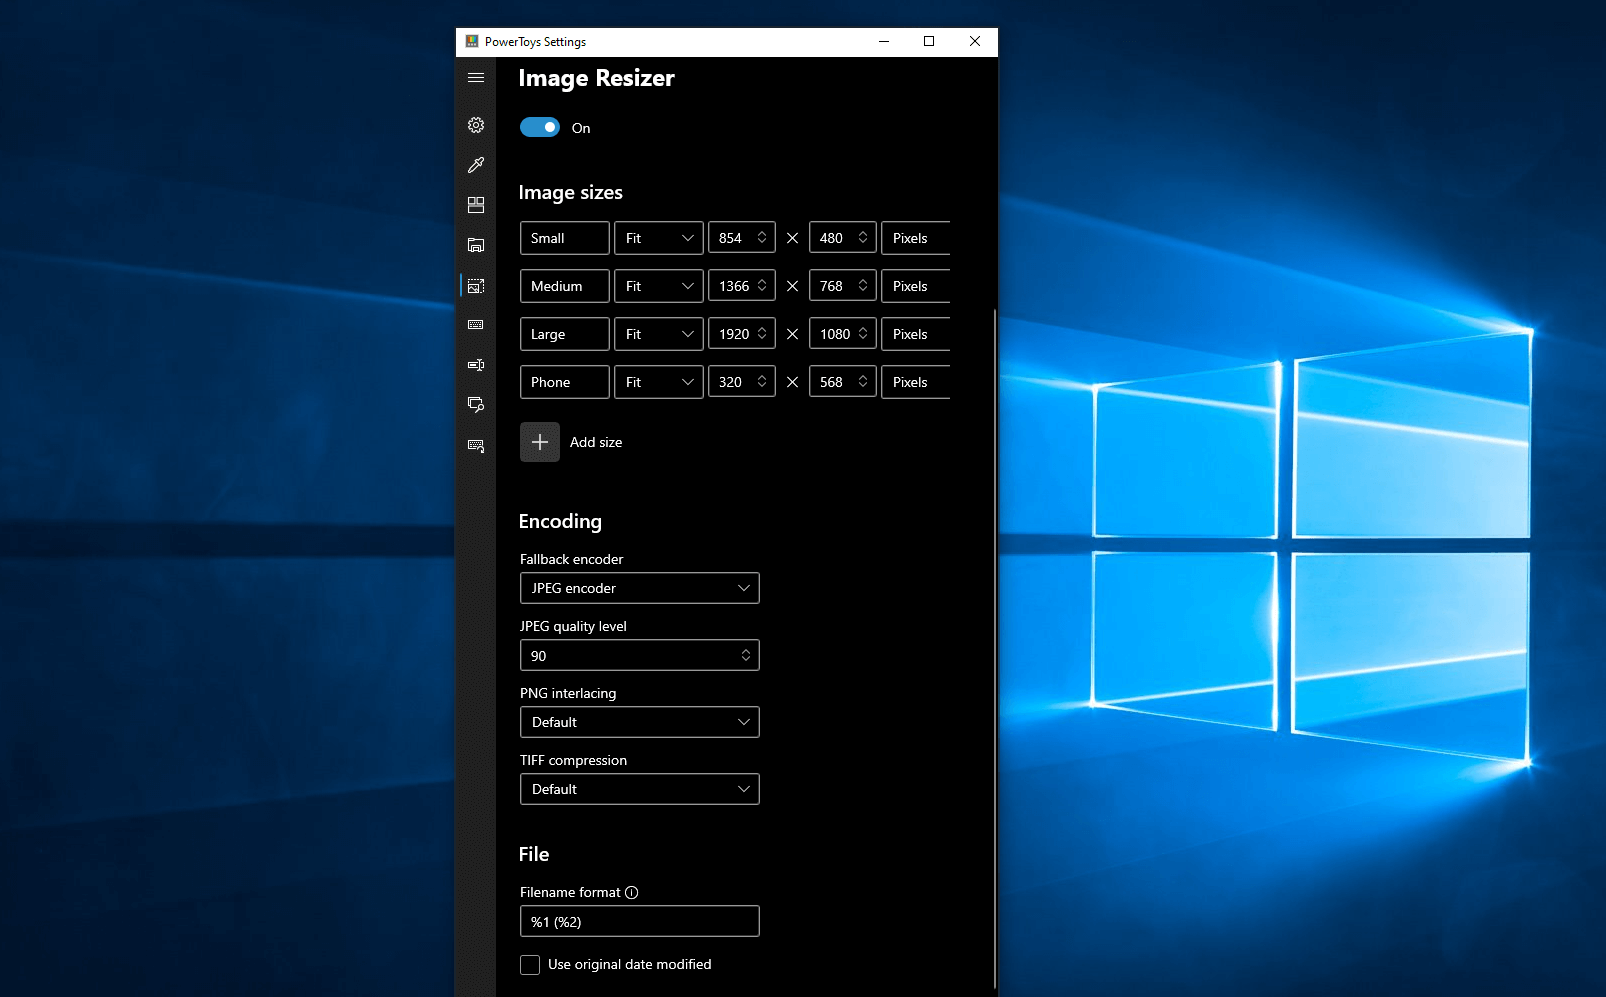
Image Resizer is a Windows shell extension for bulk image-resizing. After installing PowerToys, right-click on one or more selected image files in File Explorer, and then select Resize pictures from the menu. You can specify your own sizes if you want, you can resize when dragging files, you can overwrite files or make new copies of new sizes, and many more options. A very useful tool I am sure plenty of users can use since this eliminates the need for pictures or any other image application for common resizing tasks.

Keyboard Manager

The keyboard manager is the next tab in power toys. power toys keyboard shortcuts
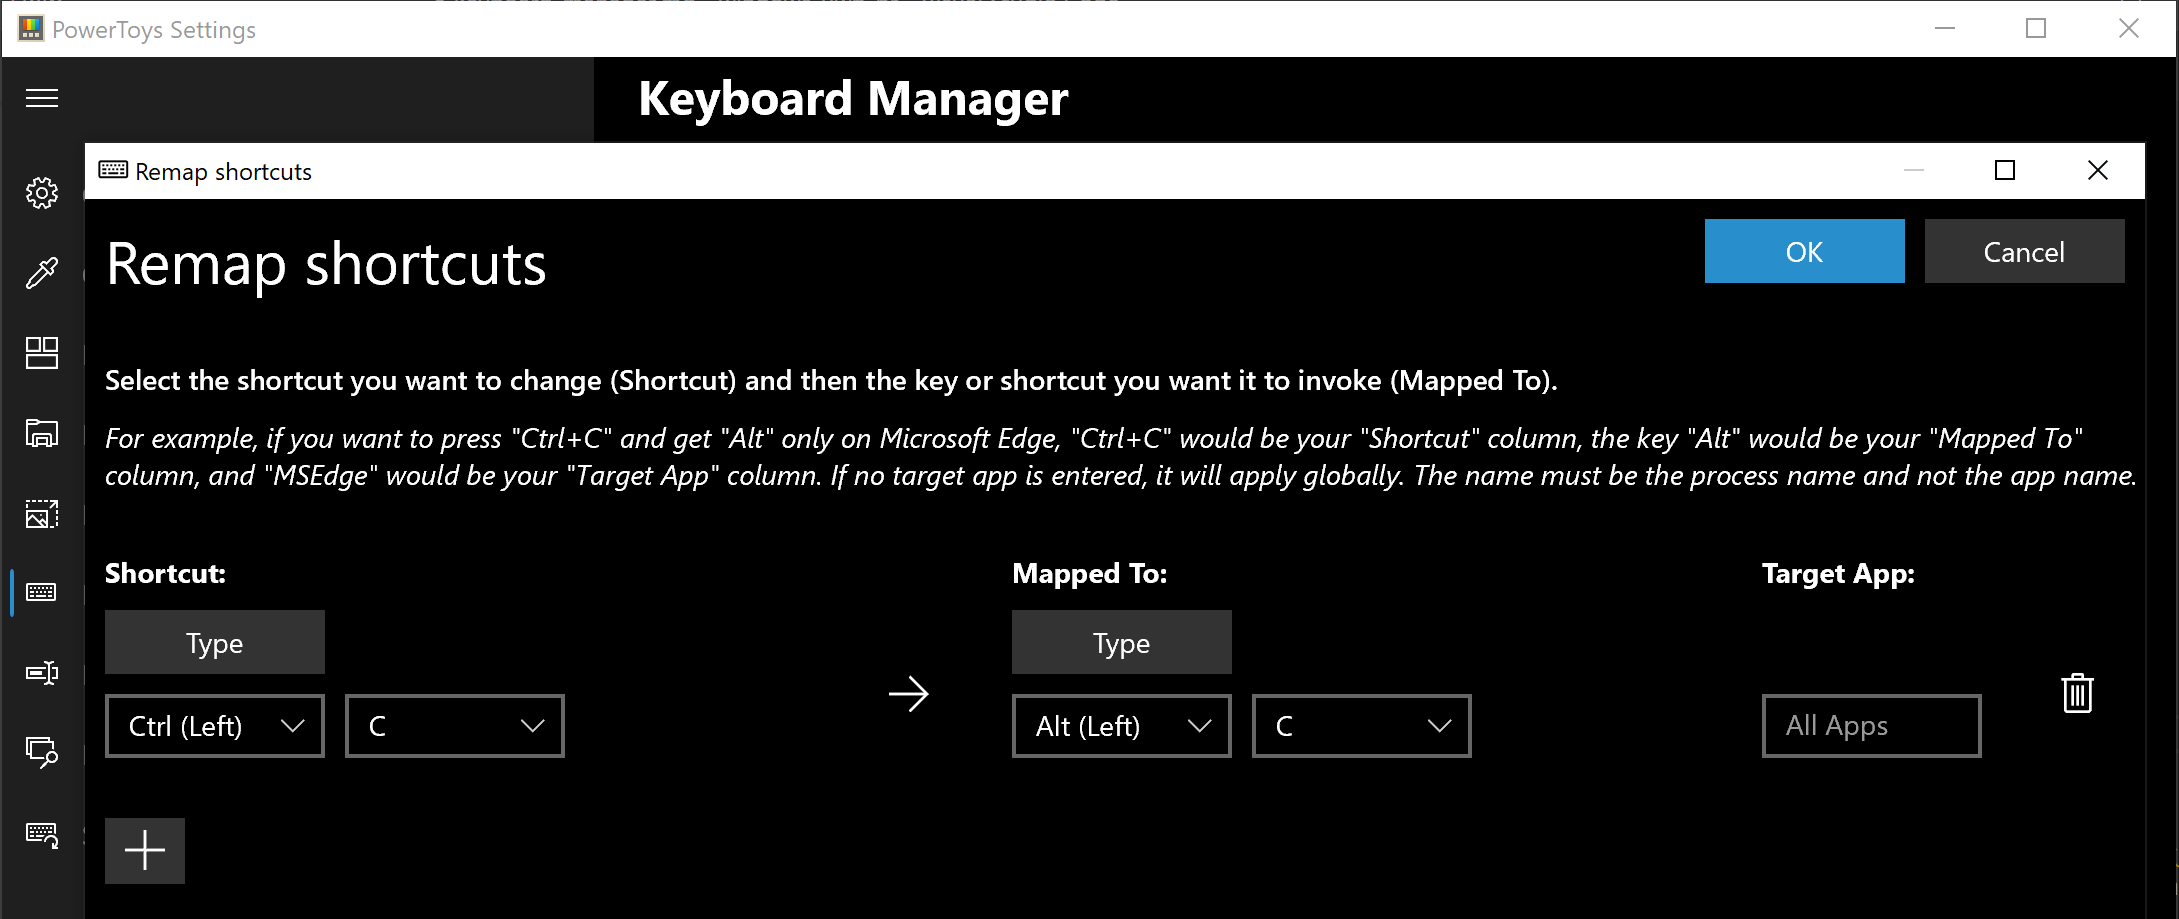
The PowerToys Keyboard Manager enables you to redefine keys on your keyboard. For example, you can exchange the letter A for the letter D on your keyboard. When you select the A key, a D will display. You can also exchange shortcut key combinations. For example, the shortcut key, Ctrl+C, will copy the text in Microsoft Word. With the PowerToys Keyboard Manager utility, you can exchange that shortcut for ⊞ Win+C). Now, ⊞ Win+C) will copy text. If you do not specify a targeted application in PowerToys Keyboard Manager, the shortcut exchange will be applied globally across Windows. PowerToys Keyboard Manager must be enabled (with PowerToys running in the background) for remapped keys and shortcuts to be applied. If PowerToys is not running, key remapping will no longer be applied.

Power Rename

Nex we have a very cool and powerful Power Rename power toys power rename
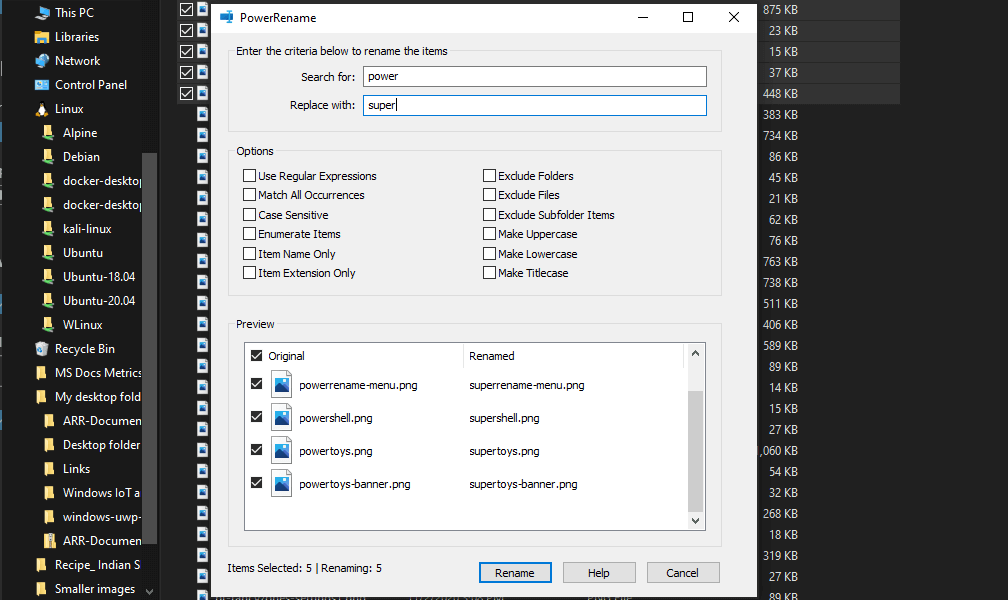
PowerRename is a bulk renaming tool that enables you to:
  • Modify the file names of a large number of files (without renaming all of the files with the same name).
  • Perform a search and replace on a targeted section of file names.
  • Perform a regular expression rename on multiple files.
  • Check expected rename results in a preview window before finalizing a bulk rename.
  • Undo a rename operation after it is completed.

Run Utility

Power Toys Run utility follows next. power toys run warning
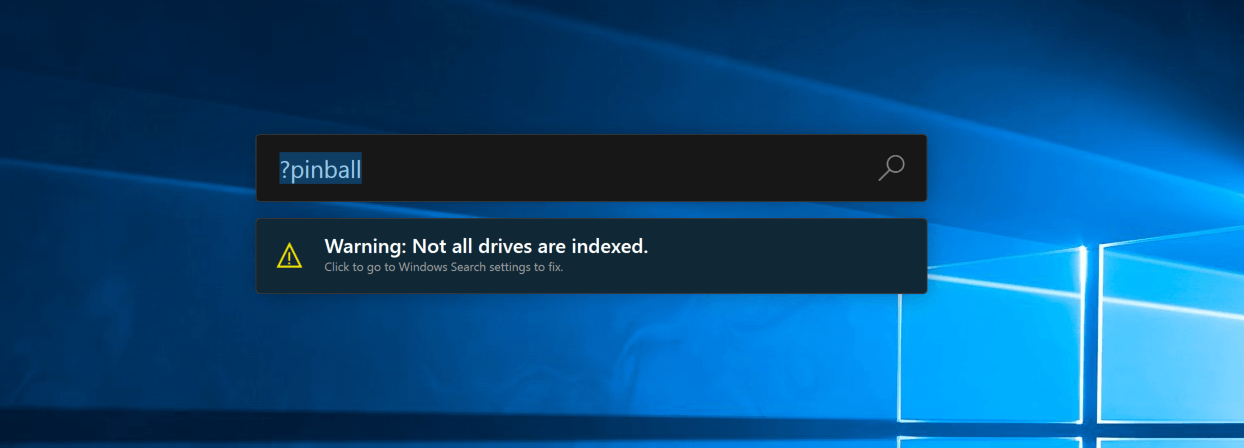
PowerToys Run is a quick launcher for power users that contains some additional features without sacrificing performance. PowerToys Run features include:
  • Search for applications, folders, or files
  • Search for running processes (previously known as WindowWalker)
  • Clickable buttons with keyboard shortcuts (such as Open as the administrator or Open containing folder)
  • Invoke Shell Plugin using > (for example, > Shell:startup will open the Windows startup folder)
  • Do a simple calculation using the calculator

Shortcut Guide

Last but not least we have a Shortcut guide. power toys shortcut guide large
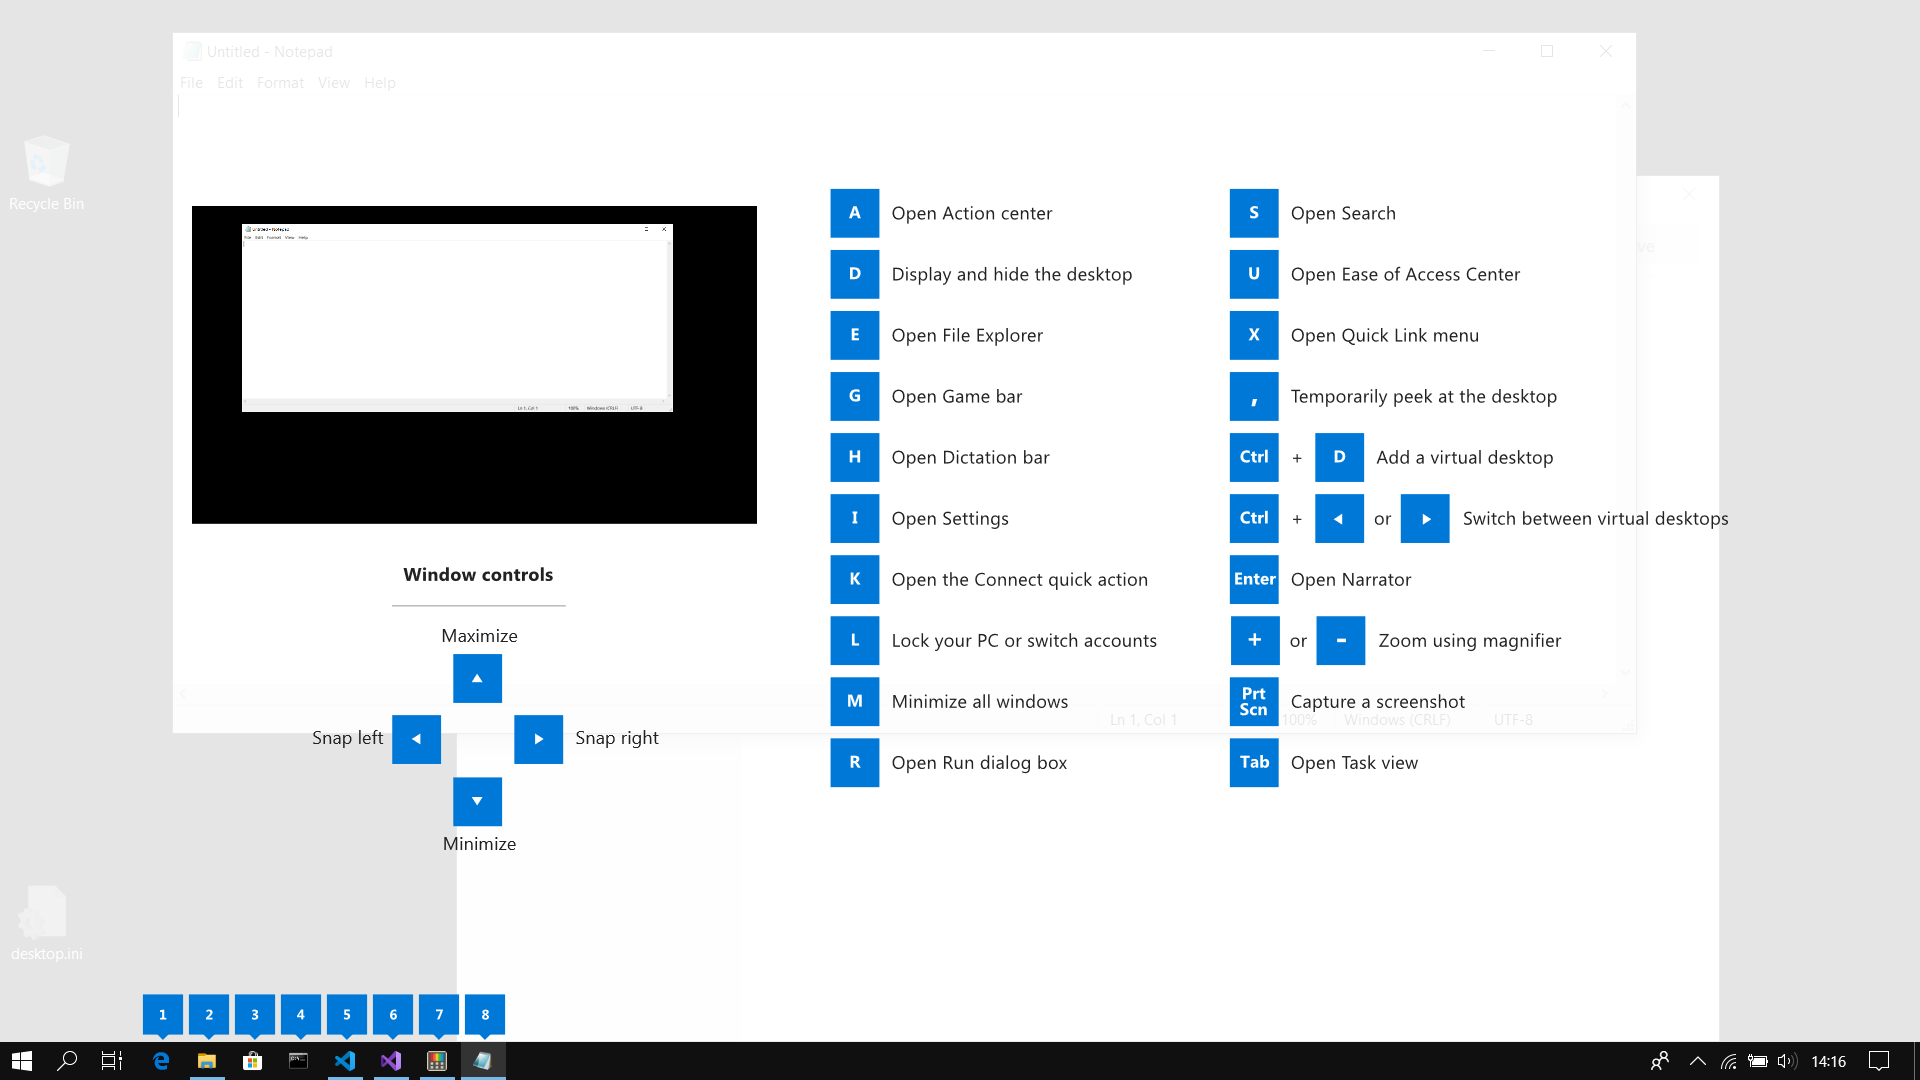
This guide uses PowerToys to display common keyboard shortcuts that use the Windows ⊞ key. Windows key keyboard shortcuts can be used while the guide is being shown and the result of those shortcuts (active window moved, arrow shortcut behavior changes, etc) will be displayed in the guide. Releasing the Windows ⊞ key will make the overlay disappear. Tapping the Windows ⊞ key will display the Windows Start menu. Hey, you made it till the end, thank you for reading and I hope to see you soon.
Read More
Enable or disable Full-screen optimizations
In case you don’t know, there is a feature in Windows 10 computers that allows them to function a lot better. This feature is called Full-Screen optimization and it is enabled by default for several applications such as games and video players. If enabled, the Full-Screen optimization feature enhances the video playback and gaming by simply putting the CPU and GPU process as a priority. However, there are times when it can also result to a drop in the frame rate or FPS while in full-screen mode. And of course, the obvious solution to this dilemma is by disabling the Full-Screen optimization feature which is why Microsoft took action and removed this feature themselves in the recent Windows 10 Update releases. However, there is another way for you to enable it back or disable it yourself if you haven’t installed the recent updates yet and there are plenty of ways you can do both. All you have to do is follow the options given below carefully.

Option 1 – Try using Windows 10 Settings

If you haven’t installed the recent updates yet and all you have are the earlier releases, then this method would suit you.
  • Open the Windows 10 Settings app.
  • Next, navigate to System > Display > Graphics Settings or Advanced graphics settings.
  • From there, uncheck the “Enable Fullscreen optimization” option if you want to disable the feature, else just keep it checked.

Option 2 – Try using the Registry Editor

  • Tap the Win + R keys to open the Run dialog box and then type “Regedit” in the field and hit Enter to open the Registry Editor.
  • Afterward, if a User Account Control or UAC prompt appears, click on Yes.
  • Once the Registry Editor is pulled up, navigate to this registry key: HKEY_CURRENT_USERSystemGameConfigStore
  • Next, right-click on Explorer and select New > DWORD (32-bit) Value and then name it to “GameDVR_DSEBehavior and tap Enter to save it.
  • Now double click on the newly created GameDVR_DSEBehavior DWORD and set its value to “2” if you want to disable it, or “0” if you want to enable it.
  • Once you entered the value, close the Registry Editor and restart your computer to successfully apply the changes made.

Option 3 – Try running the application in Compatibility Mode

If the first two options didn’t work, the next thing you can do is to run the application in a Compatibility Mode. Follow the steps below to do so:
  • Go to the location of the application or game on which you need to disable or enable the Full-Screen optimization feature.
  • After that, right-click on it and select Properties.
  • Next, switch to the Compatibility tab where you can see the “Disable fullscreen optimization” option to disable the feature and vice versa.
  • Now click on the Apply and OK buttons to apply the changes made in the application’s settings.
Read More
Fix DRIVER_VERIFIER_DMA_VIOLATION Error
In case you don’t know, Driver Verifier is a built-in utility in the Windows 10 operating system. It is the one that ensures the integrity of all the drivers in the system. It can detect any suspicious behaviors of the drivers and if it finds the driver signature of some suspicious activity during runtime, it stops the suspected action by triggering a BSOD or Blue Screen of Death error and one of these Stop errors is the DRIVER_VERIFIER_DMA_VIOLATION error. When you encounter such an error, you will see the following message on your screen:
“Your PC ran into a problem that it couldn’t handle, and now it needs to restart. If you’d like to know more, you can search online later for this error: DRIVER_VERIFIER_DMA_VIOLATION”
There are several ways you can fix this error. You can try to disable the Driver Verifier or run the Hardware troubleshooter. You could also try to update, roll back or uninstall the drivers on your computer. For more details, refer to each one of the options provided below.

Option 1 – Try to disable the Driver Verifier Manager

The Driver Verifier Manager is another tool in Windows that could help you fix driver-related issues.
  • Type in the keyword “Verifier” in the Cortana search box to search for Verifier in Windows 10.
  • After that, select the option “Create custom settings”.
  • Make sure that you have checked everything except the options “DDI compliance checking” and “Randomized low resources simulation”.
  • Next, select the option “Select driver names from a list” option.
  • Afterward, you have to select all the drivers from any unofficial or third-party provider. To simply put it, you have to select all the drivers that are not supplied by Microsoft.
  • Then click on the Finish button.
  • Open Command Prompt as administrator and execute this command – verifier /querysettings
  • The command you just executed will display the Driver Verifier settings so if you see any of the flags enabled boot your Windows 10 PC into Safe Mode.
  • Open the Command Prompt as admin again and run this command – verifier /reset
  • The command will reset the Driver Verifier. Once the process is done, restart your PC and check.

Option 2 – Try to reinstall or update device drivers of recently installed hardware

If the first few options didn’t work for you, then it’s time to either update or roll back the device drivers. It is most likely that after you updated your Windows computer that your driver also needs a refresh. On the other hand, if you have just updated your device drivers then you need to roll back the drivers to their previous versions. Whichever applies to you, refer to the steps below.
  • Open the Devices Manager from the Win X Menu.
  • Then locate the device drivers and right-click on them to open the Properties.
  • After that, switch to the Driver tab and click on the Uninstall Device button.
  • Follow the screen option to completely uninstall it.
  • Finally, restart your computer. It will just reinstall the device drivers automatically.
Note: You can install a dedicated driver on your computer in case you have it or you could also look for it directly from the website of the manufacturer.

Option 3 – Try running the Blue Screen Troubleshooter

The Blue Screen troubleshooter is a built-in tool in Windows 10 that helps users in fixing BSOD errors like DRIVER_VERIFIER_DMA_VIOLATION. It can be found in the Settings Troubleshooters page. To use it, refer to these steps:
  • Tap the Win + I keys to open the Settings panel.
  • Then go to Update & Security > Troubleshoot.
  • From there, look for the option called “Blue Screen” on your right-hand side and then click the “Run the troubleshooter” button to run the Blue Screen Troubleshooter and then follow the next on-screen options. Note that you might have to boot your PC into Safe Mode.
Note: You could also run the Hardware and Devices troubleshooter as it could also help in fixing the DRIVER_VERIFIER_DMA_VIOLATION error.

Option 4 – Try running Microsoft’s online Blue Screen Troubleshooter

If running the built-in Blue Screen Troubleshooter didn’t work, you can also try running Microsoft’s online Blue Screen Troubleshooter. All you have to do is go to Microsoft’s website and from there, you will see a simple wizard that will walk you through the troubleshooting process.
Read More
How to place control panel in File explorer
Recent Windows updates have been slowly but surely moved a lot of control panel features into settings. This indicates that in the long term goal is probably to get rid of the control panel altogether. No matter how the setting app is easy to use and good there are still things in the control panel that we need and we will still need until they are all moved in the setting application. There are several ways to open and get to the control panel from run dialog to shortcut keys but one perhaps more convenient and easiest way is to just simply have in file explorer right beside hard drives double click away. In order to place the control panel icon inside file explorer, we will need the help of our old friend: the registry editor. As always playing with the registry editor can cause some instability and it is always a smart thing to back up it first before attempting any kind of edits.

Registry editor adding a key

To open registry editor press ⊞ WINDOWS + R to open the run dialog and inside type in REGEDIT followed by ENTER Once the registry editor is opened locate the following key: HKEY_LOCAL_MACHINE\SOFTWARE\Microsoft\Windows\CurrentVersion\Explorer\MyComputer Right-click on the NameSpace folder on the left navigation pane and then select New > Key Rename the key with {21EC2020-3AEA-1069-A2DD-08002B30309D} (This CLSID code will add access to the Category view of the Windows 10 Control Panel) or with {26EE0668-A00A-44D7-9371-BEB064C98683} (This CLSID code will add access to the large icons view of the Windows 10 Control Panel) Save and exit the registry editor Now when opened, file explorer will show a control panel icon for easy access.
Read More
A Quick Guide to Resolving Error 2738

Error 2738 - What is it?

The error code 2738 typically occurs either when you attempt to install a program or uninstall it on Windows Vista and 7. The error message is displayed in the following format:
“Error 2738. Could not access VBScript run time for custom action.”
It is a type of runtime error associated with VB (Visual Basic) Script. It indicates that the VB script engine is not correctly registered on your computer.

Solution

Restoro box imageError Causes

The error 2738 may occur due to multiple reasons. These include:
  • Windows VB Script engine is not properly installed or is disabled on your PC
  • Registry keys are incorrect
  • Corrupt registry entries
  • Poor PC maintenance
As this error code may be generated due to registry issues, it is advisable to fix it immediately as it may pose serious threats to your system like system failure, crash and valuable data loss. And complete data retrieval is often the hardest task.

Further Information and Manual Repair

To avoid such threats and to resolve the error 2738 on your PC immediately, here are some solutions that you can try:

Register the VB Script Engine Correctly on Your PC

This can be done by running the command prompt as administrator:-
  • Simply go to the start menu, click all programs, and select accessories.
  • Right-click on Command Prompt and select ‘run as Administrator’.
  • Navigate to the folder that contains the DLL. If you are using Windows 32 bit version, then type cd %windir%system32 into the Command Prompt and then press enter.
Nonetheless, if you are using 64-bit version Windows then type the following command: regsvr32 vbscript.dll and then press enter. This will help you register the VB script engine correctly and resolve the issue.

Download and Run Restoro

If the error still persists, then this means the underlying cause of the error 2738 could be invalid and corrupt registry keys. To resolve either of the causes in seconds, it is advisable to install and run Restoro. Restoro is an advanced, innovative, and multi-functional PC Fixer. This tool is embedded with multiple utilities including a powerful registry cleaner, an antivirus and a system optimizer.  The registry cleaner is a powerful utility that instantly detects all registry issues and resolves them right away. The registry saves all activities performed on the PC. It stores all types of files including invalid registry keys, cookies, internet history, junk files and temporary files. If these unnecessary files are not removed and cleared from the PC, it not only takes a lot of disk space but also damages the registry and dll files. The registry cleaning utility detects all such files and removes them. It wipes out all invalid registry entries and bad keys clean the registry and restores it. In addition to this, this tool can also be used to remove viruses and optimize the system speed. It is a user-friendly and highly functional PC repair tool. It is compatible with all Windows versions Click here to download Restoro on your PC and resolve error 2738 right away!
Read More
Fix STOP 0XC000021A, error in Windows 10
Upgrading your Windows computer may not always go as expected as you could end up getting some error messages along the way. One of the error messages you can encounter is the “STOP 0XC000021A or STATUS_SYSTEM_PROCESS_TERMINATED” error. This error indicates that is some security issue within the Windows operating system. It could be that the system files have an issue and they have been modified incorrectly. Although this does not necessarily mean that malware is behind the modification, one of the applications you installed recently might have something to do with the problem. The application might have modified or corrupted some of the core system files. When you encounter this error, you will see a blue screen along with the following error message:
“Your PC ran into a problem and needs to restart. We’re just collecting some error info, and then we’ll restart for you. (0% complete) If you’d like to know more, you can search online later for this error: 0xc000021a”
This error pops up when a user-mode subsystem like the WinLogon or the Client Server Run-Time Subsystem or CSRSS has been compromised fatally and security can no longer be guaranteed in the system. Thus, the operating system switches to kernel mode, and Windows won’t be able to run without the WinLogon or the Client Server Run-Time Subsystem. This is why it’s one of the few cases where the failure of a user-mode service can shut down the system. To resolve the issue, here are some fixes that might help.

Option 1 – Uninstall programs you installed lately

  • In the search box, type in “control” and then click on Control Panel (desktop app) among the search results.
  • After that, select Programs and Features from the list which will give you a list of all the programs installed on your computer.
  • From there, look for the concerned program and select it and then uninstall it.
Note: If you have downloaded the app from the Windows Store, you can simply right-click on it from the application list and then uninstall it.

Option 2 – Perform System Restore

Performing System Restore can also help you fix the “STOP 0XC000021A or STATUS_SYSTEM_PROCESS_TERMINATED” error. You can do this option either by booting into Safe Mode or in System Restore. If you are already in the Advanced Startup Options, just directly select System Restore and proceed with the next steps. And if you have just booted your PC into Safe Mode, refer to the steps below.
  • Tap the Win + R keys to open the Run dialog box.
  • After that, type in “sysdm.cpl” in the field and tap Enter.
  • Next, go to the System Protection tab then click the System Restore button. This will open a new window where you have to select your preferred System Restore point.
  • After that, follow the on-screen instructions to finish the process and then restart your computer and check if the problem is fixed or not.

Option 3 – Run the System File Checker or SFC scan

System File Checker or SFC is a built-in command utility that helps in restoring corrupted files as well as missing files. It replaces bad and corrupted system files to good system files that might be the cause why you’re getting the “STOP 0XC000021A or STATUS_SYSTEM_PROCESS_TERMINATED” error. To run the SFC command, follow the steps given below.
  • Tap Win + R to launch Run.
  • Type in cmd in the field and tap Enter.
  • After opening Command Prompt, type in sfc /scannow
The command will start a system scan which will take a few whiles before it finishes. Once it’s done, you could get the following results:
  1. Windows Resource Protection did not find any integrity violations.
  2. Windows Resource Protection found corrupt files and successfully repaired them.
  3. Windows Resource Protection found corrupt files but was unable to fix some of them.

Option 4 – Rebuild the BCD and fix MBR

Rebuilding the BCD can help you in fixing the “STOP 0XC000021A or STATUS_SYSTEM_PROCESS_TERMINATED” error.
  • You can start by booting into the installation environment for Windows 10 from an installation media.
  • After that, click on Repair your computer and on the blue screen, select Troubleshoot and then select the Advanced options menu.
  • Next, select Command Prompt and type in the commands below one by one, and tap Enter right after you do so.
  • exe /FixMbr
  • exe /FixBoot
    • exe /RebuildBcd
The commands you entered should rebuild the BCD and repair MBR.

Option 5 – Run the CHKDSK utility

You can also run the Chkdsk utility to resolve the problem. If your hard drive has issues with integrity, the update will really fail as the system will think that it’s not healthy and that’s where the Chkdsk utility comes in. The Chkdsk utility repairs hard drive errors that might be causing the problem.
  • Open Command Prompt with admin privileges.
  • After opening Command Prompt, execute the commands listed below, and don’t forget to hit Enter right after you type in each one of them.
  • chkntfs /t
  • chkntfs /t:10
Read More
1 2 3 171
Logo
Copyright © 2023, ErrorTools. All Rights Reserved
Trademark: Microsoft Windows logos are registered trademarks of Microsoft. Disclaimer: ErrorTools.com is not affiliated with Microsoft, nor claims direct affiliation.
The information on this page is provided for information purposes only.
DMCA.com Protection Status