Since Windows 10 introduced the concept of notifications, almost any application installed on your computer sends you one. However, there are times when too many notifications can be quite annoying. Although some of them are important, most of them are not and are only getting in the way of your tasks. So if you don’t like to be flooded with tons of notifications on your Windows 10 computer, say no more as this post will help you out in disabling notifications for any apps installed.
And now with the new feature in Windows 10 called Focus Assist, you will be able to manage the level of notifications that you receive. This new feature also allows you to disable all notifications except for the ones from important or priority apps. You will just have to maintain a list of priority applications or you could also disable all the notifications except for the important ones like alarms. In addition, you could also set up some automatic rules such as the Focus Assist timings which means that you can make Focus Assist enabled for a certain period of time during the day or when you are duplicating your display or playing a game and whatnot. So if there is an application that keeps on spamming you with notifications, you can just disable the notifications for that application.
To get started on disabling notifications, refer to the steps given below.
Step 1: Go to Settings > System.
Step 2: From there, open Notifications and actions and then scroll down to the “Get notifications from these apps” section.
Step 3: After that, look for the application that you want to disable notifications for and click on the toggle button that corresponds to disabling notifications for that application. You could also click open to explore additional settings for that particular application.
Note: You can disable notifications or just the notification banners, your choice. Aside from that, you can also control the notification sound as well as its behavior when the computer screen is locked. What’s more, is that you can also adjust the number of notifications displayed in the Action Center or select the priority applications. As stated earlier, Windows 10 gives you control that allows you to customize every nook and cranny of the notification on your Windows 10 computer. Apart from applications, there are also other notifications-related settings that you can control including disabling notifications about tips, tricks, and suggestions as well as summary notifications from Windows Defender that you get every time you use or scan your computer.
When it comes to booting an operating system on a computer, one of the most essential pieces of software you can use is the UEFI. In fact, a lot of users now prefer to use UEFI instead of BIOS. It also depends on whether the UEFI or the BIOS is supported on the motherboard. Recently, a number of users reported an issue with UEFI where they were unable to find it under the Advanced Options screen where it’s supposed to be located.
The missing UEFI Firmware settings in the Advanced Options could be caused by several reasons. It is possible that the access to the UEFI menu is blocked or it could also be due to the Extra Fast Startup feature being enabled. It is also possible that the operating system is installed in Legacy mode.
There are several options to try to fix this issue. You need to check if your computer supports UEFI or you could also try to disable Fast Startup or bypass the Extra Fast Startup feature. You can also use a boot to UEFI shortcut as well as check the CMOS battery.
Option 1 – Try checking if your computer supports UEFI
The first thing you have to do is to verify if your computer supports UEFI. If your computer does not support UEFI, then it’s no wonder why you don’t see the UEFI Firmware settings in the Advanced Options.
Option 2 – Try turning off Fast Startup
First, boot your computer in Safe Mode.
Once your computer is booted in Safe Mode, tap the Win + R keys to open the Run dialog box and type in “control” to open the Control Panel.
Next, click on the Hardware and Sound section and click on Power Options.
Afterward, select the “Choose what the power buttons do” option from the left side menu pane.
Now click on Change settings that are currently unavailable and uncheck the entry that says, “Turn on fast startup (Recommended)”.
Then click on Save Changes and restart your computer and see if it has fixed the problem or not.
Option 3 – Try bypassing the Extra Fast Startup feature
As mentioned, the missing UEFI Firmware settings could be due to the Extra Fast Startup feature. To fix it, you have to disable this feature. All you have to do is tap and hold the Shift key and click on the Shutdown button from the Start button. This will boot your PC with the UEFI booting from the beginning and then use the hotkey for your motherboard to boot into the UEFI setup.
Option 4 – Try using a boot to UEFI shortcut
Right-click on any empty space on your Desktop and select New > Shortcut.
This will open a new mini window. And here, you have to type this in the text field: shutdown /r /fw
After that, click on Next and name the desktop shortcut and then click on Finish.
Next, right-click on the newly created shortcut and select Properties.
Click on the Advanced button and select the “Run as administrator” option.
Now click OK to save the changes made. Each time you execute this shortcut, your computer will automatically be booted to the UEFI Firmware Settings.
Option 5 – Try to check the CMOS battery
Another thing you can do is check the CMOS battery physically on the motherboard and see if it has to be replaced since a damaged CMOS battery can also cause the issue with the missing UEFI Firmware settings.
Option 6 – Set your computer from Legacy to UEFI
If applicable, you can try to set your computer from Legacy to UEFI to resolve the problem.
In the Windows Search box, type “command prompt” and from the search results that appear, right-click on Command Prompt and select the “Run as administrator” option.
After that, execute this command: mbr2gpt.exe /convert /allowfullOS
Now, wait until the process is completed since you can track its process on your screen.
Once it’s done, go to Settings > Update & Security > Advanced Startup options and from there, click on Restart Now. This will restart your computer and give you advanced options.
Next, select Troubleshoot > Advanced Options where you will see further options including System Restore, Startup Repair, Go back to the previous version, Command Prompt, System Image Recovery, and UEFI Firmware Settings.
Now select the UEFI Firmware Settings. This will take you to the BIOS. Boot Mode is typically available under Boot > Boot Configuration. Once you’re there, set it to UEFI and then save the changes you’ve made. After that, your computer will restart.
Privacy is a hot topic lately in all circles so naturally themes like private or incognito browsing pop up immediately as discussion topics. Naturally, when discussing private or incognito browsing it is very important to understand what exactly private or incognito browsing is, what does it do and how it works in order to shed some light on is it really private and safe as we are told.
So, when you browse the internet normally websites have tendencies to save your browsing data, save cookies, remember passwords, etc in order to provide you with a better surfing experience next time you visit that same site. Private or incognito browsing treats you as a completely new user which is the first time visiting a given website. It clears all your data, including your browsing history, cookies, etc., on exiting. Every website you visit in private or incognito mode treats you as a new visitor, even if you have visited it before in incognito mode.
And basically, that's it. So is it really private? No, it is just a non-remembering mode of internet browsing where after your browsing session history and other data is cleared from the browser, but while you are on the internet you are pretty visible to all like any other normal user.
There are a lot of misconceptions and wrong thinking about browsing the internet in this mode so let's take a look at some typical ones.
The government and other companies can not track me
Many people think that the Government cannot trace their identity when they surf privately. This is only a myth. There are many ways by which the Government can reach you if you do something illegal. When you surf online, you are connected with an ISP of your area, which helps the officials track your location.
Virus and other malware can not infect me while in private or incognito mode
Many people think that private mode protects them from virus and malware attacks. It is not true because malware and viruses can enter your PC through a software download, phishing email, etc. To protect your PC from virus and malware attacks, you should have good security software.
My IP address is hidden when I am in incognito or private browsing mode
This is not 100% true. If you search “What is my IP” in incognito and standard mode, you will get the same results. This means that websites can view your IP address in private mode also. Using a VPN would be a good option if you want to hide your IP.
I can not be tracked via ads
Since cookies are deleted after exiting private browsing, many people think that ads cannot track them. When you surf in incognito mode, the browser saves cookies in a temporary mode, allowing ads to track you during your entire private browsing session.
I am not visible when I am in incognito or private
You may think if you sign in to your Gmail or other social media accounts in private mode, no one will see you online. This is not true. It does not matter whether you have signed into your account in normal mode or incognito mode; others can always spot you online.
In your regular browsing mode, you may have some addons, extensions, themes, etc installed and you can use them. They may track your activities. The data is deleted when you exit the browser.
When you use the private browsing mode, the browser is loaded in its original form, typically without the installed addons, extension, themes, etc. The data gets deleted when you exit the browser. This mode doesn’t save data to disk but keeps it in memory during the current session.
If you are really concerned about your privacy we have articles about using DuckDuckGo and deep web where you can be sure that your browsing sessions are encrypted.
Hello everyone and welcome to our Windows 10 security basics where we will provide you with common practices you should aim to follow in order not to cough some viruses, malware, keylogger, worm, etc.
As you are all aware, we live in a digital age where we are surrounded by luxuries of unlimited information, video chats all over the globe, free calls via the internet, applications that track stuff for us, and many many more things that make our lives easier. Sadly with this kind of technology comes risks of cyber attacks that aim to steal your information, credit card numbers, or any other relevant stuff which could be used illegally in order to make purchases, loans, and other theft in your name so ones doing that could not get caught.
Think of data stealers the same as you think of armed robbers in a dark alley, just this time their pray is data about your life so they can make purchases for themselves more than once.
This article aims to provide you with some common logic, tips, and tricks of what should you do and where should you pay attention in order not to provide wrong people with your crucial information and data. we hope that you will find reading informative and helpful.
Keep Windows updated.
Microsoft is working hard on their Windows defender and firewall to provide protection to its users and fixing any introduced security leaks which are found in Windows itself. By updating and keeping Windows updated you make sure that every security leak that is found is patched and removed from Windows and that you have the latest database of known malware inside the firewall and defender.
This common practice, however, should not be limited to Windows only, you should update every application you are using for the same reasons.
Use antivirus, anti-malware, and firewall
These applications exist for a reason and that reason is to protect your data. Dedicated applications specifically made for purposes of defending your data are better than any kind of I am careful mentality since sometimes is enough to just visit a website or just click on some link and you are compromised. You can use Windows Defender and firewall if you wish, they are already in Windows but if you are serious about your data and like to surf the internet some better protection is worth the investment.
Get a dedicated password manager
Your password is bad, if you use the same password everywhere then it is even worse. Computers have come a long way in the last 50 years and so have cyber attack applications which make your commonsense passwords extremely vulnerable and all of your accounts open to cyber attacks. Dedicated password managers that can hash passwords and automate them are your safest bet that your passwords will not be compromised, get one, and get it today.
Do not click on anything inside emails
Cyber attacks come in vast variety and one of them is sending you emails informing you that for example your Paypal or anything else has been hacked and that you must click this link to reset your password. These you do not click, no matter how convincing they sound or how good they look, if you need to update your information on a specific service or website, you delete email, open browser and go to that service and change stuff. The same goes with different offers, discounts, women seeking you, men seeking you, prince sending you 1 billion in gold. Only click on links in emails from a trusted and verified source.
Do not click on pop-ups
Similar to clicking on links in emails you should not click on pop-ups, the same rules, same stuff apply as with emails.
Be careful what you are downloading
Be careful from where you download your software and be careful what are you downloading and stop using pirated software, any kind of malicious applications, keyloggers, viruses, etc could be hidden in these downloads, and by downloading them you are opening doors to your private information. Only use legal software from trusted sources.
Never leave your phone or computer unattended
You can never tell who can implement malicious software or get some crucial information from unattended devices, lock them all time and take them with you.
There you go, 7 common tips and tricks for the basic security of your computer. Thank you for reading and I hope to see you again on our site.
If you have a dual monitor setup on your Windows 10 computer and you mostly use the second screen when you are presenting something, this makes the Taskbar completely unnecessary and is not really required. So if you are using your computer generally and do not want the taskbar on your second screen, read on as this post will guide you in disabling Taskbar on your second display.
The good thing is, Windows comes with a built-in feature to disable Taskbar on your second screen or projector connected to your computer. In this post, you will be guided on how you can hide or disable the Taskbar from the second monitor in Windows 10. This post is coming in handy especially if you are using projectors or multiple displays.
Refer to the steps given below to disable Taskbar on the second display in Windows 10.
Step 1: Go to Settings and click on Taskbar from the left menu.
Step 2: After that, scroll down to lo look for Multiple Displays.
Step 3: Next, turn off the toggle labeled, “Show taskbar on all displays”.
Note: After completing the steps given above, it will disable the Taskbar on all the secondary displays. Bear in mind that these settings will work only if you are running a second screen in Extended mode. Contrariwise, if you are in the Duplicate mode, this setting will not work but you can always set your Taskbar to Autohide so that it won’t be displayed.
On the other hand, if you are facing some issues in finding which screen is primary and which one is secondary, refer to these steps:
Step 1: Go to Settings and select System.
Step 2: Next, from the left menu open Display.
Step 3: From there, select the desired display and make it the primary one as required by your setup.
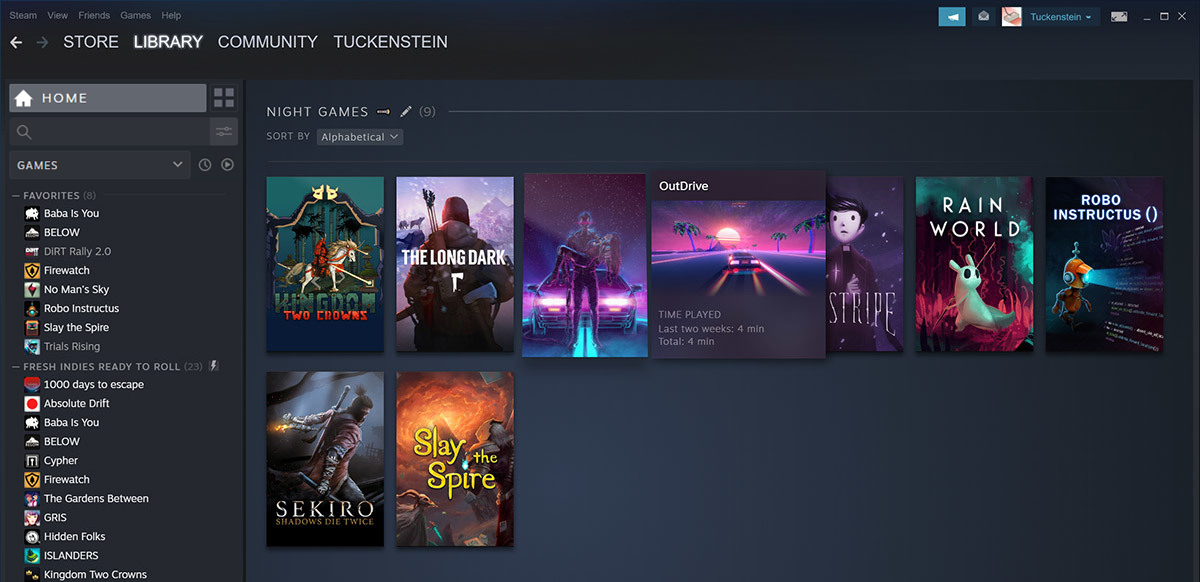
Valve has released a big update to its online store and distribution platform Steam. Among typical bugs fixing and making the user experience a little more fluid, we have received some major updates as well. Please take note that you need to update Steam itself to the latest version in order to get new features.
Storage management Page update
The storage management page has received a complete redesign and UX overhaul and it is now much easier to manage your game libraries and create new ones. The page itself looks and feels a little console more like but thanks to that it offers a much easier and clearer look and feel.
Another thing with the Steam store management page is the ability to move installation files from one location to another. Let’s say that you have two or more hard disk drivers in your machine and that you have SSD that you use for running stuff since it is fast and larger and slower one for storage. Now you can easily and quickly move one installation from one to another in order to take advantage of your faster SSD for quicker LOAD game times without making a new installation.
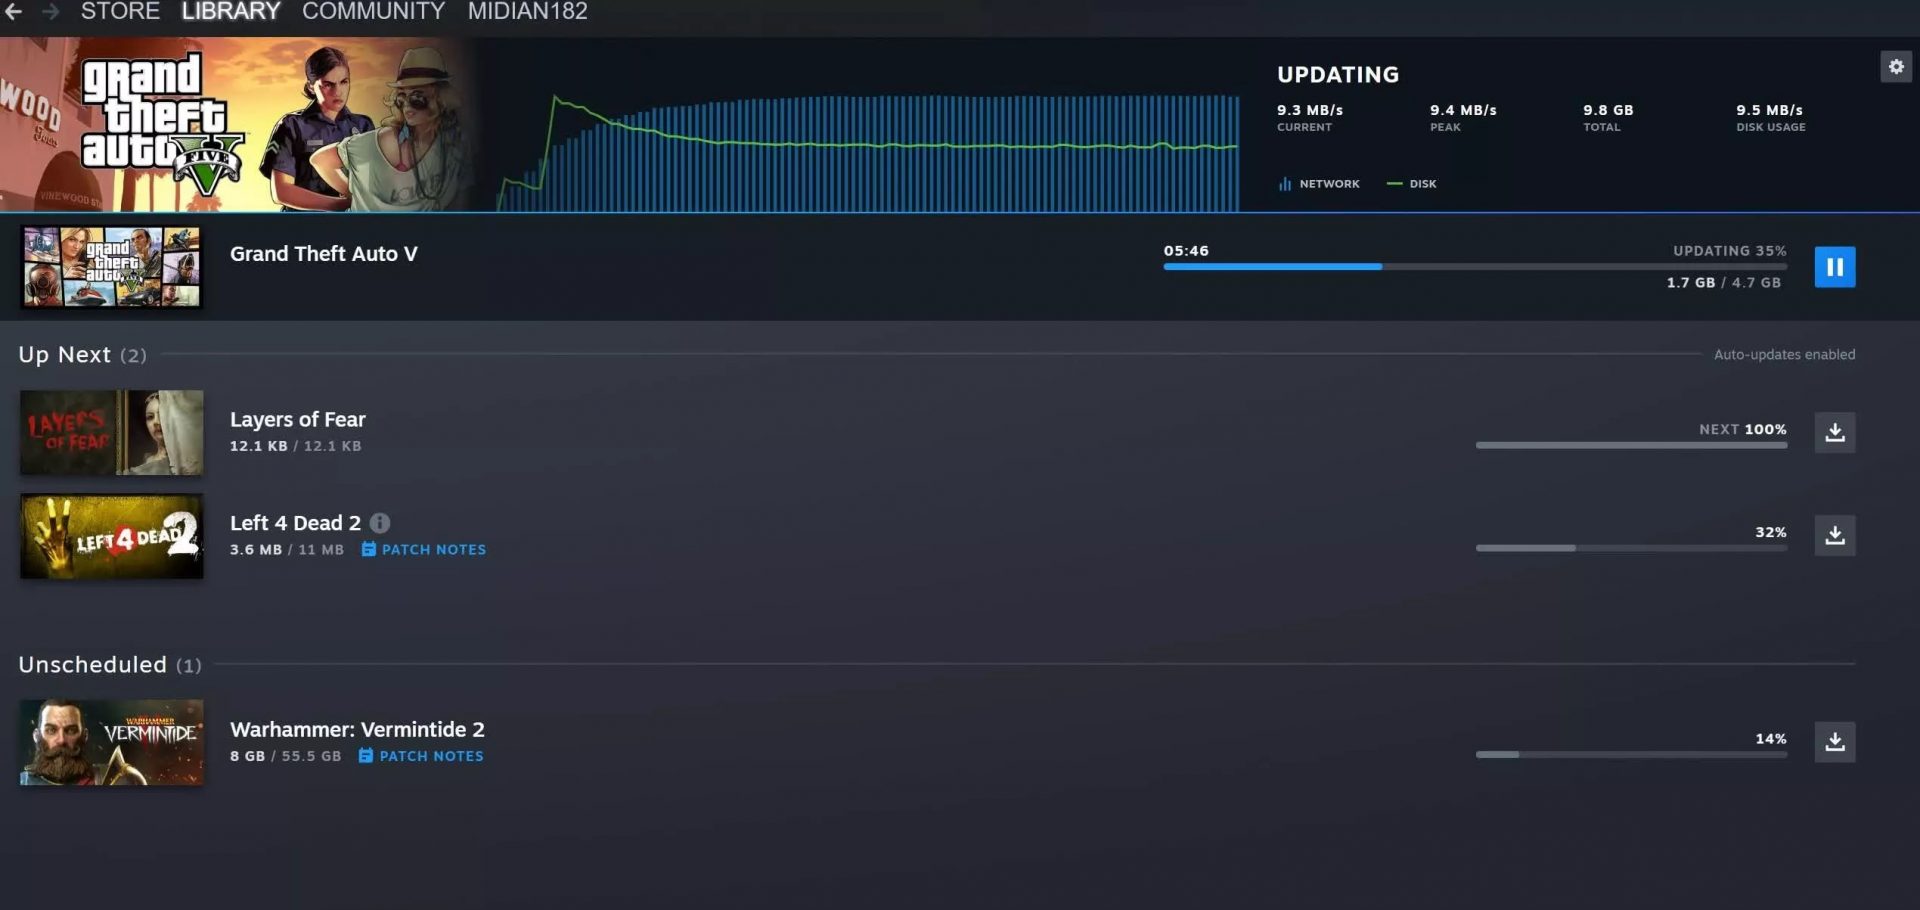
Steam Download page improvements
The download page has also received some love from Valve by enabling us to now see the installation progress. So far on the download page of Steam, you would only get download progress but it has been updated to show installation progress after download as well now making it more straightforward and giving you a general idea of how much more time there is to wait in order to start gaming.
Also, you can now drag and drop items in the download bracket to reorder download orders or place them as active downloads to start downloading right away.
Interesting information has come out from Microsoft, Windows 11 dark theme will include a different sound theme from its standard light one.
When in dark mode on Windows 11, the system sounds generally become softer, and they echo a bit, creating a more soothing experience that matches the overall look and feel of the dark mode. Flipping back to light mode brings the system sounds back to their normal level.
However, even though the light model has slightly louder sounds than the dark mode, Microsoft has taken great care to make sure the audio is more soothing, according to a report from CNBC.
The designers of Windows 11 took inspiration from an approach called calm technology. Microsoft’s Christian Koehn and Diego Baca wrote about calm technology in a post on Medium. In it, they said, “Windows 11 facilitates this through foundational experiences that feel familiar, soften formerly intimidating UI, and increase emotional connection.”
According to a Microsoft spokesperson in a statement to CNBC, “The new sounds have a much rounder wavelength, making them softer so that they can still alert/notify you, but without being overwhelming.”
Researchers have discovered 16 vulnerabilities in Bluetooth connections that could be exploited and make from minor to some serious damage to your device. The flaw can be used on chips manufactured by Intel, Qualcomm, and Texas Instruments while connecting to external devices like speakers, headphones, keyboards, mice, etc.
Who is affected?
Mentioned chips are used by many in a vast range of devices including big players with their products like Microsoft Surface laptops, Dell desktops, Samsung Phones, Google Pixel, and OnePlus handsets.
The Bluetooth bug affects a wide range of devices, including smartphones, laptops as well as smart home gadgets. In total, more than one billion devices that rely on Bluetooth are believed to be impacted.
What is the damage?
The amount of damage possible with this flaw depends on the type of device with the chipset. Some devices can only be crashed after a specially crafted packet is sent to the flawed chip. If that's the case with your gadget, it can be easily resolved with a simple restart.
With other devices, hackers can take advantage of the Bluetooth Classic flaw to remotely run malicious code. That could allow malware to be installed remotely. Researchers say vendors were informed about these issues months ago before the findings were published.
The good news is this should have given plenty of time for the relevant patches to be pushed out that remedy the flaws. However, you'll need to make sure that you're running the latest version of the operating system to be protected by the patch crafted by the manufacturers.
Android Bluetooth threat
The researchers emphasize the lack of basic tests in Bluetooth certification to validate the security of Bluetooth Low Energy (BLE) devices. The BrakTooth family of vulnerabilities revisits and reasserts this issue in the case of the older, but yet heavily used Bluetooth classic (BR/EDR) protocol implementations.
We would also advise users to disable Bluetooth on devices that do not need it. This way you can prevent attackers from sending you malformed LMP packets. Since BrakTooth is based on the Bluetooth Classic protocol, an adversary would have to be in the radio range of the target to execute the attacks. So, in a safe environment Bluetooth can be enabled.
Finally upgraded to Microsoft’s newest OS, but the performance is a bit sluggish? Here are a few useful tips you may not have thought about that could significantly transform your experience!
How to speed up Windows 11?
1. Disable startup programs
There are many programs that launch right on startup that really aren’t essential. This, in turn, causes your PC to launch and run more slowly.
To check which programs are enabled on startup, go into the Task Manager and select the Startup tab. Find every program that doesn’t need to launch immediately, right-click on it and press ‘Disable’.
This will not shut down the program in that instant. It’ll just prevent it from running automatically as you turn on your PC. You can always launch it manually when you need it.
2. Expand your memory and storage
If you want your PC to run super smoothly, you need to have enough memory to support that. This is especially significant for those of you who love to multitask. Upgrading your RAM gives your PC more space to store the temporary data it needs to complete processing tasks. In other words, processing takes a lot less time.
Your long-term storage is equally important. Hopefully at this point you’re already using SSD over HDD, since this type of storage offers a faster boot time.
Credit: Marc Pezin on Unsplash
In any case, we recommend expanding your storage capacity. The more files and data you store, the more there is to load, significantly influencing your PC’s speed. Larger storage capacity means new data and essential updates can be stored comfortably, preventing any strain on your PC’s performance.
3. Clean up disk space
If you aren’t willing to upgrade your storage just yet, the least you can do is clean up your storage right now.
Aside from manually deleting stuff you no longer need, you can also get rid of temporary files that clutter up your storage and eat up performance for no reason. To get to them, click Windows + X and select ‘Run’ (or just type it in the search bar).
A small window will pop up, where you need to type %temp%. This will take you to a whole folder full of all the temporary files you can remove without thinking twice.
For those who upgraded from Windows 10, there’s a neat trick to get rid of potential leftover files you don’t need on your brand new iteration. Only do this if you’re 100% sticking with Windows 11, though. Go to System > Storage > Temporary files. Make sure to only leave ‘Previous Windows Installation’ and ‘Windows Update Clean-up’ checked and click on ‘Remove files’.
Lastly, make use of Windows 11’s fantastic Storage Sense feature. Turning it on will enable your PC to constantly watch out for junk or unused files to optimize your PC’s performance to the maximum.
4. Install pending updates
This one should go without saying, but pending updates can be detrimental to your Windows 11 performance. The longer you leave them untouched, the more bugs the outdated programs and patches can cause. So, make sure to regularly check for updates and install them as soon as they’re available.
5. Disable visual effects
As cool as visual effects, animations, shadows and transparency are, they can also put quite a toll on your computer’s speed. On a newer setup this generally shouldn’t be a problem, but if you do notice a drop in performance, definitely consider turning off some of these settings.
To do this you can go to the Control Panel, System Properties and click the ‘Advanced’ tab. In the Performance section, choose Settings. If you’d like a quicker way to get to the dialog (Performance Options) with Visual Effects, you can also type sysdm.cpl in the search bar.
Once there, you can either have your PC choose what’s best, choose the best appearance or the best performance. The other option is to manually toggle the effects off and on. The biggest obstacles to speed are taskbar animations, window shadows, control/element animations and animations upon minimizing/maximizing.
Credit: Windows on Unsplash
In the same vein, you should go to Settings > Personalization > Colors and disable Transparency, to prevent your computer from doing overtime just to hit the aesthetic appeal.
6. Get rid of bloatware
Bloatware is one of the biggest culprits of slow computer speed.
Pre-installed software that’s pretty much useless but takes up valuable system resources has been around since day one. No matter which device or platform you’re talking about. Luckily, a lot of it is removable, making it easy to lighten the load on your device.
To boost your Windows 11 computer, go to Settings > Apps > Installed apps.You’ll probably see a bunch of apps you don’t want or need. Click on the three dots next to each one you want to remove and press ‘Uninstall’.
Aside from helping optimize performance, removing bloatware has another great benefit. Unfortunately, often this pre-installed software is quite vulnerable, exposing you to great risk of cyberattacks. So, removing it definitely improves your device’s security and gives you at least some peace of mind.
Summary
These are a few of our fastest tips for boosting performance. There are other, more complex and time-consuming ways, of course. If you’ve tried these quick ones and still need advice on how to improve your PC’s speed, feel free to reach out!
Activation errors in Windows 10 can interfere with your ability to fully use the system. When Error Code 0xC004C4AE appears on your computer, you may see a message that shows that the validation process has been stalled due to binaries that appear to have been tampered with.
While the text of this message may sound intimidating to people who are not familiar with the inner workings of the Windows 10 system, the basic meaning of the error message is that something has been introduced to the system that is not natively supported in Windows 10. During the Activation process, Windows checks to ensure that all of the Windows elements that are currently on the computer are valid and authentic to the Windows system. Usually, this particular error code refers to a language package that has been downloaded into the system using an outside application, which the Windows 10 operating system does not support.
Common symptoms include:
An error message when the activation is attempted
Inability to complete the Windows 10 Activation process
Inability to fully use apps in Windows 10 until the issue is resolved
This particular error can easily be resolved with a few simple steps. However, if you are not confident in your ability to use the methods below or they do not fully remove the issue on your computer, you may want to seek the assistance of a qualified repair technician who is well versed in the Windows 10 Activation process.
Solution
Error Causes
The most basic cause of Error Code 0xC004C4AE is that an unsupported language package has been enabled in the computer. This most often occurs when third-party applications have been used to introduce additional display languages to your system. While third-party applications that provide language packs are acceptable in some versions of the Windows operating system, the Windows 10 Activation process will not be able to complete if the system detects that one of these unofficial language packs exists on your machine.
Further Information and Manual Repair
There are several methods that may be helpful in resolving the basic issue in the display languages that causes Error Code 0xC004C4AE to appear:
Method 1:Restore Your System to an Earlier Point to Revert Changes
Use a backup copy to restore your computer to an earlier date, in effect undoing the changes that caused the error. When your system has been restored, you will be able to go through any language packs that are not native to the Windows operating system and remove them before re-attempting the installation and activation of the Windows 10 system.
This method is most useful if you keep a regular backup of your system and files. If you do not regularly back up the information on your computer, attempt one of the other methods instead. If you are unsure of how to use a backup to revert your changes or are not comfortable completing this step on your own, contact a certified Windows technician to assist you in the process.
Method 2: Revert to an Earlier System to Remove the Language Pack
If you are unable to restore your system using a backup, the other option to resolve Error Code 0xC004C4AE is to halt your installation of Windows 10 and go back to Windows 7 or Windows 8.1, from which you will be able to remove the language pack in question. Once the offending language pack has been completely removed from your computer, the Windows 10 Activation process should be able to proceed normally.
Several versions of windows don’t support language packages, so the best way to prevent this error from occurring is to avoid using any kind of third-party tool to install additional languages onto your Windows system. Activities Language You may be able to use third-party tools to instead complete alternative language actions without installing these languages as language packs.
If the above solutions do not help you to resolve Error Code 0xC004C4AE on your machine, get in touch with a qualified Windows repair technician, who may be able to perform the operations needed to remove the problematic language pack from your computer and allow the Windows 10 Activation process to continue to completion.
There is one service in the Windows operating system that is responsible for managing all the print jobs as well as handles the interaction with the printer. This service is known as the Print Spooler service. However, if it stops running, then you won’t be able to print anything on your computer. In such a case, you can try to restart the Print Spooler service, and to do that, you have to open the Windows Services Manager and look for the Print Spooler Service. Once you found it, right-click on it and select Restart. If it isn’t running, select Start and if the Service starts working again, then good but if not and you got an error message instead that says, “Windows could not start the Print Spooler service on Local Computer, Error 1068, The dependency service or group failed to start”, then read on as this post will give you a couple of suggestions you can try to resolve the issue.
The reason why you could not start the service is most likely because the Print Spooler service is dependent on other services which might not be properly running. If the following services are not running then it’s no wonder why you’re getting the error.
HTTP Service
Remote Procedure Control (RPC) Service
You might not see the RPC service which means that the Print Spooler Service does not recognize its dependency on the RPC service. In such a case, you have to manually configure the dependency by following the options given below.
Option 1 – Try configuring the dependency via CMD
The first thing you have to do is to configure the dependency using CMD. Refer to the steps below to do so:
Open an elevated Command Prompt.
Then type in “sc config spooler depend= RPCSS” and hit Enter.
After the command has been executed, restart your computer and then check if it fixed the problem. If not, proceed to the next given option below.
Option 2 – Fix dependency via the Registry Editor
You can also resolve dependency using the Registry Editor. How? Refer to these steps:
Tap the Win + R keys to open the Run dialog box.
Then type “Regedit” in the field and hit Enter to open the Registry Editor.
After that, navigate to this key: HKEY_LOCAL_MACHINESYSTEMCurrentControlSetServicesSpooler
Next, right-click on the “DependOnService” entry located on the right pane and select Modify.
Now change its value data to “RPCSS” and click OK to save the changes made and then exit the Registry Editor.
Reboot your computer and see if the issue is resolved.
Option 3 – Try running the Printer Troubleshooter
Another option you can check out is the Printer Troubleshooter. This built-in troubleshooter in Windows 10 can help you fix most print issues. It checks if you have the latest printer drivers and then tries to fix and update them automatically. Aside from that, it also checks if you have connectivity issues or if the Print Spooler and the required Services are running fine. To run it, follow the steps below.
Tap the Win + R keys to open the Run dialog box.
Next, type “exe /id PrinterDiagnostic” in the field and click OK or hit Enter to open the Printer Troubleshooter.
Then click the Next button and follow the next on-screen instructions to fix the issue with the printer.

 Storage management Page update
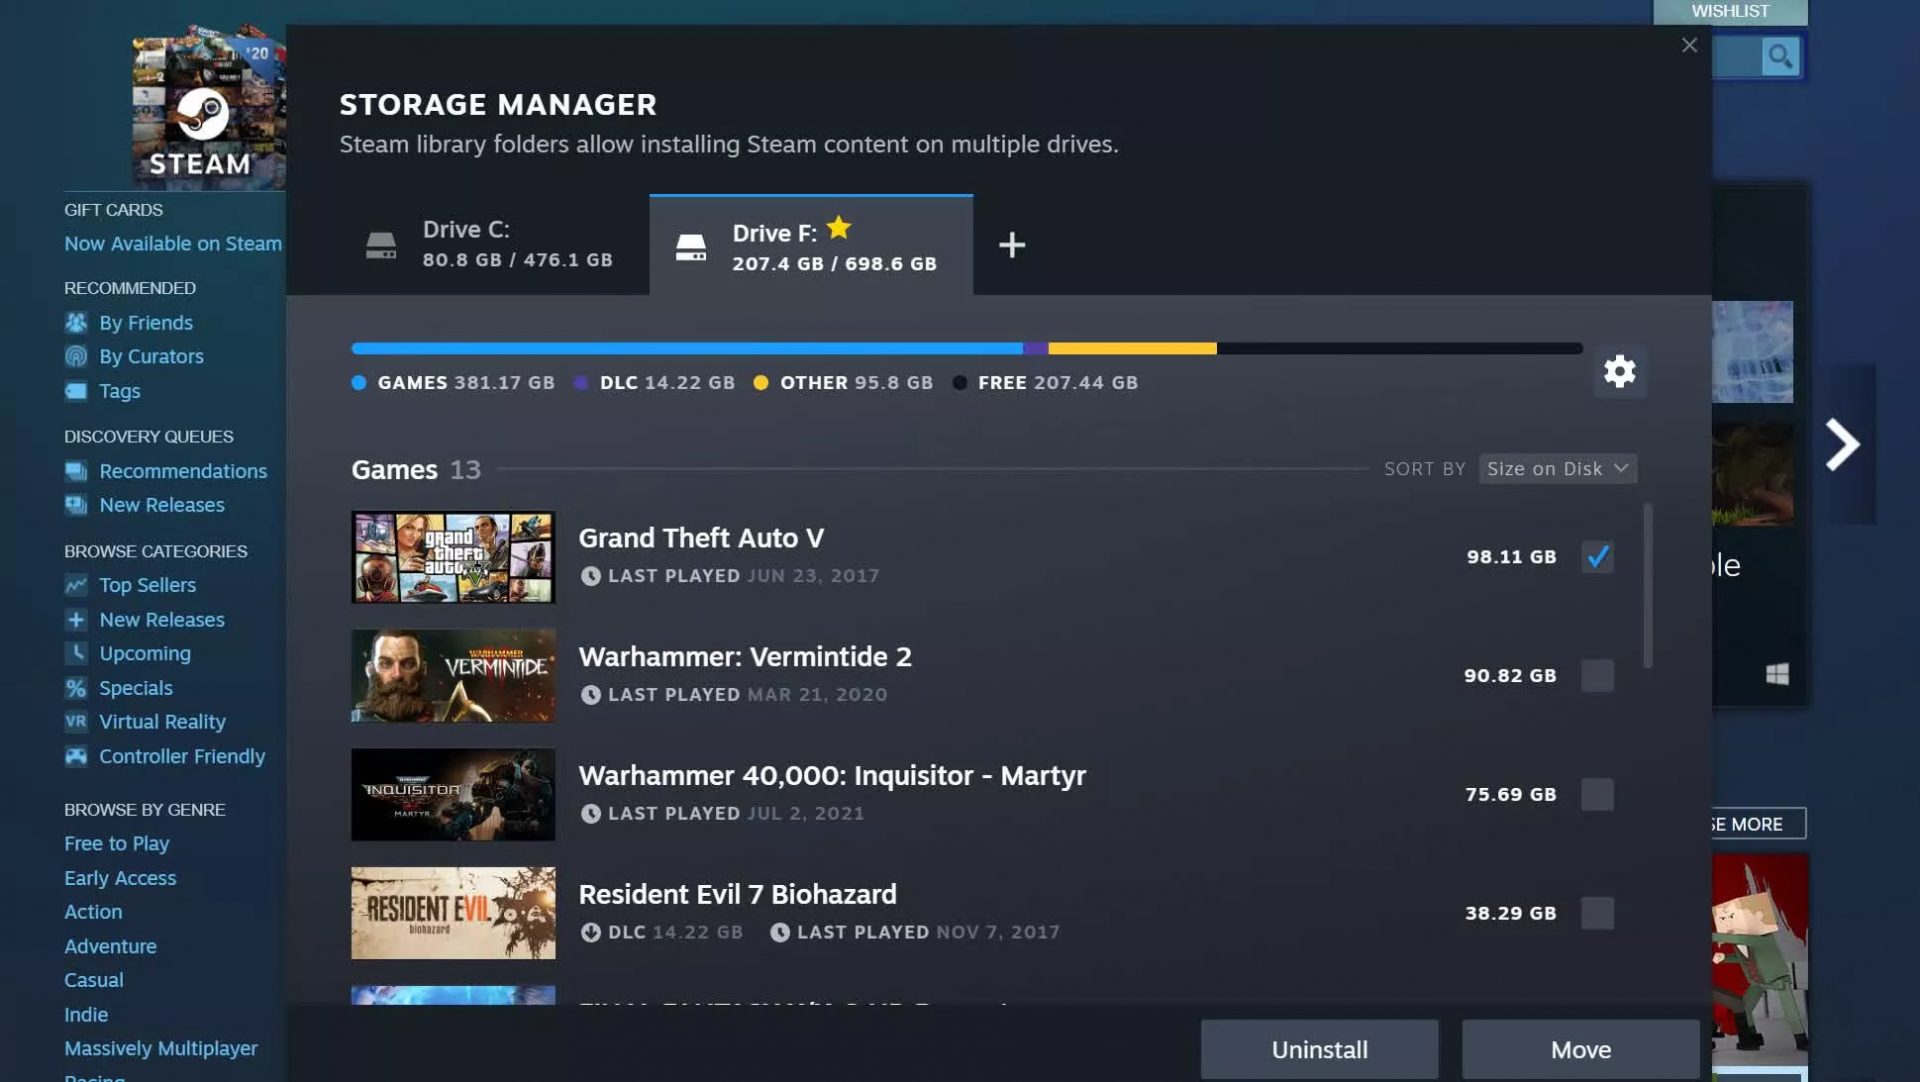 Another thing with the Steam store management page is the ability to move installation files from one location to another. Let’s say that you have two or more hard disk drivers in your machine and that you have SSD that you use for running stuff since it is fast and larger and slower one for storage. Now you can easily and quickly move one installation from one to another in order to take advantage of your faster SSD for quicker LOAD game times without making a new installation.
 Also, you can now drag and drop items in the download bracket to reorder download orders or place them as active downloads to start downloading right away.
  Interesting information has come out from Microsoft, Windows 11 dark theme will include a different sound theme from its standard light one.
When in dark mode on Windows 11, the system sounds generally become softer, and they echo a bit, creating a more soothing experience that matches the overall look and feel of the dark mode. Flipping back to light mode brings the system sounds back to their normal level.
However, even though the light model has slightly louder sounds than the dark mode, Microsoft has taken great care to make sure the audio is more soothing, according to a report from CNBC.
The designers of Windows 11 took inspiration from an approach called calm technology. Microsoft’s Christian Koehn and Diego Baca wrote about calm technology in a post on Medium. In it, they said, “Windows 11 facilitates this through foundational experiences that feel familiar, soften formerly intimidating UI, and increase emotional connection.”
According to a Microsoft spokesperson in a statement to CNBC, “The new sounds have a much rounder wavelength, making them softer so that they can still alert/notify you, but without being overwhelming.”
Interesting information has come out from Microsoft, Windows 11 dark theme will include a different sound theme from its standard light one.
When in dark mode on Windows 11, the system sounds generally become softer, and they echo a bit, creating a more soothing experience that matches the overall look and feel of the dark mode. Flipping back to light mode brings the system sounds back to their normal level.
However, even though the light model has slightly louder sounds than the dark mode, Microsoft has taken great care to make sure the audio is more soothing, according to a report from CNBC.
The designers of Windows 11 took inspiration from an approach called calm technology. Microsoft’s Christian Koehn and Diego Baca wrote about calm technology in a post on Medium. In it, they said, “Windows 11 facilitates this through foundational experiences that feel familiar, soften formerly intimidating UI, and increase emotional connection.”
According to a Microsoft spokesperson in a statement to CNBC, “The new sounds have a much rounder wavelength, making them softer so that they can still alert/notify you, but without being overwhelming.”  Researchers have discovered 16 vulnerabilities in Bluetooth connections that could be exploited and make from minor to some serious damage to your device. The flaw can be used on chips manufactured by Intel, Qualcomm, and Texas Instruments while connecting to external devices like speakers, headphones, keyboards, mice, etc.


