

In today's age, free cloud storage is no longer anything exclusive and plenty of companies will offer some free amount of it in hopes that you will buy a premium plan. Among plenty of starter and free options, there are of course some that are more generous and more appealing and offer a larger quantity of free space and even some other services.

In this article, we are taking a look and recommending some of the best ones in our opinion.
Google drive
First on the list is of course google with its google drive. With an amazing 15GB of free could storage just given to anyone who makes a google account this had to be the first recommendation. Also since google drive is requiring a google account you will be given all google office tools for free as well as the Gmail service. Completely free 15GB at your fingertips if you do not mind google tracking policies.
Microsoft one drive
Another company on the list, with only 5GB storage seems little compared to google this entry was simply included because google Microsoft also offers you Office 365 WEB for free with skype along with their Hotmail. So all in all another full package of apps with some free storage that requires also just an account.
IceDrive
With the free offer of 10GB this comes as an easy recommendation, IceDrive is a cloud storage company that is not offering anything of productivity apps but it has some great features in their cloud solution like being able to see encrypted files in your cloud. All you have to do to get this 10GB of storage is to make a free account.
MEGA
With an amazing 20GB of free storage, MEGA is certainly one that gives the most space for free. Sadly a few years ago it was hacked and files and user information were leaked, for that reason, it is on our last place of recommendation but if you are not worried about their security and plan just to use this as a temporary file sharing service with that amount I am sure it will fill your needs.
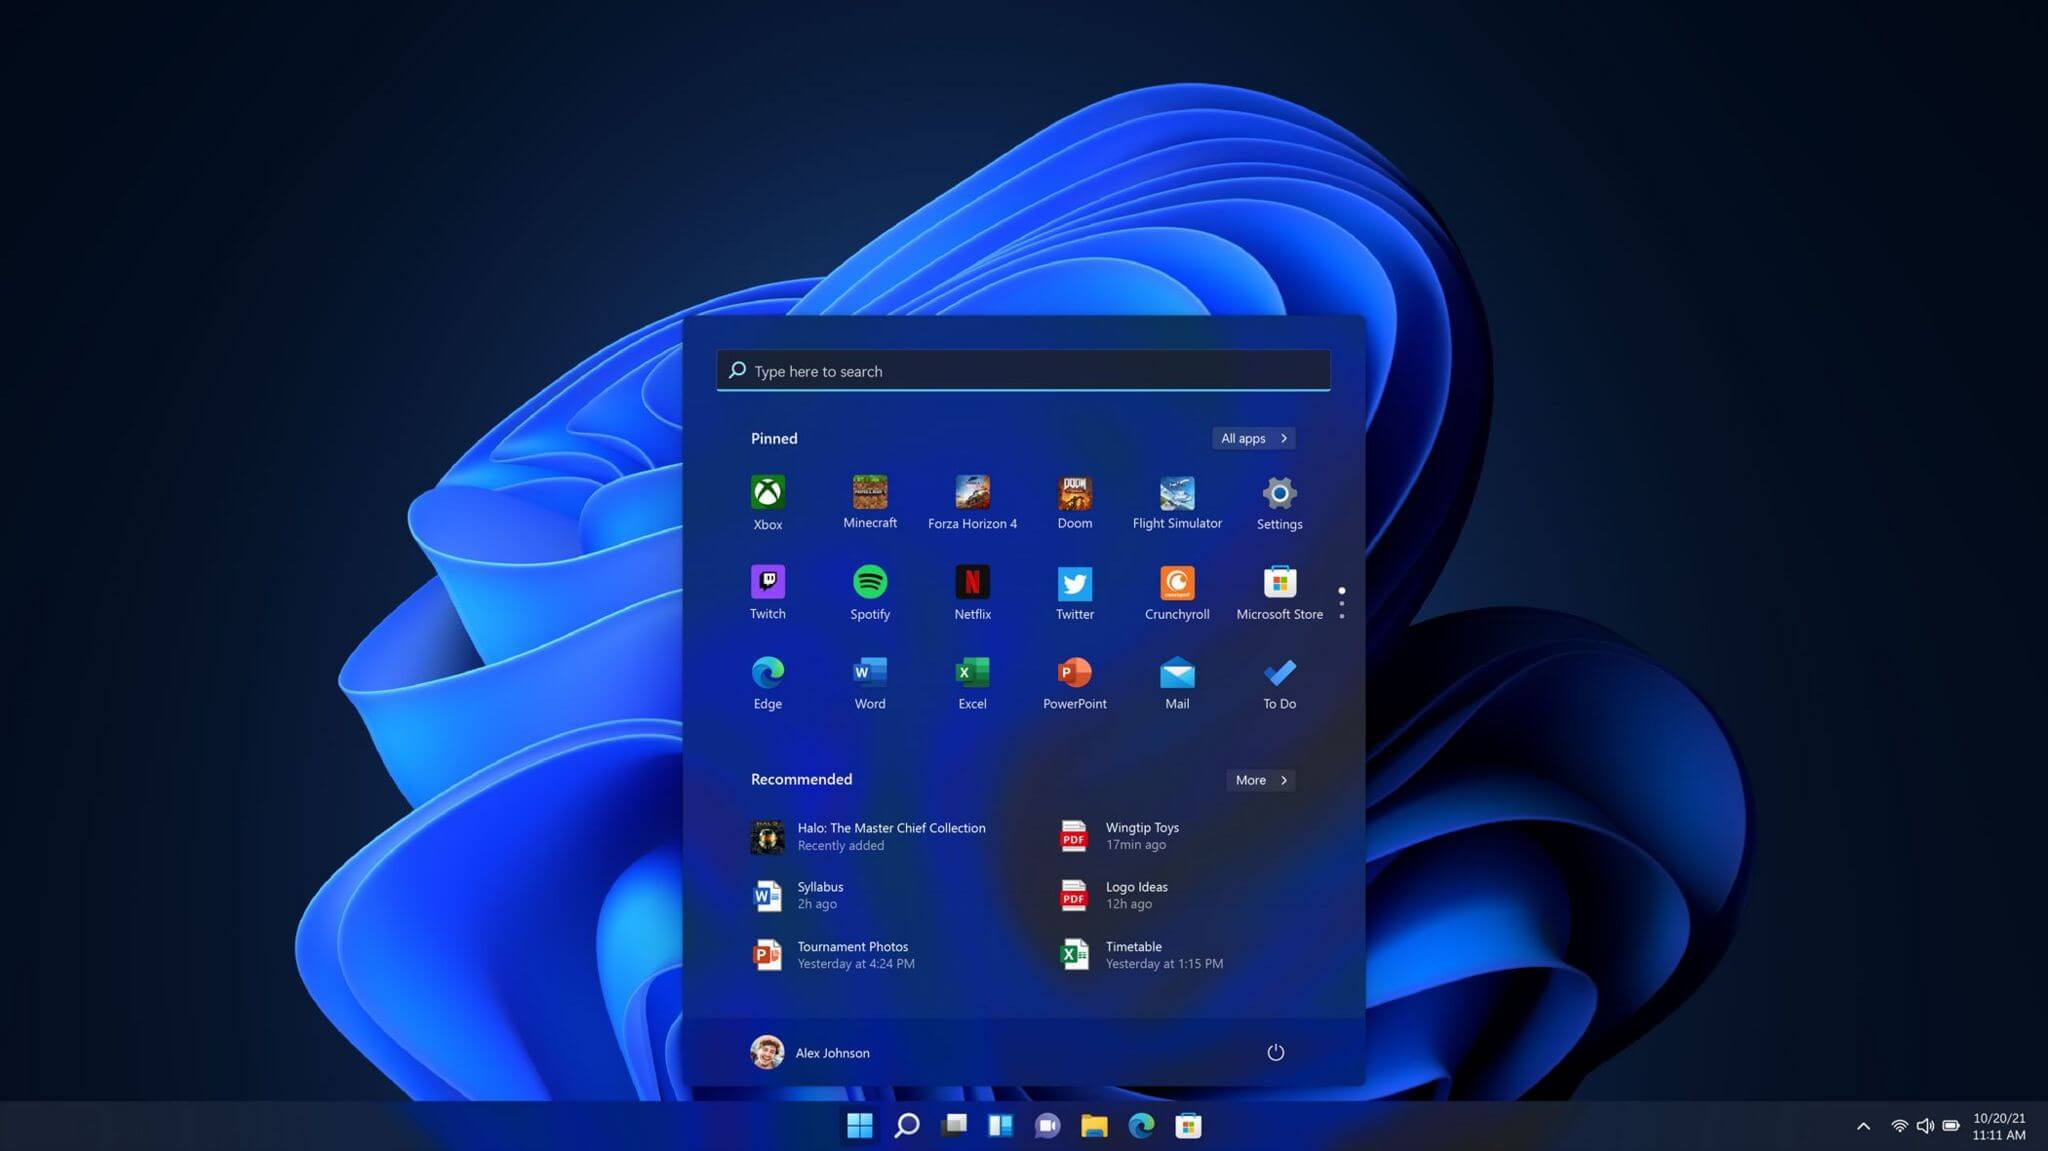 One of the first things that everyone saw when Microsoft has unveiled Windows 11 is its Start menu. Funny enough this is what has caused most of the divide among users, some find it interesting, and some do not like it. Truth is, it is different, and it is centered in the middle instead of the lower left part of the screen.
It has been confirmed however that the Start menu can be moved to any part of the screen so if you want, you could place it on the lower left as it has always been.
Live tiles do not longer exist in the Start menu, instead, we have styled simple icons.
One of the first things that everyone saw when Microsoft has unveiled Windows 11 is its Start menu. Funny enough this is what has caused most of the divide among users, some find it interesting, and some do not like it. Truth is, it is different, and it is centered in the middle instead of the lower left part of the screen.
It has been confirmed however that the Start menu can be moved to any part of the screen so if you want, you could place it on the lower left as it has always been.
Live tiles do not longer exist in the Start menu, instead, we have styled simple icons.
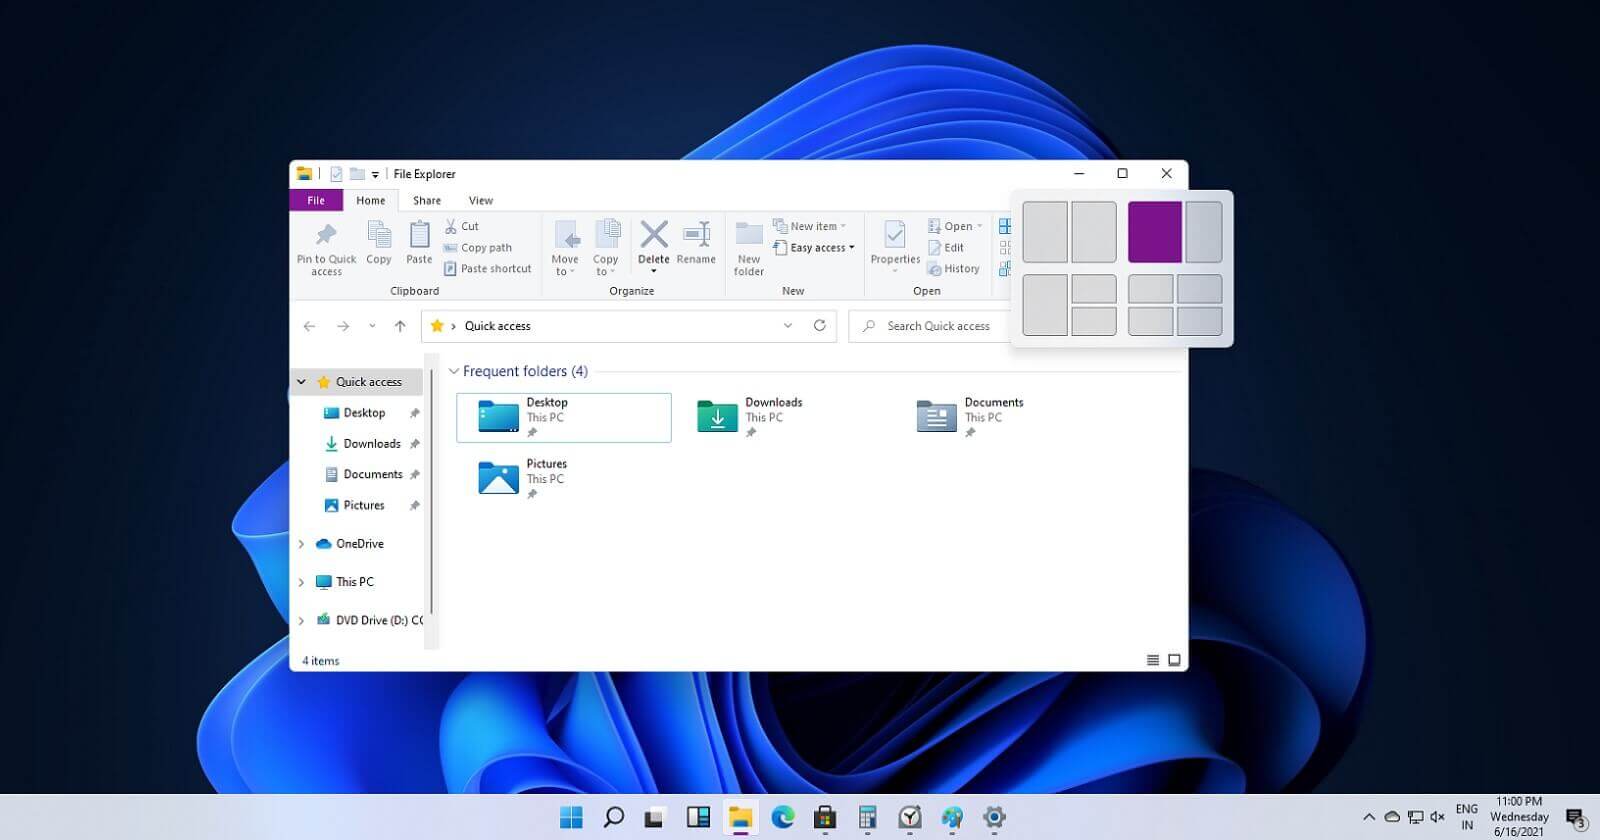 If you have used the cascade option in previous Windows versions then it is most likely that you will like the new Snap controls.
You can quickly snap windows side by side, or arrange them in sections on your desktop just by hovering over maximize button on the title bar.
If you have used the cascade option in previous Windows versions then it is most likely that you will like the new Snap controls.
You can quickly snap windows side by side, or arrange them in sections on your desktop just by hovering over maximize button on the title bar.
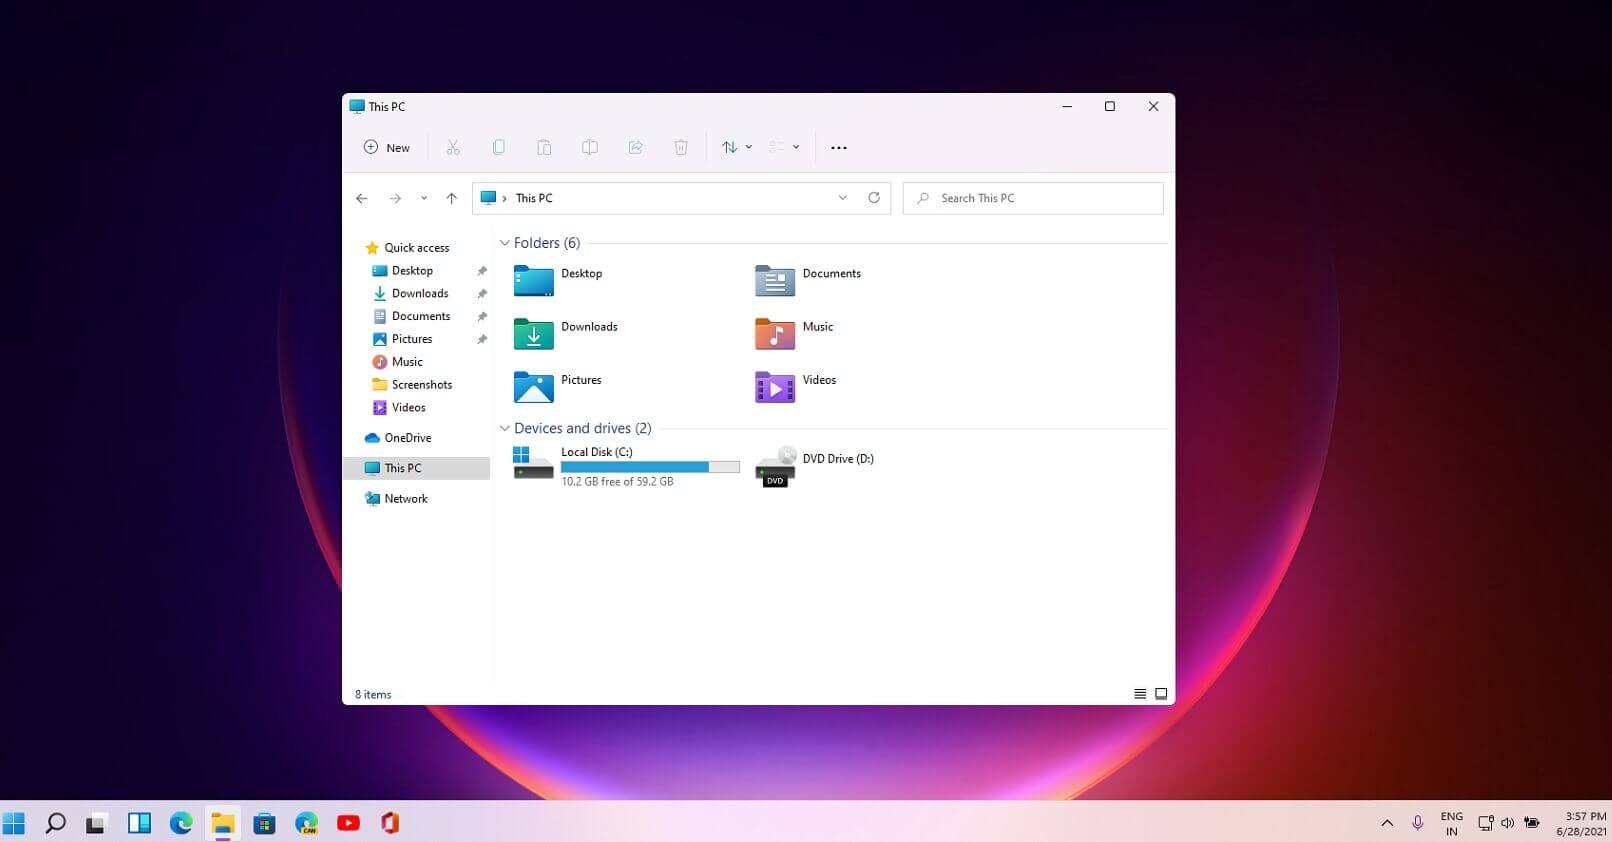 File explorer has gone through some visual and design changes, the ribbon on top has been completely removed and replaced with a header-like feature with a slick and clean design.
The header contains a nice organized and designed single row of icons like cut, paste, copy, rename, delete, and new folder icons.
File explorer has gone through some visual and design changes, the ribbon on top has been completely removed and replaced with a header-like feature with a slick and clean design.
The header contains a nice organized and designed single row of icons like cut, paste, copy, rename, delete, and new folder icons.
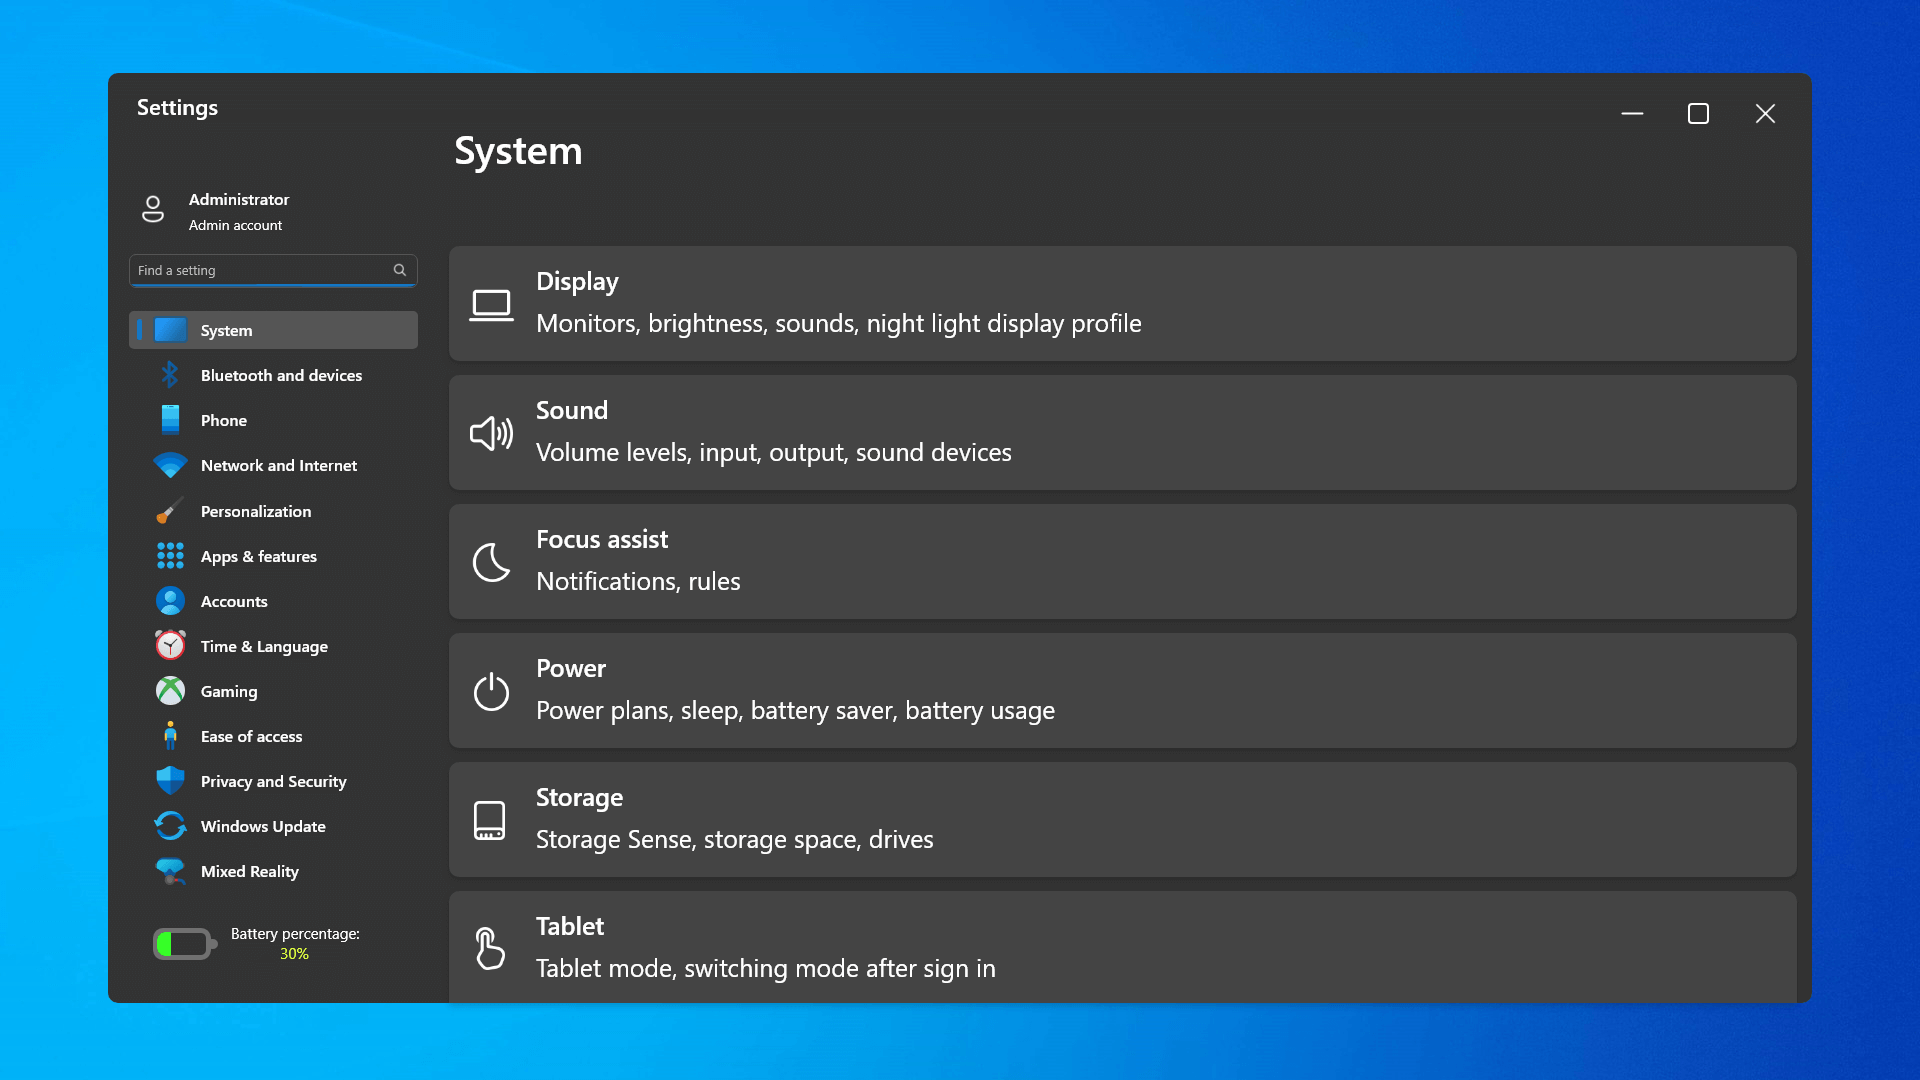 The settings app also has gone through visual and design changes. It has a new design that is very visually appealing and navigation has been simplified and more organized. Finding the right and desired setting is much faster and clearer now.
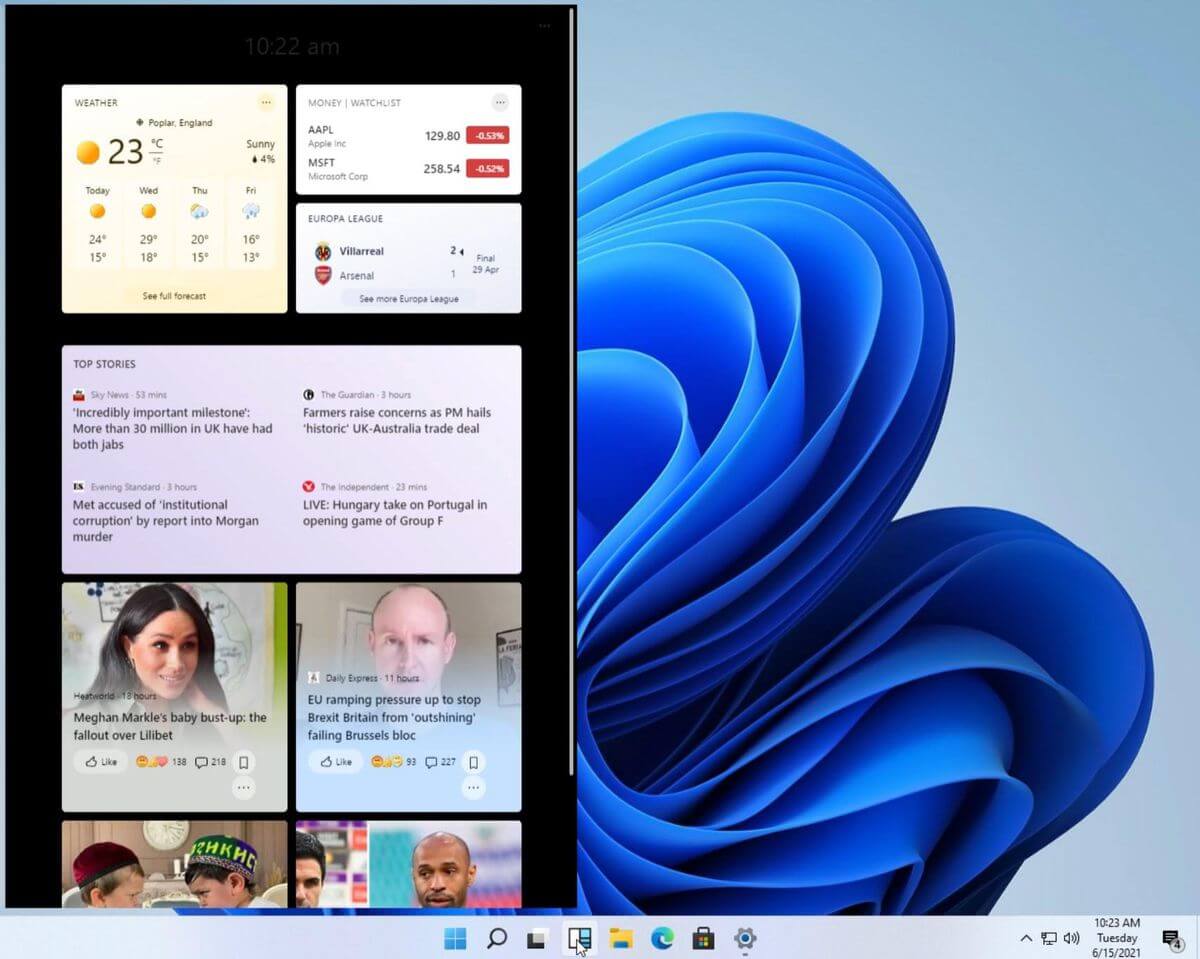 Yes, widgets are back but not like you remember them.
Instead of being all-time present at your desktop like once they used to be, now there is a button on the taskbar which brings the widget bar up that contains desired widgets. This way they are easily accessible and do not clutter desktops.
So far we have weather, news, calendar, and stocks widget but we will see how development on these goes. I expect to have community-made widgets like in old days for all of our needs.
Yes, widgets are back but not like you remember them.
Instead of being all-time present at your desktop like once they used to be, now there is a button on the taskbar which brings the widget bar up that contains desired widgets. This way they are easily accessible and do not clutter desktops.
So far we have weather, news, calendar, and stocks widget but we will see how development on these goes. I expect to have community-made widgets like in old days for all of our needs.
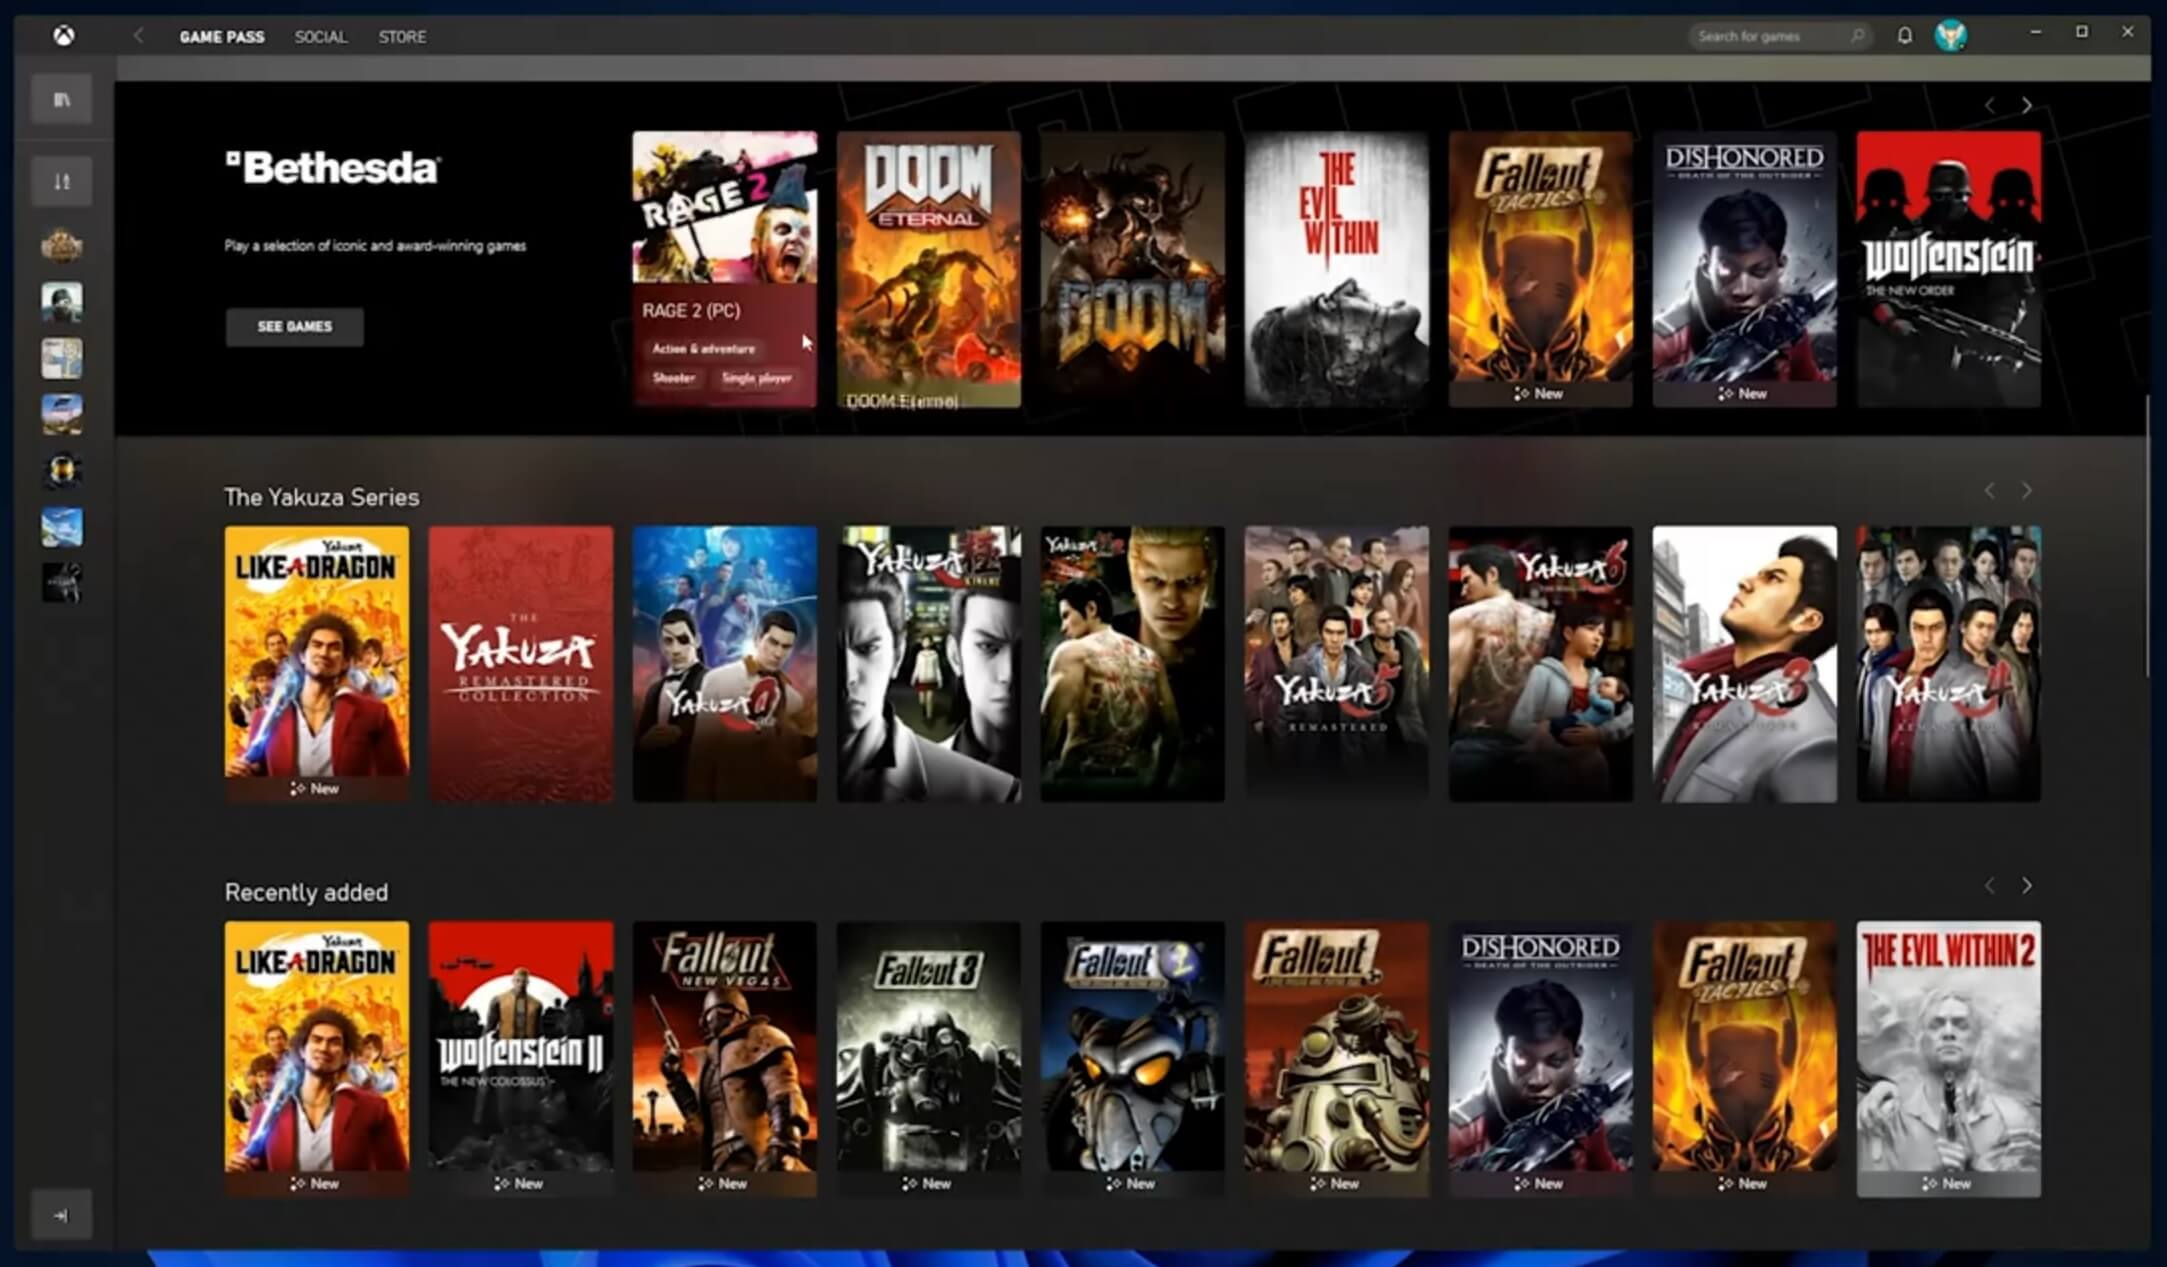 The new Xbox app is now integrated into Windows 11, offering quick access to Xbox Game Pass games, the social parts of the Xbox network, and the Xbox store.
 As widely known by now Windows 11 will require you to have a TPM 2.0 module capable CPU in order to install it.
This system requirement has caused a lot of controversies but essentially it seems that MS's goal is to protect your personal data by using this module.
The upside of course is that your data will be protected much more than in previous Windows versions, the downside, of course, will be that you will need newer hardware to run OS on it.
and that is essentially it, keep on tuned on more Windows 11 information and overall articles tied to PC and technology here at errortools.com
As widely known by now Windows 11 will require you to have a TPM 2.0 module capable CPU in order to install it.
This system requirement has caused a lot of controversies but essentially it seems that MS's goal is to protect your personal data by using this module.
The upside of course is that your data will be protected much more than in previous Windows versions, the downside, of course, will be that you will need newer hardware to run OS on it.
and that is essentially it, keep on tuned on more Windows 11 information and overall articles tied to PC and technology here at errortools.com  Each time when the company is breached data is stolen and that places the company in a bad light usually because its user database has been compromised and people are concerned about their data being misused. This is very rational fear and concern but this time things are a little bit different than usual, why is that, you might ask?
Well, as before mentioned GoDaddy is a hosting company and the vector of attack was aimed at the part where it is hosting WordPress. Attackers were able to get their hands on the sFTP credentials of customers on that server meaning that all of the websites are also been relieved of their user base as well.
This potentially means that there is a high chance that all of the hosted web site's content is also compromised, meaning that your data could also be compromised even if you were not a GoDaddy customer, all you needed to do is to be a member of any site hosted on their platform.
GoDaddy has reset WordPress passwords and private keys, so it’s already taken the steps required to stock the attacker from exploiting anything with the passwords obtained. The company is in the process of generating new SSL certificates for customers.
Bad thing is that the attack used a compromised password to get into systems all the way back around September 6th, 2021, the breach was discovered on November 17th, 2021, which is more than a 2-month active time where the attacker could harvest tons of data. The outcome of this attack will be seen in the upcoming time, until then be safe, and Just in case change your passwords.
Each time when the company is breached data is stolen and that places the company in a bad light usually because its user database has been compromised and people are concerned about their data being misused. This is very rational fear and concern but this time things are a little bit different than usual, why is that, you might ask?
Well, as before mentioned GoDaddy is a hosting company and the vector of attack was aimed at the part where it is hosting WordPress. Attackers were able to get their hands on the sFTP credentials of customers on that server meaning that all of the websites are also been relieved of their user base as well.
This potentially means that there is a high chance that all of the hosted web site's content is also compromised, meaning that your data could also be compromised even if you were not a GoDaddy customer, all you needed to do is to be a member of any site hosted on their platform.
GoDaddy has reset WordPress passwords and private keys, so it’s already taken the steps required to stock the attacker from exploiting anything with the passwords obtained. The company is in the process of generating new SSL certificates for customers.
Bad thing is that the attack used a compromised password to get into systems all the way back around September 6th, 2021, the breach was discovered on November 17th, 2021, which is more than a 2-month active time where the attacker could harvest tons of data. The outcome of this attack will be seen in the upcoming time, until then be safe, and Just in case change your passwords.  Microsoft wants to escalate the situation from Australia to the EU, what a surprise.
Hello all and welcome to another news article, this time we are focusing on Microsoft pushing the EU to accept law proposition from Australia.
For all of you who are not familiar with the given situation let me quickly explain. The feud began when the Australian government proposed a new law that targeted Facebook and Google specifically. The government said that it believed that both of the tech giants were using content from news outlets without paying.
Have you ever seen the little news snippets that Google or Facebook sometimes show its users to keep them up to date? These are lifted directly from news websites, and the Australian government claimed that this practice meant that people didn't bother visiting the news website. This then staved news websites of revenue.
As such, the government put forward a new law that would mean Google and Facebook would have to pay the source website for every time they displayed a news snippet. Facebook responded by removing its Australian news coverage in light of the law.
Google, however, put up a fight. It argued that its snippets encouraged people to click on it to read more, thus driving more traffic to the news website. It also said that such a law would be too expensive to maintain in the long run.
As such, Google threatened to remove itself from Australia if the law passed. This was likely a scare tactic, as 95 percent of Australian web users use Google; however, it actually opened the door for its rival, Microsoft.
Microsoft saw how it could push its own search engine BING to replace google. It of course went and reached the Australian government to assure them that BING is more than capable to fulfill its needs and fully abide by the proposed law.
Now Microsoft knows that if this law passes it could see a similar situation happening in Europe and it is pushing it. US News reported on how Microsoft plans to encourage EU countries to adopt this new law too. The company has teamed up with the European Publishers Council and News Media Europe to make the following statement:
Publishers might not have the economic strength to negotiate fair and balanced agreements with these gatekeeper tech companies, who might otherwise threaten to walk away from negotiations or exit markets entirely
Microsoft wants to escalate the situation from Australia to the EU, what a surprise.
Hello all and welcome to another news article, this time we are focusing on Microsoft pushing the EU to accept law proposition from Australia.
For all of you who are not familiar with the given situation let me quickly explain. The feud began when the Australian government proposed a new law that targeted Facebook and Google specifically. The government said that it believed that both of the tech giants were using content from news outlets without paying.
Have you ever seen the little news snippets that Google or Facebook sometimes show its users to keep them up to date? These are lifted directly from news websites, and the Australian government claimed that this practice meant that people didn't bother visiting the news website. This then staved news websites of revenue.
As such, the government put forward a new law that would mean Google and Facebook would have to pay the source website for every time they displayed a news snippet. Facebook responded by removing its Australian news coverage in light of the law.
Google, however, put up a fight. It argued that its snippets encouraged people to click on it to read more, thus driving more traffic to the news website. It also said that such a law would be too expensive to maintain in the long run.
As such, Google threatened to remove itself from Australia if the law passed. This was likely a scare tactic, as 95 percent of Australian web users use Google; however, it actually opened the door for its rival, Microsoft.
Microsoft saw how it could push its own search engine BING to replace google. It of course went and reached the Australian government to assure them that BING is more than capable to fulfill its needs and fully abide by the proposed law.
Now Microsoft knows that if this law passes it could see a similar situation happening in Europe and it is pushing it. US News reported on how Microsoft plans to encourage EU countries to adopt this new law too. The company has teamed up with the European Publishers Council and News Media Europe to make the following statement:
Publishers might not have the economic strength to negotiate fair and balanced agreements with these gatekeeper tech companies, who might otherwise threaten to walk away from negotiations or exit markets entirely  Microsoft is once again advising its customers to disable Windows print spooler after a new vulnerability that allows hackers to execute malicious code on machines has emerged. While a patch fixing the flaw will be released in due course, the most effective workaround currently on the table is to stop and disable the print spooler service entirely.