Chkdsk (Check Disk) is a built-in Microsoft Windows O/S utility tool.
This tool is designed to verify the integrity of data stored on the hard drive. In addition to this, it resolves and finds errors that may corrupt and damage stored data on your system and affect your PC’s performance.
This tool is intended to keep your PC’s Windows database clean.
However, this tool has certain limitations. It prevents the hard disk from getting damaged but if it gets damaged and corrupt then this tool is no good. It fails to disk check and repair. As a result, you may come across Chkdsk error pop-ups.
In such an event, it is not advisable to run the malfunctioned Chkdsk utility on your PC as it may damage your system beyond repair making you lose all your valuable data saved on your system.
 Error Causes
Chkdsk errors are triggered by multiple reasons:
Chkdsk errors may cause PC to freeze and lag and also result in data loss as we discussed above.
To avoid serious damages that the Chkdsk error code can cause to your system, it is advisable to fix it. You can either hire a professional or install Restoro. The latter is not just the best way but also a time and money-saving option. It is fast, user-friendly and you can download it for free thus saving hundreds of dollars that you would be paying for professional services.
Restoro is an advanced PC repair tool embedded with multiple features such as a registry cleaner, anti-virus, system optimizer, and Active X and Class error scanner. It helps resolve practically all types and kinds of PC-related errors including the most notorious ones like the Chkdsk errors.
It has an automated and intuitive interface smoothly integrated with the latest technology that enables this software to scan your entire PC and detect errors in seconds.
With the help of its super functional registry cleaner, Restoro detects errors registry issues triggering Chkdsk errors on your system.
It cleans all the unnecessary files like junk files, bad and invalid registry entries, and internet files that are stored in your hard disk and taking a lot of space. It removes the clutter and frees up your disk space and repairs the damaged registry.
It boosts the speed of your system and ensures that programs run smoothly on your PC and there are no hang-ups or system freezes.
The privacy error detector functions as a powerful anti-virus. With the help of this feature, Restoro identifies and scans for viruses and malware infecting your system. These are removed right away.
Restoro is 100% safe and efficient. It has a backup feature that enables users to create backup copies. This is carried for safety purposes. In case you lose your data during the repair of the Chkdsk error, you can always recover and restore the lost files without any hassle.
With some registry cleaners and repair tools you may often have to struggle with compatibility issues but not with this PC Fixer.
Restoro is compatible with all Windows versions.
It is simple and very easy to use. From beginners, intermediate to experienced, all levels of users can use it with ease.

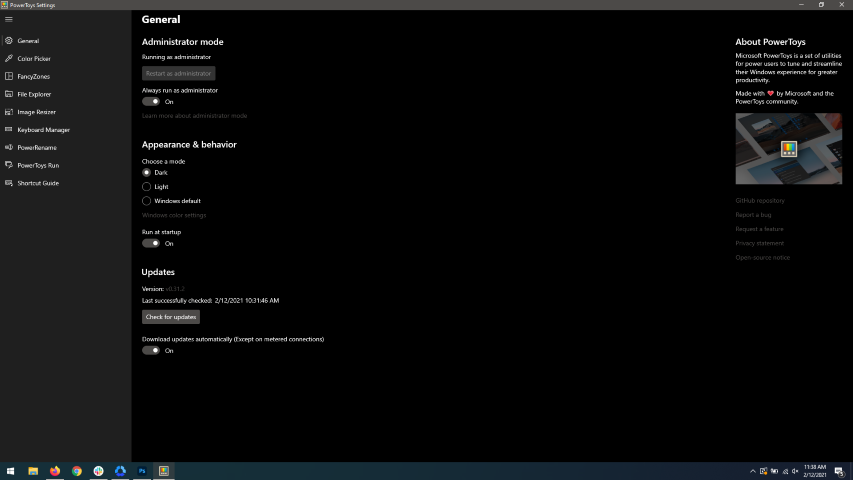 When opened you will be greeted with general settings window. These are settings for power toys themselves, Here you can check for updates, change the looks of power toys, run it on system startup and run them as administrator. Set them up so they best suit your needs.
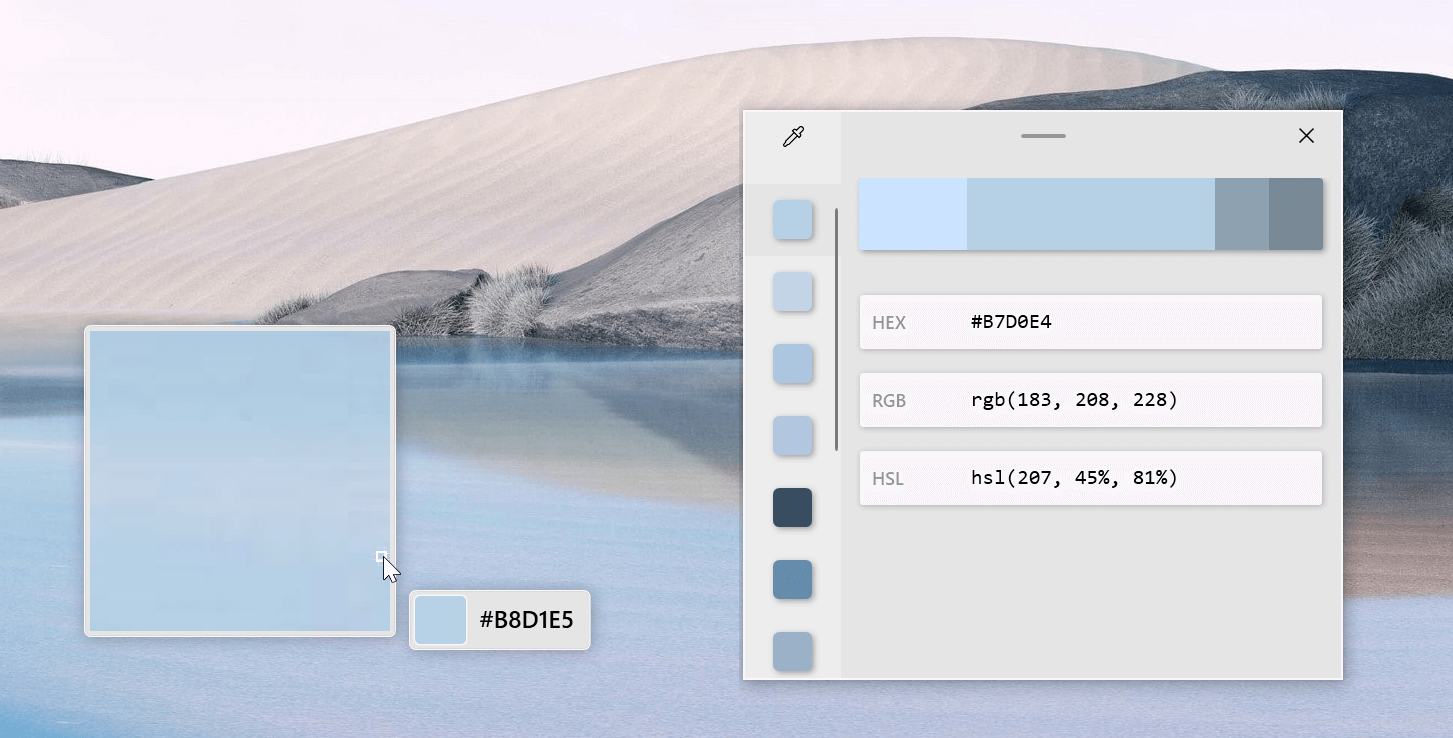 The color picker will let you as the name suggests pick colors, it will sample colors from running applications and windows, snap their values, and place them in the clipboard. A useful application if you are working as a graphic designer, want to create some cool word document, or just want to compare the difference between colors.
After the Color Picker is activated, hover your mouse cursor over the color you would like to copy and left-click the mouse button to select a color. If you want to see the area around your cursor in more detail, scroll up to zoom in. The copied color will be stored in your clipboard in the format that is configured in the settings (HEX by default). The editor lets you see the history of picked colors (up to 20) and copy their representation in any predefined string format. You can configure what color formats are visible in the editor, along with the order that they appear. This configuration can be found in PowerToys settings. The editor also allows you to fine-tune any picked color or get a new similar color. Editor previews different shades of currently selected color - 2 lighter and 2 darker ones. Clicking on any of those alternative color shades will add the selection to the history of picked colors (appears on the top of the colors history list). Color in the middle represents your currently selected color from the history of the colors. By clicking on it, the fine-tuning configuration control will appear, which will let you change the HUE or RGB values of the current color. Pressing OK will add newly configured color into the history of the colors.
The color picker will let you as the name suggests pick colors, it will sample colors from running applications and windows, snap their values, and place them in the clipboard. A useful application if you are working as a graphic designer, want to create some cool word document, or just want to compare the difference between colors.
After the Color Picker is activated, hover your mouse cursor over the color you would like to copy and left-click the mouse button to select a color. If you want to see the area around your cursor in more detail, scroll up to zoom in. The copied color will be stored in your clipboard in the format that is configured in the settings (HEX by default). The editor lets you see the history of picked colors (up to 20) and copy their representation in any predefined string format. You can configure what color formats are visible in the editor, along with the order that they appear. This configuration can be found in PowerToys settings. The editor also allows you to fine-tune any picked color or get a new similar color. Editor previews different shades of currently selected color - 2 lighter and 2 darker ones. Clicking on any of those alternative color shades will add the selection to the history of picked colors (appears on the top of the colors history list). Color in the middle represents your currently selected color from the history of the colors. By clicking on it, the fine-tuning configuration control will appear, which will let you change the HUE or RGB values of the current color. Pressing OK will add newly configured color into the history of the colors.
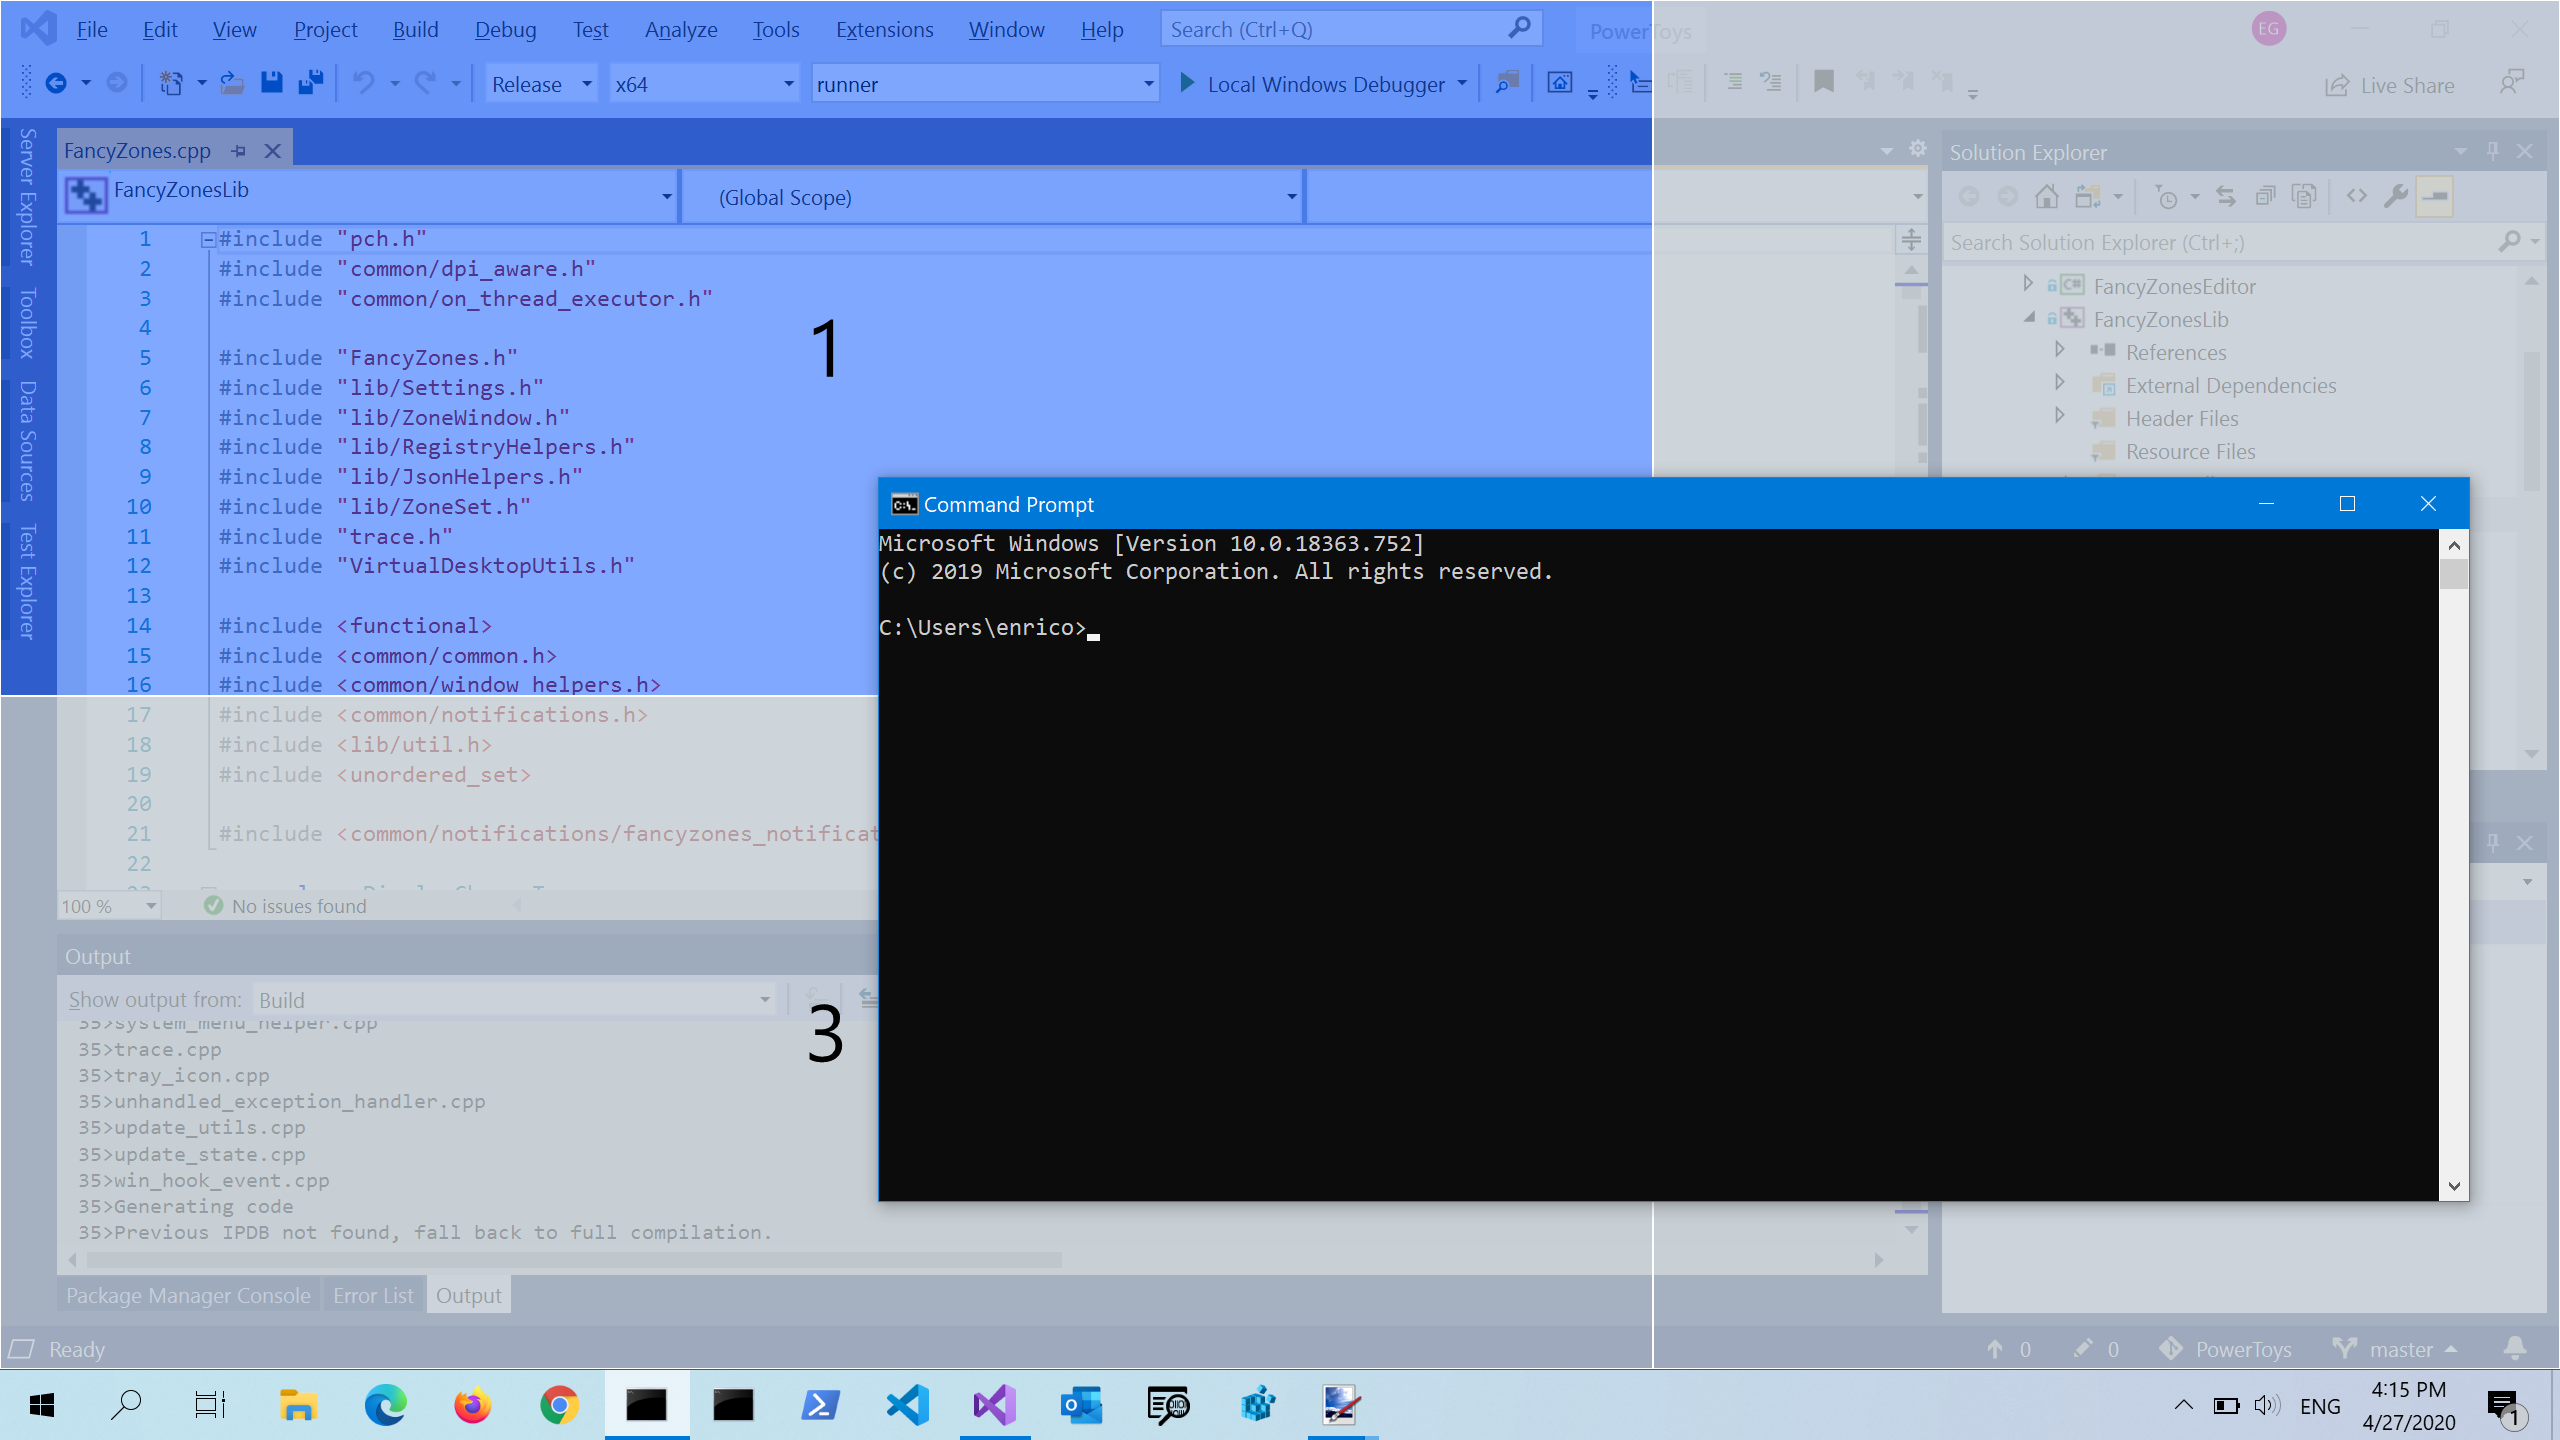 FancyZones is a window manager utility for arranging and snapping windows into efficient layouts to improve the speed of your workflow and restore layouts quickly. FancyZones allows the user to define a set of window locations for a desktop that are drag targets for windows. When the user drags a window into a zone, the window is resized and repositioned to fill that zone. When first launched, the zones editor presents a list of layouts that can be adjusted by how many windows are on the monitor. Choosing a layout shows a preview of that layout on the monitor. The selected layout is applied automatically.
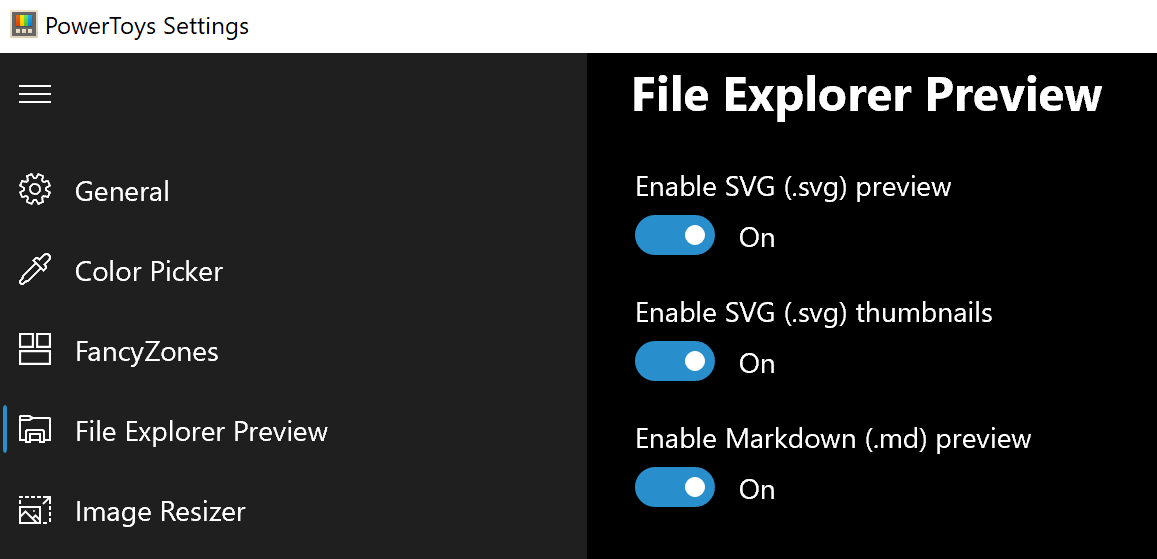 Only 3 options here but maybe some are important to you. This extension lets you enable SVG file preview in File Explorer, enable Markdown preview, and enable SVG thumbnails. Turn on each one you might need.
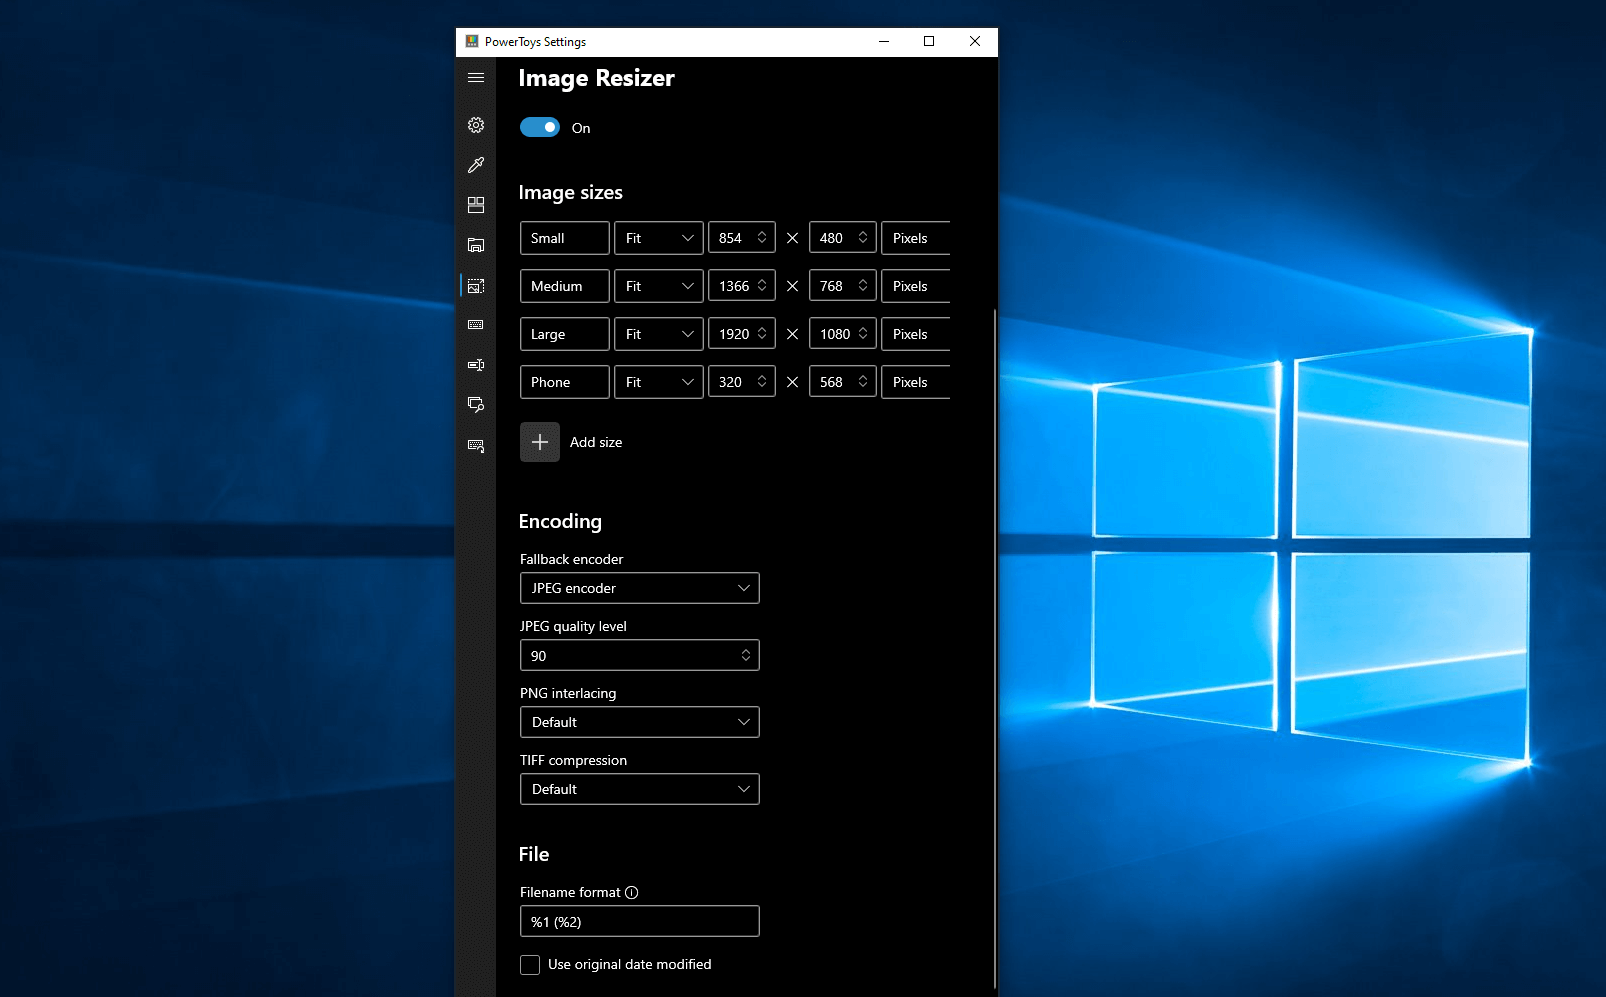 Image Resizer is a Windows shell extension for bulk image-resizing. After installing PowerToys, right-click on one or more selected image files in File Explorer, and then select Resize pictures from the menu. You can specify your own sizes if you want, you can resize when dragging files, you can overwrite files or make new copies of new sizes, and many more options. A very useful tool I am sure plenty of users can use since this eliminates the need for pictures or any other image application for common resizing tasks.
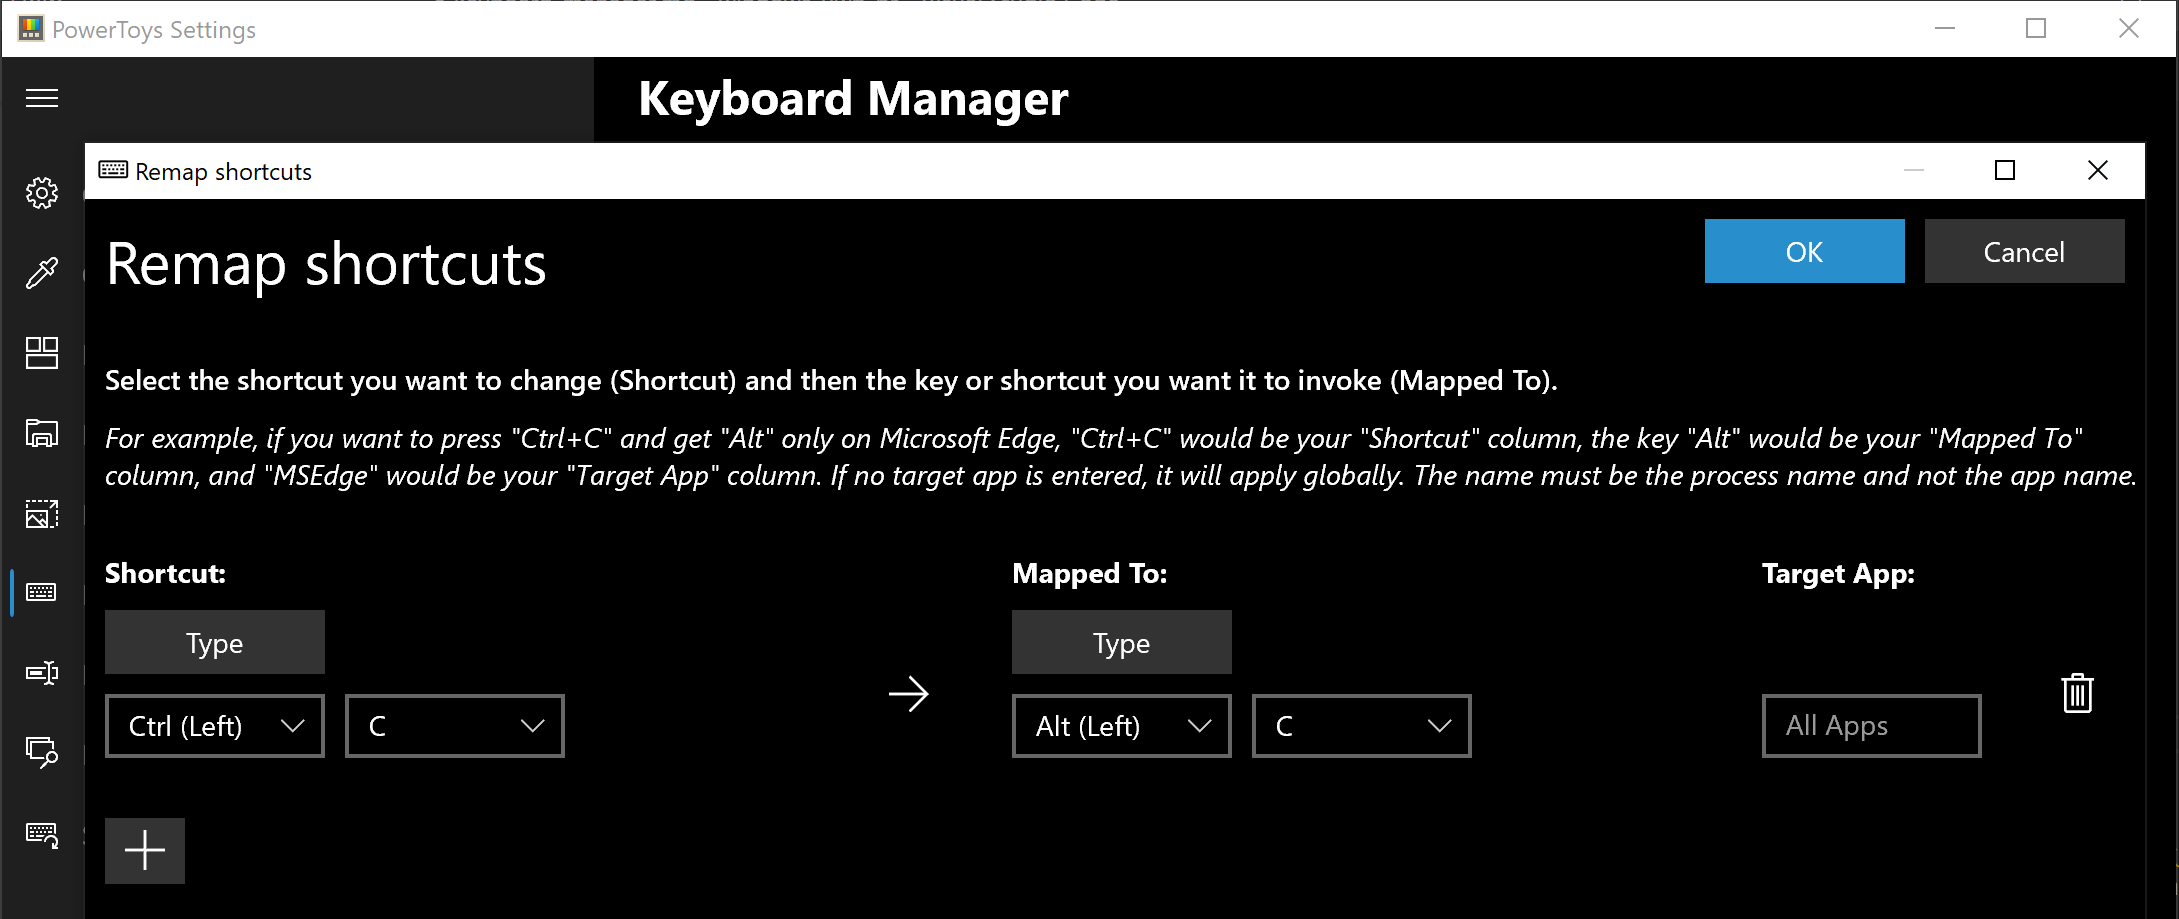 The PowerToys Keyboard Manager enables you to redefine keys on your keyboard. For example, you can exchange the letter A for the letter D on your keyboard. When you select the A key, a D will display. You can also exchange shortcut key combinations. For example, the shortcut key, Ctrl+C, will copy the text in Microsoft Word. With the PowerToys Keyboard Manager utility, you can exchange that shortcut for ⊞ Win+C). Now, ⊞ Win+C) will copy text. If you do not specify a targeted application in PowerToys Keyboard Manager, the shortcut exchange will be applied globally across Windows. PowerToys Keyboard Manager must be enabled (with PowerToys running in the background) for remapped keys and shortcuts to be applied. If PowerToys is not running, key remapping will no longer be applied.
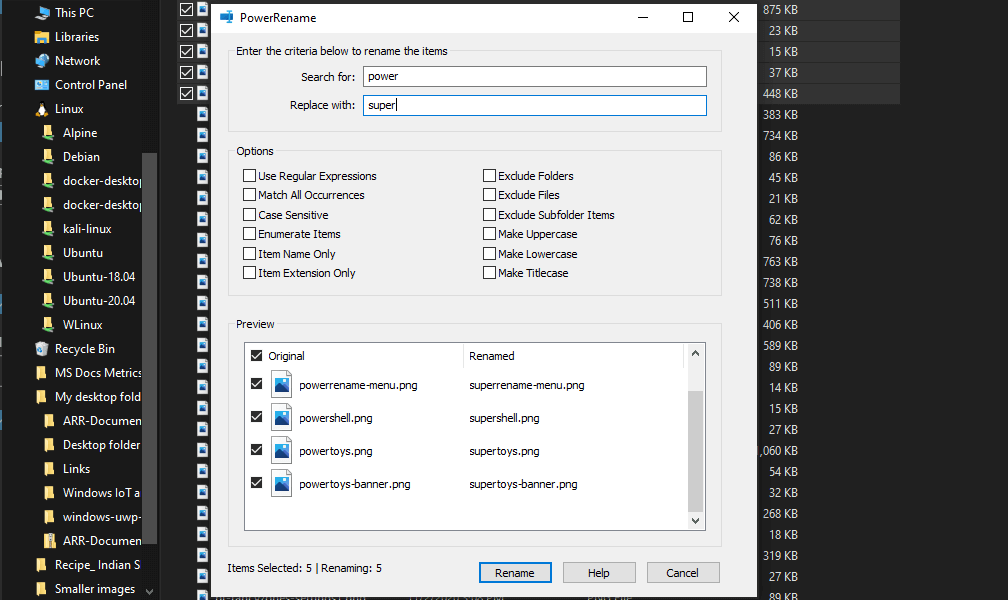 PowerRename is a bulk renaming tool that enables you to:
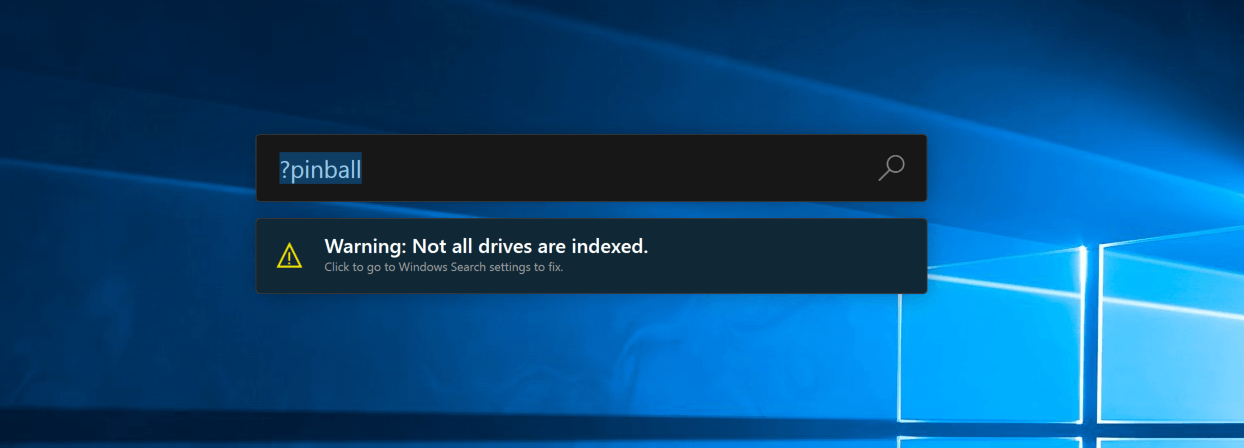 PowerToys Run is a quick launcher for power users that contains some additional features without sacrificing performance.
PowerToys Run features include:
PowerToys Run is a quick launcher for power users that contains some additional features without sacrificing performance.
PowerToys Run features include:
> (for example, > Shell:startup will open the Windows startup folder)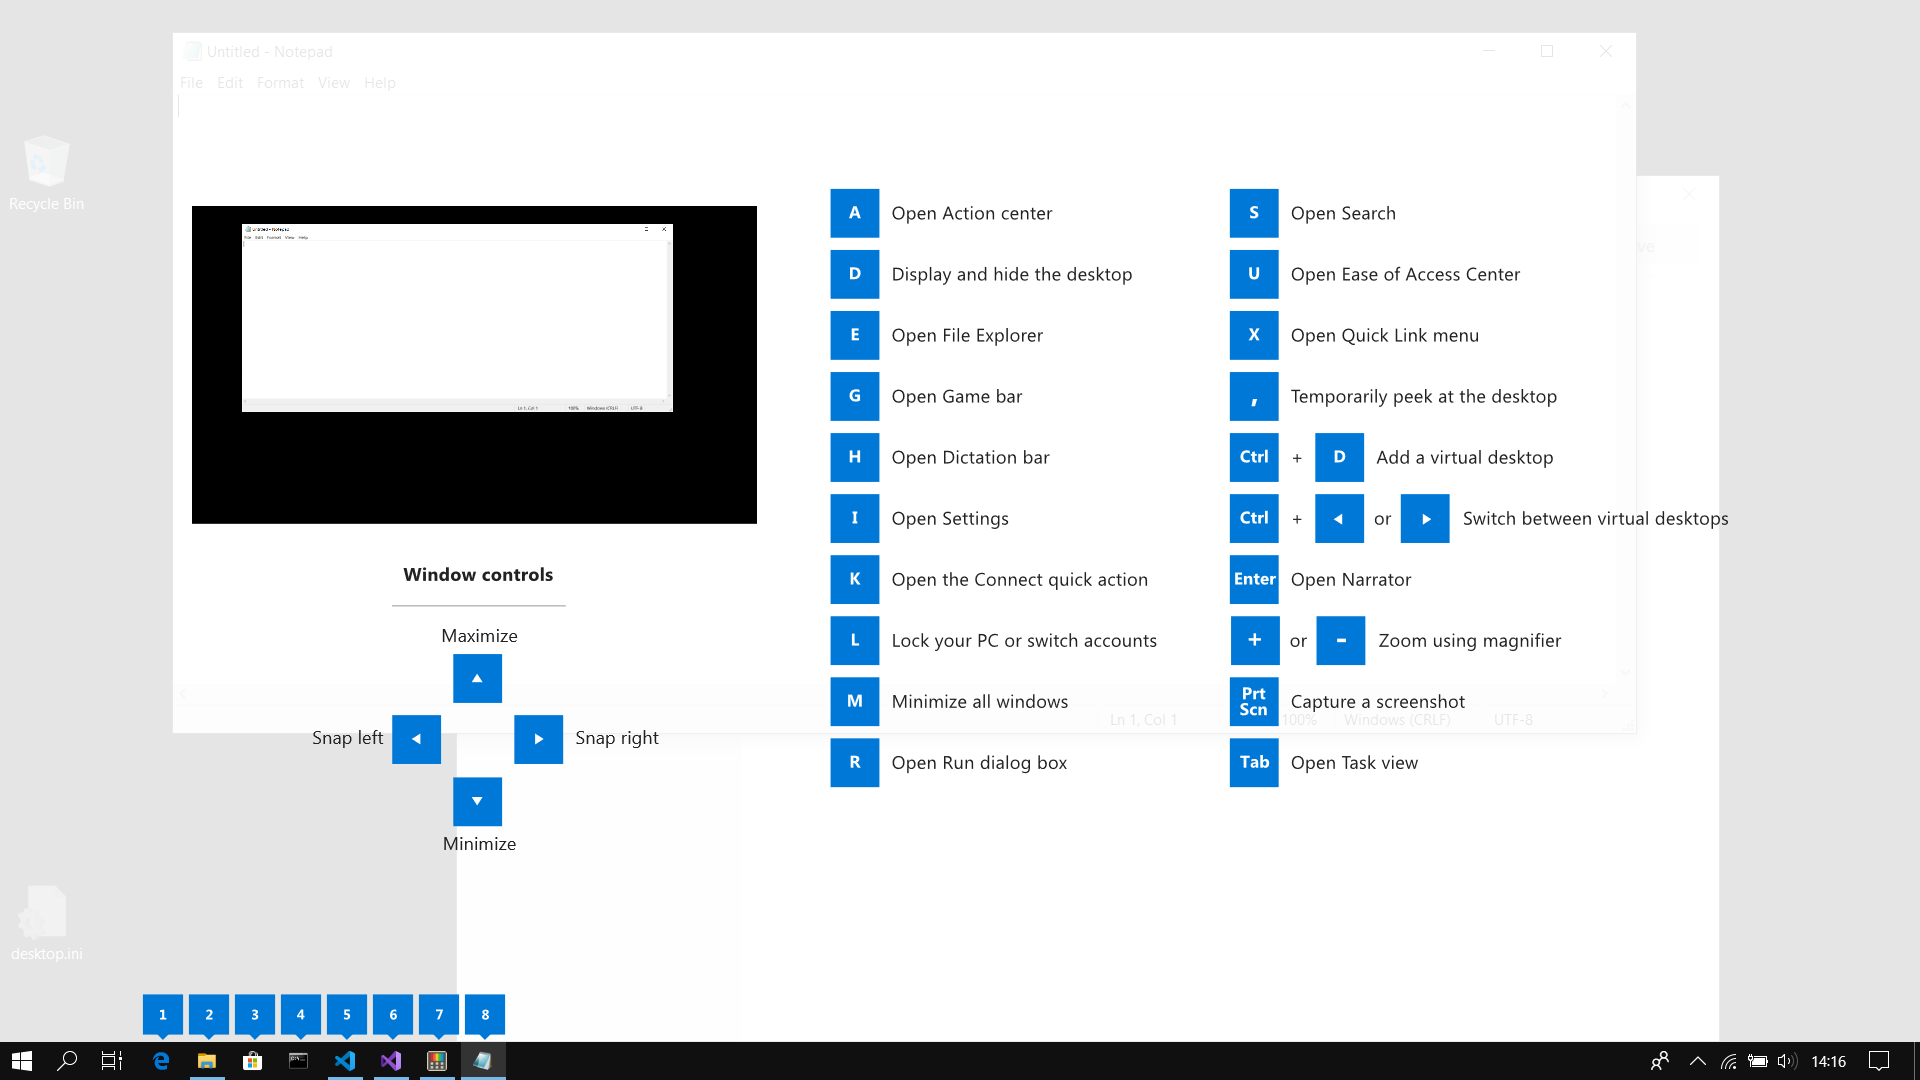 This guide uses PowerToys to display common keyboard shortcuts that use the Windows ⊞ key. Windows key keyboard shortcuts can be used while the guide is being shown and the result of those shortcuts (active window moved, arrow shortcut behavior changes, etc) will be displayed in the guide. Releasing the Windows ⊞ key will make the overlay disappear. Tapping the Windows ⊞ key will display the Windows Start menu.
Hey, you made it till the end, thank you for reading and I hope to see you soon.
This guide uses PowerToys to display common keyboard shortcuts that use the Windows ⊞ key. Windows key keyboard shortcuts can be used while the guide is being shown and the result of those shortcuts (active window moved, arrow shortcut behavior changes, etc) will be displayed in the guide. Releasing the Windows ⊞ key will make the overlay disappear. Tapping the Windows ⊞ key will display the Windows Start menu.
Hey, you made it till the end, thank you for reading and I hope to see you soon. Chedot is a Chromium-based Browser that replaces your default System Internet Browser. This browser offers users tools for downloading videos, faster browsing, and custom searches. From the publisher: A feature of our browser is a high speed on slow computers, high speed download on a poor internet, support resuming file download when connection is broken and the download in multiple threads, the ability to go on blocked websites and downloading videos from video sites.
While this may seem interesting and good at start, this browser has been marked as a Potentially Unwanted Program. It monitors user activity, collects web traffic data, and user information. While using Chedot you may see additional ads throughout your browsing sessions.
Outlook Express Socket Error10060 - The connection to the server failed Account:’ your account’Another thing you must know about this error is that it only stops the user from sending emails. This means that you can only receive emails, not send them.
Error CausesBattle.net Error #2: Unable to connect. Please try again later. If the problem persists, please contact technical support.
Error CausesAro2012 is a PC Optimizer Software that typically comes bundled with other software. Even though Aro2012 poses no threat itself, the programs that it comes bundled with may pose a problem to your computer.
From the Author: ARO is an advanced repair and optimization utility designed to help improve and maintain computers running the Windows operating system (both 32- and 64-bit). ARO focuses on finding errors that hide out in the Windows registry, identifying PC and web browser clutter that may be hindering PC performance, and ensuring computers have adequate security solutions installed and up to date. With its advanced scanning engine, ARO provides deep scanning capabilities to identify and repair registry errors. ARO also searches for and removes “junk” files that accumulate over time and can put a damper on PC performance.
When installed Aro2012 creates a startup entry that allows it to run each time the computer is started. It also adds a task scheduler that allows it to run at various times.
“Something went wrong with the projection”.This kind of error is caused by some issues with the Display driver, hardware, corrupted or damaged system files, and so on. And to fix it, there are several methods you can check out. You can try to update, roll back or reinstall the Display drivers. You could also run the Network Adapter troubleshooter or the Video Playback troubleshooter as well as run System Restore to undo any recent changes that might have triggered the error or reset your Windows 10 computer without deleting any files. For more details, refer to each one of the options provided below.
FindWide is a browser add-on for Internet Explorer. This addon Hijacks your home page and internet search provider changing it to search.findwide.com. Alternate versions change the homepage to search.us.com.
This addon monitors your user activity while you are surfing the web. It collects user and browsing data, that it uses to better display targeted ads. While browsing with this addon enabled you will see additional ads, sponsored links, and even sometimes pop-up ads displaying throughout your browsing sessions.
Several anti-virus programs have marked this addon as a Browser Hijacker and is therefore not recommended to keep on your computer.
From the Author: Each search engine has its own method of searching and each will return different results. Findwide.com looks at all of them, decides which are most relevant to your search, eliminates duplicates, and reveals them to you. In the end, you get a list of results more complete than using any one search engine alone.
Many are upgrading their OS to Windows 10, however, it’s not always smooth sailing because users have been reportedly experiencing different bugs including Black Screen after a successful update.
One common issue in installing Windows 10 is the appearance of a black screen after installation. This usually occurs when the user restarts the computer. Initially, there will be a black screen only appearing on the monitor. There are also cases where a mouse cursor is present, while some cases have no cursor at all.
Not only that, it seemed that you’ve lost all your desktop icons when experiencing this bug.
Error CausesJust like the other bugs experienced by Windows 10 users, booting to a black screen has reasons. Before you even try to look for the solution, you first have to determine the cause of the error, in this case, the error would be black screen when booting.
Before you even think of upgrading your OS to Windows 10, you need to know that there are specific system requirements and specifications to be able to successfully update your operating system.
There are more system requirements in order to use other certain Windows 10 features, but we’ll focus on solving your black screen problem in this article.
IMPORTANT NOTE: While it’s possible that you’ll be able to find the solution for your black screen during Windows 10 update, contacting the service of a professional technician or using an automated tool is advisable if you’re not confident in performing the methods to be discussed.
There’s a chance that you’ll get an error prompt saying, “installation cannot be completed in safe mode.” If this happens, simply press Shift + F10. This command will redirect you to the Command Prompt. You just open Device Manager by keying in devmgmt.msc then disable the display adapters, now check if you’ll be able to successfully boot in normal mode.
This process will normally allow you to complete the Windows 10 installation, if that’s the case you can just update the display adapter drivers from the manufacturer’s website. Restart your computer and see if this solves the problem.
Do take note, however, that the Roll Back Driver option is not available if there was no previous version installed.
Since one common cause of black screen during a Windows 10 update is the external devices you use in your computer, you might want to consider these steps as well.
Some Windows 10 users had success in solving their black screen problem by disabling the fast startup.