DRIVER_IRQL_NOT_LESS_OR_EQUAL will cause your computer to go to the blue screen of death but do not worry there are solutions around this and we are here to instruct you on how to solve this.
Uninstall and install network drivers
DRIVER_IRQL_NOT_LESS_OR_EQUAL is most commonly tied to bad network drivers, whatever that be a corruption of the driver files or their incompatibility. So first thing is to check if this is the case.
Press ⊞ WINDOWS + X to open the hidden menu in Windows and click on Device Manager.
In the Device Manager expand Network adapters, choose adapter, right-click on it and choose Uninstall.
Install latest driver or reboot so Windows will install the driver automatically
Update driver
If you do not want to reinstall the driver or you are unable to for whatever reason updating the driver might do the trick. To update driver:
Press ⊞ WINDOWS + X to open the hidden menu in Windows and click on Device Manager.
In the Device Manager expand Network adapters, choose adapter, right-click on it and choose Update Driver.
Fix via Command prompt
If both of the beforementioned solutions fail, try running the command prompt and fix the issue from there.
Press ⊞ WINDOWS + X to open the hidden menu in Windows and click on Command Prompt (administrator)
In command prompt type next line and press ENTERDEL /F /S /Q /A “C:\Windows\System32\drivers\mfewfpk.sys
Reboot the system
Scan your PC for malware
Sometimes corruption in the system is caused by malware, Scan your system for malware, viruses, etc.
Check connections or other hardware issues
If all methods fail, open your PC case and check to see if connections everywhere are properly connected and tight. Clean your PC and turn it back ON
Use system restore
If anything fails, use Windows system restore and bring back computer into a state where everything was working fine.
The ntkrnlmp.exe file is a file associated with the Windows operating system’s NT Kernel and other system processes. It is also related to the “CRITICAL PROCESS DIED” error. So if you encounter a Blue Screen of Death error that’s related to this file, then you’ve come to the right place as this post will guide you in fixing the ntkrnlmp.exe Blue Screen error.
This kind of Blue Screen error might be caused by the file getting corrupted or infected with some malware. Aside from these causes, the error might also be due to the corruption and malfunction of the graphics card drivers.
Before you troubleshoot the problem, you might want to try performing System Restore especially if you tend to create a System Restore point every now and then. Performing System Restore could help you resolve the ntkrnlmp.exe Stop error. You can do this option either by booting into Safe Mode or in System Restore. If you are already in the Advanced Startup Options, just directly select System Restore and proceed with the next steps. And if you have just booted your PC into Safe Mode, refer to the steps below.
Tap the Win + R keys to open the Run dialog box.
After that, type in “sysdm.cpl” in the field and tap Enter.
Next, go to the System Protection tab then click the System Restore button. This will open a new window where you have to select your preferred System Restore point.
After that, follow the on-screen instructions to finish the process and then restart your computer and check if the problem is fixed or not.
If System Restore didn’t help, then proceed to the given options below.
Option 1 – Disable the C-states and EIST in the BIOS
The first thing you can do is try to disable the C-states and EIST in the BIOS. To do that, refer to the steps given below.
Go to the BIOS and from there look for an option named CPU Configuration which can usually be found under the Advanced menu.
Next, look for CPU Power Management and under that section, disable both the “Intel EIST” and “Intel C-state” options.
After you disable them, save the changes you’ve made and exit the BIOS.
Now restart your computer and check if the ntkrnlmp.exe BSOD error is now fixed.
Option 2 – Try to update, rollback or disable drivers
If the first option didn’t help in fixing the ntkrnlmp.exe Blue Screen error the next thing you can do is to roll back, or update, or disable device drivers in your computer. It is most likely that after you updated your Windows computer that your driver also needs a refresh. On the other hand, if you have just updated your device drivers then you need to roll back the drivers to their previous versions. Whichever applies to you, refer to the steps below.
Open the Devices Manager from the Win X Menu.
Then locate the device drivers and right-click on them to open the Properties.
After that, switch to the Driver tab and click on the Uninstall Device button.
Follow the screen option to completely uninstall it.
Finally, restart your computer. It will just reinstall the device drivers automatically.
Note: You can install a dedicated driver on your computer in case you have it or you could also look for it directly from the website of the manufacturer.
Option 3 – Configure the Driver Verifier Manager
The Driver Verifier Manager is another tool in Windows that could help you fix driver-related issues. And so if you want to fix the ntkrnlmp.exe Blue Screen error you need to use the Driver Verifier Manager:
Type in the keyword “Verifier” in the Cortana search box to search for Verifier in Windows 10.
After that, select the option “Create custom settings”.
Make sure that you have checked everything except the options “DDI compliance checking” and “Randomized low resources simulation”.
Next, select the option “Select driver names from a list” option.
Afterward, you have to select all the drivers from any unofficial or third-party provider. To simply put it, you have to select all the drivers that are not supplied by Microsoft.
Then click on the Finish button.
Open Command Prompt as administrator and execute this command – verifier /querysettings
The command you just executed will display the Driver Verifier settings so if you see any of the flags enabled boot your Windows 10 PC into Safe Mode.
Open the Command Prompt as admin again and run this command – verifier /reset
The command will reset the Driver Verifier. Once the process is done, restart your PC and check.
Option 4 – Run the Blue Screen Troubleshooter
The Blue Screen troubleshooter is a built-in tool in Windows 10 that helps users in fixing BSOD errors like ntkrnlmp.exe. It can be found on the Settings Troubleshooters page. To use it, refer to these steps:
Tap the Win + I keys to open the Settings panel.
Then go to Update & Security > Troubleshoot.
From there, look for the option called “Blue Screen” on your right-hand side and then click the “Run the troubleshooter” button to run the Blue Screen Troubleshooter and then follow the next on-screen options. Note that you might have to boot your PC into Safe Mode.
Dynamic Wallpapers introduced with Mojave Update in macOS are pretty cool. Dynamic Desktop is a feature introduced in macOS Mojave (10.14), in which the desktop background changes according to the time of Mac's current location. If Location Services are turned off the Privacy pane of the System Preferences, then the time zone specified in the Date & Time preferences will be used.
To apply macOS Dynamic Wallpaper on Windows 10 we need to download & use WinDynamicDesktop, a free application that lets you apply macOS Dynamic Wallpaper.
After the installation, you will be asked to Configure the Schedule. While doing that you need to make sure that you enter your location correctly. You can even set specific sunrise and sunset timing by selecting “Use specific sunrise and sunset times” and changing the Sunrise and Sunset times manually.
Now, you will be greeted with some of the coolest dynamic wallpapers in the market. Select a theme of your choice, click on the Download button (file size can range between 20-200 MB), and click Apply to enjoy macOS Dynamic Wallpaper on Windows 10.
If for some reason you want to go back to the default Windows theme but not necessarily delete the application then right-click on the WinDynamicWallpaper icon from the taskbar, click Select Theme, select None (from the theme section) and click Apply.
In today's digital life, when we access the internet daily, browsers are essential almost as our operating system, after all, we do access all of the internet data via them, and having a good, reliable, and personal browser tailored for our needs can make all the difference in the world.
In today's article, we will introduce you to the five greatest browsers of today, we will point their advantages and disadvantages and why should you pick one or another. As with each piece of software, there is not an ultimate browser, better than anything else and we will not favor anyone on this list, the decision which you should use is solely up to you, we are here to provide you with an objective opinion on each one.
All of this being said, let's begin with the countdown in no particular order.
Mozilla firefox.
If you consider yourself a power user or you value your privacy then firefox is the browser for you. It is open source and is packed with great features like reporting when your email has been used for a known data breach, it stops annoying pop-up notifications, stops browser fingerprinting, and many more. Firefox is also a cross-platform browser making it a great choice if you want to transfer and use your data across multiple devices with one account. The downside of firefox however is its speed, this browser is the slowest on this list, I guess features and advantages took their tool in the speed department, but if that is not a concern for you and you feel like the positives outweigh some slower speed, grab it here.
Google Chrome
Chrome browser has been a game-changer when it was released and even today some of its features are still great and needed. It is packed with some great features like tab freezing, for example, it is cross-platform meaning that also as firefox you can change data between browsers on different devices. it is a very expandable browser with tons of extensions and its speed performance is very very good. The downside of Chrome are two things sadly, one of them is its hunger for RAM, the browser takes a big chunk of RAM once it is active and on some older computer with limited RAM it performs slowly, another is telemetry which its sending, in other words, other browsers don’t come with the lingering fear that Google’s just a little bit too involved in all of our lives. But if downsides do not trouble you and you have a decent amount of RAM in your system chrome might be the best solution for you, grab it here and check it out.
Microsoft Edge
Or should I say Microsoft edge 2.0 since this new Edge is completely recoded and rethought, a completely new browser based on chromium. The first version of the edge was an inhouse attempt from Microsoft and it was a disaster, I guess the lesson was learned, and this new edge we have today is a great Browser, it is lightning fast and packed with some great features with one among them standing out I just love, that is the ability to save web pages as applications and truth to be told you have to try this in order to see al great advantages it offers. A very interesting feature is that edge itself wins the speed race from all of the 5 contestants here which is a great surprise. Of course, the downside of annoying Microsoft pushing it to be your default is, well it's Microsoft, as chrome is tied to Google so is edge tied to Microsoft, and the same dreaded feeling that big MS is watching you. If however, you do not concern yourself with these kinds of things, since it is already part of Windows 10, give it a spin and try it, I am sure you will at least love its blazing speed.
Vivaldi
A new kid on the block, relatively unknown Browser Vivaldi offers some great customizable features no other one on this list offers, a very unique and down to each detail customization option, you can literally tweak each and every aspect of this browser making it best customizable and personal browser ever. How it is also based o chromium, every chrome extension works in it naturally. It is very good in speed and constantly updated and developed. The downside, well if you are anything like me, you could spend ages trying to customize it, ages, it has tons of features, and making it really feel and tick as you want can consume a really lot of time. If this thing does not bother you at all, grab Vivaldi here.
Opera
Last but not least, we have another relic of the old browser age, the Opera browser. Packed with great security and great in-house features like a built-in VPN, built-in ad blocker, built-in crypto wallet, etc this browser seems like a swiss army knife. Opera is full of features and it shows once you start using it. The downside of opera is that its look and feel are specifically tailored to a certain type of user and not everyone will find that appealing or attractive, add some great but hidden and hard to come by features and it may go unnoticed. However, I think you should really give it a go since it definitely deserves more attention than it gets. Grab it here and check it out.
That's it, 5 great browsers to look up, I hope that you have enjoyed the read and I hope to see you again here for more articles.
If you would like to read more helpful articles and tips about various software and hardware visit errortools.com daily.
Spying via some malicious app on the target phone is not a new thing but it can be very uncomfortable and even against the law in some countries.
Infecting the target phone can be done in various ways, another person can intentionally download and install applications on it, and you can install them via some phishing attacks or by an online scam. Once installed this piece of software presents a very serious invasion of privacy since it can track text messages, track phone location in real-time, record calls in real-time, eavesdrop on calls, take control of the camera and microphone, and many other applications.
Here are some common symptoms of mobile phones infected with spyware.
Symptoms of spyware
Random reboots Slow performance Strange text messages Overheating Unusual high data usage Non-familiar apps in the app list The fast drain of the battery Long shutdown time Strange interference and sounds during calls Signs of activity during standby mode
If your phone exhibits any of these symptoms you might have a spyware app installed and running on it.
Common spy apps
There are many apps that have been designed to spy on people that can be downloaded in the app store or on Google Play today. Most of these spyware apps are aimed at parents wanting to keep an eye on and protect their children. However, these can be used by anyone in order to spy on a target person via their phone.
Below is a list of common apps that can be used to spy on you. Many spyware apps require a phone to be ‘jailbroken’ or ‘rooted’ before being installed, this is when the phone’s operating system is changed to allow the phone to become unlocked and customizable.
mSpy : An undetectable spying app for iOS devices. It can be used to read your chats, see your location, view your email, check your call history, record your keystrokes, and more.
Spyera : This app requires rooted and jail-broken iPhones to work. It can go undetected and monitors phone calls and your call history. It even allows call recording and eavesdropping on live calls.
Flexispy : Flexispy prides itself as the #1 phone monitor for parents and can monitor everything from calls to social texts.
Umobix : This powerful spyware app has a dashboard that allows users to easily monitor someone’s location, calls, texts, keystrokes, all major social media, and more. You can detect Umobix because it heats up the infected phone and greatly affects the battery life of the infected device.
Ikey Monitor : Although it requires the device to be rooted for Android or jailbroken for iPhones, this spy app captures keystrokes, passwords, and screenshots, allows for call recording and supports multiple languages.
Clevguard : Available for both iOS and Android, Clevguard allows users to track GPS and Wi-Fi locations, capture screenshots remotely, and more. Due to a recent update, the spy app drains the target phone’s battery significantly.
Remove spyware from your phone
If any of the beforementioned apps are present on your phone you need to remove them right away.
Go to your phone settings and remove the malicious applications, then download some protection suite and scan the whole phone for any other trace of software remains or other malware apps.
MSASCui.exe is a digitally signed file from Microsoft located in folder C:\Program Files\Windows Defender.
It is a component of Microsoft Windows Defender Antispyware. This file is responsible for performing spyware scans. It is already installed in Windows Vista operating system. MSASCui.exe becomes an error code when it is found in another path. It is categorized as a Windows runtime error.
Solution
Error Causes
The cause of MSASCui.exe error is triggered by:
Corrupt or damaged registry entries
Virus Infection
The potential risks of MSASCui.exe error are:
Slow PC performance
Data loss
When this file becomes an error, it will display messages like:
“This application has failed to start to run on Windows because MSASCUI.exe cannot be found.”“Windows Defender cannot work properly and protect the Windows system effectively”
The message will keep popping up on your computer screen time and again.
Further Information and Manual Repair
When you experience an MSASCui.exe error on your PC, it is advisable to fix and repair it immediately before it causes serious damages to your system.
Here are some DIY quick solutions to repair MSASCui.exe error:
Solution 1:
If the speed of your PC reduces significantly and you also see MSASCui.exe error message pop on your screen, then in this case it is advisable to uninstall the Windows Defender program from your PC.
To do so, follow these instructions:
First, open the Windows Task Manager by pressing the “Ctrl, “Alt” and “Delete” keys on the keyboard.
Now click the ‘Processes’ tab. This will show the currently running processes on your system.
Scroll down and click on “MSASCui.exe” and then end the process. This will stop the program from running on your PC.
After this go to the start menu and double click on ‘My Computer’ and click on the C drive.
Choose the option ‘Program Files’ and then click on the ‘Windows Defender’ folder.
Now to delete this folder, right-click and select ‘delete’. This will uninstall the program, fix the MSASCui.exe error, and also improve the performance of your PC.
Solution 2:
If you find the MSASCui.exe file located in some other path, then this is an indication of a virus.
In this case, it is recommended to run an antivirus program on your PC to scan and delete all viruses.
If you don’t have an antivirus program already installed on your system, then you should download it. Once antivirus software is downloaded, simply run it to scan viruses and then click on delete to remove all the viruses on your system.
This will help you resolve the MSASCui.exe error caused by malware on your PC right away.
As you know, Excel sheet is frequently acclaimed as one of the most useful software that allows users to create spreadsheets, crunch numbers as well as prepare a business report. Usually, tapping the arrow keys to move from one cell to another. However, there are times when you might experience trouble in tapping them – for instance, they won’t work when you tap them.
This kind of problem can be quite frustrating since no matter what you do, especially when you tap the arrow keys, instead of a single cell, it moves the entire spreadsheet. If you are one of the users who experience this problem, worry no more for this post will guide you on what you can do to fix it.
When arrow keys won’t function as intended in Excel spreadsheets, it could be due to unintended behavior of the Scroll key or it could be related to some issues with the keyboard driver. Whatever the cause is, here are some suggestions you can check out to fix it.
Option 1 – Try to disable the Scroll Lock
The first thing you can do to fix this problem with arrow keys is to disable the Scroll Lock. Although doing this is easy, newer laptops don’t actually come with it so if your keyboard does not come with a scroll key, all you have to do is tap the Fn key and disable Scroll Lock. Aside from that, you could also use the on-screen keyboard to turn off the Scroll Lock. You will see its status on the Excel sheet which will help you to double-check. Moreover, you could also tap the Shift + F14 keys to toggle off the Scroll Lock. To use the on-screen keyboard to turn off Scroll Lock, follow the steps below.
Tap the Windows key and type “on-screen keyboard” and then tap Enter.
Once the on-screen keyboard is opened, you should see that the Scroll Lock is on the “On” position since the ScrLk keys are in blue.
Like pointed out earlier, you can utilize the Scroll Lock indicator located in the status bar as well as disable or enable the scroll key by using this feature on Microsoft Excel.
Option 2 – Try turning on the Sticky key
If disabling the Scroll Lock did not fix the problem, you can try turning on the Sticky Key instead. A lot of users reported that this option fixed the problem for them. So you should try to turn on the Sticky key and to do that, follow the steps below.
First, type “control panel” in the Start Search and click on Control Panel from the search results.
Next, select the “Turn On Sticky Keys” option and click on OK.
After that, go back and uncheck the “Turn On Sticky Keys” option. This should fix the malfunctioning arrow keys on Excel.
Option 3 – Try running the Hardware and Devices Troubleshooter
The first thing you can do to fix the problem is by running the Hardware Troubleshooter. Although it won’t make much of a difference, there’s still a possibility that it could automatically fix the problem with these function keys. To use it, refer to these steps:
The first thing you need to do is click on Start and then on the gear-like icon to pull up the window for Settings.
After opening Settings, look for the Update and Security option and select it.
From there, go to the Troubleshoot option located on the left-hand side of the list.
Next, select Hardware and Devices from the list and open the Troubleshooter and run it. Once it is doing its job, wait for it to complete the process and then restart the system.
After the system restarts, check if the problem’s now fixed. If not, refer to the next option given below.
Option 4 – Update the keyboard driver
You can also update the keyboard driver to fix the problem. There are cases when an outdated or corrupted driver can fix the problem. To do so, follow the steps below.
Tap the Win + R keys to open the Run dialog box.
Then type “devmgmt.msc” in the field and hit Enter to open the Device Manager.
From there, look for the keyboard driver and click on it.
Next, right-click on the keyboard driver and select the Update driver option.
After that, click the “Search automatically for updated driver software” option to proceed.
Option 5 – Reinstall the keyboard driver
If updating the keyboard driver didn’t help, then you might want to reinstall it. How? Follow the steps below.
Tap the Win + R keys to launch Run.
Type in MSC into the box and tap Enter or click OK to open the Device Manager.
After that, a list of device drivers will be displayed. Look for the keyboard driver, right-click on it and then select “Uninstall device”.
After that, unplug the device and restart your PC.
Then plug your device back in. Assuming your device is connected to your PC, open the Device Manager again.
Next, click on the Action button and click the Scan for hardware changes button. That should fix the problem
Note: You could also completely uninstall the driver and go directly to the manufacturer’s website and download the latest driver for your hardware and then install it.
Error code 0xc004fc03 occurs when Windows users fail to activate their Windows operating system due to a networking problem. The error code’s common symptoms include the following:
Inability to activate Windows 10 operating system
Message box with error code 0xc004fc03
Solution
Error Causes
Error code 0xc004fc03 in Windows 10 usually occurs due to issues related to a Windows user’s network. Your computer may be having problems connecting to the Internet or your firewall may be blocking or interrupting your device’s ability to activate Windows 10. In some cases, users may simply need to wait a day or two to reattempt to activate their system using a valid product key, as there may be an issue with the Windows activation servers. Failure to promptly fix this error code might result in other Windows 10 error messages, such as error code 0xc004f034.
Further Information and Manual Repair
To rectify the error code, Windows 10 users will need to perform manual repair procedures that fix the underlying problems causing error code 0xc004fc03. These procedures may include reconnecting to one’s network, checking your firewall settings, or activating your Windows operating system via phone. The manual repair methods are simple and do not require technical knowledge of the Windows operating system. If your attempts at manually repairing this error code fail, however, you may need to try a few other procedures.
Method One: Verify Internet Connection
To check your Internet connection, you’ll need to access the Network & Internet tab in Windows 10. Follow the instructions below to access this tab and fix Internet connectivity issues if they are preventing you from activating Windows on your machine.
Step one: Click the Start button and select Settings
Step two: Select Network & Internet
Step three: Click the Status section of the Network & Internet tab
If your status shows that you are not connected to a network, you will need to fix your connection. Simply use the Network Troubleshooter to troubleshoot your connection. You will be able to activate your copy of Windows once your connectivity issues are resolved.
If, however, the problem persists and error code 0xc004fc03 occurs during the activation process, this simply means that the existence of the error code is not due to connectivity or networking problems. In such a case, move to the next manual repair method listed below and follow the exact instructions given.
Method Two: Check Firewall Settings
Windows Firewall protects your PC from hackers, worms, and other malicious programs. However, in some cases, it may result in error codes like error code 0xc004fc03. If your firewall is interfering with the Windows 10 activation, you’ll be able to rectify the problem by simply adjusting your settings. Follow the steps below to check – and adjust if necessary – your Windows Firewall settings.
Step one: Click search bar and type firewall
Step two: Select Windows Firewall
Step three: Select Turn Windows Firewall on or off
In some cases, Windows users may not be able to adjust settings within the Windows Firewall tab, as your firewall settings may be controlled by a third party antivirus software. If this is the case, open the antivirus software and turn off the firewall if the software does not prevent you from making such changes to its settings.
Note, however, that you will need to readjust the settings as soon as you activate your version of Windows 10. This is due to the fact that turning off your firewall settings permanently may lead to exposure to worms and other malicious programs.
Method Three: Activate Windows by Phone
Activation of Windows via phone is another option for individuals experiencing error code 0xc004fc03. The activate by phone option in the Update & Security tab will be available once you fail to activate Windows 10. To complete this manual repair method, follow the steps below.
Step one: Select Settings
Step two: Click Update & security
Step three: Select Activate by phone
Step four: Follow the instructions provided thereafter.
This is one of the most effective ways to fix error code 0xc004fc03. If the issue persists, however, you can proceed to the last resort.
Method Four: Download an Automated Tool
If you wish to always have at your disposal a utility tool to fix these Windows 8 and other related issues when they do arise, download and install a powerful automated tool.
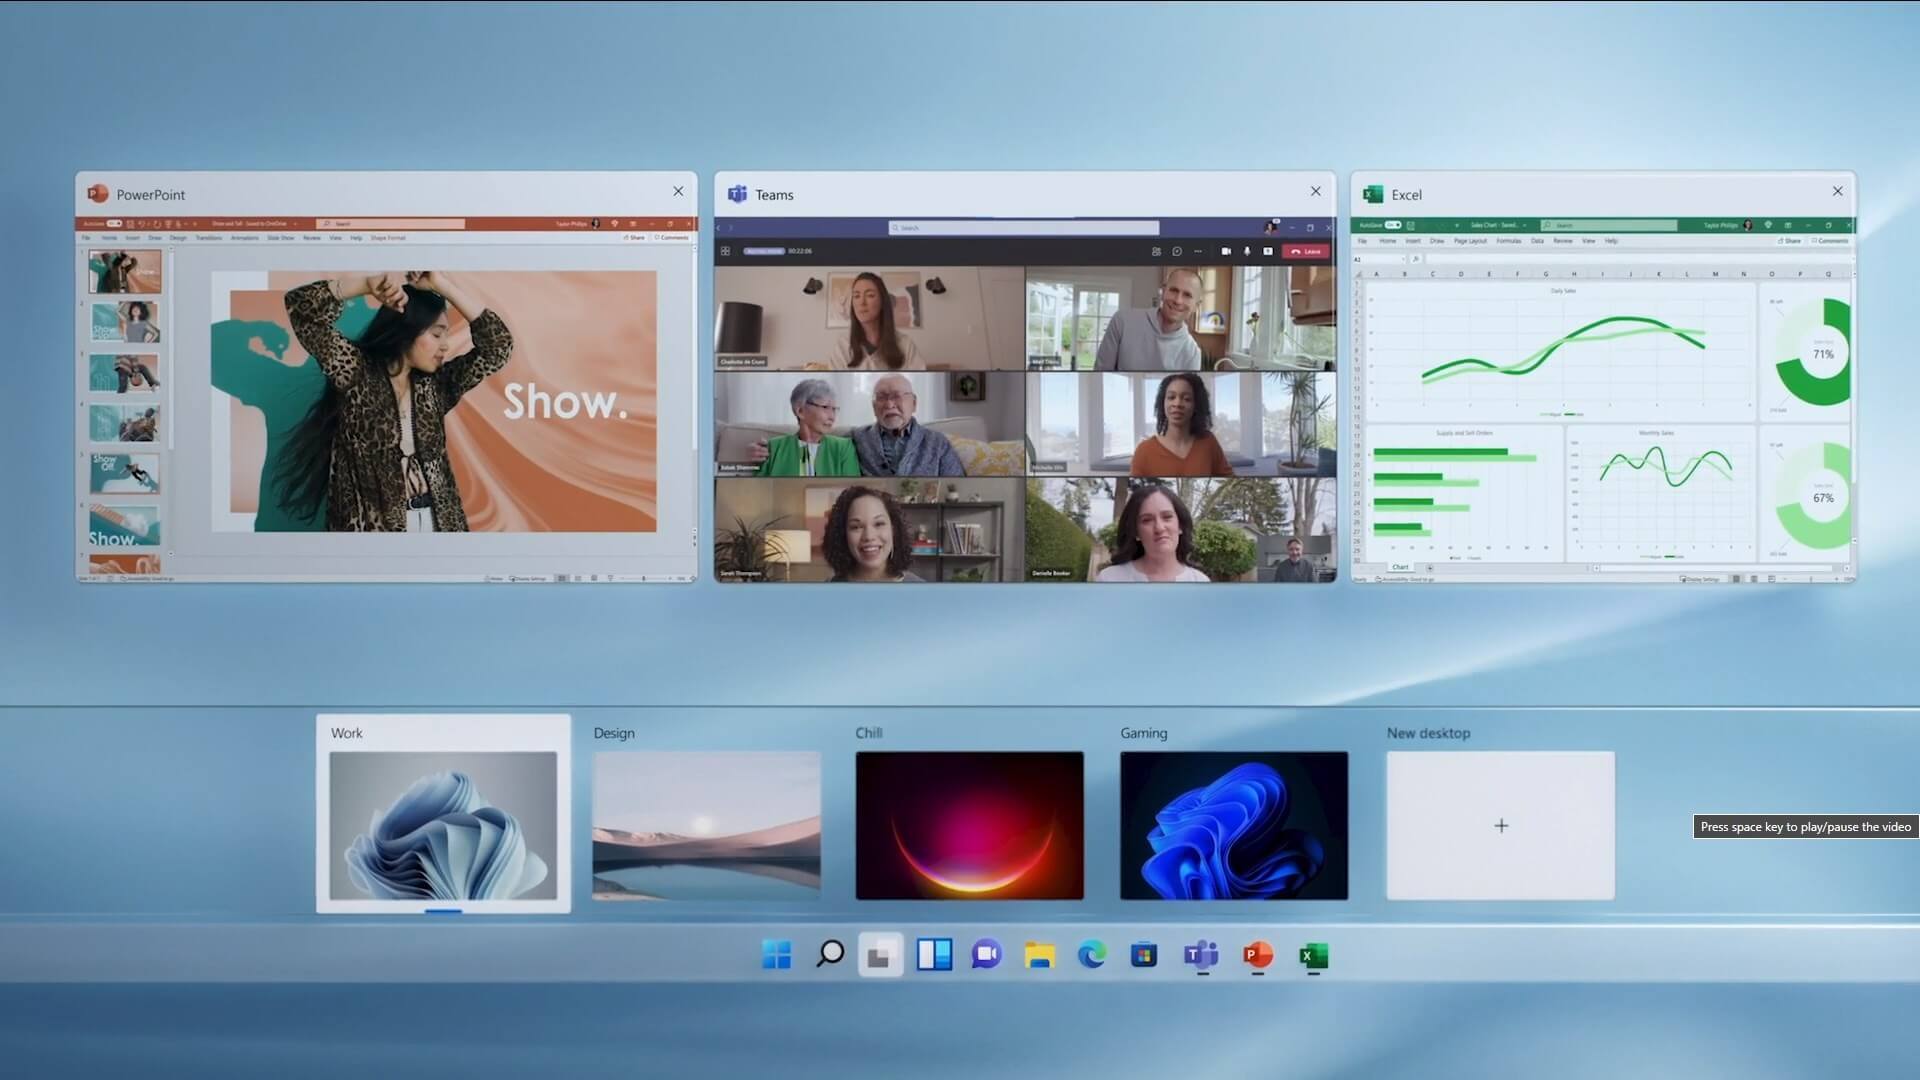
The feature that was originally planned for now scrapped Windows 10X is included in Windows 11. You will be able to customize your Virtual desktop with different wallpapers for each screen.
In order to fully customize your virtual desktops with different wallpapers follow this easy step-by-step guide.
Click on the Task View button in the taskbar
When the Task View opens, select the desktop on which you want to set wallpaper
The view will switch to the selected desktop. Right-click anywhere on the desktop and select personalize
In personalization settings, click on the background
Select wallpaper which you would like to have on the desktop by clicking on browse and navigating to the desired one
Close the settings
Repeat for each virtual desktop you would like to customize
Updating your Windows 10 computer does not always go smoothly as there are some errors you can encounter along the way. One of these Windows Update errors is the error code of 0x80246008. This kind of error can occur during different phases of an update that’s being downloaded or installed and even when an update is being initialized.
If you narrow down the cause of this Windows Update error, you’ll most likely see that it is related to the deliverability of a file to a computer from the servers of Microsoft. In other words, the error might be due to conflicts from programs like Firewall as well as third party programs like Antivirus or it could also be due to corrupted disk image or system files or it could be that any of the supporting Windows Update components and services are not working properly. Whatever the cause may be, the potential fixes provided in this post can be applicable to Windows Updates as well as the Microsoft Store.
Refer to the suggestions provided below to resolve the Windows Update Error 0x80246008 but before you proceed, make sure that you create a System Restore point first.
Option 1 – Apply some tweak in the Windows Registry from Command Prompt
Tap the Win + X keys and select Command Prompt (Admin) to open Command Prompt with admin privileges.
Next, navigate to the root location of the bootable device inside the Command Prompt command line.
Once you’re in the root location, type the following command and tap Enter to execute it:
After that, close the Command Prompt command line and then tap the Win + R keys to open Run utility.
In the field, type “services.msc” and click OK or tap Enter to open the Windows Services Manager.
From there, look for the following services:
Windows Update – Manual (Triggered)
Background Intelligent Transfer Service – Manual
Now open their Properties and make sure that their Startup type is as mentioned above and that they are running. If they are not running, just click on the Start button.
Option 2 – Run the System File Checker Scan
If the registry tweak didn’t work, you can run a System File Checker scan instead. It is a built-in command-line utility that replaces bad and corrupted system files to good system files that might be the cause why you’re getting the error when you try updating your computer. To run the SFC command, follow the steps given below.
Tap Win + R to launch Run.
Type in cmd in the field and tap Enter.
After opening Command Prompt, type in sfc /scannow
The command will start a system scan which will take a few whiles before it finishes. Once it’s done, you could get the following results:
Windows Resource Protection did not find any integrity violations.
Windows Resource Protection found corrupt files and successfully repaired them.
Windows Resource Protection found corrupt files but was unable to fix some of them.
Restart your computer.
Option 3 – Run the Windows Update Troubleshooter
If the System File Checker wasn’t able to resolve the Windows Update error, you could also try running the Windows Update Troubleshooter as it could also help in fixing any issues related to Windows Update including this one. To run it, go to Settings and then select Troubleshoot from the options. From there, click on Windows Update and then click the “Run the troubleshooter” button. After that, follow the next on-screen instructions and you should be good to go.
Option 4 – Try to disable your antivirus program
Disabling the antivirus program or any security software installed in your computer is always a good idea you can try when the Windows Update process does not go smoothly. So before you try updating your computer again, make sure to disable the antivirus or security program and once the Windows Update is done, don’t forget to enable the antivirus program back again.
Option 5 – Try deleting the files from the SoftwareDistribution folder and resetting the Catroot2 folder
The downloaded Windows Updates are placed in a folder called “SoftwareDistribution”. The files downloaded in this folder are automatically deleted once the installation is completed. However, if the files are not clean up or if the installation is still pending, you can delete all the files in this folder after you pause the Windows Update service. For complete instructions, refer to the steps below.
Open the WinX Menu.
From there, open Command Prompt as admin.
Then type in the following command – don’t forget to hit Enter right after typing each one of them.
net stop wuauservnet start cryptSvcnet start bitsnet start msiserver
After entering these commands, it will stop the Windows Update Service, Background Intelligent Transfer Service (BITS), Cryptographic, and the MSI Installer
Next, go to the C:/Windows/SoftwareDistribution folder and get rid of all the folders and files thereby tapping the Ctrl + A keys to select them all and then click on Delete. Note that if the files are in use, you won’t be able to delete them.
After resetting the SoftwareDistribution folder, you need to reset the Catroot2 folder to restart the services you just stopped. To do that, follow these steps:
Type each one of the following commands.
net start wuauservnet start cryptSvcnet start bitsnet start msiserver
After that, exit Command Prompt and restart your computer.
The error code 2738 typically occurs either when you attempt to install a program or uninstall it on Windows Vista and 7. The error message is displayed in the following format:
“Error 2738. Could not access VBScript run time for custom action.”
It is a type of runtime error associated with VB (Visual Basic) Script. It indicates that the VB script engine is not correctly registered on your computer.
Solution
Error Causes
The error 2738 may occur due to multiple reasons. These include:
Windows VB Script engine is not properly installed or is disabled on your PC
Registry keys are incorrect
Corrupt registry entries
Poor PC maintenance
As this error code may be generated due to registry issues, it is advisable to fix it immediately as it may pose serious threats to your system like system failure, crash and valuable data loss. And complete data retrieval is often the hardest task.
Further Information and Manual Repair
To avoid such threats and to resolve the error 2738 on your PC immediately, here are some solutions that you can try:
Register the VB Script Engine Correctly on Your PC
This can be done by running the command prompt as administrator:-
Simply go to the start menu, click all programs, and select accessories.
Right-click on Command Prompt and select ‘run as Administrator’.
Navigate to the folder that contains the DLL. If you are using Windows 32 bit version, then type cd %windir%system32 into the Command Prompt and then press enter.
Nonetheless, if you are using 64-bit version Windows then type the following command: regsvr32 vbscript.dll and then press enter. This will help you register the VB script engine correctly and resolve the issue.
Download and Run Restoro
If the error still persists, then this means the underlying cause of the error 2738 could be invalid and corrupt registry keys. To resolve either of the causes in seconds, it is advisable to install and run Restoro.
Restoro is an advanced, innovative, and multi-functional PC Fixer. This tool is embedded with multiple utilities including a powerful registry cleaner, an antivirus and a system optimizer. The registry cleaner is a powerful utility that instantly detects all registry issues and resolves them right away.
The registry saves all activities performed on the PC. It stores all types of files including invalid registry keys, cookies, internet history, junk files and temporary files.
If these unnecessary files are not removed and cleared from the PC, it not only takes a lot of disk space but also damages the registry and dll files.
The registry cleaning utility detects all such files and removes them. It wipes out all invalid registry entries and bad keys clean the registry and restores it.
In addition to this, this tool can also be used to remove viruses and optimize the system speed. It is a user-friendly and highly functional PC repair tool. It is compatible with all Windows versions
Click here to download Restoro on your PC and resolve error 2738 right away!


 If you consider yourself a power user or you value your privacy then firefox is the browser for you. It is open source and is packed with great features like reporting when your email has been used for a known data breach, it stops annoying pop-up notifications, stops browser fingerprinting, and many more. Firefox is also a cross-platform browser making it a great choice if you want to transfer and use your data across multiple devices with one account. The downside of firefox however is its speed, this browser is the slowest on this list, I guess features and advantages took their tool in the speed department, but if that is not a concern for you and you feel like the positives outweigh some slower speed, grab it
  Chrome browser has been a game-changer when it was released and even today some of its features are still great and needed. It is packed with some great features like tab freezing, for example, it is cross-platform meaning that also as firefox you can change data between browsers on different devices. it is a very expandable browser with tons of extensions and its speed performance is very very good. The downside of Chrome are two things sadly, one of them is its hunger for RAM, the browser takes a big chunk of RAM once it is active and on some older computer with limited RAM it performs slowly, another is telemetry which its sending, in other words, other browsers don’t come with the lingering fear that Google’s just a little bit too involved in all of our lives. But if downsides do not trouble you and you have a decent amount of RAM in your system chrome might be the best solution for you, grab it
  Or should I say Microsoft edge 2.0 since this new Edge is completely recoded and rethought, a completely new browser based on chromium. The first version of the edge was an inhouse attempt from Microsoft and it was a disaster, I guess the lesson was learned, and this new edge we have today is a great Browser, it is lightning fast and packed with some great features with one among them standing out I just love, that is the ability to save web pages as applications and truth to be told you have to try this in order to see al great advantages it offers. A very interesting feature is that edge itself wins the speed race from all of the 5 contestants here which is a great surprise. Of course, the downside of annoying Microsoft pushing it to be your default is, well it's Microsoft, as chrome is tied to Google so is edge tied to Microsoft, and the same dreaded feeling that big MS is watching you. If however, you do not concern yourself with these kinds of things, since it is already part of Windows 10, give it a spin and try it, I am sure you will at least love its blazing speed.
 A new kid on the block, relatively unknown Browser Vivaldi offers some great customizable features no other one on this list offers, a very unique and down to each detail customization option, you can literally tweak each and every aspect of this browser making it best customizable and personal browser ever. How it is also based o chromium, every chrome extension works in it naturally. It is very good in speed and constantly updated and developed. The downside, well if you are anything like me, you could spend ages trying to customize it, ages, it has tons of features, and making it really feel and tick as you want can consume a really lot of time. If this thing does not bother you at all, grab Vivaldi
  Last but not least, we have another relic of the old browser age, the Opera browser. Packed with great security and great in-house features like a built-in VPN, built-in ad blocker, built-in crypto wallet, etc this browser seems like a swiss army knife. Opera is full of features and it shows once you start using it. The downside of opera is that its look and feel are specifically tailored to a certain type of user and not everyone will find that appealing or attractive, add some great but hidden and hard to come by features and it may go unnoticed. However, I think you should really give it a go since it definitely deserves more attention than it gets. Grab it

 The feature that was originally planned for now scrapped Windows 10X is included in Windows 11. You will be able to customize your Virtual desktop with different wallpapers for each screen.
In order to fully customize your virtual desktops with different wallpapers follow this easy step-by-step guide.
The feature that was originally planned for now scrapped Windows 10X is included in Windows 11. You will be able to customize your Virtual desktop with different wallpapers for each screen.
In order to fully customize your virtual desktops with different wallpapers follow this easy step-by-step guide.