There are instances when you open a picture or an image in the Windows Photo Viewer and instead of displaying the image, it displays nothing and you’ll see an error message instead that says, “Windows Photo Viewer can’t display this picture because there might not be enough memory available on your computer”.
Although this may look like a clear-cut issue of less storage space or low RAM in your computer, that’s not always the case. Security experts noticed that even when your computer has enough resources and disk space, this kind of problem could still occur. So if you experience the same thing, you need to check the Color Profile of your screen. For more information, refer to the detailed instructions provided below but before you proceed, make sure that you close some processes in the Task Manager or restart your computer and see if it helps in fixing the problem. You can also try using the Disk Cleanup tool. To use it, refer to these steps:
- Tap the Win + R keys to open the Run dialog box and then type “cleanmgr” in the field and hit Enter to open the Disk Cleanup window.
- After that, select the drive you want to clean.
- Now click OK to clean the disk and restart your computer.
If the Disk Cleanup tool didn’t help in resolving the issue, refer to the instructions below.
Step 1: In the search box, type “color management” and then select the “Change advanced color management settings for display” option from the search results. Or you could simply go to Settings > System > Display, Advanced display settings, and from there, select display and click on the Display adapter properties of Display.
Step 2: Next, switch to the Color Management tab and click on the Color Management button.
Step 3: Select the monitor where you’re getting the “Windows Photo Viewer can’t display this picture because there might not be enough memory available on your computer” error in the next window. And if you have two displays, make sure that you select the primary display. You also have an option to identify the monitor.
Step 4: Once confirmed, select the “Use my settings for this device” checkbox.
Step 5: After that, select the Profile listed under the “Profiles associated with this device” option and then click on Remove.
Step 6: Next, go to the Advanced tab and make sure that all settings are set to System default which includes a device profile, perceptual images, rendering intent, Relative Colorimetric, and many more.
Step 7: Once you’re done, you have to restart your computer and then try to open the same image you were trying to open earlier and then check if you can now open it instead of seeing the error.


 It is officially confirmed, Windows 11 release date is October 5th. Windows 11 will be released as a free upgrade to all registered Windows 10 users that have supported hardware for it.
The rest of the users will be able to install it via ISO file as a clean installation if their computer supports Windows 10 hardware requirements. The official price for the license for Windows 11 has not yet been set but I assume after release it will be set.
Priority for W11 will have users who are upgrading from W10 as stated by Microsoft.
Also, it was officially confirmed that Android apps will not be running natively in this first release of Windows 11, that feature will come in a future update, official statement below:
It is officially confirmed, Windows 11 release date is October 5th. Windows 11 will be released as a free upgrade to all registered Windows 10 users that have supported hardware for it.
The rest of the users will be able to install it via ISO file as a clean installation if their computer supports Windows 10 hardware requirements. The official price for the license for Windows 11 has not yet been set but I assume after release it will be set.
Priority for W11 will have users who are upgrading from W10 as stated by Microsoft.
Also, it was officially confirmed that Android apps will not be running natively in this first release of Windows 11, that feature will come in a future update, official statement below:
 Automatic Windows cleanups can mostly take care of these things but for top-notch performance clearing cache manually is a far better option. We will here explore various cache temporary files, where they are, and how to clean them. Sit back and let’s do some cleaning!

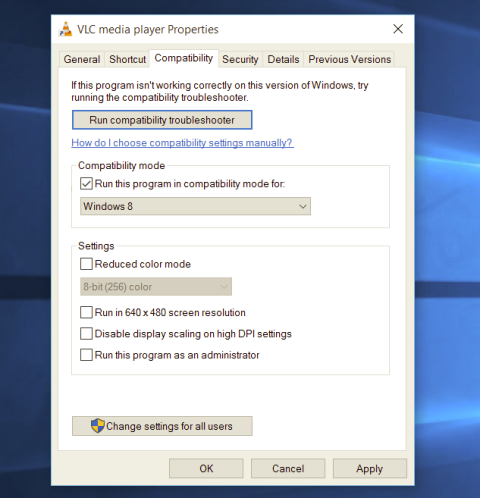 Most of the time running applications with typical settings is fine but from time to time we might have some applications that will require running with administrator privilege in order to work properly. In this case, it is very easy to do it, you just right-click and choose run as administrator.
Although a very easy solution, it can be quite annoying if running the app is on a daily basis or even more times per day. If this is the case then right-clicking and choosing to run as administrator can be a daunting task, sometimes you can even forget to run it like this in heat of work and some unforeseen consequences might occur.
Luckily there is an easy hack so you can open the chosen application each time as an administrator with a simple double click each time.
Most of the time running applications with typical settings is fine but from time to time we might have some applications that will require running with administrator privilege in order to work properly. In this case, it is very easy to do it, you just right-click and choose run as administrator.
Although a very easy solution, it can be quite annoying if running the app is on a daily basis or even more times per day. If this is the case then right-clicking and choosing to run as administrator can be a daunting task, sometimes you can even forget to run it like this in heat of work and some unforeseen consequences might occur.
Luckily there is an easy hack so you can open the chosen application each time as an administrator with a simple double click each time.