Blinking or Flashing Desktop After login - Windows 10 Upgrade

Blinking or Flashing Desktop After login - What does it mean?

Upon updating to Windows 10, some users might encounter a blinking or flashing desktop after logging in. This will result in a repetitive restarting of explorer or you won’t be able to make the start menu and shortcut keys work. In addition, the network icon might not appear in your taskbar as well. Other Windows 10 error messages include error code 0xc000021a.

Solution

Restoro box imageError Causes

Your blinking or flashing desktop after logging in might be the result of problems with the bushell.dll shell extension, which is a part of the Norton Security Suite. Another possible cause for this annoying problem is an issue with your display driver since not all systems will use the same display driver and will depend on what graphics card you use.

Further Information and Manual Repair

In fixing the bothersome blinking or flashing desktop after logging in problem, you can do a manual repair method to address the root problem. You need to be familiar with the Windows command line to successfully go through the process. However, if you are not knowledgeable or confident enough to do this on your own, it would be best to seek help from a professional. Or, you might want to consider using an automated tool to solve the issue.

You need to identify first what’s causing the blinking or flashing of your desktop after login to properly address the issue. The following methods can be done if your issue is caused by bushell.dll shell extension issue:

Method One: Forcefully Terminate Process

  1. Press on Ctrl+Alt+Del then select Task manager
  2. Start a Command Prompt as an administrator by choosing the File menu then Run New Task.
  3. Type exe. Make sure to tick the checkbox “Create this task with administrative privileges.”

NOTE: Text input is most probably affected by the explorer restarts so you might need to repeatedly type some letters or to carefully input texts.

  1. In the Command Prompt, type taskkill /f /im explorer.exe. This will stop the blinking or flashing.
  2. Type cd “Program Files” afterward, type dir /s bushell.dll to locate where the dll is. (For example, purposes, use c:\program files\Norton Security Suite\Engine6422.5.2.15 as the location)
  3. If the dll file is not found, you can try repeating step 5 but this time, use “Program Files (x86)” However, you can proceed with the next step if you already located where the bushell.dll is.
  4. Type cd ”c:\program files\Norton Security Suite\Engine 6422.5.2.15” to change the name of the directory you found the dll in.
  5. Type ren bushell.dll bushell-crash.dll
  6. Restart now the system by typing shutdown /r /f /t o in the command line.

Method Two: Uninstall Programs

  1. Log out then go to the sign in screen
  2. Press the Shift key as you simultaneously click on the Power button on the screen.
  3. Continue pressing on the Shift key as you click
  4. Continue pressing on the Shift key as you wait for the Advanced Recovery Options menu to appear.
  5. Once the Advance Recovery Options menu appears, click on Troubleshoot then select Advanced options.
  6. Click on the Startup Settings then select
  7. Boot on Safe Mode by pressing 4 on your keyboard.
  8. Log in then press Windows key + X.
  9. Select the Device Manager then expand Display Adapter.
  10. On your Display Adapter, right-click then select
  11. Exit Device Manager
  12. If in case you also have an older Antivirus utility, you should uninstall it as well.
  13. Restart

NOTE: You might need to download the latest Video Driver on a working computer. Save it in a thumb drive then copy and install it on your computer. If in case there is no native Windows 10 driver, you can also download the latest Windows 7 or Windows 8.1 video driver. Afterward, install it in compatibility mode.

Method Three: Use Microsoft System Configuration Utility

  1. Log out then go to the sign in screen
  2. Press the Shift key as you simultaneously click on the Power button on the screen.
  3. Continue pressing on the Shift key as you click
  4. Continue pressing on the Shift key as you wait for the Advanced Recovery Options menu to appear.
  5. Once the Advance Recovery Options menu appears, click on Troubleshoot then select Advanced options.
  6. Click on the Startup Settings then select
  7. Boot on Safe Mode but this time, choose 5 to start in Safe Mode with networking.
  8. Check if your problem is present or not in Safe Mode. If not, then you are on the right track.
  9. Press on the Windows key + R then type msconfig to start up your exe file.
  10. Click on the Services tab then choose Disable All. Afterward, click on
  11. Once you’re prompted to reboot your computer, go ahead and reboot in Normal Mode. Check if the issue is still present.
  12. If the blinking or flashing desktop after login is gone, then you can just do a process of elimination.
  13. Start-up on your exe again then begin bringing up services a few at a time.
  14. You can turn on all other services except for the following which causes the blinking or flashing desktop after login problem:
    Problem Reports and Solutions Control Panel Support
    •Windows Error Reporting Service.

Do You Need Help with Your Device?

Our Team of Experts May Help
Troubleshoot.Tech Experts are There for You!
Replace damaged files
Restore performance
Free disk space
Remove Malware
Protects WEB browser
Remove Viruses
Stop PC freezing
GET HELP
Troubleshoot.Tech experts work with all versions of Microsoft Windows including Windows 11, with Android, Mac, and more.

Share this article:

You might also like

How to Download Steam saves
Steam is one of if not the largest online store for the digital distribution of games on the PC platform. The game gets downloaded to your PC when you are planning to play it and its saves are synched in the Steam cloud. They get automatically downloaded when you install the game but you can also get your saves by directly downloading them from Valve's website in your browser. If Steam isn’t automatically downloading your old save games after you install a game, ensure Steam Cloud is enabled for that game within Steam. Locate the game in your Steam library, right-click it, and then select Properties. Click the Updates tab and ensure the Enable Steam Cloud synchronization option is checked for the game. If this option isn’t checked, Steam won’t automatically download your cloud saves. If you don’t see a Steam Cloud option for a game here, that game doesn’t support Steam Cloud. Not all games on Steam do, it’s up to each game developer.

Download the Files in Your Web Browser

Valve lets you download your Steam cloud save files via a web browser, too. You can download just your saved files without re-downloading the entire game. To find your saved files, visit Valve’s View Steam Cloud page in your web browser and sign in with your Steam account. You’ll see a list of games using your Steam Cloud storage. Locate the game in the list and click Show Files to see all the files for a game. Each game has a page showing all the files it’s storing in Steam Cloud, as well as the date they were modified. To download a file, click Download. Download all the save files for your game, and you’ll have a copy of its save games. This feature is especially useful for multi-platform games that don’t automatically synchronize save files between platforms.
Read More
How to Fix Stop 0x0000000A Error Code

Stop 0x0000000A - What is it?

Stop 0x000000A is a type of blue screen of death error associated with Windows XP. It occurs either during or after the installation of Windows XP. In other cases, the stop 0x000000A error may occur when the device driver uses an incorrect memory address, causing an IRQ conflict. The Stop 0x000000A error message means that a process or a driver attempted to access a memory section without permission.  The stop error message is displayed in the following format:

Stop: 0x0000000A (parameter1, parameter2, parameter3, parameter4) IRQL_NOT_LESS_OR_EQUAL *** Address x has base at x - filename

Solution

Restoro box imageError Causes

The stop 0x000000A error is triggered due to multiple reasons. These include:
  • Faulty hardware
  • The poor device driver installation
  • Incompatible device driver
  • Viruses and malware attack
  • Disk fragmentation
Blue screen of death errors like the stop 0x000000A error code is critical. These errors may pose serious PC threats. When this error occurs the computer screen turns blue, the program running on the system stops and if the error is not fixed in time it may also result in a system crash and failure.

Further Information and Manual Repair

To resolve the Stop 0x000000A error on your PC, here are some solutions that you can try:

1. Roll Back Drivers

To do this, click on the start button and go to the control panel. Then double click the system icon and locate the ‘System Properties’ window. After that click on the ‘hardware’ tab and then click the ‘Device Manager’ button. Here locate the device that you recently updated which could be causing the IRQ conflict. Now double click the device recently updated and click the driver tab. Then click on the ‘Roll Back Driver' button. Wait for the process to finish and then simply reboot your system.

2. Specify the Hardware Abstraction Layer (HAL)

Another method to resolve the Stop 0x000000A error on your system is to specify the hardware abstraction layer (HAL). This can be done during Windows XP installation startup. Simply press the F5 button on your keyboard while the “Setup is inspecting your computer’s hardware configuration’. When prompted, make sure that you specify the correct computer type and HAL (the Hardware Abstraction Layer). Most computers use a single processor, if your computer also has a single processor then simply select ‘Standard PC HAL’ computer type from the menu. Now reboot your PC and then reinstall the Windows XP operating system. If the error is still not resolved then try turning off features in CMOS settings

3. Turn off Features in CMOS Settings

Turn off all the following features in the CMOS settings:
  • All caching, including L2, BIOS, internal/external, and write back caching on disk controllers
  • Plug and Play
  • All shadowing
  • Any BIOS-based virus protection feature
After turning off these features, try reinstalling Windows XP again. If this works, then that’s great! However, if it doesn’t, then try method 4; maybe the cause of the stop 0x000000A is associated with incompatible drivers.

4. Install Windows XP compatible Drivers

Sometimes device driver compatibility can also shoot up the stop 0x000000A error message. First, remove the drivers that are incompatible with Windows XP. Now obtain and install new Windows XP compatible drivers. To do this, go to the start menu and the control panel. Now double click on Add or Remove Programs icon. Select the drivers that are incompatible with Windows XP and click on the remove button. After that restart PC and install Windows XP, compatible drivers, for the hardware devices on your system.

5. Scan for Viruses and Repair the Registry

If all the methods discussed above do not resolve the stop 0x000000A error on your PC, then it means either your computer is affected by an infection virus or the problem is associated with the registry like disk fragmentation and invalid entries. To scan for both viruses and registry issues simultaneously in seconds, it is advisable to download Restoro. Restoro is an advanced and multi-functional PC repair tool integrated with powerful utilities including a registry cleaner, antivirus, and a system optimizer. It also scans for Active X controls and class ID errors. The registry cleaning utility scans your entire PC for all possible registry issues triggering different error codes including the stop 0x000000A error. It wipes out all the unnecessary files cluttering and damaging the registry including cookies, temporary files, junk files, and invalid entries. It repairs the fragmented disk and the registry thereby resolving the stop 0x000000A error on your system. The privacy error utility functions like an antivirus. It detects all kinds of malicious software on your system including malware, adware, spyware, and viruses. These are removed immediately thus making your PC error-free. Restoro is safe, efficient, and user-friendly. It is compatible with all Windows versions including XP.  It has a sophisticated interface and a neat layout which makes it quite easy to operate and workaround. Click here to download Restoro and repair your PC and resolve the stop 0x000000A error code now!
Read More
Ventoy software review

There is a lot of software on the market today, but from time to time we discover something extraordinary and unique worth sharing and today we have a threat for you. Ventoy is a tool that will help you with system reinstallations and system maintenance once and for all.

If you are a computer user that has multiple operating systems or you are installing and maintaining different hardware via different OS there is a high chance that you have multiple USB sticks with different operating systems on them.

Now the problem with that is that there are probably too many unlabeled sticks around or you do not have enough so you keep making system USBs depending on which one you might need.

ventoy

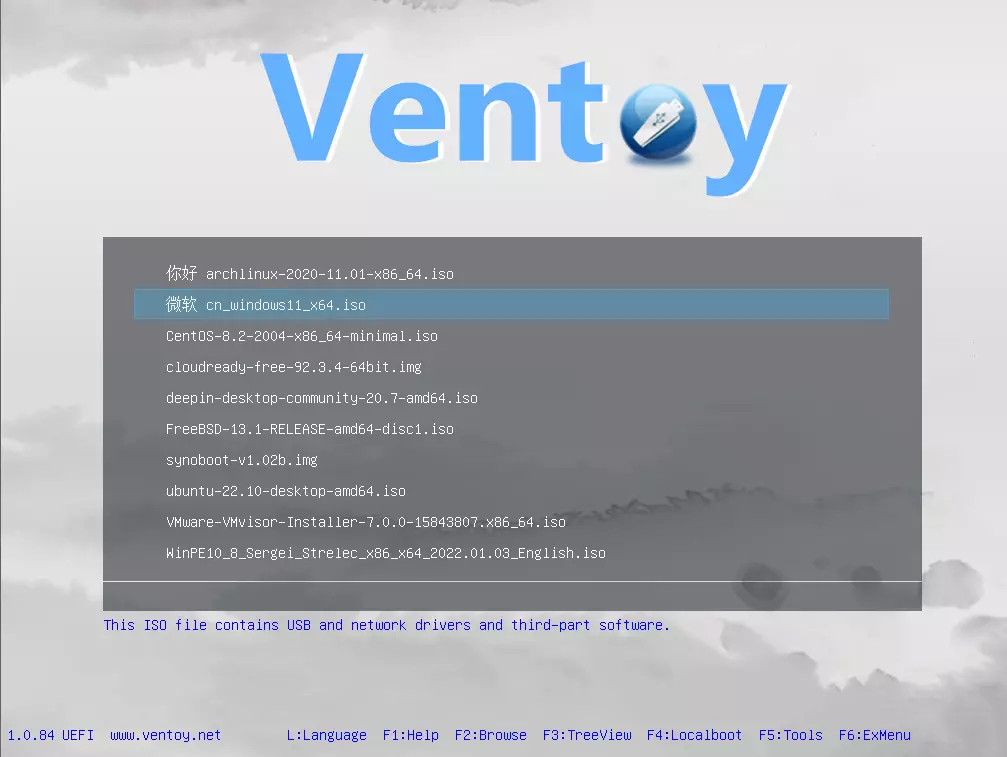
Ventoy solves all of these problems by letting you have as many operating systems images as your USB has capacity. The only thing you need to do is get the software here: https://www.ventoy.net/en/index.html and make a USB with it, then you can freely just copy your ISO images onto the USB and once it is inserted into the computer you will be given a menu to choose which one you would like to start with, simple as that.

Features

  • 100% open source (license)
  • Very simple to use (Get started)
  • Fast (limited only by the speed of copying the iso file)
  • Can be installed in USB/Local Disk/SSD/NVMe/SD Card
  • Directly boot from ISO/WIM/IMG/VHD(x)/EFI files, no extraction needed
  • Support to browse and boot ISO/WIM/IMG/VHD(x)/EFI files in local disk Notes
  • No need to be continuous in disk for ISO/WIM/IMG/VHD(x)/EFI files
  • Both MBR and GPT partition styles are supported
  • x86 Legacy BIOS, IA32 UEFI, x86_64 UEFI, ARM64 UEFI, MIPS64EL UEFI supported
  • IA32/x86_64 UEFI Secure Boot supported Notes
  • Linux Persistence supported Notes
  • Windows auto installation supported Notes
  • Linux auto installation supported Notes
  • Variables Expansion supported for Windows/Linux auto-installation script Notes
  • FAT32/exFAT/NTFS/UDF/XFS/Ext2(3)(4) supported for main partition
  • ISO files larger than 4GB supported
  • Menu alias, Menu tip message supported
  • Password protect supported
  • Native boot menu style for Legacy & UEFI
  • Most types of OS supported, 1000+ iso files tested
  • Linux vDisk(vhd/vdi/raw...) boot solution Notes
  • Not only boot but also complete the installation process
  • Menu dynamically switchable between ListView and TreeView mode Notes
  • "Ventoy Compatible" concept
  • Plugin Framework and GUI plugin configurator
  • Injection of files into runtime environment
  • Boot configuration file dynamically replacement
  • Highly customizable theme and menu style
  • USB drive write-protected support
  • USB normal use unaffected
  • Data nondestructive during a version upgrade
  • No need to update Ventoy when a new distro is released
Read More
Wallpapers by MyWay (wallpapers.myway.com) removal Guide

Wallpapers by MyWay is a browser hijacker, also known as Wallpaper Homepage adware. It was developed by Mindspark Interactive Network, Inc and it is widely promoted on the Internet as a genuine search engine powered by Google with an ability to customize homepage background and add some quick access links. This hijacker can be found in the most popular web browsers including Mozilla Firefox, Google Chrome, and IE. Generally Wallpaper by MyWay hijacker appears on the user’s computer without the user being fully aware of its modification.

While installed users will experience additional ads showing up in their search results, as well as sponsored content and pop-up ads. This extension has been flagged by several anti-virus scanners and it is recommended to remove it from your computer.

About Browser Hijackers

Browser hijack is a very common type of online fraud where your web browser settings are altered to allow it to do things you never intend. Browser hijacker malware is designed for many different reasons. These are generally used to force visitors to predetermined sites, manipulating web traffic to generate ad revenue. Nevertheless, it’s not that harmless. Your internet safety is jeopardized and it is also really irritating. Additionally, hijackers can make the entire infected system fragile – other harmful malware and viruses would take hold of these opportunities to get into your system very easily.

Signs of browser hijacker infection

Symptoms that your browser is hi-jacked include: 1. you see unauthorized modifications to your web browser’s home-page 2. you find yourself regularly directed to a different site than the one you meant 3. the default web engine and the default browser settings is modified 4. find new toolbars which you did not add 5. you notice lots of pop-up ads on your computer screen 6. your internet browser has instability issues or displays frequent errors 7. you’re blocked to access those sites of anti-malware solution providers.

Exactly how browser hijacker finds its way onto your computer

Browser hijackers can enter a computer by some means or other, for instance via file sharing, downloads, and e-mail also. Many internet browser hijackings come from add-on programs, i.e., browser helper objects (BHO), toolbars, or plug-ins added to web browsers to provide them additional functionality. A browser hijacker can be installed as a part of freeware, shareware, demoware and fake programs. An example of some popular browser hijackers includes Babylon, Anyprotect, Conduit, DefaultTab, SweetPage, RocketTab, and Delta Search, however, the names are often changing. Browser hijackers could record user keystrokes to collect potentially valuable information that leads to privacy issues, cause instability on systems, significantly disrupt user’s browsing experience, and finally slow down the system to a point where it will become unusable.

Browser hijacker removal methods

Certain types of browser hijackers can be quickly removed from your computer by deleting malicious programs or any other recently installed shareware. However, the majority of hijacking codes are certainly not easy to get rid of manually, as they go deeper into the operating system. Furthermore, manual removals require in-depth system knowledge and therefore can be a very difficult job for novices. Installing and running anti-malware programs on the affected computer can automatically delete browser hijackers and other malicious programs. One of the top tools for repairing browser hijacker infections is SafeBytes Anti-Malware. It helps you get rid of any pre-existing malicious software on your computer and gives you real-time monitoring and protection against new threats. Use a system optimizer (such as Total System Care) along with your anti-malware to fix various registry issues, remove computer vulnerabilities, and improve your computer overall performance.

How To Get Remove Malware That Is Preventing Antivirus Installation?

All malware is detrimental and the consequences of the damage will vary according to the specific type of malicious software. Some malware goes to great lengths to stop you from downloading or installing anything on your computer, especially anti-virus software programs. If you are reading this article, you may have infected by a virus that stops you from downloading a security software such as Safebytes Antimalware on your PC. Refer to the instructions below to remove malware in alternative ways.

Use Safe Mode to fix the issue

If the malware is set to run at Windows start-up, then booting in safe mode should avoid it. Only the minimum required applications and services are loaded when you boot your laptop or computer into Safe Mode. To launch your Windows XP, Vista, or 7 computers in Safe Mode with Networking, follow the instructions below. 1) After switching on the computer, press the F8 key before the Windows splash screen starts to load. This would conjure up the Advanced Boot Options menu. 2) Select Safe Mode with Networking with arrow keys and hit ENTER. 3) When this mode loads, you should have an internet connection. Now, make use of your web browser normally and navigate to https://safebytes.com/products/anti-malware/ to download and install Safebytes Anti-Malware. 4) After installation, do a complete scan and allow the program to remove the threats it discovers.

Switch to some other internet browser

Malicious code might exploit vulnerabilities in a specific internet browser and block access to all anti-malware software websites. When you suspect that your Internet Explorer happens to be hijacked by a trojan or otherwise compromised by online hackers, the most effective course of action would be to switch over to a different internet browser such as Google Chrome, Mozilla Firefox, or Apple Safari to download your chosen computer security software – Safebytes Anti-Malware.

Install anti-malware on a flash drive

Here’s another solution which is creating a portable USB anti-malware software package that can scan your computer for malware without needing installation. Adopt these measures to employ a flash drive to fix your corrupted PC. 1) On a clean PC, download and install Safebytes Anti-Malware. 2) Plug in the pen drive into the uninfected computer. 3) Run the setup program by double-clicking the executable file of the downloaded software, with a .exe file format. 4) Choose the flash drive as the destination for saving the software file. Follow the activation instructions. 5) Now, transfer the thumb drive to the infected computer. 6) Double-click the antivirus software EXE file on the thumb drive. 7) Click on the “Scan Now” button to start the malware scan.

How SafeBytes Anti-Malware Keep your Machine Virus Free

If you are looking to download an anti-malware application for your computer, there are plenty of tools on the market to consider but you just cannot trust blindly anyone, no matter whether it is a free or paid program. A few of them do a good job in eliminating threats while many will ruin your computer themselves. You must select one that is dependable, practical, and has a good reputation for its malware source protection. When considering commercial anti-malware application options, many people select well-known brands, like SafeBytes, and they are quite happy with it. SafeBytes is a powerful, real-time antivirus application that is designed to assist everyday computer user in safeguarding their PC from malicious threats. With its most advanced virus detection and repair technology, this software will help you protect your personal computer against infections caused by different types of malware and other internet threats, including adware, spyware, viruses, worms, trojans, keyloggers, ransomware, and potentially unwanted program (PUPs).

There are lots of wonderful features you’ll get with this security product. Some of them are listed as below:

Robust Anti-malware Protection: Using its advanced and sophisticated algorithm, this malware elimination tool can detect and remove the malware threats hiding within your computer system effectively. Active Protection: SafeBytes gives you round-the-clock protection for your PC limiting malware attacks in real-time. It will check your personal computer for suspicious activity at all times and safeguards your PC from unauthorized access. Fast Scan: This computer software has one of the fastest and most efficient virus scanning engines in the industry. The scans are very accurate and take a short amount of time to complete. Web Protection: Safebytes allots all sites a unique safety score that helps you to have an idea of whether the website you’re about to visit is safe to view or known to be a phishing site. Light-weight: SafeBytes gives complete protection from online threats at a fraction of the CPU load due to its enhanced detection engine and algorithms. 24/7 Customer Service: Expert technicians are at your disposal 24/7! They will quickly resolve any technical issues you may be experiencing with your security software. To conclude, SafeBytes Anti-Malware is really great for securing your PC against all kinds of malware threats. Malware problems will become a thing of the past once you put this software program to use. So if you’re looking for the best anti-malware subscription for your Windows-based PC, we highly recommend SafeBytes Anti-Malware software

Technical Details and Manual Removal (Advanced Users)

If you’d like to manually remove Wallpapers by MyWay without using an automated tool, it may be possible to do so by removing the application from the Microsoft Windows Add/Remove Programs menu, or in cases of web browser extensions, going to the browsers AddOn/Extension manager and removing it. You will probably also want to reset your internet browser to its default configuration settings. If you opt to manually delete the system files and registry entries, use the following checklist to make sure you know exactly what files to remove before performing any actions. Please keep in mind that this is for professional users only and might be difficult, with wrong file removal leading to additional system errors. In addition, some malware is capable of replicating or preventing deletion. Carrying out this malware-removal process in Safe Mode is recommended.
Files: %UserProfile%\Local Settings\Application Data\WallpapersMyWayTooltab %LOCALAPPDATA%\WallpapersMyWayTooltab %LOCALAPPDATA%\Google\Chrome\User Data\Default\Extensions\glhahjphgpghoefihgllamaapanabkmp %UserProfile%\Local Settings\Application Data\Google\Chrome\User Data\Default\Extensions\glhahjphgpghoefihgllamaapanabkmp Registry: HKEY_CURRENT_USER\Software\WallpapersMyWay
Read More
How to be a healthy PC gamer

Spending a large amount of time working or gaming in front of the computer can take a toll on your health. And as someone who indeed spends a large amount of time in front of the computer, I would like to share some insights about how can you be happy and healthy at the same time by incorporating some practices and habits.

gaming

Get good chair

This is first on the list because it matters the most. A proper sitting chair is essential for back health. If your budget allows it, do yourself a favor and get an anatomic sitting chair or gaming chair with lumbar support. It costs but it is worth it.

Learn to sit properly

As the important chair is, sitting properly is also as important as much. Your spine believe it or not is a very important part of your body and you need to take care of it. Sadly long periods of sitting sessions are bad for muscles around the spine that could reflect on the spine itself. Keep your back straight and keep your head not down nor up, place it in a position like when you are walking so the spine that is going from your head is in line with the spine on your back.

Stretch

By medical standards, each hour of sitting should be accompanied by a stretch session since sitting itself is placing too much pressure on certain muscles and blood circulation is lowered. Changing leg position and doing just a little stretch each hour can be really beneficial for your health in long run.

Take breaks

Yes, playing games is fun and most of the time we do not want to stop playing, especially if we are winning but taking breaks is essential for your personal health. Old saying goes that overdoing anything is bad and this applies true even to things that we do for pleasure and relaxation. Take periodic breaks to stretch, stand up and maybe even walk just a little.

Drink water

During long work hours or long gaming sessions, it is not uncommon that we are so focused on our activity that we forget to take our water intake. Approximately 2liters of water per day is needed for an adult person to function properly during that day and if you spend long times in front of a PC do not forget to drink water.

Do not neglect your daily tasks

As enjoyable as it is gaming can make us forget about our daily tasks, do not neglect your life and your tasks. Remember, gaming is only OK if it does not interfere with the daily things that you need to do. Do not postpone going for groceries because of gaming, do not switch shower for another level in the game. Do all of the things you must do first and then sit and game.

Take care of yourself mentally

Having mental health is as important as having a physical one. Playing games is fun, but playing games with someone is even better, do not forget to socialize and invite some friends so you can share some fun times together. Also, detach yourself from outcomes that will come because of gaming, this is very important for gamers that do a lot of PVP games and get annoyed and angry when they lose or when some other player is talking trash. Remember, gaming is for you to relax and enjoy, not to stress you.

Read More
How to Resolve Error 80073712 in Windows 10

Error Code 80073712—What is it?

Error code 80073712 is one of the dozens of error codes affecting Windows 10 users. It occurs when users attempt to upgrade their operating system but experience a failure. The error code usually results from problems associated with missing or damaged files within Windows Update. Common symptoms of this error code include the following:

  • The inability of Windows Update to successfully complete the upgrade process
  • Message box highlighting the presence of error code

Solution

Restoro box imageError Causes

In the case of error code 80073712, the issues preventing Windows Update from completing the upgrade process are most likely due to problems with files within Windows Update. For instance, there may be corruption within the Component-Based Servicing (CBS) manifest.

Further Information and Manual Repair

Manual repair methods offer solutions to Microsoft users who are experiencing Windows error codes like the upgrade error code 80073712 in Windows 10. The manual repair methods in this article are not guaranteed to fix problems unrelated to this error code. Thus, be certain you are experiencing error code 80073712 before you attempt to implement the solutions provided below.

Method One: Run Windows Update Troubleshooter

Since issues related to Windows Update may be causing error code 80073712 to occur, one of the best solutions you can consider is to run the Windows Update Troubleshooter. This troubleshooter will be able to detect and fix corruptions within Windows Update files or any other issues directly related to Windows Update. To implement this manual repair method, follow the steps listed below:

  • Step one: Open your Internet browser
  • Step two: Type www.microsoft.com/downloads
  • Step three: Type Windows Update Troubleshooter in the search bar at the top-right corner of the Microsoft website.
  • Step four: Select Windows Update Troubleshooter then wait for the webpage to load.
  • Step five: Select Run troubleshooter

Once you run the troubleshooter, you should be able to verify and fix any errors within Windows Update files. Restart your machine after the troubleshooting process is complete them proceed by checking Windows Update to see if you are able to complete the upgrade. If Windows Update downloads the upgrade and the installation of the upgrade occurs, the problem has been resolved. Otherwise, error code 80073712 will reoccur, in which case you will need to move to manual repair method two.

Method Two: Run DISM Tool

Another option available to Windows users experiencing error code 80073712 is to download and run the Deployment Image Servicing and Management (DISM) tool. This tool checks for inconsistencies or corruptions that may be preventing Windows Update services from functioning correctly. To download and run the tool, follow the instructions below:

  • Step one: Type Command Prompt in the search box near the Start button
  • Step two: Right-click Command Prompt, then click Run as administrator, providing administrator password or confirmation where necessary.
  • Step three: Select Allow
  • Step four: Press Enter after typing the following command:
DISM.exe /Online /Cleanup-image /Restorehealth

Wait a few minutes to ensure that the process is complete. Once you’ve run the DISM tool, it will detect errors, for instance within registry data, and correct or replace them. Restart your machine after running this tool then check Windows Update. Attempt to download the upgrade to see if you have successfully resolved error code 80073712. If you experience an upgrade failure, move to the next manual repair method mentioned below.

Method Three: Perform a Clean Install of Windows 10

The issues related to error code 80073712 may also be resolved by performing a clean install of Windows 10. This manual repair method ensures that any previous versions of your Windows operating system are removed before you attempt to access an upgrade. This can prove effective as it helps users avoid issues that would otherwise cause error codes or poor PC performance in cases where errors are present on one’s system.

To successfully perform a clean installation of Windows 10, be prepared to follow step-by-step procedures that include the following:
  • Step one: Download and run media creation tool
  • Step two: Click Run, then select Create installation media for another PC
  • Step three: Select changes to the installation options, then select Next
  • Step four: Choose USB flash drive or ISO file, then click Next
  • Step five: Select drive, then Next
  • Step six: Select Finish, then restart your computer, ensuring that the media option you choose, whether USB flash drive or DVD, is in your machine before you choose to reboot.
  • Step seven: Press any key then follow the prompts provided to set up Windows 10.

Method Four: Download an Automated Tool

If you wish to always have at your disposal a utility tool to fix these Windows 8 and other related issues when they do arise, download and install a powerful automated tool.

Read More
Fix 0xA00F4244 or 0x200F4244 error in Windows
Error 0xA00F4244 or 0x200F4244 is when Windows can not detect the WEB camera in your system and it is usually accompanied by the message: We can’t find or start your camera. There could be several reasons for this error and in this guide, we will cover all of them in order to help you to get back on track and start using your WEB camera which is perhaps now more required than ever in this world we live in.
  1. Check privacy settings

    With the latest Microsoft Windows updates come the latest issues and it is not strange that privacy settings can become reset or changed when an update is applied. This is a quick fix to this issue and can be the sole reason why you get this error, go to Windows settings, then to privacy and check to see if the WEB camera is turned OFF, if this is the case turn it back ON and make sure that option Allow apps to access your camera is also set to ON.
  2. Check if the camera is enabled

    Sometimes it is by mistake, sometimes by an update but the web camera could be disabled in the device manager of Windows. Right-click on the Windows Start button and click on device manager to open it up, find and expand the cameras category. Right-click on your camera, if it is disabled, you will have the option to enable the camera, if it is enabled and Windows is detecting that it is working fine you will have the option to disable it.
  3. Check antivirus settings

    Antivirus and firewall applications are in today's world and life-essential piece of software but they can sometimes create more harm than good, from stopping windows updates to killing important services of applications and preventing internet access being just some examples of their paranoid behavior. Try disabling or turning your protection software OFF and see if your WEB camera will miraculously come back to life. If this is the case, somewhere in the settings of software there is an option that controls this aspect, try to locate it and set it in that way so you are able to use your camera.
  4. Reinstall camera driver

    If the previous three solutions failed to produce a satisfactory solution then reinstalling the camera driver might fix the problem. Go to your manufacturer's camera website and download the latest driver for your camera. Go to the device manager and uninstall the driver for the camera, then apply the latest driver and reboot the system.
  5. Check connections and cable

    Sometimes an issue is not due to software nature, sometimes it is hardware. Try checking connections and plug the camera in another USB port, twist and turn the cable a little to see is issue cable-related.
  6. Check to see if the application supports your camera

    If Windows has detected the camera and is not reporting any issues with it check your application to see if it can detect your camera and that it supports it fully. Sometimes newer applications tend to support only newer camera models. Try to use the camera in other software as well to see if the problem is with the application you are using.
  7. Try camera on another computer

    If everything else fails, try the camera on another computer to see if it will work there. If the camera is not working there as well it is probably malfunctioned and broken for good. If it does work there, try to find out what is different in that computer in comparison to yours, maybe it is some service running in the background, certain application configuration, Windows version itself, USB port version, or something else.
Read More
MS Store and Electron Bot

So, what is Electron bot, and why it even matters if it is in the MS store. Electron bot is malware that somehow found its way inside MS Store via game clones of popular games temple run and subway surfer. This infiltration led to the infection of around 5000 systems over the globe in a very short period of time.

electron bot malware

This malware is a backdoor that gives complete system control to the attacker. Any type of execution can be performed remotely in real-time. Usually, this kind of attack was aimed at a spread of click fraud over popular social media like Facebook, google, youtube, etc.

Primary goal

Electron Bot's primary goals in the ongoing campaign analyzed by researchers are:

  • SEO poisoning – Create malware-dropping sites that rank high on Google Search results.
  • Ad clicking – Connect to remote sites in the background and click on non-viewable advertisements.
  • Social media account promotion – Direct traffic to specific content on social media platforms.
  • Online product promotion – Increase store rating by clicking on its advertisements.

These functions are offered as services to those who want to increase their online profits illegitimately, so the gains for the malware operators are indirect.

Publishers that contain malware

For now, users may take note of the publishers who released confirmed malicious game apps using the following names:

  • Lupy games
  • Crazy 4 games
  • Jeuxjeuxkeux games
  • Akshi games
  • Goo Games
  • Bizzon Case
Read More
Fix Something went wrong with the projection
As you know, Windows 10 is created with the goal of developing an operating system that caters to users’ needs and enhances productivity. That’s why modern computers that are running the Windows 10 OS have the capabilities to project their screen to an external display wirelessly. That said, Microsoft has a dedicated and pre-installed app called Connect which helps another device to project their screen on the computer. However, this feature is kind of delicate and won’t work unless it’s properly configured. So if some configuration does not work out well, it will throw an error message that says
“Something went wrong with the projection”.
This kind of error is caused by some issues with the Display driver, hardware, corrupted or damaged system files, and so on. And to fix it, there are several methods you can check out. You can try to update, roll back or reinstall the Display drivers. You could also run the Network Adapter troubleshooter or the Video Playback troubleshooter as well as run System Restore to undo any recent changes that might have triggered the error or reset your Windows 10 computer without deleting any files. For more details, refer to each one of the options provided below.

Option 1 – Try to update or rollback the Graphics driver

You can try to update your Graphics card driver using the Device Manager in your computer to resolve the blank dialog boxes problem or you can also go directly to the website of your graphics card manufacturers like NVIDIA, Intel, or AMD and go to the section called Drivers then check if there’s a new available update – if there is, download and install it. To update your Graphics driver via Device Manager, refer to these steps:
  • First, boot your computer into Safe Mode.
  • After that, tap the Win + R keys to launch Run.
  • Type in MSC into the box and tap Enter or click OK to open the Device Manager.
  • After that, a list of device drivers will be displayed. From there, look for the Display Adapters and click on them.
  • After that, right-click on each entry under the Display Adapters and select the “Uninstall Device” option from the menu.
  • Now restart your computer.
  • After restarting your computer, go to the Settings app and Check for Updates in the Windows Update section.
Note: If updating the Graphics driver didn’t fix the problem, you can also try to roll back to its previous version and see if that helps or you could also try to roll back, update or reinstall the Network Adapter drivers.

Option 2 – Try to run the Network Adapter troubleshooter

To run the Network Troubleshooter, refer to these steps:
  • Open the Search bar on your computer and type in “troubleshoot” to open the Troubleshoot settings.
  • Next, scroll down and select the “Network Adapter” option from the right pane.
  • Then click on the Run Troubleshooter” button.
  • After that, your computer will check for any possible errors and will pinpoint the root cause of the problem if possible.
  • Restart your computer.

Option 3 – Try to run the Video Playback troubleshooter

If the Network Adapter troubleshooter didn’t work in fixing the problem, you can try to run the Video Playback troubleshooter instead. To run it, simply go to Settings > Update & security > Troubleshoot. From there, scroll down until you see the Video Playback option and then click on the “Run the troubleshooter” button to get started. This troubleshooter will detect and automatically fix any problems related to video playback so it should help fix the error.

Option 4 – Try performing a System Restore

You might also want to perform a System Restore that might help you in fixing the error. You can do this option either by booting into Safe Mode or in System Restore. If you are already in the Advanced Startup Options, just directly select System Restore and proceed with the next steps. And if you have just booted your PC into Safe Mode, refer to the steps below.
  • Tap the Win + R keys to open the Run dialog box.
  • After that, type in “sysdm.cpl” in the field and tap Enter.
  • Next, go to the System Protection tab then click the System Restore button. This will open a new window where you have to select your preferred System Restore point.
  • After that, follow the on-screen instructions to finish the process and then restart your computer and check if the problem is fixed or not.

Option 5 – Reset your computer

  • Tap the Win key or click on the Start button located in the Taskbar.
  • Then click on the Power button at the bottom right portion of the screen.
  • Next, press and hold the Shift key on your keyboard and then click on Restart. This will restart your Pc into the Advanced Startup options.
Note: Once you have access to the Advanced Startup options, you have to go to the setting which allows you to Reset your Windows 10 PC. All you have to do is select Troubleshoot > Reset this PC to reach the following screen Afterward, select either the “Keep my files” option and then proceed to the next on-screen instructions that follow to reset your Windows 10 computer without losing your files.
Read More
Fix System Interrupts high CPU usage
System Interrupts are operating system processes that function as an alert system for the CPU. So whenever a scenario needs the attention of the CPU, it alerts the CPU about it. In turn, the CPU suspends what it is doing, saves it, and then takes care of that important job and once that job is completed, it resumes back to what it was doing. This indicates that although System Interrupts appears as a process, it’s actually not. As a matter of fact, it is like a manager that reports to the CPU about all interrupts that happen on a hardware level, e.g. hardware interrupts. And if there are lots of interrupts, this means that there might be various errors occurring on a hardware level. As a result, it may take a lot of system resources. And if you consider disabling System Interrupts, stop right there as your computer will almost become useless without it. So if you see System Interrupts consuming high CPU usage in your Windows 10 computer, you can fix it without having to disable it and cause more problems. If System Interrupts takes up more than 5 to 10% of CPU, then you definitely have a problem. This could be happening due to some hardware or driver issue. The first thing you can do is to try rebooting your computer once and see if the issue comes back or not. High CPU usage of System Interrupts is a huge backlog for the CPU and it stays in the loop. If a simple system restart didn’t fix this issue, here are some suggestions you can try.

Option 1 – Try to update the hardware drivers

As stated, the problem might have something to do with hardware drivers so you can try to update these drivers and see if it works.
  • Reboot your computer into Safe Mode with networking support.
  • Tap the Win + R keys on your keyboard to open the Run dialog box.
  • After that, type “devmgmt.msc” in the field and hit Enter or click OK to open the Device Manager.
  • After opening the Device Manager, update all the outdated Hardware drivers on your computer.
  • Next, right-click on all the driver entries that are appropriately labeled, and then click the Update driver option.
  • Now restart your PC and check if the BSOD error is fixed or not.
Note: On the other hand, if a recent update has caused the System Interrupts high CPU usage, then you might want to roll back your hardware drivers to their previous versions. You can check with the Windows Update History to check out any recent updates as well as the previous ones.

Option 2 – Try to disconnect and reconnect all hardware and cables

A lot of users reported that they were able to fix the problem by disconnecting and reconnecting cables and hardware like scanners, printers, cameras can help in fixing the problem. In addition, you can also boot your computer in a Clean Boot State so that you can find the problematic hardware by hit and trial method. Refer to the steps below to do so:
  • Log onto your PC as an administrator.
  • Type in MSConfig in the Start Search to open the System Configuration utility.
  • From there, go to the General tab and click “Selective startup”.
  • Clear the “Load Startup items” check box and make sure that the “Load System Services” and “Use Original boot configuration” options are checked.
  • Next, click the Services tab and select the “Hide All Microsoft Services” check box.
  • Click Disable all.
  • Click on Apply/OK and restart your PC. (This will put your PC into a Clean Boot State. And configure Windows to use the usual startup, just simply undo the changes.)

Option 3 – Try to enable or disable Hardware

If you do not want to remove hardware, you can just disable them using the Device Manager. Note that this can also be applied to the internal hardware.
  • Tap the Win + X + M keys to open the Device Manager.
  • Next, navigate to the device you want to disable.
  • Then right-click on it and choose to disable the device.
Note: Make sure that you disable one device at a time and then give it a couple of minutes and check if there are any changes in the CPU usage to pinpoint the hardware. And if there is no change, you need to enable the device you’ve just disabled and then proceed to disable the next hardware device. If there are changes, then it’s probably the culprit. Just keep in mind that you must no disable any device that is needed to keep your system up and running.

Option 4 – Try to update the BIOS/UEFI

Updating the BIOS/UEFI can help you fix the high CPU usage of System Interrupts but as you know, BIOS is a sensitive part of a computer. Even though it is a software component, the functioning of the hardware depends on it largely. Thus, you must be careful when modifying something in the BIOS. So if you don’t know much about it, it’s best if you skip on this option and try the other ones instead. However, if you are well-versed in navigating the BIOS, then follow the steps below.
  • Tap the Win + R keys to open the Run dialog box.
  • Next, type “msinfo32” in the field and press Enter to open System Information.
  • From there, you should find a search field on the bottom where you have to search for the BIOS version and then press Enter.
  • After that, you should see the developer and version of the BIOS installed on your PC.
  • Go to your manufacturer’s website and then download the latest version of BIOS on your computer.
  • If you are using a laptop, make sure that you keep it plugged in until you have updated the BIOS.
  • Now double click on the downloaded file and install the new BIOS version on your computer.
  • Restart your computer to apply the changes made.

Option 5 – Run the Hardware and Devices Troubleshooter or the Performance Troubleshooter

Hardware and Devices Troubleshooter:
  • The first thing you need to do is click on Start and then on the gear-like icon to pull up the window for Settings.
  • After opening Settings, look for the Update and Security option and select it.
  • From there, go to the Troubleshoot option located on the left-hand side of the list.
  • Next, select Hardware and Devices from the list and open the Troubleshooter and run it. Once it is doing its job, wait for it to complete the process and then restart the system.
  • After the system restarts, check if the problem’s now fixed. If not, refer to the next option given below.
Performance Troubleshooter:
  • Tap the Win + R keys to open the Run dialog box.
  • Type “exe /id PerformanceDiagnostic” in the field and hit Enter to open the Performance troubleshooter.
  • Then click on Next to get started. Wait until the process is completed.
Read More
1 2 3 171
Logo
Copyright © 2023, ErrorTools. All Rights Reserved
Trademark: Microsoft Windows logos are registered trademarks of Microsoft. Disclaimer: ErrorTools.com is not affiliated with Microsoft, nor claims direct affiliation.
The information on this page is provided for information purposes only.
DMCA.com Protection Status