Logo

Stellar Phoenix Outlook PST Repair Vs. ScanPST.Exe

Outlook PST Errors

Problems occur when your PST file becomes corrupted or hits the size limit. Outlook will start to display error messages. These errors include like 0x80040119, 0x80040600, and 0x8004060c.

Error Causes

You might think Outlook problems are just a minor inconvenience. You can’t access your emails and contact information, but that doesn’t actually affect computer security, right? Wrong! Outlook problems can indicate serious corruption issues within your system.

In many cases, your PST file can even be targeted specifically by a virus.

Today, many viruses are specially designed to steal personal information and then sell that information on the online black market. Since so much personal data is stored within Outlook’s PST file, this is often the first place that viruses look.

If you don’t want some hacker in a foreign country to read your emails, steal your contact information, or do all sorts of other dangerous tasks, then we advise you to fix your PST problem as soon as possible.

Other causes include hitting the 2GB memory limit on older versions of Outlook, erroneous SMTP settings, etc,.

Further Information and Manual Repair

PST errors are an incredibly annoying problem. However, thanks to powerful software like Stellar Phoenix Outlook PST Repair, it has never been easier to fix Outlook and recover all of the data inside your PST file. That means that you won’t lose contact information, calendar entries, emails, or any other information stored in Outlook.

ScanPST.exe rarely fixes problems with the PST file. Since the application is only a few megabytes in size, its effectiveness is very limited. Although Microsoft designed ScanPST.exe to be an effective solution to any PST files, it fails miserably.

Better Alternatives to Microsoft's ScanPST.Exe

Ultimately, after downloading ScanPST.exe and running it, your Microsoft Outlook will still be unable to send or receive emails. And, to make matters worse, you might also be unable to access contact data or read your old emails.

Unlike other PST repair solutions, ScanPST.exe will not recover deleted emails or other lost Outlook data. In fact, using ScanPST.exe can sometimes cause your personal data to become even more difficult to recover.

If you do want to try out ScanPST.exe, then go ahead. While it probably won’t make your PST errors worse, it won’t even come close to fixing them. If you’re ready for a more serious solution to PST problems, then keep reading.

Why are Outlook problems dangerous?

You might think Outlook problems are just a minor inconvenience. You can’t access your emails and contact information, but that doesn’t actually affect computer security, right? Wrong!

Outlook problems can indicate serious corruption issues within your system. In many cases, your PST file can even be targeted specifically by a virus.

Today, many viruses are specially designed to steal personal information and then sell that information on the online black market. Since so much personal data is stored within Outlook’s PST file, this is often the first place that viruses look.

If you don’t want some hacker in a foreign country to read your emails, steal your contact information, or do all sorts of other dangerous tasks, then we advise you to fix your PST problem as soon as possible.

How do I actually fix Microsoft Outlook PST errors?

Microsoft’s ScanPST.exe application clearly doesn’t work. So what’s the next best option? Well, a program called Stellar Phoenix Outlook PST Repair has been helping PC users solve Outlook problems for several years. As the world’s leading Outlook solution, Stellar Phoenix Outlook PST Repair will quickly and effectively repair any PST problems you encounter.

So how does Stellar Phoenix Outlook Repair work? Well, it starts by finding your PST file. Once the PST file has been found, Stellar Phoenix Outlook PST Repair determines if the file is corrupt or full. It will then repair your PST file either by removing the size limit or by fixing the corrupt files.

How Does Stellar Phoenix Outlook Repair Work?

Once Stellar Phoenix Outlook PST Repair determines that your calendar appointments, contact data, and emails have all been successfully recovered, it permanently restores access to your PST file.

In fact, Stellar Phoenix Outlook PST Repair can even restore Outlook data that you deleted a long time ago. So, instead of just being a PST error recovery tool, Stellar Phoenix Outlook PST Repair is also a powerful data recovery program.

After letting Stellar Phoenix Outlook PST Repair go to work, open up Outlook and try it out. You’ll have full access to all of your Outlook files and folders, and all of those ScanPST.exe problems will be a thing of the past.

Advantages of Stellar Phoenix Outlook PST Repair Software

Stellar Phoenix Outlook PST Repair comes with many advantages. Here are just a few reasons why it’s such a popular program:

  • Easy-to-use: Don’t worry if you’re not a computer genius. Stellar Phoenix Outlook Repair is incredibly easy to use. Even if you barely know how to send an email over your computer, the program has a straightforward interface that anybody can understand. If you can click the left mouse button, then Stellar Phoenix will be easy to use.
  • Goes to work instantly: It takes only seconds to download and install Stellar Phoenix Outlook PST Repair. Once you’re ready to perform a scan, the program goes to work instantly. It identifies your PST file in an incredibly short amount of time, and before long, you’ll be able to access Outlook once more.
  • Effective: Unlike the infamously useless ScanPST.exe application, Stellar Phoenix Outlook PST Repair actually works like it’s supposed to. It allows users to safely recover all of their most important data. While ScanPST.exe can actually damage your PST file, Stellar Phoenix Outlook PST Repair simply goes to work quickly and effectively.
  • Multiple support packages: Stellar Phoenix Outlook Repair comes with three different pricing plans. One is designed for people who only need to install the program on a single computer. Another is designed for businesses or households that want to install the program on multiple PCs.And with the third option, the technician package, users can install Stellar Phoenix Outlook PST Repair on an unlimited number of computers. One of the biggest advantages of these packages is that you can spread out the cost of the program among multiple users. If several different people at your workplace are having PST error problems, for example, then you can buy a multiple-license package and share the cost.
  • Data recovery: Along with fixing corrupt PST files and removing the size limits from the PST file, Stellar Phoenix Outlook PST Repair can actually recover any Outlook data on your computer. This is useful if you uninstalled Outlook a few months ago but still need to recover that data. In fact, Stellar Phoenix can recover Outlook data even if Outlook is not currently installed on your computer. In that sense, Stellar Phoenix Repair is more than just an Outlook repair program; it’s also a full-service data recovery solution.

Stellar Phoenix PST Repair is superior to ScanPST.exe in every way. But Stellar Phoenix’s most important advantage is that it actually works. If you’re ready to quickly fix your Outlook PST errors, then Stellar Phoenix Outlook PST Repair can help. Download it here today to experience the magic of PST repair for yourself.

Do You Need Help with Your Device?

Our Team of Experts May Help
Troubleshoot.Tech Experts are There for You!
Replace damaged files
Restore performance
Free disk space
Remove Malware
Protects WEB browser
Remove Viruses
Stop PC freezing
GET HELP
Troubleshoot.Tech experts work with all versions of Microsoft Windows including Windows 11, with Android, Mac, and more.

Share this article:

You might also like

Photo viewer on clean Windows 10 instalation
Windows photo viewer was a popular photo viewing application integrated into Windows 7, 8, and 8.1 but in Windows 10 it has been replaced with photos, Microsoft's new application aimed at photo viewing on your desktop. Now if any one of you wonders why should be bringing the old application back to Windows 10 since we have an alternative one, the answer would be resources and speed. The old photo viewer application is lightweight, fast, and reliable, opening the same photo in both photo viewer and in new photos shows us that Microsofts new viewer application takes even three times more RAM, and it's visibly slower in loading times for pictures. Since I am a person who prefers speed and functionality over fancy looks I would be very glad to have the option to bring back a photo viewer. If you have by any chance Windows 10 as an upgrade, bringing back photo viewer is easy as 1,2,3. you just need to open settings and go to default apps, under photo viewer you should see your current default viewing application, probably photos, click on it to see options and choose photo viewer and exit the Settings menu, and you're done. Sadly if Windows 10 has been installed clean on the system and not as upgrade things are a little bit more complicated but do not worry, stay with us, keep reading and you will get there.

Activating photo viewer

How technically photo viewer is still in the system but not used we will have to make it available again and this we will do by adding some lines in the Windows registry, that being said, open a notepad and paste the following code as it is in it.
Windows Registry Editor Version 5.00 [HKEY_CLASSES_ROOT\jpegfile\shell\open\DropTarget] "Clsid"="{FFE2A43C-56B9-4bf5-9A79-CC6D4285608A}" [HKEY_CLASSES_ROOT\pngfile\shell\open\DropTarget] "Clsid"="{FFE2A43C-56B9-4bf5-9A79-CC6D4285608A}" [HKEY_CLASSES_ROOT\Applications\photoviewer.dll\shell\open] "MuiVerb"="@photoviewer.dll,-3043" [HKEY_CLASSES_ROOT\Applications\photoviewer.dll\shell\open\command] @=hex(2):25,00,53,00,79,00,73,00,74,00,65,00,6d,00,52,00,6f,00,6f,00,74,00,25,\ 00,5c,00,53,00,79,00,73,00,74,00,65,00,6d,00,33,00,32,00,5c,00,72,00,75,00,\ 6e,00,64,00,6c,00,6c,00,33,00,32,00,2e,00,65,00,78,00,65,00,20,00,22,00,25,\ 00,50,00,72,00,6f,00,67,00,72,00,61,00,6d,00,46,00,69,00,6c,00,65,00,73,00,\ 25,00,5c,00,57,00,69,00,6e,00,64,00,6f,00,77,00,73,00,20,00,50,00,68,00,6f,\ 00,74,00,6f,00,20,00,56,00,69,00,65,00,77,00,65,00,72,00,5c,00,50,00,68,00,\ 6f,00,74,00,6f,00,56,00,69,00,65,00,77,00,65,00,72,00,2e,00,64,00,6c,00,6c,\ 00,22,00,2c,00,20,00,49,00,6d,00,61,00,67,00,65,00,56,00,69,00,65,00,77,00,\ 5f,00,46,00,75,00,6c,00,6c,00,73,00,63,00,72,00,65,00,65,00,6e,00,20,00,25,\ 00,31,00,00,00 [HKEY_CLASSES_ROOT\Applications\photoviewer.dll\shell\open\DropTarget] "Clsid"="{FFE2A43C-56B9-4bf5-9A79-CC6D4285608A}" [HKEY_CLASSES_ROOT\PhotoViewer.FileAssoc.Bitmap] "ImageOptionFlags"=dword:00000001 "FriendlyTypeName"=hex(2):40,00,25,00,50,00,72,00,6f,00,67,00,72,00,61,00,6d,\ 00,46,00,69,00,6c,00,65,00,73,00,25,00,5c,00,57,00,69,00,6e,00,64,00,6f,00,\ 77,00,73,00,20,00,50,00,68,00,6f,00,74,00,6f,00,20,00,56,00,69,00,65,00,77,\ 00,65,00,72,00,5c,00,50,00,68,00,6f,00,74,00,6f,00,56,00,69,00,65,00,77,00,\ 65,00,72,00,2e,00,64,00,6c,00,6c,00,2c,00,2d,00,33,00,30,00,35,00,36,00,00,\ 00 [HKEY_CLASSES_ROOT\PhotoViewer.FileAssoc.Bitmap\DefaultIcon] @="%SystemRoot%\\System32\\imageres.dll,-70" [HKEY_CLASSES_ROOT\PhotoViewer.FileAssoc.Bitmap\shell\open\command] @=hex(2):25,00,53,00,79,00,73,00,74,00,65,00,6d,00,52,00,6f,00,6f,00,74,00,25,\ 00,5c,00,53,00,79,00,73,00,74,00,65,00,6d,00,33,00,32,00,5c,00,72,00,75,00,\ 6e,00,64,00,6c,00,6c,00,33,00,32,00,2e,00,65,00,78,00,65,00,20,00,22,00,25,\ 00,50,00,72,00,6f,00,67,00,72,00,61,00,6d,00,46,00,69,00,6c,00,65,00,73,00,\ 25,00,5c,00,57,00,69,00,6e,00,64,00,6f,00,77,00,73,00,20,00,50,00,68,00,6f,\ 00,74,00,6f,00,20,00,56,00,69,00,65,00,77,00,65,00,72,00,5c,00,50,00,68,00,\ 6f,00,74,00,6f,00,56,00,69,00,65,00,77,00,65,00,72,00,2e,00,64,00,6c,00,6c,\ 00,22,00,2c,00,20,00,49,00,6d,00,61,00,67,00,65,00,56,00,69,00,65,00,77,00,\ 5f,00,46,00,75,00,6c,00,6c,00,73,00,63,00,72,00,65,00,65,00,6e,00,20,00,25,\ 00,31,00,00,00 [HKEY_CLASSES_ROOT\PhotoViewer.FileAssoc.Bitmap\shell\open\DropTarget] "Clsid"="{FFE2A43C-56B9-4bf5-9A79-CC6D4285608A}" [HKEY_CLASSES_ROOT\Applications\photoviewer.dll\shell\print] "NeverDefault"="" [HKEY_CLASSES_ROOT\Applications\photoviewer.dll\shell\print\command] @=hex(2):25,00,53,00,79,00,73,00,74,00,65,00,6d,00,52,00,6f,00,6f,00,74,00,25,\ 00,5c,00,53,00,79,00,73,00,74,00,65,00,6d,00,33,00,32,00,5c,00,72,00,75,00,\ 6e,00,64,00,6c,00,6c,00,33,00,32,00,2e,00,65,00,78,00,65,00,20,00,22,00,25,\ 00,50,00,72,00,6f,00,67,00,72,00,61,00,6d,00,46,00,69,00,6c,00,65,00,73,00,\ 25,00,5c,00,57,00,69,00,6e,00,64,00,6f,00,77,00,73,00,20,00,50,00,68,00,6f,\ 00,74,00,6f,00,20,00,56,00,69,00,65,00,77,00,65,00,72,00,5c,00,50,00,68,00,\ 6f,00,74,00,6f,00,56,00,69,00,65,00,77,00,65,00,72,00,2e,00,64,00,6c,00,6c,\ 00,22,00,2c,00,20,00,49,00,6d,00,61,00,67,00,65,00,56,00,69,00,65,00,77,00,\ 5f,00,46,00,75,00,6c,00,6c,00,73,00,63,00,72,00,65,00,65,00,6e,00,20,00,25,\ 00,31,00,00,00 [HKEY_CLASSES_ROOT\Applications\photoviewer.dll\shell\print\DropTarget] "Clsid"="{60fd46de-f830-4894-a628-6fa81bc0190d}" [HKEY_CLASSES_ROOT\PhotoViewer.FileAssoc.JFIF] "EditFlags"=dword:00010000 "ImageOptionFlags"=dword:00000001 "FriendlyTypeName"=hex(2):40,00,25,00,50,00,72,00,6f,00,67,00,72,00,61,00,6d,\ 00,46,00,69,00,6c,00,65,00,73,00,25,00,5c,00,57,00,69,00,6e,00,64,00,6f,00,\ 77,00,73,00,20,00,50,00,68,00,6f,00,74,00,6f,00,20,00,56,00,69,00,65,00,77,\ 00,65,00,72,00,5c,00,50,00,68,00,6f,00,74,00,6f,00,56,00,69,00,65,00,77,00,\ 65,00,72,00,2e,00,64,00,6c,00,6c,00,2c,00,2d,00,33,00,30,00,35,00,35,00,00,\ 00 [HKEY_CLASSES_ROOT\PhotoViewer.FileAssoc.JFIF\DefaultIcon] @="%SystemRoot%\\System32\\imageres.dll,-72" [HKEY_CLASSES_ROOT\PhotoViewer.FileAssoc.JFIF\shell\open] "MuiVerb"=hex(2):40,00,25,00,50,00,72,00,6f,00,67,00,72,00,61,00,6d,00,46,00,\ 69,00,6c,00,65,00,73,00,25,00,5c,00,57,00,69,00,6e,00,64,00,6f,00,77,00,73,\ 00,20,00,50,00,68,00,6f,00,74,00,6f,00,20,00,56,00,69,00,65,00,77,00,65,00,\ 72,00,5c,00,70,00,68,00,6f,00,74,00,6f,00,76,00,69,00,65,00,77,00,65,00,72,\ 00,2e,00,64,00,6c,00,6c,00,2c,00,2d,00,33,00,30,00,34,00,33,00,00,00 [HKEY_CLASSES_ROOT\PhotoViewer.FileAssoc.JFIF\shell\open\command] @=hex(2):25,00,53,00,79,00,73,00,74,00,65,00,6d,00,52,00,6f,00,6f,00,74,00,25,\ 00,5c,00,53,00,79,00,73,00,74,00,65,00,6d,00,33,00,32,00,5c,00,72,00,75,00,\ 6e,00,64,00,6c,00,6c,00,33,00,32,00,2e,00,65,00,78,00,65,00,20,00,22,00,25,\ 00,50,00,72,00,6f,00,67,00,72,00,61,00,6d,00,46,00,69,00,6c,00,65,00,73,00,\ 25,00,5c,00,57,00,69,00,6e,00,64,00,6f,00,77,00,73,00,20,00,50,00,68,00,6f,\ 00,74,00,6f,00,20,00,56,00,69,00,65,00,77,00,65,00,72,00,5c,00,50,00,68,00,\ 6f,00,74,00,6f,00,56,00,69,00,65,00,77,00,65,00,72,00,2e,00,64,00,6c,00,6c,\ 00,22,00,2c,00,20,00,49,00,6d,00,61,00,67,00,65,00,56,00,69,00,65,00,77,00,\ 5f,00,46,00,75,00,6c,00,6c,00,73,00,63,00,72,00,65,00,65,00,6e,00,20,00,25,\ 00,31,00,00,00 [HKEY_CLASSES_ROOT\PhotoViewer.FileAssoc.JFIF\shell\open\DropTarget] "Clsid"="{FFE2A43C-56B9-4bf5-9A79-CC6D4285608A}" [HKEY_CLASSES_ROOT\PhotoViewer.FileAssoc.Jpeg] "EditFlags"=dword:00010000 "ImageOptionFlags"=dword:00000001 "FriendlyTypeName"=hex(2):40,00,25,00,50,00,72,00,6f,00,67,00,72,00,61,00,6d,\ 00,46,00,69,00,6c,00,65,00,73,00,25,00,5c,00,57,00,69,00,6e,00,64,00,6f,00,\ 77,00,73,00,20,00,50,00,68,00,6f,00,74,00,6f,00,20,00,56,00,69,00,65,00,77,\ 00,65,00,72,00,5c,00,50,00,68,00,6f,00,74,00,6f,00,56,00,69,00,65,00,77,00,\ 65,00,72,00,2e,00,64,00,6c,00,6c,00,2c,00,2d,00,33,00,30,00,35,00,35,00,00,\ 00 [HKEY_CLASSES_ROOT\PhotoViewer.FileAssoc.Jpeg\DefaultIcon] @="%SystemRoot%\\System32\\imageres.dll,-72" [HKEY_CLASSES_ROOT\PhotoViewer.FileAssoc.Jpeg\shell\open] "MuiVerb"=hex(2):40,00,25,00,50,00,72,00,6f,00,67,00,72,00,61,00,6d,00,46,00,\ 69,00,6c,00,65,00,73,00,25,00,5c,00,57,00,69,00,6e,00,64,00,6f,00,77,00,73,\ 00,20,00,50,00,68,00,6f,00,74,00,6f,00,20,00,56,00,69,00,65,00,77,00,65,00,\ 72,00,5c,00,70,00,68,00,6f,00,74,00,6f,00,76,00,69,00,65,00,77,00,65,00,72,\ 00,2e,00,64,00,6c,00,6c,00,2c,00,2d,00,33,00,30,00,34,00,33,00,00,00 [HKEY_CLASSES_ROOT\PhotoViewer.FileAssoc.Jpeg\shell\open\command] @=hex(2):25,00,53,00,79,00,73,00,74,00,65,00,6d,00,52,00,6f,00,6f,00,74,00,25,\ 00,5c,00,53,00,79,00,73,00,74,00,65,00,6d,00,33,00,32,00,5c,00,72,00,75,00,\ 6e,00,64,00,6c,00,6c,00,33,00,32,00,2e,00,65,00,78,00,65,00,20,00,22,00,25,\ 00,50,00,72,00,6f,00,67,00,72,00,61,00,6d,00,46,00,69,00,6c,00,65,00,73,00,\ 25,00,5c,00,57,00,69,00,6e,00,64,00,6f,00,77,00,73,00,20,00,50,00,68,00,6f,\ 00,74,00,6f,00,20,00,56,00,69,00,65,00,77,00,65,00,72,00,5c,00,50,00,68,00,\ 6f,00,74,00,6f,00,56,00,69,00,65,00,77,00,65,00,72,00,2e,00,64,00,6c,00,6c,\ 00,22,00,2c,00,20,00,49,00,6d,00,61,00,67,00,65,00,56,00,69,00,65,00,77,00,\ 5f,00,46,00,75,00,6c,00,6c,00,73,00,63,00,72,00,65,00,65,00,6e,00,20,00,25,\ 00,31,00,00,00 [HKEY_CLASSES_ROOT\PhotoViewer.FileAssoc.Jpeg\shell\open\DropTarget] "Clsid"="{FFE2A43C-56B9-4bf5-9A79-CC6D4285608A}" [HKEY_CLASSES_ROOT\PhotoViewer.FileAssoc.Gif] "ImageOptionFlags"=dword:00000001 "FriendlyTypeName"=hex(2):40,00,25,00,50,00,72,00,6f,00,67,00,72,00,61,00,6d,\ 00,46,00,69,00,6c,00,65,00,73,00,25,00,5c,00,57,00,69,00,6e,00,64,00,6f,00,\ 77,00,73,00,20,00,50,00,68,00,6f,00,74,00,6f,00,20,00,56,00,69,00,65,00,77,\ 00,65,00,72,00,5c,00,50,00,68,00,6f,00,74,00,6f,00,56,00,69,00,65,00,77,00,\ 65,00,72,00,2e,00,64,00,6c,00,6c,00,2c,00,2d,00,33,00,30,00,35,00,37,00,00,\ 00 [HKEY_CLASSES_ROOT\PhotoViewer.FileAssoc.Gif\DefaultIcon] @="%SystemRoot%\\System32\\imageres.dll,-83" [HKEY_CLASSES_ROOT\PhotoViewer.FileAssoc.Gif\shell\open\command] @=hex(2):25,00,53,00,79,00,73,00,74,00,65,00,6d,00,52,00,6f,00,6f,00,74,00,25,\ 00,5c,00,53,00,79,00,73,00,74,00,65,00,6d,00,33,00,32,00,5c,00,72,00,75,00,\ 6e,00,64,00,6c,00,6c,00,33,00,32,00,2e,00,65,00,78,00,65,00,20,00,22,00,25,\ 00,50,00,72,00,6f,00,67,00,72,00,61,00,6d,00,46,00,69,00,6c,00,65,00,73,00,\ 25,00,5c,00,57,00,69,00,6e,00,64,00,6f,00,77,00,73,00,20,00,50,00,68,00,6f,\ 00,74,00,6f,00,20,00,56,00,69,00,65,00,77,00,65,00,72,00,5c,00,50,00,68,00,\ 6f,00,74,00,6f,00,56,00,69,00,65,00,77,00,65,00,72,00,2e,00,64,00,6c,00,6c,\ 00,22,00,2c,00,20,00,49,00,6d,00,61,00,67,00,65,00,56,00,69,00,65,00,77,00,\ 5f,00,46,00,75,00,6c,00,6c,00,73,00,63,00,72,00,65,00,65,00,6e,00,20,00,25,\ 00,31,00,00,00 [HKEY_CLASSES_ROOT\PhotoViewer.FileAssoc.Gif\shell\open\DropTarget] "Clsid"="{FFE2A43C-56B9-4bf5-9A79-CC6D4285608A}" [HKEY_CLASSES_ROOT\PhotoViewer.FileAssoc.Png] "ImageOptionFlags"=dword:00000001 "FriendlyTypeName"=hex(2):40,00,25,00,50,00,72,00,6f,00,67,00,72,00,61,00,6d,\ 00,46,00,69,00,6c,00,65,00,73,00,25,00,5c,00,57,00,69,00,6e,00,64,00,6f,00,\ 77,00,73,00,20,00,50,00,68,00,6f,00,74,00,6f,00,20,00,56,00,69,00,65,00,77,\ 00,65,00,72,00,5c,00,50,00,68,00,6f,00,74,00,6f,00,56,00,69,00,65,00,77,00,\ 65,00,72,00,2e,00,64,00,6c,00,6c,00,2c,00,2d,00,33,00,30,00,35,00,37,00,00,\ 00 [HKEY_CLASSES_ROOT\PhotoViewer.FileAssoc.Png\DefaultIcon] @="%SystemRoot%\\System32\\imageres.dll,-71" [HKEY_CLASSES_ROOT\PhotoViewer.FileAssoc.Png\shell\open\command] @=hex(2):25,00,53,00,79,00,73,00,74,00,65,00,6d,00,52,00,6f,00,6f,00,74,00,25,\ 00,5c,00,53,00,79,00,73,00,74,00,65,00,6d,00,33,00,32,00,5c,00,72,00,75,00,\ 6e,00,64,00,6c,00,6c,00,33,00,32,00,2e,00,65,00,78,00,65,00,20,00,22,00,25,\ 00,50,00,72,00,6f,00,67,00,72,00,61,00,6d,00,46,00,69,00,6c,00,65,00,73,00,\ 25,00,5c,00,57,00,69,00,6e,00,64,00,6f,00,77,00,73,00,20,00,50,00,68,00,6f,\ 00,74,00,6f,00,20,00,56,00,69,00,65,00,77,00,65,00,72,00,5c,00,50,00,68,00,\ 6f,00,74,00,6f,00,56,00,69,00,65,00,77,00,65,00,72,00,2e,00,64,00,6c,00,6c,\ 00,22,00,2c,00,20,00,49,00,6d,00,61,00,67,00,65,00,56,00,69,00,65,00,77,00,\ 5f,00,46,00,75,00,6c,00,6c,00,73,00,63,00,72,00,65,00,65,00,6e,00,20,00,25,\ 00,31,00,00,00 [HKEY_CLASSES_ROOT\PhotoViewer.FileAssoc.Png\shell\open\DropTarget] "Clsid"="{FFE2A43C-56B9-4bf5-9A79-CC6D4285608A}" [HKEY_CLASSES_ROOT\PhotoViewer.FileAssoc.Wdp] "EditFlags"=dword:00010000 "ImageOptionFlags"=dword:00000001 [HKEY_CLASSES_ROOT\PhotoViewer.FileAssoc.Wdp\DefaultIcon] @="%SystemRoot%\\System32\\wmphoto.dll,-400" [HKEY_CLASSES_ROOT\PhotoViewer.FileAssoc.Wdp\shell\open] "MuiVerb"=hex(2):40,00,25,00,50,00,72,00,6f,00,67,00,72,00,61,00,6d,00,46,00,\ 69,00,6c,00,65,00,73,00,25,00,5c,00,57,00,69,00,6e,00,64,00,6f,00,77,00,73,\ 00,20,00,50,00,68,00,6f,00,74,00,6f,00,20,00,56,00,69,00,65,00,77,00,65,00,\ 72,00,5c,00,70,00,68,00,6f,00,74,00,6f,00,76,00,69,00,65,00,77,00,65,00,72,\ 00,2e,00,64,00,6c,00,6c,00,2c,00,2d,00,33,00,30,00,34,00,33,00,00,00 [HKEY_CLASSES_ROOT\PhotoViewer.FileAssoc.Wdp\shell\open\command] @=hex(2):25,00,53,00,79,00,73,00,74,00,65,00,6d,00,52,00,6f,00,6f,00,74,00,25,\ 00,5c,00,53,00,79,00,73,00,74,00,65,00,6d,00,33,00,32,00,5c,00,72,00,75,00,\ 6e,00,64,00,6c,00,6c,00,33,00,32,00,2e,00,65,00,78,00,65,00,20,00,22,00,25,\ 00,50,00,72,00,6f,00,67,00,72,00,61,00,6d,00,46,00,69,00,6c,00,65,00,73,00,\ 25,00,5c,00,57,00,69,00,6e,00,64,00,6f,00,77,00,73,00,20,00,50,00,68,00,6f,\ 00,74,00,6f,00,20,00,56,00,69,00,65,00,77,00,65,00,72,00,5c,00,50,00,68,00,\ 6f,00,74,00,6f,00,56,00,69,00,65,00,77,00,65,00,72,00,2e,00,64,00,6c,00,6c,\ 00,22,00,2c,00,20,00,49,00,6d,00,61,00,67,00,65,00,56,00,69,00,65,00,77,00,\ 5f,00,46,00,75,00,6c,00,6c,00,73,00,63,00,72,00,65,00,65,00,6e,00,20,00,25,\ 00,31,00,00,00 [HKEY_CLASSES_ROOT\PhotoViewer.FileAssoc.Wdp\shell\open\DropTarget] "Clsid"="{FFE2A43C-56B9-4bf5-9A79-CC6D4285608A}" [HKEY_CLASSES_ROOT\SystemFileAssociations\image\shell\Image Preview\command] @=hex(2):25,00,53,00,79,00,73,00,74,00,65,00,6d,00,52,00,6f,00,6f,00,74,00,25,\ 00,5c,00,53,00,79,00,73,00,74,00,65,00,6d,00,33,00,32,00,5c,00,72,00,75,00,\ 6e,00,64,00,6c,00,6c,00,33,00,32,00,2e,00,65,00,78,00,65,00,20,00,22,00,25,\ 00,50,00,72,00,6f,00,67,00,72,00,61,00,6d,00,46,00,69,00,6c,00,65,00,73,00,\ 25,00,5c,00,57,00,69,00,6e,00,64,00,6f,00,77,00,73,00,20,00,50,00,68,00,6f,\ 00,74,00,6f,00,20,00,56,00,69,00,65,00,77,00,65,00,72,00,5c,00,50,00,68,00,\ 6f,00,74,00,6f,00,56,00,69,00,65,00,77,00,65,00,72,00,2e,00,64,00,6c,00,6c,\ 00,22,00,2c,00,20,00,49,00,6d,00,61,00,67,00,65,00,56,00,69,00,65,00,77,00,\ 5f,00,46,00,75,00,6c,00,6c,00,73,00,63,00,72,00,65,00,65,00,6e,00,20,00,25,\ 00,31,00,00,00 [HKEY_CLASSES_ROOT\SystemFileAssociations\image\shell\Image Preview\DropTarget] "{FFE2A43C-56B9-4bf5-9A79-CC6D4285608A}"="" [HKEY_LOCAL_MACHINE\SOFTWARE\Microsoft\Windows Photo Viewer\Capabilities] "ApplicationDescription"="@%ProgramFiles%\\Windows Photo Viewer\\photoviewer.dll,-3069" "ApplicationName"="@%ProgramFiles%\\Windows Photo Viewer\\photoviewer.dll,-3009" [HKEY_LOCAL_MACHINE\SOFTWARE\Microsoft\Windows Photo Viewer\Capabilities\FileAssociations] ".cr2"="PhotoViewer.FileAssoc.Tiff" ".jpg"="PhotoViewer.FileAssoc.Jpeg" ".wdp"="PhotoViewer.FileAssoc.Wdp" ".jfif"="PhotoViewer.FileAssoc.JFIF" ".dib"="PhotoViewer.FileAssoc.Bitmap" ".png"="PhotoViewer.FileAssoc.Png" ".jxr"="PhotoViewer.FileAssoc.Wdp" ".bmp"="PhotoViewer.FileAssoc.Bitmap" ".jpe"="PhotoViewer.FileAssoc.Jpeg" ".jpeg"="PhotoViewer.FileAssoc.Jpeg" ".gif"="PhotoViewer.FileAssoc.Gif" ".tif"="PhotoViewer.FileAssoc.Tiff" ".tiff"="PhotoViewer.FileAssoc.Tiff"
Yup, that is a lot of keys and settings but you are almost done. Once you have pasted text into your new notepad document save it but as .REG, you can name it however you want but it has to be .REG extension. Once the file is saved double click on it to merge it into the Windows registry. You might need to turn off UAC for this operation (check our tutorial on this topic) and accept warning messages but once it is done you should now have an old photo viewer as a choice for your default viewing application. All you have to do now is to go to settings and go to default apps, under photo viewer you should see your current default viewing application, probably photos, click on it to see options and choose photo viewer and exit the Settings menu, and you're done.
Read More
Valorant will enforce Windows 11 TPM 2.0
Valorant ingameBad or good news, depending on your view comes from RIOT for their game Valorant. It seems that Riot has decided to enforce Windows 11 TPM 2.0 feature into Valorant running on Windows 11 and there is a rumor that it will be de facto standard and that it will move to Valorant in general no matter on which system it runs. Furthermore, there is a rumor circling around that other developers are also talking about implementing TPM 2.0 requirements so they can harvest advanced security features of Windows 11 in order to prevent hacks and other cheats in their games. This is an interesting point to stand on, on one side, sure, advanced features that will prevent cheating and hacking is a great thing. On other hand denying access to many computers that do not support TPM 2.0 and removing them from the game can be a permanent loss of customers and therefore loss of money. It is a risk to be sure and I am not really sure that alienating gamers is a good choice for long-term income, especially when you will be able to install Windows 11 on an unsupported PC as stated by Microsoft. We will all see how this Riot decision will reflect on their business, as not a big Valorant player myself I am not impacted too much with this decision, but it will be interesting to see if others will indeed go with this trend or they will decide to wait a while until much more PC’s are upgraded.
Read More
What to do if USB tethering is not working
This post will guide you in what to do if you are trying to share the internet connection from your Android smartphone to your Windows 10 computer but USB tethering is not working. Although you can always connect your Android phone to your computer using a USB cable, you still won’t be able to access the internet. However, if you’ve already enabled the USB tethering option in your smartphone, you should be able to access the internet but if you still can’t then you can fix this issue by reading this post. There are several potential fixes you can check out to fix the USB tethering issue. You can try running both the Internet Connections and Network Adapter troubleshooters or try installing the USB RNDIS adapter or disable any unnecessary network adapters.

Option 1 – Try to run the Internet Connections and Network Adapter troubleshooter

There are various built-in troubleshooters in Windows 10 that can help fix system issues. Since you are dealing with an internet connection problem, you can try running both the Internet Connections and the Network Adapter troubleshooters. To run them, follow these steps:
  • Go to Settings > Update & security > Troubleshoot.
  • From there, you can select the Internet Connections troubleshooter.
  • Click on the Run troubleshooter button to troubleshoot the problem.
  • Wait until the troubleshooter is done identifying and fixing the problem automatically.
  • Then follow the next on-screen instructions that may appear.
  • Once it’s done, check if the USB tethering issue is now fixed.
Note: You can also try to run the Network Adapter troubleshooter. It is also located under the Troubleshoot section. Just scroll down until you see it and then run it.

Option 2 – Try installing or updating the USB RNDIS adapter

RNDIS or Remote Network Driver Interface Specification can also help you resolve the USB tethering problem. If the pre-installed driver does not help you in connecting to the internet, then you can try installing the USB RNDIS driver that is, if it’s not installed yet. If it is already installed, you can try to update it instead.
  • Tap the Win + R keys to open Run and type “devmgmt.msc” in the field and hit Enter to open the Device Manager.
  • Next, expand the Network adapters section and look for the Remote NDIS based Internet Sharing Device. But if you are using a Samsung smartphone, you might see “Samsung” instead of under Network adapters.
  • Right-click on it and then select the “Update driver” option.
  • Then select the “Browse my computer for driver software” option.
  • After that, select the “Let me pick from a list of available drivers on my computer” option.
  • Now uncheck the checkbox for “Show compatible hardware”.
  • From the given list on your left-hand side, look for Microsoft and then select the Remote NDIS based Internet Sharing Device on your right-hand side.
  • Click on Next. A new popup will appear where you have to click on Yes. This will install the driver.
  • Now click on the Close button and restart your computer.

Option 3 – Try disabling any unnecessary network adapters/connections

Assuming that your Ethernet connection is showing ping loss which indicates that the internet is not stable. In such time, if you use the USB tethering functionality, you won’t be able to access the internet connection from your smartphone. The internet connection will be frequently disconnected since your computer gives priority to the Ethernet connection. Thus, you have to disable the Ethernet connection temporarily.
  • Right-click the network icon on your Taskbar and select the option “Network and Sharing Center”.
  • After that, click the network connection. And then click the Disable button from the status box that opens.
  • After that, check if you can now connect to the internet or not.
Read More
Nvidia RTX 4090 & RTX 4080 unveiled

Nvidia announced the third generation of GeForce RTX GPUs called Ada Lovelace. New technology is bringing 76 billion transistors with 18,000 CUDA cores along with new gen ray tracing cores and improved Tensor cores as well. The new lineup also comes with DLSS 3 which is vastly improved from its previous version pushing a 4 times increase in frame rates over native rendering.

Nvidia RTX 4090

RTX 4090, a better model of GPU will come with 16,384 CUDA cores and a boost clock speed of 2.52 GHz. Also, it is packed with stunning 24 GB of GDDR6V VRAM. In Nvidia's words, its performance is twice faster than the 3090 Ti in games like Flight simulator, three times faster on Portal RTX, and four times faster on RacerX.

RTX 4080 comes in two modes, one with 12GB VRAM and a stronger one with 16GB VRAM but differences do not end here. The lower model is packing 7,680 CUDA cores while the stronger one is going to 9,728 CUDA cores. We will wait to see how will these cores count impact real-world performance in games.

As for prices, the flagship model RTX 4090 will be $1,600 USD and it will hit the market on October 12th. RTX 4080 12GB model will be $900 USD and the model with 16GB VRAM will go up to $1,200 USD. This, of course, is the price for Founders Edition cards, OEM cards from third parties like ASUS, MSI, Gigatech, etc will cost more.

Read More
Rebuild Search Index in Windows 10
If by any chance your search result in Windows is misleading, missing, or incorrect then it is a high probability that your search index is out of date. To repair this issue follow this guide step by step. Please take note that rebuilding the whole search index can take a long time on some systems depending on the size of the index itself, CPU speed, HD speed, etc. Sometimes it can take even hours on large drives. First, press ⊞ WINDOWS + R to open the run dialog and type in it Control panel to open the control panel. keyboard with windows and r markedrun dialog with control panel typed in 
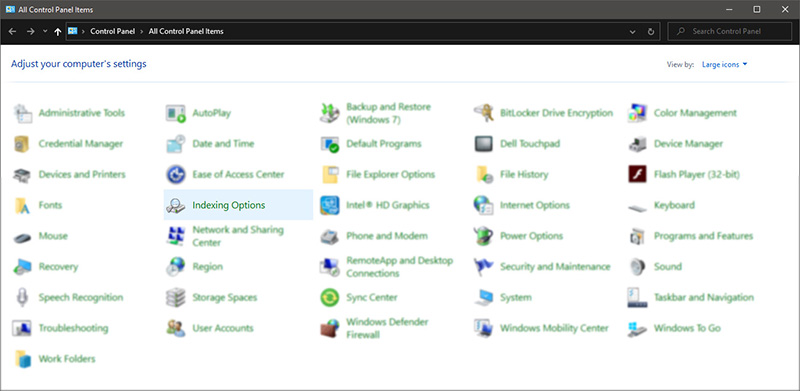
Once you are in the control panel, switch your view to large icons and locate Indexing options. Control panel with indexing options selected
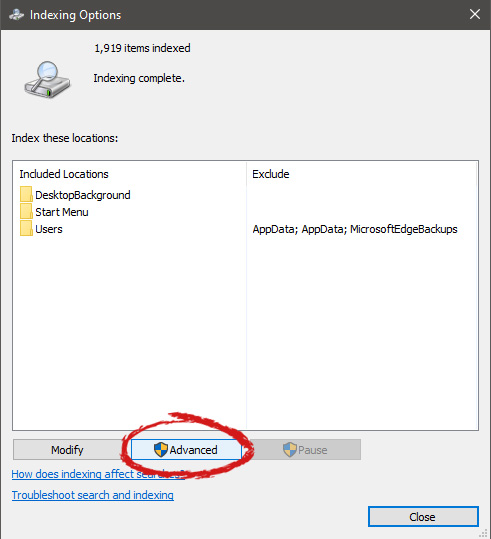
Inside indexing options, click on advanced. indexing options advanced button marked
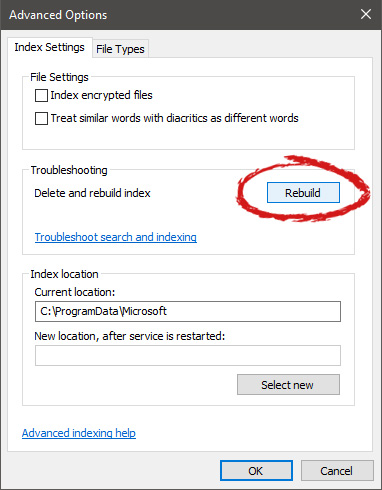
In advanced options click on the rebuild and confirm. indexing options rebuild button markedLeave your computer to finish and your searches should be working fine now.
Read More
How to remove myBrowser

myBrowser is a Potentially Unwanted Program that allows users to access the internet. This browser suggests users install other PUP like myfiles, myemail, and others. This application claims to be a good reliable portable internet browser, however during our test use of the program several website scripts crashed and were not able to open up all the website assets required, leaving the users with a mediocre browsing experience.

While browsing the internet through this program, you might see additional ads and sponsored links injected into your search results and/or websites.

About Potentially Unwanted Applications

What is a Potentially Unwanted Program (PUP)?

Everyone has experienced it – you download and install a free application, you then notice some unwanted programs on your computer system, come across a strange toolbar on your web browser, or find your default search engine has been changed to something else. You didn’t set them up, so how did they turn up? Potentially Unwanted Programs (PUP), also referred to as Potentially Unwanted Applications (PUA), are programs that you never wanted in the first place and often come bundled with freeware software. Once installed, most of these applications can be difficult to eliminate and become much more of an annoyance rather than a necessity. PUP doesn’t involve malware in the traditional sense. A basic difference between PUP and malware is distribution. Malware is commonly dropped by silent installation vectors such as drive-by downloads while PUP gets installed with the consent of the user, who knowingly or unintentionally authorizes the PUP installation on their PC. PUP developers may argue that their programs aren’t malicious software but they can still be dangerous software and put the computer at risk much the same way a computer virus does.

What do PUPs do on your PC, precisely?

Unwanted programs can be found in various forms. Usually, they will be found in adware bundlers that are known to utilize aggressive and misleading advertising. The majority of bundlers install many adware applications from several vendors, each of which features its own EULA policy. Safebytes Anti-malware entirely removes this threat and protects your PC against unwanted programs or malware infection. PUPS also appear in the form of undesirable toolbars or web browser add-ons. They may change your internet browser settings, monitor your surfing activities and online searches, take up a large amount of space on your monitor, and degrade your web browsing experience. Potentially Unwanted Programs at times act quite similarly to computer viruses or spyware. They will often carry keyloggers, dialers, and other programs built inside them that may track you or send your sensitive details to third parties. Even if the PUPs aren’t basically malicious, these programs still do absolutely nothing good on your computer – they will take precious resources, slow down your PC, weaken your device’s security, making your PC more vulnerable to trojans.

Protect yourself from PUPs

• Read very carefully before you install anything. Do not click accept till you have read the fine print. There will probably be a clause about PUPs. • Always select “Custom” or “Advanced” installation and never blindly click the Next button, which will let you uncheck any foistware software programs you do not want. • Use an anti-PUP program. Security software like Safebytes Anti-malware provides the very best real-time protection against PUPs and also other malware. • Be alert if you install freeware, open-source software, or shareware. Don’t install programs that appear suspicious or malicious. • Always download software from reliable sources like official websites instead of untrustworthy sharing space. Stay away from file-hosting sites where/when possible. Comply with these guidelines and you should more or less never get potentially unwanted programs on your PC

What To Do When You Cannot Install Safebytes Anti-Malware?

Malware could cause all kinds of damage once they invade your PC, from stealing your private details to deleting files on your computer. Some malware is designed to restrict or prevent things that you wish to do on your computer. It may well not let you download anything from the internet or stop you from accessing a few or all of the internet sites, particularly the anti-malware sites. So what you should do if malware prevents you from downloading or installing Safebytes Anti-Malware? Follow the instructions below to eliminate malware by alternate methods.

Make use of Safe Mode to fix the problem

If any virus is set to run automatically when Microsoft Windows starts, stepping into safe mode could very well block this attempt. Since only the minimal programs and services launch in Safe Mode, there are hardly any reasons for issues to occur. Below are the steps you need to follow to start into the Safe Mode of your Windows XP, Vista, or 7 computers (check out the Microsoft website for instructions on Windows 8 and 10 computers). 1) Hit the F8 key repeatedly as soon as your PC boots, but before the big Windows logo comes up. This will bring up the Advanced Boot Options menu. 2) Make use of the arrow keys to select Safe Mode with Networking and press ENTER. 3) When this mode loads, you should have the internet. Now, make use of your internet browser to download and install an anti-malware application. 4) Right after the software is installed, let the scan run to remove viruses and other threats automatically.

Obtain the antivirus software using a different browser

Some malware mainly targets specific web browsers. If this sounds like your case, make use of another internet browser as it might circumvent the virus. If you’re not able to download the security application using Internet Explorer, this means the virus is targeting IE’s vulnerabilities. Here, you should switch to another internet browser such as Chrome or Firefox to download the Safebytes program.

Create a bootable USB antivirus drive

Here’s another solution which is creating a portable USB anti-virus software package that can scan your system for malware without needing installation. Adopt these measures to run the anti-virus on the affected PC. 1) Download Safebytes Anti-Malware or Microsoft Windows Defender Offline onto a clean PC. 2) Plug in the pen drive into the uninfected computer. 3) Double click on the exe file to open the installation wizard. 4) When asked, choose the location of the USB drive as the place in which you want to store the software files. Follow the directions to finish the installation process. 5) Now, transfer the flash drive to the infected computer. 6) Double-click the EXE file to open the Safebytes tool right from the flash drive. 7) Click the “Scan” button to run a full computer scan and remove malware automatically.

SafeBytes Anti-Malware: Lightweight Malware Protection for Windows Computer

If you’re looking to download the anti-malware program for your computer, there are numerous tools on the market to consider however, you should not trust blindly anyone, irrespective of whether it is a paid or free program. Some of them do a good job in removing threats while some will ruin your computer themselves. You have to select one that is reliable, practical and has a good reputation for its malware source protection. On the list of strongly recommended tool by industry experts is SafeBytes Anti-Malware, a well known security software for Microsoft Windows. SafeBytes is a powerful, real-time anti-malware application that is designed to assist the common computer user in safeguarding their computer from malicious threats. With its outstanding protection system, this tool will quickly detect and eliminate the majority of the security threats, which includes adware, viruses, browser hijackers, ransomware, trojans, worms, and PUPs.

SafeBytes anti-malware takes computer protection to a whole new level with its enhanced features. The following are some of the great features included in the software.

Live Protection: SafeBytes offers real-time active checking and protection against all known viruses and malware. It will continuously monitor your pc for hacker activity and also gives end-users superior firewall protection. Best AntiMalware Protection: This deep-cleaning anti-malware application goes much deeper than most antivirus tools to clean your computer. Its critically acclaimed virus engine locates and disables hard to remove malware that hides deep within your computer. Website Filtering: SafeBytes provides instant safety rating to the webpages you’re going to visit, automatically blocking unsafe sites and to make sure that you are certain of your safety while browsing the internet. Lightweight Utility: SafeBytes is a light-weight application. It consumes a very small amount of processing power as it works in the background so you are free to use your Windows-based computer the way you really want. Premium Support: You will get 24/7 technical assistance to quickly resolve any concern with your security application. SafeBytes can keep your PC protected from the latest malware threats automatically, thus keeping your online experience secure and safe. Now you may realize that this tool does more than just scan and delete threats in your computer. If you’re looking for the very best malware removal tool out there, and if you don’t mind spending some dollars for it, opt for SafeBytes Anti-Malware.

Technical Details and Manual Removal (Advanced Users)

If you want to carry out the removal of myBrowser manually instead of using an automated software tool, you can follow these simple steps: Proceed to the Windows Control Panel, click on the “Add/Remove Programs” and there, choose the offending application to remove. In cases of suspicious versions of browser extensions, you can easily remove them through your web browser’s extension manager. You will most probably also want to totally reset your internet browser to its default settings. Lastly, check your hard disk for all of the following and clean your Windows registry manually to remove leftover application entries after uninstalls. Please remember that only advanced computer users should try to manually edit the registry because incorrect file deletion leads to a major problem or even a PC crash. Moreover, some malicious programs have the capability to defend against its deletion. Carrying out this in Safe Mode is advised.
Read More
A Guide to Fixing Magcore.dll Error on Your PC

Magcore.dll Error - What is it?

Magcore.dll is a type of Dynamic Link Library. This file is associated with software developed by ArcSoft, a renowned multimedia application developer. Magcore.dll consists of small programs that help load and run software developed by ArcSoft on your system smoothly. This file virtually comes into function when you use certain audio and video features incorporated in ArcSoft programs for example ArcSoft Media converter. However, you may experience Magcore.dll error code on when this DLL file fails to run and load programs. The error may hamper your ability to access ArcSoft programs on your system and cause you a great deal of inconvenience. Magcore.dll error is often displayed in any one of the following formats:
“The file magcore.dll is missing” “MagCore.dll cannot be found” "Cannot find [PATH]magcore.dll" “This application has failed to start because MagCore.dll was not found. Reinstalling the application may fix the error.”

Solution

Restoro box imageError Causes

This DLL file is known to be prone to errors. MagCore.dll error occurs due to several reasons such as:
  • Missing or damaged MagCore.dll file
  • Hardware failure
  • Viral infection
  • Registry issues
If you experience MagCore.dll error on your system, it is advisable to fix it right away. Though it is not fatal, but if you don’t repair it, you may not be able to access practically all ArcSoft programs on your PC.

Further Information and Manual Repair

Here are some of the efficient and easy manual methods to resolve error MagCore.dll on your PC:

Method 1 - Scan and Remove Malware

MagCore.dll error can be triggered by viral or other malware infection. Malware can easily damage DLL files and masquerade as the MagCore.dll file. To resolve, simply download a powerful antivirus on your system. Run it to scan your entire PC for viruses and remove them right away.

Method 2 - Update the Drivers for Hardware Devices

As we mentioned above the error may be related to hardware failure too. In times like these, it is advisable to update the drivers for hardware devices. For example if you try to play a 3D video game and it fails to run showing you MagCore.dll error message, then simply try updating the drivers for your video card. Drivers can be updated in Windows by using a driver update wizard from within Device Manager.

Method 3 - Use System Restore to Undo Recent System Changes

After trying method 1 and 2, if the error code still persists, then it is opt for method 3. Use Windows System Restore utility to undo recent system changes and bring your PC to its normal previous condition before the error occurred. To restore, simply go to the start menu, type System Restore. Now click on System Restore and just pick a point in the past called a restore point to return important Windows files and settings.

Method 4 - Repair the Registry

If the underlying cause of the MagCore.dll error code is related to registry issues, then simply repair the registry. You can fix it manually but it is a little complicated and time-consuming. You may find it difficult if you are not a technical whiz. Nonetheless to resolve and repair it in seconds, download Restoro. This is a powerful and a user-friendly PC Fixer embedded with a registry cleaner and several other highly functional scanners. Run it to scan your entire PC for registry problems. The registry cleaner utility removes all bad and invalid entries, cleans up the registry space, and repairs the damaged files. Click here to download Restoro and repair MagCore.dll error code on your PC.
Read More
Windows Clock is missing, invisible or black
Although the Windows Updates do bring in new features and improvements, there are times when they also introduce issues as well. The main cause for these arising bugs is the incompatibility between the old and new software components. One of the issues brought in by such bugs is Clock is missing, invisible or black This problem was experienced by users after they recently installed a feature update. This particular bug can make the Windows clock in the taskbar appear to be black or invisible which makes it hard for users to read the time on their computers. According to experts, this bug has something to do with the Windows Themes and Aero styling. To fix this issue, here are some suggestions that could help but before you get started, you have to restart Explorer first and see if it can help in resolving the problem – if it didn’t, follow the options given below carefully.

Option 1 – Try to disable Custom Theme

It could be that the reason behind the black or invisible Windows Clock can be an old or an incompatible theme. You might have a custom theme in place and it became incompatible after an update. Thus, you can try switching to one of the default themes and then recreate your custom theme afterward. To do so, follow the steps below.
  • Right-click on your desktop and select Personalize.
  • Next, select Themes from the left menu and then select Windows 10 as your theme.
  • After that, you can delete all the other custom themes and create them again from scratch. This should fix the black or invisible Windows 10 Clock.

Option 2 – Try to edit your existing themes

If you don’t want to get rid of your existing themes, there is an alternative solution you can try to fix the missing Windows 10 Clock albeit it’s a bit of a complex one. Follow the given steps below to modify the existing themes and fix the missing or black Windows Clock.
  • First, you need to save your existing theme. Just simply right-click on your desktop and select Personalize and select Themes from the left menu.
  • Next, click on the Save Theme button below your custom theme to save it. You can name the theme anything.
  • After that, you can now modify the saved theme by going to C:/Users/UserName/AppData/Local/MicrosoftWindowsThemes.
  • From there, look for the file with the theme name you just saved, and then right-click on the file and open it with notepad or any other text editing app.
  • Now you have to look for the line that says, “Path=%SystemRoot%resourcesthemesAeroAeroLite.msstyles” and change it to “Path=%SystemRoot%resourcesthemesAeroAero.msstyles” and then save the file and rename it with some other name.
  • Afterward, go back to themes and select the new theme you’ve created. This should resolve the Windows Clock issue as well as other Themes and Taskbar issues.

Option 3 – Try disabling the small icons in Taskbar

This option should help you fix any Windows Clock cases. So if your Windows Clock is nowhere to be found, you can try to disable small taskbar icons on your Windows 10 PC.
  • Go to Settings > Personalization > Taskbar.
  • From there turn off the toggle button for the “Use small taskbar buttons” option. Note that this solution is only a temporary one and it may or may not work in some cases.
Read More
Fix NETWORK_FAILED error in Chrome
Although the Google Chrome browser is one of the most used browsers, a lot of things could still go wrong when browsing the web using it. One of the errors you might encounter is the “ NETWORK_FAILED ” error. This kind of error in Chrome indicates that Chrome wasn’t able to send your request through the network connection. It could be that your computer has trouble connecting to a stable internet connection or there is some plugin in your Chrome browser that is causing the issue. The worst-case would be malware. But worry not for this post will guide you on what you can do when you encounter the NETWORK_FAILED error in Google Chrome. Make sure to follow each one of the options given below and see which one of them worked best for you.

Option 1 – Disable or remove any unwanted extensions in Chrome

As you know, browser extensions help in enhancing the browsing experience but there are also times when it does exactly the opposite, and such is the case with the NETWORK_FAILED error in Chrome. It could be that one of the extensions in your browser is the one that’s causing the trouble. To disable or remove these unwanted extensions, here’s what you have to do:
  • Launch Google Chrome, press Alt + F, move to More tools, and click Extensions.
  • Look for Search.tb.ask.com or any other unwanted add-ons, click the Recycle Bin button, and choose Remove.
  • Restart Google Chrome, then tap Alt + F, and select Settings.
  • Navigate to the On Startup section at the bottom.
  • Select “Open a specific page or set of pages”.
  • Click the More actions button next to the hijacker and click Remove.

Option 2 – Run the Malware Scanner and Cleanup tool in Chrome

If removing or disabling the unwanted extension didn’t help in fixing the error, you can try using the built-in malware scanner and cleanup tool in Google Chrome. These tools help you get rid of any unwanted pop-ups, ads, unusual Startup pages, toolbars, and even malware.

Option 2 – Run the Malware Scanner and Cleanup tool in Chrome

  • Launch Google Chrome and then tap the Alt + F keys.
  • After that, click on Settings.
  • Next, scroll down until you see the Advanced option, once you see it, click on it.
  • After clicking the Advanced option, go to the “Restore and clean up the option and click on the “Restore settings to their original defaults” option to reset Google Chrome.
  • Now restart Google Chrome.

Option 3 – Try to disable the Proxy

If you are using a proxy, you might want to consider disabling it as it could have something to do with the NETWORK_FAILED error.
  • Tap the Win + R keys to open the Run dialog box.
  • Then type “cpl” and hit Enter or click OK to open the Internet Properties.
  • After that, go to the Connections tab where you should see the LAN settings. Click on it.
  • Next, uncheck the “Use a Proxy Server for your LAN” and ensure that the “Automatically detect settings” option is checked as well.
  • Then click Ok and then Apply to save the changes made.
  • Restart your PC.

Option 4 – Flush DNS and reset TCP/IP

  • Click the Start button and type in “command prompt” in the field.
  • From the search results that appear, right click on Command Prompt and select the “Run as administrator” option.
  • After opening Command Prompt, you have to type each one of the commands listed below. Just make sure that after you type each command, you hit Enter
    • ipconfig /release
    • ipconfig /all
    • ipconfig /flushdns
    • ipconfig /renew
    • netsh int ip set dns
    • netsh winsock reset
After you key in the commands listed above, the DNS cache will be flushed and the Winsock, as well as the TCP/IP, will reset.
  • Now restart your computer and open Google Chrome then try opening the website you were trying to open earlier.

Option 5 – Delete the WLAN Profiles

Deleting the WLAN Profiles might be a good idea if you are not able to connect to the internet on your computer and if you’re using Wi-Fi. It could be that the networks that were connected previously have gone rogue which is why it is not connecting properly. And so deleting the WLAN profiles would be for the best. That should do it.
Read More
Guide How to Remove PCOptimizerPro

PC Optimizer Pro is a PC optimizer utility developed by Xportsoft Technologies. It is classified as a potentially unwanted program, due to its aggressive scan and registration reminders, and that it is often distributed bundled with other programs in a manner that leads many users to not know how it got on their computer. While not inherently malicious, PC Optimizer Pro adds numerous registry keys, startup entries and while running consumes a relatively high amount of system resources, especially during its scans. The software installs from a .exe file that is around 5.20 MB or 5.453.240 Bytes (depending on the version). As of the publication of these videos, the current version of PC Optimizer Pro was detected as malicious or potentially unwanted by at least 21 AntiViruses.

About Potentially Unwanted Applications

If you have ever installed freeware or shareware, chances are high that your computer can get installed with a bunch of unwanted applications. A Potentially Unwanted Program, also called PUP, in short, is actually software that contains adware, installs toolbars, or has other hidden goals. These kinds of programs are almost always bundled up with free software which you download from the net or are also bundled within the custom installers on many download sites. PUPs did not really constitute pure “malware” in the strict sense of the term. Just like malicious software, PUPs cause problems when downloaded and installed on your PC, but what makes a PUP different is that you give consent to download it – although the truth is vastly different – the software installation package actually tricks you into accepting the installation. Irrespective of whether it is regarded as malware or not, PUPs are nearly always harmful to the user as they might bring on adware, spyware, keystroke logging, and also other bad crapware features on your computer.

What do PUPs do on your computer, exactly?

Potentially Unwanted Programs come in many forms and varieties, but in most instances, these are adware programs that show annoying pop-up adverts and advertisements on websites you check out. The PUPs also get installed into your computer in the form of web browser add-ons and toolbars. Not only they needlessly take up space on your computer screen, but toolbars may also manipulate search engine results, watch your web browsing activities, decrease your web browser’s efficiency, and decelerate your internet connection to a crawl. Potentially Unwanted Programs at times act quite similarly to viruses or spyware. Some PUPs include keyloggers, dialers, along with other software to gather your private details that may result in identity theft. These are programs that don’t do anything good for you; in addition to taking over space on your hard drive, they also slow down your computer, often modify settings without your approval, the list of bothersome features goes on.

Ways to avoid PUPs

• Always study the EULA and privacy statement. Don’t agree until you know precisely what you are acknowledging. • Choose the “custom” install whenever installing a software program. In particular, look closely at those small boxes that have been checked as default, where you may ‘agree’ to receive promotions or install software bundlers. • Use good antivirus software, like Safebytes Anti-Malware that offers real-time protection against PUPs. • Avoid adding a freeware program you do not use. Turn off or remove toolbars and web browser extensions you don’t really need. • Always download software from reliable sources like official sites as opposed to untrustworthy sharing space. Avoid file-hosting sites where/when possible.

What you can do if Malware Prevents You From Downloading Or Installing Antivirus?

Practically all malware is bad, but certain types of malware do much more damage to your computer than others. Certain malware goes to great lengths to stop you from downloading or installing anything on your personal computer, particularly antivirus applications. If you are reading this right now, you have probably recognized that a malware infection is the real cause of your blocked web connectivity. So what to do if you need to install an antivirus program like Safebytes? There are a few steps you can take to circumvent this problem.

Install in Safe Mode

The Windows OS has a special mode known as “Safe Mode” in which just the bare minimum required programs and services are loaded. In the event the malware is blocking the internet connection and affecting the computer, running it in Safe Mode will let you download antivirus and run a diagnostic scan while limiting possible damage. To start the computer into Safe Mode, press the “F8” key on your keyboard right before the Windows boot screen comes up; Or right after normal Windows boot up, run MSConfig, look over “Safe Boot” under Boot tab, and click Apply. After you reboot into Safe Mode with Networking, you can download, install, and update anti-malware software from there. Right after installation, run the malware scanner to remove standard infections.

Switch to an alternate browser

Some malware may target vulnerabilities of a specific browser that block the downloading process. If you seem to have malware attached to Internet Explorer, then switch over to an alternate web browser with built-in safety features, such as Firefox or Chrome, to download your favorite antivirus program – Safebytes.

Install and run anti-virus from the USB drive

Another solution is to create a portable anti-malware program on your USB stick. Adopt these measures to employ a thumb drive to clean your infected computer system. 1) Download Safebytes Anti-Malware or MS Windows Defender Offline onto a clean PC. 2) Plug the Thumb drive into the clean computer. 3) Run the setup program by double-clicking the executable file of the downloaded software, with a .exe file format. 4) Choose the flash drive as the location for saving the file. Do as instructed on the screen to complete the installation process. 5) Now, plug the pen drive into the corrupted computer. 6) Double-click the anti-malware software EXE file on the USB flash drive. 7) Press the “Scan” button to run a full system scan and remove viruses automatically.

SafeBytes Anti-Malware: Lightweight Malware Protection for Windows PC

These days, an anti-malware tool can protect your computer from different types of online threats. But how to choose the best one amongst numerous malware protection application that’s available out there? You may be aware, there are numerous anti-malware companies and tools for you to consider. A few are well worth your money, but many aren’t. You have to be very careful not to choose the wrong application, especially if you buy a paid application. In terms of commercial anti-malware application options, many people select well-known brands, such as SafeBytes, and are quite happy with it. SafeBytes anti-malware is a powerful, highly effective protection tool created to help end-users of all levels of IT literacy in detecting and eliminating malicious threats from their computer. Using its cutting-edge technology, this software can assist you to eliminate several types of malware such as computer viruses, trojans, PUPs, worms, ransomware, adware, and browser hijackers. SafeBytes has excellent features when compared to other anti-malware programs. Let’s have a look at a few of them below: Robust, Anti-malware Protection: Safebytes is made on the best virus engine within the industry. These engines will find and get rid of threats even during the initial phases of a malware outbreak. Active Protection: Malware programs aiming to enter the system are discovered and stopped as and when detected by the SafeBytes active protection shields. It’ll check your PC for suspicious activity at all times and safeguards your personal computer from unauthorized access. High-Speed Malware Scanning Engine: SafeBytes’s high-speed malware scanning engine minimizes scan times and extends the life of the battery. Simultaneously, it will effectively detect and eliminate infected computer files or any online threat. Website Filtering: SafeBytes checks the hyperlinks present on a webpage for possible threats and informs you whether the site is safe to explore or not, through its unique safety rating system. Lowest CPU/Memory Usage: SafeBytes is a lightweight and user-friendly antivirus and antimalware solution. Since it utilizes negligible computer resources, this tool leaves the computer’s power exactly where it belongs to: with you. Premium Support: You may get high levels of support round the clock if you’re using their paid software.

Technical Details and Manual Removal (Advanced Users)

If you wish to manually remove PCOptimizerPro without the use of an automated tool, it may be possible to do so by removing the program from the Windows Add/Remove Programs menu, or in cases of browser extensions, going to the browsers AddOn/Extension manager and removing it. You will likely also want to reset your browser. To ensure the complete removal, manually check your hard drive and registry for all of the following and remove or reset the values accordingly. Please note that this is for advanced users only and may be difficult, with incorrect file removal causing additional PC errors. In addition, some malware is capable of replicating or preventing deletion. Doing this in Safe Mode is advised.

The following files, folders, and registry entries are created or modified by PCOptimizerPro

Files: DesktopPC Optimizer Pro.lnk. %Programs%PC Optimizer ProLive Support.url. %Programs%PC Optimizer ProPC Optimizer Pro.lnk. %Programs%PC Optimizer ProUninstallation Guide.url. %Programs%PC Optimizer ProVisit Website.url. %ProgramFiles%PC Optimizer ProPCOptimizerPro.exe. %ProgramFiles%PC Optimizer ProPCOptProCtxMenu.dll. %ProgramFiles%PC Optimizer ProPCOptProTrays.exe. %ProgramFiles%PC Optimizer ProStartApps.exe. %ProgramFiles%PC Optimizer Prouninst.exe. %QuickLaunch%PC Optimizer Pro.lnk. WindowsTasksPC Optimizer Pro Idle.job. WindowsTasksPC Optimizer Pro Scan.job. WindowsTasksPC Optimizer Pro startups.job. WindowsTasksPC Optimizer Pro Updates.job. C:DOCUME1USER1LOCALS1Tempoptprosetup.exe C:WINDOWSsystem32netmsg.dll C:DOCUME1USER1LOCALS1Tempoptprosetup.exe C:DOCUME1USER1LOCALS1Tempis-SJGJ9.tmpoptprosetup.tmp C:DOCUME1USER1LOCALS1Tempis-NTRVH.tmp_isetup_shfoldr.dll C:WINDOWSsystem32shfolder.dll C:DOCUME1USER1LOCALS1Tempis-NTRVH.tmpOptProHelper.dll C:DOCUME1USER1LOCALS1Tempis-NTRVH.tmpitdownload.dll C:1e4e2d65e12311cac2c0eeb8c5c1d7bd1ddc865b367b98b56bc2330bf18436 C:WINDOWSRegistrationR000000000007.clb C:DOCUME1USER1LOCALS1Tempoptprosetup.exe C:WINDOWSsystem32shfolder.dll C:1e4e2d65e12311cac2c0eeb8c5c1d7bd1ddc865b367b98b56bc2330bf18436 C:WINDOWSRegistrationR000000000007.clb C:WINDOWSsystem32shell32.dll C:DOCUME1USER1LOCALS1Tempis-SJGJ9.tmpoptprosetup.tmp C:Program FilesOptimizer Pro 3.99OptimizerPro.exe C:Program FilesOptimizer Pro 3.99unins000.exe C:Program FilesOptimizer Pro 3.99OptProStart.exe c:autoexec.bat C:DOCUME1USER1LOCALS1Tempoptprosetup.exe C:DOCUME1USER1LOCALS1Tempis-SJGJ9.tmpoptprosetup.tmp C:DOCUME1USER1LOCALS1Tempis-NTRVH.tmp_isetup_shfoldr.dll C:DOCUME1USER1LOCALS1Tempis-NTRVH.tmpOptProHelper.dll C:DOCUME1USER1LOCALS1Tempis-NTRVH.tmpitdownload.dll C:Program FilesOptimizer Pro 3.99is-BDCDJ.tmp C:Program FilesOptimizer Pro 3.99is-DB4S5.tmp C:Program FilesOptimizer Pro 3.99is-C16E7.tmp C:Program FilesOptimizer Pro 3.99is-QE691.tmp C:Program FilesOptimizer Pro 3.99is-GQ78C.tmp Registry: Key 003B9C22-6FE0-4BCA-A73F-9AA99B9BBDAA at HKEY_CLASSES_ROOTTypeLib. Key 12AB121E-44C6-488B-8773-B0AE25E662E1 at HKEY_CLASSES_ROOTInterface. Key 203ABD21-41F1-4F1B-BAE3-D6A89A90D239 at HKEY_CLASSES_ROOTCLSID. Key PC Optimizer Pro at HKEY_CURRENT_USERSoftware. Key PC Optimizer Pro at HKEY_LOCAL_MACHINESOFTWARE. Key PC Optimizer Pro at HKEY_LOCAL_MACHINESoftwareMicrosoftWindowsCurrentVersionUninstall. Key PCOptimizerPro.exe at HKEY_LOCAL_MACHINESOFTWAREMicrosoftWindowsCurrentVersionApp Paths. Key PCProCtxMenu at HKEY_CLASSES_ROOT*shellexContextMenuHandlers. Key PCProCtxMenu at HKEY_CLASSES_ROOTlnkfileshellexContextMenuHandlers.
Read More
1 2 3 171
Logo
Copyright © 2023, ErrorTools. All Rights Reserved
Trademark: Microsoft Windows logos are registered trademarks of Microsoft. Disclaimer: ErrorTools.com is not affiliated with Microsoft, nor claims direct affiliation.
The information on this page is provided for information purposes only.
DMCA.com Protection Status