You are most likely to face this error if you restart your PC while the Windows Setup is still under process and yet to complete.
Other causes of this error include any of the following conditions:
The drive on which you are installing Windows has insufficient disk space to accommodate the installation.
An incompatible or outdated third-party driver (or more) is installed on your PC which is conflicting with the installation. For instance, this could be a problematic video driver.
The system BIOS has incompatibilities with the installation.
The STOP 0x1E signifies that there was an unknown or illegal processor instruction detected by the Windows XP kernel. You will see the exception address which shows up to indicate the root of the problem which is usually a driver or faulty hardware.
You should note this address down as well as the link date of the faulty driver or image which includes it.
If at any point it becomes impossible for you to handle and you end up contacting the Windows support center to help you out with the process then this information will help you out in making things a lot easier while the support team tries to troubleshoot the problem.
The parameters included in the STOP 0x1E error message are the following:
is the exception code which couldn’t be handled.
shows the module’s address where the exception took place.
signifies the exception’s parameter 0.
represents the exception’s parameter 1.
You can use this information which usually is provided in error 0x0000001e message to pinpoint the root cause of the problem and troubleshoot it.
In order to fix this error, you need to follow either one of the following procedures as needed according to your situation.
Clean Up Your Disk
If your disk doesn’t have ample space to accommodate the installation then you should free up some of the space on your disk to make sure the Windows can be installed on it.
You can also reinstall the Windows on another disk that has sufficient space.
Get Rid of the Third Party Driver
If the error 0x0000001e message gives you the name of the driver due to which the installation process is being halted, then get rid of that driver by disabling it or removing it.
If the problem is resolved by this then you should contact the manufacturer of the third-party driver and ask them about any newer versions of the driver that wouldn’t conflict with the installation of Windows.
Upgrade System BIOS
Upgrading your system BIOS is something that you can’t do on your own. You will need to find out more about how you can upgrade. For this, you should contact either your PC’s manufacturer or your motherboard’s manufacturer.
If nothing else works, you can always make use of the Microsoft Debugging Tools which will provide you ample information about the error message.
You will find the Debugging Tools and further information about them including the downloading and installation process on Microsoft’s website.
Windows 11 will bring some old applications in new looks and some will get additional features as well. One of the old apps that will get new stuff is a calculator.
The calculator was always a way to go application for quick calculations but Microsoft aims to expand on that and make the calculator a little more useful.
The first thing that you will notice is the calculator look, the calculator has now an application theme setting that allows you to change the look of the application. It comes in standard and professional mode as usual but this time calculator will come with features that will enable it to handle some programming and engineering tasks.
The new calculator features a full graphing mode that lets you visually analyze a graph to identify key features. It also packs a deep converter that can switch between more than 100 units and currencies.
Other Windows 11 apps
A new snipping tool will be delivered with this latest update as well packed with new functionality. We have covered new features of the snipping tool in another article, if you are interested you can find the article here: https://errortools.com/windows/new-snipping-tool-redesigned-in-windows-11/
Mail and Calendar apps will also get a redesign, sadly all redesign that they will include will be of visual nature to fit in the overall Windows 11 theme, functionality will remain the same.
Blackouts are one of the most annoying things that can happen in the modern age. We have all learned to depend on electricity, maybe too much, so having a backup plan in these unpleasant situations is necessary. Here are some good gadgets for these kinds of situations.
Power Bank
The fully charged power bank is a great item that could fill up your phone or tablet. If it is a larger power bank it could fill them up all the way to the top several times and having charged phone or tablet can help greatly with some fun during dark times. The power bank can also be used to fill up other gadgets on this list so if the power outage is expected to last longer perhaps it would be wiser not to waste it on phone/tablet games.
Portable Generator
If the power bank is too short-lived for your needs, a portable generator is always a good option since it can provide power for longer time periods. The solar generator is what we recommend because it is much cheaper to produce electricity but it is limited if a power surge comes at night, one on gasoline is more stable and practical but it costs more to produce electricity.
Portable Solar Charger
One more electric-producing device on the list, this one however is aimed at charging your phone, tablet, or laptop by harvesting Sun's energy and turning it into valuable electricity for your devices. Fully silent and easy to operate this is a great tool for power outrage. It will not be able to produce electricity for smaller house appliances but for basic phone/tablet/laptop needs it will suffice.
Panic light
Self-sustained with its own battery, panic lights are great assets for lightning when power is not present. They can turn automatically when the circuit detects that power is missing but can be also manually switched on or off. There are many versions of panic lights ranging from the light they produce to how long can they work so picking the right one will depend entirely on your home size and needs.
USB Headlamp
If you lack panic lights USB headlamp is a great choice to light your way and it works even better than a flashlight, although a flashlight is also a great tool, a headlight will provide you with free arms to do various things that you would not be able to by holding a flashlight. Modern headlights come with LED lights so they provide a good amount of light with small power consumption and they can be recharged in a power bank, solar charger, or generator.
LED lantern
LED Lantern is a gadget sitting somewhere between a headlight and a panic light, it offers around the same light amount as a panic light but you can carry it around with you. Of course, it will drain its battery faster than a panic light and it will still need to carry around but it can offer some good options when you need it, like taking it with you to the toilet.
Electric Lighter
An electric lighter is also one of the things that you will need, it can ignite candles, paper, stoves, etc. Its battery is usually enough for extensive use and there are small chances that it will need to be recharged. Having matches is also smart, just in case.
Solar Oven
Great gadget when outbreaks last long or when you get hungry. Not all households have gas ovens so a Solar oven is a great tool to keep you full of food. Granted it will not be on par in speed and quality with a regular oven but when it is the only option it will suffice.
In this post, we will discuss what the “ bootres.dll ” file is in the Windows 10 operating system and where it’s also located. In addition, you will also be guided on how you can replace or fix a corrupt bootres.dll file which may prevent you from booting to your Windows desktop and will display an error message instead saying, “Boot critical file resourcescustombootres.dll is corrupt”. There are times when this error might also boot your PC to the Automatic Repair screen.
DLL files, also known as Dynamic Link Libraries are external parts of applications that run on Windows as well as other operating systems. Almost all applications are not complete in themselves and store code in different files so if there is a need for the code, the related file being called by a certain application is loaded into memory and used. If the software or the operating system is unable to find the concerned DLL file or if the DLL file ends up getting corrupted, you will most likely get an error message.
In case you don’t know, the bootres.dll file is a critical system OS file, size 90KB, and can be found in the Windows folder. It is a part of the Boot Resource Library and portrays an important role in making sure that your PC boots properly. So if it ends up getting corrupted, your PC may fail to boot correctly and you’ll get an error message instead. To resolve this problem, here are some suggestions that might help.
If your PC automatically boots to the Automatic Repair screen, you need to click on that option to run the Automatic Repair. If it doesn’t work, you have to boot into the Advanced Startup options to manually access and run the Automatic Repair. Once you’re in the Advanced Options, you will be able to:
Run Automatic Repair
Use System Restore
Start Windows from an external device
Access Command Prompt
And use the System Image Recovery to restore Windows from a Factory image.
If the Automatic Repair fails to fix the problem, you may have to use System Restore or the Command Prompt to carry out further troubleshooting steps. Refer to the guide below to use these tools.
Option 1 – Try running the System File Checker in Safe Mode
Running the System File Checker is the safest way to fix DLL file missing or corrupted errors are thrown up by the Windows operating system as it could give you better results.
System File Checker or SFC is a built-in command utility that helps in restoring corrupted files as well as missing files. It replaces bad and corrupted system files with good system files that might be causing the Machine Check Exception BSOD error. To run the SFC command, follow the steps given below.
Boot your PC into Safe Mode.
Tap Win + R to launch Run.
Type in cmd in the field and tap Enter.
After opening Command Prompt, type in sfc /scannow
The command will start a system scan which will take a few whiles before it finishes. Once it’s done, you could get the following results:
Windows Resource Protection did not find any integrity violations.
Windows Resource Protection found corrupt files and successfully repaired them.
Windows Resource Protection found corrupt files but was unable to fix some of them.
Option 2 – Try running the DISM tool to repair the System Image
To repair the System Image, you need to use the DISM or Deployment Imaging and Servicing Management tool. The DISM tool is another command-line tool in the Windows operating system that could help users fix various corrupted system files. To use it, follow these steps:
Open the Command Prompt as admin.
Then type in this command: Dism /Online /Cleanup-Image /RestoreHealth
Do not close the window if the process takes a while as it will probably take a few minutes to finish.
Note: The command you executed will check for Windows component store corruption and will restore its good health. The scan might take up to 15 minutes. Once it is done, you have to restart your computer.
Option 3 – Try to repair the MBR and rebuild BCD
To repair the MBR and rebuild BCD, follow these steps:
The problem might boil down to the Master Boot Records since the previous case has already been isolated. There are times when the Master Boot Records can get corrupted and even though it is a serious issue, it can still be rectified by repairing the Master Boot Record.
Tao the F8 key while booting the system to go into the Windows Recovery Menu.
Next, click on Troubleshoot.
Then click on the Advanced options to get into the Automatic Repair menu.
After that, you have to use the bootrex.exe tool, so click on the command prompt and type in the following commands, one after the other:
bootrec /RebuildBcd
bootrec /fixMbr
bootrec /fixboot
Exit and then go ahead and restart your PC.
Option 4 – Try running the ChkDsk utility
One of the best options you must try is running chkdsk as it will check the disk for any errors and repair them automatically. To use it, follow these steps:
Boot your PC to the Advanced Options menu and click on Command Prompt.
Once you’ve opened an elevated Command Prompt, type in the following command and tap Enter to execute it:
chkdsk C: /f /x /r
Note: “C” is the drive root drive so it could be changed if you’re using a different one.
Option 5 – Try resetting your PC
Go to the Advanced Options > Troubleshoot > and select the Reset This PC option from the menu and then select Keep my files.
One of the most popular and most used web browsers commonly used by Windows users is Google Chrome. This well-known web browser has been introducing various features recently in order to stay at the top. However, it makes the web browser a lot more complex and thus prone to errors. Although this may not be a big deal, it can be quite annoying as it can interrupt your web browsing.
There are various errors that can come up with this level of complexity of the web browser. One of these errors is the “This site can’t be loaded from the cache, ERR_CACHE_MISS” error message that can suddenly appear while you browse the web using your Google Chrome browser on your Windows 10 PC.
Take note that when you encounter this particular error, there really is no direct fault in the Chrome browser as there are also issues with caching the website data locally in the computer. Moreover, this error can also occur when a website is coded in an incorrect manner or if there are some browser extensions or toolbars that are in conflict with the proper functioning of the website.
To fix the ERR_CACHE_MISS error in Google Chrome, refer to the possible solutions laid out below.
Option 1 – Try clearing browser data
There are times when some data in the browser is conflicting with the loading of the website and triggers errors like ERR_CACHE_MISS. And so you can try to clear your browser’s data. This might be a very basic solution but oftentimes it works in fixing this kind of error in Google Chrome. Follow the steps below to clear the data in your browser.
Open your Google Chrome browser.
After that, tap the Ctrl + H keys. Doing so will open a new panel that allows you to delete the browsing history and other data in your browser.
Now select every checkbox that you see and click on the Clear browsing data button.
Then restart your Chrome browser and check if you can now open any website or not.
Option 2 – Try using the Developer Tools
You can also try using the Developer tools in Google Chrome to help you fix the ERR_CACHE_MISS error. Refer to the steps below to do so.
Open Google Chrome.
Tap the Ctrl + Shift + I keys on your keyboard and then tap the F1 key to open the Settings tab inside the Chrome Developer Tools.
Next, select the Disable cache option while DevTools is open and apply those settings.
After that, refresh your browser and check if the entries you’ve seen previously in the Network tab are gone.
Now try to load the same webpage again and see if the problem is resolved.
Option 3 – Reset Winsock, TCP/IP & Flush DNS
Resetting Winsock, TCP/IP, and flushing DNS might help you resolve the ERR_CACHE_MISS error. To do so, follow these steps:
Right-click on the Start button and click on Command Prompt (administrator) so you can pull up an elevated Command Prompt.
After that, execute each one of the commands listed below. And after you typed in one after the other, you have to hit Enter.
netsh winsock reset – type in this command to reset Winsock
netsh int ip reset resettcpip.txt – type in this command to reset TCP/IP
ipconfig /flushdns – type in this command to flush the DNS cache
Next, restart your PC and check if the problem’s fixed.
Option 4 – Get rid of any conflicting browser extensions
Open Chrome and press Alt + F keys.
Go to More tools and click Extensions to look for any suspicious browser extensions or toolbars.
Click the Recycle bin and select Remove.
Restart Chrome and press Alt + F keys again.
Proceed to On Startup and mark Open a specific page or set of pages.
To check if the browser hijacker is still active, click Set pages, if it is active, overwrite the URL.
Note: If removing the browser extensions or toolbars didn’t work, you can also try to reset your Google Chrome browser.
Open Google Chrome, then tap the Alt + F keys.
After that, click on Settings.
Next, scroll down until you see the Advanced option, once you see it, click on it.
After clicking the Advanced option, go to the “Restore and clean up option and click on the “Restore settings to their original defaults” option to reset Google Chrome.
Valve has released a big update to its online store and distribution platform Steam. Among typical bugs fixing and making the user experience a little more fluid, we have received some major updates as well. Please take note that you need to update Steam itself to the latest version in order to get new features.
Storage management Page update
The storage management page has received a complete redesign and UX overhaul and it is now much easier to manage your game libraries and create new ones. The page itself looks and feels a little console more like but thanks to that it offers a much easier and clearer look and feel.
Another thing with the Steam store management page is the ability to move installation files from one location to another. Let’s say that you have two or more hard disk drivers in your machine and that you have SSD that you use for running stuff since it is fast and larger and slower one for storage. Now you can easily and quickly move one installation from one to another in order to take advantage of your faster SSD for quicker LOAD game times without making a new installation.
Steam Download page improvements
The download page has also received some love from Valve by enabling us to now see the installation progress. So far on the download page of Steam, you would only get download progress but it has been updated to show installation progress after download as well now making it more straightforward and giving you a general idea of how much more time there is to wait in order to start gaming.
Also, you can now drag and drop items in the download bracket to reorder download orders or place them as active downloads to start downloading right away.
If you are trying to connect to the internet using a Wi-Fi, Ethernet, or a Wi-Fi connection and you suddenly encounter Error 633, then read on as this post will guide you on how you can fix this problem in your Windows 10 computer.
According to users who encountered the same problem, when they try to connect to the internet, an error pops up that states, “The modem or other connecting device is either already in use or not appropriately configured”. This error is the VPN Error 633 which indicates that the modem is malfunctioning due to some broken configuration. It is possible that this broken configuration is caused by the WAN Miniport device which is associated with your preferred VPN protocol. It could also be due to the TCP port that’s required for the VPN connection to work might be used by another application.
There are instances when Error 622 could occur when there are multiple internet connections set up on one device or when the communication port is exploited by another program. It could also occur when the affected modem is not bound to one specific device. Thus, any model and computer can be affected by this problem.
The first and basic thing you can do to fix the VPN Error 633 is to turn off or unplug the modem your computer is using and then plug it back in to see if the problem is fixed. If not, then there are several other potential fixes you need to check out to resolve the problem. You can try the suggestions provided below and see if any of them help.
Option 1 – Run the Network Adapter Troubleshooter
Open the Search bar on your computer and type in “troubleshoot” to open the Troubleshoot settings.
Next, scroll down and select the “Network Adapter” option from the right pane.
Then click on the Run Troubleshooter” button.
After that, your computer will check for any possible errors and will pinpoint the root cause of the problem if possible.
Option 2 – Try to explicitly reserve the TCP port
The next thing you can do to fix the error is to reserve the TCP port explicitly and to do that, follow the steps below.
Tap the Win + R keys to pull up the Run dialog box and type “Regedit” in the field and hit Enter to open the Registry Editor.
Next, navigate to this registry path: HKEY_LOCAL_MACHINESYSTEMCurrentControlSetServicesTcpipParameters
After that, follow the path New > Multi-String Value on the edit menu and rename the multi-string value as “ReservedPorts” and then double click on it.
Now in the value data of ReservedPorts, input “1723-1723” and click OK to save the changes made.
Close the Registry Editor and restart your PC. Once your computer has restarted, check if the VPN Error 633 is fixed or not.
Option 3 – Try to use the netstat command
In the Windows Start Search, type “cmd” and from the search results that appear, right-click on Command Prompt and then select the “Run as administrator” option.
After opening Command Prompt as admin, type this command and hit Enter: netstat –aon
After that, the output will be displayed and from there, look for the process ID or PID of any program that uses the TCP port 1723 on your computer.
Next, type this next command and hit Enter: taskkill /PID PID /F
Once the command has been executed, the concerned program will be forced to close and the TCP port 1723 will be freed up. Keep in mind that the taskkill command ends the process corresponds to the process ID number and the given command above, “/F” option is used to end the program’s process forcefully.
Now restart your computer and after that, the concerned program should start using a TCP port other than 1723 which leaves the TCP port 1723 free for your internet device to use.
Option 4 – Remove any irrelevant internet device programs
You could also try removing any irrelevant device programs since it is possible that any of these programs could be the one that’s causing the modem to malfunction. These irrelevant programs could be an internet booster or third-party tools that comes with the modem and so on. These programs are not necessarily needed for your modem to function. Thus, if you want to fix the VPN Error 633, you can try uninstalling them and see if it fixed the error.
Option 5 – Update the Network Adapter drivers
You might also want to update the Network Adapter drivers by following these steps:
Tap the Win + R keys to launch the Run window and then type in the “devmgmt.msc” command and hit Enter to open the Device Manager window.
Under the Device Manager, you will see a list of drivers. From there, look for the Network Adapters and expand them.
Then right-click on each one of the Network drivers and update them all.
Restart your PC and see if it helped in fixing the BSOD error.
Note: If updating the network drivers didn’t help in fixing the VPN Error 633, you can also try to uninstall the very same drivers and restart your Windows 10 PC. After that, the system itself will reinstall the drivers you just uninstalled. Alternatively, you can also download and install the drivers from the manufacturer’s website directly.
To reinstall the network adapter driver, refer to these steps:
Open the Devices Manager from the Win X Menu.
Then locate the device drivers and right-click on them to open the Properties.
After that, switch to the Driver tab and click on the Uninstall Device button.
Follow the screen option to completely uninstall it.
Finally, restart your computer. It will just reinstall the device drivers automatically.
This post will walk you through fixing the rtwlane.sys Blue Screen error. This kind of BSOD error belongs under the category of the “DRIVER IRQL NOT LESS OR EQUAL” Stop errors. If you encounter this kind of Stop error then it means that a kernel-mode driver tried to access pageable memory at a process IRQL that was too high.
The main issue with the rtwlane.sys Blue Screen error has something to do with the Realtek PCI-E Wireless LAN PCI-E NIC driver. In other words, it has some issues with the wireless card of your computer which is built by Realtek. And since it this error concerns your wireless card, you might also experience some connectivity problems with your computer as the wireless card refuses to find any network connections and even randomly disconnects. To resolve this problem, you need to refer to the given options below.
Option 1 – Run the Blue Screen Troubleshooter
The Blue Screen troubleshooter is a built-in tool in Windows 10 that helps users in fixing BSOD errors like rtwlane.sys Blue Screen error. It can be found on the Settings Troubleshooters page. To use it, refer to these steps:
Tap the Win + I keys to open the Settings panel.
Then go to Update & Security > Troubleshoot.
From there, look for the option called “Blue Screen” on your right-hand side and then click the “Run the troubleshooter” button to run the Blue Screen Troubleshooter and then follow the next on-screen options. Note that you might have to boot your PC into Safe Mode.
Option 2 – Try to update or rollback your Network driver
If you have updated the driver software as of late and you suddenly got this BSOD error, you might have to roll back the device driver – in other words, switch back to the previous working version. To do that, follow these steps:
Tap the Win + R keys to launch the Run window and then type in the “MSC” command and hit Enter to open the Device Manager window.
Under the Device Manager, you will see a list of drivers. From there, look for the Network Adapters and expand it.
From the list of Network Drivers, look for “Realtek <Model> Wireless LAN 802.11n PCI-E NIC” and then right-click on it and select Update Driver.
Restart your PC and see if it helped in fixing the BSOD error.
Note: If you see any of the following entries under the Network drivers, you might want to download their latest available versions from each one of their manufacturer’s websites.
Realtek High-Definition (HD) Audio Driver
Realtek Card Reader Driver
Realtek Local Area Network (LAN) Driver
On the other hand, if updating the Network driver didn’t help, you can also try to roll back to its previous version.
Open the Device Manager again and then look for Network Drivers.
Next, select Realtek <Model> Wireless LAN 802.11n PCI-E NIC from the list of Network Drivers and then double click to open a new mini window.
After that, make sure that you’re on the Driver tab and if you are not, just navigate to it then click the Roll Back Driver button to switch back to the previous version of the Realtek driver.
Now restart your computer to successfully apply the changes made.
Option 3 – Try running the System File Checker Scan
The SFC or System File Checker scan could detect and automatically repair damaged system files that could be causing the Netwtw04.sys failed BSOD error. SFC is a built-in command utility that helps in restoring corrupted files as well as missing files. It replaces bad and corrupted system files with good system files. To run the SFC command, follow the steps given below.
Tap Win + R to launch Run.
Type in cmd in the field and tap Enter.
After opening Command Prompt, type in sfc /scannow
The command will start a system scan which will take a few whiles before it finishes. Once it’s done, you could get the following results:
Windows Resource Protection did not find any integrity violations.
Windows Resource Protection found corrupt files and successfully repaired them.
Windows Resource Protection found corrupt files but was unable to fix some of them.
If you were trying to print some documents but encounter the HIDCLASS.SYS Blue Screen error instead, then you’ve come to the right place as this post will guide you in fixing any Blue Screen errors related to the HIDCLASS.SYS file. HIDCLASS.SYS is a Windows operating system driver file. HID or Human Interface Device includes Keyboards, mice, and other input devices.
HIDCLASS.SYS is a critical system driver file that is responsible for connecting different kinds of devices all over the system, including the functionality where a Word Processor can access the printer to print documents. This file comes under the category of kernel-mode device drivers and if the driver fails, it can result in a Stop Error. There are a lot of Stop errors related to the HIDCLASS.SYS file, such as:
KMODE EXCEPTION NOT HANDLED
SYSTEM SERVICE EXCEPTION
DRIVER POWER STATE FAILURE
PAGE FAULT IN A NONPAGED AREA
SYSTEM THREAD EXCEPTION NOT HANDLED
DRIVER VERIFIER IOMANAGER VIOLATION
IRQL NOT LESS EQUAL
The fixes for the Blue Screen errors related to the HIDCLASS.SYS files are pretty simple but before you troubleshoot the problem using these fixes, make sure that you boot your computer into Safe Mode with Networking first. After that, get started on these tips:
Option 1 – Update or rollback or disable concerned device drivers
To fix the HIDCLASS.SYS error, you can also try to roll back, or update, or disable the concerned device drivers.
Open the Devices Manager from the Win X Menu.
Then locate the device drivers particularly the ones that are under the sections of Keyboard, Mouse, USB, and HID Drivers.
Next, right-click on them to open the Properties.
After that, switch to the Driver tab and click on the Uninstall Device button.
Follow the screen option to completely uninstall it.
Finally, restart your computer. It will just reinstall the device drivers automatically.
Note: You can install a dedicated driver on your computer in case you have it or you could also look for it directly from the website of the manufacturer. On the other hand, if you have just updated your device drivers then you need to roll back the drivers to their previous versions or disable them.
Option 2 – Check for any incompatible devices
The next thing you can do to troubleshoot the HIDCLASS.SYS Stop error is to plug in and out each one of the different hardware that is connected to your computer. Doing so will help you determine which one of the hardware is the one that’s triggering the error to pop up. You will also know what hardware drivers or anything else that could be causing this error which includes external devices like mouse, keyboard, printer, as well as internally attached components like the Graphics card and so on.
Option 3 – Try running the ChkDsk utility
Running the ChkDsk utility can also help you resolve any Blue Screen errors related to the HIDCLASS.SYS file. To run this tool, refer to these steps:
First, open This PC and right-click on your operating system partition for Windows.
Next, click on Properties and navigate to the Tools tab.
Then click on Check under the Error Checking section.
After that, a new mini window will be opened and from there click on Scan drive and let it scan your disk drive partition for any errors and then restart your computer.
Option 4 – Try checking the Memory for any errors
Tap the Win + R keys to open Run and type exe and hit Enter to open the Windows Memory Diagnostic Tool.
After that, it will give two options such as:
Restart now and check for problems (Recommended)
Check for problems the next time I start my computer
Once your computer has restarted, perform a basic scan or you could also go for the “Advanced” options such as “Test mix” or “Pass count”. Simply tap the F10 key to start the test.
Note: After you select the option, your PC will restart and check for memory-based issues. If it finds any issues, it will automatically fix them.
Option 5 – Run the System File Checker
System File Checker or SFC is a built-in command utility that helps in restoring corrupted files as well as missing files. It replaces bad and corrupted system files with good system files. To run the SFC command, follow the steps given below.
Type “cmd” in the Start search and then right-click on the appropriate search result.
Next, select “Run as administrator” to open Command Prompt with admin privileges.
After opening Command Prompt, type in sfc /scannow
The command will start a system scan which will take a few whiles before it finishes. Once it’s done, you could get the following results:
Windows Resource Protection did not find any integrity violations.
Windows Resource Protection found corrupt files and successfully repaired them.
Windows Resource Protection found corrupt files but was unable to fix some of them.
Now restart your computer and see if the Blue Screen error is fixed or not.
The 0x80040600 error is a common error that becomes particularly distressing for Outlook users.
This error prevents users from sending or receiving emails through Microsoft Outlook. Users may also encounter this problem while altering an entry on the calendar or adding a new contact. There is no obvious message that is displayed to the user when this error occurs.
However, Outlook displays a vague message that includes the code 0x80040600.
Solution
Download available to recover all lost Outlook data
Error Causes
The primary cause of this error is a problem with the PST file. When the PST file is corrupt, missing, or damaged, this error occurs at once. The PST file is essentially an important file that stores crucial and personal information of an individual’s accounts.
Sometimes this error is because the file is corrupt while at other times, the reason that it occurs is that the file is too full to accommodate any further information.
Irrespective of the causes of this problem, it is important that this error is promptly fixed to ensure the proper and uninterrupted functioning of Outlook in the future.
Further Information and Manual Repair
The error occurs because the Outlook application encounters problems while attempting to receive, send or read emails. Some solutions that can work wonders and help you get rid of the problem are outlined below.
As soon as the error appears, the first solution is to restart the system. This is the first thing that must be done because a lot of times, these errors can be removed by simply restarting the system. This will, hence, save the user the inconvenience of manually fixing this problem.
If restarting the system doesn’t resolve the problem and the error message displays again, it is advised the user makes use of the ‘Inbox Repair Tool’.
This is the most commonly used and effective approach to fixing a corrupt PST file. The procedure to remedy this Personal Storage Table file or PST file is listed below.
Go to the start menu. Type Run and launch the Inbox Repair Tool by typing the following path: drive name: Program FilesCommon FilesSystemMapiLocale IDscanpst.exe. Now click Ok. A pop-up message will appear. Enter the file name and path of the damaged PST file. Now click on the Start button. Here it is important to mention that the inbox repair tool may take a long time depending upon the file size and the amount of data that has to be recovered. However, it is the most effective way of fixing this problem.
One of the primary packages that install the Windows Media Player is the Media Feature Pack among other related files that are needed by the associated software products. And one of the essential DLL files in that package is the mfplat.dll file which is needed by various games and streaming services. So if this DLL file goes missing, you will most likely encounter any of the following error messages:
“mfplat.dll missing”
“The application failed to start because mfplat.dll was not found.”
“The program can’t start because mfplat.dll is missing from your computer.”
In other circumstances, the Media Feature Package does not come pre-installed with the main Windows package especially for those who use Windows N, thereby causing the error to pop up. The main cause of this problem is that users who use Windows 10 N do not have the Media Feature pack pre-installed with the installation package. Aside from that, the installation package could go missing after a few Windows Updates or if you have uninstalled it by accident. To resolve this problem, you need to check out each one of the given options below.
Option 1 – Try to enable Media Playback via Command Prompt
If you encounter the mfplat.dll missing error when you attempt to run PLEX or other similar streaming service and you’ve already verified that the Media Feature Pack is indeed installed, you might want to try enabling it using an elevated Command Prompt. There are cases when a particular Windows Update ends up disabling the feature and creates the grounds which results in the mfplat.dll missing error. Thus, you can have to enable the feature via Command Prompt.
Tap the Win + R keys to open the Run dialog box.
Then type “cmd” in the field and hit Enter to open an elevated Command Prompt.
Next, click on Yes if a User Account Control prompt pops up.
After opening Command Prompt, copy and paste the following command and hit Enter to execute it:
Close Command Prompt and then open the app once again to check if the problem is now fixed.
Option 2 – Try installing the Media Feature Pack for Windows 10 N version
As mentioned, the Windows 10 N version does not come with Windows Media Player. Meaning to say, the Media Feature Pack is also not installed by default or won’t be updated by the Windows Update component. So if you are not quite sure what Windows 10 version you currently have installed, refer to these steps:
Tap the Windows key + S and then type “about” in the search box.
From the search results, click on the “About your PC” to open the About tab of the Settings app.
Afterward, scroll down to the Windows specifications and check your Windows version under Edition.
Note: If you have verified that your PC is using the Windows 10 N version, you need to install the appropriate Media Feature Pack for your computer. How? Refer to the steps below:
Click this link to download and install the Media Feature Pack from Microsoft’s official website.
Upon installation, select the edition you want to install using the drop-down menu and then click on Confirm. Take note that there are few reasons why you’d want to install the older version since most streaming services like PLEX and most games usually require version 1803.
After that, wait until the request is validated. The download should begin in a few minutes automatically.
Once the download is completed, open the installation executable file and follow the next on-screen instructions to install the Media Feature Pack on your computer.
Restart your computer. After your computer has rebooted, open the application where you’re getting the mfplat.dll missing error and then check if the problem is now fixed.
Option 3 – Try to extract a copy of the mfplat.dll file from the windows.old directory
If you encounter the error shortly after you just upgraded to Windows 10 from an older version, the best thing you can do to resolve the problem is to use windows.old directory to fetch an old copy of the mfplat.dll file. To do so, follow the steps below.
Go to the Windows drive and then look for the windows.old directory where it preserves a copy of your old operating system as well as associated files in case something goes out of hand during the upgrade process.
After that, open the windows.old folder and then go to the syswow64 folder.
Next, from the syswow64 folder, copy the mfplat.dll file and paste it to C:/windows/syswow64.
Restart your computer and check if the error is now resolved or not.

 If your disk doesn’t have ample space to accommodate the installation then you should free up some of the space on your disk to make sure the Windows can be installed on it.
 Windows 11 will bring some old applications in new looks and some will get additional features as well. One of the old apps that will get new stuff is a calculator.
The calculator was always a way to go application for quick calculations but Microsoft aims to expand on that and make the calculator a little more useful.
The first thing that you will notice is the calculator look, the calculator has now an application theme setting that allows you to change the look of the application. It comes in standard and professional mode as usual but this time calculator will come with features that will enable it to handle some programming and engineering tasks.
The new calculator features a full graphing mode that lets you visually analyze a graph to identify key features. It also packs a deep converter that can switch between more than 100 units and currencies.
Windows 11 will bring some old applications in new looks and some will get additional features as well. One of the old apps that will get new stuff is a calculator.
The calculator was always a way to go application for quick calculations but Microsoft aims to expand on that and make the calculator a little more useful.
The first thing that you will notice is the calculator look, the calculator has now an application theme setting that allows you to change the look of the application. It comes in standard and professional mode as usual but this time calculator will come with features that will enable it to handle some programming and engineering tasks.
The new calculator features a full graphing mode that lets you visually analyze a graph to identify key features. It also packs a deep converter that can switch between more than 100 units and currencies.


 Storage management Page update
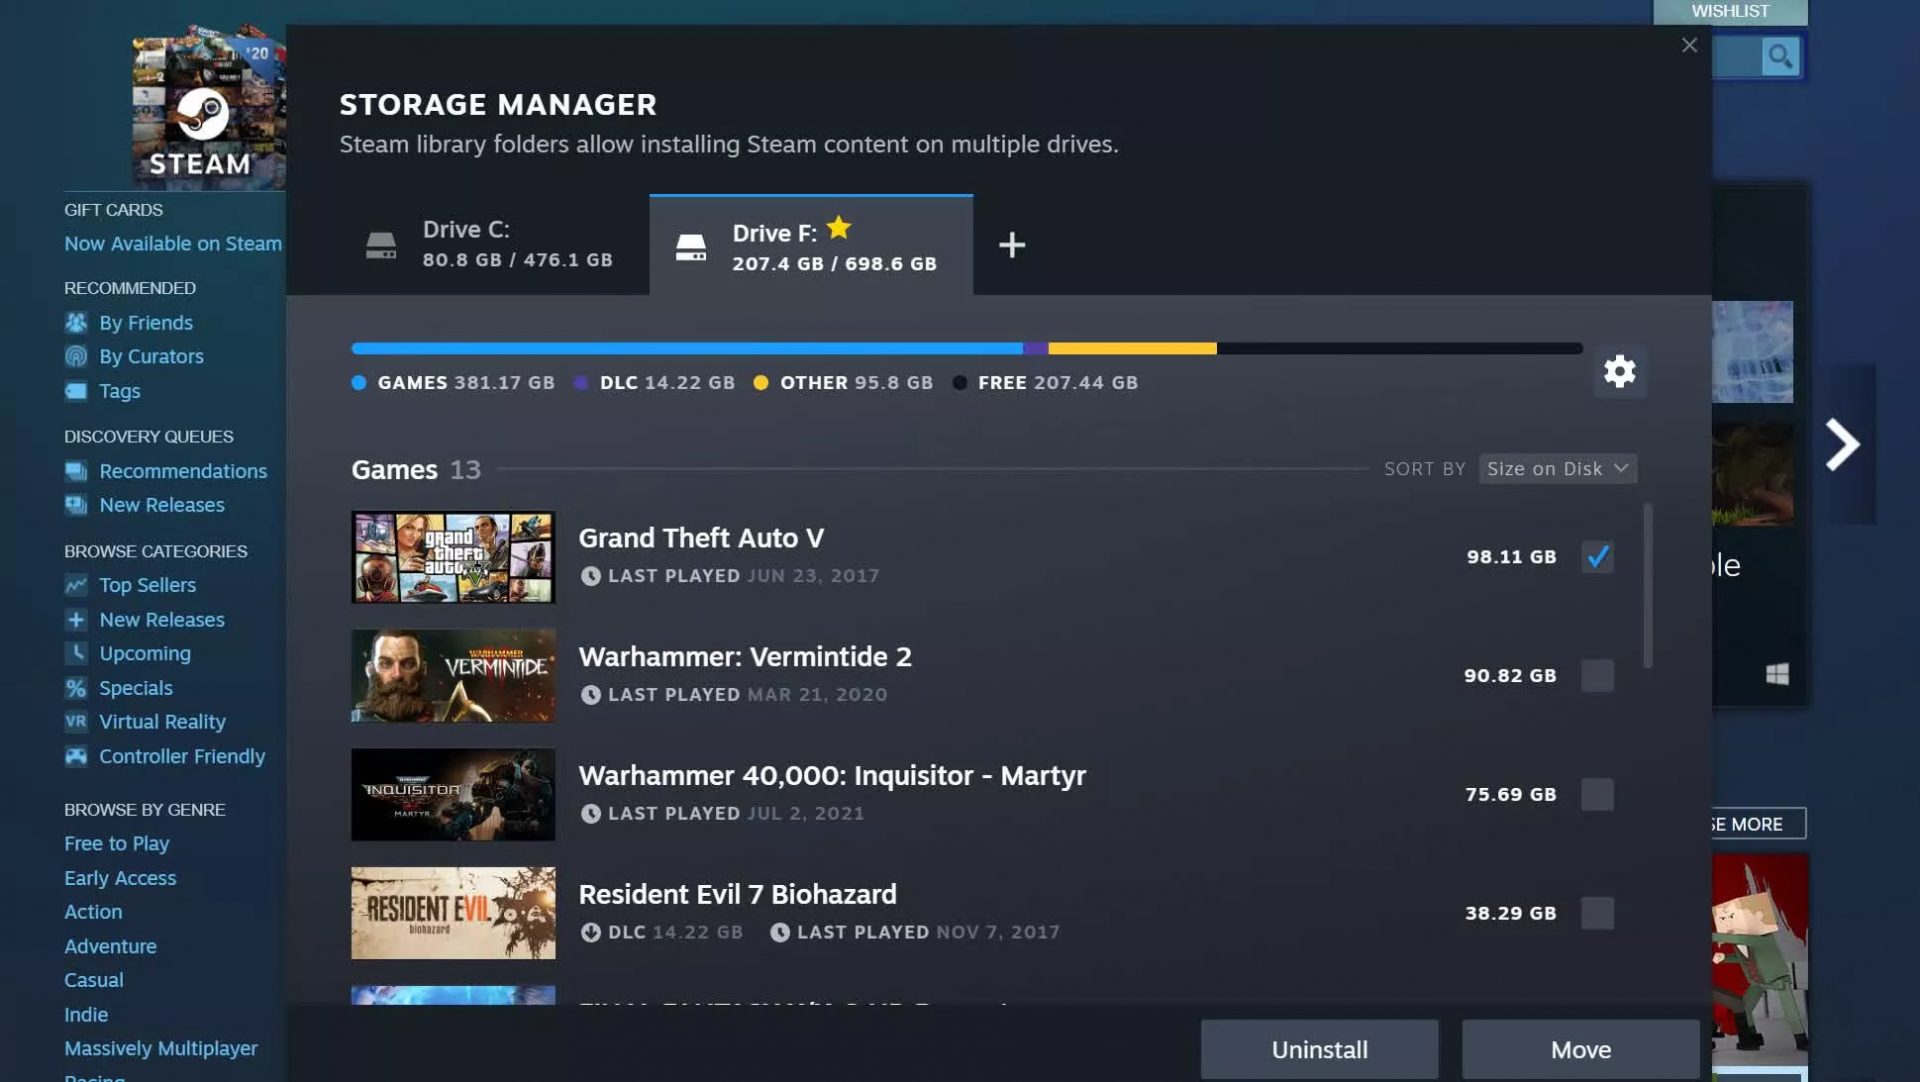 Another thing with the Steam store management page is the ability to move installation files from one location to another. Let’s say that you have two or more hard disk drivers in your machine and that you have SSD that you use for running stuff since it is fast and larger and slower one for storage. Now you can easily and quickly move one installation from one to another in order to take advantage of your faster SSD for quicker LOAD game times without making a new installation.
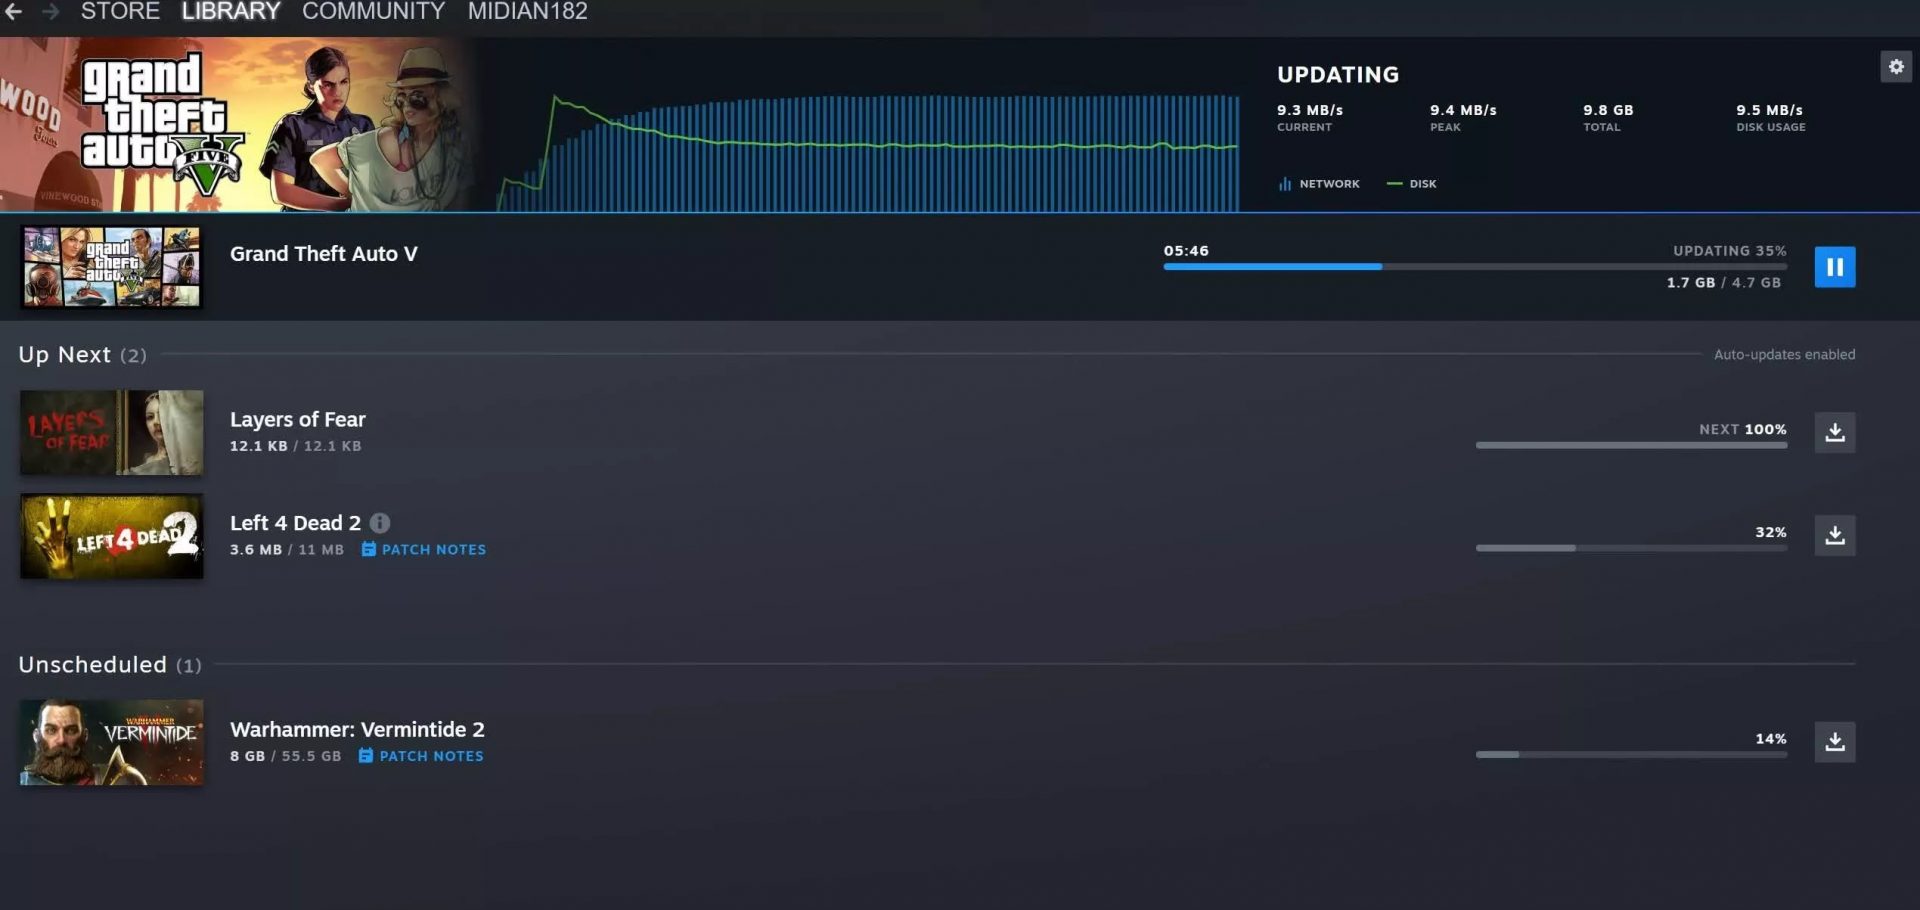 Also, you can now drag and drop items in the download bracket to reorder download orders or place them as active downloads to start downloading right away.