What Is Phishing And How Can You Protect Yourself From It?
Ever gotten an e-mail offer that seemed just a little bit too good to be true? Might’ve been a phishing attempt! These are everywhere and can come in many different forms.
So what’s phishing exactly, how can you detect it and how can you keep safe?
What is phishing?
Phishing (pronounced like fishing) is a type of cyberattack that tricks the user into trusting the source and revealing sensitive information. Fishing being the perfect analogy, the bait is a legitimate-looking site, e-mail or file and when you take a bite, your identity, banking information and much more can be revealed and stolen.
Credit Anne Nygård on Unsplash
Some phishing attempts are incredibly obvious, others are super elaborate. Like with most types of malware, cybercriminals have become extremely well-versed in phishing and anyone can fall for it. To help you recognize and avoid it, we’ll take you through a couple of phishing types and give you tips on what to do if faced with them.
Phishing techniques
E-mail phishing
This is actually the most common type of phishing. A cybercriminal creates an e-mail containing stuff like attractive offers, legitimate-looking attachments or links and makes it appear as though it’s coming from a trusted source.
Credit Justin Morgan on Unsplash
For example, it looks like it’s coming from your bank or your favorite retailer. The logo looks legit and the structure of the e-mail seems familiar, so you might get tricked into clicking on whatever clickable content is in it.
Unfortunately this exposes your device to malware that hands your data off to the hacker, who can decide what to do with it further.
SMS and social media phishing
Like the above example, you could be approached with lucrative offers or links via text messages or social media messages. Typically, the messages seem relevant to the user as they will be made to look like they’re related to apps or services you’re using.
Voice phishing
Voice phishing attacks are schemes that appear as though they’re coming from a credible number. Normally, you’ll get a call about something related to credit cards or taxes to get you into a state of worry, leading you to disclose personal information on the phone.
Spear phishing, whaling and BEC
Spear phishing normally targets specific individuals within a company who are likely to have access to sensitive data. Spear phishers spend time collecting information they can use to reach out to the individual looking as trustworthy as possible. They’ll typically lead with something relevant, for example mentioning an upcoming company event, and make a seemingly legitimate request.
Whaling is a more elaborate form of spear phishing, which targets people in even stronger positions such as executives or high-value individuals. The ultimate goal is to get them to transfer financial or other sensitive information that can be used to compromise the entire business.
Credit Azamat E on Unsplash
BEC, or Business e-mail compromise, is a specific spear phishing technique carried out via e-mail. While there are many ways this is done, most commonly you’ll see instances where the phisher poses as a CEO or similar executive, or as a lower-level employee in specific positions (e.g. sales managers or financial controllers).
In the first situation, the impersonator reaches out to employees requesting them to transfer certain files or pay invoices. In the second situation, the phisher takes control of the employee’s e-mail account and sends false instructions to other employees in order to obtain data and information from them.
What can you do?
There are many ways you can be aware and spot a phishing attempt. Here are some tips:
Always check the sender’s address in your e-mails, even when they seem to come from a familiar source.
In any instance where payment information is requested, be very, very careful.
If you are receiving attachments you never asked for and definitely didn’t expect, better not click on them.
Beware of content that transmits a sense of urgency (sales deals, urgent updates to login credentials, etc.).
Bad spelling and grammar are usually a telltale sign of phishing.
Links that look shortened (e.g. Bit.ly) or just suspicious in general - if you have a bad feeling, do not click on them.
If you are receiving threats, you probably shouldn’t be clicking on anything in that message.
Always examine first-time senders in detail.
Block suspicious e-mail addresses, numbers and social media accounts.
If you are receiving a coupon for free stuff… You aren’t.
If you’re being asked to update your payment details by a service you use, such as Netflix, chances are it’s an impersonator.
Those are some of the ways to identify and prevent phishing attacks. However, sometimes phishers disguise themselves a little too well or a misclick happens and there you go - you’ve been exposed to malware.
Credit FLYD on Unsplash
This won’t happen if you invest in powerful protection software from the get-go, though. A good antivirus program like Bitdefender will keep you safe from becoming a victim of phishing scams. In fact, it will protect you from malicious attacks overall.
Be it your household or your business you’re concerned about, there are a bunch of different packages and options available, providing different kinds of cybersecurity services. That’s the only way you can ever really be sure you aren’t at risk of a digital attack.
Summary
Have you ever been targeted by phishers and didn’t know that’s what it was until you read this article? Many can relate. Protect yourself before it’s too late!
Computer upgrades are the most common and most efficient ones. RAM upgrade is one of the easiest ones you can do and the most common ones but even as simple an upgrade as this one can cause certain issues.
If you are experiencing error 0164, memory size decreased after RAM upgrade we are offering you solutions on how to fix this particular error and get your computer back in working order.
Change BIOS settings
Enter your motherboard BIOS (usually by pressing the del key on startup)
Load BIOS defaults
Save changes and exit
If the Error 0164: Memory size decreased issue persists even after loading setup defaults, then it must be configured manually inside the BIOS.
Clear CMOS
Follow the instructions precisely:
Turn off all peripheral devices connected to the computer.
Disconnect the power cord from the AC power source.
Remove the computer cover.
Find the battery on the board. The battery may be in a horizontal or vertical battery holder or connected to an onboard header with a wire.
If the battery is in a holder, note the orientation of the + and – on the battery. With a medium flat-blade screwdriver, gently pry the battery-free from its connector.
If the battery is connected to an onboard header with a wire, disconnect the wire from the onboard header.
Hacker group recently came up with claims that they have stolen data from 100 million T-Mobile customers. T-Mobile has responded with confirmation it has been compromised and that over 40 million records were stolen, among them are not just present customers, but anyone who has applied for T-Mobile service as well as past accounts.
What has been stolen?
Report from T-Mobile states that stolen records included first and last name, date of birth, social security number, driver’s license & ID information. The company said that it has “no indication that the data contained in the stolen files included any customer financial information, credit card information, debit or other payment information.” Not really a reassuring statement meaning that they really do not know, but even if the statement is true, already stolen information is as much if even not more damaging and devastating as payment information.
What T-Mobile is planning to do now?
It is stated that the hole used for the hack has been addressed and closed so no more data can be stolen.
Considering people that had their personal information compromised, T-Mobile said it is planning to reach out to them and offer them two years of free identity protection through McAfee’s ID Theft Protection Service.
Additionally, T-Mobile recommends postpaid customers change their PIN by going online into their T-Mobile account or calling T-Mobile customer service by dialing 611 on their phone. The company also recommends a feature called Account Takeover Protection that prevents unauthorized individuals from stealing a phone number and porting it out of T-Mobile.
Finally, the company will publish a website “for one-stop information and solutions to help customers take steps to further protect themselves.”
Recently, a number of users reported an error in Google Chrome that says, “ERR_SOCKET_NOT_CONNECTED”. If you are one of these users, read on as this post will guide you in resolving this error. This kind of error in Chrome is kind of vague so it could be caused by a couple of factors like DNS server issues, Socket Pools, third-party plugins or extensions, and many more.
Whatever the cause may be, there are several options you can check out to resolve the problem. You can try to flush the Socket Pool or change the DNS address or remove unwanted extensions or reset your Google Chrome browser.
Option 1 – Try to flush the Socket Pool
Open Google Chrome and in the address bar, type “chrome://net-internals/”.
After that, select Sockets on the left side panel.
Next, select Flush socket pools from the right-side panel.
And once it’s done, restart your Chrome browser and check if the “ERR_SOCKET_NOT_CONNECTED” is fixed or not.
Option 2 – Try to change the DNS Server
In this option, you can try changing your current DNS settings to the Google Public DNS as it could also help in fixing the “ERR_SOCKET_NOT_CONNECTED” error. To do so, follow the steps below.
The first thing you have to do is right-click on the network icon in the Taskbar and select Network and Sharing Center.
Next, click on the “Change Adapter Settings” option.
After that, search for the network connection that you are using to connect to the internet. Note that the option might be “Wireless Connection” or “Local Area Connection”.
Right-click on your network connection and click on Properties.
Then select the new window to choose the “Internet Protocol 4 (TCP/IPv4)” option.
After that, click on the Properties button and click the checkbox in the new window for the option “Use the following DNS server addresses”.
Type in “8.8.8.8” and “8.8.4.4” and click OK and exit.
Option 3 – Get rid of any conflicting browser extensions
Open Chrome and press Alt + F keys.
Go to More tools and click Extensions to look for any suspicious browser extensions or toolbars.
Click the Recycle bin and select Remove.
Restart Chrome and press Alt + F keys again.
Proceed to On Startup and mark Open a specific page or set of pages.
To check if the browser hijacker is still active, click Set pages, if it is active, overwrite the URL.
Option 4 – Try to reset Google Chrome
Before you proceed, make sure that the Chrome browser is not running anywhere in the background via Task Manager. Once you’ve made sure that it’s no longer running, refer to these steps:
Tap the Win + R keys to open the Run dialog box.
Then type “%USERPROFILE%AppDataLocalGoogleChromeUser Data” in the field and tap Enter to open this location.
From there, look for the Default folder and then tap the Shift + Delete button and if a confirmation prompt appears, click on Yes.
After deleting the Default folder, open Google Chrome and click on the three vertical dots icon located in the top-right corner to open the menu.
Next, click on Settings and scroll down and then click on Advanced to open the Advanced Settings.
Then scroll down until you see the “Reset and clean up” section and click the “Restore Settings to their original defaults” option.
After that, you will see a confirmation box and from there, click on the Reset settings button to reset your Google Chrome browser.
The ntkrnlmp.exe file is a file associated with the Windows operating system’s NT Kernel and other system processes. It is also related to the “CRITICAL PROCESS DIED” error. So if you encounter a Blue Screen of Death error that’s related to this file, then you’ve come to the right place as this post will guide you in fixing the ntkrnlmp.exe Blue Screen error.
This kind of Blue Screen error might be caused by the file getting corrupted or infected with some malware. Aside from these causes, the error might also be due to the corruption and malfunction of the graphics card drivers.
Before you troubleshoot the problem, you might want to try performing System Restore especially if you tend to create a System Restore point every now and then. Performing System Restore could help you resolve the ntkrnlmp.exe Stop error. You can do this option either by booting into Safe Mode or in System Restore. If you are already in the Advanced Startup Options, just directly select System Restore and proceed with the next steps. And if you have just booted your PC into Safe Mode, refer to the steps below.
Tap the Win + R keys to open the Run dialog box.
After that, type in “sysdm.cpl” in the field and tap Enter.
Next, go to the System Protection tab then click the System Restore button. This will open a new window where you have to select your preferred System Restore point.
After that, follow the on-screen instructions to finish the process and then restart your computer and check if the problem is fixed or not.
If System Restore didn’t help, then proceed to the given options below.
Option 1 – Disable the C-states and EIST in the BIOS
The first thing you can do is try to disable the C-states and EIST in the BIOS. To do that, refer to the steps given below.
Go to the BIOS and from there look for an option named CPU Configuration which can usually be found under the Advanced menu.
Next, look for CPU Power Management and under that section, disable both the “Intel EIST” and “Intel C-state” options.
After you disable them, save the changes you’ve made and exit the BIOS.
Now restart your computer and check if the ntkrnlmp.exe BSOD error is now fixed.
Option 2 – Try to update, rollback or disable drivers
If the first option didn’t help in fixing the ntkrnlmp.exe Blue Screen error the next thing you can do is to roll back, or update, or disable device drivers in your computer. It is most likely that after you updated your Windows computer that your driver also needs a refresh. On the other hand, if you have just updated your device drivers then you need to roll back the drivers to their previous versions. Whichever applies to you, refer to the steps below.
Open the Devices Manager from the Win X Menu.
Then locate the device drivers and right-click on them to open the Properties.
After that, switch to the Driver tab and click on the Uninstall Device button.
Follow the screen option to completely uninstall it.
Finally, restart your computer. It will just reinstall the device drivers automatically.
Note: You can install a dedicated driver on your computer in case you have it or you could also look for it directly from the website of the manufacturer.
Option 3 – Configure the Driver Verifier Manager
The Driver Verifier Manager is another tool in Windows that could help you fix driver-related issues. And so if you want to fix the ntkrnlmp.exe Blue Screen error you need to use the Driver Verifier Manager:
Type in the keyword “Verifier” in the Cortana search box to search for Verifier in Windows 10.
After that, select the option “Create custom settings”.
Make sure that you have checked everything except the options “DDI compliance checking” and “Randomized low resources simulation”.
Next, select the option “Select driver names from a list” option.
Afterward, you have to select all the drivers from any unofficial or third-party provider. To simply put it, you have to select all the drivers that are not supplied by Microsoft.
Then click on the Finish button.
Open Command Prompt as administrator and execute this command – verifier /querysettings
The command you just executed will display the Driver Verifier settings so if you see any of the flags enabled boot your Windows 10 PC into Safe Mode.
Open the Command Prompt as admin again and run this command – verifier /reset
The command will reset the Driver Verifier. Once the process is done, restart your PC and check.
Option 4 – Run the Blue Screen Troubleshooter
The Blue Screen troubleshooter is a built-in tool in Windows 10 that helps users in fixing BSOD errors like ntkrnlmp.exe. It can be found on the Settings Troubleshooters page. To use it, refer to these steps:
Tap the Win + I keys to open the Settings panel.
Then go to Update & Security > Troubleshoot.
From there, look for the option called “Blue Screen” on your right-hand side and then click the “Run the troubleshooter” button to run the Blue Screen Troubleshooter and then follow the next on-screen options. Note that you might have to boot your PC into Safe Mode.
Next-generation of RAM, DDR5 supposed to hit shelves around late summer or fall in 2021if everything goes as planned.
Its goal is to increase speed and efficiency, wants to pack more memory in a single stick, and have better power management.
Hardware requirements for DDR5
Using the latest memory technology will require other hardware to follow certain standards and the first ones that will need to follow are CPUs and Motherboards.
Intel is already prepared with its Alder Lake CPUs that suppose to come out also later this year. AMD on other hand has not stated anything at the time of this writing but it is a bet that their next generation that will come in 2022 will have full support.
It is speculated that bot companies and their respective CPUs will have both support for DDR4 and DDR5.
A story about motherboards is a little different. Motherboards will support DDR4 or DDR5 memory banks, not both, so make sure that your motherboard will support the memory you plan on getting.
Capacity of memory
The goal and aim for the DDR5 memory stick are to reach a whopping 126GB per stack. This will be done by using a dual in-line module or DIMM enabling larger capacity.
That being said, the first modules that we will see are more likely to be 16GB as standard and 8GB as low entry ones.
Power consumption of DDR5 memory
The standard voltage that DDR4 operates under is 1.2V. DDR5 wants to lower this to 1.1V without sacrificing speed.
Voltage regulation on modules themselves will be now integrated on memory banks instead of leaving that to motherboards which will help to detect memory errors directly on the memory bank.
Speed of memory
The most common speed of DD4 memory banks is 2,666MHz, more expansive ones go from 3,600 to 4,000MHz.
DD5 aims to raise this bar to 4,800MHz and offers greater speed.
Should you get it right away?
Hardware is ever-evolving, we have PCIe 3.0 to PCIe 4.0, and taking into account that sometimes the newest tech can cause some unexpected behavior it is always the best strategy to wait for a little.
Price for the newest tech has also been in its heist just when it is released and seeing how DDR5 will benefit mostly servers mostly since even today memory, processors, and other available equipment can tackle all daily tasks.
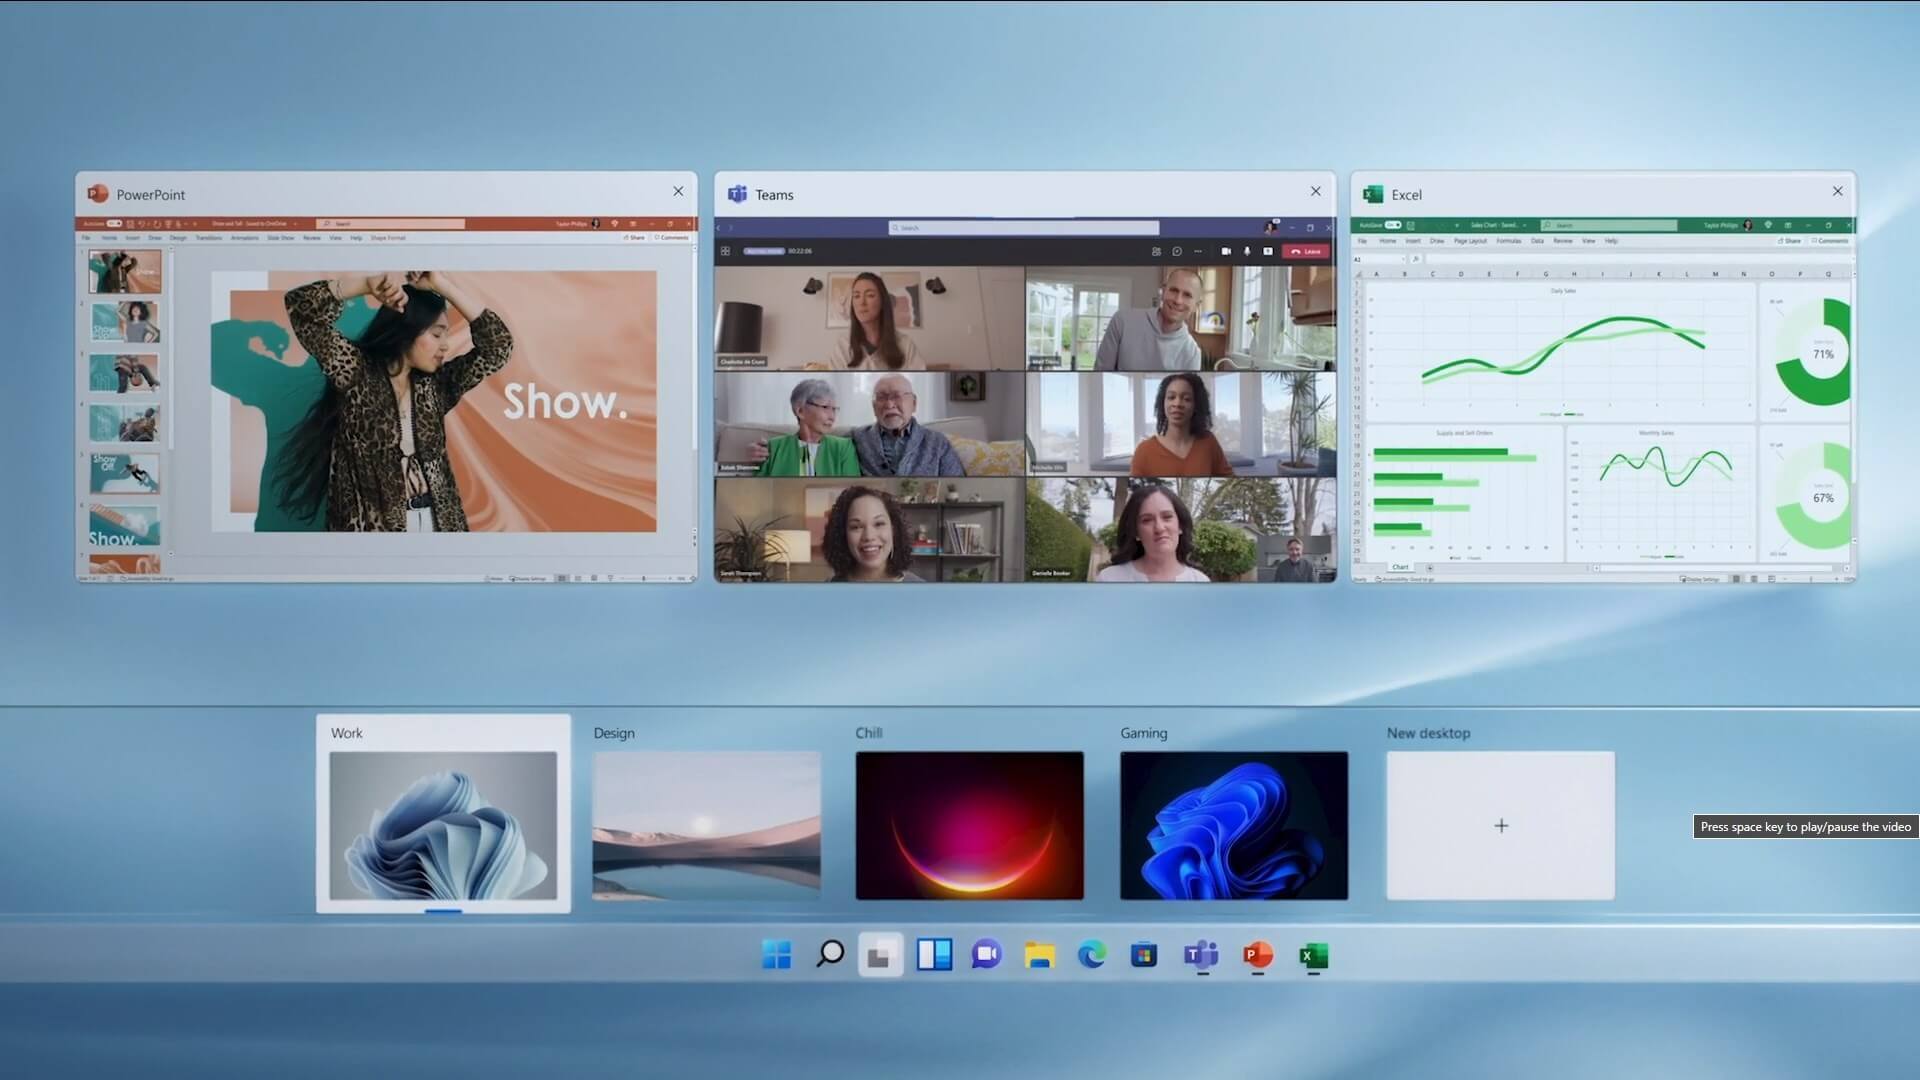
The feature that was originally planned for now scrapped Windows 10X is included in Windows 11. You will be able to customize your Virtual desktop with different wallpapers for each screen.
In order to fully customize your virtual desktops with different wallpapers follow this easy step-by-step guide.
Click on the Task View button in the taskbar
When the Task View opens, select the desktop on which you want to set wallpaper
The view will switch to the selected desktop. Right-click anywhere on the desktop and select personalize
In personalization settings, click on the background
Select wallpaper which you would like to have on the desktop by clicking on browse and navigating to the desired one
Close the settings
Repeat for each virtual desktop you would like to customize
If you are one of the few users who is still burning CDs and DVDs, you might have come across an error that says, “Medium Speed Error” or “Power Calibration Error”. There are several factors that could cause this error but it’s most likely that the CD/DVD burner wasn’t able to determine the Optimum Power Calibration rate properly.
So what is Optimum Power Calibration rate? It is a test that runs before the burning process to regulate the optimal laser power needed to complete the job. And if this process malfunctions, obviously, you won’t be able to burn the content on your CD or DVD. There are also cases when the Power Calibration error pops up for some small issues that have nothing to do with the regulation of laser power.
Here are some quick fixes you can try to resolve the Power Calibration error when burning a CD or DVD.
Option 1 – Make sure you’re using good quality CD or DVD
A lot of burning issues stem down to the purchase of low CDs or DVDs to make sure that what you are using has good quality for it is not always a good idea to purchase cheap products as cheap products could also mean cheap quality.
Option 2 – Try burning at lower speeds
If you’re certain the problem is not with the CD or DVD you are using then you can try burning again, this time at lower speeds. There are instances when doing things quickly can end in a disaster such as the “Medium Speed Error” or “Power Calibration Error” you’re getting. To fix the problem, you have to burn at a slower speed and just take the time to wait until the burning process is done.
Option 3 – Try updating your burning software
It’s always a good idea to check if the burning software you’re using requires an update especially if it’s throwing up “Medium Speed Error” or “Power Calibration Error”. Thus, you need to update your burning software right away and then try to burn your CD or DVD once the update has been completed.
Option 4 – Try cleaning the disk drive
You might want to consider cleaning the disk drive using several tools in the market that is designed to clean the disk drive. These tools work on removing dust particles from the lens which helps a lot in the burning quality. Aside from that, it also helps in reducing errors like “Medium Speed Error” or “Power Calibration Error”. So give this option a try as it might time for a disk drive cleanup.
Option 5 – Try to disable the IMAPI
If none of the options given above worked, you might want to disable the IMAPI or Image Mastering Applications Programming Interface. How? Refer to the steps below.
Open Control Panel by simply clicking the Start button and then typing “control panel” in the field.
Control Panel should pop up in the search results. Once you found it, click it to open it.
Next, select System Security > Administrative Tools and then click Services.
After that, you’ll have to search for the “IMAPI CD-Burning COM Service” option.
Then right-click on it and select Properties.
From there, switch the Startup Type from “Enabled” to “Disabled”.
When you get the “HTTP Error 304 Not modified” error in Google Chrome, Mozilla Firefox, or Microsoft Edge, there can be lots of reasons why you’re getting this error. The HTTP Error code 304 means redirection, technically. It could be that the DNS has some issues or the cache is already reusing the existing information to look for a website or it could also be that your browser might be infected.
In this post, we will show you what you can do to fix the “HTTP Error 304 Not modified” error when you are not able to open a website on your browser. Here are the exact details of the error message:
“This status code is returned if the client has already downloaded resources since the last visit and is displayed to notify the client browser that the requested resources is already stored in the browser cache which hasn’t been modified.”
Follow each one of the given fixes below to resolve the issue.
Option 1 – Clear the browsing data on your browsers
The first thing you can try is clearing the browsing data on your browsers.
Microsoft Edge:
Open Microsoft Edge.
Then click on the three horizontal dots to open the menu.
From there, click on Settings. And under Settings, click the “Choose what to clear” button under the Clear browsing data section.
Next, check all the checkboxes and then click the Clear button to clear the browsing data in the Edge browser.
Restart Edge.
Google Chrome:
Open Chrome and then click on the three vertical dots located at the top of the window.
Then click on Settings.
After that, click on Advanced. And from the Privacy and Security section, click on the “Clear browsing data” option.
Now click on the CLEAR DATA button.
Restart Chrome.
Mozilla Firefox:
Open Firefox and then click on the three horizontal lines to open the menu.
From there, click on Options.
Next, select Privacy & Security.
After that, click on the Clear Now button under the Cached Web Content section and then click the Clear All Data button under the Site Data section.
Restart Firefox.
Option 2 – Flush DNS and reset the TCP/IP
There are some websites that don’t resolve since the DNS in your computer still remembers that old IP address. And so you need to flush the DNS as well as reset the TCP/IP on your computer.
Click the Start button and type in “command prompt” in the field.
From the search results that appear, right-click on Command Prompt and select the “Run as administrator” option.
After opening Command Prompt, you have to type each one of the commands listed below. Just make sure that after you type each command, you hit Enter
ipconfig /release
ipconfig /all
ipconfig /flushdns
ipconfig /renew
netsh int ip set dns
After you key in the commands listed above, the DNS cache will be flushed and the TCP/IP will reset.
Option 3 – Try using the Google Public DNS
Changing your DNS to Google Public DNS might also help you in fixing the “HTTP Error 304 Not modified” error. To do so, follow the steps below.
The first thing you have to do is right-click on the network icon in the Taskbar and select Network and Sharing Center.
Next, click on the “Change Adapter Settings” option.
After that, search for the network connection that you are using to connect to the internet. Note that the option might be “Wireless Connection” or “Local Area Connection”.
Right-click on your network connection and click on Properties.
Then select the new window to choose the “Internet Protocol 4 (TCP/IPv4)” option.
After that, click on the Properties button and click the checkbox in the new window for the option “Use the following DNS server addresses”.
Type in “8.8.8.8” and “8.8.4.4” and click OK and exit.
Option 4 – Run Cleanup Tool and disable Extensions
You might also want to run the Cleanup Tool in Chrome if you are using this browser as well as disable all the extensions as some of them, if not all, might be the reason why you’re getting the “HTTP Error 304 Not modified” error.
Athwbx.sys or the Qualcomm Atheros driver file is known to trigger several Blue Screen of Death errors. This occurs when the driver gets corrupted or when the operating system is unable to access or find it. In addition, bad sectors in the hard disk or RAM can also cause BSOD errors. The athwbx.sys file is known to cause the following BSOD errors listed below:
Your PC ran into a problem and needs to restart. You can search online later for this error: athwbx.sys
Before you proceed with the troubleshooting tips given below, you might want to try performing System Restore as it could resolve Blue Screen errors caused by the athwbx.sys file. To run System Restore, follow these steps:
Tap the Win + R keys to open the Run dialog box.
After that, type in “sysdm.cpl” in the field and tap Enter.
Next, go to the System Protection tab then click the System Restore button. This will open a new window where you have to select your preferred System Restore point.
After that, follow the on-screen instructions to finish the process and then restart your computer and check if the problem is fixed or not.
If System Restore didn’t help in fixing the Blue Screen error, now’s the time for you to resort to the troubleshooting tips provided below but before you get started, make sure that you create a System Restore point first.
Option 1 – Try recreating the athwbx.sys file
The first thing you can try is to recreate the athwbx.sys file. Every time your Windows 10 PC boots up, it looks for all the system drivers in place and if it is unable to find them, it tries to create them. This is why if you remove your corrupt driver file, chances are, you might get a fixed file recreated just for you. How? Refer to the steps below.
Boot your Windows 10 PC in Safe Mode.
Then open File Explorer and navigate to this location: C:/Windows/System32/drivers
From there, look for the file named sys and rename it to athwbx.old.
Note: As you can see, the file’s extension has changed from .sys to .old.
Now restart your computer and check if the athwbx.sys Blue Screen error is now fixed.
Option 2 – Try to update or rollback your device drivers
If the first option didn’t work for you, then it’s time to either update or roll back the device drivers. It is most likely that after you updated your Windows computer that your driver also needs a refresh. On the other hand, if you have just updated your device drivers then you need to roll back the drivers to their previous versions. Whichever applies to you, refer to the steps below.
Open the Devices Manager from the Win X Menu.
Then locate the device drivers and right-click on them to open the Properties.
After that, switch to the Driver tab and click on the Uninstall Device button.
Follow the screen option to completely uninstall it.
Finally, restart your computer. It will just reinstall the device drivers automatically.
Note: You can install a dedicated driver on your computer in case you have it or you could also look for it directly from the website of the manufacturer.
Option 3 – Run the System File Checker Scan
System File Checker or SFC is a built-in command utility that helps in restoring corrupted files as well as missing files. It replaces bad and corrupted system files with good system files. To run the SFC command, follow the steps given below.
Tap Win + R to launch Run.
Type in cmd in the field and tap Enter.
After opening Command Prompt, type in sfc /scannow
The command will start a system scan which will take a few whiles before it finishes. Once it’s done, you could get the following results:
Windows Resource Protection did not find any integrity violations.
Windows Resource Protection found corrupt files and successfully repaired them.
Windows Resource Protection found corrupt files but was unable to fix some of them.
Restart your computer.
Option 4 – Try to run the CHKDSK utility
Running the CHKDSK utility might also help you resolve the athwbx.sys Blue Screen error. If your hard drive has issues with integrity, the update will really fail as the system will think that it’s not healthy and that’s where the CHKDSK utility comes in. The CHKDSK utility repairs hard drive errors that might be causing the problem.
Open Command Prompt with admin privileges.
After opening Command Prompt, execute the following command and hit Enter:
chkdsk /f /r
Wait for the process to be completed and then restart your computer.
Option 5 – Run the Memory Diagnostic Tool
Running the Windows Memory Diagnostic tool in Windows 10 might also help you in fixing the athwbx.sys Blue Screen error. Refer to the steps below on how to run this tool:
Tap the Win + R keys to open Run and type exe and hit Enter to open the Windows Memory Diagnostic Tool.
After that, it will give two options such as:
Restart now and check for problems (Recommended)
Check for problems the next time I start my computer
Once your computer has restarted, perform a basic scan or you could also go for the “Advanced” options such as “Test mix” or “Pass count”. Simply tap the F10 key to start the test.
Note: After you select the option, your PC will restart and check for memory-based issues. If it finds any issues, it will automatically fix them and if there’s no issue found, then it’s most likely not a memory-based issue so you should try the other options given below.
Option 6 – Run the Blue Screen Troubleshooter
The Blue Screen troubleshooter is a built-in tool in Windows 10 that helps users in fixing BSOD errors like athwbx.sys. It can be found on the Settings Troubleshooters page. To use it, refer to these steps:
Tap the Win + I keys to open the Settings panel.
Then go to Update & Security > Troubleshoot.
From there, look for the option called “Blue Screen” on your right-hand side and then click the “Run the troubleshooter” button to run the Blue Screen Troubleshooter and then follow the next on-screen options. Note that you might have to boot your PC into Safe Mode.
So you just have turned your computer ON only to find out that your device which was working perfectly yesterday is not working anymore. This situation can be very stressful and disappointing but do not despair, before you toss your device through the window know that this kind of behavior can be traced back to a software issue.
In this article, we will give you hints on what to do and where to pay attention when something like this happens so you get the device back in working order.
Check if it not a hardware malfunction
To save yourself time and unnecessary frustration with juggling through Windows first inspect the device to be sure that indeed it is working properly, check all led lamps which could indicate that the device is working and receiving power, and if it is an internal device try opening the case and visually check if there are signs of working like rotating fans or led lamps on it.
Check Cables
If it is an external device that has stopped working try checking power cables and cables which go to your computer, see if they are tightly connected. If it is an internal device also check cables, nudge them and if possible disconnect and clean them.
Disconnect and reconnect the device
Try this solution to see will Windows register the device again and start it.
Update Windows
If there is a Windows update not installed, install it and see if the device will start working.
Update device drivers
Go to device manager and update the device driver to its latest version or go to the manufacturer's site and download the latest driver version.
Reinstall the device
In the device manager, uninstall the device driver and reboot Windows. When Windows boots it will recognize the device and install the necessary drivers for it.
Disable antivirus and firewall
Sometimes antivirus can prevent certain devices from working properly, especially if they rely on some system files to which antivirus or firewall has cut access. Try disabling your PC protection to see if this will resolve the issue.
Use dedicated error software
Use DRIVERFIX to automatically search and fix driver issues.


 Hacker group recently came up with claims that they have stolen data from 100 million T-Mobile customers. T-Mobile has responded with confirmation it has been compromised and that over 40 million records were stolen, among them are not just present customers, but anyone who has applied for T-Mobile service as well as past accounts.
 Next-generation of RAM, DDR5 supposed to hit shelves around late summer or fall in 2021if everything goes as planned.
Its goal is to increase speed and efficiency, wants to pack more memory in a single stick, and have better power management.
Next-generation of RAM, DDR5 supposed to hit shelves around late summer or fall in 2021if everything goes as planned.
Its goal is to increase speed and efficiency, wants to pack more memory in a single stick, and have better power management.
 The feature that was originally planned for now scrapped Windows 10X is included in Windows 11. You will be able to customize your Virtual desktop with different wallpapers for each screen.
In order to fully customize your virtual desktops with different wallpapers follow this easy step-by-step guide.
The feature that was originally planned for now scrapped Windows 10X is included in Windows 11. You will be able to customize your Virtual desktop with different wallpapers for each screen.
In order to fully customize your virtual desktops with different wallpapers follow this easy step-by-step guide.