A runtime error is commonly an error that's created after the PC is operating software and encounters a problem of some form. For instance, a runtime error like run-time error code 7 reveals an "out of memory" dilemma.
Solution
Error Cause
Run-time errors are normally brought on by clashes with TSR (Terminate and Stay Resident) applications or additional operating applications, software problems, storage problems, or pc viruses.
Troubleshooting a Run-time Error
First, enter the run-time error signal into a search engine to see what info you will get about the precise runtime issue you are receiving. Next, end - job all running applications and TSRs to make sure these aren't the origin of the issue. You can certainly do so by obtaining the job manager by striking Control Alt Delete.
In case your issue is regularly occurring with a unique program, go to that system programmer's site and obtain any upgrades and patches. If unavailable, try uninstalling the application involved and reinstalling it.
In the event the issue is occurring with the os, you may consider reinstalling it although it is a huge commitment. A much better idea would be to try a fix for both Windows XP or Windows 2,000. It is possible to fix and scan files by typing : sfc / scannow, heading to the Begin switch, Run, and then pushing enter. Make certain to put an area between sfc and the reduce.
You might have an equipment or storage dilemma if these measures have not resolved your run-time errors. If that is the situation, contact the support of the application under consideration for potential support accompanied by the pc or motherboard manufacturer.
Many run-time problems can be solved by upgrading the application that's creating the problem. This is only because the programmer's frequently releasing patches and improvements for their applications as insects are found and repaired.
Storage problems may frequently be fixed by rebooting the pc. Consider a reboot a short-term repair. Rebooting clears the memory but in case your COMPUTER does not have adequate memory for your applications you're operating, or sufficient hard-drive space you'll immediately run out of memory again. Something less than this sum may cause memory issues since the computer's swap file isn't in a position to expand in dimension as required.
To assess the quantity of free area, available My Computer and right-click on the HDD, generally the D: drive. Select Attributes in the menu and see the disc's ability. Perform the disk clean-up function by following prompts and pressing the Disk Clean-up button, if the room is reduced.
You may be getting run-time errors, in case your storage chip is really failing. Eliminating and changing the awful memory chip will solve the difficulty. If you're encountering other runtime-related errors, like an install runtime issue, try cleaning away the portions of the registry with some software solution.
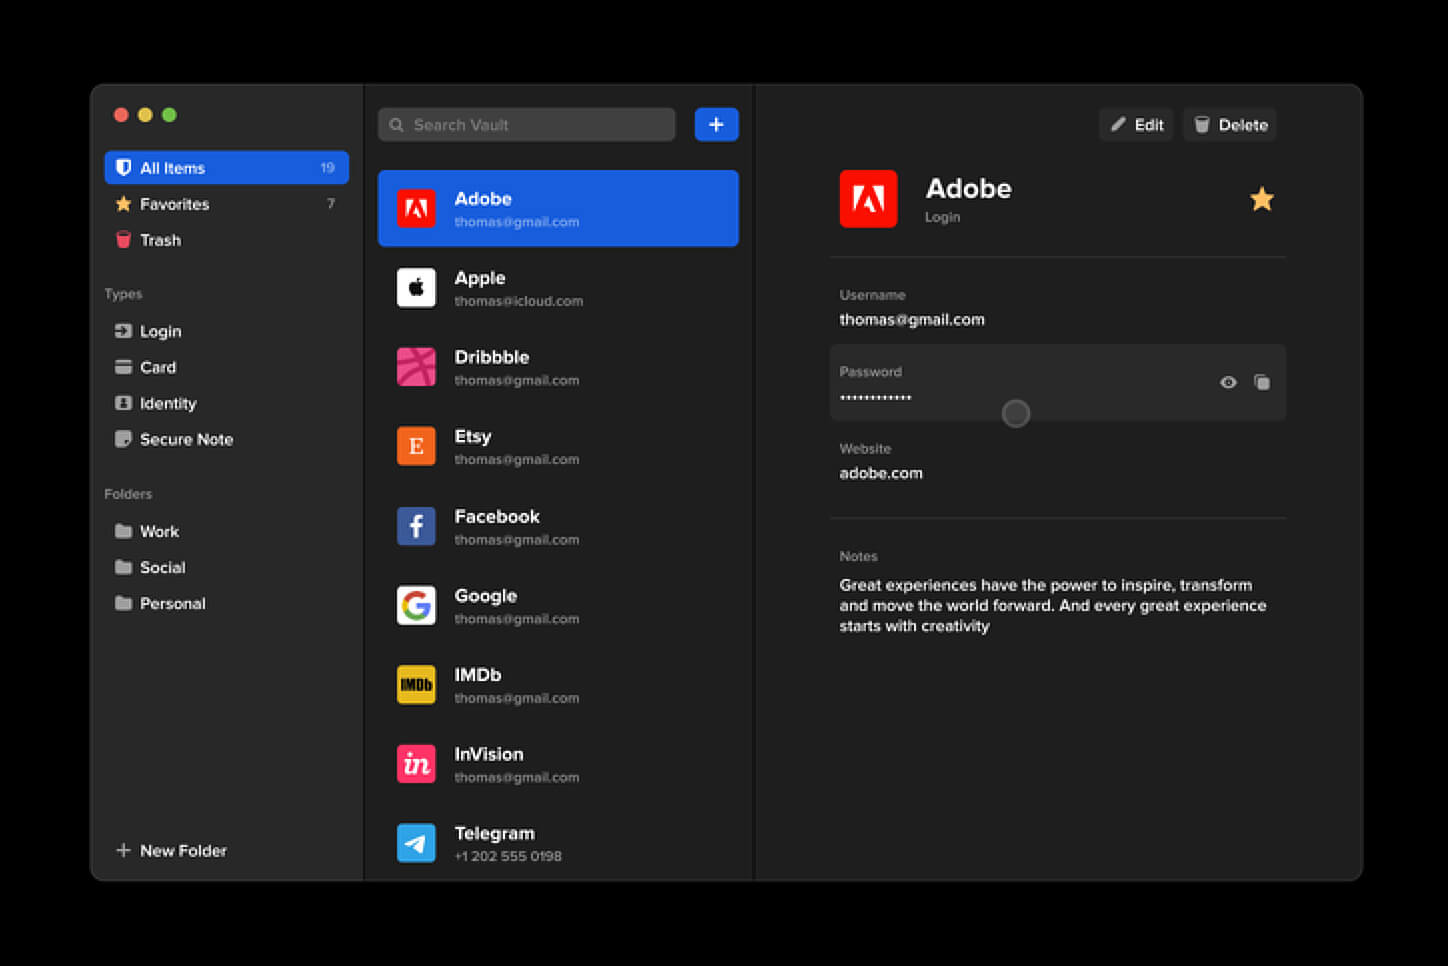
Many times we were talking and writing here on Errortools.com about security, privacy, hacking, identity theft, etc. We tried to raise important security questions and I hope I have managed to at least shed some light and change maybe some bad behaviors for some, helping them embrace better routines about their security on their PC.
In this light, I will today present you with one neat and awesome piece of software, a password manager worth your time and money (if you want premium features): BitWarden.
What BitWarden offers?
The first thing that it offers is the completely free basic plan, granted BitWarden is not an open-source project nor completely free but it has an unlimited free basic plan that will cover 90% of user needs. There is also a free basic unlimited plan for Organizations letting you and one more user share files and other stuff via BitWarden making it a cool option if you need it.
Premium features offer you encrypted sharing of files, two-step login, 1GB file attachments (encrypted), Bitwarden Authenticator (TOTP), Vault Health Reports, Emergency Access, and Priority Support. The cost for all of these additional features is 10 USD per year for an individual plan or 40 USD per year for organizations where you will get an increase of maximum users from 2 to 6. Yes, you read that correctly, only 10 USD per YEAR for the whole set of features. Granted if you do not need any of them, enjoy the free version forever.
Besides very low premium cost BitWarden will offer you compatibility with all major browsers and devices including both Android and iOS platforms making it a great cross-platform solution to login and maintain your passwords anywhere with just one click.
Once installed all you need to do is set one master password and be very careful not to lose or forget this one, if you do all of your other generated passwords will be lost forever.
Features
Secure Password Sharing
Share your encrypted data quickly and easily, and only with the users or teams who need access
Cross-Platform Accessibility
Access critical data in your Bitwarden vault from any location, browser, and device
Cloud-Based or Self-Host
Get up and running in minutes in the cloud or you can self-host Bitwarden for complete data control
Security Audit & Compliance
Open source and third-party audited, Bitwarden complies with Privacy Shield, GDPR, CCPA regulations
Vault Health Reports
Access insightful reports to reveal weak, reused passwords, and other helpful data security metrics
Directory Sync
Our powerful Directory Connector streamlines user and group onboarding and keeps them in sync
Always-On Support
Our Customer Success agents are available to support you around the clock
Detailed Event Logs
Bitwarden creates audit trails to help you keep track of user and group access to sensitive data
Flexible Integrations
Unite your existing systems with Bitwarden using SSO authentication, Directory services, or powerful APIs
Conclusion
There are many password managers out there but via recommendation I have tried BitWarden and truth to be told, I really never felt the need to try anything else, it is great at what it does and it is moving forward with features and it is constantly updated and maintained.
There are instances when the Windows 10 installation needs interaction before it reaches the file process. And so if you suddenly encounter the Windows Update Installation Failure 0x80240020 error under the Windows Update History, then you need to get it fixed.
When you encounter this kind of Windows Update Error, you will see an error message that says, “The operation did not complete because there is no logged-on interactive user”. This error also indicates the “WU_E_NO_INTERACTIVE_USER” code. To resolve this issue, in this post we’ll walk you through a couple of steps but before you get started, know that you don’t have to run any troubleshooter or delete any file just to fix this error since all you have to do is enable one option that can automatically login with your account and complete the installation for you. With that said, just make sure to only try running Windows Update once you’re told to do so.
There are two ways you can enable the option that could resolve the Windows Update Installation Failure 0x80240020 error. One is via Settings while the second one is via Registry Editor.
Option 1 – via Settings
Step 1: Go to Settings > Accounts > Sign-in Options.
Step 2: From there, toggle on the “Use my sign-in info to automatically finish setting up my device and reopen my apps after an update or restart” option.
Step 3: After that, it will make sure that the interaction part is removed from the Windows Update process.
Note: If your device is joined in a domain or if some work or email policies are applied to your device by your company or organization, then you wouldn’t be able to see this option in Settings and that’s where the Registry Editor comes in. Just make sure that you’re logged in as an administrator and that you create a System Restore Point first since registry hacks are sensitive and could highly impact how your computer behaves or functions. Once you have that covered, follow the steps below.
Option 2 – via Registry Editor
Step 1: In the Start search, type “Regedit” and hit Enter to open the Registry Editor.
Step 2: Navigate to the following registry key:
Note: If the above-given registry key does not exist, you can simply create it. All you have to do is right-click on the WindowsUpdate key and then select the New Key option and type “OSUpgrade” as its name. Afterward, create a new DWORD (32-bit) Value and name it “AllowOSUpgrade” and set its value to 0x00000001.
Step 3: Restart your computer and check if the error is now fixed. And then try to update your Windows 10 computer again and while you’re at it, make sure that you’re around your computer to interact with the prompts needed to complete the installation process.
Finally upgraded to Microsoft’s newest OS, but the performance is a bit sluggish? Here are a few useful tips you may not have thought about that could significantly transform your experience!
How to speed up Windows 11?
1. Disable startup programs
There are many programs that launch right on startup that really aren’t essential. This, in turn, causes your PC to launch and run more slowly.
To check which programs are enabled on startup, go into the Task Manager and select the Startup tab. Find every program that doesn’t need to launch immediately, right-click on it and press ‘Disable’.
This will not shut down the program in that instant. It’ll just prevent it from running automatically as you turn on your PC. You can always launch it manually when you need it.
2. Expand your memory and storage
If you want your PC to run super smoothly, you need to have enough memory to support that. This is especially significant for those of you who love to multitask. Upgrading your RAM gives your PC more space to store the temporary data it needs to complete processing tasks. In other words, processing takes a lot less time.
Your long-term storage is equally important. Hopefully at this point you’re already using SSD over HDD, since this type of storage offers a faster boot time.
Credit: Marc Pezin on Unsplash
In any case, we recommend expanding your storage capacity. The more files and data you store, the more there is to load, significantly influencing your PC’s speed. Larger storage capacity means new data and essential updates can be stored comfortably, preventing any strain on your PC’s performance.
3. Clean up disk space
If you aren’t willing to upgrade your storage just yet, the least you can do is clean up your storage right now.
Aside from manually deleting stuff you no longer need, you can also get rid of temporary files that clutter up your storage and eat up performance for no reason. To get to them, click Windows + X and select ‘Run’ (or just type it in the search bar).
A small window will pop up, where you need to type %temp%. This will take you to a whole folder full of all the temporary files you can remove without thinking twice.
For those who upgraded from Windows 10, there’s a neat trick to get rid of potential leftover files you don’t need on your brand new iteration. Only do this if you’re 100% sticking with Windows 11, though. Go to System > Storage > Temporary files. Make sure to only leave ‘Previous Windows Installation’ and ‘Windows Update Clean-up’ checked and click on ‘Remove files’.
Lastly, make use of Windows 11’s fantastic Storage Sense feature. Turning it on will enable your PC to constantly watch out for junk or unused files to optimize your PC’s performance to the maximum.
4. Install pending updates
This one should go without saying, but pending updates can be detrimental to your Windows 11 performance. The longer you leave them untouched, the more bugs the outdated programs and patches can cause. So, make sure to regularly check for updates and install them as soon as they’re available.
5. Disable visual effects
As cool as visual effects, animations, shadows and transparency are, they can also put quite a toll on your computer’s speed. On a newer setup this generally shouldn’t be a problem, but if you do notice a drop in performance, definitely consider turning off some of these settings.
To do this you can go to the Control Panel, System Properties and click the ‘Advanced’ tab. In the Performance section, choose Settings. If you’d like a quicker way to get to the dialog (Performance Options) with Visual Effects, you can also type sysdm.cpl in the search bar.
Once there, you can either have your PC choose what’s best, choose the best appearance or the best performance. The other option is to manually toggle the effects off and on. The biggest obstacles to speed are taskbar animations, window shadows, control/element animations and animations upon minimizing/maximizing.
Credit: Windows on Unsplash
In the same vein, you should go to Settings > Personalization > Colors and disable Transparency, to prevent your computer from doing overtime just to hit the aesthetic appeal.
6. Get rid of bloatware
Bloatware is one of the biggest culprits of slow computer speed.
Pre-installed software that’s pretty much useless but takes up valuable system resources has been around since day one. No matter which device or platform you’re talking about. Luckily, a lot of it is removable, making it easy to lighten the load on your device.
To boost your Windows 11 computer, go to Settings > Apps > Installed apps.You’ll probably see a bunch of apps you don’t want or need. Click on the three dots next to each one you want to remove and press ‘Uninstall’.
Aside from helping optimize performance, removing bloatware has another great benefit. Unfortunately, often this pre-installed software is quite vulnerable, exposing you to great risk of cyberattacks. So, removing it definitely improves your device’s security and gives you at least some peace of mind.
Summary
These are a few of our fastest tips for boosting performance. There are other, more complex and time-consuming ways, of course. If you’ve tried these quick ones and still need advice on how to improve your PC’s speed, feel free to reach out!
Error Code 0x8007000d is a common error code that can be found on the Windows 10 Operating system, although it can also appear in previous versions of the operating system, as well.
Common symptoms include:
Inability to download new updates.
Inability to run the Update tool through to completion.
There are four basic ways to try to resolve Error Code 0x8007000d on your Windows machine. Three of these are pretty simple for even the most basic users, while the final method requires some familiarity with running commands in the Command Prompt. If you don’t feel that you have the skill or confidence to complete the steps listed below, it is generally recommended that you get in touch with a qualified computer repair technician that can assist you in error resolution.
Error Causes
The main cause for the appearance of Error Code 0x8007000d on a Windows machine is that one of the files that the Update tool uses to run one or more updates cannot be found or has experienced damage. Fortunately, there are a few things that you can try on your machine that can be used to attempt to resolve the issues at hand.
Further Information and Manual Repair
Three primary methods exist for the resolution of Error Code 0x8007000d on a Windows machine. As mentioned above, two of these methods can usually be accomplished by basic users, while the third requires some degree of familiarity with the tools associated with the Command Prompt. If you don’t feel that you have the knowledge or skill necessary to follow these steps, contact a computer repair technician to aid you.
Here are the best ways to try to resolve Error Code 0x8007000d on your device:
Method One: Use the Troubleshooting Tool from Windows Update
From the Windows Update tool, you can attempt to run a scan using the Windows Update Troubleshooter, which can try to identify the specific issue that is occurring and to fix it automatically.
Not only will this tool often fix the problem at hand, but it can also help you to avoid other errors that you may have encountered later on in the Update process. This tool should always be your starting point when you encounter an error as you attempt to download or install updates for your Windows machine.
After the tool has been run, restart your computer to apply any changes and then reopen the Update tool to reattempt installation.
Method Two: Reset Your Computer
In some cases, the missing or corrupted files may be extensive enough that you need to restore your computer to an earlier point. If you create regular backups of your information or have a past version of the software that you can install, this can help you to resolve the issue. Otherwise, you may need to restore your device to its factory settings to resolve the error.
Always make sure to backup your important files and information before you perform a reset of your device, in order to ensure that you are able to return the computer to its original state when you have finished.
Method Three: Use Command Line Tools to Resolve the Issue
One of the ways that you can try to resolve this particular error code is the use a DISM tool. This is accessed through the Command Prompt. In order to use this method, follow the steps below:
Step One: Open up the search bar in the Start Menu and type in the words “Command Prompt,” selecting it and choosing to run it as an administrator.
Step Two: Enter each of the commands below, hitting the “Enter” key when you finish each one:
exe /Online /Cleanup-image /Scanhealth
exe /Online /Clean-upimage /Restorehealth
Exit
Step Three: Attempt to run the Update program again. In some cases, you may want to restart your computer before you attempt to run the Update tool again.
If you have not been able to resolve the error code using the steps above or if you are unsure of your ability to follow these steps on your own, get in touch with a trusted computer repair professional that is familiar with the Update process and the errors associated with it.
One of the common causes of Blue Screen of Death or BSOD errors is system driver files due to varying reasons. So if you encounter a Stop error caused by some system driver files such as isapnp.sys, gv3.sys, storahci.sys, or myfault.sys, on your Windows 10 PC, then this post should help you fix the problem.
These system driver files are associated with different error codes. The isapnp.sys file is related to the following error codes:
SYSTEM SERVICE EXCEPTION
PAGE FAULT IN A NONPAGED AREA
KERNEL DATA INPAGE
SYSTEM THREAD EXCEPTION NOT HANDLED
IRQL NOT LESS EQUAL
KMODE EXCEPTION NOT HANDLED.
While the gv3.sys file is related to the following BSOD error codes:
IRQL NOT LESS EQUAL
KMODE EXCEPTION NOT HANDLED
PAGE FAULT IN NONPAGED AREA.
On the other hand, the storahci.sys file is related to these error codes:
IRQL NOT LESS EQUAL
KMODE EXCEPTION NOT HANDLED
PAGE FAULT IN NONPAGED AREA.
And the myfault.sys file is associated with this error code:
SYSTEM SERVICE EXCEPTION.
Although this system driver file causes different kinds of Blue Screen errors, some of their potential fixes are quite the same so you need not carry out tons of troubleshooting steps. But before you troubleshoot the problem, you might want to check out System Restore first, especially if you create a System Restore point from time to time. To perform System Restore, follow these steps:
Tap the Win + R keys to open the Run dialog box.
After that, type in “sysdm.cpl” in the field and tap Enter.
Next, go to the System Protection tab then click the System Restore button. This will open a new window where you have to select your preferred System Restore point.
After that, follow the on-screen instructions to finish the process and then restart your computer and check if the problem is fixed or not.
If System Restore didn’t help in fixing the Blue Screen error, now’s the time for you to resort to the troubleshooting tips provided below but before you get started, make sure that you create a System Restore point first and boot your computer into Safe Mode.
Option 1 – Use the System Configuration utility
Note that this first fix is only applicable for Blue Screen errors associated with the myfault.sys file.
In the Cortana Search box, type “MSConfig” and click on the “System Configuration” entry to open it.
After opening System Configuration, go to the Processes tab.
Then scroll down and look for the “Digital Line Detection” process and disable it.
Now restart your computer and check if the Stop error is fixed or not.
Option 2 – Try to update, rollback or disable related device drivers
Incompatible and outdated drivers can also cause computer malfunctioning or crashing as well as Blue Screen errors. To fix that, you can update, roll back or disable the device drivers in your computer.
Tap the Win + R keys to launch the Run window and then type in the “devmgmt.msc” command and hit Enter to open the Device Manager window.
After opening the Device Manager, from the list of device drivers, look for the “WIN ISA Bus Driver” if you are facing a Stop error related to the isapnp.sys file. While you have to look for the Sony Recovery CDs PCG-Z1RAP Series device drivers if you face a Stop error concerning the gv3.sys file. For the storahci.sys, on the other hand, look for any outdated drivers and update them.
To update or roll back or disable these drivers, just right-click on each one of them, and depending on your preference, you can either select “Update driver”, “Disable device” or “Uninstall device”.
After that, restart your PC and see if it helped in fixing the Blue Screen error.
Option 3 – Use System File Checker
One of the built-in tools in Windows that you can use to fix Blue Screen errors is the System File Checker. This built-in command utility can help you restore corrupted or missing files as well as replace bad and corrupted system files. Chances are, any of the aforementioned system driver files might be corrupted so to fix them, use System File Checker.
First, right-click on the Start button and click on the “Command Prompt (Admin) option.
Next, type in the sfc /scannow command and hit Enter to execute it.
The command will start a system scan which will take a few whiles before it finishes. Once it’s done, you could get the following results:
Windows Resource Protection did not find any integrity violations.
Windows Resource Protection found corrupt files and successfully repaired them.
Windows Resource Protection found corrupt files but was unable to fix some of them.
Now restart your computer.
Option 4 – Run the Blue Screen Troubleshooter
Troubleshooting Blue Screen of Death errors wouldn’t be complete without the Blue Screen troubleshooter. As you know, it is a built-in tool in Windows 10 that helps users in fixing BSOD errors. You can find it in Settings, under the Troubleshooters page. To use it, refer to these steps:
Tap the Win + I keys to open the Settings panel.
Then go to Update & Security > Troubleshoot.
From there, look for the option called “Blue Screen” on your right-hand side and then click the “Run the troubleshooter” button to run the Blue Screen Troubleshooter and then follow the next on-screen options.
Note that you might have to boot your PC into Safe Mode.
If you suddenly encounter an error message that says, “This webpage is not available, Err_Connection_Closed” while browsing the internet or visiting a website and the website fails to load, then it means that there is some problem with your network connection. Similarly, you may also get other error messages like “Err_Network_Changed”, “Err_Connection_Reset” and “Err_Internet_Disconnected” errors in different browsers like Chrome, Firefox, and Edge.
The problem lies in your Windows 10 computer and your internet connection since this is a network issue. So before you troubleshoot the problem using the suggestions given below, you need to refresh your browser first or you could also tap Ctrl + F5 on your keyboard to hard reload the webpage. If you’re still getting the same error message, then proceed to the guide below.
Option 1 – Try removing the Proxy
Removing the Proxy might also help you in fixing the “This webpage is not available, Err_Connection_Closed” error. Here’s how you can do it:
Tap the Win + R keys to open the Run dialog box.
Then type “inetcpl.cpl” in the field and hit Enter to pull up the Internet Properties.
After that, go to the Connections tab and select the LAN settings.
From there. Uncheck the “Use a Proxy Server” option for your LAN and then make sure that the “Automatically detect settings” option is checked.
Now click the OK and the Apply buttons.
Restart your PC.
Note: If you are using a third-party proxy service, you have to disable it.
Option 2 – Try using Google Public DNS
If the first option didn’t resolve the issue, you can try to use the Public DNS by Google and see if it can help fix the problem. You have to modify the DNS settings in your system explicitly and use the DNS IP addresses.
The first thing you have to do is right-click on the network icon in the Taskbar and select Network and Sharing Center.
Next, click on the “Change Adapter Settings” option.
After that, search for the network connection that you are using to connect to the internet. Note that the option might be “Wireless Connection” or “Local Area Connection”.
Right-click on your network connection and click on Properties.
Then select the new window to choose the “Internet Protocol 4 (TCP/IPv4)” option.
After that, click on the Properties button and click the checkbox in the new window for the option “Use the following DNS server addresses”.
Type in “8.8.8.8” and “8.8.4.4” and click OK and exit.
Option 3 – Reset Winsock, TCP/IP & Flush DNS
Resetting Winsock, TCP/IP, and flushing DNS might help you resolve the Err_Connection_Closed error. To do so, follow these steps:
Right-click on the Start button and click on Command Prompt (administrator) so you can pull up an elevated Command Prompt.
After that, execute each one of the commands listed below. And after you typed in one after the other, you have to hit Enter.
netsh winsock reset – type in this command to reset Winsock
netsh int ip reset resettcpip.txt – type in this command to reset TCP/IP
ipconfig /flushdns – type in this command to flush the DNS cache
Next, restart your PC and check if the problem’s fixed.
Option 4 – Disable both the Antivirus program and Firewall temporarily
There are times when antivirus programs and the firewall blocks a website that they consider to be malicious or even because of false-positive effects which is why you have to disable these programs temporarily as it might be the reason why you’re getting the “This webpage is not available, Err_Connection_Closed” error when trying to browse the internet.
Option 5 – Try to check the network cables and then restart your router
The most obvious thing you can do first is to try checking if the network cables connected to your computer or router are properly connected or not. If it turns out that some network cables are not connected properly, then it’s probably why you’re getting this error.
Option 6 –Try a Network Reset
When all else fails, you might have to consider resetting your entire network settings. Simply follow the steps below to do so.
Click on the Start button and then click on the gear-like icon for Settings to open it.
Next, select Network and Internet.
Then scroll down and look for “Network Reset” – click on it and then click on the Reset now button.
Recently, a number of users reported that they were not able to use the “Run as administrator” context menu option when they tried using it or opening a program with administrator privilege. If you are one of these users facing this problem, then you’ve come to the right place as this post will guide you in fixing this issue.
At the time of writing, it isn’t clear what the cause of the issue is but there are potential fixes you can try to fix the problem. You can try turning on the User Account Control or clean up the Context Menu items change the Group Membership. On the other hand, you can also perform both SFC and DISM scans via Command Prompt or troubleshoot the problem in a clean boot state as it is possible that some third-party programs are the ones that are causing the problem. You could also run an anti-malware scan using Windows Defender or your antivirus program.
Option 1 – Try to turn on the User Account Control
When you open a program with administrator privilege, the User Account Control or UAC prompt will pop up asking you to confirm the permission. However, if you have disabled the User Account Control by mistake or some malware has disabled it, then it’s no wonder why the “Run as administrator” option is not working. Thus, you need to check if UAC is turned on or not. All you have to do is go to the User Account Control settings.
Option 2 – Try changing the Group Membership
First, you need to sign in with your administrator account or ask your administrator to sign in for you. So if you only have a Standard User account, you have to add that account to the Administrators group.
In the taskbar search box, type “netplwiz” and check the search results.
From there, select your user account and click the Properties button.
After that, go to the Group Membership tab and select Administrator.
Now click on the Apply and OK buttons to save the changes made and then sign in to your computer again and see if the “Run as administrator” option is working or not.
Option 3 – Try to create a new Administrator User account
If you have a standard account, you can try creating a new account but this time, you create an administrator user account and then see if you can now use the Run as administrator option or not. Note that you have to sign in with your main account before you can create an admin account.
Option 4 – Run the DISM tool
You can run the DISM tool as well to help fix the problem with the “Run as administrator” option. Using this built-in tool, you have various options such as the “/ScanHealth”, “/CheckHealth”, and “/RestoreHealth”.
Open the Command Prompt with admin privileges.
Then type in the following commands and make sure to hit Enter right after you type each one of them:
Dism /Online /Cleanup-Image /CheckHealth
Dism /Online /Cleanup-Image /ScanHealth
exe /Online /Cleanup-image /Restorehealth
Do not close the window if the process takes a while as it will probably take a few minutes to finish.
Option 5 – Perform a System File Checker scan
The SFC or System File Checker scan could detect and automatically repair damaged system files that could be causing the problem with the “Run as administrator” option on your Windows 10 computer. SFC is a built-in command utility that helps in restoring corrupted files as well as missing files. It replaces bad and corrupted system files with good system files. To run the SFC command, follow the steps given below.
Tap Win + R to launch Run.
Type in cmd in the field and tap Enter.
After opening Command Prompt, type in sfc /scannow and hit Enter.
The command will start a system scan which will take a few whiles before it finishes. Once it’s done, you could get the following results:
Windows Resource Protection did not find any integrity violations.
Windows Resource Protection found corrupt files and successfully repaired them.
Windows Resource Protection found corrupt files but was unable to fix some of them.
Once done, restart your computer.
Option 6 – Put your computer in a Clean Boot State
You can also troubleshoot the problem in a Clean Boot state. It could be that there are some third-party applications in your computer that are preventing you from using the “Run as administrator” option and to isolate this possibility, you need to boot your computer in a Clean Boot State and then try to use the Run as administrator again. Putting your computer in this state can help you identify which program is the culprit and thus isolates the problem. In a Clean Boot state, your computer will start using only the pre-selected minimal set of drivers and startup programs. Note that you have to disable and enable one process at a time.
Log onto your PC as an administrator.
Type in MSConfig in the Start Search to open the System Configuration utility.
From there, go to the General tab and click “Selective startup”.
Clear the “Load Startup items” check box and make sure that the “Load System Services” and “Use Original boot configuration” options are checked.
Next, click the Services tab and select the “Hide All Microsoft Services” check box.
Click Disable all.
Click on Apply/OK and restart your PC. (This will put your PC into a Clean Boot State. And configure Windows to use the usual startup, just simply undo the changes.)
After you’ve set your computer into a Clean Boot State, try to check if the error is now fixed and that you can now view the Properties.
Option 7 – Try scanning your computer using Windows Defender
As mentioned, if your computer was recently infected with some malware, it is possible that the malware changed the User Account Control settings which is why you’re not able to use the Run as administrator option. Thus, you need to scan your computer using Windows Defender.
Tap the Win + I keys to open Update & Security.
Then click on the Windows Security option and open Windows Defender Security Center.
Next, click on Virus & threat protection > Run a new advanced scan.
Now make sure that Full Scan is selected from the menu and then click the Scan Now button to get started.
If you encounter errors 1603 and 0x00000643 on your Windows 10 computer while trying to install or update your Google Chrome browser. Although most errors can be fixed by some simple troubleshooting steps, that is not the case for these two errors since they have pretty specific solutions.
To resolve errors 1603 and 0x00000643 on your Chrome browser, here are some solutions you need to check out.
Option 1 – Try to run Microsoft Install and Uninstall Troubleshooter
Running the Microsoft Install and Uninstall Troubleshooter could help you fix errors 1603 and 0x00000643 in Chrome as well as the following issue in your Windows 10 computer:
Corrupted registry keys on 64-bit operating systems.
Corrupted registry keys that control the updated data.
Problems that:
Prevent new programs from being installed.
Prevent new programs from being installed.
Problems that block you from uninstalling a program through Add or Remove Programs (or Programs and Features) in Control Panel.
To use the Microsoft Install and Uninstall Troubleshooter, refer to the given steps below.
First, right-click on the downloaded MicrosoftProgram_Install_and_Uninstall.meta.diagcab file and run it with administrative privileges.
Next, it will offer you two scenarios to troubleshoot namely, “Installing” or “Uninstalling” and you have to select Installing to resolve the current errors.
After that, it will show you a list of available programs on your computer. From there, select Google Update Helper and then click Next.
It will then start to troubleshoot the problem and will automatically apply the fixes for you. It will offer you to uninstall Chrome if it turns out that it’s the root cause of the problem.
After that, you need to download Google Chrome again and then reinstall it.
Option 2 – Try to clean reinstall Chrome
There are instances when programs leave files behind after you’ve uninstalled them and the same thing can happen to Chrome so before you reinstall Chrome, you have to make sure that you have deleted the User Data folder. To do so, refer to the following steps:
Hit the Win + R keys to open the Run dialog box.
Next, type “%LOCALAPPDATA%GoogleChromeUser Data” in the field and hit Enter to open the User Data folder.
From there, rename the default folder and name it something else, e.g. “Default.old”.
After that, install Google Chrome again and check if the issue is now fixed.
Option 3 – Try running the Chrome Cleanup tool
You might want to run Google Chrome’s built-in Malware Scanner & Cleanup tool as it could also help in getting rid of any unwanted ads, pop-ups, and even malware, as well as unusual startup pages, toolbars, and anything else that might overtake the network and could affect the performance of the browser.
Option 4 – Try to run the Network Troubleshooter
Open the Search bar on your computer and type in “troubleshoot” to open the Troubleshoot settings.
Next, scroll down and select the “Network Adapter” option from the right pane.
Then click on the Run Troubleshooter” button.
After that, your computer will check for any possible errors and will pinpoint the root cause of the problem if possible.
Option 5 – Reset Chrome
Resetting Chrome can also help you fix the error. This means that you will be restoring its default settings, disabling all the extensions, add-ons, and themes. Aside from that, the content settings will be reset as well and the cookies, cache, and site data will also be deleted. To reset Chrome, here’s what you have to do:
Open Google Chrome, then tap the Alt + F keys.
After that, click on Settings.
Next, scroll down until you see the Advanced option, once you see it, click on it.
After clicking the Advanced option, go to the “Restore and clean up option and click on the “Restore settings to their original defaults” option to reset Google Chrome.
There are a lot of reasons to ban or block different websites in your Windows. From wanting to limit yourself from distraction to block certain sites for sake of kids not going into them. Whatever your reason might be, keep reading in order to find out how you can block any website inside Windows for all browsers.
The technique I am going to share with you is universal and not tied to Windows versions, they will work in any Windows from XP onward. Also, the technique will block desired websites on any browser, already installed or even ones that will be installed after doing the trick. And we will also be looking at applications that can help you in this task if you do not wish to do it manually.
Block websites using dedicated software
A small free application called Focal Filter which can be found here: https://www.focalfilter.com/ is a software solution for your needs. It is a pretty straightforward and easy-to-understand application and not really much can be said here about it. You simply download and install it, set your websites, and you are done, the app does rest.
Blocking manually via host file
Another method besides mentioned one using the dedicating application is to manually set site addresses inside the Windows host file.
The first thing, of course, is to open the host file, run a notepad with administrator privileges, go to file open, and navigate to c:\windows\system32\drivers\etc\hosts.
Once the file is opened go all the way down and add:
127.0.0.1 SITENAME
For example: 127.0.0.1 www.youtube.com or 127.0.0.1 www.facebook.com
This way each time user on a PC tries to access a listed website computer will reroute it to the given address which is your PC's local address and asked website will not be able to load.
If you were trying to print some documents but encounter the HIDCLASS.SYS Blue Screen error instead, then you’ve come to the right place as this post will guide you in fixing any Blue Screen errors related to the HIDCLASS.SYS file. HIDCLASS.SYS is a Windows operating system driver file. HID or Human Interface Device includes Keyboards, mice, and other input devices.
HIDCLASS.SYS is a critical system driver file that is responsible for connecting different kinds of devices all over the system, including the functionality where a Word Processor can access the printer to print documents. This file comes under the category of kernel-mode device drivers and if the driver fails, it can result in a Stop Error. There are a lot of Stop errors related to the HIDCLASS.SYS file, such as:
KMODE EXCEPTION NOT HANDLED
SYSTEM SERVICE EXCEPTION
DRIVER POWER STATE FAILURE
PAGE FAULT IN A NONPAGED AREA
SYSTEM THREAD EXCEPTION NOT HANDLED
DRIVER VERIFIER IOMANAGER VIOLATION
IRQL NOT LESS EQUAL
The fixes for the Blue Screen errors related to the HIDCLASS.SYS files are pretty simple but before you troubleshoot the problem using these fixes, make sure that you boot your computer into Safe Mode with Networking first. After that, get started on these tips:
Option 1 – Update or rollback or disable concerned device drivers
To fix the HIDCLASS.SYS error, you can also try to roll back, or update, or disable the concerned device drivers.
Open the Devices Manager from the Win X Menu.
Then locate the device drivers particularly the ones that are under the sections of Keyboard, Mouse, USB, and HID Drivers.
Next, right-click on them to open the Properties.
After that, switch to the Driver tab and click on the Uninstall Device button.
Follow the screen option to completely uninstall it.
Finally, restart your computer. It will just reinstall the device drivers automatically.
Note: You can install a dedicated driver on your computer in case you have it or you could also look for it directly from the website of the manufacturer. On the other hand, if you have just updated your device drivers then you need to roll back the drivers to their previous versions or disable them.
Option 2 – Check for any incompatible devices
The next thing you can do to troubleshoot the HIDCLASS.SYS Stop error is to plug in and out each one of the different hardware that is connected to your computer. Doing so will help you determine which one of the hardware is the one that’s triggering the error to pop up. You will also know what hardware drivers or anything else that could be causing this error which includes external devices like mouse, keyboard, printer, as well as internally attached components like the Graphics card and so on.
Option 3 – Try running the ChkDsk utility
Running the ChkDsk utility can also help you resolve any Blue Screen errors related to the HIDCLASS.SYS file. To run this tool, refer to these steps:
First, open This PC and right-click on your operating system partition for Windows.
Next, click on Properties and navigate to the Tools tab.
Then click on Check under the Error Checking section.
After that, a new mini window will be opened and from there click on Scan drive and let it scan your disk drive partition for any errors and then restart your computer.
Option 4 – Try checking the Memory for any errors
Tap the Win + R keys to open Run and type exe and hit Enter to open the Windows Memory Diagnostic Tool.
After that, it will give two options such as:
Restart now and check for problems (Recommended)
Check for problems the next time I start my computer
Once your computer has restarted, perform a basic scan or you could also go for the “Advanced” options such as “Test mix” or “Pass count”. Simply tap the F10 key to start the test.
Note: After you select the option, your PC will restart and check for memory-based issues. If it finds any issues, it will automatically fix them.
Option 5 – Run the System File Checker
System File Checker or SFC is a built-in command utility that helps in restoring corrupted files as well as missing files. It replaces bad and corrupted system files with good system files. To run the SFC command, follow the steps given below.
Type “cmd” in the Start search and then right-click on the appropriate search result.
Next, select “Run as administrator” to open Command Prompt with admin privileges.
After opening Command Prompt, type in sfc /scannow
The command will start a system scan which will take a few whiles before it finishes. Once it’s done, you could get the following results:
Windows Resource Protection did not find any integrity violations.
Windows Resource Protection found corrupt files and successfully repaired them.
Windows Resource Protection found corrupt files but was unable to fix some of them.
Now restart your computer and see if the Blue Screen error is fixed or not.

 Many times we were talking and writing here on Errortools.com about security, privacy, hacking, identity theft, etc. We tried to raise important security questions and I hope I have managed to at least shed some light and change maybe some bad behaviors for some, helping them embrace better routines about their security on their PC.
In this light, I will today present you with one neat and awesome piece of software, a password manager worth your time and money (if you want premium features): BitWarden.
Many times we were talking and writing here on Errortools.com about security, privacy, hacking, identity theft, etc. We tried to raise important security questions and I hope I have managed to at least shed some light and change maybe some bad behaviors for some, helping them embrace better routines about their security on their PC.
In this light, I will today present you with one neat and awesome piece of software, a password manager worth your time and money (if you want premium features): BitWarden.

