Google's Pixel smartphone is one if not the best Android smartphone on the market. It regularly gets updates and Google is really trying to keep it as a top choice for Android smartphone users. One of the new things that Google has released for its smartphone series is a new emergency dialer.
With an emergency dialer, you will be able to quickly access local contact information for police, fire, and medical services. This dialer is able to contact before mentioned services even when the phone is locked and when you are traveling.
The idea is to quickly access the default emergency number no matter in which country you are currently in, service will find the appropriate number and set it as default so if you need it there is no delay in searching for the appropriate number and dialing it.
Once the service is enabled on the device you can swipe up and tap Emergency call without unlocking your phone or you can press and hold the power button for five seconds and tap Emergency.
If you have a Pixel smartphone go to the Google support page and follow instructions on how to enable this service. It costs nothing and it could potentially even save your life.
If you encounter an error message saying, “ERR SSL VERSION OR CIPHER MISMATCH” while visiting a website, then it is not primarily your fault as an end-user. In fact, it can happen on any website like Chrome, Edge, Firefox, and even Internet Explorer. Getting this error means that the website you are visiting is using an SSL certificate which your browser seems to be rejected because there is some issue with the certificate. It is also possible that the certificate that’s downloaded on your computer is corrupted or that your computer configuration for TSL/SSL is misconfigured.
Here are the complete details of the error message:
“A secure connection cannot be established because this site uses an unsupported protocol, Error code ERR_SSL_VERSION_OR_CIPHER_MISMATCH”
To resolve the ERR_SSL_VERSION_OR_CIPHER_MISMATCH error, refer to the options given below and see which one works for you.
Option 1 – Try to access the website with the only HTTP
The first thing you can do is to try accessing the website using HTTP instead of HTTPS. If you can open the website using HTTP then it means that the problem is in the website itself. And if you are the website owner, you can check the following:
Check if your website’s SSL certificate name is mismatched. Here you need to ensure that the name and alias of the websites match with the actual website URL where the certificate is installed.
Second, check if your server is using the RC4 Cipher. If it is, then you need to fix that.
On the other hand, you may also check if your CDN also supports SSL since most of the CDN nowadays supports SSL. All you have to do is configure it correctly and it should be good to go.
If you were using Google Chrome when you got the ERR SSL VERSION OR CIPHER MISMATCH error, then you need to follow the protocol fixes for SSL3/TLS and QUIC which are usually some of the reasons that cause the SSL version / Cipher Mismatch. It also has a few fixes for Windows 10 computer where you can clear the certificates and make sure that your computer date and time is in sync with your time zone and so on.
If you were using Edge or Internet Explorer when you got the error, then you have to follow the steps below.
Type “Internet” in the search box of your browser. After that, you should see the Internet Options from the search results.
Next, open the Internet Properties window and switch to the Advanced tab and then scroll down to the Security section.
From there, check the “Use TLS 1.1” checkbox as well as the “Use TLS 1.2” checkbox and then click OK to save the changes made.
Restart the browser.
On the other hand, if you were using Firefox when you go the error, here’s what you have to do.
Open Firefox and in the address bar, type “about:config” and hit Enter.
If a warning appears, just click on the “I accept the risk!” button to proceed.
Next, type in “TLS” in the search field and hit Enter.
Then look for “security.tls.version.min” and double click on it and set its integer value to 3 to force the protocol of TLS 1.3.
Now click OK and restart Firefox and do the same thing with SSL.
So, you have finished with work, game, movie, music, email, or whatever on your PC, you look at the clock, it is late, you decide to go to sleep or outside, you click on the power button and choose shutdown. Now when a PC is shut down you feel good and go with your business but the next time you power it up you get the same error like the computer never really shut down in the first place. You wonder why and reboot it, just in case and all of the sudden error is gone.
If something similar has happened to you or you had the feeling that after shutting down your computer has not really felt like shutting it down, do not seek professional help, everything is OK with you because when you click on shut down, your computer does not really shut down!
Truth is that Microsoft has changed how to shut down works and how rebooting works in Windows with an update but has not publicly said anything about it so some users may experience this feeling of not shutdown phenomenon and might even think there is something wrong with their PC.
Why this change?
A few years ago shutdown button and option in Windows were really shutting down OS, but things changed when Microsoft wanted to increase boot-up speed. Now when that decision was made shutdown option was changed. So, what was changed? Well in order to increase Windows booting time, the shutdown will now turn off power to PC components and it will look like everything is indeed shutdown but the Windows kernel will actually be saved to a hard drive with all settings and just awaken once the PC is turned back ON. This will result in all errors and other stuff being just still present same as they were once the system was instructed to be turned off.
Rebooting your PC will now clear kernel and file from the hard drive and you will get a clean system startup without any issues tied with the kernel itself.
Workaround
Now that we know why and what change has been made to Windows logical question is can we shut down our PC at all properly? Luckily for us, the answer is yes and we will not need any external application to do it, we can still do it inside Windows itself and it is quite quick and easy.
Bringing back the old shutdown
In order to bring the old shutdown functionality of your PC please follow the instructions but be aware that by doing this your PC will boot a little bit slower since it will have to load the kernel from scratch each time computer is turned ON.
First thing is to go to settings and go to System
Then once you are inside the system, navigate to the power and sleep and click on it to select it. Once you have it selected to all the way to the right and click on additional power settings.
When you click on advanced power settings you should be led to the control panel's power options. Inside this panel click on top left link where it says Choose what the power button does.
Inside options, you will need to untick the box next to Turn on fast startup (recommended), this option has been ticked ON by the Windows update and probably without notifying you. Option means exactly what was described, it will save kernel state on the hard drive for faster boot time but sadly it can cause some issues since it will never be reloaded from 0.
If you are unable to uncheck the box click on the text beside the shield icon that says: Change settings that are currently unavailable (you will have to be logged in as administrator).
Conclusion
Altho turning off fast startup and shutting down the PC completely will for sure extend your bootup time I still believe that it is the right choice since sometimes a lot of clutter and bad things accumulate over time inside the OS and can cause a vast variety of problems in a long run. So stay safe and shut down that PC as it used to be in the past.
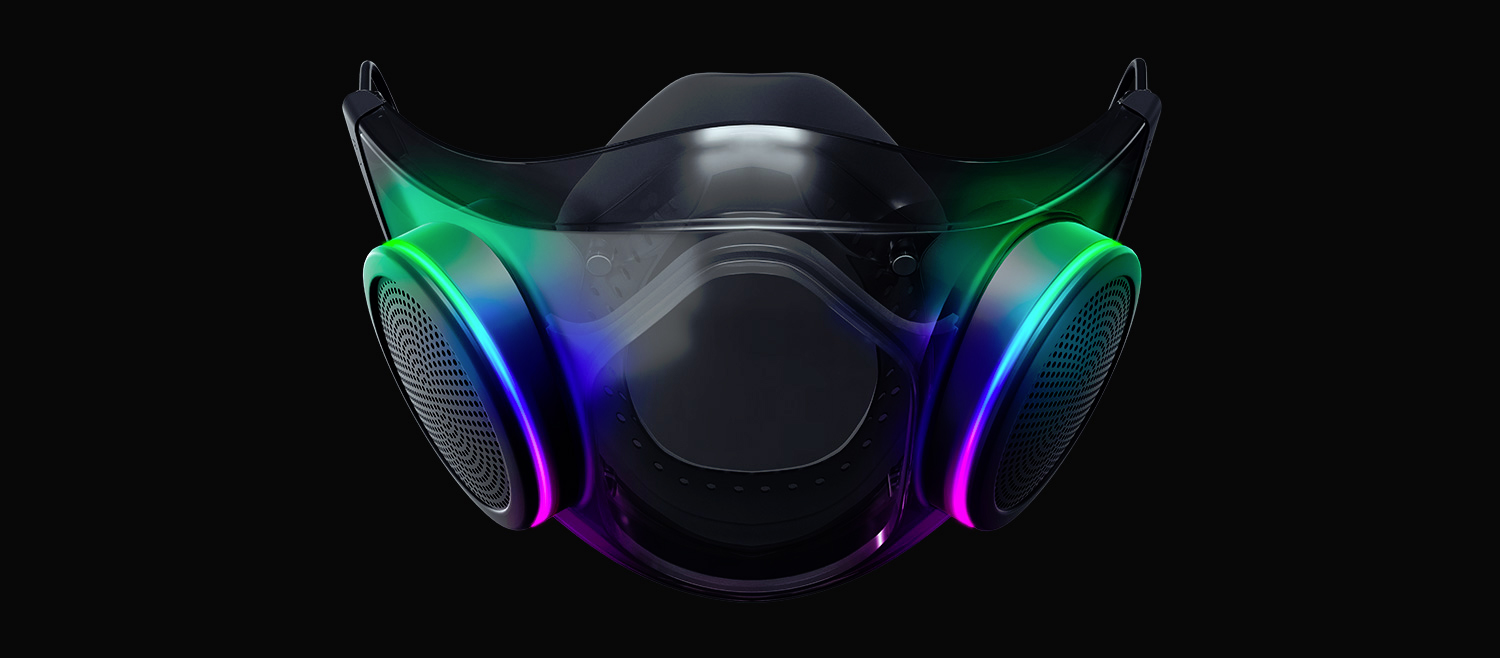
The world today is still sadly under pandemic and by the looks of it, COVID-19 is here to stay, well at least for some time in the near future. Razer seems to think so as well since their upcoming gear is not really what you would expect.
Enter Hazel, a new and upcoming Razer smart mask.
Protection
Hazel mask has a high bacterial surgical N95 filter with fluid resistance that will protect you against large droplets and splashes. A detachable active ventilator regulates airflow and is capable of filtering around 95% of airborne particles. Mask comes with a special charging case that has an auto sterilization UV light that will kill bacteria and viruses inside the case interior while it charges.
When the mask is recharging it will change color from red to green visually showing the level of the current charge. Mask of course has easy to replace filters inside ventilators and Razer is standing by that fully charged mask will last enough for full-day use.
An active ventilation system brings cool air while releasing breathing heat at the same time drastically reducing CO2 inside the mask that could produce dizziness and headache.
Silicon guard is on its edge gluing to around your face in order to prevent exterior air sneaking inside the mask and positioning it firmly so it does not rest on your lips in order for easier and clearer communication.
Hazel personalization and technical features
Hazel has a clear and transparent design making it better for social interaction since other people will be able to see your lips and smiles thus making it more natural. A low light mode that turns on automatically when it is dark outside is also aimed for easier communication.
Speaking of communication, the mask comes with voice Amp technology that has a built-in mic and amplifier thus making your voice lines clear so you are not muffled when wearing the mask itself. Your friends and other people will be able to hear you like you are not wearing a mask at all.
Thicker air loops apply less pressure on ears and can be adjusted for a more secure fit, while the mask itself can be custom-made to fit your face shape.
And of course Hazel comes with 16.8 million colors and a suite of effects with Razer Chroma RBG
The Makecab.exe process that’s running on your Windows 10 computer is a program that compresses the Component-Based Servicing log or CBS log files and they can get really huge if they’re not compressed. As a result, it would utilize important space on your operating system although makecab.exe does not consume high CPU resources in doing so. However, there are times when it recreates thousands of instances of itself and could cause overconsumption of system resources which slows down your computer. So when the makecab.exe process causes high CPU usage in your system, this could mean that there is a failed Windows Update. In addition, the high CPU usage of the makecab.exe process could also mean that your computer is infected with a virus or malware. Whichever the case is, you can check out several possible solutions that are given in this post to resolve the problem.
Option 1 – Try to delete log file using File Explorer
The CBS log files could reach up to 20GB size and so if you delete them, it would help in saving space in your computer and since they’re not much of use, deleting them won’t negatively affect the system at all. To delete the CBS log files, all you have to do is open the File Explorer and then go to C:/Windows/Logs/CBS and from there, open the CBS log files and delete them all. Doing so should ease the load in the makecab.exe process since it no longer has to compress the CBS log files. As a result, the process would be more relaxed. After that, you can restart your computer and check if the problem’s now fixed.
Option 2 – Try deleting the log file via Command Prompt
You can also try to delete the log files using an elevated Command Prompt. Refer to these steps to do so:
Type “command prompt” in the Windows Search bar and then right-click on the related search result and select the “Run as administrator” option.
Next, type the following command and hit Enter to execute it:
del /f %windir%logscbs*.log
Restart your computer afterward once the command has been executed. This should end the high disk usage by makecab.exe, if not, proceed to the next given options below.
Option 3 – Uninstall any suspicious programs you’ve installed recently
If you have recently installed some programs on your Windows 10 computer, and since then you’ve experienced high CPU usage brought on by makecab.exe, then you might want to uninstall those programs.
Tap the Win + R keys to open the Run dialog box
Then type “appwiz.cpl” in the field and hit Enter to open the Programs and Features in Control Panel.
From there, look for the suspicious programs you’ve installed, select them and then click on Uninstall to remove them.
After that, restart your computer and try to install the latest version of the program again. It should work now. If not, proceed to the next available option below.
Option 4 – Try running Disk Cleanup
You might want to run the Disk Cleanup utility as it is a useful tool that could delete temporary and useless files on your computer.
Tap the Win + R keys to open the Run dialog box and then type “cleanmgr” in the field and hit Enter to open the Disk Cleanup window.
After that, select the drive you want to clean.
Now click OK to clean the disk and restart your computer.
Option 5 – Try to run System File Checker scan
System File Checker or SFC is a built-in command utility that helps in restoring corrupted files and missing files. It replaces bad and corrupted system files to good system files. To run the SFC command, follow the steps given below.
Tap Win + R to launch Run.
Type in cmd in the field and tap Enter.
After opening Command Prompt, type in sfc /scannow
The command will start a system scan which will take a few whiles before it finishes. Once it’s done, you could get the following results:
Windows Resource Protection did not find any integrity violations.
Windows Resource Protection found corrupt files and successfully repaired them.
Windows Resource Protection found corrupt files but was unable to fix some of them.
Restart your PC.
Option 6 – Try scanning your computer using Windows Defender
As mentioned, the high CPU usage of makecab.exe might be caused by some malware or virus in the system and so to eliminate it, you have to scan your computer using security programs like Windows Defender.
Tap the Win + I keys to open Update & Security.
Then click on the Windows Security option and open Windows Defender Security Center.
Next, click on Virus & threat protection > Run a new advanced scan.
Now make sure that Full Scan is selected from the menu and then click the Scan Now button to get started.
A new update to popular Microsoft PowerToys has brought a few new features that are aimed at speeding up the workflow.
The first new feature that was slid in is Always on top utility. With this cool utility, you can keep the window as the name suggests, always on top of other windows. To enable this cool feature all you have to do is press the key combination of ⊞ WINDOWS + CTRL + T and an active window will be now always on top of all other windows. To reverse and unlock this window from being always on top just press key combination again.
A second new feature is a really great one and my favorite thing to happen in power toys. Often we are making the search in our browsers to find stuff, things, maybe some explanations, information, etc. The newest update in power toys brings this to a whole new dimension. While you are on PC you just simply need to type ?? followed by questions like: ?? When doctor strange 2 is coming out and that will launch your default browser with your chosen search engine and provide you with the answer.
Third and final thing is G-code support in the file explorer preview pane and thumbnails, meaning that if you work with CNC equipment you can now have a thumbnail preview of the code itself inside File Explorer.
And that’s it for now, thank you for coming and reading, Take care and I hope to see you next time.
Windows 10 is has a lot of features that help a user in optimizing a computer. So when the operating system encounters a problem, it is able to provide users with proper resources to get the problem fixed. There are even times when a user is not notified and an issue is either being repaired or dodged in the background. This kind of feature is known as the Diagnosis of the Automatic Repair feature that starts when your computer is booting. In such times, you will either see the “Diagnosing your PC” or “Preparing Automatic Repair” message on your screen.
Although this feature is useful and has proven to be effective, some users reported that the process gets stuck. If you experience the same problem, read on as this post will guide you on what to do to fix it but before you start troubleshooting the problem, you might want to perform a Hard Boot first. All you have to do is to power down your computer, remove the battery and the AC adapter and then reconnect them. After that, tap and hold the power button for about 20 seconds and see if your computer boots up properly. If it doesn’t, follow the given fixes below.
Option 1 – Try disabling the automatic Startup Repair
The Automatic Startup Repair window will automatically open during boot when you have some system driver-related problem. So if you think that this is where the problem lies, you can try to disable the automatic Startup Repair.
Click on Troubleshoot and go to the Advanced options.
After that, select Command Prompt and execute the following command:
bcdedit /set recoveryenabled NO
Restart your computer after that and then check.
Option 2 – Run the System File Checker
System File Checker or SFC is a built-in command utility that helps in restoring corrupted files as well as missing files. It replaces bad and corrupted system files to good system files that might be the cause why you’re facing this problem. To run the SFC command, follow the steps given below.
Type “cmd” in the Start search and then right-click on the appropriate search result.
Next, select “Run as administrator” to open Command Prompt with admin privileges.
After opening Command Prompt, type in sfc /scannow
The command will start a system scan which will take a few whiles before it finishes. Once it’s done, you could get the following results:
Windows Resource Protection did not find any integrity violations.
Windows Resource Protection found corrupt files and successfully repaired them.
Windows Resource Protection found corrupt files but was unable to fix some of them.
Now restart your computer and see if the problem is fixed or not.
Option 3 – Run CHKDSK to check your disk for errors
When it comes to some issues concerning the hard drive or removable devices, there is a utility in Windows that might help which is called “chkdsk”. This error check utility can help with several issues in the system.
Tap the Win + S keys to open the Search box.
Then type “command prompt” in the field and from the search results that appear, right-click on Command Prompt and select “Run as administrator”.
After opening an elevated command prompt, copy and paste the following command and hit Enter:
chkdsk /r /f
Now if you are prompted to run CHKDSK after your reboot your computer, just tap Y and reboot your PC.
If CHKDSK is not able to find any errors, tap the Win + E keys and navigate the access window. From there, right-click on the concerned drive and click on Properties.
After opening Properties, click on the tab Tools and then click on the “Check” button under the Error-checking section.
Wait until the process is completed and then restart your computer.
Once your computer has restarted, try accessing the file and check if the error persists.
Option 4 – Run the DISM tool
The next thing you can do is run the DISM tool. This tool is known to repair potentially corrupted files in your system as having them could also system issues like your computer getting stuck in the “Diagnosing your PC” or “Preparing Automatic Repair” screen.
Tap the Win + X keys and click on the “Command Prompt (Admin)” option.
After that, input each one of the commands listed below sequentially to execute them:
Dism /Online /Cleanup-Image /CheckHealth
Dism /Online /Cleanup-Image /ScanHealth
Dism /Online /Cleanup-Image /RestoreHealth
Once you’ve executed the commands given above, restart your computer and check if the problem is now fixed.
Option 5 – Try to use installation media to boot and repair your computer
Another thing you can try to resolve the issue is to use the Windows installation bootable media so you can boot and repair the operating system. To use it, follow these steps:
You need to first create an installation media which has the dame version of the operating system installed in your computer.
After that, once you reach the Install Windows screen, click on the “Repair your computer” link.
Wait until the repair is completed and then shut down your computer
Now once your computer has restarted, check if it can now boot properly.
Hello everyone, I hope you are all doing well. Today we will be changing the Windows Lock Screen background. Changing the lock screen background is a very easy task and it can be done in a very short time. So let's jump right into it.
The first thing you need to do is to press the Windows start button on the bottom left and then press settings.
Once the settings screen appears, choose and click on Personalization.
Inside personalization, click on the Lock Screen tab.On the right screen, under the picture, you will find Windows spotlight, click on it to bring a drop-down menu up.
Your choice is presented as a single picture for background or slideshow, a series of pictures that are going to be looped in a given time interval.
If you would like just a single picture for your background, choose that and click on it.
Once you are in choose picture dialog, click on the browse button and navigate to the picture on your storage which you would like to have as a background.
If however, you fancy slideshow as your lock screen background, click on the background drop-down menu and choose the slideshow. Next, click on add a folder and navigate to a folder where you have pictures that you would like to have as a slideshow for your Windows lock screen.
As you know, “JPEG” is one of the commonly used formats for image files which is a compression of digital images. It is one of the topmost used file formats by mobile phones and digital cameras and usually achieves a 10:1 compression with little visible loss in the quality of the image.
There are tons of cases as of late, most particularly after the latest Windows 10 update where users were not able to open JPEG files on their PCs. Every time they try to open any JPEG file, they either get an error or nothing happens at all. This issue could be due to the default handler application for JPEG applications not being set or there could be some third-party image viewer not working properly. To fix this issue with JPEG files, refer to the troubleshooting options below.
Option 1 – Try to change the file type association
You need to check if the file type association of the JPEG files are correctly set or not since there are tons of third party programs that change the file type association automatically to themselves without your permission the instant they are installed and so if any of these third-party programs are broken, then naturally, your JPEG files won’t really open. That’s why you can try changing the setting to the default photo viewer instead of the third-party one. To do so, follow the steps below.
Tap the Win + R keys to open the Run dialog box.
Then type in “control panel” in the field and hit Enter to open the Control Panel.
After opening Control Panel, click on the Programs category and select the “Default Programs” option from the menu.
Next, select the second option “Associate a file type or protocol with a program” and then select the “Choose default apps by file type” option.
After that, click on the .jpg file extension and choose the option from the pop-up.
Now restart your PC to refresh all your programs and then see if it has fixed the problem or not.
Option 2 – Try to update your computer
Microsoft frequently releases updates to target bugs and improve users’ experience. And this particular error where JPEG files won’t open is already acknowledged by Microsoft so you need to make sure that your Windows 10 PC is updated to the latest released update and that there are no pending updates.
Tap the Win + S keys to open Search and then type in “update” in the field and open the system setting from the search results.
After that, check for updates and then download and install them if needed.
Now restart your PC once the update is done and check if you can now open JPEG files.
Option 3 – Try to reset the Photos app via Settings
Resetting the Photos app could also help you in fixing the problem. Note that this option will reset all the configurations and your data associated with your Photos and makes the application go into a state when you first started using it and that this option will fix any discrepancies that your application might be experiencing right now.
Tap the Win + S keys to open the search bar.
Then type in “settings” in the field to open the Settings application.
After opening Settings, click the “Apps” category.
From there, a list of applications installed on your computer will appear.
Navigate through these applications until you find the Photos app and then click on the Advanced options.
Afterward, click the Reset button that appears on the next screen. Then a new pop-up comes up and will warn you that all the preferences, as well as sign-in information, will be lost. Click on “Reset” anyway to proceed in resetting the Photos app.
Restart your PC once the reset is done.
Option 4 – Try to reinstall the Photos app
Before you start using other third-party image viewers just yet, you can try to reinstall the Photos app first. Thus, if there is something wrong with it, it will instantly get fixed right after it reinstalls. Just take note that this option requires administrative privileges so you need to be logged in as an administrator.
The first thing you have to do is tap the Windows + S keys and type in “PowerShell”.
Next, right-click on the file and click on the “Run as administrator” option from the context menu.
Once PowerShell is opened, execute this command: get-appxpackage *Microsoft.Windows.Photos* | remove-appxpackage
The command you just entered will remove the Photos app. After the process is done, go to the Microsoft Store and look for Microsoft Photos then download and install it again.
This post will walk you through fixing the rtwlane.sys Blue Screen error. This kind of BSOD error belongs under the category of the “DRIVER IRQL NOT LESS OR EQUAL” Stop errors. If you encounter this kind of Stop error then it means that a kernel-mode driver tried to access pageable memory at a process IRQL that was too high.
The main issue with the rtwlane.sys Blue Screen error has something to do with the Realtek PCI-E Wireless LAN PCI-E NIC driver. In other words, it has some issues with the wireless card of your computer which is built by Realtek. And since it this error concerns your wireless card, you might also experience some connectivity problems with your computer as the wireless card refuses to find any network connections and even randomly disconnects. To resolve this problem, you need to refer to the given options below.
Option 1 – Run the Blue Screen Troubleshooter
The Blue Screen troubleshooter is a built-in tool in Windows 10 that helps users in fixing BSOD errors like rtwlane.sys Blue Screen error. It can be found on the Settings Troubleshooters page. To use it, refer to these steps:
Tap the Win + I keys to open the Settings panel.
Then go to Update & Security > Troubleshoot.
From there, look for the option called “Blue Screen” on your right-hand side and then click the “Run the troubleshooter” button to run the Blue Screen Troubleshooter and then follow the next on-screen options. Note that you might have to boot your PC into Safe Mode.
Option 2 – Try to update or rollback your Network driver
If you have updated the driver software as of late and you suddenly got this BSOD error, you might have to roll back the device driver – in other words, switch back to the previous working version. To do that, follow these steps:
Tap the Win + R keys to launch the Run window and then type in the “MSC” command and hit Enter to open the Device Manager window.
Under the Device Manager, you will see a list of drivers. From there, look for the Network Adapters and expand it.
From the list of Network Drivers, look for “Realtek <Model> Wireless LAN 802.11n PCI-E NIC” and then right-click on it and select Update Driver.
Restart your PC and see if it helped in fixing the BSOD error.
Note: If you see any of the following entries under the Network drivers, you might want to download their latest available versions from each one of their manufacturer’s websites.
Realtek High-Definition (HD) Audio Driver
Realtek Card Reader Driver
Realtek Local Area Network (LAN) Driver
On the other hand, if updating the Network driver didn’t help, you can also try to roll back to its previous version.
Open the Device Manager again and then look for Network Drivers.
Next, select Realtek <Model> Wireless LAN 802.11n PCI-E NIC from the list of Network Drivers and then double click to open a new mini window.
After that, make sure that you’re on the Driver tab and if you are not, just navigate to it then click the Roll Back Driver button to switch back to the previous version of the Realtek driver.
Now restart your computer to successfully apply the changes made.
Option 3 – Try running the System File Checker Scan
The SFC or System File Checker scan could detect and automatically repair damaged system files that could be causing the Netwtw04.sys failed BSOD error. SFC is a built-in command utility that helps in restoring corrupted files as well as missing files. It replaces bad and corrupted system files with good system files. To run the SFC command, follow the steps given below.
Tap Win + R to launch Run.
Type in cmd in the field and tap Enter.
After opening Command Prompt, type in sfc /scannow
The command will start a system scan which will take a few whiles before it finishes. Once it’s done, you could get the following results:
Windows Resource Protection did not find any integrity violations.
Windows Resource Protection found corrupt files and successfully repaired them.
Windows Resource Protection found corrupt files but was unable to fix some of them.
Runtime Error 713 is an error that occurs during the distribution of a Visual Basic application that includes a data report.
The error is displayed on the screen when you try to open the data report from your desired application.
Error Causes
The reason why computer users often experience the Runtime Error 713 is that the data report run-time file also referred to as Msdbrptr.dll is not included in your setup package.
Though this error does not pose any big threat to your computer, however, it is recommended to fix the error because the Runtime error 713 may hamper your ability to install and access new programs.
Further Information and Manual Repair
Don’t you panic if you see Runtime Error 713 message pop up on your PC? This error is rated easy to repair and can be fixed in a couple of minutes.
There are two ways to fix Runtime Error 713. You can choose whichever 2 alternatives suit you best.
Method 1
First, open your project and include a reference to the data report file, the Msdbrptr.dll file. Locating this file is not difficult. It is listed as Microsoft Data Report Designer v6.0 in the reference dialog box. Sometimes you may see this file listed more than once.
Now when this happens be sure to select the file that is associated with Msdbrptr.dll. After you select it, the reference will be verified. Once verification is complete, you are good to go. Now you can try rebuilding your setup package again.
Method 2
The second alternative is to add the Msdbrptr.dll file manually in PDW (the Package and Deployment Wizard). Simply add the file in the Included Files dialog box window and run the PDW. Now you are all set to rebuild your setup package.
Whether you follow method 1 or 2 after you rebuild the setup package and the installation is complete, you will see the following files in the indicated folders:
<windows system>Msdbrptr.dll
<program files>Common Files\Designers\Msderun.dll
<windows system>Msstdfmt.dll
The presence of these files indicates successful installation and now you can easily try opening the data report.
If you’ve noticed, all you have to do to fix Runtime Error 713 was to include the Msdbrptr.dll file.
So, next time if you or your friends experience Runtime Error 713, you know exactly what to do and how to fix it.


 The world today is still sadly under pandemic and by the looks of it, COVID-19 is here to stay, well at least for some time in the near future. Razer seems to think so as well since their upcoming gear is not really what you would expect.
Enter Hazel, a new and upcoming Razer smart mask.
The world today is still sadly under pandemic and by the looks of it, COVID-19 is here to stay, well at least for some time in the near future. Razer seems to think so as well since their upcoming gear is not really what you would expect.
Enter Hazel, a new and upcoming Razer smart mask.
 The first new feature that was slid in is Always on top utility. With this cool utility, you can keep the window as the name suggests, always on top of other windows. To enable this cool feature all you have to do is press the key combination of ⊞ WINDOWS + CTRL + T and an active window will be now always on top of all other windows. To reverse and unlock this window from being always on top just press key combination again.
A second new feature is a really great one and my favorite thing to happen in power toys. Often we are making the search in our browsers to find stuff, things, maybe some explanations, information, etc. The newest update in power toys brings this to a whole new dimension. While you are on PC you just simply need to type ?? followed by questions like: ?? When doctor strange 2 is coming out and that will launch your default browser with your chosen search engine and provide you with the answer.
Third and final thing is G-code support in the file explorer preview pane and thumbnails, meaning that if you work with CNC equipment you can now have a thumbnail preview of the code itself inside File Explorer.
And that’s it for now, thank you for coming and reading, Take care and I hope to see you next time.
The first new feature that was slid in is Always on top utility. With this cool utility, you can keep the window as the name suggests, always on top of other windows. To enable this cool feature all you have to do is press the key combination of ⊞ WINDOWS + CTRL + T and an active window will be now always on top of all other windows. To reverse and unlock this window from being always on top just press key combination again.
A second new feature is a really great one and my favorite thing to happen in power toys. Often we are making the search in our browsers to find stuff, things, maybe some explanations, information, etc. The newest update in power toys brings this to a whole new dimension. While you are on PC you just simply need to type ?? followed by questions like: ?? When doctor strange 2 is coming out and that will launch your default browser with your chosen search engine and provide you with the answer.
Third and final thing is G-code support in the file explorer preview pane and thumbnails, meaning that if you work with CNC equipment you can now have a thumbnail preview of the code itself inside File Explorer.
And that’s it for now, thank you for coming and reading, Take care and I hope to see you next time.  Inside personalization, click on the Lock Screen tab.
 On the right screen, under the picture, you will find Windows spotlight, click on it to bring a drop-down menu up.
 Your choice is presented as a single picture for background or slideshow, a series of pictures that are going to be looped in a given time interval.
If you would like just a single picture for your background, choose that and click on it.
Your choice is presented as a single picture for background or slideshow, a series of pictures that are going to be looped in a given time interval.
If you would like just a single picture for your background, choose that and click on it.
 Once you are in choose picture dialog, click on the browse button and navigate to the picture on your storage which you would like to have as a background.
If however, you fancy slideshow as your lock screen background, click on the background drop-down menu and choose the slideshow. Next, click on add a folder and navigate to a folder where you have pictures that you would like to have as a slideshow for your Windows lock screen.
Once you are in choose picture dialog, click on the browse button and navigate to the picture on your storage which you would like to have as a background.
If however, you fancy slideshow as your lock screen background, click on the background drop-down menu and choose the slideshow. Next, click on add a folder and navigate to a folder where you have pictures that you would like to have as a slideshow for your Windows lock screen.
